background image

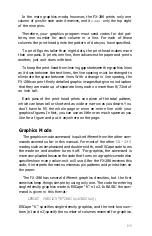
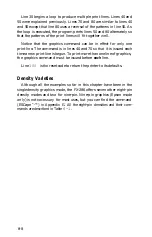
Line 30 begins a loop to produce multiple print lines. Lines 40 and

50 were explained previously. Lines 70 and 80 are similar to lines 40
and 50 except 

that 

line 80 uses a reversal of the patterns in line 50. As

the loop is executed, the program prints lines 50 and 80 alternately so
that the patterns of the print lines will fit together well.

Notice that the graphics command can be in effect for only one

print line. The command is in lines 40 and 70 

so that 

it is issued each

time a new print line is begun. To print more than one line of graphics,
the graphics command must be issued before 

each 

line.

Line 

100 

is 

the 

reset code to return the printer to its defaults.

Density Varieties

Although all the examples so far in this chapter have been in the

singledensity graphics mode, the FX-286 offers seven other eight-pin
density modes and two for nine-pin. Nine-pin graphics (Epson mode
only) is not 

necessary 

for most uses, but you can find the command

(ESCape “^“) in Appendix G. All the eight-pin densities and their com-

mands are described in Table 

6-1.

6-8

Summary of Contents for FX-286 - Impact Printer

Page 1: ......

Page 2: ......

Page 3: ...nterference Problems This booklet is available from the U S Government Printing Office Washington DC 20402 Stock No 004 000 00345 4 WARNING The connection of a non shielded printer interface cable to this printer will invalidate the FCC Certification of this device and may cause interference levels which exceed the limits established by the FCC for this equipment If this equipment has more than on...

Page 4: ...EED NLQ 1 17 LINE FEED DRAFT 1 17 The NLQ Mode 1 18 Setting the Top of Page Position 1 18 Adjusting the paper thickness lever 1 19 Running the Self Test 1 21 Connecting Your Printer to Your Computer 1 22 Printing Your First Document 1 24 2 Using the FX 286 with Commercial Software 2 1 Using the FX 286 with Word Processors 2 1 The IBM Proprinter mode 2 2 Using the FX 286 with Other Applications Pro...

Page 5: ...nter Mode 5 1 Pica Printing 5 3 Changing Widths 5 3 Cancelling Codes 5 4 Resetting the Printer 5 4 Disabling a program s reset code 5 5 Width Comparison 5 5 Near Letter Quality Mode 5 6 Print Enhancements and Special Characters 5 7 Emphasized mode 5 7 Double strike 5 8 Double width mode 5 9 Mode combinations 5 9 Underline mode 5 10 Proportional mode 5 11 Master Select 5 11 Superscript and subscrip...

Page 6: ...our Own Characters 7 1 Designing Process 7 2 Definition program 1 7 4 Running the program 7 5 Definition program 2 7 7 Running the program 7 8 Index Index 1 Appendixes A Defaults and DIP Switches A 1 Default Settings A 1 The DIP Switches A 2 Selecting the IBM Proprinter mode A 3 Printing the Alternate and All Print character sets A 3 Running the self test in the IBM Proprinter mode A 3 B Loading S...

Page 7: ...Character Solutions Defining more than three characters Data numbers for user defined characters WIDTH statements C 1 C 1 C 1 C 1 C 2 C 2 C 2 C 2 C 2 C 3 C 4 C 4 C 6 C 7 C 8 C 8 C 8 C 8 C 9 C 9 D Maintenance D 1 Changing the Print Head D 1 Removing the old print head D 1 Installing the new print head D 2 E The Parallel Interface E 1 Data Transfer Sequence E 3 Interface timing E 3 Printing enabled ...

Page 8: ...exadecimal numbers to decimal numbers H 2 I ASCII Code Conversion Chart and Proportional Width Tables I 1 ASCII Code Conversion Chart I 2 Proportional Width Table I 6 International Character Width Table I 7 J IBM Proprinter Mode Command Summary Selecting the IBM Proprinter Mode Printing the Alternate and All print character sets Running the self test in the IBM Proprinter mode Software Commands in...

Page 9: ... Removing the locking tabs from the tractor unit Moving the pin feed holders Opening the pin feed covers and paper release lever Adjusting the paper supports loading paper Fitting the paper over the pin feeds Installing the paper separator Turning on the power switch The FX 286 control panel Top of page position Paper thickness lever FX 286 self test in Epson draft and NLQ modes Connecting a paral...

Page 10: ... characters 7 3 7 3 Correct and incorrect designs 7 3 7 4 Design for character 7 4 7 5 Using the bottom eight rows 7 6 A 1 A 2 B 1 Removing the tractor unit B 1 B 2 Loading single sheet paper B 2 B 3 Installing the tractor unit B 4 C 1 D 1 E 1 J 1 IBM Proprinter mode self test J 3 DIP switch location IBM Proprinter mode self test A 2 A 4 Hexadecimal codes in order C 6 Print head replacement D 2 Pa...

Page 11: ...raft mode 5 4 International characters in Epson draft italic mode 5 5 Maximum right margin settings 6 1 A 1 A 2 E 1 E 2 SelecType modes Graphics modes 6 9 DIP switch functions International DIP switch settings Pins and signals Printing enabled disabled signals and control conditions 3 3 5 7 5 15 5 15 5 15 5 17 A 4 A 5 E 1 E 4 X ...

Page 12: ...e IBM Proprinter commands and charac ter set l An 8K buffer quickly frees your computer so you can work on one document while printing another l And of course the FX 286 also has the many features that have made previous FX printers so popular including a fast print speed of 200 characters per second both friction and tractor feed paper loading and Master Select for instant access to a variety of ...

Page 13: ...ed located and ready for operation Unpacking Your Printer Be careful when unpacking your printer to make sure that you don t lose any necessary pieces First remove the printer from the box and take off all outside plastic coverings and foam packing supports Check that you ve received all the parts shown in Figure 1 1 Figure 1 1 Printer parts 1 1 ...

Page 14: ...verlay on the control panel to protect against scratching and discoloration It s up to you whether you want to remove the overlay or leave it on Installing the paper feed knob Before proceeding you should install the paper feed knob To install the knob simply push it onto the shaft on the right side of the printer as shown in Figure 1 2 The shaft has one flat side that must be matched with the fla...

Page 15: ... printer and computer away from base units for cordless telephones l Avoid using an outlet on the same circuit breaker with large electri cal machines or appliances that might disrupt the flow of power to your printer l Protect your printer from direct sunlight and keep it away from excessive heat moisture and dust Make sure it s not too close to a heater or other heat source Once you ve found a s...

Page 16: ...l up on the left corner and the cover comes off the printer Only the left side of the cover is slotted where it attaches to the mounting pins on the printer case Now you re ready to install the ribbon 1 Manually move the print head to the middle of the platen WARNING The power must be OFF when moving the print head Moving the print head when the power is ON may damage your printer If you ve been u...

Page 17: ...2 Before loading the cartridge into the printer turn the small knob on top in the direction of the arrow to tighten the ribbon as shown in Figure 1 5 Figure 1 5 Tightening the ribbon 1 5 ...

Page 18: ...r the cartridge into the printer guiding the two square pins on each end of the cartridge into the slots in the printer frame as shown in Figure 1 6 Press firmly on each end of the cartridge to make sure the pins are firmly seated in the slots Figure 1 6 Loading the ribbon cartridge 1 6 ...

Page 19: ...he ribbon And that s it the ribbon is now installed Replacing the ribbon The FX 286 uses a continuous loop inked fabric ribbon When printing becomes too light you ll need to replace the ribbon with a fresh cartridge To replace the ribbon just pull up on the two plastic tabs on top of the cartridge and lift the cartridge out of the printer To install a new ribbon follow the preceding steps 4 Loadin...

Page 20: ...8 Or you can use any other arrangement that allows you to put the paper underneath or behind the printer If you prefer you can stack the paper behind the printer as shown in Figure 1 9 Figure 1 8 Continuous feed paper with printer stand Figure 1 9 Continuous feed paper without stand 1 8 ...

Page 21: ...e print head to the center of the printer and pull the paper bail away from the platen 3 Remove the two plastic locking tabs that secure the tractor feed unit during shipping as shown in Figure 1 10 If you have difficulty pulling the tabs off a pair of pliers might help Keep the tabs in case you need to ship or store the printer Figure 1 10 Removing the locking tabs from the tractor unit 1 9 ...

Page 22: ...rd so that you can move the holders to the left and right Figure 1 11 Moving the pin feed holders 5 Position the left holder midway between the two stops on the tractor bar see Figure 1 11 and push the locking lever back to lock that holder in place Leave the right holder unlocked 1 10 ...

Page 23: ...Figure 1 12 Figure 1 12 Opening the pin feed covers and paper release fever 7 Guide the paper into the paper slot and push it through until it comes up between the ribbon guide and the platen Moving the paper with a side to side motion makes it easier to push the paper through 1 11 ...

Page 24: ...along the width of the paper as shown in Figure 1 13 Figure 1 13 Adjusting the paper supports loading paper 9 Pull the paper up until the top is above the pin feed holders Fit the holes on the left side of the paper over the pins in the left holder and close the cover 1 12 ...

Page 25: ... the paper supports together they provide an even pressure for paper feed ing Push the paper bail against the paper and that s it the paper is ready Loading single sheet paper The FX 286 can also accommodate single sheet paper It can be loaded manually as shown in Appendix B or by using the optional cut sheet feeder Appendix B also contains information on how to remove and reinstall the tractor fe...

Page 26: ...losure The separator ensures that the paper com ing out of the printer is not pulled back in The separator has rounded pins on each end that fit into notches located just behind the tractor feed unit Slide one of the separator s pins into one notch then with a gentle pressure snap the other pin into the other notch as shown in Figure 1 15 Figure 1 15 Installing the paper separator 1 14 ...

Page 27: ... is properly grounded Turn the power ON with the switch on the left side of the printer see Figure 1 16 Figure 1 16 Turning on the power switch When the power is turned ON l The print head moves back and forth and stops at the left side of the printer l The printer is initialized any previous settings are erased and the printer is reset to its default or preset values see Appendix A for default se...

Page 28: ...he Control Panel Each of the three buttons on the FX 286 control panel see Fig ure 1 17 has two functions the functions marked on the blue panels ON LINE NLQ and DRAFT are active when the printer is on line the functions marked on the yellow panels OFF LINE FORM FEED and LINE FEED are active when the printer is off line Figure 1 17 The FX 286 control panel 1 16 ...

Page 29: ...on If you re using single sheet paper it fully ejects one sheet The FORM FEED function works only when the printer is off line NLQ Near Letter Quality Pressing the NLQ button selects the Near Letter Quality typestyle for more information on NLQ see the shaded box The printer beeps twice to acknowledge the NLQ selec tion You can select the NLQ typestyle with the NLQ button only when the printer is ...

Page 30: ...uality each time you print You can print your ordinary work or preliminary drafts quickly in the draft mode and use the NLQ mode for final cop ies or special purposes The panel buttons make it especially easy to change from draft to NLQ but you can also select and cancel the NLQ mode with a soft ware command see Chapter 5 The following functions are not available in the Epson NLQ mode italic conde...

Page 31: ...nce the paper If you are using a word processor or other applications program and the printing is too high or too low on the page adjust your top of page setting accordingly Adjusting the paper thickness lever The FX 286 is equipped with a paper thickness lever that can be adjusted to accommodate varying thicknesses of paper The lever is located in front of the paper release lever on the left side...

Page 32: ... shorten print head life if used in normal operation You ve completed the setup and paper loading steps and have made the necessary adjustments the FX 286 is ready to print You can now replace the dust cover and tilt it down into its operational position Figure 1 19 Paper thickness lever 1 20 ...

Page 33: ...sn t run onto the platen Note If you ve already loaded narrower paper such as 8 x 11 then you should replace it with wider 14 inch paper before running the self test For information on loading single sheet paper see Appendix B With the power OFF hold down the DRAFT button while you turn the power switch ON the self test takes over and the FX 286 starts printing out the full character set in draft ...

Page 34: ...UVWXYZ _ a Figure 1 20 FX 286 self test in Epson draft and NLQ modes 9 Connecting Your Printer to Your Computer Your FX 286 communicates with your computer through a parallel interface cable If your computer requires a different type of interface such as a serial interface see your Epson dealer The connector on a parallel interface cable as shown in Figure 1 21a is secured to both the FX 286 and y...

Page 35: ......

Page 36: ...6 or one of the alternate choices given in the following chapter The Epson command set allows you to take full advantage of all of the FX 286 s features and capabili ties The FX 286 is already set in the Epson mode from the factory so there are no DIP switches to change Refer to Appendixes G H and I for additional information on the Epson mode If you wish to use the IBM Proprinter mode use the pri...

Page 37: ... word processing programs all you have to do is to tell the program that you are using an Epson FX printer When you do this the word processing program automati cally sends the correct information to the printer This process is nor mally part of the setup or installation process Many word processors have special utility programs for different printers called printer drivers This is usually a short...

Page 38: ... A Remember however that when you reset the FX 286 for the IBM Proprinter mode you will lose some of the capabilities available in the Epson mode When you reset the FX 286 for the IBM Proprinter mode you need to change the printer driver on your word processor or applications program Your first choice should be IBM Proprinter model 4201 if it s listed If the Proprinter isn t listed look for IBM Pa...

Page 39: ...am that allows you to print only in standard draft mode with a maximum of 136 columns However if you use the Selec Type function to put your FX 286 in the condensed mode you can fit 233 columns in the same space As with word processors most of your printing will be straight forward If your program has a printer selection routine follow the advice given in the word processing section 2 3 ...

Page 40: ...2 4 ...

Page 41: ... h i s s u p e r s c r i p t T h i s i s s u b s c r i p t SelecType Operation Using SelecType is easy You turn on SelecType and select a type style then turn off SelecType and print Note For convenience this chapter uses the yellow label names of the buttons OFF LINE FORM FEED and LINE FEED Turning SelecType on 1 Make sure that the printer is on and that the POWER READY and ON LINE lights are all...

Page 42: ... if you do not want NLQ Then press both the OFF LINE and FORM FEED buttons to turn on SelecType Figure 3 1 Turning SelecType on When you release the OFF LINE and FORM FEED buttons the FX 286 signals in three ways that SelecType is on l The printer beeps l The READY light turns off l The ON LINE light begins flashing Selecting typestyles In SelecType each button has a function l OFF LINE selects ty...

Page 43: ...FF LINE button 3 Press the FORM FEED button to set the typestyle 4 Press the LINE FEED button to turn SelecType off The control panel returns to its normal functions but the printer is off line 5 Press the OFF LINE button and you are ready to print SelecType exercise You don t need to know anything about programming for this exer cise because it is merely for practice If you would rather not use B...

Page 44: ...e 3 1 the code for double width is two There fore press the OFF LINE button two times Remember to make sure you hear a beep each time you press the OFF LINE button when you are in SelecType mode 4 Now that you have selected the double width mode push the FORM FEED button once to set it 5 Push the LINE FEED button once to return the panel to its standard operation 6 Press the OFF LINE button so the...

Page 45: ... instructions below 1 See that the ON LINE and READY lights are on 2 Press the OFF LINE and FORM FEED buttons at the same time 3 Press the OFF LINE button twice and then the FORM FEED button once Since two is the code for double width you have now set the FX 286 for double width 4 Press the OFF LINE button two more times and then the FORM FEED button once again This makes a total of four times and...

Page 46: ...Type you can use it whenever you wish You should be aware of a few restrictions however l SelecType is designed to control the printing of an entire file or document not an individual line or word l If you are using the NLQ mode remember that the following SelecType modes are not available in NLQ italic condensed double strike and elite l Emphasized can t combine with condensed or elite l Because ...

Page 47: ...m hap pens since you usually won t use SelecType with files that have such codes but if your FX 286 follows the SelecType instructions for only part of a document print codes in the document may conflict with the SelecType modes After you turn on a mode with SelecType it stays in effect until the printer is turned off If for example you use SelecType to print a document in emphasized anything you ...

Page 48: ...3 8 ...

Page 49: ...t against the paper to produce a dot This dot is about 1 72nd of an inch in diameter The size varies slightly depending upon the age of the ribbon and the type of paper used As the head moves horizontally across the page these pins are fired time after time in different patterns to produce letters numbers symbols or graphics For example to print a pica capital T the head fires the top pin moves 1 ...

Page 50: ...ce between them is reduced Figure 4 2 shows enlargements of four sample letters in each of the three widths These letters are chosen to show how the FX 286 prints letters that are uppercase and lowercase with and without descenders the bottom dots of the j and y and wide and narrow Figure 4 2 The three widths of the FX 286 The dot pattern of each character is carefully designed so that in pica no ...

Page 51: ... punctuation marks have been assigned code numbers from 32 through 255 ASCII Codes Although these codes are standard from computer to computer they can be expressed in a number of different ways The chart in Appendix I lists each ASCII code as a character A B C 1 2 3 as a decimal and as a hexadecimal number For example the letter A is represented as an A and as the decimal number 65 If you wanted ...

Page 52: ...in a sentence or as a control code You might also see it written as ESC in other manuals The ESCape code changes the interpretation of the codes that fol low it they are interpreted as part of a printer command For exam ple if the FX 286 receives the decimal code 52 it prints the numeral 4 because 52 is the ASCII code for that number If however the printer receives a 27 just before the 52 it turns...

Page 53: ...nd communicating with the printer for you All you need to do is install your software as explained in Chapter 2 Running BASIC Programs This section describes how to run the BASIC demonstration pro grams in this manual it is not a tutorial in BASIC programming Although there are many versions of BASIC the programs in this manual are designed to work with the two most popular ones Micro soft BASIC a...

Page 54: ... CHR 49 50 LPRINT CHR 27 Wl Double width print 60 LPRINT Still double width BASIC programs for the FX 286 FX 286 W1 W1 D o u b l e w i d t h p r i n t S t i l l d o u b l e w i d t h In each line LPRINT signals that the rest of the information on the line is to be sent to the printer In line 10 the letters inside the quotation marks are printed just as they appear in the program Line 20 shows an a...

Page 55: ... with the letters in quotation marks after the ESCape sequence Line 60 shows that the double width mode stays on for more than one line This program is only an introduction The next three chapters have more demonstration programs that allow you to see the features of your FX 286 in action 4 7 ...

Page 56: ...4 8 ...

Page 57: ...inside your printer see Appendix A When you have selected the IBM Proprinter mode your printer is changed in two ways It uses an IBM character set and it uses a some what different set of control codes There are actually three different character sets in the IBM Pro printer mode Standard Alternate and All Print All three sets are available in draft and NLQ Printouts of the three sets appear at the...

Page 58: ...ndix J If you are not a programmer all you need to know is to select IBM Proprinter or IBM Graphics Printer if that is one of the options when you install an applications program Note The features demonstrated in this chapter are available in both the Epson and the IBM Proprinter modes except as noted In Chapter 4 you saw the enlargements of the three FX 286 widths Now you ll learn how to produce ...

Page 59: ... horizontal spaces between the dots to produce the three different widths In elite mode there are 12 characters per inch and in condensed there are 17 16 The FX 286 prints in elite when it receives the ESCape WI command Escape in Proprinter mode and prints in con densed when it receives the ASCII 15 command Print a sample line of elite characters by adding the following line to your previous pro g...

Page 60: ...memo with a word process ing program afterward the memo is printed in condensed because the printer is still in condensed mode To cancel condensed use ASCII 18 In BASIC you use this format LPRINT CHR 18 To avoid having one program interfere with the printing modes of another you can cancel a mode one of two ways l With a specific cancelling code such as ASCII 18 to cancel con densed Each mode has ...

Page 61: ...instances this is fine However if you decide you want to set up the FX 286 to do something your applications program won t do you have to make sure a reset code doesn t wipe out your new settings Many initialization codes can be disabled by using the setup or installation procedures that are part of many applications programs Once you re into the setup procedure find the section that deals with in...

Page 62: ...05 50 LPRINT CHR X 60 NEXT X LPRINT With this addition the program turns on condensed but doesn t turn off elite giving you the printout below ABCDEFGHIJKLMNOPQRSTUVWXYZ _ abcdefghi Near Letter Quality Mode The examples so far in this chapter are in the draft mode but you can also use a software command rather than the FORM FEED NLQ button to turn on the NLQ mode Enter and run the following progra...

Page 63: ...emember that you don t have to use BASIC to change modes you can use any method or software that sends the proper codes to the printer Print Enhancements and Special Characters Besides the widths pica elite and condensed already covered the FX 286 offers many other typestyles Emphasized mode In the emphasized mode the FX 286 prints each dot twice with the second dot slightly to the right of the fi...

Page 64: ...ode to turn off emphasized is ESCape F Double strike The other bold mode is double strike For this mode the FX 286 prints each line then moves the paper up slightly and prints the line again Each dot is printed twice with the second one slightly below the first as you can see if you run this program which uses ESCape G to turn on double strike In the IBM Proprinter mode ESCape G produces NLQ rathe...

Page 65: ...if you enter and run this program 10 LPRINT This is standard printing 20 LPRINT CHR 27 Wl 30 LPRINT This is double width 100 LPRINT CHR 27 W0 T h i s i s s t a n d a r d p r i n t i n g T h i s i s d o u b l e w i d t h For this mode the letter W and the numeral one together turn the mode on and the letter W and the numeral zero together turn it off Thus ESCape W1 turns on double width and ESCape ...

Page 66: ...h A later section in this chapter explains a special Epson mode ESCape code Master Select which allows you to control seven fea tures with one ESCape sequence Underline mode The FX 286 also has a mode that will underline characters and spaces You turn it on with ESCape 1 and off with ESCape 0 Note that the underline code is like the double width code in that it uses a character in this case the hy...

Page 67: ...nal mode which is available only in Epson mode draft pica also prints all letters in emphasized You can see the difference between standard and proportional modes if you enter and run the following program 10 LPRINT CHR 27 p1 20 LPRINT Proportional mode is on 30 LPRINT CHR 27 p0 40 LPRINT Proportional mode is off P r o p o r t i o n a l m o d e i s o n P r o p o r t i o n a l m o d e i s o f f Not...

Page 68: ...use ESCape followed by the number 160 In the BASIC programming language the com mand is CHR 27 CHR 160 To try this number or any other enter and run this short program which will ask you for a Master Select number and then give you a sample of printing using that code 10 INPUT Master Select number M 20 LPRINT CHR 27 CHR M 30 LPRINT This sample of printing uses 40 LPRINT Master Select number M 50 L...

Page 69: ...hat are not selected For example suppose that you have a page in elite and want part of it underlined If you use ESCape 128 to turn on underlining your FX 286 will begin printing in underlined pica instead of underlined elite because the 128 code does not include elite Use 129 for underlined elite Superscript and subscript Your FX 286 can also print superscripts and subscripts which you can use fo...

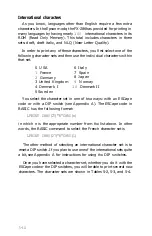
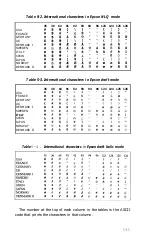
Page 70: ...nmark I 10 Denmark II 5 Sweden You select the character set in one of two ways with an ESCape code or with a DIP switch see Appendix A The ESCape code in BASIC has the following format LPRINT CHR 27 R CHR n in which n is the appropriate number from the list above In other words the BASIC command to select the French character set is LPRINT CHR 27 R CHR l The other method of selecting an internatio...

Page 71: ...DENMARK II Table 5 3 International characters in Epson draft mode 35 36 64 91 92 93 94 96 123 124 125 126 USA FRANCE GERMANY UK DENMARK I SWEDEN ITALY SPAIN JAPAN NORWAY DENMARK II Table 5 4 International characters in Epson draft italic mode The number at the top of each column in the tables is the ASCII code that prints the characters in that column 5 15 ...

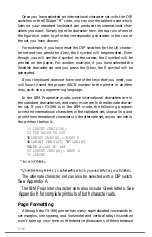
Page 72: ...umber to the printer in another way such as a programming language In the IBM Proprinter mode some international characters are in the standard character set and many more are in the alternate charac ter set If your FX 286 is in the IBM mode the following program prints the international characters in the standard set skips a line and prints the international characters in the alternate set as you...

Page 73: ... the margins you can send margin commands to your FX 286 with BASIC or another programming language before you print your documents For example if you prefer wider margins than your word processing program gives you run the following BASIC program before print ing This program gives you a left margin of 10 and a right margin of 60 but you can use any numbers you prefer for the margin com mands NEW...

Page 74: ...s set for 11 inch paper 10 LPRINT CHR 27 N CHR 6 Since an 11 inch page is 66 lines this will give you one inch of blank space at the bottom of each page If you prefer to have half of the blank space at the top of the page and half at the bottom simply set the top of page approximately three lines l 2 of an inch below the perforation See Step 7 in Chapter 1 if you need to refresh your mem ory on se...

Page 75: ...ses this switch it triggers a signal that sounds the beeper and stops your printing This saves wear on your print head ribbon and platen but because of the distance between the switch and the print head it stops the printing about two inches from the end of the page Therefore if you use single sheet paper in your FX 286 you can t print on the last two inches of each page without an adjust ment If ...

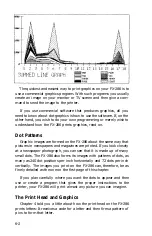
Page 76: ...phics mode prints dots column by column and line by line You plan where you want the dots to appear and then use a program to tell the FX 286 where to put them Because many software programs use dot graphics you may be able to print pictures and graphs like the ones on this page and the next by simply giving your software a few instructions A graph like the one on the next page can be created and ...

Page 77: ...apers and magazines are printed If you look closely at a newspaper photograph you can see that it is made up of many small dots The FX 286 also forms its images with patterns of dots as many as 240 dot positions per inch horizontally and 72 dots per inch vertically The images you print on the FX 286 can therefore be as finely detailed as the one on the first page of this chapter If you plan carefu...

Page 78: ...h can be as tall or short and as wide or narrow as you desire You don t have to fill the whole page or even an entire line with your graphics figures In fact you can use as little or as much space as you like for a figure and put it anywhere on the page Graphics Mode The graphics mode command is quite different from the other com mands covered so far in this manual For most of the other FX 286 mod...

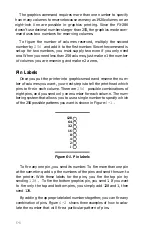
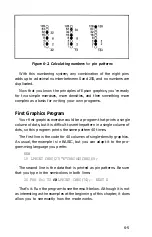
Page 79: ...ou want your next step is to tell the print head which pins to fire in each column There are 256 possible combinations of eight pins and you send only one number for each column The num bering system that allows you to use a single number to specify which of the 256 possible patterns you want is shown in Figure 6 1 128 64 32 16 8 4 2 1 Figure 6 1 Pin labels To fire any one pin you send its number ...

Page 80: ...of dots but it is difficult to see the pattern in a single column of dots so this program prints the same pattern 40 times The first line is the code for 40 columns of single density graphics As usual the example is in BASIC but you can adapt it to the pro gramming language you prefer NEW 10 LPRINT CHR 27 K CHR 40 CHR 0 The second line is the data that is printed as pin patterns Be sure that you t...

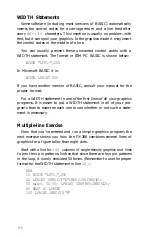
Page 81: ...IDTH statement in one of the first lines of all your graphics programs It is easier to put a WIDTH statement in all of your pro grams than to examine each one to see whether or not such a state ment is necessary Multiple line Exercise Now that you ve entered and run a simple graphics program the next exercise shows you how the FX 286 combines several lines of graphics for a figure taller than eigh...

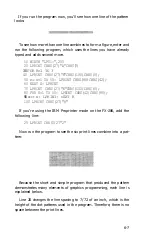
Page 82: ...INT CHR 27 K CHR l00 CHR 0 80 FOR X 1 TO 50 LPRINT CHR 42 CHR 85 90 NEXT x LPRINT NEXT R 100 LPRINT CHR 27 If you re using the IBM Proprinter mode on the FX 286 add the following line 25 LPRINT CHR 27 2 Now run the program to see the six print lines combine into a pat tern Because the short and simple program that produced the pattern demonstrates many elements of graphics programming each line is...

Page 83: ...mand is in lines 40 and 70 so that it is issued each time a new print line is begun To print more than one line of graphics the graphics command must be issued before each line Line 100 is the reset code to return the printer to its defaults Density Varieties Although all the examples so far in this chapter have been in the singledensity graphics mode the FX 286 offers seven other eight pin densit...

Page 84: ...one row 80 dots per inch 640 dots per 8 line 1088 dots per 13 6 line Matches the screen density of the QX 10 This makes it easy to do screen dumps 72 dots per inch 576 dots per 8 line 979 dots per 13 6 line Produces the same density horizontally as vertically which makes circles look round 90 dots per inch 720 dots per 8 line 1224 dots per 13 6 line 144 dots per inch 1152 dots per 8 line 1958 dots...

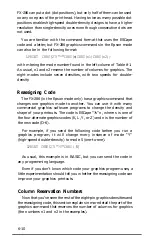
Page 85: ...phics mode to another You can use it with many commercial graphics software programs to change the density and shape of your printouts The code is ESCape s n where s is one of the four alternate graphics codes K L Y or Z and n is the number of the new code O 6 For example if you send the following code before you run a graphics program it will change every instance of mode Y high speed double dens...

Page 86: ...hosen the number of columns you want to use you can have your program do the calculations for you with the fol lowing format CHR 27 L CHR N MOD 256 CHR INT N 256 The variable N is the total number of columns you want to specify The MOD modulus function calculates the value for n1 and the INT integer function calculates the value for n2 For programming lan guages other than BASIC consult your manua...

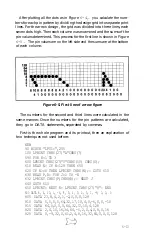
Page 87: ...rent densities In this figure you can see the main rules for graphic design in the three densities In single density no dots can be placed on vertical lines In high speed double density dots can be placed on vertical lines but no dots can overlap In low speed double density dots can be placed on vertical lines and they can overlap Now look at the figure designed for high speed double density It sh...

Page 88: ... in the same manner Once the numbers for the pin patterns are calculated they go in DATA statements separated by commas First is the whole program and its printout then an explanation of two techniques not used before NEW 90 WIDTH LPT1 255 100 LPRINT CHR 27 A CHR 7 590 FOR K 1 TO 3 600 LPRINT CHR 27 Y CHR 50 CHR 0 610 READ N IF N 128 THEN 650 620 IF N 0 THEN LPRINT CHR N GOT0 610 630 READ P R FOR ...

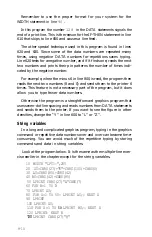
Page 89: ...ure is not a necessary part of the program but it does allow you to type fewer data numbers Otherwise the program is a straightforward graphics program that uses seven dot line spacing and reads numbers from DATA statements and sends them to the printer If you want to see the figure in other densities change the Y in line 600 to L or Z String variables In a long and complicated graphics program ty...

Page 90: ...he command Once you have done this at the beginning of the program each time you enter LPRINT G you have issued the graphics command Lines 20 and 30 do the same thing with the data used in this program As you can see the use of string variables saves some typing even in this short program In a long program it can save you much more time and effort 6 15 ...

Page 91: ...6 16 ...

Page 92: ... information on its use see the ESCape and ESCape I commands in Appendix J Defining Your Own Characters The printout below displays a few such characters to give you an idea of what can be done but remember that you can create whatever you need or want It may seem that designing a character and telling the FX 286 how to print it would be extremely complicated but in this chapter the task is reduce...

Page 93: ...govern their design The column on the right side is always left blank so that there will be spaces between the characters on a line a character can use the top row or the bottom row but no character uses both the top and the bottom row and a dot can be placed on a vertical line only when the columns next to that line are not used Figure 7 1 FX 286 dot matrix characters Designing Process Suppose th...

Page 94: ...ots on this grid remember that dots cannot go on horizontal lines but they can go on vertical lines as long as they do not overlap any other dots As you design your characters draw the dots as large as you see them in the example on the left in Figure 7 3 If you draw them smaller you may have overlapping dots with out realizing it Figure7 3 Correct and incorrect designs If you do accidentally call...

Page 95: ...T CHR 27 CHR 0 CHR 0 CHR 0 170 LPRINT CHR 27 CHR 1 CHR 0 180 LPRINT CHR 27 CHR 0 CHR 60 CHR 60 190 LPRINT CHR 128 200 FOR X 1 TO 9 210 LPRINT CHR F X NEXT X 220 LPRINT CHR 0 CHR 0 230 LPRINT YouR CHARACTER IN PICA 240 LPRINT IN EXPANDED EMPHASIZED PICA 250 LPRINT CHR 27 260 LPRINT CHR 27 CHR 0 YOUR DATA NUMBERS 270 FOR K 1 TO 9 LPRINT F K NEXT K 300 LPRINT END So that you can see how the program w...

Page 96: ... 2 For column 3 press 8 6 4 and 2 with a RETURN after each of them Then press RETURN to finish with column 3 and go on to column 4 For column 4 press RETURN only The rest of the directions assume that you know to press RETURN after each number and one extra time to end the entries for each column For column 5 enter 6 4 3 2 and 1 For column 6 press RETURN only for column 7 enter 8 6 4 and 2 for col...

Page 97: ...in the next program The pro gram as listed creates the symbol for Mercury but you can use it for any character you create if you make one or two changes explained after the program listing NEW 100 LPRINT CHR 27 CHR 0 CHR 0 CHR 0 110 LPRINT CHR 27 CHR l CHR 0 120 LPRINT CHR 27 CHR 0 CHR 60 CHR 60 130 LPRINT cHR 128 140 FOR X 1 TO 9 150 READ R 160 LPRINT CHR R NEXT X 170 LPRINT CHR 0 CHR 0 200 DATA ...

Page 98: ...l continue to show the character Because the program puts this new definition in your printer s Ran dom Access Memory RAM it will print the new character unless it is turned off or receives the reset code If you have designed a character and want to use it with your word processing program for example just run program 2 before you start using your word processing program If you wish you can define...

Page 99: ...on A dot means that you can change the default for this setting by changing a DIP switch l Pica pitch Margins set at maximums left margin at 0 and right margin at 136 1 6 of an inch line spacing Page length of 11 inches Vertical tabs set at every two lines Horizontal tabs set at every eight spaces l Epson mode l USA character set l Paper out sensor on l Carriage return issued at the end of a line ...

Page 100: ...n the right side of the printer To remove the cover use a Phillips screwdriver to remove the top screw Then press the cover down and sideways with the palm of your hand as shown in Figure A 1 Figure A 1 also shows the location of the switches and their factory settings Figure A 1 DIP switch location Always turn the power OFF with the switch on the left side of the printer before you change the set...

Page 101: ...see Appendix K for printouts of all three sets Two of the sets Standard and Alternate can be selected with DIP switches The third set All Print can only be selected with ESCape code or See Appendix J for complete descriptions of these codes The DIP switch settings for the Standard and Alternate sets are DIP Switch 1 6 1 7 1 8 Standard ON ON ON Alternate Set any one of these three switches to OFF R...

Page 102: ...F Then reset either switch 1 6 1 7 or 1 8 from ON to OFF and run the self test again Remember you must also reset DIP switches 2 1 and 2 3 as previ ously mentioned if you want to select the IBM Proprinter mode for uses other than the self test Tables A 1 and A 2 show you the functions of all the switches and the rest of the appendix explains each of them Table A Z DIP witch functions Switch 1 Swit...

Page 103: ...t sensor The PE Paper End signal will go out of pin 12 on the host connector regardless of the setting of switch 1 3 See ESC 8 in Appendix G or J Switch 1 4 Selects the printer mode When it is on the printer uses the control codes and character sets of the Epson mode when the switch is off the printer uses the control codes and character sets of the IBM Proprinter mode Chapter 5 explains the diffe...

Page 104: ... is off the printer can be activated and deactivated by exter nal software codes ASCII 19 DC3 turns off printing While the printer is inactive all input data is ignored until the printer is reacti vated by DC1 Switch 2 2 Controls the optional cut sheet feeder When it is on the cut sheet feeder is enabled When it is off the cut sheet feeder is dis abled Leave it off unless you are using a cut sheet...

Page 105: ...ed there may be times when you will want to print on single sheet paper rather than continuous form Removing the Tractor Unit Removing the installed tractor unit is easy Simply push back on the tractor release levers as shown in Figure B 1 tilt the unit back and lift it off the printer Figure B 1 Removing the tractor unit B 1 ...

Page 106: ...pushed back in the direction of the arrow 4 Line up the left edge of the paper with the alignment arrow marked on the metal plate as shown in Figure B 2 With the power OFF use the paper feed knob to roll the paper into the printer If the power is ON use the LINE FEED button Alignment arrow Figure B 2 Loading single sheet paper 5 If you plan on extensive single sheet printing you can also install t...

Page 107: ...Compensate for the two line difference when rolling the paper into the printer b Use the installation procedure on your word processor to change the default page length c Use commands in your word processing program to alter the page or margin lengths in each file to accommodate the FX 286 s page length 3 Once you ve established the best settings always load the paper so that your word processor s...

Page 108: ...talled 2 Hold the tractor with the gears to the right and fit the notches in the tractor unit over the pins on the printer as shown in Figure B 3 Figure E 3 Installing the tractor unit 3 Tilt the unit forward until it clicks in place over the front pins 4 Remove the front lid and replace it with the dust cover B 4 ...

Page 109: ... FX 286 double spaces when you expect it to single space or if it prints all the lines on top of each other change DIP switch 2 4 See Appendix A Paper loading If you have trouble while loading paper check these four items 1 Move the print head to the middle of the platen Be sure that the printer is OFF when you do this 2 See that the pin feed holders are set for the correct width If you are not su...

Page 110: ...e the label yourself Graphics Solutions There are three common sources of problems with graphics pro grams in BASIC 1 Unwanted codes for carriage returns and line feeds may be inserted by BASIC if lines are over 80 columns long or if semicolons are not used at the end of program lines between the graphics command and its data See Chapter 6 for the proper format for a WIDTH statement and for sample...

Page 111: ...gain and press the FORM FEED button before you press the OFF LINE button In fact you can use the FORM FEED button to cancel any previous SelecType settings each time you use SelecType If you want to be absolutely certain that no previous settings interfere with your use of SelecType always press the FORM FEED button once immediately after you enter SelecType mode You can also cancel individual mod...

Page 112: ...am that sends ASCII code 7 and by certain error conditions in the printer itself If the printer beeps and stops printing when it is not out of paper turn the printer off and check to see if the paper is loaded correctly If the paper is loaded correctly turn the printer back on and try to print again If the printer beeps and does not print again take it to a qualified service person Using the Hex D...

Page 113: ...ds the hex codes 47 48 and 49 with each followed by a carriage return and line feed When the program gets to line 30 it sends ESCape E and a car riage return and line feed These are hex codes lB 45 0D and 0A Now you can follow a hex dump printout on your own Some software changes one or more codes when sending them to the printer The ability of the FX 286 to dump in hexadecimal lets you determine ...

Page 114: ...C9 CA CB CC CD CE CF D0 D1 D2 D3 D4 D5 D6 D7 D8 D9 DA DB DC DD DE DF E0 E1 E2 E3 E4 E5 E6 E7 E8 E9 EA EB EC ED EE EF F0 F1 F2 F3 F4 F5 F6 F7 F8 F9 FA FB FC FD FE FF Figure C 1 Hexadecimal codes in order For example in the lines below which are the first two lines of the printout of the test program run with IBM PC BASIC you can see that in this case BASIC adds hex OA which is the code for line fee...

Page 115: ... each carriage return CHR 13 is no problem except when you need to use CHR 13 in a graphics program Getting rid of the extra CHR 10 is rather complicated First you open the printer as a random file OPEN LPT1 AS 1 Although this allows you to send any code to the printer you can no longer use the LPRINT command Instead you must use a PRINT l command PRINT 1 Now I can print anything This does allow y...

Page 116: ...ions Chapter 7 gives you two programs to define up to one character but you can define over 200 if you wish Defining more than three characters In order to define more than one character in Epson mode you need to understand more about Definition program 1 in Chapter 7 There fore four lines from that program are reprinted and explained below 160 LPRINT CHR 27 CHR 0 CHR 0 CHR 0 170 LPRINT CHR 27 CHR...

Page 117: ...and changes codes 128 through 159 and 255 to printable characters and ESCape 7 returns these codes to their normal functions In the same manner ESCape I1 changes the fol lowing codes into printable characters O 6 16 17 21 26 28 31 128 134 144 145 149 154 156 159 ESCape I0 returns these codes to their normal functions Data numbers for user defined characters Each user defined character requires 12 ...

Page 118: ...C 10 ...

Page 119: ...nd soft brush to clean inside the printer Be careful not to bend or damage any of the parts inside the printer With the power OFF you can move the print head back and forth to clean under it Once in a great while your FX 286 should be lubricated by an authorized Epson dealer Changing the Print Head The expected life of an FX 286 print head is about 100 million char acters assuming an average of 14...

Page 120: ...the ribbon cable from the connector block at the bottom of the printer mechanism under the carriage by pulling the heavy plastic tab just below the ribbon cable Pull the print head straight up and off of the carriage Installing the new print head Place the new print head onto the head mount and flip the locking lever back toward the front of the printer Connect the cable to the block That s all th...

Page 121: ...information of DATA 2 IN the 1st to 8th bits of parallel data 4 22 5 23 DATA 3 IN respectively Each signal is at HIGH 6 DATA 4 IN level when data is logical 1 and LOW 24 7 8 25 DATA 5 IN when it is logical 0 DATA 6 IN 26 DATA 7 IN 9 27 DATA 8 IN 10 28 ACKNLG OUT Approximately 12 microsecond pulse LOW indicates that data has been received and that the printer is ready to accept more data 11 29 BUSY...

Page 122: ...the receiving terminal This level becomes LOW when the printer is in 1 Paper end state 2 Off line 3 Error state Same as for Pins 19 30 Unused Pulled up to 5V through 3 3K ohm resistance The DC1 DC3 code is valid only when this signal is HIGH Internal fixing can be carried out with DIP switch pin 2 1 The level of this signal is factory set to LOW Notes 1 The column heading Direction refers to the d...

Page 123: ...ode disables pins 11 and 32 but not pin 12 Those computers that monitor pin 12 halt printing when the paper is out making ESCape 8 ineffective Data Transfer Sequence Interface timing Figure E 1 shows the timing for the parallel interface Figure E 1 Parallel interface timing Printing enabled disabled signals and control conditions Table E 2 shows the relationship between printing being enabled or d...

Page 124: ...W PULSE EA CHAR ENABLED normal cond ON LINE HIGH DC1 RECV D HIGH HIGH LOW PULSED EA CHAR ENABLED ON LINE HIGH DC3 RECV D HIGH HIGH LOW PULSED EA CHAR DISABLED OFF LINE H I G H L O W D C 1 D C 3 no effect no effect LOW HIGH NOT GENERATED DISABLED Even though printing is disabled data characters are received and acknowledged since the printer is looking for another DC1 character which would allow it...

Page 125: ...ffer Character sizes Roman characters Italic characters Special international characters NLQ characters roman IBM standard and alternate character sets 8K Mode Width inches Height inches Pica Pica Emphasized Pica Double width Elite Elite Double width Condensed Condensed Double width Condensed Elite Super Subscript 083 083 166 055 110 041 082 041 122 122 122 122 122 122 122 122 063 In condensed eli...

Page 126: ...1 216 of an inch Maximum characters per line 136 68 163 81 233 272 116 One original plus two carbon copies total thickness not to exceed 0 012 inch 0 3 mm Paper width Paper feed Pin feed paper 4 to 16 Tractor feed Cut sheet 7 25 to 14 4 Friction feed Printer Ribbon Cartridge ribbon black Ribbon life expectancy 3 million characters M T B F 5 million lines excluding print head life Print head life 1...

Page 127: ...rage 31 F to 158 F 35 C to 70 C Operating 10 to 80 no condensation Storage 5 to 85 no condensation Shock Operating 1 G less than 1 millisecond Storage 2 G less than 1 millisecond Vibration Operating 0 25 G 55Hz maximum Storage 0 50 G 55Hz maximum Insulation resistance 10 megaohms between AC power line and chassis Dielectric strength No trouble when 1 kilovolt R M S 50 or 60 Hz is applied for more ...

Page 128: ...Centronics compatible 8 bit parallel Synchronization By externally supplied STROBE pulses Handshaking By ACKNLG or BUSY signals Logic level Input data and all interface control signals are compatible with the TTL level F 4 ...

Page 129: ...ection if you re using the IBM Proprinter mode If a command functions in the same way in both modes it is described in both sections If a command is available in only one mode or if it has a different function in the other mode the comments indicate either Epson only or IBM only Each command has a format section and a comment section The format section gives the ASCII decimal and hexadecimal codes...

Page 130: ...7 Q CHR 60 ESCape sequences that require a 0 or 1 with a letter such as ESC W1 to turn on double width can use either the ASCII code or the numeral in quotation marks for the 0 or 1 For example in BASIC you can turn on double width with either of the formats below LPRINT CHR 27 W1 or LPRINT CHR 27 W CHR l Software Commands in Numerical Order The following list shows the control codes and ESC seque...

Page 131: ...ode one line G 8 Select Condensed Mode G 7 Cut Sheet Feeder Control G 32 Select Character Space G 22 Master Select G 12 MSB Control Sequence Cancel G 29 Select Absolute Dot Position G 22 Select User defined Set G 27 Define User defined Characters G 27 Select Graphics Mode G 26 Select Cancel Underlining G 12 Select Vertical Tab Channel G 21 Select 1 8 inch Line Spacing G 16 Select 7 72 inch Line Sp...

Page 132: ...n G 29 Immediate n 216 inch Line Feed G 17 Single density Graphics Mode G 24 Double density Graphics Mode G 24 Select Elite Width G 9 Select Skip over perforation G 15 Cancel Skip over perforation G 15 Select Pica Width G 10 Set Right Margin G 14 International Character Set G 13 Select Superscript G 11 Select Subscript G 11 Cancel Superscript Subscript G 12 Select Unidirectional Mode G 34 Select C...

Page 133: ...Epson Mode Commands G 5 ...

Page 134: ...G 6 ...

Page 135: ...s Near Letter Quality NLQ mode l Epson only Character Width SI Select Condensed Mode Format A S C I I c o d e S G Decimal 15 Hexadecimal O F Control CTRL O Comments Condensed mode has 17 16 characters per inch Not available in NLQ ESC SI Select Condensed Mode Format ASCII code ESC SG Decimal 27 15 Hexadecimal 1 B OF Comments Duplicates the SI command G 7 ...

Page 136: ...I SO Select Double width Mode one line Format ASCII code S O Decimal 14 Hexadecimal O E Control CTRL N Comments Doubles the width of all characters It can be cancelled by a carriage return DC4 ESC W0 or ESC ESC SO Select Double width Mode one line Format ASCII code ESC SO Decimal 27 14 Hexadecimal 1 B OE Comments Duplicates the SO command G 8 ...

Page 137: ...h printing set by ESC W or ESC ESC W Select Cancel Double width Mode Format ASCII code ESC W n Decimal 27 87 n Hexadecimal 1 B 57 n Comments Double width mode doubles the width of all characters n 1 selects the mode n 0 cancels it ESC M Select Elite Width Format ASCII code ESC M Decimal 27 77 Hexadecimal 1 B 4D Comments Elite width has 12 characters per inch Not available in NLQ Epson only G 9 ...

Page 138: ...elite width l Epson only Print Enhancement ESC E Select Emphasized Mode Format ASCII code ESC Decimal 27 Hexadecimal 1 B Comments E 69 45 In emphasized each dot is printed twice with the second dot slightly to the right of the first Reduces print head speed Valid only in pica mode ESC F Cancel Emphasized Mode Format ASCII code ESC F Decimal 27 70 Hexadecimal 1 B 46 Comments Turns off the mode sele...

Page 139: ...valid in NLQ mode ESC H Cancel Double strike Mode Format ASCII code ESC H Decimal 27 72 Hexadecimal 1 B 48 Comments Turns off the mode selected by ESC G ESC S0 Select Superscript Format ASCII code ESC S 0 Decimal 27 83 0 Hexadecimal 1B 53 0 Comments Selects superscript mode ESC S1 Select Subscript Format ASCII code ESC S 1 Decimal 27 83 1 Hexadecimal 1B 53 1 Comments Selects subscript mode G 11 ...

Page 140: ...2D n Comments n 1 selects underlining n 0 cancels it ESC Master Select Format ASCII code ESC Decimal 27 Hexadecimal 1 B Comments n 33 n 21 n Selects any valid combination of the following modes pica elite proportional condensed emphasized double strike double width italic underline Elite proportional condensed double strike and italic are not available in NLQ Further details in Chapter 5 l Epson o...

Page 141: ...set Not valid in NLQ l Epson only ESC 5 Cancel Italic Mode Format ASCII code ESC 5 Decimal 27 53 Hexadecimal 1 B 35 Comments Cancels the mode selected by ESC 4 l Epson only ESC R Select an International Character Set Format ASCII code ESC R n Decimal 27 82 n Hexadecimal 1B 52 n Comments See Chapter 5 for details on this command l Epson only G 13 ...

Page 142: ...elite 4 233 in condensed 4 272 in condensed elite l Epson only ESC I Set Left Margin Format ASCII code ESC I n Decimal 27 108 n Hexadecimal 1 B 6C n Comments Sets the left margin n first printing column in the current width Maximum value of n is 134 in pica 160 in elite 229 in condensed 270 in condensed elite Clears previous tab settings therefore should be set before tabs are set Use lowercase 1 ...

Page 143: ...6 lines ESC N 6 will cause the FX 286 to print 60 lines and then skip six DIP switch 2 3 and SelecType mode 10 perform the same function ESC O Cancel Skip over perforation Format ASCII code ESC 0 Decimal 27 79 Hexadecimal 1 B 4F Comments Cancels the mode selected by ESC N Line spacing LF Line Feed Format ASCII code LF Decimal 10 Hexadecimal O A Control CTRL J Comments When this command is received...

Page 144: ... ASCII code ESC 1 Decimal 27 49 Hexadecimal 1 B 31 Comments Sets the line spacing to 7 72 of an inch for subsequent line feed commands The 1 is the digit one and not lower case L or ASCII code 1 ESC 2 Select l 6 inch Line Spacing Format ASCII code ESC 2 Decimal 27 50 Hexadecimal 1 B 32 Comments Sets the line spacing to l 6 of an inch for subsequent line feed com mands The 2 is the digit two and no...

Page 145: ...e ESC Decimal 27 Hexadecimal 1 B J n 74 n 4A n Comments Advances the paper by one line at a spacing of n 216 of an inch The value of n should be in the range 0 to 255 This produces an immediate line feed but does not affect subsequent line spacing and does not produce a carriage return ESC A Select n 72 inch Line Spacing Format ASCII code ESC A n Decimal 27 65 n Hexadecimal 1 3 41 n Comments Sets ...

Page 146: ...nteed up to n 18 l Epson only Note Can only be used with single sheet paper not with the trac tor unit Form feed and page length FF FF Format A S C I I c o d e F F Decimal 12 Hexadecimal OC Control CTRL L Comments Prints the data in the print buffer and advances the paper to the top of the next page according to the current page length ESC C Select Page Length in Lines Format ASCII code Decimal ES...

Page 147: ...s the print position to the next horizontal tab setting ESC D Set Horizontal Tabs Format ASCII code ESC Decimal 27 Hexadecimal 1 B Comments D n1 n2 0 68 n1 n2 0 44 n1 n2 00 This command allows setting of up to 32 horizontal tabs These are entered as n1 n2 n3 etc in the range 1 to 255 with ASCII 0 as the terminator The tab settings n1 n2 n3 etc must be entered in ascending order If n1 0 all tabs ar...

Page 148: ... B n1 n2 0 66 n1 n2 0 42 n1 n2 00 Sets up to 16 vertical tabs in the current line spacing Tab settings are not affected by subsequent changes in line spacing Terminate this tab sequence with 0 or a number less than that of the last tab ESC b Select Vertical Tabs in Channels Format ASCII code ESC b c n1 n2 0 Decimal 27 98 c n 1 n 2 0 Hexadecimal 1 B 62 c n1 n2 00 Comments c 0 to 7 Sets up to 16 ver...

Page 149: ...as the value 0 to 7 l Epson only Word Processing ESC p Select Cancel Proportional Mode Format ASCII code ESC P n Decimal 27 112 n Hexadecimal 1 B 70 n Comments Selects or cancels proportional printing mode n 1 selects n 0 cancels This command is valid only in draft mode See Chapter 5 for fur ther details and Appendix I for proportional width tables l Epson only G 21 ...

Page 150: ...ct Absolute Dot Position n1 n2 36 n1 n2 24 n1 n2 This sequence specifies the position from which subsequent charac ters are to be printed The dot position is specified by n1 and n2 n1 is the lower byte of the dot position and n2 is the higher byte Specifying the dot position as 0 specifying 0 for both n1 and n2 results in printing at the left margin however the sequence is ignored and the previous...

Page 151: ... negative values move it to the left NLQ only l Epson only ESC a NLQ Justification Format ASCII code ESC Decimal 27 Hexadecimal 1 B n 97 n 61 n Comments This sequence selects justification as follows n 0 Selects left justification n 1 Selects centering n 2 Selects right justification n 3 Selects full justification The default setting is n 0 Full justification n 3 is performed when the buffer becom...

Page 152: ...e If d is the total number of columns required n1 d MOD 256 n2 INT d 256 This command must be followed by d data numbers ESC L Select Double density Graphics Mode Format ASCII code ESC Decimal 27 Hexadecimal 1 B Comments L n1 n2 76 n1 n2 4C n1 n2 Turns on low speed double density graphics mode with 960 possi ble dots per eight inch line and 1632 per 13 6 inch line If d is the total number of colum...

Page 153: ...otal number of columns required n1 d MOD 256 n2 INT d 256 This command must be followed by d data numbers ESC Z Select Quadruple density Graphics Mode Format ASCII code ESC Z n1 n2 Decimal 27 90 n1 n2 Hexadecimal 1 B 5A n1 n2 Comments Turns on quadruple density graphics mode with 1920 possible dot positions per eight inch line and 3264 per 13 6 inch line Will not print consecutive dots in a row If...

Page 154: ... Hexadecimal 1 B 3F s n Comments Changes one graphics mode to another The variable s is a character K L Y or Z which is reassigned to a mode O 6 l Epson only ESC Format ASCII code ESC Decimal 27 Hexadecimal 1 B Select Nine pin Graphics Mode m n1 n2 94 m n1 n2 5E m n1 n2 Comments Turns on nine pin graphics mode Where m defines density of print 0 for single and 1 for double and d is the total number...

Page 155: ...ined in the currently selected mode l Epson only ESC Copy ROM Into RAM Format ASCII code ESC 0 0 0 Decimal 27 58 0 0 0 Hexadecimal 1B 3A 00 00 00 Comments This code allows the characters in the FX 286 ROM to be copied into RAM so that specific characters can be redefined l Epson only ESC Select User defined Set Format ASCII code ESC n Decimal 27 37 n Hexadecimal 1 B 25 n Comments This code selects...

Page 156: ...rintable upon input of the ESC 6 code which allows the use of these codes for user defined characters l Epson only ESC 7 Cancel ESC 6 Format ASCII code ESC Decimal 27 Hexadecimal 1 B Comments 7 55 37 Cancels ESC 6 setting Input of this code causes the printer to ignore all codes except control codes in ASCII codes 128 to 159 and 255 This is the default setting l Epson only G 28 ...

Page 157: ...28 to 159 return to non printable codes l Epson only MSB Control Note MSB control does not work for graphics data ESC MSB Control Sequence Cancel Format ASCII code ESC Decimal 27 35 Hexadecimal 1B 23 Comments Cancels the MSB control set by ESC or ESC l Epson only Note MSB control does not work for graphics data ESC equal MSB 0 Setting Format ASCII code ESC Decimal 27 61 Hexadecimal 1 B 3D Comments...

Page 158: ...CII code BEL Decimal 7 Hexadecimal 07 Control CTRL G Comments Sounds the FX 286 beeper BS Format A S C I I c o d e B S Decimal 8 Hexadecimal 08 Control CTRL H Backspace Comments Prints out data in the print buffer then moves the print position one space to the left If this code is received immediately after graphics printing the print position of subsequent data is moved back to the point at which...

Page 159: ...imal 1 1 Control CTRL Q Comments Returns the printer to the on line mode if it has been switched off by the printer deselect code DC3 It will not switch the printer on line if it has been switched off using the ON LINE switch on the control panel DC3 Deselect Printer Format ASCII code DC3 Decimal 19 Hexadecimal 1 3 Control CTRL S Comments Places the printer in off line mode until the select printe...

Page 160: ...same effect l Epson only ESC 8 Disable Paper out Sensor Format ASCII code ESC Decimal 27 Hexadecimal 1 B Comments 8 56 38 Turns off the paper out sensor so that you can print to the end of a single sheet of paper This command duplicates the function of DIP switch 1 2 Computer systems that monitor printer cable pin 12 will ignore both ESCape 8 and the setting of switch 1 2 If you have such a system...

Page 161: ...ecimal 27 60 Hexadecimal 1 B 3C Comments Selects unidirectional printing for more accurate positioning during text printing for one line only It is cancelled by a carriage return l Epson only ESC Format ASCII code ESC Decimal 27 64 Hexadecimal 1 B 40 Comments Initialize Printer Resets the printer to the power on state including top of form Clears the buffer of all data entered before the command b...

Page 162: ...ics printing is always unidirectional ESC s Select Half speed Mode Format ASCII code ESC S n Decimal 27 115 n Hexadecimal 1 B 73 n Comments n 1 selects the mode n 0 cancels it l Epson only D E L Delete Character Format ASCII code DEL Decimal 127 Hexadecimal 7F Comments Removes the last text character in the print buffer but does not affect control codes It cannot be guaranteed in the italic mode N...

Page 163: ... the Epson mode In order to present the character sets as clearly as possible the tables in this appendix are arranged by hexa decimal numbers There is also a hexadecimal to decimal conversion table for those who prefer to use decimal numbers See Chapter 5 for the international characters available in the Epson mode H 1 ...

Page 164: ... the deci mal equivalent of hex 5A look where column 5 intersects with row A There you will find decimal 90 Hex to Decimal Conversion Chart 0 1 2 3 4 5 6 7 6 9 A B C D E F 0 0 16 32 48 64 80 96 112 128 144 160 176 192 208 224 240 1 1 17 33 49 65 81 97 113 129 145 161 177 193 209 225 241 2 2 18 34 50 66 82 98 114 130 146 162 178 194 210 226 242 3 3 19 35 51 67 83 99 115 131 147 163 179 195 211 227 ...

Page 165: ...Epson Draft Mode 0 1 2 3 4 5 6 7 6 9 A B C D E F 0 1 2 3 4 5 6 7 6 9 A B C D E F 0 1 2 3 4 5 6 7 8 9 A B C D E F Epson Near Letter Quality NLQ Mode 0 1 2 3 4 5 6 7 8 9 A B C D E F H 3 ...

Page 166: ...H 4 ...

Page 167: ...width table lists all the characters except the inter national ones For each character the table lists the decimal Dec value the hexadecimal Hex value a printout of the character Char and the width of the character The width is given in units that are approximately 1 120th of an inch In the international character table each of the international char acters is displayed in printout and enlarged ma...

Page 168: ...quivalent IBM Proprinter character sets see Appen dix K Decimal Hexadecimal 0 00 1 01 2 02 3 03 4 04 5 05 6 06 7 07 8 08 9 09 10 0A 11 0B 12 0C 13 0D 14 0E 15 0F 16 10 17 11 18 12 19 13 20 14 21 15 22 16 23 17 24 18 Abbreviation NUL SOH STX ETX EOT ENQ ACK BEL BS HT LF VT FF CR SO SO DLE DC1 DC2 DC3 DC4 NAK SYN ETB CAN Control key Control Control A Control B Control C Control D Control E Control F...

Page 169: ... 55 37 56 38 57 39 58 3A 59 3B 60 3C 61 3D 62 3E 63 3F 64 40 65 41 66 42 67 43 Character 0 1 2 3 4 5 6 7 8 9 A B C Control key Control Y Control Z Control Decimal Hexadecimal 68 44 69 45 70 46 71 47 72 48 73 49 74 4A 75 4B 76 4C 77 4D 78 4E 79 4F 80 50 81 51 82 52 83 53 84 54 85 55 86 56 87 57 88 58 89 59 90 5A 91 5B 92 5C 93 5D 94 5E 95 5F 96 60 97 61 98 62 99 63 100 64 101 65 102 66 Character D ...

Page 170: ...A 123 7B 124 7C 125 7D 126 7E Hexadecimal Abbreviation Decimal 7F DEL 144 80 NUL 145 81 SOH 146 82 STX 147 83 ETX 148 84 EOT 149 85 ENQ 150 86 ACK 151 87 BEL 152 88 BS 153 89 HT 154 8A LF 155 8B VT 156 8C FF 157 8D CR 158 BE SO 159 8F SI 160 Hexadecimal Character Decimal Al 167 A2 168 A3 169 A4 170 A5 171 A6 172 Character S t U V W X Y Z Hexadecimal Abbreviation 90 DLE 91 DC1 92 DC2 93 DC3 94 DC4 ...

Page 171: ... C1 C2 C3 C4 C5 C6 C7 C8 C9 CA CB CC CD CE CF D0 D1 D2 D3 D4 D5 0 1 2 3 4 5 6 7 8 9 A B C D E F G H I J K IL M N O P Q R S T U Decimal 214 215 216 217 218 219 220 221 222 223 224 225 226 227 228 229 230 231 232 233 234 235 236 237 238 239 240 241 242 243 244 245 246 247 248 249 250 251 252 253 254 255 Hexadecimal Character D6 D7 D8 D9 D A DB DC D D DE DF EO El E2 E3 E4 E5 E6 E7 E8 E9 EA EB EC ED E...

Page 172: ... 11 q 11 r 11 s 12 t 11 u 12 v 12 w 12 x 10 Y 12 z 10 9 5 9 12 192 C 0 193 C1 194 C 2 195 C 3 196 C 4 197 C 5 198 C 6 199 C 7 200 C 8 201 C 9 202 C A 203 C B 204 CC 205 C D 206 C E 207 C F 208 D 0 209 D1 210 D 2 211 D 3 212 D 4 213 D 5 214 D 6 215 D 7 216 D 8 217 D 9 218 D A 219 D B 220 D C 221 D D 222 D E 223 D F 160 A 0 blank 12 224 EO 161 Al 10 225 El 162 A 2 10 226 E2 163 A3 12 227 E3 164 A4 1...

Page 173: ...International Character Width Table Roman characters Italic characters I 7 ...

Page 174: ...I 8 ...

Page 175: ...fferent function in the other mode the comments indicate either Epson only or IBM only Each command has a format section and a comment section The format section gives the ASCII decimal and hexadecimal codes for the command In some cases there is also a control key code because some commercial software programs can use a control key for a code between 0 and 27 decimal In this section CTRL O for ex...

Page 176: ...1 or LPRINT CHR 27 W CHR 1 Selecting the IBM Proprinter Mode To set the FX 286 in the IBM Proprinter mode you need to reset three DIP switches see Appendix A Once the FX 286 is set in the IBM mode the printer responds to commands like a Proprinter and prints in the selected character set Reset the following DIP switches to select the Proprinter mode DIP Factory Switch Setting 1 4 ON 2 1 ON 2 3 OFF...

Page 177: ...test make sure the power is OFF then hold down the DRAFT button while turning the power switch ON the self test takes over and the FX 286 starts printing out the Standard IBM Pro printer character set as shown in Figure J 1 Figure J 1 IBM Proprinter mode self test If you want to see the Alternate set turn the power OFF Then reset either switch 1 6 1 7 or 1 8 from ON to OFF and run the self test ag...

Page 178: ... J 25 ESC ESC ESC ESC ESC ESC ESC ESC ESC ESC ESC ESC ESC ESC ESC ESC ESC ESC ESC ESC 14 ESC SO Select Double width Mode one line J 10 15 ESC SI Select Condensed Mode J 9 45 ESC Select Cancel Underline J 14 48 ESC 0 Select l inch Line Spacing J 16 49 ESC 1 Select 7 72 inch Line Spacing J 17 50 ESC 2 Execute Line Spacing J 17 51 ESC 3 Select n 216 inch Line Spacing J 17 52 ESC 4 Resets Top of Form ...

Page 179: ...ics J 22 78 ESC N Select Skip over perforation J 15 79 ESC O Cancel Skip over perforation J 16 81 ESC Q3 Deselects Printer J 27 82 ESC R Return to Default Tabs J 21 83 ESC S 0 Select Superscript J 14 83 ESC S 1 Select Subscript J 14 84 ESC T Cancel Superscript Subscript J 14 85 ESC U Select Unidirectional Mode J 27 87 ESC W Select Cancel Double width Mode J 11 88 ESC X Set Margins J 15 89 ESC Y Hi...

Page 180: ...J 6 ...

Page 181: ...IBM Proprinter Mode Commands J 7 ...

Page 182: ...J 8 ...

Page 183: ...17 16 characters per inch ESC SI Select Condensed Mode Format ASCII code ESC SI Decimal 27 15 Hexadecimal 1 B OF Comments Duplicates the SI command DC2 Select Pica Mode Format ASCII code DC2 Decimal 18 Hexadecimal 1 2 Control CTRL R Comments Selects 10 cpi Pica mode Cancels condensed and elite printing set by SI ESC SI or ESC l IBM only J 9 ...

Page 184: ...ect Double width Mode one line Format ASCII code SO Decimal 14 Hexadecimal O E Control CTRL N Comments Doubles the width of all characters It is cancelled by a carriage return ESC WO or DC4 ESC SO Select Double width Mode one line Format ASCII code ESC SO Decimal 27 14 Hexadecimal 1B OE Comments Duplicates the SO command J 10 ...

Page 185: ... Select Cancel Double width Mode Format ASCII code ESC W n Decimal 27 87 n Hexadecimal 1 B 57 n Comments Double width mode doubles the width of all characters n 1 selects the mode n 0 cancels it Print Enhancement ESC E Format ASCII code ESC Decimal 27 Hexadecimal 1 B E 69 45 Select Emphasized Mode Comments In emphasized each dot is printed twice with the second dot slightly to the right of the fir...

Page 186: ...SC 6 Decimal 27 54 Hexadecimal 1 B 36 Comments Selects alternate IBM character set See Appendix K for character set tables l IBM only ESC 7 Select Standard Character Set Format ASCII code ESC 7 n Decimal 27 55 n Hexadecimal 1 B 37 n Comments Selects standard character set if the alternate character set has been previously selected See Appendix K for character set tables l IBM only J 12 ...

Page 187: ...rmat ASCII code ESC H Decimal 27 72 Hexadecimal 1 B 48 Comments Turns off the mode selected by ESC G ESC I Select Print Mode Format ASCII code ESC I n Decimal 27 73 n Hexadecimal 1 B 49 n Comments When n 0 the standard draft font is selected when n 2 the standard Near Letter Quality font is selected When n 4 a user defined font is selected when n 6 a user defined NLQ font is selected l IBM only J ...

Page 188: ...Hexadecimal 1B Comments Selects subscript S 1 83 1 53 1 Select Subscript ESC T Format ASCII code ESC Decimal 27 Hexadecimal 1B Cancel Superscript Subscript T 84 54 Comments Cancels either mode ESC Select Cancel Underline Format ASCII code ESC n Decimal 27 45 n Hexadecimal 1 B 2D n Comments When n 1 underline is turned on when n 0 underline is cancelled J 14 ...

Page 189: ...is set to n1 in the current width and the right margin column is set to n2 l IBM only ESC N Format ASCII code ESC Decimal 27 Hexadecimal 1 B Select Skip over perforation N n 78 n 4E n Comments The variable n number of lines skipped between the last line printed on one page and the first line on the next page For example with the standard settings for line spacing and page length 66 lines ESC N 6 w...

Page 190: ... Hexadecimal O A Control CTRL J Comments When this command is received the data in the print buffer is printed and the paper advances one line in the current line spacing ESC 0 Select 1 8 inch Line Spacing Format ASCII code ESC 0 Decimal 27 40 Hexadecimal 1 B 30 Comments Sets the line spacing to 1 8 of an inch for subsequent line feed com mands The 0 is the digit zero and not ASCII code 0 J 16 ...

Page 191: ...xadecimal 1 B Comments 2 50 32 Executes the line spacing stored in memory by ESC A If no ESC A command has been sent ESC 2 sets the line spacing to 1 6 of an inch The 2 is the digit two and not ASCII code 2 l IBM only ESC 3 Select n 216 inch Line Spacing Format ASCII code ESC 3 n Decimal 27 51 n Hexadecimal 1 3 33 n Comments Sets the line spacing to n 216 of an inch for subsequent line feed comman...

Page 192: ...e Feed Format ASCII code ESC Decimal 27 Hexadecimal 1 B J n 74 n 4A n Comments Advances the paper by one line at a spacing of n 216 of an inch The value of n should be in the range 0 to 255 This produces an immediate line feed and carriage return but does not affect subse quent line spacing l IBM only Form feed and page length FF Form Feed Format A S C I I c o d e F F Decimal 12 Hexadecimal 0C Con...

Page 193: ... should be between 1 and 127 ESC C0 Select Page Length in Inches Format ASCII code ESC C 0 n Decimal 27 67 0 n Hexadecimal 1 B 43 00 n Comments Sets the page length to n inches where n has a value of 1 to 22 ESC 4 Resets Top of Form Format ASCII code ESC 4 Decimal 27 52 Hexadecimal 1 B 34 Comments Resets top of form to current position l IBM only J 19 ...

Page 194: ...allows setting of up to 28 horizontal tabs These are entered as n1 n2 n3 etc in the range 1 to 255 with ASCII 0 character as the terminator The tab settings n1 n2 n3 etc must be entered in ascending order If n1 0 all tabs are cleared The set tings on power up are every eight characters VT Tab Vertically Format A S C I I c o d e V T Decimal 11 Hexadecimal 0 B Control CTRL K Comments Advances the pa...

Page 195: ...ommand before using this ESC R Return to Default Tabs Format ASCII code ESC R Decimal 27 82 Hexadecimal 1 B 52 Comments Returns the horizontal and vertical tabs to their default settings l IBM only Graphics ESC K Format ASCII code ESC Decimal 27 Hexadecimal 1 B Select Single density Graphics Mode K n1 n2 75 n1 n2 4B n1 n2 Comments Turns on single density graphics mode with 480 possible dots per ei...

Page 196: ...1 n2 Turns on high speed double density graphics mode with 960 possi ble dot positions per eight inch line and 1632 per 13 6 inch line Will not print consecutive dots in a row If d is the total number of columns required n1 d MOD 256 n2 INT d 256 This command must be followed by d data numbers ESC Z Select Quadruple density Graphics Mode Format ASCII code ESC Z n1 n2 Decimal 27 90 n1 n2 Hexadecima...

Page 197: ... code of the first character to be defined n5 0 if the top eight pins are to be used n5 128 for the bottom eight n6 0 in all cases n7 through nk are the data numbers that define the characters with 11 data numbers for each character The data numbers for each character are determined as shown on the grid below Determining data numbers To print a user defined character you must use ESCape I which is...

Page 198: ...odes function when this mode is in effect The total number of characters affected by this command is n1 n2 x 256 l IBM only ESC Print One Character from All Print Table Format ASCII code ESC Decimal 27 94 Hexadecimal 1 B 5E Comments Allows the printing of one character from the All Print table in Appendix K l IBM only Other Codes BEL Beeper Format ASCII code BEL Decimal 7 Hexadecimal 07 Control CT...

Page 199: ... print position of subsequent data is moved back to the point at which graphics printing started CR Carriage Return Format A S C I I c o d e C R Decimal 13 Hexadecimal 0D Control CTRL M Comments Prints the data in the buffer and returns the print position to the left margin CAN Format ASCII code CAN Decimal 24 Hexadecimal 1 8 Control CTRL X Cancel Line Comments Removes all text in the print buffer...

Page 200: ...e feed to each carriage return If n 0 it does not l IBM only ESC 8 Disable Paper out Sensor Format ASCII code ESC Decimal 27 Hexadecimal 1 B Comments 8 56 38 Turns off the paper out sensor so that you can print to the end of a single sheet of paper This command duplicates the function of DIP switch 1 2 Computer systems that monitor printer cable pin 12 will ignore both ESCape 8 and the setting of ...

Page 201: ...SCII code ESC Q 3 Decimal 27 81 51 Hexadecimal 1 B 51 33 Comments Deselects printer under software control This command is can celled by DC1 l IBM only ESC U Select Unidirectional Mode Format ASCII code ESC Decimal 27 Hexadecimal 1 B Comments U n 85 n 55 n Selects unidirectional printing for more accurate positioning during text printing n 1 selects the feature n 0 cancels it Graphics printing is ...

Page 202: ...J 28 ...

Page 203: ...ts available on the FX 286 printer in the IBM Proprinter mode In order to present the character sets as clearly as possible the tables in this appendix are arranged by hexadecimal numbers There is also a hexadecimal to decimal conver sion table for those who prefer to use decimal numbers K 1 ...

Page 204: ...d the deci mal equivalent of hex 5A look where column 5 intersects with row A There you will find decimal 90 Hex to Decimal Conversion Chart 0 1 2 3 4 5 6 7 6 9 A B C D E F 0 0 16 32 48 64 80 96 112 128 144 160 176 192 208 224 240 1 1 17 33 49 65 81 97 113 129 145 161 177 193 209 225 241 2 2 18 34 50 66 82 98 114 130 146 162 178 194 210 226 242 3 3 19 35 51 67 83 99 115 131 147 163 179 195 211 227...

Page 205: ...IBM Standard Character Set 0 1 2 3 4 5 6 7 6 9 A B C D E F 0 1 2 3 4 5 6 7 8 9 A B C D E F 0 1 2 3 4 5 6 7 8 9 A B C D E F IBM NLQ Standard Character Set 0 1 2 3 4 5 6 7 6 9 A B C D E F K 3 ...

Page 206: ...IBM Alternate Character Set 0 1 2 3 4 5 6 7 8 9 A B C D E F 0 1 2 3 4 5 6 7 8 9 A B C D E F IBM NLQ Alternate Character Set 0 1 2 3 4 5 6 7 8 9 A B C D E F 0 1 2 3 4 5 6 7 8 9 A B C D E F K 4 ...

Page 207: ...IBM All Print Character Set 0 1 2 3 4 5 6 7 8 9 A B C D E F 0 1 2 3 4 5 6 7 8 9 A B C D E F IBM NLQ All Print Character Set 0 1 2 3 4 5 6 7 8 9 A B C D E F 0 1 2 3 4 5 6 7 8 9 A B C D E F K 5 ...

Page 208: ...K 6 ...

Page 209: ...ormation Interchange See ASCII Applesoft BASIC C 8 Applications programs 2 2 2 3 ASCII American Standard Code for Information Interchange 63 codes listed for all characters 4 3 4 4 I 1 I 5 See also International characters Automatic test See Self test B Bail See Paper bail BASIC 3 3 4 3 4 7 5 4 See also Applesoft BASIC IBM PC BASIC Beeper C 4 Bold printing See Double strike Emphasized Proportional...

Page 210: ... 3 Control codes Epson codes listed by function G 5 G 34 Epson codes listed by number G 2 G 4 Proprinter codes listed by function J 7 J 27 Proprinter codes listed by number J 4 J 5 See also specific modes and functions Control panel 1 16 1 17 Selecting typestyles See SelecType Cover See Access cover Dust cover Cut sheet feeder 1 13 A 4 A 6 D Data transfer sequence E 3 Defaults A 1 Density See Grap...

Page 211: ...ouble width mode 5 9 F Firing of pins See Pins FORM FEED button 1 17 Foreign language characters See International characters Formatting page 5 16 5 19 Friction control lever See Paper release lever Friction feed See Paper loading single sheet Function switches See DIP switches G Graphics 6 1 6 16 column reservation numbers 6 10 6 11 designing 6 11 6 14 densities 6 8 nine pin 6 8 reassigning code ...

Page 212: ...national characters 5 14 5 16 A 5 A 6 Italic mode G 13 See also SelecType K Knob See Paper feed knob L Labels self adhesive C 2 Left margin See Margins Lever See Paper release Paper thickness Pin feed LINE FEED button 1 17 Lid See Dust cover Line feed DIP switch for A 4 A 6 Line spacing 5 18 5 19 in graphics 6 3 6 6 Location of printer 1 2 1 3 Lubrication D 1 M Maintenance D 1 D 2 Manual feed knob...

Page 213: ...ecting typestyles with See SelecType Paper bail 1 9 1 13 feed knob 1 2 paper out sensor 5 19 DIP switch control of A 4 A 5 release lever 1 11 separator 1 14 thickness lever 1 19 1 20 Paper loading continuous feed 1 7 1 13 single sheet B 1 B 4 troubleshooting C 1 Parallel interface See Interface Parts printer 1 1 Pica mode 5 3 5 7 5 8 5 11 5 12 Pin feed paper See Paper Pin feed holder and pin feed ...

Page 214: ...7 Right margin See Margins Rows See Columns S SelecType feature 3 1 3 8 cancelling functions with C 3 C 4 mode combinations 3 5 mode numbers 3 3 skip over perforation 3 6 Self test Epson mode 1 20 1 21 IBM Proprinter mode A 3 A 4 Sensor See Paper out sensor Separator See Paper separator Serial board See Interface Setup applications programs 2 1 2 3 printer 1 1 1 23 Single sheet printing B 1 B 4 Sk...

Page 215: ...age 1 18 1 19 Tractor removing B 1 installing B 4 Troubleshooting C 1 C 9 U Underline mode 3 3 5 10 Unpacking your printer 1 1 1 2 User defined characters 7 1 7 7 V Vertical tabs See Tabs W Width changing 4 2 5 3 dot patterns of 4 2 of proportional characters 1 4 I 5 statements 6 6 summary table of 5 7 See also specific widths by name Word processing 49 Index 7 ...

Page 216: ......

Page 217: ...I 92 5C Select Relative Dot Position 97 61 NLQ Justification Graphics 75 48 Select Single density Graphics Mode 76 4 C Select Double density Graphics Mode 89 59 Select High speed Double density Graphics Select Quadruple density Graphics Mode ESC ESC a ESC K ESC L ESC Y ESC Z 9 0 5 A ESC 42 2A Select Graphics Mode ESC 63 3 F Reassign Graphics Mode ESC 9 4 5E Select Nine pin graphics Mode User defin...

Page 218: ...elect 7 72 inch Line Spacing 50 32 Select 1 6 inch Line Spacing 51 33 Select n 216 inch Line Spacing 74 4A immediate n 216 inch Line Feed 65 41 Select n 72 inch Line Spacing 106 6A Produce Reverse Line Feed 12 0C Form Feed ESC C ESC C0 HT ESC D VT 67 43 Select Page Length in Lines 67 43 Select Page Length in Inches 9 09 Tab Horizontally 68 44 Set Horizontal Tabs 11 0B Tab Vertically ESC B ESC b ES...

Page 219: ... U 85 55 Select Unidirectional Mode ESC 61 3D Select User defined Characters ESC ESC 92 5C Print from All Print Table 94 5E Print One Character from All Print Table DIP Switch Functions Switch 1 No ON 1 1 Condensed 1 2 0 slashed 1 3 inactive 1 4 Epson 1 5 Emphasized 1 6 ON 1 7 ON 1 8 ON Print mode Function International character set Print mode See Table A 2 Zero character Paper out sensor Printer...

Page 220: ...IBM Mode See Appendix J for detailed explanations of codes Character Width Pitch ...

Page 221: ...Notes ...

Page 222: ...teries not supplied by Epson or by accident misuse neglect or improper packing shipping modification or servicing by other than Epson or an authorized Epson Service Center SOME EPSON PRODUCTS HAVE A COMPARTMENT CONTAINING STATIC SENSITIVE ELECTRONIC CIRCUITRY THIS COMPARTMENT IS CLEARLY LABELED DO NOT OPEN IT THIS WARRANTY WILL BECOME VOID IF YOU ATTEMPT TO MODIFY OR ADJUST ANY ROM OR OTHER PART O...

Page 223: ......
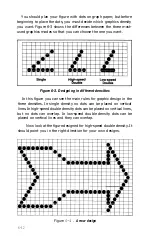
Reviews: