background image

Epson Stylus Photo R280/R285/R290/Epson Artisan 50/Epson Stylus Photo T50/T59/T60/P50

Revision C

Chapter 1 Product Description

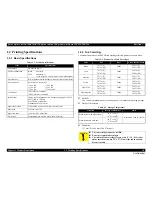
1.2  Printing Specifications

12

Confidential

Note *1: cps = character per second

*2: In Photo mode, either of 1.5 or 2.0 pass is selected depending on the paper size.

1.5 pass supported size: 4”x6”
2.0 pass supported size: 5”x7”, 8” x 10”, Letter, A4

*3: Epson Artisan 50/Epson Stylus Photo T50/T59/T60/P50 only

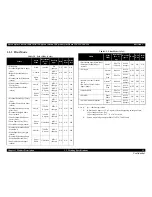
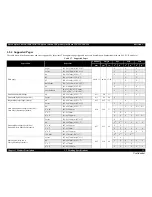
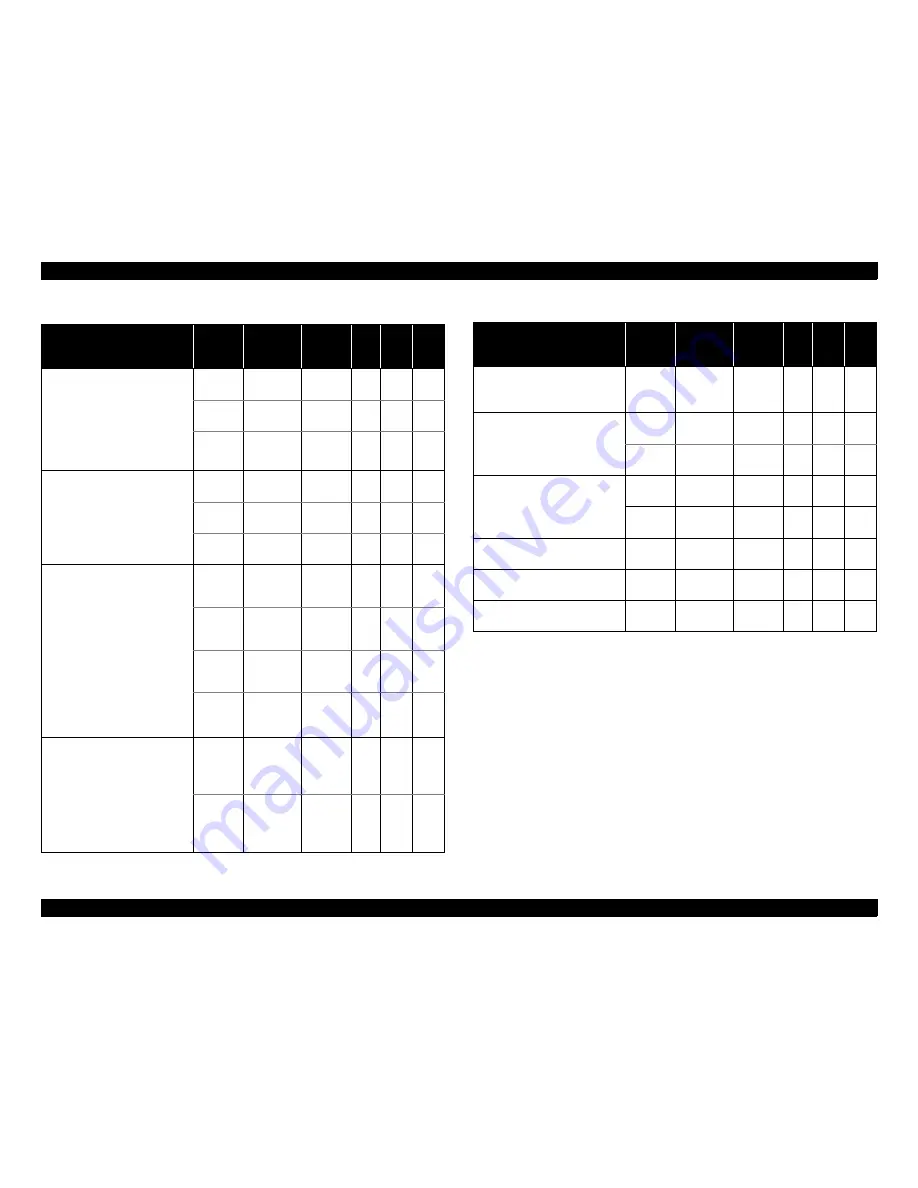
Table 1-6.  Print Mode (Monochrome)

Media

Print 

Mode

Resolution

(H x V) 

dpi

Dot Size

(cps)*

1

Bi-d

Micro

Weave

Border

-less

• Plain paper
• Premium Bright White Paper 

(EAI)

• Bright White Inkjet Paper 

(others)

• Premium Ink Jet Plain Paper 

(others)

Draft

360x180

Eco

(400cps)

ON

OFF

N/A

Normal

360x360

MC2-1

(360cps)

ON

OFF

N/A

Photo 

Fine

720x720

MC1-1

(240cps)

ON

ON

N/A

• Ultra Premium Photo Paper 

Glossy (EAI)

• Ultra Glossy Photo Paper 

(others)

Photo*

2

720x720

(1.5 pass)

MC1-2

(240cps)

ON

ON

OK

Photo*

2

720x720

(2.0 pass)

MC2-2

(280cps)

ON

ON

OK

Super 
Photo

5760x1440

MC1-5

(200cps)

ON

ON

OK

• Premium Photo Paper Glossy 

(EAI)

• Premium Glossy Photo Paper 

(others)

• Premium Photo Paper Semi-

gloss (EAI)

• Premium Semigloss Photo 

Paper (others)

• Ultra Premium Photo Paper 

Luster (EAI)

• Photo Paper Glossy (EAI)
• Glossy Photo Paper (others)

Fine

720x360

MC1-1

(240cps)

ON

ON

OK

Photo*

2

720x720

(1.5 pass)

MC1-2

(240cps)

ON

ON

OK

Photo*

2

720x720

(2.0 pass)

MC2-2

(280cps)

ON

ON

OK

Super 
Photo

5760x1440

MC1-5

(200cps)

ON

ON

OK

• Premium Presentation Paper 

Matte (EAI)

• Matte Paper Heavy-weight 

(others)

• Premium Presentation Paper 

Matte Double-sided (EAI)

• Double-Sided Matte paper 

(others)

Photo*

2

720x720

(2.0 pass)

MC2-2

(280cps)

ON

ON

OK

Super 
Photo

5760x1440

MC1-5

(200cps)

ON

ON

OK

• Presentation Paper Matte (EAI)
• Photo Quality Inkjet Paper

(others)

Photo*

2

720x720

(2.0 pass)

MC2-2

(280cps)

ON

ON

N/A

• Envelopes

Normal

360x360

MC2-1

(360cps)

OFF OFF

N/A

Photo 

Fine

720x720

MC1-1

(240cps)

OFF

ON

N/A

• Iron-On Cool Peal Transfer 

(EAI)

• Ion-On Cool Peal Transfer 

Paper (Other)

Normal

*3

360x360

MC2-1

(360cps)

ON

OFF

N/A

Photo 

Fine

720x720

MC1-1

(240cps)

OFF

ON

N/A

• Photo Stickers

Photo*

2

720x720

(2.0 pass)

MC2-2

(280cps)

ON

ON

N/A

• CD/DVD

Super 
Photo

5760x1440

MC1-5

(200cps)

ON

ON

N/A

• CD/DVD Premium Surface

Super 
Photo

5760x1440

MC1-5

(200cps)

ON

ON

N/A

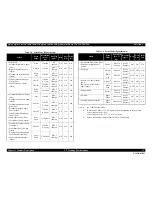
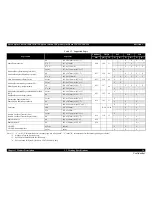
Table 1-6.  Print Mode (Monochrome)

Media

Print 

Mode

Resolution

(H x V) 

dpi

Dot Size

(cps)*

1

Bi-d

Micro

Weave

Border

-less

Summary of Contents for 50 - Artisan 50 - Printer

Page 1: ...EpsonStylusPhotoR280 R285 R290 EpsonArtisan50 EpsonStylusPhotoT50 T59 T60 P50 Color Inkjet Printer SEIJ07 004 SERVICE MANUAL Confidential ...

Page 2: ...tents of this manual However should any errors be detected SEIKO EPSON would greatly appreciate being informed of them The above not withstanding SEIKO EPSON CORPORATION can assume no responsibility for any errors in this manual or the consequences thereof EPSON is a registered trademark of SEIKO EPSON CORPORATION General Notice Other product names used herein are for identification purpose only a...

Page 3: ...RKING ON POWER SUPPLY AND OTHER ELECTRONIC COMPONENTS 4 WHEN DISASSEMBLING OR ASSEMBLING A PRODUCT MAKE SURE TO WEAR GLOVES TO AVOID INJURIER FROM METAL PARTS WITH SHARP EDGES WARNING 1 REPAIRS ON EPSON PRODUCT SHOULD BE PERFORMED ONLY BY AN EPSON CERTIFIED REPAIR TECHNICIAN 2 MAKE CERTAIN THAT THE SOURCE VOLTAGES IS THE SAME AS THE RATED VOLTAGE LISTED ON THE SERIAL NUMBER RATING PLATE IF THE EPS...

Page 4: ...rence Exploded Diagram Parts List Symbols Used in this Manual Various symbols are used throughout this manual either to provide additional information on a specific topic or to warn of possible danger present during a procedure or an action Be aware of all symbols when they are used and always read NOTE CAUTION or WARNING messages Indicates an operating or maintenance procedure practice or conditi...

Page 5: ...nterface p 16 is updated 1 4 1 Electrical Specifications p 17 is updated 1 4 4 Acoustic Noise p 18 is updated 1 4 5 Safety Approvals Safety standards EMI p 18 is updated Chapter 2 2 3 Power On Sequence p 26 is added 2 4 Printer Initialization p 28 is added 2 2 Electrical Circuit Operating Principles is deleted Chapter 4 4 1 9 Procedural Differences p 59 is added 4 5 Disassembly reassembly procedur...

Page 6: ...ower On Sequence 26 2 4 Printer Initialization 28 Chapter 3 Troubleshooting 3 1 Overview 30 3 1 1 Troubleshooting on Motors and Sensors 30 3 2 Warning Error Indications 31 3 2 1 Error Indication Method 31 3 3 Troubleshooting by Error Message 33 3 3 1 Troubleshooting Problems with Error Messages 33 3 4 Troubleshooting by Symptom 44 3 4 1 Problems in Printing Operation 44 3 4 2 Power Problems 49 3 4...

Page 7: ...4 18 CDR Tray Sensor 98 4 5 Disassembly reassembly procedures of Epson Artisan 50 Epson Stylus Photo T50 T59 T60 P50 99 4 5 1 Panel Assy 99 Chapter 5 Adjustment 5 1 Adjustment Items and Overview 104 5 1 1 Servicing Adjustment Item List 104 5 1 2 Required Adjustments 107 5 2 Using the Adjustment Program 109 5 2 1 Top Margin Adjustment 109 5 2 2 Head Angular Adjustment 109 5 2 3 Bi D Adjustment 110 ...

Page 8: ...Confidential C H A P T E R 1 PRODUCTDESCRIPTION ...

Page 9: ...d DVD label printing are supported Borderless printing on specified EPSON brand paper is available Control panel Simple design with three buttons and three indicators LED Dimensions and weight Note 1 Paper support and stacker are closed Rubber feet are included 2 Without ink cartridges Figure 1 1 External View Table 1 1 Dimensions and weight Model Dimensions W x D x H mm 1 Weight 2 Epson Stylus Ph...

Page 10: ...nt Character code Alphanumeric with expanded graphics PC437 ASCII 20H to 7FH only Font EPSON original font Alphanumeric font Courier Paper feed method Friction feed using one ASF Auto Sheet Feeder Paper path Top feed front out Paper feed rates 110 msec at 25 4 mm feed PF interval Programmable in 0 01764 mm 1 1440 inch steps Table 1 3 Product No of Ink Cartridges Color EAI Euro Asia CISMEA Latin Bl...

Page 11: ...Paper others Premium Photo Paper Semi gloss EAI Premium Semigloss Photo Paper others Ultra Premium Photo Paper Luster EAI Photo Paper Glossy EAI Glossy Photo Paper others Fine 720x360 MC1 1 240cps ON ON OK Photo 2 720x720 1 5 pass MC1 2 240cps ON ON OK Photo 2 720x720 2 0 pass MC2 2 280cps ON ON OK Super Photo 5760x1440 MC1 5 200cps ON ON OK Premium Presentation Paper Matte EAI Matte Paper Heavy w...

Page 12: ...ers Premium Photo Paper Semi gloss EAI Premium Semigloss Photo Paper others Ultra Premium Photo Paper Luster EAI Photo Paper Glossy EAI Glossy Photo Paper others Fine 720x360 MC1 1 240cps ON ON OK Photo 2 720x720 1 5 pass MC1 2 240cps ON ON OK Photo 2 720x720 2 0 pass MC2 2 280cps ON ON OK Super Photo 5760x1440 MC1 5 200cps ON ON OK Premium Presentation Paper Matte EAI Matte Paper Heavy weight oth...

Page 13: ... 56 x 5 08 13 16 x44 7 Y Y Y Premium Inkjet Plain Paper A4 210 x 297 mm 8 3 x11 7 0 11 80 21 Y Y Premium Bright White Paper EAI Letter 215 9 x 279 4 mm 8 5 x11 0 11 90 24 Y Bright White Inkjet Paper others A4 210 x 297 mm 8 3 x11 7 0 13 92 5 25 Y Y Ultra Premium Photo Paper Glossy EAI Ultra Glossy Photo Paper others Letter 215 9 x 279 4 mm 8 5 x11 0 30 290 77 Y Y A4 210 x 297 mm 8 3 x11 7 Y Y Y 2 ...

Page 14: ...r others Letter 215 9 x 279 4 mm 8 5 x11 0 22 185 49 Y A4 210 x 297 mm 8 3 x11 7 Y Y Presentation Paper Matte EAI Photo Quality Inkjet Paper others Letter 215 9 x 279 4 mm 8 5 x11 0 12 102 27 Y A4 210 x 297 mm 8 3 x11 7 Y Y Y Envelopes 10 104 8 x 241 3 mm 4 125 x9 5 75 90 20 24 Y Y Y DL 110 x 220 mm Y Y C6 114 x 162 mm Y Y Iron On Cool Peal Transfer EAI Iron On Cool Peal Transfer Paper Other Lette...

Page 15: ...ve of paper must be 5 mm or below When printing on an envelope be sure the flap is folded neatly Do not use the adhesive envelopes Do not use double envelopes and cellophane window envelopes Table 1 8 Printing Area Margins Print Mode Paper Size Margin Left Right Top Bottom Standard print Any size 3 mm 3 mm 3 mm 3 mm Envelope 5 mm 5 mm 3 mm 20 mm Borderless print A4 Letter to 5 x 7 2 54 mm 2 54 mm ...

Page 16: ...CMD ESCPL2 BDC MDL Stylus SP Photo SP R280 CLS PRINTER Epson Stylus Photo R285 MFG EPSON CMD ESCPL2 BDC D4 D4PX MDL Stylus SP Photo SP R285 CLS PRINTER DES EPSON SP Stylus SP Photo SP R285 MFG EPSON CMD ESCPL2 BDC MDL Stylus SP Photo SP R285 CLS PRINTER Epson Stylus Photo R290 MFG EPSON CMD ESCPL2 BDC D4 D4PX MDL Stylus SP Photo SP R290 CLS PRINTER DES EPSON SP Stylus SP Photo SP R290 MFG EPSON CM...

Page 17: ...frequency 50 to 60 Hz Input frequency range 49 5 to 60 5 Hz Insulation resistance 3000 V for one minute Energy conservation International Energy Star Program compliant Power consumpt ion Printing ISO10561 Letter Pattern Epson Stylus Photo R280 R285 R290 Approx 12 W Epson Artisan 50 Epson Stylus Photo T50 T59 T60 P50 Approx 13 W Sleep mode Approx 1 0 W Approx 1 2 W Standby mode power off Approx 0 2...

Page 18: ...ylus Photo T50 T59 T60 P50 34 7 dB or less when printing from PC on Premium Glossy Photo Paper in highest quality 1 4 5 Safety Approvals Safety standards EMI USA UL60950 1 FCC Part15 Subpart B Class B Canada CAN CSA C22 2 No 60950 1 CAN CSA CEI IEC CISPR 22 Class B Mexico NOM 019 SCFI 1998 Taiwan CNS13438 Class B CNS14336 EU EN60950 1 EN55022 Class B EN61000 3 2 EN61000 3 3 EN55024 Germany EN60950...

Page 19: ...elated error occurs 2 Paper LED orange 1 Lights or flashes when an paper or CD R related error occurs 2 Power Button Paper Button Ink Button Power LED Paper LED Ink LED Power Button Paper Button Ink Button Power LED Paper LED Ink LED Epson Stylus Photo R280 R285 R290 Epson Artisan 50 Epson Stylus Photo T50 T59 T60 P50 Table 1 15 Operation Button Functions During Normal Operation Button Function Po...

Page 20: ...r longer In Does not function Out Same as during normal operation 11 1 31 21 51 41 71 61 81 20 10 40 30 60 50 80 70 90 11 1 31 21 51 41 71 61 81 20 10 40 30 60 50 80 70 90 11 1 31 21 51 41 71 61 81 20 10 40 30 60 50 80 70 90 11 1 31 21 51 41 71 61 81 20 10 40 30 60 50 80 70 90 11 1 31 21 51 41 71 61 81 20 10 40 30 60 50 80 70 90 11 1 31 21 51 41 71 61 81 20 10 40 30 60 50 80 70 90 Note The numbers...

Page 21: ...be replaced Replace the waste ink pads and reset the counter CD R guide error The CD R guide stacker position does not match with the print job The CD R guide stacker is in the CD R printing position at power ON Attach the CD R guide stacker to the proper position Paper jam A paper jam has occurred When printing on paper Remove the jammed paper and press the Paper button 1 When printing on CD R Re...

Page 22: ...Confidential C H A P T E R 2 OPERATINGPRINCIPLES ...

Page 23: ... the PF roller shaft to feed paper being powered by the PF motor ASF Unit Being powered by the PF motor feeds paper loaded on the ASF into the printer mechanism EJ Unit Being powered by the PF motor ejects paper or the CDR tray The EJ frame moves corresponding to the stacker position so that the frame matches with the paper size Ink System Located on the right side of the printer mechanism Covers ...

Page 24: ...upter 5 CR Contact module Ink cartridge detection CSIC 6 CR Encoder sensor Type Transmissive photo interrupter Resolution 180 pulse inch 7 PF Encoder sensor Type Transmissive photo interrupter Resolution 180 pulse inch 8 PW sensor Detecting items Left right edges of paper before during printing Top edge of paper before printing Bottom edge of paper during printing Left right top bottom of CDR befo...

Page 25: ...anding Reducing System do not perform the overlapping printing They carry out 1 path printing correcting ink drop amount for each raster mode in order to avoid making a gap between each path printed line This enables to achieve both high print quality less banding and high print speed Ultra Glossy Photo Paper Premium Glossy Photo Paper Glossy Photo Paper Premium Semigloss Photo Paper 4 x 6 inch 10...

Page 26: ... CDR Tray sensor if the CDR Tray is not set 3 2 The PF Motor rotates clockwise to eject the CDR Tray CR lock CR CR lock is released 4 Releasing the CR lock 4 1 The PF Motor rotates clockwise and releases the CR lock Any position 5 Seeking the home position 5 1 The carriage slowly moves to the 80 digit side 5 2 The carriage moves to the 0 digit side slowly and confirms it touches the Right Frame 5 ...

Page 27: ...h between CR lock and the 80 digit side for two times Table 2 5 Operation of the power on sequence Operation 1 Carriage PF roller movement and position 2 PG 3 11 Setting the APG to PG 11 1 The carriage slowly moves to the Right Frame and stops there 11 2 The PF Motor rotates clockwise and sets to PG PG 11 3 The carriage slowly returns to its home position 12 CR measurement and PW sensor initializa...

Page 28: ...izes printer mechanism b Clears input data buffer c Clears print buffer d Sets default values 2 Operator initialization Initialization when resetting the USB software and the following are performed a Clears input data buffer b Clears print buffer c Sets default values 3 Software initialization The ESC command also initialize the printer When printer is initialized the following actions are perfor...

Page 29: ...Confidential C H A P T E R 3 TROUBLESHOOTING ...

Page 30: ...hem with the values given in the tables to see if the motors or sensors are broken or not Note See 2 1 2 Motors Sensors p 24 for locations of the motors and sensors Start Identifying the error cause by the error message or observed symptom Repair or replacement of parts or components Reassembly and adjustment End Table 3 1 Motor Resistance Measuring Points Motor Motor Connector Measuring Points Re...

Page 31: ...h LEDs You can check most of the troubles with the status of the LEDs or messages shown on the windows of EPSON Status Monitor 3 See 1 5 3 Operation Buttons LEDs Functions p 19 LEDs Status Message box on the window of EPSON Status Monitor 3 Figure 3 2 Error Indication on EPSON Status Monitor 3 NOTE The part number of the Ink Cartridges shown in the Status Monitor 3 screen differs by destination LE...

Page 32: ...er is in the CD R printing position at power ON Table 3 11 p 43 Paper CDR jam Flash For sheets of paper turn off the printer and then remove any jammed paper by hand For a CD or DVD remove the CDR tray Next press the Paper button on the printer or click the Eject button if it appears on this screen A paper jam has occurred Table 3 8 p 38 No paper Light Reload the paper and manually set the front t...

Page 33: ... Main Board 1 Connect the FFC correctly 4 3 2 Panel Assy Cover Open Sensor p 67 2 Is the Panel FFC damaged 2 Replace the Panel FFC 3 Is the Panel Board damaged 3 Replace the Panel Board P S ASSY 1 Is the P S ASSY connector cable not connected to CN3 on the Main Board 1 Connect the cable correctly 4 3 3 P S Assy p 71 2 Is the P S ASSY cable or the P S ASSY itself damaged 2 Replace the P S ASSY If t...

Page 34: ...2 CR Guide Shaft 1 Is their any dirt on the CR Guide Shaft Or is the shaft not adequately lubricated 1 Clean off any dirt on the shaft and apply adequate grease on it 6 1 3 Lubrication P 122 2 Is the PG cam chipped or broken 2 Replace the CR Guide Shaft 4 4 13 CR Unit p 89 CR Encoder 1 Is the Head FFC not connected to the CR encoder connector 1 Connect the Head FFC to the connector correctly 2 Is ...

Page 35: ... and the Main Board 1 Connect the FFC to the PF encoder and the Main Board 4 3 1 Main Board Unit p 64 2 Is the PF encoder chipped or broken 2 Replace the PF encoder 4 4 10 PF Encoder PF Scale p 86 PF Scale 1 Is the PF Scale not moving freely centered between the sides of PF encoder sensor 1 Install the PF Scale or PF encoder correctly 4 4 10 PF Encoder PF Scale p 86 2 Is their any dirt on the PF S...

Page 36: ...ny time Other than above symptoms Printhead 1 Is the Printhead damaged 1 Replace the Printhead 4 4 2 Printhead p 75 Main Board 1 Is the Main Board damaged 1 Replace the Main Board 4 3 1 Main Board Unit p 64 Table 3 6 Troubleshooting for Cover Open Error Occurrence Timing Symptom Failed Part Check Point Remedy Reference At power on The Printer Cover is closed but the Cover Open error occurs Cover O...

Page 37: ...fter the carriage home position is detected Ink Cartridge 1 Is the memory chip on the cartridge chipped or broken 1 Replace the ink cartridge Head FFC 1 Is the Head FFC not connected to the Head Board and CN10 CN11 and CN12 on the Main Board 1 Connect the Head FFC to the Head Board and the Main Board 4 4 13 CR Unit p 89 4 3 1 Main Board Unit p 64 Head Board 1 Are the CSIC terminals chipped or brok...

Page 38: ...the Torsion Spring 6 45 correctly Front Paper Guide Assy 1 Is the Torsion Spring 0 22 attached incorrectly 1 Install the PE Sensor Lever and Torsion Spring 0 22 correctly 4 4 17 Front Paper Guide Assy p 96 Multiple sheets are fed at a time ASF Unit 1 Is the Retard Roller Assy not moving properly during the feeding operation 1 Attach the Extension Spring 1 98 on the back side of the Retard Roller A...

Page 39: ... Roller and the Star Wheel Roller Front Paper Guide Pad 1 Is the Front Paper Guide Pad attached incorrectly 1 Install the pad correctly EJ Frame ASSY 1 Is the Star Wheel Holder detached 1 Attach the Star Wheel Holder correctly 4 4 9 EJ Frame Assy p 84 2 Is the EJ Frame Assy installed incorrectly 2 Install the EJ Frame Assy correctly 3 Has the EJ Frame Assy become deformed obstructing the paper pat...

Page 40: ...he Compression Spring 2 51 correctly to the ASF Frame and the Hopper 4 4 14 ASF Unit p 92 The LD Roller rotates normally but paper is not fed into the printer ASF Unit 1 Is there any paper dust on the LD Roller 1 Remove the paper dust on the LD Roller with a cloth moistened with alcohol If this does not solve the problem replace the ASF Unit The PF Motor drive force is not transmitted to the LD Ro...

Page 41: ...4 14 ASF Unit p 92 4 Is the Compression Spring 2 36 of the Change Lever detached 4 Replace the ASF Unit The LD Roller shaft is not set in the ASF home position and paper is always fed from the ASF Assy ASF Unit 1 Is the edge of the Change Lever chipped or broken 1 Replace the ASF Unit Table 3 9 Troubleshooting for No Paper Error Occurrence Timing Symptom Failed Part Check Point Remedy Reference LD...

Page 42: ... of the CDR Tray that contacts with the CDR Tray Sensor become cracked 1 Replace the CDR Tray CDR Tray Sensor 1 Is the CDR Sensor cable not connected to CN4 on the Main Board 1 Connect the cable to the connector on the Main Board 4 4 18 CDR Tray Sensor p 98 4 3 1 Main Board Unit p 64 2 Is the CDR Tray Sensor damaged 2 Replace the CDR Tray Sensor The CDR Tray center detection sequence is interrupte...

Page 43: ...pped or broken elements on the Main Board 1 Replace the Main Board 4 3 1 Main Board Unit p 64 Table 3 11 Troubleshooting for CDR Guide Error Occurrence Timing Symptom Failed Part Check Point Remedy Reference When printing on CDs DVDs The CDR Guide is set correctly but the error occurs CDR Sensor 1 Is the CDR Guide Sensor cable not connected to CN4 on the Main Board 1 Connect the cable to the cable...

Page 44: ... moistened with alcohol to a post card and carry out the following operations 1 Set the post card in the ASF with the attached cloth facing the LD Roller or Retard Roller 2 Then holding the top edge press the button on the operation panel to load the card 3 Repeat Step 2 The paper dust or oil stain on the LD Roller or the Retard Roller surface is removed If this does not solve the problem replace ...

Page 45: ...force transmitted to the EJ Roller Engage the gears in the paper feed mechanism correctly A malfunction of EJ Roller Is the EJ Roller moving correctly Engage the gears which transmit drive force to the EJ Roller Table 3 14 Troubleshooting Carriage Movement Problems Symptom Possible Cause Check Point Remedy Movements of the CR Unit during printing is abnormal Something interferes with the operation...

Page 46: ...e the CR Linear Scale A malfunction of the CR Encoder Is the Encoder FFC disconnected from the CR Encoder Board Connect the FFC to the board properly Is there any paper dust or dirt on the CR Encoder Remove any paper dust or dirt on the CR Encoder Is the Encoder FFC damaged or broken Replace the Head FFC Is the CR Encoder damaged or broken Replace the CR Unit PF Scale failure Is the PF Scale not m...

Page 47: ...Printhead Run a cleaning cycle and print a nozzle check pattern Repeat the operation several times Does the problem still appear Clean the Printhead surface with a cotton swab Ink cartridge failure Replace the ink cartridge with a new one and print a nozzle check pattern The printed pattern has no missing dots The cartridge is defective Use the new cartridge Poor connection of the Head FFC Check t...

Page 48: ... Unit p 124 Improper platen gap Is the platen gap gap between the Printhead surface and the platen not properly set Adjust the platen gap properly Some gear s is are damaged Is are the gear s in the paper feed and ASF mechanisms damaged Replace the damaged gear s Dirt on the Printhead is preventing nozzles from firing ink straight toward the paper Run a cleaning cycle and make a test print Repeat ...

Page 49: ...Board Connect the connector properly The fuse burned out Is the fuse F1 on the PS Board burned out Replace the PS Board Abnormal voltage output of the PS Board Check the voltage output from the PS Board Is it abnormal When the voltage is normal Replace the Main Board When the voltage is abnormal Replace the PS Assy Table 3 18 Troubleshooting Ink Supply Problems Symptom Possible Cause Check Point R...

Page 50: ...nthead Run a cleaning cycle and make a test print Repeat the operation several times Does the problem still appear Replace the Printhead Ink leakage clogging Is there any ink leakage found in the Printhead Reinstall the ink cartridge correctly If this does not solve the problem replace the ink cartridge or the Printhead Table 3 20 Troubleshooting Waste Ink Problems Symptom Possible Cause Check Poi...

Page 51: ...has not been installed correctly On the Windows PC go to My Computer Properties Hardware Device Manager Is the printer driver associated with Other Devices Uninstall the driver and reinstall it correctly following the instruction described in the User s Guide USB cable failure Replace the USB cable with a new one Does the USB communication between the printer and PC return to normal The USB cable ...

Page 52: ...Confidential C H A P T E R 4 DISASSEMBLY ASSEMBLY ...

Page 53: ... W A R N I N G Disconnect the power cable before disassembling or assembling the printer If you need to work on the printer with power applied strictly follow the instructions in this manual Wear protective goggles to protect your eyes from ink If ink gets in your eye flush the eye with fresh water and see a doctor immediately Always wear gloves for disassembly and reassembly to avoid injury from ...

Page 54: ...own in the No column appear throughout this chapter to indicate the screw type more clearly Table 4 1 List of Tools Tool Part No Phillips Screwdriver No 1 1080530 Phillips Screwdriver No 2 Flathead Screwdriver Precision Screwdriver 1 flathead Tweezers Long nose pliers Acetate tape 1003963 2 pins thinner than Ø2mm Strong tape Table 4 2 List of Screw Types No Description Image 1 C B S 3x6 2 C B S 3x...

Page 55: ... or component has almost reached the end of its service life replace the part after receiving prior approval from the user Clip Handle part 7mm 25mm 50mm Special Tool Table 4 4 Work Completion Checklist Classification Item Check Point Status Printer Unit Self test Is the operation normal OK NG On line Test Is the printing attempt successful OK NG Printhead print a nozzle check pattern Is ink disch...

Page 56: ...d side of the tape to the housing with the carriage locked at its lock position First move the carriage to the lock position then attach the tape to the housing Figure 4 3 Securing the Carriage Packing Ink Cartridge Are the ink cartridges installed correctly OK NG Waste Ink Pads Is the remaining capacity of the waste ink pads enough OK NG Carriage position Is the carriage located at the position w...

Page 57: ...Support Assy Securing the Stacker Assy tape 60mm x 1 pc fold one end by 5mm Attach the strong tape to the center of the Stacker Assy as shown below The edge and backside of the Stacker have irregular steps Make sure to attach the tape along the shape Figure 4 5 Securing the Stacker Assy Securing the Stacker Cover tape 60mm x 1 pc fold one end by 5mm Have a commercially available 280mm width x 80mm...

Page 58: ...Orientation Definition 4 1 8 How to Unlock the Carriage Unlocking the carriage is required for disassembly of some parts or components Carry out any of the following operations to unlock the carriage and move the carriage to other than its home position Power the printer and turn it off forcedly by disconnecting the power cable when the CR Unit is unlocked and moved away from the home position Tur...

Page 59: ...less otherwise specified this chapter describes Epson Stylus Photo R280 R285 R290 Refer to the pages mentioned below for the disassembly reassembly procedures of Epson Artisan 50 Epson Stylus Photo T50 T59 T60 P50 Table 4 5 Procedure Differences Parts name Reference page Epson Stylus Photo R280 R285 R290 Epson Artisan 50 Epson Stylus Photo T50 T59 T60 P50 Panel Assy The figures of the Panel Assy i...

Page 60: ...Stacker Assy Stacker Cover p 62 Upper Housing p 62 Main Board Unit p 64 Removing the Printer Mechanism p 72 Panel Assy Cover Open Sensor p 67 Printhead p 75 CR Scale p 77 APG Unit p 78 P S Assy p 71 Waste Ink Tray p 80 Waste Ink Pad p 80 Left Right Guide Stackers CDR Guide Sensor p 81 Ink System p 82 ASF Unit p 92 Upper Paper Guide p 94 CR Unit p 89 PF Motor p 87 EJ Frame Assy p 84 CR Motor p 87 F...

Page 61: ... of the Paper Support Assy from the bushing of the ASF Unit by pushing the bushing outward Then remove the Paper Support Assy disengaging the left shaft preventing the Edge Guide projection from hitting against the other parts Figure 4 10 Removing the Paper Support Assy Printer Cover Shaft right Shaft left When reinstalling the Paper Support Assy match the projection and hole of the Edge Guide the...

Page 62: ...acker Cover 4 2 4 Upper Housing Parts Components need to be removed in advance Printer Cover Paper Support Assy Removal procedure 1 Remove the four screws and remove the Upper Housing upward Screw C B P M3x10 tightening torque 5 7 kgf cm No 4 The numbers shown in the figure indicate the order of tightening the screws Figure 4 14 Removing the Upper Housing When installing the Stacker Assy insert th...

Page 63: ...ure 4 15 Removing the Front Housing When installing the Upper Housing be careful of the following Do not pinch the cables Tighten the screws in the order given in Fig 4 14 p 62 Match the ribs of the Upper Housing shown in Fig 4 14 p 62 with the grooves of the Lower Housing As shown in Fig 4 16 match the A part of the Front Housing with the screw box of the Lower Housing Figure 4 16 Installing Uppe...

Page 64: ...owing cables on the back of the Main Board Unit Power Supply Cable CR Motor Cable PF Motor Cable PE Motor Cable APG Sensor Cable Figure 4 18 Removing the Main Board Unit 1 Table 4 6 List of Connectors and their Destinations CN No Color Destination Number of pins CN3 White P S Assy 3pin CN4 White CDR Guide Sensor CDR Tray Sensor 4pin CN5 FFC Panel Board 8pin CN6 White PE Sensor 3pin CN7 Black APG S...

Page 65: ...in Fig 4 19 Insert the rib of the Main Board Unit into the positioning hole of the Cable Holder Frame as shown in Fig 4 19 Tighten the screws in the order given in Fig 4 19 Rib 3 Left Side Main Board Unit 1 2 Positioning Holes and Guide Pins Upper Side After connecting the cables secure them with acetate tape following the procedures below 1 Route the Power Supply Cable closely along the Lower Shi...

Page 66: ...gure indicate the order of tightening the screws 4 Remove the screw and remove the Main Board Unit Screw C B S M3x10 tightening torque 4 6 kgf cm No 2 Figure 4 22 Removing the Main Board C A U T I O N Do not apply unnecessary force on the screw receiving parts of the Lower Shield Plate M B as they are easy to deform When assembling or disassembling the Upper Shield Plate M B be careful of its shar...

Page 67: ... the CDR Sensor Cable from the Cover Open Sensor Cable Figure 4 23 Removing the Panel Assy 1 6 Remove the two screws Screw 3 pcs C B P M3x6 tightening torque 5 7 kgf cm No 1 Screw 3 pcs C B P M3x10 tightening torque 5 7 kgf cm No 4 7 From the bottom of the Printer insert a flathead screwdriver into the hole to disengage the tab and remove the Panel Assy Figure 4 24 Removing the Panel Assy 2 C H E ...

Page 68: ...s CDR cable faces its black side upward Cover Open Sensor cable faces its gray side upward 4 Route the cables through the two hooks of the Cable Holder Frame aligning the center of the tapes with the hooks Figure 4 25 Routing the Cables Upper Side CDR Sensor Cable Lower Side Cover Open Sensor Cable Hook A B C Ref Line Do not route the Panel FFC over the screw of the Cable Holder Frame Align the lo...

Page 69: ...ove the Panel Shield Plate from the Panel Unit Screw C B P M3x10 tightening torque 3 5 kgf cm No 4 Figure 4 29 Removing the Panel Board Buttons 2 6 Disengage the hook on the back of the Panel Board and remove the Panel Board Figure 4 30 Removing the Panel Board Buttons 3 7 Release the liens from the guide pins of the Housing Panel B and remove the sense from the Housing Panel B 8 Disengage the nin...

Page 70: ...e Panel Shield Plate to the Open Sensor Holder match the hook and guide pins with the positioning holes shown in Fig 4 32 and insert the Panel Shield Plate into the groove of the Open Sensor Holder to secure the Panel Shield Plate Figure 4 32 Installing the Panel Unit Attach the Panel FFC with double sided tape along with the reference line shown in Fig 4 29 p 69 When installing the Panel Board ma...

Page 71: ... acetate tape and remove the ferrite core from the groove of the Lower Housing 2 Remove the screw that secures the P S Assy and remove the P S Assy from the Lower Housing Screw C B P M3x10 tightening torque 5 7 kgf cm No 4 Figure 4 34 Removing the P S Assy When installing the P S Assy put the ferrite core into the groove of the Lower Housing and secure it with acetate tape as shown in Fig 4 34 A D...

Page 72: ...re 4 37 Removing the Ink Tube Cover C A U T I O N Be careful of the four sharp edges shown in the figure below when assembling or reassembling Printer Mechanism Handling Precaution When lifting the printer hold parts shown in the figure below to prevent the frame from deforming Figure 4 35 Printer Mechanism Handling Precaution 1 Sharp Edge C A U T I O N Do not touch the PF Scale with bare hands or...

Page 73: ...ning torque 5 7 kgf cm No 3 Figure 4 40 Removing the Cover Case 6 Disconnect the connector of the CDR Guide Sensor Figure 4 41 Removing the Printer Mechanism 2 7 Remove the five screws and remove the Printer Mechanism Screw C B P P2 M3x8 tightening torque 5 7 kgf cm No 9 The numbers shown in the figure indicate the order of tightening the screws Figure 4 42 Removing the Printer Mechanism 3 C A U T...

Page 74: ...ube contacts with the rib Figure 4 43 Cautions of inserting the Waste Ink Tube Match the positioning holes with guide pins two pairs shown in Fig 4 42 p 73 Tighten the screws in the order given in Fig 4 42 p 73 Make sure the Waste Ink Tube or cables are not pinched between the Printer Mechanism and the Lower Housing Top end of Waste Ink Tube Waste Ink Tray Waste Ink Tube Tube of Waste Ink Tray Rib...

Page 75: ...moving the Head FFC Cover 3 Disconnect the CSIC FFC from the connector on the CSIC Board Figure 4 46 Removing the CSIC FFC 4 While disengaging the hook of the Head FFC Cover Inner with a flathead screwdriver slide the Head FFC Cover Inner upward and remove it Figure 4 47 Removing the Head FFC Cover Inner C A U T I O N When removing the Head FFC Cover and the Head FFC Cover Inner do not use tools w...

Page 76: ...SIC Board Figure 4 49 Removing the CSIC Assy 2 8 Remove the three screws and remove the Printhead Screw C B P M2 6x8 tightening torque 3 5 kgf cm No 5 The numbers shown in the figure indicate the order of tightening the screws Figure 4 51 Removing the Printhead 1 Hook A Back Side CSIC Assy Special Tool Hook B Back Side CSIC Assy Hook B Hook A Removal Direction Special Tool Back Side of CSIC Assy C...

Page 77: ...om the hook on the right side of the Main Frame 4 Pull out the CR Scale from the slit of the CR Unit 5 Turn the CR Scale 90 degrees in the direction of the arrow and remove the CR Scale from the hook Figure 4 53 Removing the CR Scale Tighten the screws in the order given in Fig 4 51 A D J U S T M E N T R E Q U I R E D Whenever the Printhead is removed replaced the required adjustments must be carr...

Page 78: ... to lose the gears and remove the APG Unit Screw C B S M3x6 tightening torque 7 9 kgf cm No 1 The numbers shown in the figure indicate the order of tightening the screws Figure 4 55 Removing the APG Unit 2 Remove the Combination Gear 10 15 2 Figure 4 56 Removing the Combination Gear 10 15 2 Install the CR Scale with its cut corner facing upward Hitch one end of the Torsion Spring to the hole of th...

Page 79: ...d the right PG Cam on the CR Shaft Figure 4 57 Reinstalling the APG Unit 1 2 Put the pin through the positioning holes of the Spur gear 28 8 and the APG Unit Figure 4 58 Reinstalling the APG Unit 2 Pin 1 Positioning Hole Right PG Cam Spur Gear 28 8 APG Unit Pin Front Positioning Hole of Spur Gear 28 8 Back Positioning Hole of APG Unit 3 Install the APG Unit to the Main Frame Figure 4 59 Reinstalli...

Page 80: ...echanism Removal procedure 1 Remove the three Waste Ink Pads from the trays Figure 4 62 Removing the Waste Ink Pad C A U T I O N When removing the Waste Ink Tray take extra care not to spill ink and contaminate the printer and surroundings A D J U S T M E N T R E Q U I R E D Whenever the Waste Ink Tray is replaced the required adjustments must be carried out Refer to 5 1 2 Required Adjustments p 1...

Page 81: ...moval procedure Left Right Guide Stacker Removal 1 Remove the screw and remove the Left Guide Stacker Screw C B P M3x8 tightening torque 5 7 kgf cm No 3 2 Remove the screw and remove the Right Guide Stacker Screw C B P M3x8 tightening torque 5 7 kgf cm No 3 Figure 4 64 Removing the Left Right Guide Stacker A D J U S T M E N T R E Q U I R E D Whenever the Waste Ink Pad is replaced the required adju...

Page 82: ...holes and guide pins indicated with two pairs When installing the Right Guide Stacker match the positioning holes and guide pins indicated with two pairs in Fig 4 65 Figure 4 65 Installing the Left Right Guide Stacker RightGuide Stacker Left Guide Stacker Back Side Hooks Right Guide Stacker CDR Guide Sensor C A U T I O N Take extra care not to spill ink and contaminate the surroundings Also when r...

Page 83: ...ystem from the guide pin of the ASF Unit Figure 4 69 Removing the Ink System 2 5 Remove the Ink System in the following procedures 1 Slide it to the right 2 Rotate it in the direction of the arrow 1 and release the pump part from the Main Frame 3 Pull it out toward you arrow 2 Figure 4 70 Removing the Ink System 2 2 Hole 1 Cap section Pump Rear Side Guide Pin Cap When installing the Ink System be ...

Page 84: ...of the Front Frame and peel off the double sided tape Figure 4 72 Removing the Head FFC 4 Disconnect the PF Encoder FFC from the PF Encoder 5 Remove the two screws disengage the two hooks of the Cable Holder Frame from the Front Frame and Main Frame and remove the Cable Holder Frame 6 Screw C B S M3x6 tightening torque 7 9 kgf cm No 1 The numbers shown in the figure indicate the order of tightenin...

Page 85: ... Frame 1 Positioning hole and Guide Pin 2 EJ Frame Assy Removal Direction Cable Guide CDR Sensor Cable When installing the EJ Frame Assy be careful of the following Lubrication is required See the page given below for the lubrication information Lubrication of EJ Frame Assy p 123 As shown in Fig 4 77 insert the two bearings of the EJ Frame Assy over the EJ Roller Shaft Figure 4 77 Reinstalling the...

Page 86: ...nt Frame 2 When installing the Cable Holder Frame match the two hooks of the Cable Holder Frame with the positioning holes of the Main Frame and Front Frame as shown in Fig 4 73 p 84 and tighten the screws in the order given in the figure When installing the Cable Holder Frame attach the PF Encoder FFC along with the reference line shown in Fig 4 74 p 84 When installing the Front Frame match the p...

Page 87: ...F Motor 4 4 12 CR Motor Parts Components need to be removed in advance Printer Cover Paper Support Assy Upper Housing Main Board Unit Panel Assy Cover Open Sensor Printer Mechanism Removal procedure 1 Remove the Extension Spring of the Driven Pulley Assy from the rear side Figure 4 82 Removing the Extension Spring 2 Remove the Driven Pulley Assy and remove the Timing Belt from the Pinion Gear of t...

Page 88: ...tor CR Motor Cable Rear Side 1 2 CR Motor When routing the CR Motor Cable and PE Sensor Cable refer to Fig 4 86 and follow the steps below 1 Wrap the CR Motor Cable with the acetate tape A 30 mm at the position of 100 mm away from the acetate tape that is on the CR Motor side 2 Tie the two cables together with the acetate tape B 20 mm at the position 60mm 40mm away from the acetate tape A PE Senso...

Page 89: ...e screw and turn the Parallelism Bushing L clockwise to the maximum Figure 4 88 Removing the CR Unit 1 Lubrication is required See the page given below for the lubrication information Lubrication of Driven Pulley p 122 When installing the CR Motor install it so that the print side faces upwards Figure 4 87 Reinstalling the CR Motor A D J U S T M E N T R E Q U I R E D Whenever the CR Motor is repla...

Page 90: ...Shaft release from the bushing in the 1 2 order and remove the CR Unit with the Shaft from the Main Frame Figure 4 90 Removing the CR Unit 3 7 Remove the CR Shaft from the CR Unit Figure 4 91 Removing the CR Unit 4 8 Remove the Timing Belt from the CR Unit Figure 4 92 Removing the CR Unit 5 9 Disconnect the FFC from the CR Encoder connector pull out the FFC from the slit of the CR Unit and remove ...

Page 91: ...ain Frame Figure 4 95 Reinstalling the CR Unit A D J U S T M E N T R E Q U I R E D Whenever the CR Unit is removed or replaced the required adjustments must be carried out Refer to 5 1 2 Required Adjustments p 107 Lumpy side Inner side Flat side Outer side Up Lumpy on both inner outer side CR Unit Guide Part C H E C K P O I N T Remove the Cartridge Cover following the steps below The Hinge Cover C...

Page 92: ... upward to remove it disengaging the five hooks Figure 4 97 Removing the LD Roller Guide 1 4 Remove the Torsion Spring 137 7 from the LD Roller Guide Figure 4 98 Removing the LD Roller Guide 2 Removing the ASF Unit 1 Release the following cables from the ASF Unit CR Motor Cable PF Motor Cable PE Motor Cable Figure 4 99 Releasing the Cables 2 Remove the two screws on the rear side Screw C B S P4 M3...

Page 93: ...mbination Gear tip of the Change Lever and the two hooks are securely attached Also make sure that there is appropriate space at both the left and right of the Change Lever Tighten the screws in the order given in Fig 4 100 p 92 Install the LD Roller following the procedure below Make sure to apply grease referring to the page given below Lubrication of the ASF Unit p 126 1 Install the LD Roller a...

Page 94: ...er Guide C A U T I O N Be sure to follow the procedure below to remove the Upper Paper Guide to avoid damaging the PE Sensor Lever It is recommended to place a transparent sheet between the Upper and Front Paper Guides to avoid scratching the roller Do not touch the roller surface with bare hands as it can adversely affect the print quality Spring Hook Rear Side C H E C K P O I N T The figure belo...

Page 95: ...y Parts Components need to be removed in advance Printer Cover Paper Support Assy Upper Housing Main Board Unit Removal procedure 1 Disengage the two hooks and remove the APG Sensor Assy Figure 4 106 Removing the APG Sensor A D J U S T M E N T R E Q U I R E D Whenever the Front Paper Guide Assy is removed or replaced the required adjustments must be carried out Refer to 5 1 2 Required Adjustments ...

Page 96: ...g L Screw C B S P2 M3x8 tightening torque 6 8 kgf cm No 9 Figure 4 107 Removing the Parallelism Bushing L 2 Disconnect the connector of the PE Sensor Cable on the rear side of the printer 3 Remove the screw that secures the Front Paper Guide Assy Screw C B S M3x6 tightening torque 7 9 kgf cm No 1 Figure 4 108 Removing the PE Sensor Cable 4 Pull out the EJ Ground Spring to the front side Figure 4 1...

Page 97: ...formation Lubrication of Front Paper Guide Assy p 123 1 2 Removal Direction Front Paper Guide Assy Cutout 2 When installing the Front Paper Guide Assy pull out the CDR Tray Sensor cable as shown below Figure 4 111 Routing the CDR Tray Sensor Cable Attach the long foot of the EJ Ground Spring as follows 1 put it through the gap under the portion contacts with the EJ Roller 2 let it contact with the...

Page 98: ...grees in the direction of the arrow to disengage its another hook and pull it out from the hole to remove it together with the CDR Guide Sensor Figure 4 114 Removing the CDR Tray Sensor Place the four tips of the Front Paper Guide Pad on the Waste Ink Pad Figure 4 113 Installing Front Paper Guide Pad When installing Parallelism Bushing L match the positioning hole with the guide pin shown in Fig 4...

Page 99: ...4 Peel off the acetate tape A B to separate the CDR Sensor Cable from the Cover Open Sensor Cable Figure 4 115 Removing the Panel Assy 1 5 Remove the two screws Screw 3 pcs C B P M3x6 tightening torque 5 7 kgf cm No 1 Screw 3 pcs C B P M3x10 tightening torque 5 7 kgf cm No 4 6 From the bottom of the Printer insert a flathead screwdriver into the hole to disengage the tab and remove the Panel Assy ...

Page 100: ...Holder Frame respectively The cables orientation must be as follows CDR cable faces its black side upward Cover Open Sensor cable faces its gray side upward 4 Route the cables through the two hooks of the Cable Holder Frame aligning the center of the tapes with the hooks Figure 4 117 Routing the Cables Upper Side CDR Sensor Cable Lower Side Cover Open Sensor Cable Hook A B Ref Line Do not route th...

Page 101: ...anel Shield Plate and remove the Panel FFC 5 Remove the two screws and remove the Panel Shield Plate from the Panel Unit Screw C B P M3x10 tightening torque 3 5 kgf cm No 4 Figure 4 121 Removing the Panel Board Buttons 2 6 Disengage the hook on the back of the Panel Board and remove the Panel Board Figure 4 122 Removing the Panel Board Buttons 3 7 Release the three hooks and remove the PS button t...

Page 102: ... and guide pins with the positioning holes shown in Fig 4 124 and insert the Panel Shield Plate into the groove of the Open Sensor Holder to secure the Panel Shield Plate Figure 4 124 Installing the Panel Unit Attach the Panel FFC with double sided tape along with the reference line shown in Fig 4 121 p 101 When installing the Panel Board match the guide pin with the positioning hole shown in Fig ...

Page 103: ...Confidential C H A P T E R 5 ADJUSTMENT ...

Page 104: ...he main board to apply settings for the target market Select the target market The selected market settings are automatically written to the main board Adjustment Program Head ID input This must be carried out after replacing the printhead in order to enter the new printhead ID Head ID that reduces variation between printheads Enter the ID printed on the Head QR code label attached on the printhea...

Page 105: ...actly 5mm away from the paper edge for each of the left right top and bottom PF adjustment Corrects variations in paper feed accuracy when using the Microweave to achieve higher print quality A PF adjustment pattern is printed Examine the printout patterns and select the value for the best pattern The correction value is registered Adjustment Program BRS PFP adjustment This adjustment is made to e...

Page 106: ...user due to the maintenance error After replacing the Waste Ink Pad reset the counter to its default Adjustment Program Ink charge This must be carried out after replacing the printhead in order to fill ink inside the new printhead The printhead becomes ready for print Filling ink inside the printhead is automatically performed Print a nozzle check pattern to check if all nozzles are firing ink pr...

Page 107: ...ultiple adjustments must be carried out be sure to carry out them in the order given in the Priority row Table 5 4 Adjustment Items Priority 1 2 3 4 5 6 7 8 9 10 11 12 13 14 15 16 17 18 PG adjustment EEPROM data copy Initial setting USB ID input Head ID input Waste ink pad counter Ink charge Initialize PF deterioration offset Disenable PF deterioration offset Top margin adjustment Head angular adj...

Page 108: ...O O O O O Replace O O O O O O O O O O Paper Eject Frame Assy Remove O O O Replace O O O Printer Mechanism Remove Replace O O O O O O O O O O O Table 5 4 Adjustment Items Priority 1 2 3 4 5 6 7 8 9 10 11 12 13 14 15 16 17 18 PG adjustment EEPROM data copy Initial setting USB ID input Head ID input Waste ink pad counter Ink charge Initialize PF deterioration offset Disenable PF deterioration offset ...

Page 109: ... Angular Adjustment Two patterns are printed as shown below Band pattern The following pattern is printed The lines below 0 80 are printed while the carriage moves from the home to the other side and lines below 80 0 are printed while the carriage returns to the home Figure 5 2 Head Angular Adjustment Band Pattern How to Judge Examine the printout patterns and enter the value 16 to 16 for the most...

Page 110: ...formation If no appropriate pattern is found reassemble replace the Print Head 5 2 3 Bi D Adjustment The pattern shown below is printed for each of the 7 print modes Figure 5 4 Bi D Adjustment Pattern How to Judge Find the pattern with no gaps or overleaps of the left and right pattern and enter the value of that pattern Additional information If an appropriate pattern is not printed enter the nea...

Page 111: ...the left figure enter 0 top 0 right 5 bottom and 3 left First dot position adjustment How to Judge Enter the value for the point where the PW adjustment pattern line and the First dot position adjustment pattern line overlap on the left of the paper Example In the left figure enter 2 since the lines overlap at 2 position 8 7 6 5 4 3 2 1 0 1 2 3 4 5 6 7 8 9 10 11 12 13 14 15 16 17 18 19 5 4 3 2 1 0...

Page 112: ...s PF for bottom margin area Patterns are printed as shown below Figure 5 7 PF Adjustment bottom margin area Pattern How to Judge Enter the value for the one that has no gap or overlap between the upper block and the lower block Example In the above figure 0 should be selected Additional information In case that all patterns have gap or overlap select the value for the pattern which has the least g...

Page 113: ...ial thick paper PGPP Postcards Matte etc Cleaning CR measurement VH detection CR home position seek PG typ Mechanical default 1 7 Plain paper EPSON special thin paper SF etc Rubbing with PG1 2 is avoided PG 2 35 Envelopes Rubbing with PG1 2 and 1 7 is avoided PG 4 2 CD R printing At ink replacement C A U T I O N The thickness gauge to be used must be free from dust and dirt and from deformation Be...

Page 114: ...ontact with gauge 7 Pull the Timing Belt to move the carriage to the right end 8 If the carriage comes in contact with the gauge adjust the Right Parallelism Bush to raise the carriage to a position where the Printhead does not come in contact with gauge 9 Move the carriage to the middle area of the platen and place 1 3 mm thickness gauges at the left and right ends of the platen 10 Pull the Timin...

Page 115: ...scale 1453980 BRS Matte Paper Heavyweight A4 PFP Premium Glossy Photo Paper 4 x 6 C A U T I O N Install the driver of the scanner to the PC in advance As the profile required for the adjustment is not prepared for scanners other than the ones specified below BRS PFP Adjustment can not be carried out by the other scanners Table 5 7 Specified Scanner for BRS PFP Adjustment Model Name Sensor type Rem...

Page 116: ... Printing the BRS Adjustment Pattern Scanning the BRS Adjustment Pattern Printing the PFP Adjustment Pattern Scanning the PFP Adjustment Pattern Printing the PFP Check Pattern Judging the Check Pattern c d e C H E C K P O I N T When an error is displayed in the Adjustment program check the points below then carry out the adjustment again If an error occurs even after checking the points below chan...

Page 117: ... check that the document table glass and the scale is clean and the scale adjustment pattern is not tilted then repeat from step 5 Figure 5 14 PFP Base Scale and BRS Adjustment Pattern Position Viewed from the document glass of the scanner C H E C K P O I N T In the Adjustment program the identification code is used to distinguish whether the printer that printed the pattern and the printer to reg...

Page 118: ... are written to the serial flash ROM If an error occurs check that the document table glass and the scale is clean and the scale adjustment pattern is not tilted then repeat from step 4 Figure 5 16 PFP Base Scale and PFP Adjustment Pattern Position When viewed from the document glass of the scanner C H E C K P O I N T In the Adjustment program the identification code is used to distinguish whether...

Page 119: ...g 5 18 check that there is no white or overlapped bands in all the check patterns If any bands are found carry out the steps below 1 Re print the check pattern to see if the bands appear again 2 When bands appear in Step 1 try the PFP adjustment again from the beginning 3 When bands appear even after the re adjustment in step 2 determine that it is the mechanism failure and carry out check reassem...

Page 120: ...Confidential C H A P T E R 6 MAINTENANCE ...

Page 121: ...e ink consumption amount for manual cleaning varies depending on the mode 6 1 2 2 Maintenance request error Ink is consumed also for cleaning and flashing operations When the ink is used for cleaning and flashing operations the ink is drained to the Waste Ink Pads via the Pump The amount of the waste ink is stored as the waste ink counter into the EEPROM When the waste ink counter has reached the ...

Page 122: ...pes of oil or grease may damage the component and adversely affect the printer operation Observe the specified amount Never apply excess Table 6 1 Specified Lubricant Type Name EPSON code Supplier Grease G 71 1304682 EPSON Grease G 77 1455324 EPSON Lubrication Points Four points where contact with the Main Frame Type G 71 Application Amount ø 1 x 4 mm x 4 points Application Timing Apply before ins...

Page 123: ...ation Timing Apply after installing the Front Paper guide Remarks Apply with Injector Make sure that the coated part of the PF Roller Shaft and rubber rollers on the EJ Roller are free from grease Front Paper Guide Assy left Application Point Application Point Front Paper Guide Assy right Application Point Lubrication Points EJ Frame Assy Busing Left Right back side Type G 71 Application Amount ø1...

Page 124: ...pplication Amount 160 20mg Application Timing Apply after installing the CR Unit Remarks Apply with Injector Do not apply to the both ends 40mm from edge Move the CR Unit the left right to spread the grease evenly Rib Notch for spring Front Frame contact point right Application Point 2 1 5 mm from the top edge 2 10 mm from the top edge 1 Main Frame upper rear Except both ends 40mm Application Poin...

Page 125: ... G 71 Application Amount 210 20mg x 2 points Application Timing Apply before installing the CR Unit Remarks Apply with Injector Apply grease from the two lubrication holes Make sure that the Timing Belt is free from grease Contact point between CR Unit and CR Shaft 1 CR Shaft Application Point CR Shaft Contact point between CR Unit and CR Shaft 2 Application Point Apply from the holes Lubrication ...

Page 126: ...h Cotton bud Rim of the APG Unit Spur Gear 28 8 Application Point Hole for LD Roller on ASF Unit Application Point Clutch side Lubrication Points Contact point between the LD Roller Shaft and the Hopper ASF Gear Type G 71 Application Amount ø 1 x 10mm x 3 points Application Timing Apply before installing the ASF Unit Remarks Apply with Injector Rotate the LD Roller Shaft so that the Curved Flat su...

Page 127: ...rication Points Contact point between the LD Roller and Hopper ASF Gear Type G 71 Application Amount ø 1 x 1 4 circle x 4 points Application Timing Apply before assembling the LD Roller Holder Remarks Apply with Injector Rotate the LD Roller Shaft so that the Curved Flat surface face up then apply grease to the specified parts LD Roller Shaft Curved surface Ribs beside the LD Roller Application Po...

Page 128: ...Confidential C H A P T E R 7 APPENDIX ...

Page 129: ...n Stylus Photo T50 T59 T60 P50 Revision C Chapter 7 Appendix 7 1 Exploded Diagram Parts List 129 Confidential 7 1 Exploded Diagram Parts List This manual does not provide exploded diagrams or parts list For the information see SPI Service Parts Information ...

Reviews: