background image

Manual cooking/baking 

59 

7


Manual cooking/baking 

7.1


Manual cooking in the hot-air unit 


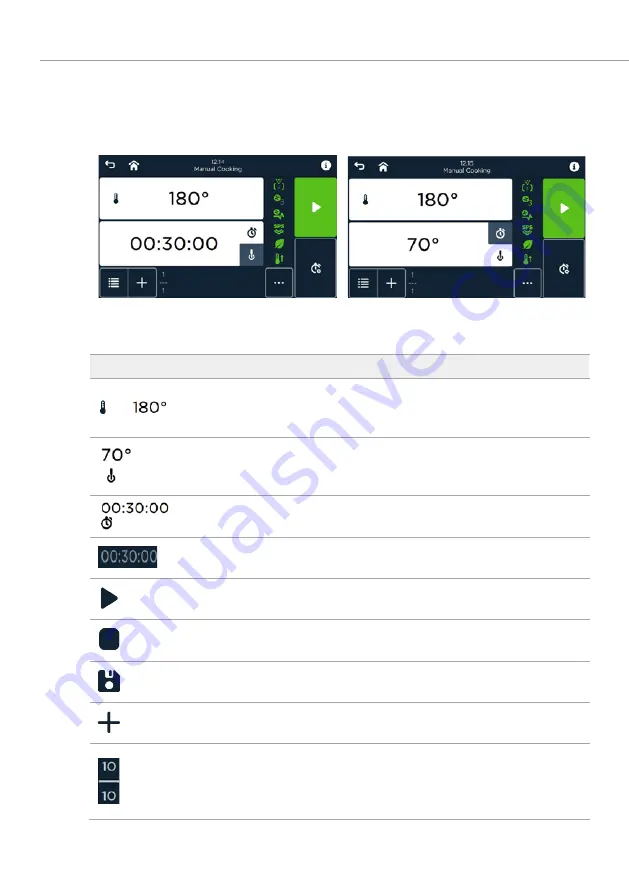
Fig. 33:  Screens Manuelles Kochen mit Garzeit (Manual cooking with cooking time) (left) and 

Kerntemperaturkontrolle (Core temperature control) (right) 


Symbol 

Designation/function 


Field Cooking chamber temperature 


Display and select the cooking chamber 
temperature (°C/°F) 


Field Core temperature 


Display and select the core temperature (°C/°F) 
(with CT sensor). 


Field Cooking time 


Display and select the cooking time (h:min:sec) 


Field Step cooking time with programme time 
(below) 


Field Start programme 


Starts the programme. 


Field Stop programme 


End programme. 


Field Save 


Saving programme. 


Field Add programme step 


Add (New) programme step.  


Display field Programmschritt von Schritten 
(programme step procedure) 


Current programme step is displayed at the top. 


The total number of steps is displayed below. 

Summary of Contents for Joker

Page 1: ...JOKER with MT controller Sizes 6 23 6 11 6 43 ENERGY TYPE ELECTRICS Translation of the original operating instructions Subject to technical changes Read carefully before use Keep safe for future use ...

Page 2: ... tips and recipes Please also feel free to contact our application advice department T 49 0 8141 395 150 E application eloma com You can contact us almost 24 hours a day 7 days a week 365 days a year T 49 0 8141 395 188 E service eloma com Our Customer Service department will be happy to help you with any question on our products T 49 0 35023 63 888 E sales eloma com Please refer to the terms and ...

Page 3: ...pliance 17 3 2 Cooking chamber module size position operation and dimensions 19 3 3 Operation module 21 3 4 Water module 22 3 5 Module cleaning 24 3 6 Design module 26 4 Appliance structure and functions 28 4 1 Appliance general structure 28 4 2 Operation module structure 29 4 3 Operating modes and functions 31 5 Startup 41 5 1 Setting the date and time 43 5 2 Setting language and keyboard 44 5 3 ...

Page 4: ...Last 20 on the home screen 175 9 2 Load 20 in the home screen direct access to programmes 180 10 Programme list 184 10 1 Starts the programme 184 10 2 Programme list options 184 10 3 Searching changing and starting programmes 186 11 Favourites 190 11 1 Starts the programme 190 11 2 Favourite options 190 11 3 Searching changing and starting favourites 192 12 Weekly programming PRO 196 12 1 Adding a...

Page 5: ...1 QuickMode 255 16 2 Directmode 259 17 Settings and Service 263 17 1 Changing the general settings 265 17 2 Protocol management 274 17 3 Setting changing parameters 277 17 4 Upload DownloadManager 290 17 5 Sound management 293 17 6 Customisation 294 17 7 Cleaning and water treatment 295 17 8 Network settings 298 18 Error messages troubleshooting 299 18 1 Error messages and elimination of errors 29...

Page 6: ...lity The device must not be modified technically without the approval of the manufacturer supplier Any warranty or guarantee cover will be rendered null and void in case of unauthorised technical modifications In that case the safety of the appliances will no longer be guaranteed Warranty or liability claims for personal injury or material damage cannot be asserted if caused by one or more of the ...

Page 7: ...wnership Any missing operating manual can be requested from the manufacturer or supplier Every update or supplement published by the manufacturer must be added to the operating instructions Please also add any additional instructions including supervisory and reporting obligations to meet operating requirements e g with regard to work organisation work procedures or the staff employed 1 3 2 Struct...

Page 8: ... Failure to observe will lead to serious injuries Measure to prevent the hazard CAUTION Type and source of hazard Consequence Failure to observe will lead to minor injuries Measure to prevent the hazard NOTE Type and source of hazard Consequence Failure to observe will lead to material damage Measure to prevent the hazard INFORMATION Tip on operation Tab 2 Meanings of the pictograms and signal wor...

Page 9: ...p to 150 C WARNING Hot cooked product hot fluids in insert containers WARNING Do not open the door whilst the autoclean programme is in progress MARKING Equipotential bonding connection MARKING Connections for hard and soft water MARKING Connections for cleaner and rinsing agent MARKING Waste water connection MARKING Completed device testing and quality control Tab 3 Overview of the device signs u...

Page 10: ...General information 10 1 3 3 Use of figures INFORMATION Figures are shown as examples and may differ from the appliances delivered ...

Page 11: ...o have received instruction regular training and safety briefing Make sure that JOKER is only operated and cleaned by people who have fully and thoroughly read the operating instructions for the appliance and understood the relevant safety notes Make sure that the following category of persons only operates the JOKER if supervision and instruction is provided by a person with the aforementioned qu...

Page 12: ... an authorised Eloma service partner and or qualified specialists only DANGER Detection of smoke development and fires Stop the energy supply and ventilate the installation location immediately Notify the fire services Extinguish fat fires with a fire extinguisher for class F fires Never use water Extinguish other fires e g with an ABC extinguisher CO2 extinguisher or an extinguishing agent suitab...

Page 13: ...from hot liquids in cooking containers Wear protective clothing e g long sleeved clothing and protective gloves Close the cooking chamber door carefully so that hot water does not run out of the syphon overflow WARNING Risk of scalding from hot steam Wear protective clothing e g long sleeved clothing and protective gloves Open the cooking chamber door carefully Allow steam to escape CAUTION Risk o...

Page 14: ... accordance with the regional regulations Do not spray aerosols near this appliance while it is running CAUTION Material damage due to improper or non intended use Use accessories in the cooking chamber properly in order to prevent damage to the door glass Make sure that there are no objects in the pivoting range of the cooking chamber door Do not operate the device at temperatures below 4 C Remov...

Page 15: ...ng the canisters for cleaner or rinsing agent Wear protective clothing e g long sleeved clothing protective gloves and safety goggles With assisted manual and semi automatic cleaning Allow the device to cool down slowly before cleaning Wear protective clothing e g long sleeved clothing protective gloves and safety goggles Do not inhale any spray from the cleaner With fully automatic cleaning autoc...

Page 16: ...5 Equipment on movable castors or roller frames CAUTION Risk of injury from electric shock Do not use the cable to move the device CAUTION Risk of toppling and making uncontrolled movements for appliances on castors rolling base frames as a result of an uneven floor Only move the device on an even floor max 10 inclination Move the device carefully After transport secure the castors rolling base fr...

Page 17: ...ented by modularity flexibility and design which stand out as the three basic features of the new JOKER Eloma does not impose any standard to its customers but offers modular configuration options for them to decide what is actually needed JOKER is a reliable space saving tool to work with This multifunctional appliance supports the kitchen team in all work processes thus ensuring that the user ca...

Page 18: ...use The appliance is solely intended for the thermal preparation of food Foodstuffs containing highly flammable and combustible substances e g alcohol are excluded The device can be operated without supervision The appliance is intended for commercial use ...

Page 19: ...4 400 mm 15 3 4 400 mm 15 3 4 Volumes 0 065 m 3 0 088 m 3 0 096 m 3 Outer dimensions Left hand operation Hinge right right right Width W 650 mm 25 5 8 650 mm 25 5 8 650 mm 25 5 8 Depth D 625 mm 24 5 8 755 mm 29 3 4 805 mm 31 3 4 Height H 560 mm 22 560 mm 22 560 mm 22 Top operation Hinge on the left right on the left right on the left right Width W 520 mm 20 1 2 520 mm 20 1 2 520 mm 20 1 2 Depth D ...

Page 20: ...5 5 8 Depth D 625 mm 24 5 8 755 mm 29 3 4 805 mm 31 3 4 Height H 560 mm 22 560 mm 22 560 mm 22 Number of inserts 5 1 x GN2 3 4 1 x BN43 5 1 x GN1 1 Slide in inserts distance mm inch 67 2 64 84 3 31 67 2 64 Inner and outer casing Stainless steel rustproof 1 4301 Weight kg lbs Device Packaging 70 155 16 35 76 167 18 40 83 185 18 40 Tab 4 Appliance data overview ...

Page 21: ...cally is the code word here Using the functions of the MT module you can not only bake and cook but also plan and standardise processes With the MT technology you can keep not only JOKER but your daily work as well completely under control Functions extract Start up Settings Weekly programming PRO PRO Multi Cooking Multi Baking Multifunctionality such as fermentation and defrosting functions depen...

Page 22: ...modularity 22 3 4 Water module 1 Directional valve 2 Orifice plate 3 Flow measuring device 4 Complete water supply pipe Fig 1 Hydraulic diagram of the water module live steam system humidification depending on the mode selected ...

Page 23: ...tion pipe according to the set humidification quantity and is evaporated at the appropriate cooking chamber temperature by the heated recirculating air that is flowed in by the fan 3 4 2 Fresh steam system The wish Saving time energy and water The solution the live steam system developed by Eloma JOKER thus generates steam directly in the cooking chamber Humidity can be set with the utmost accurac...

Page 24: ...Directional valve 2 Orifice plate 3 Injection pipe 4 Pressure switch 5 Pump 6 Drainage pump Fig 2 Hydraulic diagram for the autoclean PRO cleaning module Both liquid cleaners can be used for this fully automatic circulation system with extremely low consumption water detergent energy ...

Page 25: ...al valve 2 Check valve 3 Directional valve Fig 3 Hydraulic diagram for the hose spray nozzle cleaning module Simple and effective for slight impurities e g crumbs or flour after baking use the handy hose spray nozzle with automatic return to quickly rinse out the cooking chamber ...

Page 26: ...ppliance s rear panel can be customised by the user as a design module by attaching static advertising or a screen to it in addition to its actual purpose of safely covering and protecting the equipment connections Fig 4 Personalised design of the appliance s rear panel design proposal ...

Page 27: ...ed to the appliance so that it can be optimally used as a storage space Fig 5 Appliance with left hand operation provided with tray 3 6 3 Unit colour With a minimum purchase quantity of 10 units or more the appliances can be supplied with outer casings and door frames in the colour desired by the customer ...

Page 28: ...g top operation right hand stop 1 Door handle with quick release 2 Cooking chamber door 3 Intermediate door 4 Inner door 5 Drip tray 6 Cooking chamber 7 Hose spray nozzle optional 8 Connection for external KT sensor optional 9 Operation module 10 LED lighting 11 Supply air opening 12 Exhaust air pipe 13 Hanging rack 14 Locking block ...

Page 29: ...ogrammes Weekly programming PRO Multi Cooking PRO Cleaning and Care Settings and Service Manual baking Last R 20 Programme list Favourites Special programmes Weekly programming PRO Multi Baking PRO Cleaning and care Settings and service Manual cooking Manual baking Last R 20 Programme list Favourites Special programmes Weekly programming PRO Multi Cooking Baking PRO Cleaning and care Settings and ...

Page 30: ...mming PRO Multi Cooking PRO Cleaning and Care Settings and Service With humidification module Manual baking Last R 20 Programme list Favourites Special programmes Weekly programming PRO Multi Baking PRO Cleaning and care Settings and service With live steam system modules Manual cooking Manual baking Last R 20 Programme list Favourites Special programmes Weekly programming PRO Multi Cooking Baking...

Page 31: ...ing chamber atmosphere This prevents the surface of the cooked product from drying off or out and accelerates the heat transfer in the cooked product When cooking with convection hot air or forced humidification combi humidification and Vario humidification the following special programmes can be set Low temperature cooking Delta T cooking Regeneration Baking with steam injection Hold Fermentation...

Page 32: ...ff key 2 Open close the cooking chamber door to the pre locking position or open it slightly Switch off the appliance in case of longer breaks in operation or put it out of service Press the On Off key 1 Close the operating company s water connection 2 Open the cooking chamber door 3 NOTICE Power outage Local or regional power failure Characteristics of the device in case of power failure Close th...

Page 33: ...e yourself with section Safety Pay attention to whether the door is right hinged or left hinged Secure JOKER to prevent it from slipping or toppling over Opening a door with quick release lock Wait for approx 3 seconds after the end of the cooking baking cleaning programme Push the door handle to the left or right Slightly open the door Allow steam to escape Open the door completely Fig 10 Opening...

Page 34: ...right again The appliance door will now be opened Open the door completely Fig 11 Opening a door with safety door lock Electric door latch optional INFORMATION Depending on the parameter settings the door opens automatically at the end of the respective cooking baking programme a feature which could be advantageous in chain stores Earlier opening is possible at any time using the door handle Closi...

Page 35: ...ners in a horizontal position same hanging height on the left and right Adhere to the maximum load We recommended that you do not place a container with liquids or cooked products which liquefy during the cooking process in the device at a height of above 1 60 m measured from the access level Always remove the containers in a horizontal position and wherever possible only move them with a cover at...

Page 36: ...mber Before using the hose spray nozzle in the cooking chamber it is essential to cool it down to below 80 C 176 F NOTICE The hose spray nozzle may only be used to clean the cooking chamber not for cooling Pull out the hose with spray head by the hose Hold the spray head firmly when using it To wind on the hose with spray head allow it to slowly slide back into the mount 4 3 9 Use external tempera...

Page 37: ... skin and eyes Take care not to injure yourself or other persons in the vicinity Avoid making quick movements with the temperature probe INFORMATION Clean the temperature probe before use Remove the temperature probe with protective gloves before removing the cooked product Hang the temperature probe in its designated position after use NOTICE Adaptive core temperature sensor for last programme st...

Page 38: ...rder to ensure that data e g cooking programmes images sounds reports is transferred successfully the current screen must not be changed during the USB uploading downloading process on the device Data transfer from appliance to USB stick The following data can be copied from the device to the USB stick This data can also be analysed edited and printed using Eloma s ProConnect software Cooking prog...

Page 39: ...stem Steam injection Hose with spray head autoclean PRO Appliances with steam injection without hand shower or autoclean PRO Liquid created during the cooking process is collected in the appliance s pipe system and fed to the drip tray 1 Cooking chamber outlet 2 Evaporated water supply for the exhaust air and condensation hood if available 3 Exhaust air pipe 4 Waste water outlet in the drip tray F...

Page 40: ...sition the drip tray upright 3 Empty drip tray 4 The opening in the pipe system outlet that limits the fill level of the drip tray can be used to empty the drip tray Inserting the emptied drip tray Press the drip tray at the front without tiling using the pins in the spring clips until the back of the tray is positioned on the front frame ...

Page 41: ...Designation function Field Next Switch to the following screen Field Programme list Select programme list Field USB Transfer data from USB to appliance from appliance to USB Field Password Enter password Field Confirm Confirm selection entry entries and changes are accepted Field Close Close selection entry entries and changes are not accepted Tab 6 Symbols used during startup Fig 16 Willkommen We...

Page 42: ...ing general settings can be made before starting the appliance for the first time Date and time Language and keyboard Selecting the programme list Display mode of the screen Selecting the stand by image Password management ...

Page 43: ...al Settings 1 screen with The Datum Einstellung Date setting screen appears 2 Select month year with the left right arrow keys 3 Select day current day is highlighted in green 4 Confirm cancel with The Datum Einstellung Date setting screen is displayed 5 Set the hours and minutes using the number field or the keys 6 Confirm cancel with The Datum Einstellung Date setting screen is displayed ...

Page 44: ...ettings 1 screen with The Einstellen von Sprache Language setting screen is displayed 2 Select a language in the scroll field 3 Confirm cancel with The Datum Einstellung Date setting screen is displayed 4 Open the keyboard field in the Allgemeine Einstellungen General Settings screen with 5 Select a keyboard in the scroll field 6 Confirm cancel with The Datum Einstellung Date setting screen is dis...

Page 45: ... loading programme lists screen with The Einstellen Laden von Programmlisten Setting loading programme lists screen is displayed 2 Select the Existing programme list field in the scroll field 3 Confirm cancel with The Datum Einstellung Date setting screen is displayed 5 3 2 Loading your own programme lists Fig 20 Screens Upload eigener Programmlisten Uploading custom programme lists via USB stick ...

Page 46: ...ts screen is displayed 2 Select a Custom programme list field in the scroll field 3 Confirm with The prompt to plug in a USB stick appears 4 Plug in the USB stick and confirm with The Upload Fortschritt Upload Progress screen is displayed INFORMATION If the upload was not completed an error message Upload failed will appear The Allgemeine Einstellungen General Settings screen is displayed after su...

Page 47: ...factory It is also possible to set and upload your own stand by image via USB stick FAT32 For an automatic upload to take place this image file must be a JPG or PNG file stored in the Stand by Image folder on the USB stick named standby png or standby jpg The stand by images must comply with the following pixel format for horizontal display 800x480px for vertical display 480x800px ...

Page 48: ...and by Bild Stand by Image field in the Allgemeine 1 Einstellungen General Settings screen with A screen with a pre installed selection of standby images appears 2 Highlight the stand by image 3 Confirm cancel with The Allgemeine Einstellungen General Settings screen appears ...

Page 49: ...tt Upload Progress screen is displayed INFORMATION If the upload was not completed an error message Upload failed will appear 4 Use the confirmation field Continue to switch to the display duration stand by image The standby image is displayed Fig 23 Setting the time for a standby image to be displayed INFORMATION The following selection options are available 15 min 30 min 45 min and 60 min Select...

Page 50: ...up screen 8 The Auswahl Vorgabe Default selection or Individuelle Passworteinstellungen Custom Password Settings screen appears Fig 25 Auswahl Vorgabe Default selection or Individuelle Passworteinstellungen Custom Password Settings screen INFORMATION Defaults can be accepted Default or new passwords can be edited for the following access levels Password to access the appliance User password for ap...

Page 51: ...the password for the desired level appears Enter passwords for different access levels 10 After confirming with field Default or Ende der Passwortauswahl End of 11 password selection the Auswahl Anzeigemodus Display mode selection screen will be greyed out enabled Fig 27 Screen Display mode selection greyed out enabled Select a greyed out enabled display mode and confirm with Continue 12 The Anzei...

Page 52: ...Startup 52 Fig 28 Anzeige Setup Ende Setup end display screen After confirmation the system is restarted 13 ...

Page 53: ...Select the Settings and Service line The screen for entering the password appears 3 Enter a password Full access to Settings and service is displayed 4 Select the General settings line The Allgemeine Einstellungen General Settings screen appears 5 Scroll to the Restart Startup field and select The screen with the control question appears 6 Confirm close with 7 If confirmed startup will be performe...

Page 54: ... is on the right or left side of the appliance the screen will be arranged vertically If the Operation module is on the top of the appliance the screen will be arranged horizontally All basic visual settings are performed at the factory INFORMATION The home screen for direct programme access can be set during startup or later in Einstellung Service Settings Service 6 1 Home screen with overview of...

Page 55: ...play the list of the last 20 cooking and or baking programmes called up Field Programme list Switch to the list display of all programmes in alphabetical step order Field Favourites Switch to the list display of all favourites in alphabetical order Field Weekly programming PRO Switch to the Weekly programming PRO start screen Field Multi Baking PROSwitch to the PRO Multi Cooking PRO Multi Baking h...

Page 56: ...ens A description of the icons appears on all screens Notes Errors on all screens only in case of errors malfunctions or notes Switch to the specific error code by touching it Tab 7 Elements on the home screen of the appliance with MT control system full functionality ...

Page 57: ...ng them 2 Programme name with product image 3 Field Zusatzfunktionen Additional functions By selecting it the operator opens another screen with various options Field Change Field Display Change Programme Details Field Close 4 Field Start Programme is started Tab 8 Elements on the home screen with direct access to the programmes Fig 32 Screen Programmdetails Programme details und programme informa...

Page 58: ...CE Touch the desired function field on the touch screen to continue INFORMATION To ensure clear and concise operating instructions how to operate the horizontal screen display is explained in detail below The vertical screen display contains all the symbols and functions described here although the fields have different positions ...

Page 59: ...r temperature C F Field Core temperature Display and select the core temperature C F with CT sensor Field Cooking time Display and select the cooking time h min sec Field Step cooking time with programme time below Field Start programme Starts the programme Field Stop programme End programme Field Save Saving programme Field Add programme step Add New programme step Display field Programmschritt v...

Page 60: ...function Set and activate preheating 10 Field E 2 Energiesparen energy saving Set to half energy consumption Field SPS Activate the Steam protection system Field ADC with level Enable active dehumidification control ADC levels 1 to 5 Level 1 Flap 20 open Level 2 Flap 40 open Level 3 Flap 60 open Level 4 Flap 80 open Level 5 Flap completely open Field Step overview Switch to step overview Field Hom...

Page 61: ...ivated default Level 5 Active dehumidification control activated levels 1 to 5 if set Cooking time 00 30 h 00 01h 23 59h or continuous operation Core temperature 70 C 158 F 20 C 100 C 68 F 212 F Preheat 10 adjustable Tab 10 Setting ranges for hot air 7 1 1 Changing the temperature Fig 34 Screen Einstellen Ändern der Temperatur Set change temperature ...

Page 62: ...nfirm your entry with or close with Return to the Manuelles Kochen Manual Cooking screen NOTICE Temperature entry outside the setting range If the value falls below or exceeds the setting range entered 30 C 86 F to 300 C 572 F a message will appear and the value will be set to the minimum or maximum value after confirmation Fig 35 Note Temperature entry outside the setting range 7 1 2 Changing the...

Page 63: ... steps of 1 h 5 min or 10 sec via the corresponding fields 3 Confirm your entry with or close with Return to the Manuelles Kochen Manual Cooking screen INFORMATION When time is entered as 00h 00min 00sec continuous mode will be set NOTICE Time entry outside the setting range If the setting range 24 h is exceeded a message will appear and the value will be set to the maximum value 24h 00min 00sec a...

Page 64: ... with Return to the Manuelles Kochen Manual Cooking screen NOTICE Core temperature entry outside the setting range If a value falls below or exceeds the setting range 20 C 68 F to 100 C 212 F a message will appear and the value will be set to the minimum or maximum value after confirmation Fig 39 Note Core temperature entry outside the setting range 7 1 4 Selecting additional functions Fig 40 Zusa...

Page 65: ... Field SPS Activate the Steam protection system Field ADC with level Enable active dehumidification control ADC levels 1 to 5 Level 1 Flap 20 open Level 2 Flap 40 open Level 3 Flap 60 open Level 4 Flap 80 open Level 5 Flap completely open Field Switch Toggle OFF ON Switch additional function on off Field Bestätigen Confirm Confirm your entry and close the screen Field Schließen Close Cancel your e...

Page 66: ...ates changes the additional function With the toggle ON OFF the additional function is switched on off When selecting a level the display is expanded for selection and a level is set by touching the corresponding level field 3 Confirm your entry with or close with Return to the Manuelles Kochen Manual Cooking screen Setting changing the fan speed Fig 41 Screen Lüftergeschwindigkeit einstellen Set ...

Page 67: ...r change the temperature value exactly in degrees using the numeric keypad or in one degree steps via fields 3 Confirm your entry with or close with Return to the Zusatzfunktionen Additional functions screen with the changed preheating temperature Fig 44 Screen note Temperature entry outside the setting range NOTICE Temperature entry outside the setting range If the value falls below or exceeds th...

Page 68: ...ing function on off Fig 45 Additional function E 2 set Switch the SPS Steam Protection System on off Fig 46 SPS additional function set Setting changing the ADC Active Dehumidification Control Fig 47 ADC additional function with level selection set ...

Page 69: ...step programme display of step 2 Symbol Designation function Field Start Starts the programme Field Delete Deleting a cooking step Field Duplizieren Duplicate Duplicating a cooking step Field Hinzufügen Add Adding a cooking step Field Start Endzeit Start end time Call up the start end time preselection Field Speichern Save Save the cooking programme Field Zusatzfunktionen Additional functions Call...

Page 70: ...ted for all the cooking steps listed 2 Make settings for values options etc and confirm them Work procedures Changing cooking step Select the cooking step to be changed in the Schrittansicht Step View screen 1 The Manuelles Kochen Manual cooking screen appears 2 Change and confirm the settings for temperature and cooking time core temperature additional functions etc Work procedures Duplicating co...

Page 71: ...to be deleted 1 Use the Garschritt Löschen Delete cooking step field to delete the step 2 The selected cooking step is deleted The number of cooking steps is decreased by value 1 7 1 6 Setting the start end time Sets the start time Fig 50 Work procedures for the screens Setting start time ...

Page 72: ... Switch to the home screen Field Zurück Back Switch to the last screen display Field Bestätigen Confirm Confirm entry Field Schließen Close Cancel your entry and close the screen view Field Start Endzeit Start end time Call up the Start time screen Call up the End time screen Tab 13 Elements on the Start Endzeit Start end time screen ...

Page 73: ...h screen it appears in light grey Enter edit the Minutes value field in the 00 01 h to 00 59 h minute value highlighted in light grey on the screen via the numeric keypad or the keys 4 Confirm your entry with or close with Returning to theManual cooking screen INFORMATION Select either the start or end time An end time cannot be set if a cooking step is controlled by the core temperature INFORMATI...

Page 74: ...53 Save programme with name screen and other entry options optional Symbol Beschriftung Symbol caption Designation function Adding programme information via keyboard Adding a programme to a menu group Adding a programme to a product group Adding a product image to a programme Adding a sound to a programme Saving a programme with barcode product code Saving a programme with ID no for quick recall o...

Page 75: ...a programme name using the screen keyboard and confirming with The screen switches to an assignment overview 3 Open the input screen by touching the field of the desired line Enter programme information Assign a programme to a menu group Assign a programme to a product group Assign a product image to the programme Assign specific sounds to the programme Programme provided with a barcode product co...

Page 76: ... information will appear when the programme starts Fig 54 Eingabe von Zusatzinformationen Entering additional information screen New programme group Assign the programme to one or several menu groups by touching the relevant symbol and confirm with Fig 55 Screen Assignment to Menu Group Symbol Designation function Breakfast Lunch Snacks Dinner Field Bestätigen Confirm Confirm your entry and move t...

Page 77: ...o last step Tab 15 Overview of the menu groups Assigning to a product group Assign the programme to a product group by touching the symbol and confirm with Fig 56 Screen Assignment to Product Group Symbol Designation function Baking Poultry Meat Fish Pasta Garnishes Vegetables Dessert Regeneration ...

Page 78: ...make it possible to easily recall cooking programmes and hear the end of each programme or any errors and faults during operation For this purpose a number of images and sounds are preinstalled in JOKER for selection INFORMATION The assignments of external images jpg and sounds mp3 wav to the programmes can be created edited and checked for duplicate assignments using the ProConnect software They ...

Page 79: ...Manual cooking baking 79 Fig 58 Uploading and assigning custom programme images Assigning and saving programme sounds Fig 59 Assigning programme sounds stored in the appliance ...

Page 80: ...mme image or sounds by touching and confirm with or close with Upload and assign your own images and sounds 3 by plugging the USB stick with them into the USB connector socket on JOKER s front 4 Touch the Custom Images custom sounds field and confirm with or close with 5 Confirm your entry with OR close with After confirming the respective upload screen will appear 6 By confirming the upload proce...

Page 81: ...rcodes and product codes can be edited changed printed checked for duplicated assignment and saved using the ProConnect software Fig 61 Entering a barcode or a product code Symbol Designation function Field Barcode Switch to the numeric entry of the barcode Field Bestätigen Confirm Confirm your entry and move to the next input screen Field Schließen Close Close entry go back to last step Field Zei...

Page 82: ...ntry 4 Save the barcode product code with Return to the Save programmes screen Definition of an ID number for programmes By defining the ID five digit number codes default can be assigned to the programmes for quick recall e g in DirectMode Fig 62 Screens Setting saving an ID code Working steps 1 Save with an ID code in the Programm speichern Save programme screen call up the programme and continu...

Page 83: ...g steps Touch field Hinzufügen zu Favoriten Add to favourites in screen 1 Programm speichern Save programme The Favoriten Favourites selection screen appears 2 Select the Favourites field and confirm The programme has been added to favourites Returning to the Programm speichern Saving programmes screen INFORMATION All entries into the Programm speichern Saving programmes screen will only take effe...

Page 84: ...trol right Symbol Designation function Field Baking without humidification Switch to baking without humidification Field Backing with humidification Switch to backing with humidification Field Baking chamber temperature Display and select the baking chamber temperature C F Field Humidification Display and select humidification ml Field Core temperature Display and select the core temperature C F w...

Page 85: ...e field Sets the start time h min Sets the end time h min Field Speichern Save Saving programme Field Add programme step Add New programme step Display field Programmschritt von Schritten Programme step procedure The current programme step is displayed Field Zusatzfunktionen Additional functions Calling up additional functions Field Fan speed Activate fan speed levels 1 to 5 Field Fan pulsing Acti...

Page 86: ...ents on the Manual Baking screen Function Default value Setting range Temperature 180 C 356 F 30 C 300 C 86 F 572 F Core temperature 70 C 158 F 20 C 100 C 68 F 212 F ADC Active dehumidification control deactivated default Level 5 Active dehumidification control activated levels 1 to 5 if set Baking time 00 30 h 00 00h 24 00h continuous mode Off time 00 40 min 00 00 min 03 00 min Steam injection 10...

Page 87: ...Screen Einstellen Ändern der Temperatur Set change temperature Working steps Touch the value field for the temperature in the Manual Baking screen 1 The temperature input screen appears 2 Enter change the temperature value exactly in degrees using the numeric keypad or in 5 degree steps via fields 3 Confirm your entry with or close with Return to the Manuelles Backen Manual Baking screen NOTICE Te...

Page 88: ...our entry appears highlighted in light grey Enter change the time h min sec exactly using the numeric keypad or in steps of 1 h 5 min or 10 sec via the corresponding fields 3 Confirm your entry with or close with Return to the Manuelles Backen Manual Baking screen INFORMATION When time is entered as 00h 00min 00sec for manual baking without humidification continuous mode will be set NOTICE Time en...

Page 89: ...e field for entering seconds is active light grey 3 Touch the respective field h min or sec before entering appears highlighted in light grey Enter change the time h min sec exactly using the numeric keypad or in steps of 1 min or 10 sec via the corresponding fields 4 Confirm your entry with or close with Return to the Anzeige Betriebsart Backen Baking operating mode display screen NOTICE Rest tim...

Page 90: ...Manual baking screen The input screen for the core temperature appears 2 Enter change the temperature value exactly in degrees using the numeric keypad or in one degree steps via fields 3 Confirm your entry with or close with Go back to the Manual Baking screen NOTICE Core temperature entry outside the setting range If a value falls below or exceeds the setting range 20 C 68 F to 100 C 212 F a mes...

Page 91: ...n screen The input screen for the humidification quantity appears 2 Enter change the humidification quantity exactly in ml sing the numeric keypad or in 10ml steps via the fields 3 Confirm your entry with or close with Return to the Manuelles Backen mit Beschwadung Manual baking with humidification screen NOTICE The humidification quantity entered is outside the setting range If a value falls belo...

Page 92: ...ntity entered is outside the setting range 7 2 6 Selecting additional functions Fig 77 Additional functions screen not active toggle left display grey active toggle right display green Fig 78 Manual baking with humidification all additional functions activated ...

Page 93: ...ergy consumption Field ADC mit Stufe ACD with level Enable active dehumidification control ADC levels 1 to 5 Level 1 Flap 20 open Level 2 Flap 40 open Level 3 Flap 60 open Level 4 Flap 80 open Level 5 Flap completely open Field Switch Toggle OFF ON Switch additional function on off Field Bestätigen Confirm Confirm your entry and close the screen Field Schließen Close Cancel your entry and close th...

Page 94: ... ON OFF or the level the additional function is activated changed 3 Confirm your entry with or close with 4 Go back to the Manual Baking screen Setting changing the fan speed Fig 79 Screen Lüftergeschwindigkeit einstellen Set Fan Speed Switching fan speed pulsing on off Fig 80 Fan speed pulsing set Setting changing preheating Fig 81 Setting preheating left setting changing preheating temperature r...

Page 95: ...numeric keypad or in one degree steps via fields 3 Confirm your entry with or close with Return to the Zusatzfunktionen Additional functions screen with the changed preheating temperature Fig 82 Screen note Temperature entry outside the setting range NOTICE Temperature entry outside the setting range If the value falls below or exceeds the setting range entered 30 C 86 F to 300 C 572 F a message w...

Page 96: ...unction E 2 set Setting changing the ADC Active Dehumidification Control Fig 84 Setting the ADC screen and the flap opening level 7 2 7 Step overview single and multi step programmes Touching the icon displays the Step overview screen Fig 85 Step overview with one three step programmes ...

Page 97: ... step Field Start Endzeit Start end time Call up the start end time preselection Field Speichern Save Save the cooking programme Field Zusatzfunktionen Additional functions Call up additional functions Display of the cooking step Select operating mode for the cooking step Baking without steam injection Baking with steam injection Setting a value of the baking step e g temperature Baking time of th...

Page 98: ...Schrittansicht Step view 1 screen The Manuelles Backen Manual baking screen appears 2 Change and confirm settings for temperature baking rest time core temperature additional functions etc Work procedures Duplicating baking step Select the baking step to be duplicated in the Schrittansicht Step View 1 screen 2 Copying a step with field Backschritt Duplizieren Baking step duplicate The duplicated b...

Page 99: ...g baking 99 7 2 8 Setting the start end time Sets the start time Fig 87 Work procedures for screens Setting the Startzeit Start time Sets the end time Fig 88 Work procedures for screens Setting the Endzeit End time ...

Page 100: ...ken Manual baking screen The Start Endzeitauswahl Start end time selection screen appears 2 Touch or to select the start or end time The Zeiteingabe Time entry screen appears 3 Enter change time from 01 00h to 23 59h via the numeric keypad or the keys 4 Confirm your entry with or close with Return to the Manuelles Backen Manual baking screen INFORMATION Only the start or end time can be selected A...

Page 101: ...gs for one or several cooking steps are defined A maximum of 400 programmes can be stored as numbers with up to 20 cooking steps Fig 90 Programm speichern Save programme screen with further entries optional Symbol Beschriftung Symbol caption Designation function Adding programme information via keyboard Adding a programme to a menu group Adding a programme to a product group Adding a product image...

Page 102: ... Adding a programme to favourites Keypad field touch the desired character to enter it Field Bestätigen Confirm Confirm your entry and move to the next input screen Field Schließen Close Close entry go back to last step Field Delete characters Deleting the characters of the keyboard entry Field Speichern Save Saving the programme Tab 24 Elements on the Programm speichern Save programme input scree...

Page 103: ...Assign specific sounds to the programme Programme provided with a barcode product code Programme provided with ID no for simplified entry e g for DirectMode Add programme to favourites Entry instruction below 4 After completing all entries confirm with The programme name appears in the middle of the screen header in the Manuelles Kochen Manual cooking screen INFORMATION Upload of custom images and...

Page 104: ...e to one or several menu groups by touching the relevant symbol and confirm with Fig 92 Screen Assignment to Menu Group Symbol Designation function Breakfast Lunch Snacks Dinner Field Bestätigen Confirm Confirm your entry and move to the next input screen Field Schließen Close Close entry go back to last step Tab 25 Overview of the menu groups ...

Page 105: ...onfirm with Fig 93 Screen Assignment to Product Group Symbol Designation function Baking Poultry Meat Fish Pasta Garnishes Vegetables Dessert Regeneration Field Bestätigen Confirm Confirm your entry and move to the next input screen Field Schließen Close Close entry go back to last step Tab 26 Overview of the product groups ...

Page 106: ...ion For this purpose a number of images and sounds are preinstalled in JOKER for selection INFORMATION The assignments of external images jpg and sounds mp3 wav to the programmes can be created edited and checked for duplicate assignments using the ProConnect software They can also be saved on a USB stick and transferred to JOKER Assigning and saving programme images Fig 94 Assigning programme ima...

Page 107: ...talled in the appliance Touch the selection line programme image or sounds 1 The Selection from appliance images sounds or Upload Custom Images Sounds appears 2 Selecting whether to use images sounds for the appliance OR Uploading your own images sounds When using appliance images sounds 3 Touch the Gerätebilder töne Appliance images sounds field and confirm with or close with The Overview of appl...

Page 108: ...over the screen will switch to the programme image sound selection overviews 7 Select the desired image sound file for the cooking programme and confirm with Return to the Save programmes screen INFORMATION All the images sounds stored in JOKER are displayed in the respective overviews Barcode and product code management A barcode and or product code can be saved for each cooking programme This ma...

Page 109: ...e with barcode product code field in the Save programmes 1 screen The selection screen Save with barcode product code appears 2 Select the Barcode field and confirm with Screen Adding a Barcode Product Code via keyboard screen appears 3 A barcode product code is optically generated through the entry 4 Save the barcode product code with Return to the Save programmes screen Definition of an ID numbe...

Page 110: ...er via the Favoriten Favourites home screen The desired programme can be found and called up by scrolling through or searching it Fig 100 Screens Adding a programme to favourites Working steps Touch the Hinzufügen zu Favoriten Add to favourites field on the 1 Programm speichern Save programme screen The Favoriten Favourites selection screen appears 2 Select the Favoriten Favourites field and confi...

Page 111: ...Manual cooking baking 111 Fig 101 Finish saving the programme and return to the Manuelles Kochen Manual cooking screen Saved programme ...

Page 112: ...eld on the home screen e g Manuelles Kochen Manual cooking 1 The Manuelles Kochen Manual cooking screen appears 2 Touch the desired operating mode field e g operating mode field Kombidampf Combi cooking If active the filed will be highlighted in blue Temperature humidity cooking time core temperature settings and active additional functions are displayed 3 Touch the desired value field e g Tempera...

Page 113: ...alue ml set Field Kerntemperatur Core temperature Switch to the Core temperature C F set Field Schrittgarzeit Step cooking time Changing to the step cooking time h min sec set Field Schrittgarzeit Step cooking time with programme time display bottom Field Programmstart Programme start Starts the programme Field Programmstopp Programme stop End the programme Field Start Endzeit Start end time Sets ...

Page 114: ...ay Tab 28 Elements on the Manuelles Kochen Manuelles Backen Manual Cooking Manual Baking screens 7 3 1 Field Manuelles Kochen mit Heißluft Manual cooking with hot air Fig 102 Screen Manuelles Kochen mit Heißluft Manual cooking with hot air with cooking time controller left and core temperature right Function Default value Setting range Temperature 180 C 356 F 30 C 300 C 86 F 572 F Cooking time 00 ...

Page 115: ...e controller left and core temperature right Function Default value Setting range Temperature 150 C 302 F 30 C 300 C 86 F 572 F Humidification 30 1 100 Cooking time 00 30 h 00 01h 23 59h or continuous operation Core temperature 70 C 158 F 20 C 100 C 68 F 212 F ADC Active dehumidification control deactivated default Level 5 Active dehumidification control activated levels 1 to 5 if set Preheat 10 a...

Page 116: ...tion 100 Constant cannot be changed Cooking time 00 30 h 00 01h 23 59h or continuous operation Core temperature 70 C 158 F 20 C 100 C 68 F 212 F ADC Active dehumidification control deactivated default Level 5 Active dehumidification control activated levels 1 to 5 if set Preheat 10 adjustable Tab 31 Setting ranges for steam 7 3 4 Manual baking Fig 105 Screens Manuelles Backen ohne Beschwadung Manu...

Page 117: ...et Preheat 10 adjustable Tab 32 Adjustment ranges for baking without humidification Fig 106 Screens Manuelles Backen mit Beschwadung Manual baking with humidification via baking time left via core temperature control right Function Default value Setting range Temperature 180 C 356 F 30 C 300 C 86 F 572 F Core temperature 70 C 158 F 20 C 100 C 68 F 212 F Cooking time 00 30 h 00 00h 24 00h continuou...

Page 118: ...lue field for the temperature in the Manual cooking manual 1 baking screen The temperature input screen appears 2 Enter change the temperature value exactly in degrees using the numeric keypad or in 5 degree steps via fields 3 Confirm your entry with or close with Return to the Manuelles Kochen Manuelles Backen Manual cooking baking screen NOTICE Temperature entry outside the setting range If valu...

Page 119: ...nuelles Backen Manual 1 cooking Manual baking screen The input screen for the cooking baking time appears 2 The value field for entering minutes is active light grey Touch the other value fields h or sec before your entry appears highlighted in light grey Enter change the time h min sec exactly using the numeric keypad or in steps of 1 h 5 min or 10 sec via the corresponding fields 3 Confirm your ...

Page 120: ...g without humidification continuous operation will be set NOTICE Time entry outside the setting range If the setting range 24 h is exceeded a message will appear and the value will be set to the maximum value 24h 00min 00sec after confirming the message Fig 111 Time entry outside the setting range 7 3 7 Changing the core temperature Fig 112 Einstellen Ändern der Kerntemperatur Set Change core temp...

Page 121: ...ry outside the setting range If a value falls below or exceeds the setting range 20 C 68 F to 100 C 212 F a message will appear and the value will be set to the minimum or maximum value after confirmation Fig 113 Note Core temperature entry outside the setting range 7 3 8 Changing steaming only for manual combi cooking Fig 114 Screen Einstellen Ändern der Beschwadung Set change humidification for ...

Page 122: ...hange the rest time screen Working steps Select the Rest time field in the Manuelles Backen mit Beschwadung 1 Manual baking with humidification screen The rest time value field is activated 2 Touch the rest time value field The rest time input screen appears The value field for entering seconds is active light grey 3 Touch the respective field h min or sec before entering appears highlighted in li...

Page 123: ...ual baking with humidification Working steps Touch the value field for humidification in the Manual Baking with 1 humidification screen The input screen for the humidification quantity appears 2 Enter change the humidification quantity exactly in ml sing the numeric keypad or in 10ml steps via the fields 3 Confirm your entry with or close with Return to the Manuelles Backen mit Beschwadung Manual ...

Page 124: ...gnation function Field Lüftergeschwindigkeit Fan speed Activate fan speed levels 1 to 5 Field Lüftergeschwindigkeit Taktung Fan speed pulsing Activate fan pulsing at the selected fan speed Field Vorheizfunktion Preheat function Set and activate preheating 10 Field E 2 Energiesparen energy saving Set to half energy consumption Field SPS Activate SPS mode safe steam extraction Field ADC with level E...

Page 125: ...ld Zurück Back Switch to the last screen display Tab 34 Elements on the Additional Functions screen Work procedures Selection additional function Touch the Zusatzfunktionen Additional Functions field on the 1 Manuelles Backen Manual baking screen The Additional Functions screen appears 2 Touching the ON OFF toggle or step activates changes an additional function 3 Confirm your entry with or close ...

Page 126: ...ouch the field Vorheiztemperatur Preheating temperature e g 198 C 1 in the Preheat line The Temperatureinstellung Temperature setting screen appears 2 Enter change the temperature value exactly in degrees using the numeric keypad or in one degree steps via fields 3 Confirm your entry with or close with Back to the screen Zusatzfunktionen Additional functions with changed preheating temperature Fig...

Page 127: ...l appear and the value will be set to the minimum or maximum value after confirmation Switch E 2 energy saving function on off Fig 125 Additional function E 2 set Switching on off SPS Steam Protection System For manual cooking only Fig 126 SPS additional function set Setting changing the ADC Active Dehumidification Control Fig 127 Setting the ADC screen and flap opening level ...

Page 128: ...an speed Field Vorheizfunktion Preheat function Set and activate preheating 10 Field E 2 Energiesparen energy saving Set to half energy consumption Field ADC mit Stufe ACD with level Enable active dehumidification control ADC levels 1 to 5 Level 1 Flap 20 open Level 2 Flap 40 open Level 3 Flap 60 open Level 4 Flap 80 open Level 5 Flap completely open Field Switch Toggle OFF ON Switch additional fu...

Page 129: ...atzfunktionen Additional Functions field on the 1 Manuelles Backen Manual baking screen The Additional Functions screen appears 2 Touching the ON OFF toggle or step activates changes an additional function 3 Confirm your entry with or close with Return to the Manuelles Backen Manual Baking screen Setting changing the fan speed Fig 129 Screen Lüftergeschwindigkeit einstellen Set Fan Speed Switching...

Page 130: ...rs 2 Enter change the temperature value exactly in degrees using the numeric keypad or in one degree steps via 3 Confirm your entry with or close with Back to the screen Zusatzfunktionen Additional functions with changed preheating temperature Fig 132 Screen note Temperature entry outside the setting range NOTICE Temperature entry outside the setting range If the value falls below or exceeds the s...

Page 131: ... function E 2 set Setting changing the ADC Active Dehumidification Control Fig 134 Setting the ADC screen and flap opening level 7 3 12 Step overview single and multi step programmes Touching the icon displays the Step overview screen Fig 135 Step overview with one three step programmes ...

Page 132: ...gen Add Adding a cooking step Field Start Endzeit Start end time Call up the Startzeit Start time screen Call up the End time screen Field Speichern Save Save the cooking programme Field Zusatzfunktionen Additional functions Call up additional functions Display of the cooking step Select operating mode for the cooking step Convection Setting value of the cooking step e g temperature Cooking time o...

Page 133: ...e Manuelles Kochen Manuelles Backen Manual cooking baking screen appears 2 Change and confirm the settings for temperature and cooking time core temperature additional functions etc Work procedures Duplicating cooking step Select the cooking step to be duplicated in the Schrittansicht Step View screen 1 2 Using field Garschritt Duplizieren Duplicate cooking step to copy a step The duplicated cooki...

Page 134: ...ime Sets the start time Fig 137 Work procedures for screens Setting the Startzeit Start time applies to Manual cooking in the same way Sets the end time Fig 138 Work procedure for screens Setting the Endzeit End time applies to Manual baking in the same way ...

Page 135: ...ing Manual baking screen The Start Endzeitauswahl Start end time selection screen appears 2 Touch or to select your start or end time entry The Zeiteingabe Time entry screen appears 3 Enter change time from 00 01h to 23 59h via the numeric keypad or the keys 4 Confirm your entry with or close with Return to the Manuelles Kochen Manuelles Backen Manual cooking baking screen INFORMATION Only the sta...

Page 136: ...d The settings for one or several cooking baking steps are defined A maximum of 400 programmes can be stored as a number with up to 20 cooking baking steps Fig 140 Programm speichern Save programme screen with further entries optional Symbol Beschriftung Symbol caption Designation function Adding programme information via keyboard Adding a programme to a menu group Adding a programme to a product ...

Page 137: ...ichern Save Saving the programme Tab 38 Elements on the Programm speichern Save programme input screens Work procedures Saving programme Touch the Speichern Save field 1 The screen to enter a programme name with the keyboard appears 2 Entering a programme name using the screen keyboard and confirming with The screen switches to an assignment overview 3 Open the input screen by touching the field o...

Page 138: ...FORMATION Entering the programme name is required All other entries are optional Entering programme information Enter additional information using the screen keyboard and confirm with Additional information will appear when the programme starts Fig 141 Eingabe von Zusatzinformationen Entering additional information screen New programme group Assign the programme to one or several menu groups by to...

Page 139: ... Symbol Designation function Breakfast Lunch Snacks Dinner Field Bestätigen Confirm Confirm your entry and move to the next input screen Field Schließen Close Close entry go back to last step Tab 39 Overview of the menu groups ...

Page 140: ...nfirm with Fig 143 Screen Assignment to Product Group Symbol Designation function Baking Poultry Meat Fish Pasta Garnishes Vegetables Dessert Regeneration Field Bestätigen Confirm Confirm your entry and move to the next input screen Field Schließen Close Close entry go back to last step Tab 40 Overview of the product groups ...

Page 141: ...ny errors and faults during operation For this purpose a number of images and sounds are preinstalled in JOKER for selection INFORMATION The assignments of external images jpg and sounds mp3 wav to the programmes can be created edited and checked for duplicate assignments using the ProConnect software They can also be saved on a USB stick and transferred to JOKER Assigning and saving programme ima...

Page 142: ...Manual cooking baking 142 Fig 145 Uploading and assigning custom programme images Assigning and saving programme sounds Fig 146 Assigning programme sounds stored in the appliance ...

Page 143: ...e programme image or sounds 1 The Selection from appliance images sounds or Upload Custom Images Sounds appears 2 Selecting whether to use images sounds for the appliance OR Uploading your own images sounds When using appliance images sounds 3 Touch the Gerätebilder töne Appliance images sounds field and confirm with or close with The Overview of appliance images and sounds screen will appear ...

Page 144: ...over the screen will switch to the programme image sound selection overviews Select the desired image sound file for the cooking programme and confirm 9 with Return to the Save programmes screen INFORMATION All the images sounds stored in JOKER are displayed in the respective overviews Barcode and product code management A barcode and or product code can be saved for each cooking baking programme ...

Page 145: ...ave with barcode product code field in the Save programmes screen The selection screen Save with barcode product code appears 2 Select the Barcode field and confirm with Screen Adding a Barcode Product Code via keyboard screen appears 3 A barcode product code is optically generated through the entry 4 Save the barcode product code with Return to the Save programmes screen Definition of an ID numbe...

Page 146: ... order via the Favoriten Favourites home screen The desired programme can be found and called up by scrolling through or searching it Fig 150 Screens Adding a programme to favourites Working steps 1 Touch the Hinzufügen zu Favoriten Add to favourites field on the Programm speichern Save programme screen The Favoriten Favourites selection screen appears 2 Select the Favoriten Favourites field and c...

Page 147: ...Manual cooking baking 147 Fig 151 Finish saving the programme and return to the saved programme in the Manuelles Kochen Manuelles Backen Manual Cooking Manual baking screen ...

Page 148: ... 8 1 1 Starting manual cooking Fig 152 Starting manual cooking with hot air left or step overview right Start the manual cooking programme in theManuelles Kochen Manual Cooking or Schrittübersicht Step Overview screen by touching the Start field 8 1 2 Ongoing operation screen Fig 153 Screen Programm im laufenden Betrieb Programme running left and Programmende Programme end right ...

Page 149: ... with green bar in the background Field Stop The programme is interrupted Field Display of cooking step temperature Field Display of cooking time current step Field Schrittübersicht Step overview Switch to step overview Field Multi Cooking PRO Assign to Multi Cooking programmes Field Display of the current cooking step out of total number of cooking steps Field Display of actual temperature Field ...

Page 150: ...orheizen Stop preheat Stop preheating Tab 42 Elements of the cooking programme s Ongoing operation screen 8 1 3 Preheat Fig 155 Screen Vorheizen im laufenden Betrieb Preheating running left and Ende Vorheizen End preheating right Fig 156 Auto Temp screen Fig 157 Screen Garraumtür geöffnet Cooking chamber door open ...

Page 151: ...peration of the cooking and baking process 151 INFORMATION When preheating has been completed open the door insert the container with food items and close the door The cooking programme then starts automatically ...

Page 152: ...single minute steps by default The cooking baking time can be extended Touch the Extend cooking baking time field The cooking baking time for the last cooking step is extended 8 1 5 Changing the settings for manual cooking Fig 159 Changing settings during operation e g time INFORMATION During operation only cooking settings for a cooking step which is currently in progress or has not yet been star...

Page 153: ... Enter change the time h min sec exactly using the numeric keypad or in steps of 1 h 5 min or 10 sec via the corresponding fields 4 Confirm your entry with or close with Return to screen Anzeige Betriebsart Backen Hot air operating mode display screen 5 Confirm your entry with Programme will be continued INFORMATION Without confirmation of the changes and without further activity the programme wil...

Page 154: ...must be set to 00 00 00 h min sec Continuous operation can be ended by touching the Stop field 8 1 8 Ending manual cooking Earlier end of the current cooking programme continuous mode Fig 162 Screens Stopp laufendes Programm Stop the running programme INFORMATION Cooking step programme has been started and is not yet finished Green progress bar shows less than 100 Remaining time or target core tem...

Page 155: ...o run if the exit query is closed The Manuelles Kochen Manual Cooking screen will appear if the exit query is confirmed 3 Open the door allow any steam to escape 4 Remove the cooked product as necessary On completion of the cooking programme Fig 163 End of the expired cooking programme without restarting INFORMATION The cooking programme ends when the cooking time of the last cooking step has elap...

Page 156: ...d baking process 156 8 1 9 Restart repeat cooking programme Fig 164 Repeat the same cooking programme restart Working steps 1 Load the appliance with the same food 2 Touch the Neustart New Start field to start the same cooking programme ...

Page 157: ...les Backen Manual baking with several steps in the Schrittübersich Step Overview screen Start the manual baking programme in the Manuelles Backen Manual Baking or Schrittübersicht Step Overview screen by touching the Start field 8 2 2 Ongoing operation screen Fig 167 Screen Programm im laufenden Betrieb Programme running left Manuelles Backen ohne Beschwadung Manual baking without humidification u...

Page 158: ...ed Field Manuelles Backen ohne Beschwadung Manual baking without humidification Switch to manual baking without humidification Field Manuelles Backen mit Beschwadung Manual baking with humidification Switch to manual baking with humidification Field Anzeige Back Schritt temperatur Display baking step temperature Field Anzeige gesamte Backprogrammzeit Display total baking programme time Field Schri...

Page 159: ...king time by selecting appropriate setting setting 1 min Field Ändern Editieren Change edit Change edit baking steps Field Start Vorheizen Start Preheat Start preheating Field Stop Vorheizen Stop preheat Stop preheating Tab 43 Elements of the screen Ongoing operation of the baking programme 8 2 3 Preheat Fig 169 Screen Vorheizen im laufenden Betrieb Preheating running left and Ende Vorheizen End p...

Page 160: ...ts automatically INFORMATION Additional parameter setting under Service Settings Manual Temp and Active Temp Manual Temp low energy consumption fan needs however to be supported by the user Active Temp quick but consumes additional water and energy Default setting Manual Temp automatic without water consumption 8 2 4 Extending the baking time Fig 171 Display before and after baking time extension ...

Page 161: ...ing process 161 8 2 5 Changing settings for manual baking Fig 172 Changing settings during operation INFORMATION During operation only baking settings for a baking step which is currently in progress or has not yet been started can be changed ...

Page 162: ...ec exactly using the numeric keypad or in steps of 1 h 5 min or 10 sec via the corresponding fields 6 Confirm your entry with or close with Return to the Manuelles Backen Manual Baking screen 7 Confirm your entry with The current programme is continued with the changed values INFORMATION Without confirmation of the changes and without further activity the programme will continue to run without any...

Page 163: ...n 00sec for manual baking without humidification Dauerbetrieb continuous operation will be set Continuous operation can be ended by touching the field 8 2 8 Ending the baking programme Earlier end of the current baking programme continuous mode Fig 175 Screens Stopp des laufenden Programms Stop running programme INFORMATION Baking step programme was started and is not yet finished Green progress b...

Page 164: ...e programme continues to run When confirmed the Manuelles Backen Manual Baking screen appears 3 Open the door allow any steam to escape 4 Remove the baked product as necessary On completion of the baking programme Fig 176 End of the expired baking programme without restarting INFORMATION The baking programme ends when the baking time of the last baking step has expired the target core temperature ...

Page 165: ...king process 165 8 2 9 Restarting repeating the backing programme Fig 177 Repeat the same cooking programme restart Working steps Load the appliance with the same food 1 2 Touch the Neustart Restart field to start the same backing programme ...

Page 166: ...nuelles Backen Manual Baking screen left or Schrittübersicht Step Overview screen right Start the manual baking cooking programme in Manuelles Kochen Manuelles Backen Manual cooking manual baking or step overview screens by touching the Start field 8 3 2 Ongoing operation screen Fig 180 Screen Programm im laufenden Betrieb Backen ohne Beschwadung Programme running in baking without humidification ...

Page 167: ...ocess 167 Fig 181 Screen Nachfrage Request to stop the running programme INFORMATION Additional functions e g preheating must be selected before starting the programme The symbol of the additional function appears on the progress line of the screen ...

Page 168: ...aking with humidification operating mode Display field Baking temperature Display field Total baking programme time Field Schrittübersicht Step overview Switch to step overview Field Display of the current baking step out of total number of baking steps Field Display of temperature and humidity instantaneous values Display of the core temperature instantaneous value Field Manuelle Beschwadung Manu...

Page 169: ...mperature screen Fig 184 Screen Garraumtür geöffnet Baking chamber door open INFORMATION If the current cooking chamber temperature is above the selected preheating temperature the cooking chamber is cooled down When preheating has been completed open the door insert the container with baked items and close the door The baking programme then starts automatically ...

Page 170: ...e user Active Temp quick but consumes additional water and energy Default setting Manual Temp automatic without water consumption 8 3 4 Extending the baking time Fig 185 Display before and after Baking cooking time extension INFORMATION The baking cooking time of the last programme step is extended in single minute steps by default The baking cooking time can be extended 8 3 5 Changing settings fo...

Page 171: ...meric keypad or in 5 steps via Enter change the humidification quantity exactly using the numeric keypad 4 or in 10ml steps via the fields Enter change the humidity value with the utmost accuracy using the numeric 5 keypad or in 1 steps using fields The value field for entering minutes is active light grey Touch the other 6 value fields h or sec before your entry appears highlighted in light grey ...

Page 172: ...e humidity field The actual values appear for a short time Touch the actual core temperature field The core temperature is displayed 8 3 7 Continuous mode Fig 188 Screen Home left and Laufender Betrieb des Garprogramms Ongoing operation of the cooking programme right in continuous mode INFORMATION For continuous operation the time must be set to 00 00 00 h min sec Continuous operation is not possi...

Page 173: ...rogress bar shows less than 100 Remaining time or target core temperature is displayed Working steps Stop exit the Running programme continuous operation by touching the 1 Stop field The cooking programme is stopped The Abbruchnachfrage Exit Request screen appears Confirm your entry with or close with 2 The programme will continue to run if the exit query is closed The Manual Cooking screen will a...

Page 174: ...of the last cooking step has elapsed the target core temperature of the last cooking step has been achieved green progress bar is complete 8 3 9 Re starting repeating the programme Fig 191 Repeating restarting the same programme Working steps 1 Load the appliance with the same items to be baked cooked 2 Touch the Neustart Restart field to start the same cooking backing programme 3 Remove any finis...

Page 175: ...ing baking programme Items to be baked Product group Field Programme Options By selecting it the operator opens another screen with the functions Field Start Starts the programme Field Home Switch to the home screen Field Zurück Back Switch to the last screen display Tab 45 Elements of the Last 20 screen Working steps 1 Touch the Last 20 field in the start screen The Last 20 screen appears 2 If re...

Page 176: ...tarts the programme with 9 1 1 Programme Options Fig 193 Programmoptionen Programme options selection screen Symbol Designation function Field Ändern Change Change programmes Field Display Change other programme details Display and change further details functions Field Schließen Close Close the Programme Information screen Tab 446 Elements of the programme options screen ...

Page 177: ...copy under a new name 9 1 3 Field Display Change Programme Details Fig 195 Field Display Change Programme Details Symbol Designation function Mini Pizza Name of the cooking baking programme Field Programminformation Programme information Switch to the screen with additional information 00 45 00 Displaying the cooking baking time Field Schrittübersicht Step overview Switch to display and edit the p...

Page 178: ...Zurück Back Switch to the last screen display Tab 47 Elements of the programme list screen Fig 196 Programme information screen for the cooking baking programme All values and additional functions for all programme steps can be changed by switching to theManuelle Einstellungen Manual settings screen Programmes can be overwritten or saved under a new name Entries can be made directly into the Detai...

Page 179: ...me start Working steps 1 Touch the Start field to start the programme from the Last 20 overview The Zusatzinformationen Additional Information screen appears 2 Touch the Schließen Close field The laufender Betrieb Ongoing operation screen appears ...

Page 180: ...ed programme image optional Symbol display without programme image Operating mode hot air or baking without humidification single step multi step Combi cooking mode symbol single step multi step Symbol Steam operating mode one step multi step Symbol for operating mode baking with humidification single step multi step Programme symbol manual cooking manual baking multi stage Field Details Switch to...

Page 181: ...with 9 2 1 Programme information Fig 198 Programminformation Programme information selection screen Symbol Designation function Field Ändern Change Change programmes Field Display Change other programme details Display and change further details functions Field Schließen Close Close the Programme Information screen Tab 48 Elements of the programme options screen 9 2 2 Displaying changing setting v...

Page 182: ...optional Mini pizza Name of the cooking baking programme Items to be baked Product group Field Programminformation Programme information Switch to the screen with additional information 00 45 00 Displaying the cooking baking time Field Schrittübersicht Step overview Switch to display and edit the programme steps Field Wochenprogrammierung PRO Weekly programming PRO Go to the Weekly programming PRO...

Page 183: ...and additional functions for all programme steps can be changed by switching to the Garen Backen Cooking baking screen Programmes can be overwritten or saved as a copy under a new name Entries can be made directly into the Details screen for Start Endzeit Start end time Preheat Of Wochenprogrammierungen Weekly programming cycles 9 2 4 Starts the programme 1 Touch the Start field to start the progr...

Page 184: ...ne or more menu groups Displaying and filtering product and menu groups Favourites is accessed by touching on the home screen Symbol Designation function Display Assigned programme image optional Symbol display without programme image Operating mode hot air or baking without humidification single step multi step Combi cooking mode symbol single step multi step Symbol Steam operating mode one step ...

Page 185: ...te ohne Filter Programme list without filter Fig 203 Screens Programme list with filter Menu group left or filter Product group right Fig 204 Screen Programmliste mit Filter Menü und Produktgruppe Programme list with filter Menu and product group ...

Page 186: ... the keyboard and start the search by touching the Bestätigen Confirm field The list of cooking programmes is reduced to those entered When searching for product menu groups the programme list and the marked group s will appear 4 If required select the programme line with field Programmoptionen Programme options The Programmoptionen Programme Options screen appears 5 Touch the Change field or Deta...

Page 187: ... saved favourites for cooking left and Backen baking right The Einstellungen Garen Backen Settings for cooking baking screen for the programme appears and all values and additional functions for all programme steps can be changed Programmes can be overwritten or saved under a new name Fig 208 Field Display Change Programme Details ...

Page 188: ...nd edit the programme steps Field Wochenprogrammierung PRO Weekly programming PRO Go to the Weekly programming PRO screen and edit Field Multi Cooking PRO Switch to the Multi Cooking PRO screen and edit Field Start Starts the programme Field Vorheizen Preheating Set preheating Field Start Endzeit Start end time Switch to the Start End Time screen Field Startzeit Start time Sets the start time Fiel...

Page 189: ...mme steps can be changed by switching to the Einstellung Garen Backen Cooking baking setting screen Programmes can be overwritten or saved under a new name Entries can be made directly into the Detailsscreen for Start end time Preheat Weekly programming PRO Multi Cooking PRO Multi Baking PRO Wochenprogrammierungen Weekly programming cycles ...

Page 190: ...ORMATION Only the cooking baking programmes saved as favourites are displayed in alphabetical order as a list Favourites is accessed by touching field on the home screen Fig 210 Favourites screen Symbol Designation function Display Assigned programme image optional Apple Strudel Name of the cooking baking programme Items to be baked Product group Symbol display without programme image Operating mo...

Page 191: ...ome Switch to the home screen Field Zurück Back Switch to the last screen display Tab 52 Elements of the screen Start Edit programmes from Favourites Working steps Touch the Favoriten Favourites field on the Home screen 1 The Programmliste Favoriten Favourite programme list screen appears If required select the programme line with field 2 Programminformationen Programme information The Programme I...

Page 192: ... name or menu product group 3 etc using the keyboard and start the search by touching the Bestätigen Confirm field The list of cooking programmes is reduced to those entered When searching for product menu groups the favourites and the marked group s will appear If required select the programme line with field 4 Programminformationen Programme information The Programme Information screen appears T...

Page 193: ...cherten Favoriten für Garen Display change settings of saved favourites for cooking left and Backen baking right The Einstellungen Garen Backen Settings for cooking baking screen for Favourites appears and all values and additional functions for all programme steps can be changed Programmes can be overwritten or saved under a new name Fig 214 Field Display Change Programme Details ...

Page 194: ...edit the programme steps Field Wochenprogrammierung PRO Weekly programming PRO Go to the Weekly programming PRO screen and edit Field Multi Cooking PRO Switch to the Multi Cooking PRO screen and edit Field Start Starts the programme Field Vorheizen Preheating Set preheating Field Start Endzeit Start end time Switch to the Start End Time screen Field Startzeit Start time Sets the start time Field E...

Page 195: ...ues and additional functions for all programme steps can be changed by switching to the Garen Backen Cooking baking screen Programmes can be overwritten or saved as a copy under a new name Entries can be made directly into the Details screen for Start Endzeit Start end time Preheat Of Wochenprogrammierungen Weekly programming cycles ...

Page 196: ...d on the home screen Fig 216 Selection screen Weekly programming PRO deactivated left activated right Symbol Designation function Field Weekly programming PRO Activate deactivate the weekly programming with the OFF ON switch Today this week all Filter time range Filter by time range for the weekly programme display Display field Programme image Fried mushrooms Display field Programme name with men...

Page 197: ...g phase Select drying phase Field Weekly programme view from the weekly programme selection area Calling up the Weekly Programme View screen Field Startzeit Start time Enter change the day time for programme start Field Endzeit End time Enter change the day time of the programme end Field Wiederholung Repeat Enter change the repetition period Field Bestätigen Confirm Confirm entry Field Schließen ...

Page 198: ...gramme list or Cleaning programme right Fig 218 Selection screen Wochenprogramm aus Programmliste Gar Backprogramme Add weekly programme from programme list of Cooking baking programmes left and Reinigungsprogramme cleaning programmes right Working steps Touch the Wochenprogrammierung PRO Weekly programming PRO 1 field on the start screen The selection screen Wochenprogrammierung PRO Weekly progra...

Page 199: ...ying phase field Cleaning Touch the Startzeit einstellen Set Start line or Set End Time line 6 und or lines Wiederholung Repeat Confirm your entry with or close with 7 Weekly programme appears with day and start end time in the Weekly programming PRO overview Weekly programmes start automatically 12 1 1 Setting the start end time for weekly programming PRO Fig 219 Start time setting for weekly pro...

Page 200: ...y s of the month same start end time never no repetition can be agreed The next weekly programme to be started is displayed on the stand by screen The stored weekly programmes will be started in the agreed periods until they are deleted Fig 221 Programme repeat selection screen on the left and Weekly programming PRO display right Fig 222 Repetition of the programme daily left or weekly right ...

Page 201: ...t setting is never 2 Touch the line Wiederholungszeitraum Repeat period The overview of the current month with the suggested days green appears 3 Touch to switch to the months 4 Select a day 5 Confirm your entry with or close with The weekly programme appears with day and start end time in the PRO weekly programme overview according to the selected time range display today this week or all Weekly ...

Page 202: ...amme Fig 224 Changing the Wochenprogrammierung PRO ändern für Programmliste Weekly programming PRO screen for the programme list Fig 225 Changing the Wochenprogrammierung PRO ändern für autoclean PRO weekly programming PRO screen for autoclean PRO ...

Page 203: ...d scheduled weekly programmes 3 Touch the Programmdetails Programme Details field in the programme line The Wochenprogrammierung PRO ändern löschen Change Delete Weekly Programming PRO screen appears The following settings can be changed Preheating for cooking baking programme Active Temp and drying for cleaning programmes Start end time Repetition options 4 Touch the line to be changed 5 Confirm ...

Page 204: ...election screen Wochenprogrammierung PRO Weekly programming PRO appears Weekly programme switch is set to ON green Touch the Programmdetails field in the programme line 2 The Wochenprogramm Weekly Programme löschen delete screen appears Confirm your entry with 3 The screen with the query Wochenprogramm löschen Delete weekly programme appears Confirm your entry with or close with 4 The weekly progr...

Page 205: ... same time be terminated at the same time INFORMATION Multi Cooking PRO Multi Baking PRO can be activated as follows directly from the start screen also with insertion selection for the containers of the items to be cooked baked in the programme details of the programme list also with insertion selection for the containers of the items to be cooked baked during operation also with insert selection...

Page 206: ...g field on the start screen Fig 227 Screen Selection of all Multi Cooking PRO Multi Baking PRO programmes before left and after right selection of a master programme Fig 228 Selection of Multi Cooking PRO Multi Baking PRO programmes with similar setting values Fig 229 Start Multi Cooking PRO Multi Baking PRO without left and with right insertion selection ...

Page 207: ...display The selected humidity in the cooking chamber is displayed e g 0 Field Einschubauswahl Insertion selection Defining the Einschubauswahl Insertion selection for Multi Cooking PRO Multi Baking PRO programmes 1 Display insertion level Shows the insertion level in the programme line Programm duplizieren Duplicate Programme Programme is duplicated and placed at the end of the list Programm lösch...

Page 208: ...oking PRO Multi Baking PRO Save Multi Cooking Multi Baking PRO settings programme s Field Start Start Multi Cooking PRO Baking PRO 00 25 00 Display field Cooking baking time The cooking baking time for each programme is displayed Big muffins Display Baking cooking programme name BAKERY ITEMS Display Assigned menu product group Tab 55 Elements of screens Auswahl Selection and Start Multi Cooking PR...

Page 209: ...nsertion level can be defined by touching the Auswahl der Einschubebene Select insertion level field 6 If necessary Activate the Vorheizen Preheating field Touch field Start Endzeitvorwahl Start end preset time Touch the Startzeit Start Set line or line Endzeit einstellen 7 Confirm your entry with or close with The selected function field for preheating and the start end time appears in light grey...

Page 210: ... Fig 230 Work procedures Add a programme to Multi Cooking PRO Multi Baking PRO example Last 20 Working steps Touch fields Last 20 Programme list or Favourites in the 1 start screen The screen with the selected programme overview appears 2 Touch the Programminfo for the desired programme line The Programm Info Programme info screen appears Touch the Details field 3 The Programmdetails screen appear...

Page 211: ...tart Endzeitvorwahl Start end preset time 7 Touch the Startzeit Start Set line or line Endzeit einstellen 8 Confirm your entry with or close with 9 The selected function field for preheating and the start end time appears in light grey Touch field PRO Multi Cooking PRO Multi Baking 10 Select the Start field 11 Multi Cooking PRO Multi Baking PRO programmes start immediately without a start end time...

Page 212: ...s fields in the home screen Multi Cooking Auswahl Multi Cooking PRO PRO Selection screen OR list of applicable Multi Cooking PRO programmes appears Touch the Select insertion level field 2 Level list 1 to 5 or 6 appears Select an insertion level via the numeric keypad or keys 3 The insertion level appears with a number in the programme list ...

Page 213: ...y for programmes without selection of the insertion level The list of programmes without selection of the insertion level is ordered by the end of the programme the next programme ending is at the top Sorting can be changed by the user Once the level has been selected it is possible to change the position sequence of the multi cooking programmes by pressing and holding A start end time cannot be s...

Page 214: ...3 3 Duplicating multi cooking pro programme Fig 233 Work procedures Duplicate programme Select the field Duplizieren Duplicate in the programme line to be duplicated The cooking programme with the same settings is entered at the end of the list ...

Page 215: ...O Baking PRO by touching the Start field When programmes are started refer to the length of the progress bar green and the remaining time for information about the progress 13 4 2 Start with preset time Fig 235 Start Multi Cooking PRO Multi Baking PRO with start time left and end time right Fig 236 Screen Ongoing operation with preset end time programme 1 started programme 2 not yet started ...

Page 216: ... start time is displayed When the end time is preset the time until the start of the first programme and the end time of Multi Cooking PRO Multi Baking PRO are displayed When programmes are automatically started refer to the length of the progress bar green and the remaining time for information about the progress 13 4 3 Adding duplicating and deleting programmes during operation Fig 237 Adding du...

Page 217: ...s added placed at the end of the list and started immediately Duplicating programmes Touch field Duplizieren Duplicate in the programme line to be duplicated on the laufender Betrieb Ongoing operation screen Duplicated programme is added placed at the end of the list and started immediately Delete programmes Touch the Löschen Delete field field in the programme line to be deleted on the laufender ...

Page 218: ...the cooking chamber door 3 Remove the food reload if necessary 4 Closing the cooking chamber door Programme lines of expired programmes red and green are deleted from the screen 5 If necessary add duplicate programme for new the items to be cooked baked When all Multi Cooking PRO Baking PRO programmes have finished and the food has been removed the Start Multi Cooking PRO Baking screen appears aga...

Page 219: ...ring operation The screen Nachfrage bei vorzeitigem Programmabbruch Request for early programme end appears 2 Confirm your entry with or close with The Start Multi Cooking PRO Baking screen appears when confirmed Screen Laufender Betrieb Ongoing operation being Schließen Closed ...

Page 220: ...wever be changed as required Special programmes are called up by touching field on the home screen 14 1 Description of special programmes For the hot air unit Fig 241 Selection screen Hot air unit special programme Live steam system module Fig 242 Selection screen for Sonderprogramme Special programmes with Live Steam System module ...

Page 221: ...re cooking Select Low temperature cooking Field Delta T cooking Select Delta T cooking Field Regeneration Select for re heating ready food Field Halten Hold Select to keep the food at a preset temperature Field Auftauen Defrosting Select for defrosting deep frozen food Field Gären Fermentation Select for dough dough pieces fermentation Tab 56 Full overview of selectable special programmes ...

Page 222: ...ture Cooking line The screen for selecting the Heißluft hot air operating mode appears 2 Touch the desired Betriebsart Operating mode line The Betriebsart mit Vorgabewerten Operating Mode with Default Values screen appears 3 Touch the value field for the Temperatur Temperature and or Kerntemperatur Core temperatre to be changed The Werteeingabe Value entry screen appears 4 Enter change the value f...

Page 223: ...rt the special low temperature cooking programme with Steam injection module Fig 244 Screens Auswahl Niedertemperaturgaren für Modul Beschwadung Selection of low temperature cooking for humidification module Live steam system module Fig 245 Screens Auswahl Niedertemperaturgaren Low temperature cooking selection and Betriebsart Operating mode ...

Page 224: ...mperatur Kerntemperatur Temperature Core temperature exactly to the degree using the numeric keypad or in 5 1 steps via fields Change the Feuchte Humidity value with the utmost accuracy using the numeric keypad or in 1 steps using the fields 5 Confirm your entry with or close with 6 If necessary edit additional functions and programme steps Switch to the Schrittübersicht Step overview screen 7 Sta...

Page 225: ...The Betriebsart mit Vorgabewerten Operating Mode with Default Values screen appears 3 Touch the value field for Temperatur Feuchte und Kerntemperatur to be changed The Werteeingabe Value entry screen appears 4 Enter change the value for Temperatur Kerntemperatur Temperature Core temperature exactly to the degree using the numeric keypad or in 5 1 steps via fields Enter change the Feuchtewert humid...

Page 226: ...an be used to reheat fully cooked foods gently after they have cooled Only for live steam system module Fig 249 Screens Regeneration selection Fig 250 Screen Voreinstellungen Regenerieren für Bankett Chargen und Teller Regeneration settings for banquet batches and plates ...

Page 227: ...emperature Feuchte humidity and Garzeit cooking time to be changed The Werteeingabe Value entry screen appears 4 Enter change the Temperature value exactly in degrees using the numeric keypad or in 5 degree steps via Enter change the Feuchtewert humidity value with the utmost accuracy using the numeric keypad or in 1 steps via The value field for entering minutes is active light grey Touch the oth...

Page 228: ... mit Vorgabewerten Operating Mode with Default Values screen appears 3 Touch the value field for Temperatur temperature Feuchte humidity and Garzeit cooking time to be changed The value entry screen appears 4 Enter change the Temperatur Temperature value exactly in degrees using the numeric keypad or in 5 degree steps via Enter change the Feuchtewert humidity value with the utmost accuracy using t...

Page 229: ... Screens Auswahl Auftauen mit Module Frischdampfsystem Selection of defrosting with Live Steam System or Beschwadung Humidification Fig 253 Screens Defrosting presets Working steps 1 Touch the Auftauen Defrosting The screen for selecting an operating mode Heißluft Kombidampf Hot air combi cooking appears 2 Touch the desired line The Betriebsart mit Vorgabewerten Operating Mode with Default Values ...

Page 230: ...numeric keypad or in steps of 1 h 1 min or 10 sec via 5 Confirm your entry with or close with 6 If necessary edit additional functions and programme steps switch to the Schrittübersicht Step overview screen 7 Start the special defrosting programme with 14 2 6 Proofing INFORMATION The fermentation process is aimed at properly loosening dough pieces Dough maturation processes such as dough swelling ...

Page 231: ...exactly to the degree using the numeric keypad or in 5 1 steps via fields Enter change the Feuchtewert humidity value with the utmost accuracy using the numeric keypad or in 1 steps via The value field for entering minutes is active light grey Touch the other value fields h or sec before your entry appears highlighted in light grey Enter change the time h min sec exactly using the numeric keypad o...

Page 232: ...modules semi automatic cleaning With autoclean PRO module fully automatic cleaning With autoclean PRO module and spray hose fully automatic cleaning INFORMATION The Cleaning and Maintenance screen can be opened by selecting the field on the home screen Symbol Designation function full 3 4 full 1 2 full 1 4 full empty Reiniger Cleaner Indicates the filling quantity of the cleaner tank Indicates whe...

Page 233: ...ing phase Select the drying stage Hose with spray head Instruction Rinse the cooking baking chamber with a hand shower Spray cleaner Instruction Spray cleaner into cooking baking chamber Wipe Instruction Wipe out and dry the cooking baking chamber Start Starts the cleaning and servicing programme Stop Stops the cleaning and servicing programme Cleaning and servicing programme Select from various p...

Page 234: ...en incl autoclean PRO 15 1 1 Required cleaners or rinse aids The following cleaning and maintenance products are approved for cleaning the cooking baking chamber Eloma Multi Clean PRO Eloma Multi Clean rinsing agent Eloma Multi Clean PRO cleaner tabs Eloma Multi Clean PRO finisher tabs INFORMATION The warranty will be rendered null and void with immediate effect if the stipulated cleaning and main...

Page 235: ...protective clothing e g long sleeved clothing protective gloves and safety goggles Do not inhale any cleaner and rinse aid spray mist or lye vapours NOTICE Material damage due to incorrect cleaner and incorrect cleaning utensils Stains in the cooking baking chamber damage to the housing Only use the stipulated cleaner and rinsing agent or cleaner and finisher tabs Do not clean the housing with fla...

Page 236: ...cleaning of the cooking chamber CAUTION Risk of burns from hot surfaces Skin burns Allow the device to cool down before cleaning CAUTION Risk of scalding from hot lye or hot steam Skin burns Allow the device to cool down before cleaning ...

Page 237: ...p tray Weekly Window panes and glass door panes use a cloth and mild detergent Cooking chamber behind air baffles use a cloth and mild detergent Fitting for the core temperature probe use a cloth and mild detergent Monthly External surfaces of the unit Degreasing cleaning agent or stainless steel cleaner soft cloth Tab 59 Overview Cleaning intervals manual cleaning and semi automatic cleaning ...

Page 238: ...g steps Heat cool cooking chamber to cleaning temperature below 60 C 1 2 Open the door after the signal 3 Use a pressure pump sprayer to spray the cooking chamber with a mixture of cleaner and water and remove large food and grease residues adhere to the hygiene plan 4 Close the door 5 Leave the cleaner to act for 10 minutes 6 Open the door after the signal 7 Thoroughly clean the cooking chamber t...

Page 239: ...en door after signal 3 Use the spray hose to remove coarse food and grease residues from the cooking chamber 4 Spray the cooking chamber with a cleaner and water mixture using a pressure pump atomizer adhere to hygiene plan 5 Close the door 6 Leave the cleaner to act for 10 minutes 7 Open the door after the signal 8 Thoroughly rinse out the cooking chamber with the hose with spray head 9 Close the...

Page 240: ...ted Fig 255 Release for swivelling air baffle shown without cooking chamber housing Requirement The device has been switched off The device has cooled down Working steps 1 Remove the hanging racks 2 Loosen the locking bracket of the air baffles and swivel them out 3 Clean the space behind the baffle with a damp cloth 4 Swivel the air baffle back in place and fasten the locking bracket ...

Page 241: ...ning agents for screens Destruction of the screen Never spray directly onto the screen The protective layer will be corroded and the image in that area will become poor Do not use window cleaners or washing up liquid Requirement The screen has been switched off In case of light soiling wipe the screen with a damp microfibre cloth Where possible use a TFT cleaner and microfibre cloth to remove deep...

Page 242: ... and door glass INFORMATION Regularly check the door mount for damage If necessary have the door mount repaired Requirement The device has been switched off The device has cooled down NOTICE Damage due to incorrect opening of the inner door with double triple glazing Damage to the door mount Do not open the inner door with double triple glazing at a more than 90 degree angle Firmly hold the inner ...

Page 243: ...autoclean PRO and a spray hose Clean separately and rinse off afterwards Working steps 1 Start semi automatic cleaning Heat cool down cooking chamber to cleaning temperature below 60 C The steaming or humidification phase for the cooking chamber begins 10 min 2 Open the door after the signal Spray the cooking chamber with a cleaner and water mixture using a 3 pressure pump atomizer adhere to hygie...

Page 244: ...arse food and grease residues from the cooking chamber 4 Close the door Reheat cooking chamber to 60 C 5 Open the door 6 Spray the cooking chamber with a cleaner and water mixture using a pressure pump atomizer adhere to hygiene plan 7 Close the door 8 Leave the cleaner to act for 10 minutes The steaming or humidification phase for the cooking chamber begins 10 min 9 Open the door after the signal...

Page 245: ...ng but consumes additional water and energy Default setting Auto temp for autoclean PRO with liquid cleaner Active temp for autoclean PRO with solid detergent INFORMATION The cleaning programme will only start when the door is closed 15 5 1 autoclean PRO with liquid cleaner Requirement The cooked baked goods have been removed Accessories e g containers have been removed The Cleaning and Care scree...

Page 246: ...ation Compact Level 1 00 45 00 h Light soiling from preparation of steamed vegetables meat products baked goods or fish and occasional preparation of roast or grilled products Basic level 2 01 10 00 h Medium normal soiling from preparation of steamed vegetables meat products baked goods or fish and occasional preparation of roast or grilled products Standard Level 3 01 35 00 h Medium to heavy soil...

Page 247: ...g 00 11 00 h For light soiling or between cooking procedures during the daily routine Commissioning 00 01 00 h After replacing the canister for cleaner or rinsing agent and when commissioning for the first time in order to fill the suction hoses Tab 60 Cleaning and care programmes list 15 5 2 autoclean PRO with solid detergent Requirement The cooked baked goods have been removed Accessories e g co...

Page 248: ...ow many tabs need to be placed in the tab tray according to the selected programme INFORMATION Number of cleaner and finisher tabs Basic 1 cleaner tab 0 finisher tabs Intensive 1 cleaner tab 0 finisher tabs Maintenance 1 cleaner tab 1 finisher tab Quick clean 1 cleaner tab 0 finisher tabs Rinse warm rinse 0 cleaner tabs 0 finisher tabs Fig 259 Number and placement of the cleaner finisher tabs scre...

Page 249: ...and warm rinse In order to prevent calcification the maintenance programme must be completed at regular intervals The frequency depends on the water hardness determined during installation and configured in the appliance Water hardness lower than or equal to dH Number of cleans possible before the maintenance programme needs to be performed 3 0 5 8 0 4 13 0 3 14 0 2 Once the threshold for performi...

Page 250: ...n as you select a cleaning programme by displaying the Please run maintenance programme now notification Fig 262 Please run maintenance programme now screen This notification will disappear once the maintenance programme is complete INFORMATION The warranty shall not apply to appliance faults caused by failure to adhere to the stipulated cycles for the maintenance programme The Water hardness leve...

Page 251: ...Cleaning and care 251 Fig 263 Water hardness level too high Please install softening system screen ...

Page 252: ...ed products Maintenance 02 30 00 h Medium to heavy soiling from preparation of steamed vegetables meat products baked goods fish or roast and grilled products Descaling and rinsing with a finisher tab Quick Cleaning 00 30 00 h Removal of coarse contamination or soiling during the daily routine This is not a complete cleaning programme and cools the appliance down Rinsing out 00 07 00 h For light s...

Page 253: ...ing cleaning 15 6 1 Cancel semi automatic cleaning INFORMATION Semi automatic cleaning can be stopped at any time Press the Stop field The Confirm programme stop screen appears Fig 264 Screen Semi Automatic Cleaning Stop Confirmation ...

Page 254: ...pped at any time It is continued with a safety flushing cycle Fig 265 Screens Stopp autoclean PRO Reinigung Stop autoclean PRO cleaning and Start Sicherheitsausspülen Start safety flushing Press the Stop field The Confirm programme stop screen appears The Start Safety Flushing screen appears Press the Start field The safety rinse will start ...

Page 255: ...s are set by the branch manager for example The branch manager determines the settings programmes images etc ahead of actual use The following Quick Modes are possible QuickMode Quick Mode Plus QuickMode Last 20 QuickMode Product Group QuickMode Menu Group Quick Mode cleaning Direct Mode Direct Mode manual 16 1 1 Setting quickmode INFORMATION QuickMode can be set or changed in Settings Service und...

Page 256: ...de 256 Fig 267 Screen Arbeitsschritte Einstellen QuickMode über Customisation Work procedures for Setting QuickMode via customization Fig 268 Screen for the work procedures for Setting QuickMode via parameters ...

Page 257: ...the desired mode The line appears in light grey 6 Touch and confirm your selection The Changed Mode Parameter screen appears 7 Return to the previous or start screen by touching or 16 1 2 QuickMode The QuickMode screen contains the following startup icons Programme list Cleaning Care Setting Service 16 1 3 Quickmode Plus The QuickMode Plus screen contains the following startup icons Programme list...

Page 258: ...g Care Setting Service 16 1 6 QuickMode Menu Group The screen QuickMode menu group contains the following startup icons Display of the menu group s Breakfast Lunch Snacks Dinner Cleaning Care Setting Service 16 1 7 Quickmode cleaning The QuickMode Cleaning screen contains the following startup icons Cleaning Care Setting Service INFORMATION A cleaning programme defined in the parameters is set and...

Page 259: ...nning or numerical codes Direct Mode ID No Programmes with different settings are ignored Multi step programmes can also be assigned 16 2 1 Set directmode INFORMATION DirectMode can be set and changed in Settings Service under Customization user setting Parameters in parameter 121 QuickMode is accessed by touching field on the start screen Fig 269 Screen DirectMode selection screen via customizati...

Page 260: ... Entry screen appears 2 Enter the password via the on screen keyboard and confirm with The Einstellungen und Service Settings and Service screen appears 3 Touch the Customization or Parameter line The Parameter screen appears 4 Select parameter 121 Mode The Mode selection screen appears 5 Touch the line for the desired mode The line appears in light grey 6 Touch and confirm your selection The Chan...

Page 261: ...r 126 Scanner activated must be set to ON in Settings and Service Set change ID character length INFORMATION The DirectMode character length for numeric keypad entries is set to 5 by default but can be changed to 4 to 8 characters in Settings and Service under Customisation or under Parameters parameter 122 DirectMode ID length Fig 273 Change ID character length screens ...

Page 262: ...nual The Direct Mode Manual screen gives the user access to the following startup functions Barcode product code entry Manual cooking Manual baking Cleaning Care Setting Service 16 2 3 Direct Mode The Direct Mode screen gives the user access to the following startup functions Barcode product code entry Cleaning Care Setting Service ...

Page 263: ...unction Model Display Appliance type e g JOKER Serial number Display Serial no of appliance Version Display of the appliance s software version Line General settings Switch to Screen Allgemeine Einstellungen General Settings Line Protocols Switch to the Protocols screen Line Settings and Service Switch to processing for settings and service password release is necessary Tab 62 Elements of the Sett...

Page 264: ...tings Line Protocols Switch to the Protocols screen Line Download and Upload Manager Switch to Upload Download Manager Line Sound Manager Switch to Sound Manager Line Personalization Switch to personalization Line cleaning and water treatment Switch to the setting for cleaning and water treatment Line Network settings Switch to network settings Settings Password enter asdf to unlock the areas of t...

Page 265: ...ge Automatic switching between standard time and daylight saving time Line Automatic summer winter time changeover Switch to set the automatic summer winter time Keypad Line Keyboard Switch to set change keyboard Programme list Line Programme list Switch to set change programme list Display mode Line Display mode Switch to set change display modes Stand by image Line Stand by image Switch to Set c...

Page 266: ...Fig 279 Enter change date and time Fig 280 Confirm change the time zone Working steps 1 Select the date time line in General Settings with The Calendar screen appears The currently set day is marked green 2 Select month year and day on the calendar via and confirm with or close with The Time Setting screen appears after confirmation 3 Enter the time hh min using the number keys or keys for hours a...

Page 267: ...he line Automatic summer winter time in General Settings with The screen for setting the automatic summer winter time appears 2 Select Automatic summer winter time ON OFF and confirm with or close with The Allgemeine Einstellungen General Settings screen appears 17 1 2 Changing language and keyboard Fig 282 Screens Selection Change Language and Keyboard Working steps 1 Select the language or keybo...

Page 268: ... Fig 283 Screen sequence Change load programme lists Working steps 1 Select the Programme list line in General Settings with The Programme list selection screen is displayed 2 Select from the preset Eloma programme list Preinstalled programme list s of the appliance own programme list s Must be uploaded via USB stick 3 After successful completion the confirmation screen appears and is confirmed wi...

Page 269: ...ayed 2 Mark the mode dark or bright and confirm cancel with General Settings screen appears in the selected display mode 17 1 5 Select Stand by image and Pause time INFORMATION The following sources are possible for the stand by screen Image file provided by Eloma Image file of the appliance Image file from the user loaded via USB stick Only images in the png and jpg file formats are processed Fig...

Page 270: ... The Allgemeine Einstellungen General Settings screen appears 3 Select the Stand by Zeit Stand by time line in Allgemeinen Einstellungen General settings with The Pause Time Selection screen is displayed 4 Select the pause time and confirm with or close with The Allgemeine Einstellungen General Settings screen appears 17 1 6 Selecting the HOME SCREEN INFORMATION It is possible to configure the hom...

Page 271: ...d function fields 2 Select the Startbildschirm Home screen and confirm with or close with The Allgemeine Einstellungen General Settings screen appears 17 1 7 Password manager With the password manager passwords for two access levels operator management can be agreed and managed Fig 288 Password entry with hidden left and open character display right NOTICE To switch from hidden to open character d...

Page 272: ...e current password and confirm with The Allgemeine Einstellungen General Settings screen appears Parameters and settings can be changed INFORMATION It is recommended to use different passwords for the different access levels 17 1 8 Appliance startup INFORMATION These settings were already queried at the initial startup Startup can be performed again at any time via General Settings in the Settings...

Page 273: ...itch on Working steps 1 Select the Restart Startup line in General Settings with The query screen appears 2 Confirm your entry with or close with After confirmation startup will take place after the appliance has been restarted The Allgemeine Einstellungen General Settings screen appears ...

Page 274: ...ts of the cooking baking and cleaning processes sorted by day Consumption Shows the consumption data of the logged cooking baking and cleaning processes sorted by day Door Shows how often the door has been opened and closed Fault messages Shows the occurring fault messages and warnings and sorts them in order of occurrence Device properties Display of Start end time and duration of cooking baking ...

Page 275: ...nd display of programmes Fig 293 Protocol View screen e g HACCP Symbol Designation function Friday Day of the week 2019 11 29 Date HACCP report Protocol type Field Download Download from USB stick Field Download last 7 days Download from USB stick Tab 66 Elements of the Protokolle Protocols screen ...

Page 276: ...y appears 4 Select programme line Screen view of the protocol appears 17 2 2 Up Download of Protocols Working steps 1 Select the Protocols line in Settings and Service with The Protocol type selection screen appears 2 Select the line of the protocol type e g HACCP List of the last 30 days appears 3 Select line s of the day s List of programmes for that day s appears 4 Plug the USB stick into JOKER...

Page 277: ...4 Scroll to the desired parameter line and select it Parameter list or numeric prompt appears 5 Select a line or enter numerical value or keyboard and confirm with or close with The Parameter List screen appears 17 3 2 Parameter list No Text Selection option default Description 011 Time display in 24h Activate deactivate with key Default Activated The time display can be changed to 24h format or 1...

Page 278: ...Flashing at the end of cooking Activate deactivate with key Default Deactivated Activated The light flashes at cooking end Deactivated The light does not flash at cooking end 017 Graphic display Dark mode Light mode Default Dark mode Selection between dark display mode or bright display mode 021 Fair Mode Activate deactivate with key Default Deactivated In measurement mode all functions are displa...

Page 279: ...nd of a programme a sound will be heard for a certain time The user can select a sound from a number of different tones 036 Programme end Volume from volume level 0 to volume level 10 Default 5 The volume of the sound that is heard at the end of the programme can be adjusted 037 Programme end sound duration from 0 s to 999 s Default 5 s The playback time of the sound is adjustable 038 Programme en...

Page 280: ...rogram Default StartCombiProgram This sound will be heard when the user is scheduled to add the next product to the appliance 046 Multi Cooking PRO Start volume from volume level 0 to volume level 10 Default 5 You can adjust the volume of the sound that is emitted when the next product is placed in the unit 047 Multi Cooking PRO start sound duration from 0 s to 999 s Default 5 s The playback time ...

Page 281: ...ume level 0 to volume level 10 Default 5 The volume of the sound that is heard at the beginning of the Cook Hold special programme can be adjusted 057 Keep warm sound duration from 0 s to 999 s Default 3 s The playback time of the sound is adjustable 058 Keep warm repetition from 0 s to 999 s Default 3 s The sound can be repeated after a certain time This time can be set 061 Critical Error Volume ...

Page 282: ...TC 6 UTC 5 UTC 4 UTC 3 30 UTC 3 UTC 2 UTC 1 UTC 0 UTC 1 UTC 2 UTC 3 UTC 3 30 UTC 4 UTC 4 30 UTC 5 UTC 5 30 UTC 5 45 UTC 6 UTC 6 30 UTC 7 UTC 8 UTC 8 30 UTC 9 UTC 9 30 UTC 10 UTC 10 30 UTC 11 UTC 12 UTC 12 45 UTC 13 UTC 14 Default UTC 1 The user can select the difference to world time UTC here 111 Home screen Last20 Programmes Favourites Default Last20 The Last20 list programme list favourites list...

Page 283: ...ot desired the user can deactivate this function The change field is no longer displayed 117 Display infinite Activate deactivate with key Default Deactivated Selection between the different symbols for continuous mode Activated Deactivated 120 Humidification in time Activate deactivate with key Default Deactivated Humidification can be controlled by quantity ml or by duration s Activated Humidifi...

Page 284: ...de ID Manager and manual cooking baking are available 122 DirectMode ID Length 4 characters to 8 characters Default 5 The user can store an ID for a programme and call the programme with this specified ID This parameter specifies how many digits this ID may have 124 Core temperature delay active Activate deactivate with key Default activated Switch the KT delay on or off 125 KT Delay Duration from...

Page 285: ...hide the Step Overview field in the programme list 134 No Multi Cooking PRO in operation Activate deactivate with key Default Deactivated The Multi Cooking PRO field can be hidden during operation 135 Disable steam jet icon Activate deactivate with key Default Deactivated The manual humidification field can be hidden during operation 136 Cooking time extension in last step only Activate deactivate...

Page 286: ...tivate with key Default Deactivated When this parameter is activated the Restart field is displayed at the end of a cooking baking process in order to restart the previous process 146 Warning autoclean PRO Do not open Activate deactivate with key Default Deactivated When this parameter is activated a warning message is displayed not to open the door during the cleaning process 147 Preheating in re...

Page 287: ...g interval 5 h 100 h Cooking time until the cleaning instruction is displayed 155 Hide cleaner reset icons Activate deactivate with key Default Deactivated After changing the cleaning agent container touching the field resets it to 100 and acknowledges This field can be hidden 156 Hide water filter reset icon Activate deactivate with key Default Deactivated After changing the water filter touching...

Page 288: ...isplayed 163 Drying activated Activate deactivate with key Default activated Activate deactivate drying after cleaning 164 Cool Down Mode Cleaning Active Temp Auto Temp Manual Temp Default Auto Temp This is where you define how the device cools down before a cleaning programme Active temp Quick cooling Water is used for cooling Auto Temp Slow cooling Energy is saved and no water is used Manual Tem...

Page 289: ...emperature holding duration Enter holding duration for standby temperature Defines how long the temperature is held when working in standby temperature mode 173 Skip programme info popup Activate deactivate with key Default activated Activate deactivate popup for skip programme info 174 Type Group selection Menu groups Product groups Both Selection whether menu groups product groups or both are di...

Page 290: ... from to the JOKER Cooking baking programmes and programme lists Appliance and product images Operating and signal sounds Customer backups and software backups Fig 294 Upload DownloadManager selection screen Fig 295 Screens Download Upload Back cooking programmes Off 296 Screens Download images and upload sounds ...

Page 291: ...reen when active Field Download Download from USB stick Field Upload Upload to USB stick Check All field Select all Deactivate all field Deselect all Activate Customised field Select single ones Deactivate Customised field Remove marker from customised ones Field Delete Delete selected ones Tab 68 Upload Download Manager elements ...

Page 292: ...e screen appears 4 Select the Upload DownloadManager line File Type Selection screen appears 5 Select the line of the desired file type programmes programme lists images sounds etc The desired selection screen appears 6 Select all or single files and call up Upload Download then start data transfer When the transfer is complete the files are added to the screen INFORMATION If data transmission was...

Page 293: ...certain events can be assigned specific tones with time duration and volume as well as their triggering times Fig 298 Screen Selection List Sound Manager Fig 299 Screens Event selection left and Setting changing sound duration right Fig 300 Adjust Edit Screen Sound Volume ...

Page 294: ...allows adjusting selected parameters for the customised preparation of meals and items to be baked in line with the customer s needs This is an advantage for e g large and chain customers see also parameter list Fig 301 Parameter selection screen Customisation ...

Page 295: ...d This helps to save energy and resources By specifying the cleaning and filter change intervals with reminder messages Joker s necessary hygiene and gentle handling can be ensured Fig 302 Cleaning and water treatment selection screen 17 7 1 Water treatment Fig 303 Water treatment screen By selecting the parameters for the water treatment the monitoring is switched on off the flow rate is set chan...

Page 296: ...e defined 17 7 3 Cleaning reminder menu Fig 305 Reminder Menu Screen Specifications for cleaning and filter change intervals as well as blocking times can be specified for the appliance 17 7 4 Starting up the cleaning programme INFORMATION Cleaning programme Always start up the cleaning programme upon initial installation and after changing the liquid detergent canister Fig 306 Screens Cleaning st...

Page 297: ...ing and Care field The Cleaning and Care screen is displayed 2 Select Commissioning 3 Press the Start field Cleaning Progress screen will appear and time will count down to 00 00 00 4 When the programme ends confirm the Stop field The confirmation screen appears 5 Confirm your entry with or close with The Cleaning and Care screen is displayed ...

Page 298: ...Settings and Service 298 17 8 Network settings Fig 308 Network configuration screen LAN and W LAN ...

Page 299: ...amber does not drain off The drain is blocked Clean the drain strainer Clean the device s drain outlet Make sure that the drainage system provided by the user is free White stains in the cooking chamber Water hardness is too high Install a water softener or replace the water softener currently in use Black stains in the cooking chamber The water quality is poor Install a water filter or replace th...

Page 300: ...nerate steam Check the water connection 551 The USB stick is not inserted Plug in the USB stick 550 Contact an Eloma service partner 111 Cooking chamber probe 1 is faulty Contact an Eloma service partner 112 Cooking chamber probe 2 is faulty Contact an Eloma service partner 113 116 The core temperature probe is faulty Contact an Eloma service partner The combi steamer can only be operated with res...

Page 301: ... only be operated with restrictions The autoclean PRO cleaning programme is stopped and cannot be operated Contact an Eloma service partner 312 Insufficient water available for steaming operating mode Contact an Eloma service partner The combi steamer can only be operated with restrictions 511 513 Overheating of electrical components Contact an Eloma service partner 784 Drip tray missing Insert dr...

Page 302: ...eet Wear protective clothing e g long sleeved clothing protective gloves and safety goggles Adhere to the safety notes for the stipulated cleaner and rinsing agent INFORMATION The container sizes can be set and the fill level monitoring can be activated via the fill level monitor The connections for Eloma liquid detergent PRO black and Eloma rinse aid blue are marked on the appliance Fig 309 Selec...

Page 303: ...nister connection Always connect the rinsing agent to the blue canister connection 4 Switch on the device 5 Select field Cleaner and Rinse aid The Detergent and Rinse aid screen is displayed 6 Field Reset canister of liquid detergent rinse aid The confirmation screen appears 7 Confirm your entry with or close with Level indicator for liquid detergent rinse aid is set to 100 INFORMATION Cleaning pr...

Page 304: ... steps 1 Close the operating company s water tap 2 Replace the water filter Open the operating company s water tap 3 Switch on the appliance 4 Select field Water treatment 5 The Water Treatment screen is displayed 6 Reset the water filter field 7 The counter for the water filter is reset 8 Return with field Wasseraufbereitung water treatment 9 ...

Page 305: ... Fig 312 Screens End of cleaning Commissioning and inquiry Requirement The appliance is ready for operation Working steps Select the Cleaning and Care field 1 The Cleaning and Care screen is displayed Select Commissioning 2 Press the Start field 3 Cleaning Progress screen will appear and time will count down to 00 00 00 4 At the end of the programme confirm 5 The confirmation screen appears 6 Conf...

Page 306: ...al of used devices The device must not be disposed of with the waste and must not be placed in the used devices containers at communal collection points at the end of its service life We or our service partners will be pleased to assist you with the disposal of the appliance The Eloma customer service department will be happy to provide the following information for the economical return disposal ...

Page 307: ...Disposal and environmental protection 307 ...

Page 308: ...T 49 8141 395 188 F 49 8141 395 164 sales eloma com APPLICATION ADVICE ____________ T 49 8141 395 150 applications eloma com TECHNICAL SERVICE _____________ T 49 35023 63 888 F 49 8141 359 156 service eloma com Eloma GmbH An ALI Group Company End of the list for bookmark content5 OM_EL2006398_J_MT_v2_EN 10 2021 ...

Reviews: