background image

APPENDIX B - USB DRIVER INSTALLATION

EATON 

PXG600E User Manual • IM02603003E 

Rev 5, 11-May-2012 • Firmware Version 5.03:3835

196

Procedure for Windows 7

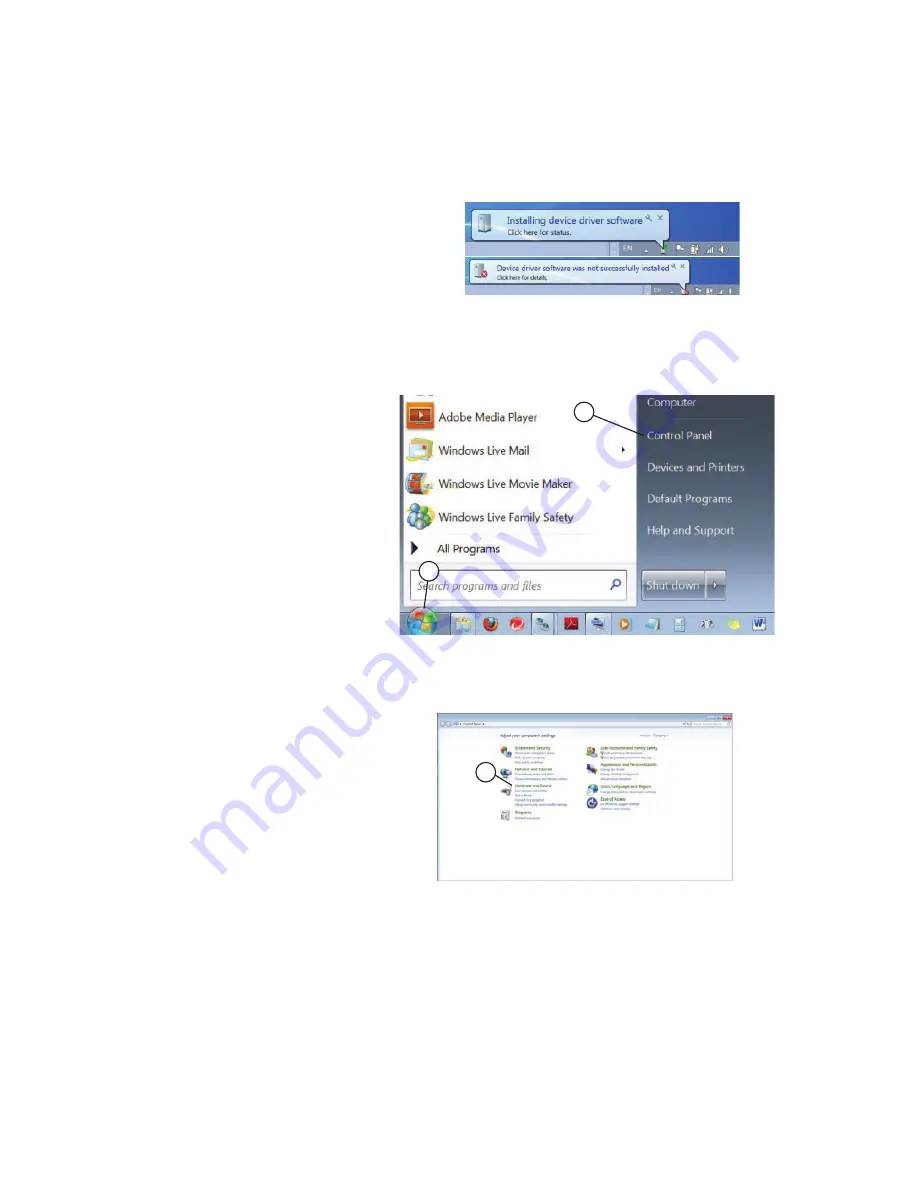
1.

You will observe the following dialog boxes on the screen.

Figure 209

2.

Click the Microsoft

®

 icon (also called the “Start Button”) 

(Figure 210, A) 

and then the


“Control Panel” link 

(Figure 210, B)

.

Figure 210

3.

Click Hardware and Sound 

(Figure 211, A)

.

Figure 211

PXG600E_205

PXG600E_206

A

B

PXG600E_207

A

Summary of Contents for PXG600E

Page 1: ...User Installation Manual IM02603003E Power Xpert Gateway 600E Rev 5 03 3835 May 2012...

Page 2: ...reen shots shown in this manual are typical for the firmware that was current at the time this manual was published Screens shown on your system may differ Current versions of this manual are availabl...

Page 3: ...ersion Number _____________________________ Product Serial or License Number ______________________________ Company _____________________________________________________ Your Name ____________________...

Page 4: ...EATON PXG600E User Manual IM02603003E Rev 5 11 May 2012 Firmware Version 5 03 3835 iv This Page Intentionally Left Blank...

Page 5: ...er Xpert Architecture 9 Power Monitoring in a Networked World 10 Easy Integration into Multi Protocol Environments 10 4 PXG600E Overview 11 Layout of PXG600E 11 5 PXG600E Theory of Operation 13 Suppor...

Page 6: ...rnet LAN Connection 33 Requirements 33 Procedure 33 8 PXG600E Configuration Web Page 37 Accessing the PXG600E Configuration Web Page 37 PXG600E Configuration Web Page Links 38 Common PXG600E Configura...

Page 7: ...r All Recipients 123 Email Parameters for Individual Recipients 124 Examples of Event Emails 125 Examples of Periodic Status Emails 126 Time Settings 127 9 Device Configuration Tabs 131 Parameters 131...

Page 8: ...Greater 166 Waveforms 167 Procedure to Download a Waveform 167 11 PXG600E System Integration 169 Accessing the PXG600E from Eaton Software Products 169 PowerNet Software 169 Power Xpert Software 169...

Page 9: ...ents 189 Procedure 189 Common Procedure for Windows XP and Windows 7 189 Procedure for Windows XP 190 Procedure for Windows 7 196 Appendix C Connecting to an Ethernet LAN 205 Using a DHCP Server to As...

Page 10: ...TABLE OF CONTENTS EATON PXG600E User Manual IM02603003E Rev 5 11 May 2012 Firmware Version 5 03 3835 x This Page Intentionally Left Blank...

Page 11: ...ARNING level hazards SHOCK HAZARDS IMPROPER INSTALLATION CAN CAUSE DEATH INJURY AND OR EQUIPMENT DAMAGE Follow all Warnings and Cautions Completely read and understand the information in this document...

Page 12: ...CHAPTER 1 SAFETY PRECAUTIONS EATON PXG600E User Manual IM02603003E Rev 5 11 May 2012 Firmware Version 5 03 3835 2 This Page Intentionally Left Blank...

Page 13: ...Screen Resolution 1280x1024 for best appearance Web Browsers Recommended IE 6 0 or higher Mozilla Firefox 2 0 or higher Number of Devices Supported 96 Devices Maximum supported between the three ports...

Page 14: ...d to the top The serial number for the PXG600E is noted on the label Note the serial number here for your convenience Network Configuration After your PXG600E Ethernet LAN network is configured proper...

Page 15: ...the PXG600E COM1 connector connect the B terminal on the QCPort device to the A terminal on the PXG600E and the A terminal on the QCPort device to the B terminal on the PXG600E NOTICE Refer to the Eat...

Page 16: ...connection protocol Check with the user manual of your Modbus RTU device to confirm the signal pinouts NOTICE The recommendation is that you have a null modem and the necessary serial cables to comple...

Page 17: ...connecting the PXG600E Ethernet LAN port to the Ethernet LAN system such as to a router or switch An Ethernet LAN Crossover cable An Ethernet LAN Crossover cable is for connecting the PXG600E Etherne...

Page 18: ...CHAPTER 2 TECHNICAL DATA EATON PXG600E User Manual IM02603003E Rev 5 11 May 2012 Firmware Version 5 03 3835 8 This Page Intentionally Left Blank...

Page 19: ...lectrical and third party products Web enabled Data can be viewed from any location with a web browser Real time power monitoring Network managers can view critical device data and make informed decis...

Page 20: ...lone device to view one system or location or it can be easily integrated into a large multi location system Easy Integration into Multi Protocol Environments The PXG600E is typically installed in an...

Page 21: ...blink it means that no devices have been entered into the PXG600E device list for this port If indicator blinks green it means that devices entered into the PXG600E device list are connected but not r...

Page 22: ...CHAPTER 4 PXG600E OVERVIEW EATON PXG600E User Manual IM02603003E Rev 5 11 May 2012 Firmware Version 5 03 3835 12 This Page Intentionally Left Blank...

Page 23: ...rs Advantage Central Monitoring Unit w WPONI Multi Port Device Server Power Xpert Gateway 400E ATS STS PDU GEN CTRL CRAC Critical Power Distribution Cooling Eaton PDU EOLR Freedom MCC SVX9000 MVX9000...

Page 24: ...INCOM messages over Ethernet This pass through capability allows the use of existing PowerNet software to configure INCOM devices from the Ethernet port of the PXG600E QCPort Network The PXG600E cont...

Page 25: ...ice have been included in the PXG600E CD ROM and are also available online at www eaton com pxg Accessing Device Data from the Ethernet LAN The PXG600E provides support for several different types of...

Page 26: ...to the Upstream Ethernet LAN port of PXGE number 4 Rules for connecting a PXG600E to the Ethernet LAN If the PXG600E is connected directly to the Local Area Network use the Upstream Ethernet LAN port...

Page 27: ...E provides a three tiered web view of your power system that bubbles up key summary information to a home screen and allows a user to drill down to details on individual devices These screens are auto...

Page 28: ...tatus indications are OK green no events present on any connected device Events red one or more events present on one or more connected devices No Devices gray there are no devices configured The Even...

Page 29: ...assigned Each device has two flags associated with it a device status flag and a communications flag The status flags operate in a similar fashion as the home page as described previously The key par...

Page 30: ...u connect your Windows computer to the USB port you will be able to access the same web interface that you can see from the LAN This can be useful in cases where the address on the LAN is not known or...

Page 31: ...take you to the trend graph for that particular parameter There is an option to view the past 24 hours 7 days 30 days or All Data when you access the Trend Graph page It should be noted that if this o...

Page 32: ...t Please refer to the device data map at www eaton com pxg for the list of events that are supported by each device User Defined Events The PXG600E supports the setting of user defined events on an in...

Page 33: ...E itself The admin level of authorization allows for reading and setting data in downstream devices Admin level also allows for configuration changes to the PXG600E NOTICE To ensure the security of yo...

Page 34: ...page 118 for configuration details Modbus TCP Enable Modbus TCP Write Enable Modbus TCP is a very common and simple protocol for data access Many commercial products and freely available software wil...

Page 35: ...Mounted with Standard Panel Mounting Hardware Figure 10 Example of PXG600E Mounted with Low Profile Mounting Hardware Optional Front PXG600E_008 C O M 1 I N C O M C O M 1 R E S T A R T SHLD D2 D1 CMN...

Page 36: ...Firmware Version 5 03 3835 26 Figure 11 DIN Rail Adapter Can be used in conjunction with Standard or Low Profile Mounting Hardware Figure 12 shows a typical installation using a combination of the st...

Page 37: ...QCPort devices For example to connect a QCPort device to the PXG600E COM1 connector connect the B terminal on the QCPort device to the A terminal on the PXG600E and the A terminal on the QCPort device...

Page 38: ...232 connection protocol Check with the user manual of your Modbus RTU device to confirm the signal pinouts NOTICE The recommendation is that you have a null modem and the necessary serial cables to co...

Page 39: ...he Eaton Electrical Field Devices Communication Wiring Specification TD 17513 included on your PXG600E CD ROM This document is also available at www eaton com pxg 5 Connect the COM1 Figure 15 H and or...

Page 40: ...CHAPTER 6 INSTALLATION OF PXG600E EATON PXG600E User Manual IM02603003E Rev 5 11 May 2012 Firmware Version 5 03 3835 30 This Page Intentionally Left Blank...

Page 41: ...r 64 bit PC compatible computer A USB AB cable USB driver files contained on the PXG600E CD ROM that came with the unit Procedure 1 Connect one end of a USB AB cable to the PXG600E USB port Figure 16...

Page 42: ...To ensure the security of your system immediately change the user and admin passwords after the initial login c The initial login set at the factory is as follows Login with User Privileges no Configu...

Page 43: ...outer or switch An Ethernet LAN Crossover cable An Ethernet LAN Crossover cable is for connecting the PXG600E Ethernet LAN port directly to the Ethernet LAN port on your computer without connecting to...

Page 44: ...he factory is shown Figure 21 A NOTICE This is only an example of entering the static IP address that was configured at the factory and not necessarily the address that you will need for your configur...

Page 45: ...mmediately change the user and admin passwords after the initial login d The initial login set at the factory is as follows Login with User Privileges no Configuration Page access User name user Passw...

Page 46: ...CHAPTER 7 ACCESSING THE PXG600E EATON PXG600E User Manual IM02603003E Rev 5 11 May 2012 Firmware Version 5 03 3835 36 This Page Intentionally Left Blank...

Page 47: ...ar Figure 23 A consists of a series of links Clicking on a link changes the type of data presented in the data presentation area Figure 23 B The default data presentation is the device list A typical...

Page 48: ...nfiguration Network Settings Serial Settings Application Servers and Time Settings Figure 25 General Configuration Device List Device Summary Personalization Product Support Passwords Update PXG Firmw...

Page 49: ...make These three functions only become visible after a change has been made to the configuration Once a change has been saved or discarded by the user the functions become invisible again NOTICE Plea...

Page 50: ...ion 5 03 3835 40 3 After you click on the OK button the following message Figure 28 appears Click OK NOTICE DO NOT click on the checkbox Figure 28 A that is next to the phrase Prevent this page from c...

Page 51: ...03 3835 Viewing Configuration Changes To view the parameters you changed click on the VIEW CHANGES link Figure 29 A Figure 29 4 After you click on the VIEW CHANGES link a screen similar to Figure 30...

Page 52: ...1 May 2012 Firmware Version 5 03 3835 42 Discarding Configuration Changes You may use the DISCARD CHANGES link Figure 31 A to delete all of the changes you entered This will delete all changes that ar...

Page 53: ...Enter INCOM Receive Timeout Extend Figure 32 C in milliseconds INCOM Receive Timeout Extend is a value which is added to the default INCOM timeout when receiving data from an INCOM device It allows t...

Page 54: ...guration click on the COM1 link Figure 33 A in the toolbar of the PXG600E configuration web page Figure 33 2 Select the Protocol from the PROTOCOL drop down menu Figure 33 B There are two items to sel...

Page 55: ...p down menu Figure 33 D Choose from the following number of stop bits a 1 default b 2 5 If you chose Modbus RTU for the device protocol you can select the Parity from the PARITY drop down menu Figure...

Page 56: ...uration click on the COM2 link Figure 35 A in the toolbar of the PXG600E configuration web page Figure 35 2 Select the Protocol from the PROTOCOL drop down menu Figure 35 B There are two items to sele...

Page 57: ...Modbus RTU for the device protocol you can select the Stop Bits from the STOP BITS drop down menu Figure 35 D Choose from the following number of stop bits a 1 default b 2 5 If you chose Modbus RTU f...

Page 58: ...to the COM2A or COM2B port and QCPort devices can only be connected to COM2A NOTICE You can connect devices to either COM2A or to COM2B Both ports cannot be used at the same time Figure 37 8 You can...

Page 59: ...e toolbar of the PXG600E configuration web page 2 The initial setup screen requires that you first set a Routed Network Number Figure 38 B Each BACnet IP network uses the Routed Network Number to iden...

Page 60: ...Edit this value if necessary for a specific application 2 Auto Assign Gateway ID Figure 41 B If there is a check mark in this box the Device ID object identifier Figure 41 C cannot be modified If the...

Page 61: ...o live value The default for the time to live is 360 seconds and you can set any value in seconds from 30 to 65536 7 Auto Assign Virtual Device IDs Figure 42 C If there is a check mark in this box the...

Page 62: ...capable device is added to the PXG600E make sure it is configured correctly for the BACnet IP 1 Click the Refresh link Figure 43 A 2 Select the BACnet IP capable device Figure 43 B Figure 43 3 Check...

Page 63: ...sed to indicate a group of electrical monitoring devices connected to the same power Bus Devices are the actual communicating units that are connected to one of the downstream communications ports of...

Page 64: ...er circuits are to be labeled Feeder 1 4 The following are some of the optional settings that can be made as devices are added to the system In this example we are adding Eaton Optim 550 devices Enabl...

Page 65: ...03 3835 2 Enter Mains For this example a single Main needs to be entered in the device list editor as shown in Figure 46 3 You can SAVE ALL SETTINGS VIEW CHANGES or DISCARD CHANGES that you have made...

Page 66: ...6 4 Enter Buses For this example a single Bus needs to be entered under the Main in the device list editor as shown in Figure 47 5 You can SAVE ALL SETTINGS VIEW CHANGES or DISCARD CHANGES that you ha...

Page 67: ...d under the power Bus entered in Step 4 Figure 48 shows the steps to add the first device During the device configuration you will enable event triggering trending and waveform capture as required 7 Y...

Page 68: ...s Screen The Buses screen shown in Figure 50 is automatically generated based on the device list entry for this example Figure 50 10 Activate Special Features After you have added the Mains Buses and...

Page 69: ...PXG600E Main and Bus are the only devices you will find on the drop down menu If there is at least one Bus installed on the PXG600E there will be a variety of devices listed on the Create Which Device...

Page 70: ...at the answer determines what other questions are asked as you are completing the configuration of the Main The selections are a Yes default b No 6 Click on the button Figure 53 B if you are satisfied...

Page 71: ...re Version 5 03 3835 8 Select the type of trip device from the drop down menu Figure 54 A Figure 54 9 Click on the button Figure 54 B to proceed to Step 11 if you are satisfied with your selection 10...

Page 72: ...e answer determines what other questions are asked as you are completing the configuration of the Main The selections are a Yes default b No 12 Click on the button Figure 55 B if you are satisfied wit...

Page 73: ...ur selection 16 Click on the button Figure 56 C to go back to Step 1 if you wish to change the selection 17 Select the communications port to which the meter will be connected Figure 57 A There are tw...

Page 74: ...r device It is not used to provide an alarm The default value is 1000 A When you configure a particular device it is important to enter its amp rating to ensure a meaningful value is provided when you...

Page 75: ...s feature allows the user to create events on an individual device basis For more details and a description on how to use this feature go to User Events on page 133 Native Events Figure 59 C and or Fi...

Page 76: ...aving the Entries is a two step process FIrst you must click and then click SAVE ALL SETTINGS Click on the button Figure 60 E to go back to Step 1 if you wish to change the selection You can SAVE ALL...

Page 77: ...ded to the system To add a new Bus to the system follow these procedures 1 Click on the button Figure 61 A in the device list of the PXG600E configuration web page Figure 61 2 Select Bus from the Crea...

Page 78: ...l NOT have an associated Main click on NONE Figure 63 A b If the Bus WILL have an associated Main click on the Main with which the Bus will be associated Figure 63 B Figure 63 6 Click on the button Fi...

Page 79: ...the button Figure 64 C to go back to Step 1 if you wish to change the selection 11 You can SAVE ALL SETTINGS VIEW CHANGES or DISCARD CHANGES that you have made For details on how to use these functio...

Page 80: ...our electrical power system To make the explanation of how to add these devices clearer we have broken the devices into these categories Devices that connect directly to the PXG600E via COM1 or INCOM...

Page 81: ...65 2 The drop down menu Create Which Device Figure 66 A appears You can either choose a category of device types or All Device Types If you choose All Device Types you will be presented with an alphab...

Page 82: ...with your selection 7 Click on the button Figure 67 C to go back to Step 1 if you wish to change the selection 8 Select the type of device from the What is the Device Type drop down menu Figure 68 A...

Page 83: ...69 C Enter the current carrying capacity in amps for the Main you are adding The PXG600E uses this value to calculate the percentage of current capacity that is used by a particular device It is not u...

Page 84: ...This feature allows the user to create events on an individual device basis For more details and a description on how to use this feature go to User Events on page 133 Native Events Figure 70 C Click...

Page 85: ...the Entries is a two step process FIrst you must click and then click SAVE ALL SETTINGS Click on the button Figure 71 E to go back to Step 1 if you wish to change the selection You can SAVE ALL SETTI...

Page 86: ...50 remote points which may include a combination of Digitrip OPTIM Trip Units and IQ Energy Sentinels Only the BIM II is connected directly to the PXG600E instead of each individual remote point Other...

Page 87: ...tisfied with your selection 4 Click on the button Figure 73 C to go back to Step 1 if you wish to change the selection Figure 73 5 If there is more than one Bus in the system select the Bus to which t...

Page 88: ...device from the What is the Device Type drop down menu Figure 75 A Note that the list of Submasters that are available is presented 9 Click on the button Figure 75 B to proceed to Step 11 if you are s...

Page 89: ...he name of the Main as you want it to appear on PXG600E web pages Maximum number of characters is 30 Address Hex for INCOM devices decimal for Modbus RTU or QCPort devices Figure 76 B Enter the addres...

Page 90: ...This feature allows the user to create events on an individual device basis For more details and a description on how to use this feature go to User Events on page 133 Native Events Figure 70 C Click...

Page 91: ...the Entries is a two step process FIrst you must click and then click SAVE ALL SETTINGS Click on the button Figure 71 E to go back to Step 1 if you wish to change the selection You can SAVE ALL SETTI...

Page 92: ...submaster to the PXG600E using the instructions in section Procedure for Submaster on page 76 2 Map out the field devices NOTICE An IQMESII submaster is equipped with connectors for up to 16 current s...

Page 93: ...er Click on the button Figure 79 A in the device list of the PXG600E configuration web page Figure 79 4 The drop down menu Create Which Device Figure 80 A appears Choose Meter Point 5 Click on the but...

Page 94: ...re 81 B to proceed to Step 10 if you are satisfied with your selection 9 Click on the button Figure 81 C to go back to Step 3 if you wish to change the selection 10 Select the type of device from the...

Page 95: ...es decimal for Modbus RTU or QCPort devices Figure 83 C Enter the address of the trip device or meter Each device on the network has a unique address Capacity A Figure 83 D Enter the current carrying...

Page 96: ...This feature allows the user to create events on an individual device basis For more details and a description on how to use this feature go to User Events on page 133 Native Events Figure 84 C Click...

Page 97: ...the Entries is a two step process FIrst you must click and then click SAVE ALL SETTINGS Click on the button Figure 85 E to go back to Step 1 if you wish to change the selection You can SAVE ALL SETTI...

Page 98: ...86 A in the device list of the PXG600E configuration web page Figure 86 2 The drop down menu Create Which Device Figure 87 A appears Choose Pulse Counter 3 Click on the button Figure 87 B to proceed...

Page 99: ...isfied with your selection 7 Click on the button Figure 88 C to go back to Step 1 if you wish to change the selection 8 Select the type of device from the What is the Device Type drop down menu Figure...

Page 100: ...s a submaster connected to the INCOM network it will appear on the configuration screen every time you add additional devices to the INCOM network Unless you are adding an IQMESII meter point ignore t...

Page 101: ...ails and a description on how to use this feature go to User Events on page 133 Native Events Figure 91 C Click this tab to configure Native Events This feature allows the user to define a priority fo...

Page 102: ...the Entries is a two step process FIrst you must click and then click SAVE ALL SETTINGS Click on the button Figure 92 E to go back to Step 1 if you wish to change the selection You can SAVE ALL SETTI...

Page 103: ...lowing types of downstream devices varies significantly so a guide for editing various scenarios has been provided The types of devices that are covered are Main Bus Devices that connect directly to P...

Page 104: ...8 of the Adding a New Bus Step By Step procedure The steps to define the name and edit the name are the same c To edit devices that connect directly to the PXG600E COM1 or INCOM start at Step 11 of t...

Page 105: ...CE Waveforms that have already been captured will remain even if a device is deleted They will only be removed if they are rolled off or the user manually deletes each waveform NOTICE If you need to d...

Page 106: ...CHANGES that you have made For details on how to use these functions see Common PXG600E Configuration Functions on page 39 NOTICE When you delete a Main Bus or a device and save the changes all devic...

Page 107: ...tudio software for configuration of QCPort devices 3 Click on the Enable Writes checkbox Figure 96 C to enable or disable the ability to write to the Modbus TCP server NOTICE To ensure the security of...

Page 108: ...ion 5 03 3835 98 5 After you click on the Enable or Enable Writes checkbox a screen similar to Figure 97 appears Figure 97 6 You can SAVE ALL SETTINGS VIEW CHANGES or DISCARD CHANGES that you have mad...

Page 109: ...swords and IP Addresses on page 215 User Password 1 Click on the PASSWORDS link Figure 98 A in the toolbar of the PXG600E configuration web page Figure 98 2 Change User Password by typing the new pass...

Page 110: ...hange Admin Password by typing the new password into Admin Password box Figure 99 B and type it again into re enter box Figure 99 C NOTICE You will note that as soon as you click outside of the Admin...

Page 111: ...a screen similar to Figure 100 appears Figure 100 2 You can SAVE ALL SETTINGS VIEW CHANGES or DISCARD CHANGES that you have made For details on how to use these functions see Common PXG600E Configurat...

Page 112: ...Address NOTICE The Network Administration page provides all of the TCP IP communications settings You have two choices for configuring the PXG Fixed IP address DHCP which resolves to a fixed IP addre...

Page 113: ...Figure 102 C d Enter the Gateway Figure 102 D e If you will be using one or more Domain Name Servers type the IP address of each Domain Name Server in the corresponding Name Server box Figure 102 E U...

Page 114: ...teless auto configuration which is enabled by default The address and prefix length determined by stateless auto configuration is displayed only if the router provides them It cannot be edited by the...

Page 115: ...gure 104 A in the toolbar of the PXG600E configuration web page Figure 104 2 Modify the data that appears in line one Figure 104 B and line two Figure 104 C 3 You can change the photo Figure 105 A sho...

Page 116: ...s the screen looks similar to the one shown in Figure 106 Notice that the upload was successful Figure 106 A and the photo has been replaced Figure 106 B Figure 106 4 You can SAVE ALL SETTINGS VIEW CH...

Page 117: ...at the same location as the PXG600E to reboot All configuration settings will be retained 1 Click on the REMOTE REBOOT link Figure 107 A in the toolbar of the PXG600E configuration web page Figure 10...

Page 118: ...02603003E Rev 5 11 May 2012 Firmware Version 5 03 3835 108 4 After you click OK the Gateway rebooting please wait Figure 109 A message appears Figure 109 5 The home web page will refresh when the rebo...

Page 119: ...will be lost or become floating to a node with no value attribute This will cause the affected device to display improperly After the restore has completed make sure you edit the EDS with the correct...

Page 120: ...835 110 5 Click on the SAVE RESTORE CONFIGURATION link Figure 111 A in the toolbar of the PXG600E configuration web page 6 Click on the SAVE THE CONFIGURATION button Figure 111 B Figure 111 7 A confir...

Page 121: ...Configuration Internet Explorer 1 Click on the SAVE RESTORE CONFIGURATION link Figure 113 A in the toolbar of the PXG600E configuration web page 2 Click on the SAVE THE CONFIGURATION button Figure 113...

Page 122: ...re Version 5 03 3835 112 5 Select the location where the Save file will be stored Figure 115 A 6 Click the SAVE button Figure 115 B Figure 115 7 The file is saved to the location you selected in Step...

Page 123: ...t history will be cleared from the PXG600E The passwords WILL NOT be affected by the restore 1 Click on the SAVE RESTORE CONFIGURATION link Figure 117 A in the toolbar of the PXG600E configuration web...

Page 124: ...ll reboot The screen will have an indication that the PXG600E is rebooting Figure 120 B Figure 120 9 Wait at least four minutes for the PXG600E to completely reboot 10 The home web page should appear...

Page 125: ...Figure 121 A in the toolbar of the PXG600E configuration web page Figure 121 2 Enter the location for this specific PXG600E Figure 121 B 3 Enter the name of the person responsible for this specific PX...

Page 126: ...ecific PXG600E click on the SUPPORT button Figure 122 A and you can easily view the information Figure 122 B A link to the Eaton Power Xpert web page is provided for convenience Figure 122 C Figure 12...

Page 127: ...helpful troubleshooting aid for BACnet IP is also available on the support page Click on the SUPPORT button Figure 124 A and then click on the BACnet IP EPICS Files link Figure 124 B Download the EPI...

Page 128: ...Encapsulated QCPort used by CH Studio Software There are two distinct parts to restricting access 1 Enabling Disabling Access Control 2 Entering the IP addresses or host names of trusted computers if...

Page 129: ...imit communications to computers you trust enter those IP addresses or hostnames in the Trusted Hosts box below Note If you specify hostnames of trusted computers you must configure the IP address of...

Page 130: ...if ip udp tcp snmp RFC1213 MIB txt RFC 4133 Entity MIB groups entityPhysical entityGeneral ENTITY MIB txt RFC 4268 EntityState MIB entStateTable entStateNotifications ENTITY STATE MIB txt RFC 4268 En...

Page 131: ...s not user defined 7 Privacy The privacy algorithm Figure 126 G is displayed It is not user defined 8 Enter Read Only User Name Figure 126 H 9 Enter Read Only Password Figure 126 I Maximum limit 30 ch...

Page 132: ...us email has an event log and data log attached to it The PXG600E uses Simple Mail Transfer Protocol SMTP to send each email NOTICE Properly configuring email reports should be considered an important...

Page 133: ...a Name Server box Manually Enter IPv4 Address on page 103 2 Enter the SMTP Server IP Hostname Figure 127 B 3 Enter the SMTP Username Figure 127 C This is an optional entry This entry is only required...

Page 134: ...nt Emails box Figure 127 I if the recipient will receive an event email when an event is detected or cleared with an event log attached to it The default value is un checked 5 Click the Send Periodic...

Page 135: ...onary and the event has cleared the subject line is Power Xpert Gateway Event CLEARED Ic ID 4044 Details of the event Figure 128 C indicate The condition detected was Critical High Current Phase C Not...

Page 136: ...E that sent the email Figure 129 A The subject line Figure 129 B indicates the nature of the email Power Xpert Gateway Status Report Event attachment Figure 129 C Information about the PXG600E that se...

Page 137: ...ur own settings It is recommended that you do this prior to adding devices to the device list This will ensure that the data reported to Power Xpert Software is correctly time stamped 1 Click on the D...

Page 138: ...30 F c NTP Server IP host name 3 Figure 130 G 6 You can select the time zone where the PXG600E is located using the Time Zone drop down menu Figure 130 H This selection affects logs web display and se...

Page 139: ...CHAPTER 8 PXG600E CONFIGURATION WEB PAGE 129 EATON PXG600E User Manual IM02603003E Rev 5 11 May 2012 Firmware Version 5 03 3835 This Page Intentionally Left Blank...

Page 140: ...CHAPTER 8 PXG600E CONFIGURATION WEB PAGE EATON PXG600E User Manual IM02603003E Rev 5 11 May 2012 Firmware Version 5 03 3835 130...

Page 141: ...of downstream devices This chapter includes the procedures you need to take to configure these features Parameters on page 131 User Events on page 133 Native Events on page 136 Trends on page 138 Pul...

Page 142: ...box Figure 134 A to disable all polling trending and events for that parameter Un check the box Figure 134 A to enable all polling trending and events for that parameter Figure 134 5 Repeat Step 3 and...

Page 143: ...03E Rev 5 11 May 2012 Firmware Version 5 03 3835 User Events 1 While you are adding a downstream device or editing it a screen similar to Figure 135 appears 2 Click on the User Events Tab Figure 135 A...

Page 144: ...e up to 2 decimal places 4 Enter the text Figure 136 D that will display on event reports when the value for the parameter selected Figure 136 A drops below the low event threshold Figure 136 C The de...

Page 145: ...e condition for the parameter will change from Condition Present to Condition Cleared If the priority is set as Event Only the condition of the parameter is automatically reported as Condition Cleared...

Page 146: ...T save it first and then edit the device Otherwise the phrase NO PARAMETERS will display in the parameter drop down Figure 139 A when you click on the Native Events Tab 1 While you are adding a downst...

Page 147: ...e condition for the parameter will change from Condition Present to Condition Cleared If the priority is set as Event Only the condition of the parameter is automatically reported as Condition Cleared...

Page 148: ...b Figure 141 A to enable interval logs for selected parameters Figure 141 3 Select the parameter s you wish to enable or disable interval logs for To select individual parameters follow the instructio...

Page 149: ...re 143 A to enable interval trend logs for the individual parameter c Click the trait s Figure 143 B for the interval log you want to enable NOTICE You must select at least one trait if Interval Log E...

Page 150: ...ntries on page 142 for these actions to complete Figure 144 5 Click the DISABLE ALL button Figure 145 A to disable interval logs for all parameters Clicking the DISABLE ALL button Figure 145 A will un...

Page 151: ...device or editing it a screen similar to Figure 146 appears 2 Click on the Pulse Counting Tab Figure 146 A to configure the pulse counting device Figure 146 3 Up to four meters can be monitored by th...

Page 152: ...ion of the device click on the button Figure 148 A to save your entries in the temporary memory 2 Click on the button Figure 148 B if you wish to change the selection 3 You can SAVE ALL SETTINGS VIEW...

Page 153: ...ck the DEVICE SUMMARY link Figure 149 A and review the Device Summary to verify that the device Figure 149 B parameters have been entered correctly Figure 149 6 Configure the email feature see Configu...

Page 154: ...CHAPTER 9 DEVICE CONFIGURATION TABS EATON PXG600E User Manual IM02603003E Rev 5 11 May 2012 Firmware Version 5 03 3835 144 This Page Intentionally Left Blank...

Page 155: ...on about system operation Accessing PXG600E Web Pages Accessing the PXG600E Home Web Page To access the home web page click on the HOME button Figure 150 A Figure 150 Accessing the PXG600E Main Web Pa...

Page 156: ...Rev 5 11 May 2012 Firmware Version 5 03 3835 146 To access a Main web page from another Main web page click on a Main link Figure 152 A Figure 152 To access a Main web page from a Bus web page click o...

Page 157: ...ay 2012 Firmware Version 5 03 3835 Accessing the PXG600E Bus Web Page To access a Bus web page from the home web page click on a Bus link Figure 154 A Figure 154 To access a Bus page from any other pa...

Page 158: ...148 Accessing the PXG600E Bus Device Web Page Bus devices such as feeders and motors are associated with each Bus To access a Bus Device page 1 Access the associated Bus web page Figure 156 A Figure...

Page 159: ...3 3835 Accessing the Device Summary Web Page Device Summary gives the user the ability to view the devices respective network settings and communication status in one concise location 1 Click on the D...

Page 160: ...e Events Figure 159 D are summarized by their associated group immediately below the group status box See PXG600E Home Web Page Events on page 151 Communication Status Figure 159 E The communication s...

Page 161: ...f the events box Figure 160 B If the link says EXPAND clicking on the link will open the box If the link says COLLAPSE clicking on the link will close the box Figure 160 If the device status indicates...

Page 162: ...160 J Critical major normal minor or cautionary priorities are considered alarm conditions That means when the trigger conditions you have selected for the parameter are met you must take an action t...

Page 163: ...shown in Figure 162 Note the navigation bar Figure 162 A on the left side of the screen allows easy access to other Mains Buses and Bus devices Figure 162 PXG600E Bus Web Page Details The Bus web page...

Page 164: ...Device Web Page Details The Bus Device web page displays detailed information about the status of the Bus Device that you selected A typical Bus Device page is shown in Figure 164 Note the navigation...

Page 165: ...he ability to view the devices respective network settings and communication status in one concise location A typical Device Summary page is shown in Figure 165 Click on the PRINT link Figure 165 A to...

Page 166: ...that particular parameter There is an option to view the past 2 hours 24 hours 7 days 30 days or All Data when you access the Trend Graph page It should be noted that if this option is not selected fo...

Page 167: ...5 03 3835 NOTICE The trend graph will take several seconds to load depending upon the number of items in the trend database and the number of points trended for each device While the data is being com...

Page 168: ...ls are available All Data all data collected is displayed Last 30 Days all data collected in last 30 days is displayed Last 7 Days all data collected in last 7 days is displayed Last 24 Hours all data...

Page 169: ...es or perform maintenance on a proactive basis Procedure to Download an Event Log Use the following procedure to download an event log 1 Click on the EVENT LOG Figure 170 A button 2 Click on the VIEW...

Page 170: ...he content in each one 3 Locate the column labeled Device Parameter Display Name Figure 171 A and select that column by left clicking on the letter Figure 171 B above the column header Figure 171 A Fi...

Page 171: ...are represented by one or more entries in the log file You may then select one of the listed parameters Figure 173 D and Microsoft Excel will then filter out all the other parameters so only data for...

Page 172: ...7 or Greater 1 Open the file 2 Adjust the width of each column so you can display all of the content in each one 3 Locate the column labeled Device Parameter Display Name Figure 175 A and select that...

Page 173: ...nu Figure 176 D lists of all the parameter names that are represented by one or more entries in the log file You may then select one of the listed parameters Figure 176 F and Microsoft Excel will then...

Page 174: ...on 2 Select the device Figure 178 B from the drop down menu that you would like to view the interval log for Figure 178 3 Select the time interval Figure 179 A 4 Click on the VIEW THE INTERVAL LOG but...

Page 175: ...Select the device Figure 180 A from the drop down menu that you would like to erase the interval log for Each device interval log is viewed and erased independently from the other devices 2 Click on...

Page 176: ...ewing the Interval Log With Microsoft Excel 2003 1 Open the file 2 View the data for the interval log for the device you selected Figure 181 Viewing the Interval Log With Microsoft Excel 2007 or Great...

Page 177: ...the following procedure to download a data log 1 Click on the WAVEFORMS Figure 183 A button 2 Click on the download symbol Figure 183 B to download the waveform file NOTICE The file you download will...

Page 178: ...CHAPTER 10 PXG600E WEB PAGES EATON PXG600E User Manual IM02603003E Rev 5 11 May 2012 Firmware Version 5 03 3835 168 This Page Intentionally Left Blank...

Page 179: ...select an EMINT from the software device list to represent the PXG600E when configuring the PowerNet device server Power Xpert Software The PXG600E can be accessed from the Power Xpert Software More...

Page 180: ...s map shows the register assignments and data formats for the supported parameters Triggering INCOM Slave Actions from Modbus TCP The PXG600E supports a selected set of slave actions on some of the IN...

Page 181: ...egister Map The register map for pass through mode is the register map provided by the device vendor on Modbus RTU Supported Function Codes Using pass through mode the Modbus RTU device documentation...

Page 182: ...CHAPTER 11 PXG600E SYSTEM INTEGRATION EATON PXG600E User Manual IM02603003E Rev 5 11 May 2012 Firmware Version 5 03 3835 172 This Page Intentionally Left Blank...

Page 183: ...e support for new devices is developed via the electronic data sheets EDS they will be made available to all PXG600E users and can be downloaded from the website www eaton com pxg If you have a device...

Page 184: ...utilizing the CONTROL EDS that you have obtained from Eaton Corp It is recommended that you save off your original configuration before making this adjustment because this will cause all historical d...

Page 185: ...utton Figure 184 D NOTICE Please be patient the upload could take a while DO NOT touch any buttons on the browser during the upload or close the browser DO NOT disconnect power during the upload Inter...

Page 186: ...CHAPTER 12 ADDING SUPPORT FOR NEW DEVICES EATON PXG600E User Manual IM02603003E Rev 5 11 May 2012 Firmware Version 5 03 3835 176 This Page Intentionally Left Blank...

Page 187: ...les have the format rom The stands for the firmware revision number 2 Click on the UPDATE PXG FIRMWARE link Figure 186 A in the toolbar of the PXG600E configuration web page Figure 186 3 Click on the...

Page 188: ...pload or close the browser DO NOT disconnect power during the upload Interrupting the upload could cause permanent damage to the PXG600E 6 During the firmware upload the message Updating Firmware will...

Page 189: ...Version 5 03 3835 8 Wait at least four minutes for the PXG600E to completely reboot 9 The home web page should appear If not press the F5 key on your computer keyboard 10 The new version of the firmw...

Page 190: ...CHAPTER 13 FIRMWARE UPDATES EATON PXG600E User Manual IM02603003E Rev 5 11 May 2012 Firmware Version 5 03 3835 180 This Page Intentionally Left Blank...

Page 191: ...aff at 1 800 809 2772 See Warranty Information on page 187 for more information on returning the product to Eaton WAR N I N G The safety messages that follow have WARNING level hazards SHOCK HAZARDS I...

Page 192: ...eam at PQSupport eaton com or visit us on the web at www eaton com pxg Device Logs Two diagnostic logs INCOM Device Log and Modbus RTU Device Log are available These logs will help evaluate communicat...

Page 193: ...he Windows computer using a USB AB cable Connect one end of the USB cable to an empty USB port on your computer and the other end to the USB port on the PXG600E 2 Press the Restart button Figure 191 A...

Page 194: ...tors blink a Yellow Red hue depending upon the amount of signal traffic No blinking when no devices are connected COM1 and INCOM indi cators are NOT flashing periodically PXG600E is being rebooted The...

Page 195: ...d the version number on the bottom of the page Screen resolution not set to recommended 1280x1024 On a temporary basis use scroll bar to scroll screen up to view the screen content On a permanent basi...

Page 196: ...CHAPTER 14 TROUBLESHOOTING AND MAINTENANCE EATON PXG600E User Manual IM02603003E Rev 5 11 May 2012 Firmware Version 5 03 3835 186 This Page Intentionally Left Blank...

Page 197: ...O OTHER WARRANTY IS EXPRESSED OR IMPLIED EATON CORPORATION SPECIFICALLY DISCLAIMS THE IMPLIED WARRANTIES OF MERCHANTABILITY AND FITNESS FOR A PARTICULAR PURPOSE Warranty Repair If you believe your equ...

Page 198: ...n RMA number Ship the unit prepaid in the original container or a container of sufficient strength and protection to Eaton Corporation Eaton Corporation will not be responsible for damage incurred dur...

Page 199: ...CD ROM that came with the unit and also downloadable from www eaton com pxg Procedure Common Procedure for Windows XP and Windows 7 1 Insert the PXG600E CD ROM into the drive A dialog box similar to...

Page 200: ...pear on the bottom of the screen One or both of these dialog boxes should appear Figure 194 Procedure for Windows XP 1 You will observe the following dialog box on the screen Select No not this time F...

Page 201: ...wing Figure 197 a Search for the best driver in these locations Figure 197 A b Search removable media floppy CD ROM Figure 197 B c Include this location in the search Figure 197 C d Click on the BROWS...

Page 202: ...IVER INSTALLATION EATON PXG600E User Manual IM02603003E Rev 5 11 May 2012 Firmware Version 5 03 3835 192 5 Click NEXT Figure 199 A Figure 199 6 Click CONTINUE ANYWAY Figure 200 A Figure 200 PXG600E_19...

Page 203: ...ALLATION 193 EATON PXG600E User Manual IM02603003E Rev 5 11 May 2012 Firmware Version 5 03 3835 7 Wait while the USB drivers are installed Figure 201 Figure 201 8 Click FINISH Figure 202 A Figure 202...

Page 204: ...203 Figure 204 10 Unplug the USB cable from the PXG600E and reboot the computer 11 After the computer reboots plug in the USB cable and wait two minutes for the PXG600E to be fully recognized by the...

Page 205: ...Figure 207 A and press the ENTER key on the keyboard Figure 207 e Carefully review the report and find the following description Eaton PXG USB Remote NDIS Network Device Figure 208 A The exact descrip...

Page 206: ...196 Procedure for Windows 7 1 You will observe the following dialog boxes on the screen Figure 209 2 Click the Microsoft icon also called the Start Button Figure 210 A and then the Control Panel link...

Page 207: ...r Manual IM02603003E Rev 5 11 May 2012 Firmware Version 5 03 3835 4 Click on Device Manager Figure 212 A Figure 212 5 RIGHT Click on RNDIS Ethernet Gadget Figure 213 A and select Update Driver Softwar...

Page 208: ...nual IM02603003E Rev 5 11 May 2012 Firmware Version 5 03 3835 198 6 Click Browse my computer for driver software Figure 214 A Figure 214 7 Click on Let me pick from a list of device drivers on my comp...

Page 209: ...ATON PXG600E User Manual IM02603003E Rev 5 11 May 2012 Firmware Version 5 03 3835 8 Select device type a Wait until the list appears on your screen b Select Network Adapters Figure 216 A c Click NEXT...

Page 210: ...12 Firmware Version 5 03 3835 200 9 Select supplier and specific device a Select MICROSOFT CORPORATION not Microsoft Figure 217 A b Select REMOTE NDIS COMPATIBLE DEVICE Figure 217 B c Select NEXT Figu...

Page 211: ...r Manual IM02603003E Rev 5 11 May 2012 Firmware Version 5 03 3835 11 Wait while the USB drivers are installed Figure 219 Figure 219 12 Windows will indicate that the USB drivers have successfully been...

Page 212: ...02 13 The RNDIS Ethernet Gadget Figure 221 A now appears under Network Adapters in the Device Manager Figure 221 14 Unplug the USB cable from the PXG600E and reboot the computer 15 After the computer...

Page 213: ...information as reported by in the IPCONFIG command a Click the Microsoft icon also called the Start Button Figure 222 A and the start menu appears b Type cmd in the search window Figure 222 B c Click...

Page 214: ...y review the report and find the following description Eaton PXG USB Remote NDIS Network Device Figure 224 A The exact description depends upon the configuration Figure 224 a Close the CMD window NOTI...

Page 215: ...e requested a static IP address to be assigned from an existing DHCP server your network administrator should be able to tell you what the IP address will be Write the expected static IP address down...

Page 216: ...APPENDIX C CONNECTING TO AN ETHERNET LAN EATON PXG600E User Manual IM02603003E Rev 5 11 May 2012 Firmware Version 5 03 3835 206 This Page Intentionally Left Blank...

Page 217: ...ganization that issues digital certificates for use with encrypted digital transactions The digital certificate guarantees that the company holding a certificate is who it claims to be You can use the...

Page 218: ...ernet Explorer 6 or higher 1 Open the browser and type the IP address of the PXG600E followed by the path ca html in the address bar For example https 192 168 1 103 ca html The following window displa...

Page 219: ...re Version 5 03 3835 Figure 227 4 Click OPEN Figure 227 A The Certificate Window opens Figure 228 NOTICE The certificate cannot be verified yet because it is issued by a nontrusted CA Figure 228 5 Cli...

Page 220: ...opens prompting you to specify a certificate store Figure 230 Figure 230 7 Change the default setting Automatically select the certificate store based on the type of certificate to the selection Plac...

Page 221: ...A Figure 231 10 Click OK Figure 231 B The certificate wizard displays the certificate store you selected for verification Figure 232 Figure 232 11 Verify that the certification store the certificate...

Page 222: ...E User Manual IM02603003E Rev 5 11 May 2012 Firmware Version 5 03 3835 212 Figure 233 13 Click FINISH Figure 233 A to complete the wizard A message box similar to Figure 234 opens Figure 234 14 Click...

Page 223: ...5 11 May 2012 Firmware Version 5 03 3835 15 A new dialog Figure 235 box window opens to verify that the import was successful Figure 235 16 Click OK Figure 235 A 17 The certificate you installed appe...

Page 224: ...Version 5 03 3835 214 18 Close the browser and open it again 19 Next you need to verify the certificate was installed correctly 20 Open the Internet Options menu by first opening the browser navigatio...

Page 225: ...ALLATION 215 EATON PXG600E User Manual IM02603003E Rev 5 11 May 2012 Firmware Version 5 03 3835 21 The Internet Options menu Figure 238 opens Click on the Content tab Figure 238 A and then Certificate...

Page 226: ...2012 Firmware Version 5 03 3835 216 22 The Certificates menu Figure 239 opens Click on the Trusted Root Certificate Authorities tab Figure 239 A and verify the PowerXpert certificate Figure 239 B is l...

Page 227: ...ons menu Figure 240 reappears a Before you close this menu you should add the secure URL of the PXG600E to the Trusted Sites zone b Click the Security tab Figure 240 A of the Internet Options menu Fig...

Page 228: ...this website to the zone Figure 241 A making sure you enter the address using the secure server https For example https 192 168 1 103 e Click the Add button Figure 241 B f The trusted site is now lis...

Page 229: ...er Manual IM02603003E Rev 5 11 May 2012 Firmware Version 5 03 3835 24 Click the General tab on the Figure 242 A on the Internet Options menu Figure 242 and click the Delete button Figure 242 B and Del...

Page 230: ...Version 5 03 3835 220 25 Click the items you want to delete it is a good idea to delete the temporary internet files cookies and browsing history Figure 243 A after you change the Internet Options 26...

Page 231: ...TE AUTHORITY INSTALLATION 221 EATON PXG600E User Manual IM02603003E Rev 5 11 May 2012 Firmware Version 5 03 3835 27 Click the OK button Figure 244 A on the Internet Options menu Figure 244 to close it...

Page 232: ...s 192 168 1 103 The home web page for the PXG600E appears Figure 245 Note the secure certificate symbol appears Figure 245 A If you click on secure certificate symbol Figure 245 A you can view the sec...

Page 233: ...s bar For example https 192 168 1 103 ca html The following window displays Figure 246 Figure 246 2 Click on Technical Details Figure 246 A for more of an explanation of the security exception 3 Click...

Page 234: ...ure Permanently store this exception Figure 247 B is checked 7 Click Confirm Security Exception Figure 247 C after you are satisfied the certificate is legitimate Figure 248 8 The window shown in Figu...

Page 235: ...sion 5 03 3835 10 If desired click the VIEW button Figure 250 A to manually examine the contents of the certificate Figure 250 11 Click the Trust this CA to identify web sites Figure 250 B check box o...

Page 236: ...Next you need to verify the certificate was installed correctly 15 Open the Options menu by first opening the browser navigation menu Figure 251 and selecting Tools Figure 251 A and then Options Figu...

Page 237: ...5 03 3835 17 The Certificate Manager menu Figure 253 opens Verify the PowerXpert certificate Figure 253 B is listed Click OK Figure 253 C to close the Certificate Manager menu Figure 253 Figure 253 18...

Page 238: ...ge the Internet Options a Open the Clear Recent History menu by first opening the browser navigation menu Figure 255 and selecting Tools Figure 255 A and then Clear Recent History Figure 255 B Figure...

Page 239: ...21 You can now access the PXG600E using the https protocol for example https 192 168 1 103 22 Notice that the secure icon appears on the home web page Figure 257 A NOTICE The format of the home web pa...

Page 240: ...APPENDIX D ROOT CERTIFICATE AUTHORITY INSTALLATION EATON PXG600E User Manual IM02603003E Rev 5 11 May 2012 Firmware Version 5 03 3835 230 This Page Intentionally Left Blank...

Page 241: ...er IQ Analyzer 6400 6600 Meter IQ Data Meter IQ Data Plus Meter IQ Data Plus II Meter Power Manager Meter IQ Power Sentinel Meter IQMESII Meter Point Submaster IQMESII Protective DigiTrip 3000 Protect...

Page 242: ...369 Motor Relay Protective GE 469 Motor Relay Protective FP4000 FP5000 Protective FP6000 Protective EDR3000 Overload C441 Temp Monitor Qualitrol 118 Transformer Differential Relay ABB TPU 2000 QCPort...

Page 243: ...ration Protocol is a set of rules used by communications devices such as a computer router or network adapter to allow the device to request and obtain an IP address from a server which has a list of...

Page 244: ...interactive forms embedded images and other objects HTTP Hypertext Transfer Protocol is a method used to transfer or convey information on the World Wide Web Its original purpose was to provide a way...

Page 245: ...Reactive Hours 1 Million Volt Ampere Reactive Hours MWh Megawatt Hours One million Watt Hours Netmask A mask or setting normally obtained from an IT manager that is used to determine to what subnet a...

Page 246: ...ow the receiving device will indicate that it has received a message QCPort Eaton proprietary communication protocol Reactive Power For sinusoidal quantities in a two wire circuit reactive power is th...

Page 247: ...of a periodic electromagnetic wave The RMS value is obtained by taking the square root of the mean of the squared value of a function Timeout The amount of time allotted before a device stops process...

Page 248: ...APPENDIX F GLOSSARY EATON PXG600E User Manual IM02603003E Rev 5 11 May 2012 Firmware Version 5 03 3835 238 This Page Intentionally Left Blank...

Reviews: