background image

5-1

EATON

Powerware

®

9390 IAC-B and IAC-T Installation and Operation Manual

S

164201590 Rev C

powerware.com

Chapter 5

IAC Features, Options, Controls, and Operation

5.1 IAC Standard Features

The IAC has many standard features that provide cost-effective and consistently reliable

power distribution. The following descriptions provide a brief overview of the IAC controls,

and standard and optional features.

5.1.1 Maintenance Bypass Configuration

A maintenance bypass switch (MBP), in combination with the maintenance isolation switch

(MIS), can be used to completely isolate the UPS during service. The UPS can be serviced

or replaced without interrupting power to critical systems.

5.1.2 Parallel Redundant Configuration

Module output breakers (MOBs) 1 and 2 enable two UPS modules to be paralleled

together for redundancy. An optional system level breaker (SLB) provides output control

to the critical load for the whole system.

5.1.3 Parallel Redundant Configuration with Maintenance Bypass

MOBs 1 and 2 enable two UPS modules to be paralleled together for redundancy. The

MBP, in combination with the MIS, can be used to completely isolate the UPS during

service without interrupting power to critical systems.

5.1.4 Customer Interface

The IAC uses UPS building alarm inputs for MBP and MOB monitoring. One alarm input will

detect when the MBP is closed and the system is on bypass. A second building alarm is

used in parallel redundant systems to detect when the MOBs are closed.

5.1.5 Installation Features

The IAC can be installed in a

line-up-and-match

or

standalone

configuration. The cabinet

can be permanently bolted to the floor or left standing on leveling feet. Power and control

wiring can be routed through the top or bottom of the cabinet with connections made to

easily accessible terminals. Line-up-and-match cabinets are wired through knockouts in the

side panels of the units.

5.1.6 Expansion

The IAC supports custom configurations and scalability to adapt to changing and future

power and distribution needs. See paragraph 5.2 for available options.

Summary of Contents for Powerware 9390 IAC-B

Page 1: ...Powerware 9390 Integrated Accessory Cabinet IAC B and IAC T Configurations Installation and Operation Manual For use with Powerware 9390 40 80 kVA and 100 160 kVA UPS Models...

Page 2: ...quipment and save this manual for future reference Consignes de s curit CONSIGNES DE S CURIT IMPORTANTES CONSERVER CES INSTRUCTIONS CE MANUEL CONTIENT DES CONSIGNES DE S CURIT IMPORTANTES Powerware is...

Page 3: ...1 3 2 Unloading the Powerware 9390 IAC from the Pallet 3 1 3 3 IAC Cabinet Installation Maintenance Bypass Configuration 3 5 3 3 1 Line up and Match MBP IAC Installation 3 5 3 3 2 Installing IAC Line...

Page 4: ...atures 5 1 5 1 1 Maintenance Bypass Configuration 5 1 5 1 2 Parallel Redundant Configuration 5 1 5 1 3 Parallel Redundant Configuration with Maintenance Bypass 5 1 5 1 4 Customer Interface 5 1 5 1 5 I...

Page 5: ...6 2 Performing Preventive Maintenance 6 1 6 2 1 DAILY Maintenance 6 1 6 2 2 PERIODIC Maintenance 6 2 6 2 3 ANNUAL Maintenance 6 2 6 3 Short Circuits 6 2 6 4 Recycling the Used IAC 6 2 6 5 Maintenance...

Page 6: ...Table of Contents iv EATON Powerware 9390 IAC B and IAC T Installation and Operation Manual S 164201590 Rev C powerware com This page intentionally left blank...

Page 7: ...and Match IAC 3 18 Figure 3 11 40 80 kVA UPM 1 to IAC Joining Brackets 3 20 Figure 3 12 IAC to 40 80 kVA UPM 2 Joining Brackets 3 21 Figure 3 13 100 160 kVA UPM 1 to IAC Joining Brackets 3 22 Figure 3...

Page 8: ...vi EATON Powerware 9390 IAC B and IAC T Installation and Operation Manual S 164201590 Rev C powerware com This page intentionally left blank...

Page 9: ...ethod for removing power from the UPS when using the maintenance bypass to supply the load Parallel Redundant Configuration Module Output Breakers MOB 1 and 2 enable two UPS modules to be paralleled t...

Page 10: ...Introduction 1 2 EATON Powerware 9390 IAC B and IAC T Installation and Operation Manual S 164201590 Rev C powerware com Figure 1 1 Powerware 9390 IAC...

Page 11: ...the site for the installation of the IAC It discusses equipment environmental requirements inspecting and unpacking cabinets Chapter 3 Installing the IAC describes how to install and wire the IAC Sect...

Page 12: ...on the screen or LCD Icon Description Information notes call attention to important features or instructions In this manual the term UPS refers only to the UPS cabinet and its internal elements The t...

Page 13: ...ins its own energy source batteries The output terminals may carry live voltage even when the UPS is disconnected from an AC source To reduce the risk of fire or electric shock install this IAC in a t...

Page 14: ...ided UPS operation including UPS cabinet controls functions of the UPS standard features and optional accessories procedures for starting and stopping the UPS and information about maintenance and res...

Page 15: ...1 1 EATON Powerware 9390 IAC B and IAC T Installation and Operation Manual S 164201590 Rev C powerware com Section I Installation...

Page 16: ...1 2 EATON Powerware 9390 IAC B and IAC T Installation and Operation Manual S 164201590 Rev C powerware com This page intentionally left blank...

Page 17: ...Creating an Installation Plan Before installing the IAC read and understand how this manual applies to the system being installed Use the procedures and illustrations in the following chapters to crea...

Page 18: ...breakers or one feed with two upstream feeder breakers must be provided one for the UPS and one for the IAC bypass input DO NOT use one feed or a single feeder breaker to supply both the UPS and IAC P...

Page 19: ...damaged cabinet Report any damage to the carrier and contact your Eaton service representative immediately Do not tilt the IAC more than 10 from vertical or the cabinet may tip over 1 Carefully inspec...

Page 20: ...lation is complete 4 Remove the protective covering from the cabinet 5 Remove the packaging material and discard or recycle in a responsible manner 6 Inspect the contents for any evidence of physical...

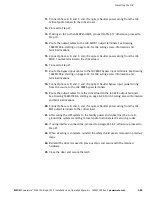
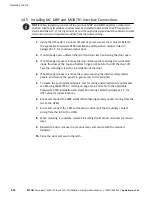
Page 21: ...or suitable for computer or electronic equipment See Table A on page A 6 for equipment weight and point loading Details about control wiring are provided in each procedure Drawing 164201590 7 and Tabl...

Page 22: ...the bracket to the pallet see Figure 3 2 Remove the rear shipping bracket If installing the cabinet permanently retain the shipping bracket and securing hardware for later use 7 Remove the three rear...

Page 23: ...IAC B and IAC T Installation and Operation Manual S 164201590 Rev C powerware com FRONT VIEW PALLET FRONT SHIPPING BRACKET SHIPPING BRACKET BOLTS SHIPPING BRACKET BOLTS Figure 3 1 Removing the Front...

Page 24: ...Installation and Operation Manual S 164201590 Rev C powerware com REAR VIEW REMOVABLE SKID SKID BOLTS 3 PLACES PALLET REAR SHIPPING BRACKET SHIPPING BRACKET BOLTS SHIPPING BRACKET BOLTS Figure 3 2 Re...

Page 25: ...with external contractor supplied wiring To install a line up and match MBP IAC proceed to paragraph 3 3 1 To install a standalone MBP IAC proceed to paragraph 3 3 3 3 3 1 Line up and Match MBP IAC In...

Page 26: ...gain access to the inside of the cabinet 6 Remove the field kit from the bottom of the cabinet and retain for later use 7 If necessary remove the cosmetic cover and hanger brackets from the right han...

Page 27: ...ng the retained hardware reinstall the shipping brackets previously removed to the front and rear of the IAC with the angle facing outward see Figure 3 1 on page 3 3 and Figure 3 2 on page 3 4 20 Secu...

Page 28: ...ket M4 screws and large nut from the field kit Place one end of the bracket over the bolt on the bottom side of the lower hinge on the IAC and loosely secure the bracket to the hinge with the large nu...

Page 29: ...t over the door hinge screw holes Replace the screws in the hinges securing the bracket to the cabinets see Figure 3 6 30 Locate the large flat bracket from the field kit Place one end of the bracket...

Page 30: ...d bottom hinge pivot points then lift the door off Save the retaining screws for reinstallation of the door 4 If not already removed remove the screws securing the internal safety shield panels and re...

Page 31: ...IB continue to Step 13 otherwise proceed to Step 19 13 Disconnect the single feed jumpers between the bypass input terminals and the rectifier input terminals on the IAC 14 Change UPS wiring for dual...

Page 32: ...eld panels removed in previous steps 24 Reinstall the door removed in previous steps and secure with the retained hardware 25 Close the door and secure the latch 3 3 3 Standalone MBP IAC Installation...

Page 33: ...al safety shield panels and remove the panels to gain access to the inside of the cabinet 6 If permanently mounting the IAC proceed to Step 9 otherwise proceed to Step 7 7 Secure the IAC in position b...

Page 34: ...e the door at the top and bottom hinge pivot points then lift the door off Save the retaining screws for reinstallation of the door 4 If not already removed remove the screws securing the internal saf...

Page 35: ...ass input terminals and the rectifier input terminals on the IAC 14 Change UPS wiring for dual feed Refer to the applicable Powerware 9390 Installation and Operation manual listed in paragraph 1 5 for...

Page 36: ...ware 9390 Installation and Operation manual listed in paragraph 1 5 for shutdown instructions 2 If not already open unfasten the IAC front door latch and swing the door open 3 If not already removed r...

Page 37: ...nal contractor supplied wiring To install a line up and match Parallel IAC proceed to paragraph 3 4 1 To install a standalone Parallel IAC proceed to paragraph 3 4 3 3 4 1 Line up and Match Parallel I...

Page 38: ...e the door at the top and bottom hinge pivot points then lift the door off Save the retaining screws for reinstallation of the door 7 Remove the screws securing the internal safety shield panels and r...

Page 39: ...ng M4 screws see Drawing 164201590 5 sheet 2 of 2 17 If not already installed hang the side panels on the hanger brackets and align with the front and rear of the UPMs 18 If not already secured secure...

Page 40: ...PM to match the thickness of hinge on the IAC Secure the bracket to the UPM using the M4 screw and to the hinge on the IAC using the screw removed in Step 25 see Figure 3 11 27 Locate a large angle br...

Page 41: ...M4 screw and to the hinge on the UPM using the screw removed in Step 30 see Figure 3 12 32 Locate a large angle bracket M4 screws and large nut from the field kit Place one end of the bracket over the...

Page 42: ...m The small flat bracket is attached to the cabinet tops first 37 Locate a small flat bracket from the field kit Align the holes in the small flat bracket over the door hinge screw holes Replace the s...

Page 43: ...ers between the bracket and the top of the IAC to match the thickness of the hinge on the UPM Secure the bracket to the IAC using the M4 screw and to the hinge on the UPM using the screw removed in St...

Page 44: ...cable Powerware 9390 Installation and Operation manual listed in paragraph 1 5 for shutdown instructions 2 If not already open unfasten the IAC front door latch and swing the door open 3 If not alread...

Page 45: ...the critical load 16 Proceed to Step 21 17 Route the bypass input cables to the IAC MBP bypass input terminals See Drawing 164201590 6 starting on page A 34 for IAC wiring access information and termi...

Page 46: ...re properly installed and secured Refer to the applicable Powerware 9390 Installation and Operation manual listed in paragraph 1 5 for installation instructions 2 Roll the IAC to the installation area...

Page 47: ...o Step 7 7 Secure the IAC in position by lowering the leveling feet until the cabinet is not resting on the casters and the cabinet is level 8 Proceed to paragraph 3 4 4 9 Using the retained hardware...

Page 48: ...nside the door at the top and bottom hinge pivot points then lift the door off Save the retaining screws for reinstallation of the door 4 If not already removed remove the screws securing the internal...

Page 49: ...on page A 34 for IAC wiring access information and terminal locations 18 Connect phase A B and C and if required Neutral bypass input power wiring from the source to the IAC MBP bypass terminals 19 R...

Page 50: ...he door Remove the retaining screws located inside the door at the top and bottom hinge pivot points then lift the door off Save the retaining screws for reinstallation of the door 4 If not already re...

Page 51: ...t This checklist ensures that you have completely installed all hardware cables and other equipment Completing all items listed on the checklist will ensure a smooth installation Make a copy of the In...

Page 52: ...xiliary contact signal wiring is connected from the IAC to the UPS A ground conductor is properly installed Air conditioning equipment is installed and operating correctly The area around the installe...

Page 53: ...__________________ _________________________________________________________________________ _________________________________________________________________________ _________________________________...

Page 54: ...Installing the IAC 3 34 EATON Powerware 9390 IAC B and IAC T Installation and Operation Manual S 164201590 Rev C powerware com This page intentionally left blank...

Page 55: ...3 35 EATON Powerware 9390 IAC B and IAC T Installation and Operation Manual S 164201590 Rev C powerware com Section II Operation...

Page 56: ...3 36 EATON Powerware 9390 IAC B and IAC T Installation and Operation Manual S 164201590 Rev C powerware com This page intentionally left blank...

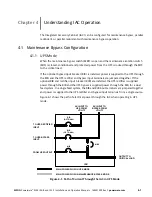
Page 57: ...BIB and the UPS rectifier and bypass input terminals are jumpered together If the optional BIB and rectifier input breaker RIB are installed the UPS rectifier is supplied power through the RIB and the...

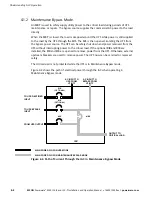
Page 58: ...er removed from the UPS without interrupting power to the critical load If the optional BIB and RIB are installed the BIB and RIB are opened to remove power from the UPS Otherwise external upstream br...

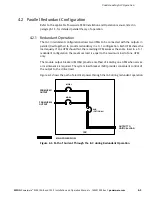
Page 59: ...1 configuration Each UPM shares the load equally If one UPM should fail the remaining UPM assumes the entire load In a 1 1 redundant configuration the maximum load is equal to the maximum load of one...

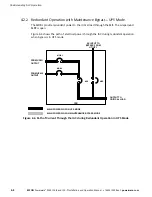
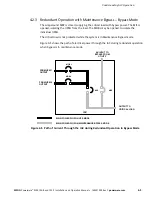
Page 60: ...ical load through the MIS The wraparound MBP is open Figure 4 4 shows the path of electrical power through the IAC during redundant operation when bypass is in UPS mode OUTPUT TO CRITICAL LOAD IAC MIS...

Page 61: ...MOBs may be opened to isolate the individual UPMs The critical load is not protected while the system is in Maintenance Bypass mode Figure 4 5 shows the path of electrical power through the IAC during...

Page 62: ...Understanding IAC Operation 4 6 EATON Powerware 9390 IAC B and IAC T Installation and Operation Manual S 164201590 Rev C powerware com This page intentionally left blank...

Page 63: ...rallel Redundant Configuration with Maintenance Bypass MOBs 1 and 2 enable two UPS modules to be paralleled together for redundancy The MBP in combination with the MIS can be used to completely isolat...

Page 64: ...dual feed systems The BIB provides a single point of input power control to the UPS and easily removes power from the UPS for servicing 5 2 2 Rectifier Input Breaker Maintenance bypass configurations...

Page 65: ...Indicates the circuit breaker is in the Off position RISK OF ELECTRIC SHOCK Indicates that a risk of electric shock is present and the associated warning should be observed CAUTION REFER TO OPERATOR S...

Page 66: ...thorough knowledge of UPS operation before attempting to operate any of the IAC controls The IAC can contain the following controls Maintenance Bypass Configuration Maintenance Bypass Switch Standard...

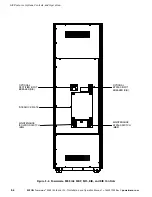
Page 67: ...ion 5 5 EATON Powerware 9390 IAC B and IAC T Installation and Operation Manual S 164201590 Rev C powerware com MAINTENANCE BYPASS SWITCH MBP MAINTENANCE ISOLATION SWITCH MIS INTERLOCK PLATE Figure 5 1...

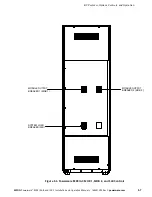
Page 68: ...AC T Installation and Operation Manual S 164201590 Rev C powerware com OPTIONAL BYPASS INPUT BREAKER BIB OPTIONAL RECTIFIER INPUT BREAKER RIB MAINTENANCE BYPASS SWITCH MBP MAINTENANCE ISOLATION SWITCH...

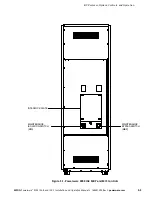
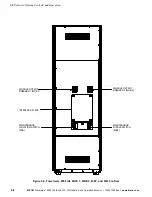
Page 69: ...EATON Powerware 9390 IAC B and IAC T Installation and Operation Manual S 164201590 Rev C powerware com MODULE OUTPUT BREAKER 1 MOB 1 SYSTEM LOAD BREAKER SLB MODULE OUTPUT BREAKER 2 MOB 2 Figure 5 3 P...

Page 70: ...nd IAC T Installation and Operation Manual S 164201590 Rev C powerware com MODULE OUTPUT BREAKER 1 MOB 1 MAINTENANCE BYPASS SWITCH MBP MAINTENANCE ISOLATION SWITCH MIS INTERLOCK PLATE MODULE OUTPUT BR...

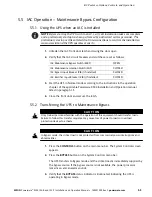
Page 71: ...d CLOSED 3 Start the UPS in Normal mode according to the instructions in the operation chapter of the applicable Powerware 9390 Installation and Operation manual listed in paragraph 1 5 4 Close the fr...

Page 72: ...eft 9 Open the MIS 10 Open the BIB and RIB if installed 11 Close the front door and secure the latch 5 5 3 Transferring the UPS from Maintenance Bypass C A U T I O N Only trained personnel familiar wi...

Page 73: ...OSED IAC System Load Breaker SLB if installed CLOSED 3 Start the UPS in Normal mode according to the Multiple Module Parallel Operation instructions in the operation chapter of the applicable Powerwar...

Page 74: ...IAC Features Options Controls and Operation 5 12 EATON Powerware 9390 IAC B and IAC T Installation and Operation Manual S 164201590 Rev C powerware com This page intentionally left blank...

Page 75: ...e should be performed by qualified service personnel only LETHAL VOLTAGE PRESENT This unit should not be operated with the cabinet doors open or protective panels removed Do not make any assumptions a...

Page 76: ...ngs 6 3 Short Circuits Short circuits are not considered normal phenomena in UPS applications Tripping of protective devices due to low impedance short circuits should be thoroughly investigated for d...

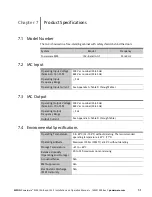
Page 77: ...ating Input Current See Appendix A Table D throughTable I 7 3 IAC Output Operating Output Voltage Nominal 10 15 208 Vac nominal 50 60 Hz 480 Vac nominal 50 60 Hz Operating Output Frequency Range 5 Hz...

Page 78: ...Product Specifications 7 2 EATON Powerware 9390 IAC B and IAC T Installation and Operation Manual S 164201590 Rev C powerware com This page intentionally left blank...

Page 79: ...binet IAC This appendix contains the following drawings 164201590 1 Typical Powerware 9390 UPS System with Integrated Accessory Cabinet 164201590 2 Physical Features and Requirements 164201590 3 IAC O...

Page 80: ...PICAL POWERWARE 9390 UPS SYSTEM WITH INTEGRATED ACCESSORY CABINET BATTERY CABINET 40 80 kVA UPS CABINET IAC MAINTENANCE BYPASS CONFIGURATION Installation Information A 2 EATON Powerware 9390 IAC B and...

Page 81: ...UPS SYSTEM WITH INTEGRATED ACCESSORY CABINET 164201590 1 BATTERY CABINET 100 160 kVA UPS CABINET IAC MAINTENANCE BYPASS CONFIGURATION 2 of 4 Installation Information A 3 EATON Powerware 9390 IAC B an...

Page 82: ...RY CABINET 40 80 kVA UPS CABINET IAC 1 1 PARALLEL REDUNDANT CONFIGURATION WITH OR WITHOUT MAINTENANCE BYPASS 164201590 1 BATTERY CABINETS NOT SHOWN 40 80 kVA UPS CABINET 3 of 4 Installation Informatio...

Page 83: ...CABINET 164201590 1 100 160 kVA UPS CABINET IAC 4 of 4 1 1 PARALLEL REDUNDANT CONFIGURATION WITH OR WITHOUT MAINTENANCE BYPASS BATTERY CABINETS NOT SHOWN 100 160 kVA UPS CABINET Installation Informat...

Page 84: ...ght Component Model Weight kg lb Shipping Installed Point Loading Powerware 9390 IAC with an MBP and MIS 333 4 735 303 9 670 4 at 76 167 5 NOTES 1 For IAC with a BIB add 6 8 kg 15 lb 2 For IAC with a...

Page 85: ...m 6 The basic environmental requirements for operation of the IAC are Ambient Temperature Range 0 40 C 32 104 F Recommended Operating Range 20 25 C 68 77 F Maximum Relative Humidity 95 noncondensing T...

Page 86: ...160 100 160 120 AND 160 160 kVA 480V 480V 120 100 AND 120 120 kVA 480V 480V NOTE 1 A minimum of two separate feeds with upstream feeder breakers or one feed with two upstream feeder breakers must be...

Page 87: ...00 AND 120 120 kVA 208V 208V NOTE 1 A minimum of two separate feeds with upstream feeder breakers or one feed with two upstream feeder breakers must be provided one for the UPS and one for the IAC byp...

Page 88: ...breakers or one feed with two upstream feeder breakers must be provided one for the UPS and one for the IAC bypass input DO NOT use one feed or a single feeder breaker to supply both the UPS and the...

Page 89: ...and one for the IAC bypass input DO NOT use one feed or a single feeder breaker to supply both the UPS and the IAC 2 Move bypass contactor wires to bypass terminals for dual feed 3 If the load require...

Page 90: ...E8 E12 E9 E10 E11 E12 F AC OUTPUT TO CRITICAL LOAD D E E4 E5 BATTERY CONVERTER INVERTER RECTIFIER NOTE 1 Remove jumper for dual feed 2 If the load requires a neutral a bypass neutral feeder must be su...

Page 91: ...E4 E5 BATTERY CONVERTER INVERTER RECTIFIER NOTE 1 Move bypass contactor wires to bypass terminals for dual feed 2 If the load requires a neutral a bypass neutral feeder must be supplied WITH UPS SERI...

Page 92: ...FEED E1 E2 E3 E12 E9 E10 E11 E12 F AC OUTPUT TO CRITICAL LOAD D E E4 E5 BATTERY CONVERTER INVERTER RECTIFIER NOTE 1 Remove jumper for dual feed 2 If the load requires a neutral a bypass neutral feeder...

Page 93: ...ER RECTIFIER NOTE 1 Move bypass contactor wires to bypass terminals for dual feed 2 If the load requires a neutral a bypass neutral feeder must be supplied SERIAL NUMBER SEVENTH DIGIT AT B OR HIGHER W...

Page 94: ...E11 E12 A SINGLE FEED JUMPER REMOVE FOR DUAL FEED F AC OUTPUT TO CRITICAL LOAD C D E BATTERY CONVERTER INVERTER RECTIFIER NOTE 1 Remove jumper for dual feed 2 If the load requires a neutral a bypass...

Page 95: ...eed 2 If the load requires a neutral a bypass neutral feeder must be supplied MOB 1 MOB 2 SLB OPTIONAL F BATTERY BREAKER BATTERY CABINET BATTERY BREAKER BATTERY CABINET IAC ONELINE DRAWINGS C E9 E10 E...

Page 96: ...IAC bypass input DO NOT use one feed or a single feeder breaker to supply both the UPS and the IAC 2 Remove jumper for dual feed 3 If the load requires a neutral a bypass neutral feeder must be suppli...

Page 97: ...UPS Standalone Installation 3 Phases 1 Ground C AMPS 300 360 480 Minimum Conductor Size Number per Phase AWG or kcmil each For contractor supplied wiring refer to the applicable Powerware 9390 UPS In...

Page 98: ...l each 3 0 2 4 0 2 400 2 NOTE Callout letters D and F map to drawing 164201590 3 sheet 10 of 11 Table F INPUT OUTPUT Ratings External Wiring Requirements for Powerware 9390 IAC 40 80 kVA 208V 1 1 Para...

Page 99: ...tor supplied wiring refer to the applicable Powerware 9390 UPS Installation and Operation manual listed in paragraph 1 5 Wiring for line up and match installation is factory supplied Neutral if requir...

Page 100: ...h Module 3 Phases 1 Ground D AMPS 278 333 444 Minimum Conductor Size Number per Phase AWG or kcmil each For contractor supplied wiring refer to the applicable Powerware 9390 UPS Installation and Opera...

Page 101: ...h Module 3 Phases 1 Ground D AMPS 120 144 192 Minimum Conductor Size Number per Phase AWG or kcmil each For contractor supplied wiring refer to the applicable Powerware 9390 UPS Installation and Opera...

Page 102: ...nstalled a minimum of two separate feeds with upstream feeder breakers or one feed with two upstream feeder breakers must be provided one for the UPS and one for the IAC bypass input DO NOT use one fe...

Page 103: ...4 375 3 8 Hex E7 Phase B 2 2 500 kcmil 42 4 375 3 8 Hex E8 Phase C 2 2 500 kcmil 42 4 375 3 8 Hex AC Input to Optional RIB E1 Phase A 2 400 500 kcmil 31 1 275 5 16 Hex E2 Phase B 2 400 500 kcmil 31 1...

Page 104: ...0 kcmil 42 4 375 3 8 Hex BIB 4 Phase B 2 2 500 kcmil 42 4 375 3 8 Hex BIB 6 Phase C 2 2 500 kcmil 42 4 375 3 8 Hex AC Output to Critical Load E9 Phase A 2 2 500 kcmil 42 4 375 3 8 Hex E10 Phase B 2 2...

Page 105: ...Critical Load E9 Phase A 2 2 500 kcmil 42 4 375 3 8 Hex E10 Phase B 2 2 500 kcmil 42 4 375 3 8 Hex E11 Phase C 2 2 500 kcmil 42 4 375 3 8 Hex Neutral E12 Neutral 16 2 600 kcmil 56 5 500 1 2 Hex Ground...

Page 106: ...500 kcmil 31 1 275 31 1 275 5 16 Hex 3 8 Hex AC Input to MOB 2 from UPS MOB2 2 Phase A 1 2 0 250 kcmil 1 2 0 500 kcmil 31 1 275 31 1 275 5 16 Hex 3 8 Hex MOB2 4 Phase B 1 2 0 250 kcmil 1 2 0 500 kcmi...

Page 107: ...4 350 kcmil 20 3 500 M4 Hex AC Output to Critical Load E9 Phase A 1 14 2 0 13 5 120 3 16 Hex E10 Phase B 1 14 2 0 13 5 120 3 16 Hex E11 Phase C 1 14 2 0 13 5 120 3 16 Hex Neutral E12 Neutral 4 2 600...

Page 108: ...ctifier Input Circuit Breaker Ratings IAC Model Input Voltage Rating 208V 100 kVA 80 Rated 450A 100 Rated 350A 120 kVA 80 Rated 500A 100 Rated 450A 160 kVA 80 Rated 700A 100 Rated 600A Table S Maximum...

Page 109: ...for the site requirements using the dial on each breaker The MIS and SLB breakers on the 40 kVA IAC are non adjustable 16 The continuous current Ir values for the corresponding lettered adjustment set...

Page 110: ...EW BOTTOM ENTRY CONDUIT LANDING PLATE FOR AC INPUT AC OUTPUT AND INTERFACE CONNECTIONS REMOVE PANEL TO DRILL OR PUNCH CONDUIT HOLES TOP ENTRY CONDUIT LANDING PLATE FOR AC INPUT AC OUTPUT AND INTERFACE...

Page 111: ...TER CABINET WIRING ACCESS KNOCKOUTS REMOVE KNOCKOUTS AS REQUIRED TO ROUTE WIRES BETWEEN CABINETS INSTALL NYLON GROMMET AFTER REMOVAL OF KNOCKOUTS INSIDE PANELS HANGER BRACKET LOCATIONS SECURED WITH SC...

Page 112: ...OM UTILITY A B C OPTIONAL RECTIFIER INPUT BREAKER RIB AC INPUT TO RIB FROM UTILITY A B C GROUND TERMINALS NEUTRAL TERMINALS SEE SHEET 10 of 22 FOR DETAILS SEE SHEET 10 of 22 FOR DETAILS SEE SHEET 9 of...

Page 113: ...IB TO UPS A B C AC OUTPUT FROM RIB TO UPS RECTIFIER A B C MAINTENANCE BYPASS SWITCH MBP SEE SHEET 9 of 22 FOR DETAILS MAINTENANCE ISOLATION SWITCH MIS OPTIONAL BYPASS INPUT BREAKER BIB SEE SHEET 9 of...

Page 114: ...s covering wiring terminals must be removed to gain access to terminals 2 160 100 kVA model must be wired for 120 kVA OPTIONAL SYSTEM LOAD BREAKER SLB MODULE OUTPUT BREAKER 2 MOB 2 SEE SHEET 13 of 22...

Page 115: ...CONFIGURATION WITH MAINTENANCE BYPASS MODULE OUTPUT BREAKER 2 MOB 2 MODULE OUTPUT BREAKER 1 MOB 1 SEE SHEET 14 of 22 FOR DETAILS AC INPUT FROM UPM 2 A B C SEE SHEET 14 of 22 FOR DETAILS AC INPUT FROM...

Page 116: ...LOAD A B C AC INPUT TO BYPASS FROM UTILITY A B C GROUND TERMINALS NEUTRAL TERMINALS 1 1 PARALLEL REDUNDANT CONFIGURATION WITH MAINTENANCE BYPASS MODULE OUTPUT BREAKER 2 MOB 2 MODULE OUTPUT BREAKER 1...

Page 117: ...ION AC OUTPUT TO CRITICAL LOAD A B C AC INPUT TO BYPASS FROM UTILITY A B C GROUND TERMINALS NEUTRAL TERMINALS 120 100 AND 120 120 kVA 480V 480V 1 1 PARALLEL REDUNDANT CONFIGURATION WITH MAINTENANCE BY...

Page 118: ...INALS MAINTENANCE BYPASS SWITCH MBP SEE SHEET 20 of 22 FOR DETAILS MAINTENANCE ISOLATION SWITCH MIS SEE SHEET 20 of 22 FOR DETAILS AC OUTPUT TO CRITICAL LOAD A B C AC INPUT TO BYPASS FROM UTILITY A B...

Page 119: ...ASS SWITCH MBP SEE SHEET 22 of 22 FOR DETAILS MAINTENANCE ISOLATION SWITCH MIS SEE SHEET 22 of 22 FOR DETAILS AC OUTPUT TO CRITICAL LOAD A B C AC INPUT TO BYPASS FROM UTILITY A B C GROUND TERMINALS MO...

Page 120: ...208V MAINTENANCE BYPASS CONFIGURATION MIS AND MBP TERMINAL DETAIL AC INPUT FROM UPS PHASE C PHASE B PHASE A MIS AC INPUT TO BYPASS FROM UTILITY PHASE C PHASE B PHASE A MBP AC OUTPUT TO CRITICAL LOAD P...

Page 121: ...T FROM RIB TO UPS RECTIFIER PHASE C PHASE B PHASE A 160 100 kVA 160 120 kVA AND 160 160 kVA 208V 208V MAINTENANCE BYPASS CONFIGURATION RIB AND BIB TERMINAL DETAIL AC OUTPUT FROM BIB TO UPS PHASE C PHA...

Page 122: ...120 100 AND 120 120 kVA 208V 208V MAINTENANCE BYPASS CONFIGURATION BIB TERMINAL DETAIL PHASE C PHASE B PHASE A AC OUTPUT FROM RIB TO UPS RECTIFIER PHASE C PHASE B PHASE A AC INPUT TO RIB FROM UTILITY...

Page 123: ...OB 2 TERMINAL DETAIL IAC POWER TERMINAL LOCATIONS MOB 1 AC INPUT FROM UPM 2 PHASE C PHASE B PHASE A MOB 2 PHASE C PHASE B PHASE A AC INPUT FROM UPM 1 PHASE C PHASE B PHASE A AC OUTPUT TO CRITICAL LOAD...

Page 124: ...HASE C PHASE B PHASE A SLB 160 100 160 120 AND 160 160 kVA 208V 208V 1 1 PARALLEL REDUNDANT CONFIGURATION SLB TERMINAL DETAIL AC OUTPUT TO CRITICAL LOAD 13 of 22 Installation Information A 46 EATON Po...

Page 125: ...LLEL REDUNDANT CONFIGURATION WITH MAINTENANCE BYPASS MOB 1 AND MOB 2 TERMINAL DETAIL IAC POWER TERMINAL LOCATIONS MOB 1 AC INPUT FROM UPM 2 PHASE C PHASE B PHASE A MOB 2 PHASE C PHASE B PHASE A AC INP...

Page 126: ...UTPUT TO CRITICAL LOAD PHASE C PHASE B PHASE A 120 100 AND 120 120 kVA 208V 208V 160 100 kVA 160 120 kVA AND 160 160 kVA 208V 208V 1 1 PARALLEL REDUNDANT CONFIGURATION WITH MAINTENANCE BYPASS MIS AND...

Page 127: ...PARALLEL REDUNDANT CONFIGURATION WITH MAINTENANCE BYPASS MOB 1 AND MOB 2 TERMINAL DETAIL IAC POWER TERMINAL LOCATIONS MOB 1 AC INPUT FROM UPM 2 PHASE C PHASE B PHASE A MOB 2 PHASE C PHASE B PHASE A AC...

Page 128: ...B PHASE A 80 40 80 50 80 60 AND 80 80 kVA 208V 208V 160 100 kVA 160 120 kVA AND 160 160 kVA 480V 480V 1 1 PARALLEL REDUNDANT CONFIGURATION WITH MAINTENANCE BYPASS MIS AND MBP TERMINAL DETAIL 17 of 22...

Page 129: ...1 PARALLEL REDUNDANT CONFIGURATION WITH MAINTENANCE BYPASS MOB 1 AND MOB 2 TERMINAL DETAIL IAC POWER TERMINAL LOCATIONS MOB 1 AC INPUT FROM UPM 2 PHASE C PHASE B PHASE A MOB 2 PHASE C PHASE B PHASE A...

Page 130: ...PHASE C PHASE B PHASE A 120 100 AND 120 120 kVA 480V 480V 1 1 PARALLEL REDUNDANT CONFIGURATION WITH MAINTENANCE BYPASS OUTPUT AND MBP TERMINAL DETAIL OUTPUT TERMINAL BLOCK 19 of 22 AC INPUT TO BYPASS...

Page 131: ...B PHASE A 40 40 kVA 208V 208V 80 40 80 50 80 60 AND 80 80 kVA 480V 480V 1 1 PARALLEL REDUNDANT CONFIGURATION WITH MAINTENANCE BYPASS OUTPUT AND MBP TERMINAL DETAIL OUTPUT TERMINAL BLOCK 20 of 22 AC I...

Page 132: ...H MAINTENANCE BYPASS MOB 1 AND MOB 2 TERMINAL DETAIL IAC POWER TERMINAL LOCATIONS MOB 1 AC INPUT FROM UPM 2 PHASE C PHASE B PHASE A MOB 2 PHASE C PHASE B PHASE A AC INPUT FROM UPM 1 21 of 22 Installat...

Page 133: ...1 1 PARALLEL REDUNDANT CONFIGURATION WITH MAINTENANCE BYPASS OUTPUT AND MBP TERMINAL DETAIL AC OUTPUT TO CRITICAL LOAD PHASE C PHASE B PHASE A OUTPUT TERMINAL BLOCK 22 of 22 AC INPUT TO BYPASS FROM U...

Page 134: ...r interface and control wiring for maintenance bypass configuration Table U TB1 Terminals Maintenance Bypass Configuration IAC Terminal TB1 Name Description 1 MBP Aux Contact NO Contacts used to indic...

Page 135: ...intenance Bypass IAC Terminal TB1 Name Description 1 MBP Aux Contact NO Contacts used to indicate whether IAC MBP is closed Contacts are closed when MBP is closed 2 MBP Aux Contact Common 3 MOB 1 Aux...

Page 136: ...overing wiring terminals must be removed or opened to gain access to terminals TERMINAL TB1 INTERFACE AND CONTROL WIRING INSTALLATION NOTES AND TERMINAL LOCATIONS 3 of 7 Installation Information A 58...

Page 137: ...anel Display Screen unless the alarms are programmed to display the alarm functional name 2 Use twisted pair wires for each alarm input and common MOB 1 AUX 1 CONTACT COMMON MOB 1 AUX 1 CONTACT NC MOB...

Page 138: ...B1 1 MBP Aux NO UPS TB1 10 Bldg Alm Common IAC TB1 2 MBP Aux Common 013106 B 164201590 7 DESCRIPTION DATE DRAWING NO SHEET REVISION 1 2 3 4 5 7 8 6 TB1 9 10 MAINTENANCE BYPASS CONFIGURATION MAINTENANC...

Page 139: ...0 MOB 2 Aux 2 Common UPM 1 TB2 1 Bldg Alm 2 UPM 1 TB2 3 Byp UPM 1 TB2 2 Bldg Alm 2 Rtn UPM 1 TB2 4 Byp Common UPM 2 TB2 1 Bldg Alm 2 UPM 2 TB2 3 Byp UPM 2 TB2 2 Bldg Alm 2 Rtn UPM 2 TB2 4 Byp Common 0...

Page 140: ...Alm IAC TB1 3 MOB 1 Aux 1 NO UPM 1 Can Bridge Card J3 2 Build Alm Common IAC TB1 4 MOB 1 Aux 1 Common UPM 2 Can Bridge Card J3 1 Build Alm IAC TB1 7 MOB 2 Aux 1 NO UPM 2 Can Bridge Card J3 2 Build Al...

Page 141: ...8 FRONT VIEW RIGHT SIDE VIEW DESCRIPTION DATE DRAWING NO SHEET REVISION Dimensions are in millimeters inches Installation Information A 63 EATON Powerware 9390 IAC B and IAC T Installation and Operati...

Page 142: ...ION DATE DRAWING NO SHEET REVISION Dimensions are in millimeters inches BOTTOM VIEW OPTIONAL FLOOR MOUNTING SHOWN 2 of 2 Installation Information A 64 EATON Powerware 9390 IAC B and IAC T Installation...

Page 143: ...f the Product b if the Product is moved to a new location by someone other than an authorized Eaton Customer Service Engineer in the USA or Agent outside of the USA or c if the Product s serial number...

Page 144: ...Warranty W 2 EATON Powerware 9390 IAC B and IAC T Installation and Operation Manual S 164201590 Rev C powerware com This page intentionally left blank...

Page 145: ......

Page 146: ...164201590C 164201590 C...

Reviews: