background image


31 


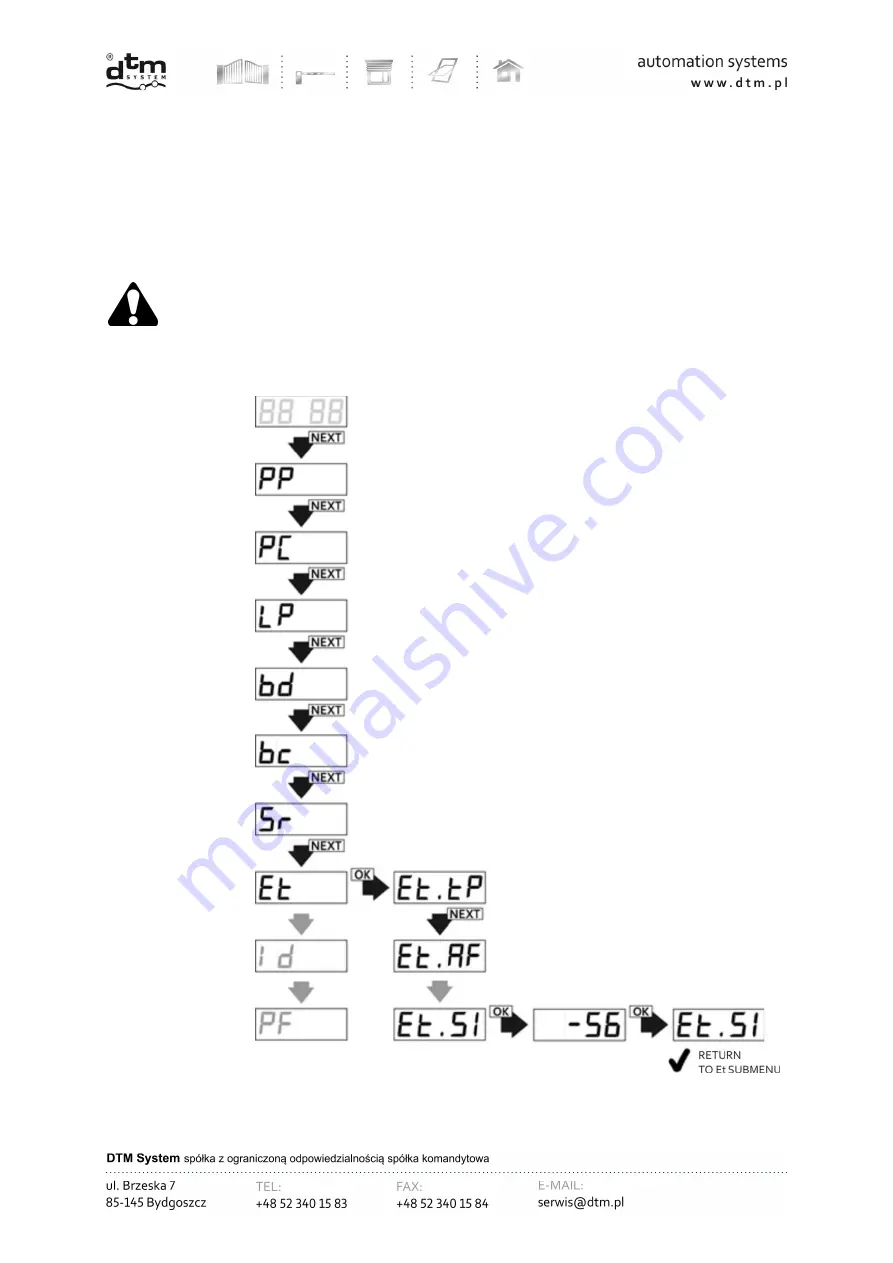
In order to make installation works  of the receiver with wireless WL card easier it is possible with the help of the Si 

function in the submenu of the Et function obtain information about the strength of the signal which reaches the receiver 
from the transmitting device (AccessPoint/router). In order to obtain such information it is necessary to (Fig.29): 


from main menu of the receiver with NEXT button choose Et option and press OK/ESC button of the receiver; 


with  NEXT  button  choose  Et.SI  option  and  press  OK/ESC  button  of  the  receiver;  the  strength  of  the  signal  is 
shown in dBm; 


to return to submenu of Et” function press OK/ESC button again. 
 

By pressing and holding OK/ESC button of the receiver it is possible to return to the menu.  


The strength of the signal given in SI function is approximate value. The closer it is to “0” the stronger is the 
strength of the signal. The value of the signal is updated every 1sec.   


Fig. 29

 Displaying the strength of radio signal of the transmitter (routera). 

Summary of Contents for cloud FLEX

Page 1: ...v 1 3 ...

Page 2: ...y 15 5 2 PC option receiver channels programming 16 5 2 1 Bistable and monostable connection time programming mode 16 5 2 2 PC CH Pulse mode programming 17 5 2 3 PC 2P Double click function programming 18 5 3 LP option the number of remotes assigned to the receiver 19 5 4 bd option main menu access blockade of the receiver PIN code 20 5 5 bc option global blockade of the remote assigning function ...

Page 3: ...1 General information 38 8 2 Technical and usage data 38 9 Optional SHRF433 module 38 9 1 General information 38 9 2 Technical and operational data 38 10 Optional external aerial 39 11 FLEX868 receiver error codes 39 12 Exemplary table of remotes evidence 39 ...

Page 4: ...er Different possible modes of output channels give huge flexibility and allow to adjust to the conditions of the majority of installations The receiver cooperates with remotes of DTM868MHz series This receiver is the improved version of the MAX receiver Strong emphasis was put for improving the functionality through the following remote control using the integration in so called Cloud optional WL...

Page 5: ...y FSK 868MHz aerial output impedance 50Ω aerial wire clamps to connect external aerial rod aerial on the casing optional splash proof IP 54 plastic surface casing openings in the receiver board are suitable for installation in buffer power supply unit casings receiver memory on the support user interface buttons and LED display possibility to protect the access to the receiver menu with PIN code r...

Page 6: ... the range of the radio remote control it is possible to use the outside aerial with the use of a coaxial cable with the impedance 50Ω The aerial coaxial cable should be connected to the clamp marked centre vein of the cable and to the clamp marked screen of the cable to mass of the arrangement Optional it is possible to use the outside aerial fixed to the casing of the receiver Fig 2 View of the ...

Page 7: ...ed in optional REL 2 REL 2 PWR module assigning removing the remote to the channels C3 C4 is made similarly as for the channels C1 C2 4 2 Fast removing of the connection between the remote button and the channel of the receiver To remove the connection between the remote button and C1 channel it is necessary to press and hold C1 button for more than 5 sec c1 is shown on the display press the remov...

Page 8: ...uccessful adding is to have a remote with the Galactic function with an authentication code set consistent with the code set in the receiver To add a remote control with the Galactic function being within the radio range of the receiver press and hold any two buttons on the remote control for 5 seconds activate the remote control in the system by pressing any button The added remote control works ...

Page 9: ...en function Alt A remote management through the Wi fi WL2 card Option and web application CloudFlex see pt 8 is an alternative option of the programming of the receiver Main menu options Fig 8 PP programming of the remotes adding removing and copying of the remote changes of the channels assigned to the buttons individual blockade of the remote assigning of the remote PC programming of the channel...

Page 10: ...to different numbering of the buttons channels of the remote assigned to the channels of the receiver After assigning the new remote we are in PP sub option which allows to CP copying of the remote settings to the other remote in the memory of the receiver Its number should be given during the process Pn association of the channels with the remote buttons bc blockade admin blockade of remote assig...

Page 11: ... and the receiver waits for reference number of the remote which is to be edited the number is entered with the use of the button NEXT confirm the number of the remote with the OK ESC button At this time we are in sub options of PP function see pt 5 1 4 5 1 6 Fig 10 Declaring the absent remote to be edited with the use of the function PP in the main menu It is necessary to have remotes evidence as...

Page 12: ...y to when the display shows CP press OK ESC button of the receiver with the NEXT button set the number of the remote from which the settings are to be copied short pressing enlarges the value holding the button moves to the next position press OK ESC button the remote edited gets the configuration of the buttons as the remote from set position Pressing and holding OK ESC button of the receiver it ...

Page 13: ...e receiver confirm by pressing OK ESC button the display shows Cn Cx where x is a number of channel which is assigned with declared button if declared button has to control the chosen channel with NEXT button we set C in front of the channel number Cn Cx if the channel is not to be switched on we must set _ Cn _x the changes are done with NEXT button by pressing it longer to accept it is necessary...

Page 14: ...ckade of remote assigning it is necessary to in remote edition mode PP with NEXT button set bc option and press OK ESC button of the receiver with NEXT button set the necessary value of the parameter and press OK ESC button of the receiver At any time it is possible to withdraw from the edition by pressing and holding OK ESC button of the receiver Blockade function discussed here is an individual ...

Page 15: ... receiver to confirm Reference number of removed remote left is attached to other remote entered in the future Numbering of the rest of the remotes doesn t change In the case when the remote is to be switched off temporarily it is possible to keep the reference number of this remote in the receiver memory switch off all the channels assigned to the buttons P1 P4 options instead of removing this re...

Page 16: ...ion in monostable mode To change the channel connection time it is necessary to Fig 15 in main menu with NEXT button choose PC option and press OK ESC button of the receiver the display shows PC C1 with NEXT button choose needed channel and press OK ESC button of the receiver short pressing of NEXT button causes the change of value long change of digit edited accept the time set by pressing OK ESC...

Page 17: ...necessary to in main menu with NEXT button choose PC option and press OK ESC button of the receiver the display shows PC C1 with NEXT button choose PC CH option and press OK ESC button the display shows CH Cx where x is a number of configured channel If the channel is to operate in pulse mode it is necessary to se in front of the channel number x sign C Cn Cx with the NEXT button if the channel is...

Page 18: ...ile in PC option with NEXT button choose PC 2P and OK ESC button the display shows 2P _x where x is a channel number which is configured if the channel is to have double click function switched on with NEXT button set in front of the channel number C 2P Cx if the channel is not to have double click function switched on set _ 2P _x the change of edited channel number is done by longer pressing of N...

Page 19: ...umber of assigned remotes it is necessary to Fig 18 from main menu level with the NEXT button choose LP option and press OK ESC button of the receiver the number of programmed remotes is shown to return to main menu press OK ESC button Fig 18 Control of the number of remotes in the memory of the receiver LP function in main menu of the receiver ...

Page 20: ...eceiver on symbol starts to blink on the display press OK ESC button again to confirm PIN code set identical PIN code again and accept with OK ESC button when the display shows on A3 press OK ESC button three times to accept the blockade with PIN number To switch off the blockade it is necessary to Fig 21 from main menu with NEXT button choose bd option and press OK ESC button of the receiver with...

Page 21: ...21 Fig 20 Securing the menu of the receiver with PIN code bd function in main menu of the receiver ...

Page 22: ...22 Fig 21 Switching off the security code of main menu bd function in main menu of the receiver ...

Page 23: ...ress OK ESC button of the receiver with NEXT button set on blockade activated or oF blockade switched off and press OK ESC button of the receiver Switching on off of the global bc function does not influence the local settings of bc function of the remotes The setting is superior to remote assigning blockade set for individual remotes Rys 21 Globalna blokada prostego zdalnego będąc w zasięgu radio...

Page 24: ...to the manual control mode from the main menu level with the NEXT button select the Sr option and press the OK ESC button of the receiver the display will show Sr CA fig 23 press OK ESC button the display will show Sr_x where x is the channel number associated with the manual control input if the manual control input is to control the selected channel with the NEXT button set the C Sr Cx marker in...

Page 25: ...25 Fig 23 Assigning receiver channels to the manual control output Sr CA function ...

Page 26: ...26 Fig 24 Programming of manual control output type Sr In function OUTPUT TYPE NO NC ...

Page 27: ...27 Fig 25 Programming of breach time of manual control output Sr ti function ...

Page 28: ...28 Fig 26 Setting the receiver input to the status signaling mode Sr St STATUS SIGNALING MODE ON OFF RETURN TO MENU ...

Page 29: ...ommunication on Wi Fi of the receiver Fig 27 from main menu of the receiver with NEXT button choose Et option and press OK ESC button of the receiver the display shows Et tP press NEXT button choose Et option and press OK ESC of the receiver the display shows Et tP press OK ESC button of the receiver with NEXT button activate nC communication or switch off oF communication on Wi Fi accept with OK ...

Page 30: ... with NEXT button choose Et AF option and press OK ESC of the receiver physical address is shown in three phases xxxx next yyyy and zzzz which indicates MAC xxxxyyyyzzzz after displaying the address the receiver returns to main menu of the receiver Physical address MAC of the WL card is also placed directly on the WL card Fig 28 Displaying physical address of the WL card Et AF function ...

Page 31: ...EXT button choose Et option and press OK ESC button of the receiver with NEXT button choose Et SI option and press OK ESC button of the receiver the strength of the signal is shown in dBm to return to submenu of Et function press OK ESC button again By pressing and holding OK ESC button of the receiver it is possible to return to the menu The strength of the signal given in SI function is approxim...

Page 32: ...lactic authentication code set the next characters in the same way after entering the code press the OK ESC button on the receiver with the display showing on A3 press the OK ESC button three times to accept the setting of the Galactic function authentication code To disable the Galactic function proceed as follows from the main menu level with the NEXT button select the GA option and press the OK...

Page 33: ...33 Fig 30 Galactic function on off Setting the authentication code GALACTIC CODE SETTING RETURN TO MENU ...

Page 34: ...loud e g in the event of an emergency to control a channel that is blocked by a schedule The HA option disables all the schedules programmed in the receiver To disable all schedules programmed in the receiver from the menu level proceed in the following sequence from the main menu level with the NEXT button select the HA option and press the OK ESC button of the receiver oF will be flashing on the...

Page 35: ...ssary to Fig 28 from main menu of the receiver with NEXT button choose Id option press OK ESC button of the receiver ID number is shown in three phases Id xx next yyyy and zzzz which means Id number xxyyyyzzzz After displaying the address the receiver returns to main menu of the receiver Fig 32 Displaying ID number of the receiver Id function ...

Page 36: ...gs it is necessary to Fig 29 with NEXT button choose PF option press OK ESC button of the receiver when display shows PF A3 press OK ESC button three times wave animation is shown on the display after it is finished the receiver is formatted To quit formatting in any moment but before its beginning press and hold OK ESC button of the receiver The process of formatting causes irreversible removing ...

Page 37: ...1 General information REL 2 Fig 31 and REL 2 PWR Fig 32 modules are extensions by two relay outputs They are intended for DTM System devices equipped with 20 pin output 2x10 pin connector REL 2 and REL 2 PWR models differ with acceptable electricity of switching and the type of joints led out of the transmitter Their assembly and the service is the same Connecting REL 2 REL 2 PWR module to the FLE...

Page 38: ...stallation and service of the WL card available on www dtm pl 8 2 Technical and usage data Frequency 2 400 to 2 483 GHz Modulation 802 11b g n Wireless security WEP WPA PSK TKIP WPA2 PSK AES Power consumption 700mW Cooperation with DTM System devices equipped with cards connector Possibility of easy configuration of Wi Fi connection WPS SMART CONFIG HOT SPOT functions Card Power supply by connecto...

Page 39: ...age of the memory M2 Er 15 No memory or damage of the internal memory Er 16 RTC clock damage Tab 1 FLEX868 receiver error codes 12 Exemplary table of remotes evidence To manage the remotes especially without physical access to them it is necessary to start and evidence of remotes assigned to the receiver memory The example of a table is shown in Table 2 Flex868 receiver in additional wireless mana...

Page 40: ...40 ...

Reviews: