background image

E-64

6. Using On-Screen Menu

Key1-4:

Enter encryption key when selecting [64bit] or [128bit] in [WEP].
Up to 5 characters can be set in 64 bit and up to 13 characters
in 128 bit. Press the “HEX” button to change to “ASCII” to set
the key in ASCII digit. You can toggle this button between
“ASCII” and “HEX”.

The key can also be set in hexadecimal digit.
* Hexadecimal uses 0 to 9 and A to F.
* Up to 10 characters can be set in 64 bit and up to 26

characters in 128 bit.

NOTE: Only numbers can be entered when you use the remote control Source/
Input buttons.

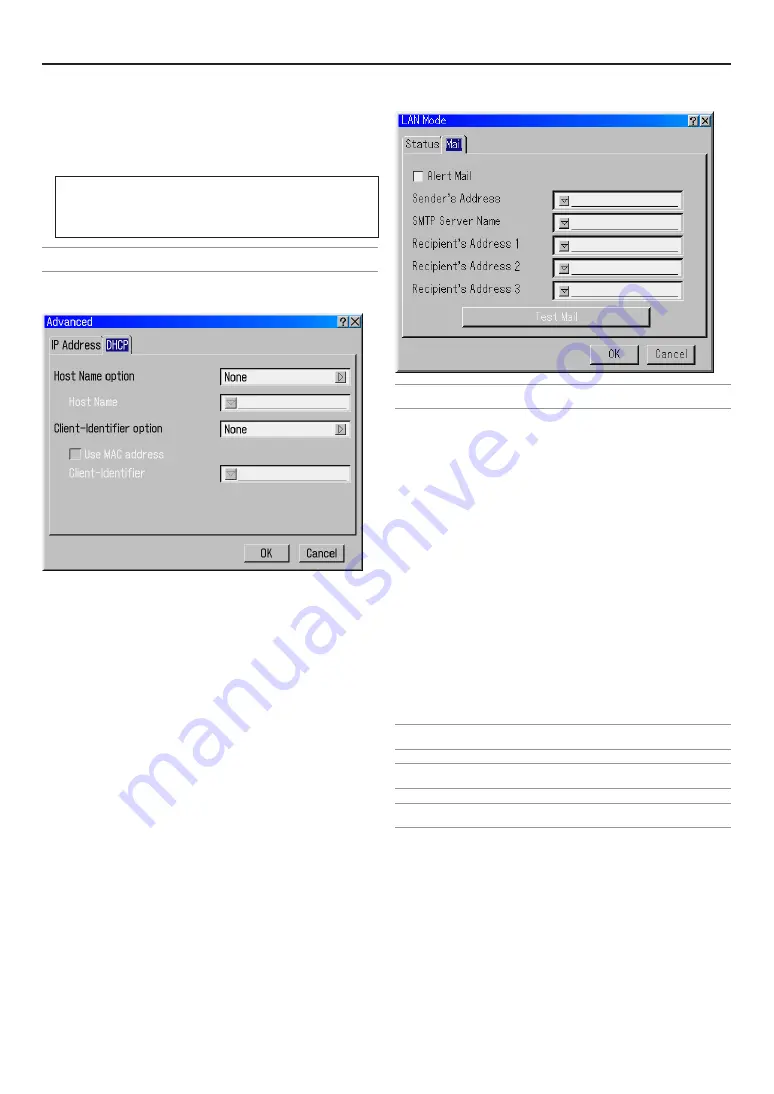
DHCP

Depending on your network environment, acquiring an IP ad-
dress from a DHCP server may not be possible.
Should this happen, consult your network administrator to make
changes to the following settings.

Host Name option

Select whether or not to add option hostname for DHCP.
None ........................ Not add

Request ................... Add at the time of DHCP_REQUEST.

Discover/Request .... Add at the time of DHCP_DISCOVER

and DHCP_REQUEST.

Host Name

Type in a hostname. This field is available only when “Request”
or “Discover/Request.”

Client-identifier option

Select whether or not to add option client identifier for DHCP.
None ........................ Not add

Request ................... Add at the time of DHCP_REQUEST.

Discover/Request .... Add at the time of DHCP_DISCOVER

and DHCP_REQUEST.

Use MAC address

Turn on to use MAC address for Client-identifier.

Client-identifier

Type in a client identifier.

Mail

NOTE: To the Alert Mail feature on wireless LAN connection, select "Infrastructure"
for "Mode" in "Network Type".

Alert Mail:

Checking this box enables Alert Mail feature.
This option notifies your computer of an error message via e-
mail when using wireless or wired LAN.

Sender's Address:

Specify the senders address. Use the Software keyboard. Up
to 60 alphanumeric and symbols characters can be used. See
"Using Software Keyboard" in Appendix for more details.

SMTP Server Name:

Type in the SMTP server name to be connected to the Switcher.
Up to 60 alphanumeric characters can be used.

Recipient's Address 1 to 3:

Type in your recipient's address. Up to 60 alphanumeric and
symbols characters can be used.

Test Mail:

Send a test mail to check if your settings are correct.

NOTE: If you entered an incorrect address in a test, you may not receive an Alert
mail. Should this happen, check if the Recipient's Address is correctly set.

NOTE: Unless any one of the "Sender's Address", "SMTP Server Name" or "Recipient's
Address 1-3" is selected, "Test Mail" is not available.

NOTE: Be sure to highlight “OK” and press the ENTER button before executing
“Test Mail”.

Summary of Contents for HIGHlite 12000Dsx+

Page 1: ...E 1 HIGHlite 12000Dsx HIGHlite 8000Dsx Super High Brightness Digital Video Projector User s Manual 104 018A...

Page 2: ...of Immunity Characteristics of Information Technology Equipment EN 61000 3 2 2000 Harmonic Current Emissions EN 61000 3 3 1995 Immunity to Voltage Fluctuations and Flicker The technical documentation...

Page 3: ...peration and maintenance of this unit has been included Therefore it should be read carefully in order to avoid any problems DOC compliance Notice This Class A digital apparatus meets all requirements...

Page 4: ...ally dangerous concentrations of ozone and the build up of heat inside your projector Allow at least 8 inches 20cm of space between your projector and a wall Allow at least 20 inches 50 cm of space be...

Page 5: ...1 S assurer qu il y ait une ventilation suffisante et que les ouvertures ne soient pas obstru es afin d viter des concentrations potentiellement dangereuses d ozone et l accumulation de chaleur l int...

Page 6: ...ellen Sie den Projektor weder in direktes Sonnenlicht noch in die N he einer Heizung oder sonstiger Hitze abstrahlender Einrichtungen 3 Wenn das Ger t direktem Sonnenlicht Rauch oder Dampf ausgesetzt...

Page 7: ...ber die empfohlenen 1000 Betriebsstunden hinaus Beachten Sie bitte dass im Ger t ein Warnsystem integriert ist das bei Erreichen der 1000 Betriebsstunden die nachfolgende Meldung anzeigt Das Ende der...

Page 8: ...Line Help and Information E 36 3 Lens Memory E 36 5 Setting Up for ouble Stacking E 37 1 Stacking and Connecting the Projectors E 38 2 Adjusting and Registering Signals to Be Projected E 41 3 Adjusti...

Page 9: ...r E 12 Control Panel E 13 Control Terminals E 14 Input Terminals E 15 Option Boards E 16 4 Remote Control Features E 17 Remote Control Precautions E 19 Remote Control Battery Installation E 19 Operati...

Page 10: ...troduction HIGHlite 12000Dsx Projector USA model 103 487 ROW model 103 488 HIGHlite 8000Dsx Projector USA model 103 757 ROW model 103 758 Remote control 102 161 and batteries AA 2 Remote cable 102 162...

Page 11: ...t is standard equipment and wireless LAN is sup ported Connection of a commercially available LAN cable Ethernet cable to the LAN port RJ 45 permits control of this Projector from the personal compute...

Page 12: ...ge E 13 Ventilation inlet Control terminals See page E 14 Main power switch See page E 30 Power cable Input terminals See page E 15 Remote sensor Lens optional Frame Remote sensor Tilt Adjustment Knob...

Page 13: ...ent or setting menu 1 Introduction 9 SHUTTER Button While pressing and holding CTL Button pressing this button shuts off the light completely 10 CTL Button Press the CTL Button together with the FOCUS...

Page 14: ...this equipment is assembled to Re mote Control Cable near side of this equipment 5 LAN Port RJ 45 This port is typically used for UTP Ethernet Fast Ethernet Use this connector to control the Projector...

Page 15: ...equipment Standard definition only 525 60i 625 50i 4 ACT Indicator Steady green light Shows that this board is selected 1 RGB Input Connectors 5 BNC Type Use a 75 coaxial cable 5 conductor type and c...

Page 16: ...t connector of a computer When cable is connected to this port ferrite core which at tached to this equipment is assembled to the cable the side ferrite core is not attached 2 AUDIO Input Connector St...

Page 17: ...ly Tums the backlight on and off If no button operation is made within 30 seconds with the Backlight ON the Backlight will turn off to conserve battery life When using as the wired remote control The...

Page 18: ...nu item A press of the E button executes the selection Pressing and holding CTL then pressing F button works as a Back Space key in the entry screen Pressing and holding CTL then pressing this button...

Page 19: ...e will be required 1 Press and open the cover 2 Align and insert the batteries according to the and indications inside the case 3 Replace the cover Operating Range for Wireless Remote Control The infr...

Page 20: ...red Operation Connect one end of the supplied remote cable to the REMOTE IN 1 mini jack and the other end to the remote jack on the remote control NOTE Do not use this jack for anything other than int...

Page 21: ...ustable Range E 23 Maximum Possible Range for SL 14Z SL 18Z SL 25Z SL 45Z E 23 3 Making Connections E 24 Connecting to the Image Input Terminals E 24 Install the Option Boards and Expand the Image Inp...

Page 22: ...22 25 18 29 29 67 22 86 37 08 27 43 44 50 36 58 59 33 45 72 74 17 288 1 467 3 359 8 583 9 540 2 876 0 720 1 1168 1 900 0 1459 8 1079 9 1752 0 1440 2 2335 8 1800 0 2920 1 SL 07F 1 19 1 48 2 23 2 97 3 7...

Page 23: ...7F No shift available Maximum Possible Range for TL 1ZH TL 2Z TL 4Z TL 08SF Parenthesized values for the ceiling mount application For TL 08SF No shift available For TL 1ZH TL 2Z 4Z Up 0 37 V 0 14 V R...

Page 24: ...rrite clamp core When cable is for RGB signal ferrite core is assembled to the both side of the cable When cable is for DVI D signal ferrite core is assembled to the side where ferrite core is not att...

Page 25: ...OTE When inserting the board into the slot insert it so that it moves along the rails located at the right and left of the slot If the board is not positioned be tween the rails the connector will not...

Page 26: ...and others Example of LAN connection Using the HTTP Server function 1 Configure your LAN settings such as IP address on the Projector See LAN Mode on page E 62 Server Hub Ethernet cable not supplied L...

Page 27: ...he main power switch before disconnecting the power plug Disconnecting the power plug or turning off the main power switch without first setting the projector to the standby mode may result in the val...

Page 28: ...a USB memory device as a Protect key for Security function select one from the Drive icons in the Security set ting screen NOTE Some USB memory devices brands or USB memory card readers may not work...

Page 29: ...cting an Image Basic Operation 1 Turning on the Projector E 30 2 Selecting a Source E 31 3 Adjusting the Picture Size and Position E 31 4 Optimizing RGB Picture Automatically E 33 5 Turning off the Pr...

Page 30: ...green and the Projector become ready to use Note on Startup screen Menu Language Select screen When you first turn on the Projector you will get the Startup screen This screen gives you the opportuni...

Page 31: ...L B AMP G PICT SHUT MUTE Using the menu You can also select the computer or video source using the menu 3 Adjusting the Picture Size and Position 1 Turn on the projector 2 Select your type of projecto...

Page 32: ...Tool If you use a special shaped screen such as a cylindrical or spherical screen a downloadable program Geometric Cor rection Tool is available This program Geometric Correc tion Tool enables the ge...

Page 33: ...as been switched OFF and before Stand by is displayed on the liquid crystal display screen Steady green light Steady orange light 3 Projecting an Image ENTER CANCEL UNDO AUTO HELP INFO PIXEL SOUND OSD...

Page 34: ...E 34...

Page 35: ...E 35 4 Convenient Features 1 Turning Off the Image E 36 2 Getting the On line Help and Information E 36 3 Lens Memory E 36...

Page 36: ...s tom Point the adjusted settings in Ref erence Point will be applied Custom memory Custom Point Adjusted settings are stored in memory for each input signal Usage Example When you wish to display on...

Page 37: ...Up for Double Stacking 1 Stacking and Connecting the Projectors E 38 2 Adjusting and Registering Signals to Be Projected E 41 3 Adjusting the Lens Shift Zoom and Focus to Clearly Display all projected...

Page 38: ...more apparent when displaying small text and detailed graphics NOTE The frame is not supplied on HIGHlite 8000Dsx CAUTION To prevent the projectors from falling install them in a place and fasten the...

Page 39: ...rled knob S Knurled knob Enlarged Screen Screen Screen note 1 when Knurled knobs at two locations are turned the same charge should be turned 1 3 Assigning Projector IDs You can operate multiple proje...

Page 40: ...ct are different Please check the picture devices instruction manuals S Video cable not supplied 1 3 3 On the remote control specify the ID number of the pro jector to be adjusted Press and hold the C...

Page 41: ...d at the same time with one remote controllers To control two projectors indivisually setup IDs for each projector and each remote controller Master projector Slave projector REMOTE OUT REMOTE IN 1 Re...

Page 42: ...2 1 2 for all signals you want to project Display all the signals you registered and check To check select Source Select Entry List 3 Adjusting the Lens Shift Zoom and Fo cus to Clearly Display all p...

Page 43: ...E 52 Gamma Correction E 52 Image Options E 53 Option Adjust E 54 Lens Memory E 54 Signal Type E 55 Ref Adjust E 55 3D Reform E 55 Screen E 56 Ref Lens Memory E 56 Edge Blending E 57 Lamp Mode E 58 Fac...

Page 44: ...u cannot cancel the changes on the Menu screen However you can reedit the menu items over again as described in the steps above NOTE If the Advanced Menu item has been selected on the Menu mode you ge...

Page 45: ...al in the Entry List 6 Using On Screen Menu 3 Using the USB Mouse Using a commercially available USB mouse gives you smooth operation NOTE There may be some brands of USB mouse that the projector does...

Page 46: ...ast R Contrast G Contrast B Return to Reference Ok Cancel Set Custom Set Reference Cancel Graphics Enhanced Graphics NTSC NTSC Enhanced PAL SECAM2 8 PAL SECAM Enhanced Gamma1 0 3 0 Pixel Adjust Clock...

Page 47: ...M DD YYYY ddd Time HH MM Display Select Date Time Input Terminal Source Name Projector ID Message Menu Colour Colour Monochrome Orientation Desktop Front Ceiling Rear Desktop Rear Ceiling Front Backgr...

Page 48: ...ame option None Request Discover Request Host Name Client Identifer option None Request Discover Request Use Mac Address On Off Client Identifer Recconect Alert Mail On Off Sender s Address SMTP Serve...

Page 49: ...App Config Degamma Main App Sequences Page 4 Version Formatter Green Boot App Config Degamma Main App Sequences Page 5 Version Formatter Blue Boot App Config Degamma Main App Sequences Cross Hatch Cr...

Page 50: ...ntered when you use the remote control Source Input buttons while displaying the Software Keyboard 5 Menu Descriptions Functions Source Select Enables you to select a video source such as a VCR DVD pl...

Page 51: ...eric characters See page E 84 for the key function of the software keyboard All Delete This feature enables you to delete all the regis tered signals in the Entry List The following buttons are not av...

Page 52: ...ur temperature using the slide bar Checking Colour Temperature enables the colour temperature slide bar White Balance Item relating to colour adjustment Press the White Balance button to access the Co...

Page 53: ...put signal cannot be detected properly with Auto Adjust this function can be used to manually set the correct resolution PAL SECAM Enhanced Correction fit to PAL signals and SECAM signals are done Gam...

Page 54: ...e made in such circumstances Use the SELECT F or E button to adjust the VD level VD Delay Adjustment This feature is used to correct vertical jitter of a signal NOTE When connecting with a scan conver...

Page 55: ...ection 1 Press SELECT Button Adjust screen size in vertial direction 2 Press ENTER Button after adjusting screen size Return to the menu MM WARP active When MM WARP optional is installed and active bo...

Page 56: ...Use Point on Signal Change For change to take effect at the time of source selection select Yes Picture Mute during Lens Shift To turn off the image and sound during lens shift select Yes Screen Scre...

Page 57: ...adation expression of this curve is 8 bits 256 gradations Use the Projector s test pattern Horizontal Gray Scale allows for an easy adjustment of the gamma curve 3 From among the 4 locations of G mark...

Page 58: ...e English German French Italian Span ish Swedish and Japanese Selecting Menu Mode Menu Mode This feature allows you to select 4 menu modes Advanced Custom Basic and Service Menu Advanced Menu This is...

Page 59: ...e and time again The built in clock will not cease while in the standby condition Page 2 Display Select You can choose the desired status information to be displayed on the screen The information sele...

Page 60: ...tion Vertical Position Clock Phase and Resolution On Automatically adjusts image Horizontal Posi tion Vertical Position Clock Phase and Resolution Off User can adjust the image display functions Horiz...

Page 61: ...efault is 38400 bps Select the appropriate baud rate for your equipment to be connected depending on the equipment a lower baud rate may be recommended for long cable runs Enabling and Disabling Proje...

Page 62: ...k on Status LAN Card This option selects to use either LAN feature between the stan dard LAN port RJ 45 and an optional LAN card inserted in the PC CARD slot Projector Name Specify a unique Projector...

Page 63: ...less LAN to communicate with a computer in a one to one correspondence SSID Network name Enter an identifier SSID for wireless LAN Communication can be done only with equipment whose SSID matches SSID...

Page 64: ...d at the time of DHCP_REQUEST Discover Request Add at the time of DHCP_DISCOVER and DHCP_REQUEST Use MAC address Turn on to use MAC address for Client identifier Client identifier Type in a client ide...

Page 65: ...hanging the menu to Advanced Editing the custom menu For Logo Changing the background Procedures for Password setting apply to both Menu and Logo Entry To assign your password NOTE Up to 15 alphanumer...

Page 66: ...projector 2 Use the SELECT GH button to select Use Protect key and press the ENTER button A check mark will be placed 3 Use the SELECT GH button to select Read and press the ENTER button Data of the P...

Page 67: ...menu and press hte ENTER button The Release Code input screen will be displayed as well as your Re quest Code 24 alphanumeric characters 3 Enter your Release Code in the Release Code Input screen If t...

Page 68: ...ling the On or Off Timer 1 To execute the setting select Active 2 Select OK and press the ENTER button NOTE When one program or more are specified all the settings are active NOTE The settings will be...

Page 69: ...ect a file you want to display You can also sort files by file name or date or display the file See page E 28 Changing Background Logo You can change the default background logo using the PC Card File...

Page 70: ...maining Lamp Time Lamp Hour Meter Projector Usage Pro jector ID NOTE Nothing is displayed on the item Serial Number Please confirm the serial number on label attached on the projector itself Page 2 Ve...

Page 71: ...E 71 Test Pattern Press to display the test pattern Pressing this button sequen tially selects 17 test patterns for each red green and blue 6 Using On Screen Menu...

Page 72: ...E 72...

Page 73: ...E 73 7 Maintenance 1 Cleaning the Cabinet and the Lens E 74...

Page 74: ...cally with a damp cloth If heavily soiled use a mild detergent Never use strong detergents or solvents such as alcohol or thinner 3 Use a blower or lens paper to clean the lens and be careful not to s...

Page 75: ...tible Input Signal List E 82 5 Pin Assignment of PC CONTROL IN Connector D Sub 9 Pin E 83 6 Pin Assignment of REMOTE IN 3 Connector XLR connector E 83 7 Pin Assignment of EXT I O Connector Mini D Sub...

Page 76: ...hood or the lamp cover correctly The projector is overheated Move the projector to a cooler location Power unit will not work correctly Cooling fan has stopped Contact your dealer Lamp fails to light...

Page 77: ...the projector and the notebook PC before turning on the power to the notebook PC In most cases signal cannot be output from RGB output unless the notebook PC is turned on after connecting with the pro...

Page 78: ...Ceiling Front Ceiling Rear Stacking Up to 3 projectors can be gravity stacked Scan Rate Horizontal 15 107kHz RGB 31kHz or over Vertical 24 120Hz Synchronous Input Output mode 24 96Hz Input Signal MM V...

Page 79: ...Consumption 2 8KW Input Current 14A Dimensions HIGHlite 12000Dsx 27 2 W 40 1 D 20 4 H 690mm W 1018mm D 532mm H HIGHlite 8000Dsx 26 4 W 36 5 D 16 8 H 670mm W 926mm D 425mm H Net Weight HIGHlite 12000D...

Page 80: ...3 668 26 3 690 27 2 636 25 1 108 4 3 752 29 6 1018 40 1 134 5 3 134 5 3 486 19 2 296 11 7 115 4 5 532 20 9 410 16 1 80 3 2 711 28 0 150 5 9 60 2 4 Lens Center 42 1 7 Unit mm inch 3 Cabinet Dimensions...

Page 81: ...E 81 Lens Center 108 4 3 926 36 5 670 26 4 400 15 8 425 16 7 242 9 5 Unit mm inch 8 Appendix HIGHlite 8000Dsx...

Page 82: ...75 0 A A A F A 1024 768 68 7 85 0 A A A F A 1152 864 67 5 75 0 A A A F A 1280 960 60 0 60 0 A A A F A 1280 960 85 9 85 0 A A A F A 1280 1024 64 0 60 0 A A A F A 1280 1024 80 0 75 0 A A A F A 1280 102...

Page 83: ...and switching operations are enabled by ei ther opening OPEN or short circuiting SHORT the pin number 15 GND of the external control connector EXT I O with the various pins listed in the table below 5...

Page 84: ...ut and then re insert the LAN card Access is gained to the HTTP server functions by specifying http the Projector s IP address index html in the entry column of the URL Preparation Before Use Make net...

Page 85: ...of Slot 2 S2 None No operation S2 None No operation S3 None No operation S3 None No operation S3 None No operation S4 None No operation S4 None No operation S4 None No operation Switcher Status This d...

Page 86: ...mat E 59 Date Time Preset E 59 Default Source Select E 61 DHCP E 64 Display Select E 59 DNS Configuration E 63 Domain Name E 63 DVI D signal cable E 10 E Edge Blending E 57 Entry Edit Command E 50 Ent...

Page 87: ...51 Screen E 56 Screen Type E 56 Seamless E 65 Security E 66 Sender s Address E 64 Setup E 59 Setup Level E 51 Sharpness E 51 Signal Level E 54 Signal Select E 60 Signal Type E 55 Sleep Timer E 69 SMT...

Page 88: ...E 88...

Page 89: ...E 89...

Page 90: ...E 90...

Reviews: