background image


184  •  Program Mode Programming 

SAM4s SPS-300 Operator's & Programming Manual v1.4 


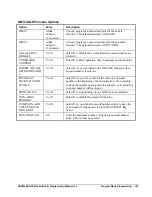
POS.:Y NEG.:N 

Y or N 

Select 

Y

 if you wish the amount or percentage to add to the 

sale total.  Select 

N

 if you wish the amount or percentage 

to subtract from the sale.   

TAXable BY TAX1 

TAXable BY TAX2 

TAXable BY TAX3 

TAXable BY TAX4 

Y or N 

Select 

N

 to tax any taxable items before the discount or 

surcharge is applied (tax the gross amount).  Select 

to tax 

any taxable items after the discount or surcharge is applied 
(tax the net amount). 


F/S ELIGIBLE 

Y or N 

Select 

Y

 to reduce (increase) the food stamp subtotal by the 

amount of % entry.   

ALLOW ONLY ONE 
TIME SUBTOTAL 
ENTRY 

Y or N 

If 

Y

, you can enter only a single coupon and you must 

press the 

SUBTL

 key before the coupon entry. 

ALLOW MULTIPLE 
AMOUNT 
DISCOUNT 
(COUPON) 
WITHOUT 
SUBTOTAL ENTRY 

Y or N 

If you set a % key to be used for vendor coupons (i.e. 
amount, negative and sale status) then choose Y to allow 
the function to be operated multiple times, without 
requiring the 

SUBTL

 key to be pressed prior to the coupon 

entry.   

PRESET OVERRIDE 
IN MGR ONLY 

Y or N 

Select 

Y

 to allow preset override only in manager 

operation mode.   

COMPULSORY 
VALIDATION 

Y or N 

Choose 

Y

 to enforce validation if an optional printer with 

validation capability is connected to an RS-232C port.   

Summary of Contents for Sam4s SPS-300 Series

Page 1: ...4s SPS 300 Series Electronic Cash Register Operator s and Programming Manual SPS 320 Shown Above with Optional Card Reader All specifications are subject to change without notice 2012 CRS Inc SPS 300 v1 4 ...

Page 2: ...IS THESE PRODUCT S CRS INC SPECIFICALLY DOES NOT WARRANT THAT THE OPERATION OF ANY DRIVERS SOFTWARE OR PROGRAMMING PRODUCTS LICENSED HEREUNDER WHETHER EMBEDDED IN PRODUCTS OR PROVIDED AS SEPARATE PROGRAMS SHALL BE UNINTERRUPTED OR ERROR FREE OR THAT FUNCTIONS CONTAINED IN SUCH DRIVERS SOFTWARE OR PROGRAMMING PRODUCTS SHALL OPERATE IN COMBINATION S WHICH MAY BE SELECTED FOR USE BY YOU OR OTHERWISE ...

Page 3: ...pecially the AC and high voltage supplies Always inspect for pinched out of place or frayed wiring Do not change the spacing between components and the printed circuit board Check the AC power cord for damage Make sure that leads and components do not touch thermally hot parts 7 Product Safety Notice Some electrical and mechanical parts have special safety related characteristics that might not be...

Page 4: ...the instrument chassis ground before connecting the positive lead always remove the instrument s ground lead last 1 3 Precautions for Electrostatically Sensitive Devices ESDs 1 Some semiconductor solid state devices are easily damaged by static electricity Such components are called Electrostatically Sensitive Devices ESDs examples include integrated circuits and some field effect transistors The ...

Page 5: ...0 SPS 345 Memory All Clear 32 Operations 35 Operator Display Screen 35 Operator Display Example 36 Clerk Operations 37 Clerk Sign On Instructions 38 Clerk Sign Off Instructions 38 Clerk Time Keeping 39 Item Registrations 41 Open Keyboard PLU Entry 42 Preset Price Keyboard PLU 42 Gallonage PLU Entry 42 Keyboard PLU Repeat Entry 43 Keyboard PLU Multiplication 43 Keyboard PLU Multiplication with Deci...

Page 6: ...ved On Account Operations 61 Paid Out Operations 62 Subtotaling a Sale 62 Eat In Take Out Drive Thru Sales 63 Totaling and Tendering 63 Totaling a Cash Sale 63 Totaling a Check Sale 63 Tendering a Cash Sale 64 Tendering a Check Sale 64 Totaling a Charge Sale 65 Tendering a Charge Sale 66 Check Cashing 67 Split Tender 67 Post Tender 68 Receipt On Off and Receipt on Request 68 Food Stamp Sales 69 Cu...

Page 7: ...up Program 108 Age Verification 109 DataTran Operation Menus 110 S Mode Programming 111 Overview 111 Hardware Test 113 Hardware Test Table 113 Memory All Clear 114 Clear All Totals 114 Clear Grand Total 115 Clear PLU File 115 Flash ROM Information 116 Memory Allocation 116 Function Key Assignment 118 Function Key Codes 120 IRC Options 121 RS232C Port Options 122 RS232C Settings Screen Program Note...

Page 8: ...rogramming 170 Print Options Reference Information 174 Clerk Programming 178 Clerk Programming Reference Information 178 Function Key Programming 179 NS 180 1 5 182 ADD CHECK 185 CANCEL 186 CASH 187 CHARGE 1 8 188 CHECK CASHING 190 CHECK ENDORSEMENT 191 CHECK 192 CHECK 194 CURRENCY CONVERSION 1 4 196 EAT IN TAKE OUT DRIVE THRU 197 ERROR CORRECT 198 FINALIZE 199 F S TEND 200 FUNCTION LOOK UP 1 2 20...

Page 9: ...43 Program Scans 244 Sample Reports 247 Financial 247 Time 251 PLU 252 Clerk 253 Individual Clerk 254 Groups 254 Day 255 Stock 255 Clerk Time Report 256 Check File 257 PLU Zero Sale 257 Balancing Formulas 258 Integrated Payment Appendix 259 One Day Example of Credit Authorization 259 Open Batch 259 Sample Transaction 261 Manual Card Entry 263 Merchandise Return 264 Void Transaction 265 Local Total...

Page 10: ... Report Key 272 IRC Inter Register Communications Appendix 275 Overview 275 IRC Functions 276 Reports 276 Device Sharing 276 IRC Programming Setup 277 Communication Cable Specifications 277 Communication Conduit Size 277 Communication Cable Termination 278 Routing Communication Cable 280 Glossary 283 Manual Revision Record 291 ...

Page 11: ...This manual includes instructions for all models The keyboard and printer configuration defines the model All other features are the same unless otherwise noted The SAM4s SPS 320 features a flat 150 position keyboard and a receipt printer The SAM4s SP 340 features a flat 150 position keyboard and receipt journal printers The SAM4s SPS 345 features a raised key keyboard and receipt journal printers...

Page 12: ...s and managers Call your SAM4s dealer if you find you need programming assistance 7 Sample Reports on page 247 provides a sample of each register report 8 The Integrated Payment Appendix on page 259 provides important operation information for users where optional integrated electronic payments are done using a Datacap appliance 9 The IRC Inter Register Communications Appendix on page 275 provides...

Page 13: ...taTran Integrated Payment Appliance Remote Journal or Video Surveillance System SPS 300 PC Utility SAM300 Polling Software Identifying Components Connections Operator Display Adjustable 8 line 32 character Backlit Liquid Crystal Display Printer s SPS 320 58mm Receipt Printer SPS 340 SPS 345 58mm Receipt and Journal Printers Cash Drawer Sturdy Metal Cash Drawer with media slots and removable 5 Bill...

Page 14: ...ur real time clock with automatic day and date change Check Cash and up to 8 charge tender functions Currency conversion capability for up to 4 foreign currencies Training mode Food stamp sorting and tendering Programmable discount surcharge coupon keys Error Correct Void Cancel and Void Transaction functions Function keys for posting charges and payments to accounts or guest checks Macro Function...

Page 15: ...option program settings As items are registered they will be listed on the next available line The quantity information will update when multiples of the same item are entered Additional information and error messages will display as appropriate and may be accompanied by an error tone Programming options also display In most cases you can make changes to your program without consulting this manual...

Page 16: ...OPERATION 1 X REPORTS 2 DECLARATION 3 REG PRINT FORMAT 4 STOP RECEIPT PRINTING 5 STOP JOURNAL PRINTING 6 TRAIN MODE Press PAGE DOWN to view the remainder of the X MODE menu PROGRAM MODE 7 E J OPERATION 8 NOT FOUND PLU 9 OPEN CHECK IRC Z Reset Report Mode RESET REPORT MODE 0 Z REPORTS 1 RESET E J 2 PC COMMUNICATION 3 MIX MATCH PROGRAM 4 MIX MATCH SCAN 5 PLU LOOKUP PROGRAM 6 AGE VERIFICATION ...

Page 17: ...gram Mode PROGRAM MODE 0 PLU 1 GROUP 2 SALES TAX 3 SYSTEM OPTION 4 PRINT OPTION 5 FUNCTION KEYS 6 CLERK Press PAGE DOWN to view the remainder of the PROGRAM MODE menu PROGRAM MODE 7 LOGO DESCRIPTOR 8 NLU CODE PROGRAM 9 DOWNLOAD PROGRAMS 00 MORE Press 00 to view the MORE PROGRAMS menu PROGRAM MODE P1 0 CLERK I O 1 PLU STOCK 2 DRAWER LIMIT 3 CHECK CHANGE LIMIT 4 TIME DATE 5 TARE WEIGHT 6 MACRO ...

Page 18: ...ACHINE NO 8 PC SCHEDULE TIME 9 TRAINING MODE P W 00 SCAN SM Service Mode SERVICE MODE 0 HW TEST 1 CLEAR ALL TOTALS 2 CLEAR GRAND TOTAL 3 CLEAR PLU FILE 4 FLASHROM INFORMATION 5 MEMORY ALLOCATION 6 KEY ASSIGNMENT Press PAGE DOWN to view the remainder of the SERVICE MODE menu SERVICE MODE 7 IRC OPTIONS 8 RS232C PORT 9 SD CARD OPERATION 00 CLEAR CURR BATCH ...

Page 19: ...ers The SPS 320 features a single receipt printer SPS 340 and SPS 345 Models feature separate receipt and journal printers Printer Specifications Paper 2 58mm Thermal Paper Paper Loading Drop in Loading Print Speed 22 Lines per second Access to SD Card Slot Access to SD Card Slot ...

Page 20: ...zero P Use to program the register S The S position is a hidden position reserved for dealer access Before performing any operations in Register Mode a clerk must be signed on See Clerk Sign On Sign Off for a description of clerk operations Control Keys All SPS 300 series models include two sets of keys that may be used to access the following control lock positions Key Positions Accessible REG OF...

Page 21: ...5 FUNC LOOKU P PAGE UP YES NO PAGE DOWN CONV 1 6 16 26 36 46 56 66 76 86 96 FUNC LOOKU P CLEAR PLU X TIME ADD CHECK 7 17 27 37 47 57 67 77 87 97 MACRO 1 7 8 9 CHA RGE 1 8 18 28 38 48 58 68 78 88 98 MACRO 2 4 5 6 CHECK 9 19 29 39 49 59 69 79 89 99 MACRO 3 1 2 3 SUBTL 10 20 30 40 50 60 70 80 90 100 MACRO 4 0 00 CASH SPS 345 Raised Keyboard Version Default The SPS 345 keyboard includes 21 keyboard PL...

Page 22: ...9 CLEAR PLU X TIME TAX 1 FUNC LOOKU P 2 4 11 18 25 32 39 46 53 60 7 8 8 CHECK CHA RGE 1 5 12 19 26 33 40 47 54 61 4 5 5 SUBTOTAL 6 13 20 27 34 41 48 55 62 1 2 2 7 14 21 28 35 42 49 56 63 0 00 CASH TEND SPS 345 Alpha Keyboard Overlay Expanded Note There is no alpha overlay option for the default 21 PLU Location version of the SPS 300 Series You must use the descriptor code entry method for programm...

Page 23: ...ay 1 11 21 31 41 51 61 71 81 91 FEED JOURNA L FEED 2 12 22 32 42 52 62 72 82 92 q w e r t y u i o p a s d f g h j k l CLEAR PLU X TIME z x c v b n m 7 8 9 CAP DOUBL E SPACE SPACE SPACE SPACE SPACE CAP DOUBL E BACK 4 5 6 9 19 29 39 49 59 69 79 89 99 1 2 3 SUBTL 10 20 30 40 50 60 70 80 90 100 0 00 CASH ...

Page 24: ...ion An initial clear may be necessary as part of servicing or troubleshooting Perform this procedure only as necessary Contact your SAM4s dealer first if you have questions about operating or programming your SAM4s SPS 300 To Perform an Initial Clear 1 Turn the power switch located on the right side of the register to the OFF position 2 Turn the control lock to the PGM position 3 Press and hold th...

Page 25: ...e menus presented when the key is turned to the PGM program position Detailed programming steps and reference information is found in the Program section of this manual Steps In this chapter 1 Unpacking 2 Installing the Paper 3 Clearing All Memory Unpacking 1 Unpack and unwrap the cash register 2 Locate in the packing the following items Paper roll s 1 rewind spindle SPS 340 and SPS 345 2 sets of ...

Page 26: ...ng Manual v1 4 Installing the Paper 1 Remove the printer cover 2 Push the blue cap lever and then lift up to open the paper cover 3 Ensure that the paper is being fed from the bottom of the roll and then close the paper cover slowly until it locks firmly ...

Page 27: ...bar slot Tear off the excess paper Replace the printer cover Models with Two Printer Stations The SPS 340 and PS 345 models are equipped with separate printers for receipt and journal Paper loading for these models is shown below 1 Remove the printer cover 2 Push the green cap lever and then lift up to open the paper cover ...

Page 28: ...n close the paper cover slowly until it locks firmly 4 Pass the leading edge of the paper through the tear bar slot Tear off the excess paper 5 Push the blue cap lever and then lift up to open the journal paper cover 6 Ensure that the paper is being fed from the bottom of the roll and then close the paper cover slowly until it locks firmly ...

Page 29: ...ed 29 7 If you wish to use the printer to print a sales journal insert the paper into the paper take up spool Wind the paper two or three turns around the spool shaft and install the spool in the mount Insure that the paper is being fed from the bottom of the roll ...

Page 30: ...register to the OFF position 2 Turn the control lock to the S position 3 Press and hold the key position where the CHECK key is located on the default keyboard layout 4 Continue to hold the appropriate key while turning the power switch to the ON position The message RAM ALL CLEAR displays 5 Press the upper left key of the keyboard then the lower left key then the upper right key and finally press...

Page 31: ...s complete and the receipt prints ETHERNET LINK FAIL if the register is not connected to another register in the network The receipt will print the message ETHERET LINK SUCCESS if the register is connected to another network register DATE 07 01 2011 FRI TIME 08 37 RAM ALL CLEAR OK RAM 16M OK FLASHROM INFORMATION VERSION USA 01 027 CHECKSUM A6D8 BOOT APP 0806 9ED2 MAY 10 2012 CLERK 00 000001 00000 ...

Page 32: ...nd finally press the lower right key Note In the default configuration there are 21 double width PLU keys Under each key the left most key is inactive and the right most key is active The four key sequence shown with the default configuration will set the keyboard in the default 21 PLU key configuration When the keyboard is expanded the four key sequence shown will set the keyboard in the expanded...

Page 33: ...345 has two printer stations 8 The display now reads AUTO CUT CASH Key NO CUT CLEAR Key Press CLEAR 9 The SERVICE MODE menu displays The RAM Clear procedure is complete and the receipt prints ETHERNET LINK FAIL if the register is not connected to another register in the network The receipt will print the message ETHERET LINK SUCCESS if the register is connected to another network register DATE 07 ...

Page 34: ...34 Getting Started SAM4s SPS 300 Operator s Programming Manual v1 4 ...

Page 35: ...eep track of each item as it is registered For example When you are operating the register in the REG or VOID control lock positions you can view a list of items that have been registered as well as updated tax and sale subtotals If an item is multiplied or repeated the display lists the quantity of the item sold Note Only quantities up to 99 are displayed in the quantity field Up to six items can...

Page 36: ...LU7 7 00 1 PLU8 8 00 TAX 0 06 SBTL 46 06 When more than six items are registered the display lists the last six items sold When more than six items have been registered you can press the PAGE UP key to view the items registered earlier in the sale If an item is multiplied or repeated the display lists the quantity of items here Tax and sale subtotals are updated with each new item entered Up to si...

Page 37: ...stem Enter the clerk secret code and then press the CLERK key to sign on the register You can sign off a clerk by entering 0 then pressing the CLERK key Using an optional card reader you can use employee cards to log on or off You can also select stay down or pop up mode for clerk operation Stay down means that once a clerk is signed on the same clerk will remain signed on until the clerk signs of...

Page 38: ...lerk Sign On Instructions When a clerk is not signed on the message CLOSED is shown on the display Note that the current clerk must be signed off before a new clerk can be signed on Push Button CLERK Code Entry CLERK Secret clerk Clerk Sign Off Instructions CLERK 0 ...

Page 39: ...ade in the program mode See Clerk In Out in the in the Program Mode Programming chapter Clerk times can be read in the X control lock position or reset in the Z control lock position See the X Mode and or Z Mode chapters Using an optional card reader you can use employee cards to clock in or out Note When a function is located on a function look up menu key you access the function by pressing the ...

Page 40: ... 2011 05 00 I 00 00 0000 00 00 O 00 00 0000 00 00 I 00 00 0000 00 00 O 00 00 0000 00 00 TIME WORKED 09 00 5 Repeat the procedure from step 1 to clock out 6 The printer will print Time In and Time Out records as in the examples below THANK YOU CALL AGAIN DATE 06 05 2011 SUN TIME 08 33 CLERK TIME IN CLERK 1 01 IN 11 09 2011 08 33 CLERK 1 No 000011 00001 THANK YOU CALL AGAIN DATE 06 05 2011 SUN TIME ...

Page 41: ... scanned As you make item registrations you can follow your entries by viewing the display Remember that the sale and tax totals are updated automatically with each entry Using Function Look Up Keys Because the SPS 300 keyboard is programmable both the selection and location of function keys may vary from one register to another You must pay particular attention to the two function look up keys FU...

Page 42: ...previously programmed for the PLU See PLU Programming in the Program Mode Programming chapter to program preset prices 1 Press a preset PLU key For example press PLU 5 5 THANK YOU CALL AGAIN DATE 06 05 2011 SUN TIME 08 33 PLU5 1 29 TOTAL 1 29 CASH 1 29 CLERK 1 No 000011 00001 Gallonage PLU Entry 1 Enter the total fuel purchase on the ten key pad Do not use the decimal key For example for 20 00 ent...

Page 43: ...5 2011 SUN TIME 08 33 PLU1 T1 2 99 PLU1 T1 2 99 TAX1 0 36 TOTAL 6 34 CASH 6 34 CLERK 1 No 000011 00001 Keyboard PLU Multiplication When several of the same items are to be entered into the same PLU you can use multiplication You can enter a quantity 1 to 999 999 using the X TIME key You can multiply open or preset PLUs 1 Enter the quantity of items being purchased press the X TIME key For example ...

Page 44: ...011 SUN TIME 08 33 3 75X 0 99 PLU1 T1 3 71 TAX1 0 22 TOTAL 3 93 CASH 3 93 CLERK 1 No 000011 00001 Split Pricing Keyboard PLU When items are priced in groups i e 3 for 1 00 you can enter the quantity purchased and let the register calculate the correct price 1 Enter the quantity purchased press the X TIME key For example enter 2 X TIME 2 Enter the quantity of the group price press the X TIME key Fo...

Page 45: ...tem preset PLU key or enter a price and press a single item open PLU key For example press PLU 6 6 THANK YOU CALL AGAIN DATE 06 05 2011 SUN TIME 08 33 PLU6 1 29 TOTAL 1 29 CASH 1 29 CLERK 1 No 000011 00001 Open Code Entry PLU If the PRESET status of a PLU is set to N no the PLU will operate as an open PLU See PLU Programming in the Program Mode Programming chapter to program PLU descriptors and op...

Page 46: ...ey For example enter 4 on the numeric key pad and press the X TIME key 4 X TIME 2 Enter the PLU number press the PLU key For example enter 1 PLU THANK YOU CALL AGAIN DATE 06 05 2011 SUN TIME 08 33 4X 1 99 PLU1 T1 7 96 TAX1 0 48 TOTAL 8 44 CASH 8 44 CLERK 1 No 000011 00001 Code Entry PLU Multiplication with Decimal Point If you are selling items by weight or if you are selling yard goods you can mu...

Page 47: ...LU THANK YOU CALL AGAIN DATE 06 05 2011 SUN TIME 08 33 2 3FOR 2 99 PLU3 T1 1 99 TAX1 0 12 TOTAL 2 11 CASH 2 11 CLERK 1 No 000011 00001 PLU Price Inquiry You can check the price of a PLU without registering the PLU by placing a price inquiry function key on the keyboard 1 Press the PRICE INQ key The message PRICEINQ displays PRICE INQ 2 Press a preset PLU key or enter a PLU number and press the PLU...

Page 48: ... for example large medium or small soft drink or pop up after each transaction to register the same modification for the item until the transaction is finalized See System Options in the Program Mode Programming chapter to select stay down pop up status Pop Up Modifier Key Affecting PLU Code 1 Press a preset PLU key For example press PLU 1 with a price of 1 00 1 2 Press the MOD 1 key The message M...

Page 49: ...selected pop up after each item to register for example large medium or small soft drink pop up after each transaction to register the same level until the transaction is finalized See System Options in the Program Mode Programming chapter to set how the price level keys operate Pop Up Price Level Keys 1 Press a preset PLU key For example press PLU 1 programmed with a price of 1 00 for price level...

Page 50: ...ady registered in this transaction 1 THANK YOU CALL AGAIN DATE 06 05 2011 SUN TIME 08 33 PLU1 1 00 PROMO PLU1 TOTAL 0 00 CASH 0 00 CLERK 1 No 000011 00001 Waste The WASTE key allows control of inventory by accounting for items that must be removed from stock due to spoilage breakage or mistakes Press the WASTE key before entering wasted items and then press the WASTE key again to finalize The WAST...

Page 51: ...You can perform this tax shifting with one of the four tax shift keys 1 Press the tax shift for the tax you wish to shift For example Press TAX SHIFT 1 TAX 1 SHIFT 2 Enter an amount on the ten key pad Do not use the decimal key For example for 2 99 enter 2 9 9 3 Press a PLU key For example press PLU 1 If PLU 1 is normally taxable by tax 1 the registration will be non taxable 1 THANK YOU CALL AGAIN...

Page 52: ...th Tax Shift Keys 1 Enter an amount on the ten key pad Do not use the decimal key For example for 2 99 enter 2 9 9 2 Press a taxable PLU key For example press PLU 1 1 3 Press SUBTL SBTL 4 Press the tax shift key or keys that represents the tax you wish to shift For example to exempt tax 1 press TAX SHIFT 1 then press SUBTL TAX 1 SHIFT SBTL 5 The display reflects the transaction without added taxes...

Page 53: ...on the function look up 1 menu so to use the TAX EXMT function you would first press FUNCTION LOOK 1 then press the numeric 6 key 1 Enter an amount on the ten key pad Do not use the decimal key For example for 2 99 enter 2 9 9 2 Press a taxable PLU key For example press PLU 1 1 3 Press SUBTL SBTL 4 Press the TAX EXMT key or access the TAX EXMT function from a function look up menu key TAX EXMT 5 T...

Page 54: ...the Program Mode Programming chapter to assign a specific function to each percentage key Preset Percent Discount on an Item In this example the 1 function is preset with a rate of 10 1 Register the item 2 Press the 1 key 1 3 The discount is automatically subtracted THANK YOU CALL AGAIN DATE 06 05 2011 SUN TIME 08 33 PLU2 10 00 1 10 000 AMOUNT 1 00 TOTAL 9 00 CASH 9 00 CLERK 1 No 000011 00001 Ente...

Page 55: ...d as amount sale open and negative a key will perform a coupon against a sale or vendor coupon Also depending upon programming You may be allowed to enter only one coupon in a sale after the SUBTL key is pressed You may be allowed to enter multiple coupons but you must press the SUBTL key before each coupon entry or You may be allowed to enter multiple coupons without first pressing SUBTL In this ...

Page 56: ...PLU you wish the coupon to be subtracted from 1 Register the items you wish to sell 2 Enter the amount of the coupon press the appropriate key For example 0 2 0 1 3 Press the PLU key you wish to subtract the coupon from or enter the PLU number of the PLU you wish to subtract the coupon from and press PLU 1 4 The coupon is automatically subtracted THANK YOU CALL AGAIN DATE 06 05 2011 SUN TIME 08 33...

Page 57: ...ropriate function look up key then pressing the numeric digit corresponding to the function you wish to select On the default keyboard the RETURN function is function 2 on the function look up 1 menu so to use the RETURN function you would first press FUNCTION LOOK 1 then press the numeric 2 key 1 Press RETURN RETURN 2 Enter the price of the item you wish to return then press the PLU key where it ...

Page 58: ...CORR PLU2 1 29 TAX1 AMT 0 14 TOTAL 2 43 CASH 2 43 CLERK 1 No 000011 00001 Void Previous Item This function allows you to correct an item registered previously in a transaction 1 Register an item Then register a second item 2 To correct the first item press VOID VOID 3 Enter the price of the first item then press the PLU key where it was registered originally 2 2 9 1 THANK YOU CALL AGAIN DATE 06 05...

Page 59: ...the CANCEL function you would first press FUNCTION LOOK 1 then press the numeric 1 key 1 Register the items you wish to sell 2 Press the CANCEL key or access the CANCEL function from the function look up menu CANCEL THANK YOU CALL AGAIN DATE 06 05 2011 SUN TIME 08 33 PLU1 T1 2 29 PLU2 0 50 CANCEL CLERK 1 No 000011 00001 Void Position Operations You can use the VOID control lock position to correct...

Page 60: ...LL AGAIN DATE 06 05 2011 SUN TIME 08 33 NO SALE CLERK 1 No 000011 00001 Non Add Number You can also use the NO SALE key to print any number up to 9 digits on the printer paper You can enter the number any time during a transaction For example if you wish to record a checking account number enter the number and press the NO SALE key before totaling the sale with the CHECK key 1 Register the items y...

Page 61: ...function is function 3 on the function look up 1 menu so to use the RA1 function you would first press FUNCTION LOOK 1 then press the numeric 3 key 1 Press one of the received on account keys RA1 RA3 or select one of the received on account functions from a function look up menu RA 2 Enter the amount of cash received press CASH CASH 0 0 0 1 3 Enter the check amount received press CHECK CHECK 0 0 0...

Page 62: ...en press the numeric 4 key 1 Press one of the paid out keys PO1 PO3 or select one of the paid out functions from a function look up menu PO 2 Enter the amount of cash paid out press CASH CASH 0 0 0 1 3 Enter the check amount paid out press CHECK CHECK 0 0 0 1 4 You can continue to itemize paid outs or you can finalize by pressing or selecting the same paid out key PO THANK YOU CALL AGAIN DATE 06 0...

Page 63: ...ctions available to categorize sales CASH and CHECK are individual keys on the keyboard The eight charge functions CHARGE 1 CHARGE 8 are available on the FUNCTION LOOK 2 key on the default keyboard Depending upon how your register is programmed you might find charge keys as individual function keys on the keyboard or listed on one of the function look up keys Totaling a Cash Sale 1 Register the it...

Page 64: ...1 SUN TIME 08 33 PLU1 T1 2 99 PLU1 T1 2 99 4X 1 99 PLU2 7 96 TAX1 0 36 TOTAL 14 30 CASH 20 00 CHANGE 5 70 CLERK 1 No 000011 00001 Tendering a Check Sale 1 Register the items you wish to sell 2 Enter the amount tendered by the customer For example for 20 00 enter 0 0 0 2 3 Press CHECK CHECK 4 The display will indicate the total amount of the check tendered and the change due if any THANK YOU CALL A...

Page 65: ... menu key you access the function by pressing the appropriate function look up key then pressing the numeric digit corresponding to the function you wish to select On the default keyboard the CHARGE 1 function is function 1 on the function look up 2 menu so to use the CHARGE 1 function you would first press FUNCTION LOOK 2 then press the numeric 1 key 1 Register the items you wish to sell 2 Press ...

Page 66: ...ter the items you wish to sell 2 Enter the amount of the charge and press one of the charge keys if it is located on the keyboard 0 0 0 2 CHARGE 1 or if the charge function is located on a function look up key enter the amount of the charge 0 0 0 2 Press FUNCTION LOOK2 then press the digit representing the charge function you are using FUNC LOOK 2 1 THANK YOU CALL AGAIN DATE 06 05 2011 SUN TIME 08...

Page 67: ...od For example a 20 00 sale could be split so 10 00 is paid in cash and the remaining 10 00 is paid by a check If necessary you can make several different payments Note By default CASH and or CHECK under tenders are allowed This can be changed through function key programming 1 Register the items you wish to sell 2 Enter the amount of cash tendered by the customer For example enter 10 00 and press...

Page 68: ...wer opens on the post tender 1 Register the items you wish to sell 2 Press CASH CASH 3 The display will indicate the total of the cash sale 4 Enter the amount of the new tender Press CASH CASH 0 0 2 0 5 The display will indicate the change due THANK YOU CALL AGAIN DATE 06 05 2011 SUN TIME 08 33 PLU1 T1 2 00 TAX1 0 12 CASH 2 12 CLERK 1 No 000011 00001 Receipt On Off and Receipt on Request When a re...

Page 69: ...ropriate settings 1 Register the items you wish to sell You do not need to sort food stamp eligible or non eligible items The SPS 300 will maintain a subtotal of eligible items based upon the pre programmed status for each PLU If you wish to register a normally food stamp eligible item into a PLU programmed as non food stamp eligible press the F S SHIFT key before registering the item In the same ...

Page 70: ...tion you wish to select On the default keyboard the CONV1 function is function 7 on the function look up 1 menu so to use the CONV1 function you would first press FUNCTION LOOK 1 then press the numeric 7 key 1 Register the items you wish to sell 2 Press the CONV1 key if it is located on the keyboard CONV1 or if the conversion is located on a function look up key press FUNCTION LOOK2 then press the...

Page 71: ...he soft check is set in memory allocation programming Options For hard or soft check operations the following tracking options are available Tracking by manually entering the check number The number of digits in the check number may be set from 0 9 with zero meaning no fixed length Tracking by automatically assigning a check number The starting check is always 1 Enforcing entry of a table number w...

Page 72: ...VICE Use to temporarily finalize Previous Balance or check tracking transactions If you are using a hard check system you must program the SERVICE key for the port where the slip printer is connected TABLE You can enforce the entry of a table number for guest check transactions or for all transactions If you are tracking guest check balances the balance can be recalled either by entering the check...

Page 73: ... slip printer press the PRINT CHECK key THANK YOU CALL AGAIN DATE 06 05 2011 SUN TIME 08 33 PBAL 0 00 PLU2 1 00 SERVICE 1 00 BFWD 1 00 CLERK 1 No 000011 00001 Adding to a Check 1 Enter the previous balance press the PBAL key PBAL 0 1 0 2 Register the next items you wish to sell 3 To total the posting press SERVICE SERVICE 4 Place a slip in an optional slip printer press the PRINT CHECK key THANK Y...

Page 74: ...tip amount and press the TIP key SBTL TIP 0 5 3 Pay the balance as you would normally tender a transaction with CASH CHECK or one of the CHARGE functions If the tender is greater than the balance due change is displayed CASH 0 0 1 0 4 Place a slip in an optional slip printer press the PRINT CHECK key THANK YOU CALL AGAIN DATE 06 05 2011 SUN TIME 08 33 PBAL 3 00 TIP 0 50 CHECKS PAID 3 50 CASH 10 00...

Page 75: ...If required enter the number of guests and press the GUEST key GUEST 2 4 Register the items you wish to sell 5 To total the posting press SERVICE SERVICE Receipt Example THANK YOU CALL AGAIN DATE 06 05 2011 SUN TIME 08 33 CHECK 123 PBAL 0 00 TABLE 3 GUEST 2 CHICKEN 7 00 STEAK 10 00 SERVICE 17 00 BFWD 17 00 CLERK 1 No 000011 00001 Note If a table number entry is required for all guest checks and ch...

Page 76: ... BFWD 19 00 CLERK 1 No 000012 00001 Printing a Soft Check 1 Enter the number of the guest check press the CHECK key CHECK 3 1 2 or if you entered a table number enter the table number and press the TABLE key TABLE 3 2 Press PRINT CHECK to print the complete check If programmed to do so the PRINT CHECK key will automatically service the check PRINT CHECK Sample of soft check printed on the receipt ...

Page 77: ... wish to add a tip press SUBTL then enter the tip amount and press the TIP key SBTL TIP 0 0 3 3 Pay the balance as you would normally tender a transaction with CASH CHECK or one of the CHARGE functions If the tender is greater than the balance due change is displayed CASH 0 0 2 5 Sample of soft check printed on the receipt THANK YOU CALL AGAIN DATE 06 05 2011 SUN TIME 08 33 CHECK 123 PBAL 19 00 TA...

Page 78: ... the table number and press the TABLE key TABLE 3 3 If required enter the number of guests and press the GUEST key GUEST 2 4 Register the items you wish to sell 5 Place a slip in an optional slip printer the check will print automatically when you press SERVICE SERVICE Receipt Example THANK YOU CALL AGAIN DATE 06 05 2011 SUN TIME 08 33 CHECK 123 PBAL 0 00 TABLE 3 GUEST 2 CHICKEN 7 00 STEAK 10 00 S...

Page 79: ...enter the table number and press the TABLE key TABLE 3 2 If necessary add additional items If you wish to add a tip press SUBTL then enter the tip amount and press the TIP key SBTL TIP 0 0 3 3 Pay the balance as you would normally tender a transaction with CASH CHECK or one of the CHARGE functions If the tender is greater than the balance due change is displayed CASH 0 0 2 5 Sample of Hard Check p...

Page 80: ...ally by pressing the MACRO key See Function Key Programming in the Program Mode Programming chapter Taking a Drive Thru Order 1 Register the items you wish to sell 2 Press the CHECK key to begin an automatically assigned check CHECK 3 To store the posting press SERVICE SERVICE Receipt Example THANK YOU CALL AGAIN DATE 06 05 2011 SUN TIME 08 33 HAMBURGER 2 00 FRIES 1 00 CHECK 3 PBAL 0 00 SERVICE 3 ...

Page 81: ...ongoing account activity Payments can be posted before charges are posted and credit balances can be carried forward Overpayments can be issued as change or carried forward Managers can control access to new account numbers or closing accounts Zero balance accounts can remain active The total of outstanding accounts prints at the end of the open check report and also on the Financial report The to...

Page 82: ... you are using a hard check system you must program the SERVICE key for the port where the slip printer is connected You may wish to reprogram the descriptor of the SERVICE key to HOUSE CHRG PAYMENT Press to make a payment partial payment or pre payment while posting to a check account If the payment amount exceeds the check balance the screen will display the option to apply the change to the acc...

Page 83: ... Press the PAYMENT key 3 Enter the amount of the payment and press the appropriate tender key cash check or charge 4 Press the SERVICE key to finalize and store the balance Posting New Charges 5 Enter the number of the account and press the CHECK key 6 Enter items purchased 7 Press the SERVICE key to finalize and store the balance Accepting an Overpayment and Issuing Change 8 Enter the number of t...

Page 84: ...g it times the amount entered A tare is the amount of weight accounted for by the container or packaging By entering a tare weight as required by law in some areas the weight of the container is subtracted and only the true weight of the product is measured on the scale By entering the tare number 1 5 the operator can automatically subtract the predetermined container weight when a product is on t...

Page 85: ... Press a PLU key For example press PLU 1 1 THANK YOU CALL AGAIN DATE 06 05 2011 SUN TIME 08 33 1 50 lb 3 00 lb PLU1 4 50 TAX1 0 27 TOTAL 4 77 CASH 4 77 CLERK 1 No 000011 00001 Automatic Scale Entry Place a product on the scale and make the appropriate PLU entry The PLU must be set with auto scale status 1 Place an item on the scale 2 Press a PLU key if the item is a preset item or enter the price ...

Page 86: ...Press the SCALE key SCALE 4 Note that the weight less the tare weight is displayed on the screen Enter the price per pound on the ten key pad Do not use the decimal key For example for 3 00 enter 3 0 0 5 Press a PLU key For example press PLU 1 1 THANK YOU CALL AGAIN DATE 06 05 2011 SUN TIME 08 33 1 50 lb 3 00 lb PLU1 4 50 TAX1 0 27 TOTAL 4 77 CASH 4 77 CLERK 1 No 000011 00001 ...

Page 87: ...e enter 01 press the tare key 4 Press the SCALE key SCALE 5 Note that the weight less the tare weight is displayed on the screen Enter the price per pound on the ten key pad Do not use the decimal key For example for 3 00 enter 3 0 0 6 Press a PLU key For example press PLU 1 1 THANK YOU CALL AGAIN DATE 06 05 2011 SUN TIME 08 33 1 50 lb 3 00 lb PLU1 4 50 TAX1 0 27 TOTAL 4 77 CASH 4 77 CLERK 1 No 00...

Page 88: ...3 00 enter 3 0 0 4 Press a PLU key For example press PLU 1 1 THANK YOU CALL AGAIN DATE 06 05 2011 SUN TIME 08 33 1 50 lb MANUAL WT 3 00 PLU1 4 50 TAX1 0 27 TOTAL 4 77 CASH 4 77 CLERK 1 No 000011 00001 Quick Journal Review This feature was designed for use with the SPS 320 where a separate journal printer is not provided It allows the operator to quickly print out the details of the last transactio...

Page 89: ...ber If the item is in the PLU file it will register if an item is not in the PLU file the NOT FOUND PLU screen will display NOT FOUND PLU PROGRAM 0 NO 1 YES 2 Press the numeric 1 key to allow the registration of the PLU The cursor will point at the SELECT COPY PLU field NOT FOUND PLU PROGRAM SELECT COPY PLU 0 PRICE 0 3 Press a PLU on the keyboard or enter a PLU number and press the PLU key The cur...

Page 90: ...screen will display NOT FOUND PLU PROGRAM 0 NO 1 YES 2 Press the numeric 1 key to allow the registration of the PLU The cursor will point at the SELECT COPY PLU field NOT FOUND PLU PROGRAM SELECT COPY PLU 0 PRICE 0 3 Enter 0 and press the PLU key The cursor will advance to the price field and additional fields will display to allow entry of a unique descriptor and PLU tax status NOT FOUND PLU PROG...

Page 91: ...tus from N o to Y es Set the status for the four possible tax rates and press CASH The PLU entry is completed Not Found PLU Report Managers will typically use the Not Found PLU Report as a tool to update the PLU file A list of up to 50 not found PLU items can be retained in the report When capacity is reached you must clear Z the Not Found PLU report To run an X Report of not found PLUs choose NOT...

Page 92: ...92 Operations SAM4s SPS 300 Operator s Programming Manual v1 4 ...

Page 93: ...e programmed to require the control lock in the X position in order to operate All reports require a key that will access the X or Z position Manager Mode Turn the control lock to the X position to display the MANAGER MODE menu MANAGER MODE 0 MANAGER OPERATION 1 X REPORTS 2 DECLARATION 3 REG PRINT FORMAT 4 STOP RECEIPT PRINTING 5 STOP JOURNAL PRINTING 6 TRAIN MODE Press PAGE DOWN to display the se...

Page 94: ...rmed 1 From the MANAGER MODE menu press 0 to enter manager mode MANAGER MODE 2 The MANAGER MODE screen displays 3 Complete the operation requiring manager control X Reports X reports read but do not reset totals and counters within a report 1 From the MANAGER MODE menu press 1 to select X Reports MANAGER MODE ENTER REPORT TO ISSUE X REPORT PRESS CASH TO VIEW REPORT LIST PRESS CLEAR TO RETURN TO MA...

Page 95: ...ERK 4 GROUPS 5 DAY 6 STOCK Press PAGE DOWN to view the second page of reports X REPORT LIST P2 7 CLERK TIME 8 OPEN CHECK 9 DRAWER TOTALS 00 PLU ZERO SALE DEC MIX MATCH 3 When a report is selected the X REPORT OPTIONS screen displays X REPORT OPTIONS RPT FINANCIAL 1 TYPE 0 0 DAILY 1 PERIOD 2 0 PRINT 1 DISPLAY 0 3 IRC 0 0 STANDALONE 1 ALL 2 SELECT 4 Select the TYPE DAILY or PERIOD PRINT or DISPLAY a...

Page 96: ...consolidated report Press CASH after each selection After the last selection the report will start Field Description TYPE Select X1 or X2 if available for the selected report IRC Select STANDALONE ALL or SELECT if available for the selected report If SELECT the screen will prompt for selection of registers the screen will initially show the registers available from the from to IRC register program...

Page 97: ...CREEN The cash drawer opens DECLARATION SCREEN CASH 0 00 CHECK 0 00 CHARGE1 0 00 F S TEND 0 00 TOTAL 0 00 2 At the DECLARATION SCREEN enter cash amounts press the CASH key Enter checks individually or enter a check total press the CHECK key Enter Food Stamps press the F S TEND key You can make as many entries as you wish the screen will keep running totals You may wish to use the X TIME key to mul...

Page 98: ...journal format The screen will display the current status Press CASH to set the new format Stop Register Printing You can turn the register printer to an on or off condition In the off condition transactions will not be printed but reports will continue to print if requested 1 From the MANAGER MODE menu press 4 to set receipt printing on or off or 5 to set journal printing to on or off SPS340 345 ...

Page 99: ...remember that the check tracking total will be updated Remember to pay or clear the check file Reset Mode Menu Z Open Checks before resuming normal operations You must close all open checks prior to entering training mode 1 From the MANAGER MODE menu press 6 to enter or exit training mode ENTER EXIT TRAINING REGIST IS CURRENTLY NOT IN TRAINING TO ENTER TRAINING ENTER 4 DIGIT PASSWD AND PRESS ENTER...

Page 100: ...chapter to clear the E J 1 From the MANAGER MODE menu press 7 to display the electronic journal menu ELECTRONIC JOURNAL 0 PRT ALL EJ 1 PRT ONLY CASH 2 PRT ONLY CHECK 3 PRT ONLY MISC TEND 4 PRT ONLY 5 PRT ONLY RA PO 6 PRT ONLY RETURN 2 Press PAGE DOWN to view the remaining electronic journal options ELECTRONIC JOURNAL 7 PRT ONLY ERR CORR VOID 8 PRT ONLY NOSALE 9 PRT ONLY CANCEL 00 PRT BY CLERK DEC ...

Page 101: ...is information is not consolidated but rather reported separately for each register 1 From the MANAGER MODE menu press 9 to report open check by IRC The display returns the message shown below MANAGER MODE 7 E J OPERATION 8 NOT FOUND PLU 9 OPE SD 0 PRINT 1 3 Press 1 to print the report The check file will print sequentially for each ECR in the system or Press 0 to save the reports to SD A file wil...

Page 102: ...102 Management Functions SAM4s SPS 300 Operator s Programming Manual v1 4 ...

Page 103: ...r Totals position to display the RESET REPORT MODE menu RESET REPORT MODE 0 Z REPORTS 1 RESET E J 2 PC COMMUNICATION 3 MIX MATCH PROGRAM 4 MIX MATCH SCAN 5 PLU LOOKUP PROGRAM 6 AGE VERIFICATION 2 Press PAGE DOWN to view the remaining Reset Mode options RESET REPORT MODE 7 RESET NOT FOUND PLU 9 DATATRAN DEBIT 00 DATATRAN ...

Page 104: ...SET REPORT MODE MENU 2 If you know the number of the report you wish to generate enter the number and press CASH If you wish to look up the number press CASH to view the Z Report List then press the number of the report you wish to generate Z REPORT LIST P1 0 FINANCIAL 1 TIME 2 PLU 3 CLERK 4 GROUPS 5 DAY 6 STOCK Press PAGE DOWN to view the second page of reports Z REPORT LIST P2 7 CLERK TIME 8 OPE...

Page 105: ...INANCIAL 1 TYPE 0 0 DAILY 1 PERIOD 2 0 PRINT 0 3 IRC 2 0 STANDALONE 1Y 2N 3N 4N 5N 6N 7N 8N 6 Press the YES NO key at each register to select whether you wish to include each register in the consolidated report Press CASH after each selection After the last selection the report will start Field Description TYPE Select Z1 or Z2 if available for the selected report IRC Select STANDALONE ALL or SELEC...

Page 106: ...U SURE Press the YES NO key to toggle to yes and then press CASH to clear the report Mix Match Program Retailers often offer discounts when multiples of different items are purchased For example the offer save 5 on any three bottles of wine can be handled by a mix and match discount The SPS 300 series can accommodate up to 99 different mix and match discounts This program sets the number of items ...

Page 107: ...h table you wish to program and press CASH MIX MATCH M M 1 COUNT 0 AMOUNT 0 00 3 At the COUNT field enter the number of items that need to be purchased to qualify for the discount At the AMOUNT field enter the amount of the discount 4 Press CASH to advance to the next Mix Match or press CLEAR to exit Mix Match Scan You can print out the options for each mix match discount table Select Mix Match Sc...

Page 108: ...DE menu press 5 to select PLU LOOKUP PGM The PLU LOOKUP PGM screen displays PLU LOOKUP PROGRAM PUSH LOOKUP NUMBER TO BE PROGRAMMED AND PRESS CASH 1 15 0 2 Enter the number of the PLU LOOKUP key you wish to program press CASH 1 0 2 0 3 0 4 0 5 0 6 0 7 0 8 0 3 With the cursor pointed at the first position of the PLU LOOKUP screen select a PLU by typing the PLU number and pressing CASH The descriptor...

Page 109: ...entification Because different categories of items might require different ages for example alcohol might require age 21 while tobacco might require age 18 up to five different age categories can be defined This program allows you to set the required age for each of the five available age categories See Group Programming in the Program Mode Programming chapter to link an age category to groups of ...

Page 110: ...ted Are you sure Press the YES NO key to toggle to YES and press CASH to continue 3 From the RESET REPORT MODE menu press 00 to display the DataTran Operation menu DATATRAN OPERATION 0 INITIALIZE EFT 1 OPEN BATCH 2 CLOSE CURR BATCH 4 CHG BATCH NUMBER 5 ISSUE LOCAL TOTAL 6 ISSUE TRANSACTION 4 If necessary press PAGE DOWN to display the second page of the DataTran Operation menu DATATRAN OPERATION 7...

Page 111: ...e done from the Service Mode menu Hardware Tests Clear all totals Clear grand total Clear PLU file FLASH ROM Information Memory Allocation Assignment of functions to keyboard locations IRC Options RS232C Port Options SD Card Operations including Program Backup and Loading Clear Current Batch Integrated Payment Applications only ...

Page 112: ...the PGM position to display the SERVICE MODE menu SERVICE MODE 0 HW TEST 1 CLEAR ALL TOTALS 2 CLEAR GRAND TOTAL 3 CLEAR PLU FILE 4 FLASHROM INFORMATION 5 MEMORY ALLOCATION 6 KEY ASSIGNMENT Press PAGE DOWN to view the remainder of the SERVICE MODE menu SERVICE MODE 7 IRC OPTIONS 8 RS232C PORT 9 SD CARD OPERATION 00 CLEAR CURR BATCH ...

Page 113: ...rform See the table that follows for notes about each test Hardware Test Table TEST NOTES PRINTER A printer test pattern is printed The H W TEST menu automatically returns when the test is complete DISPLAY A display test is initiated The H W TEST menu automatically returns when the test is complete KEYBOARD The display indicates KEYBOARD TEST Press any key location to display its position Turn the...

Page 114: ...ory tests Toggle the power switch on and off to end the test Memory All Clear Before you use your SPS 300 Series ECR for the first time you must perform a memory all clear to insure that all totals and counters are cleared and that the default program is installed Go to Clearing Memory on page 30 to complete this procedure Clear All Totals This selection clears all totals and counters including th...

Page 115: ...E YOU SURE question Press CASH 3 The message GRAND TOTAL CLEAR is printed and the screen returns to the SERVICE MODE menu Clear PLU File This selection clears the entire PLU file including totals counters and programming 1 From SERVICE MODE menu press 3 to display the CLEAR PLU FILE screen CLEAR PLU FILE ARE YOU SURE N 2 Press the YES NO key to display Y at the ARE YOU SURE question Press CASH 3 T...

Page 116: ...isplays FLASHROM INFORMATION VERSION USA 01 027 CHECKSUM A6D8 BOOT APP 0806 9ED2 PLUS USED 300 2000 EFT VER DTRAN 01 000 MAY 10 2012 PRESS CLEAR KEY 2 Press CLEAR to return to the SERVICE MODE menu Memory Allocation Note You must step through every memory allocation field to implement new memory allocation If you press CLEAR at any field you will abort memory allocation processes without making ch...

Page 117: ...ROUP TOTALS field is set MEMORY ALLOCATION TTL AVAIL 1855488 TTL USED 314865 EJ LINES 1000 CHECKS 10 Y HARD N SOFT CHK N LINES SFT CHK 50 3 Continue filling each field until complete Press CASH after setting the last field LINES SOFT CH The screen will display ARE YOU SURE N No will display as the default answer to the question If you wish to implement the new allocation you have entered press the...

Page 118: ...specific key 1 At the SM control lock position menu press 6 for Key Assignment programming The KEY ASSIGNMENT screen displays KEY ASSIGNMENT PUSH KEY TO BE PROGRAMMED 0 2 Press any key location The current key assignment is displayed KEY ASSIGNMENT KEY NUMBER 322 CURRENT ASSIGNMENT CASH ENTER NEW CODE PRESS CASH 0 3 Enter a new key code from the list of Function Key Codes on page 110 and press CAS...

Page 119: ...ays KEY ASSIGNMENT PRESS ENTER TO SAVE CHANGES OR PRESS CLEAR TO EXIT WITHOUT SAVING 6 Press CASH to save the changes you have made or press CLEAR to exit without saving changes 7 The printer will print out a receipt showing all the changes made to the keyboard Notes 1 Numeric keys 0 9 CLEAR and CASH cannot be removed from the keyboard unless they have been assigned to a new keyboard location This...

Page 120: ...ric 00 350 PLU CODEENTRY 389 TARE 312 Decimal 351 PRICE LEVEL 1 390 TAKE OUT 313 NS 352 PRICE LEVEL 2 391 TAX EXEMPT 314 1 353 PRICE LEVEL 3 392 TAX SHIFT 1 315 2 354 PRICE LEVEL 4 393 TAX SHIFT 2 316 3 355 PRICE LEVEL 5 394 TAX SHIFT 3 317 4 356 MACRO 1 395 TAX SHIFT 4 318 5 357 MACRO 2 396 TIME IN OUT 319 X TIME 358 MACRO 3 397 TIP 320 ADD CHECK 359 MACRO 4 398 VOID ITEM 321 CANCEL 360 MACRO 5 3...

Page 121: ...C OPTIONS screen 4 Press the CLEAR key to finalize and return to the SERVICE MODE screen Option Entry Description REG 1 8 Enter the sequential number of the register in the IRC System Use 1 for a standalone register STORE 6 digits Enter the store number FROM REG 1 16 Enter the number of the first register in the IRC range TO REG 1 16 Enter the number of the last register in the IRC range IRC RETRI...

Page 122: ... port you wish to program The appropriate PORT PROGRAM screen displays PORT 1 PROGRAM PG1 BAUD RATE 0 0 9600 1 1200 2 2400 3 4800 4 19200 5 38400 6 57600 7 115200 PARITY CHECK 0 0 NONE 1 ODD 2 EVEN DATA BITS 0 8 1 7 0 3 At each field press CASH to view the selections Enter the digit representing your selection 4 Press PAGE DOWN to view page 2 of the RS232C port program PORT 1 PROGRAM PG2 STOP BITS...

Page 123: ... port program PORT 1 PROGRAM PG4 PRINT LINE ON GUEST CHECK 0 50 0 SCALE TYPE 0 0 NCI 1 CAS 2 OZ PRINTER TYPE 0 0 NONE 1 SAM4S ELLIX 10 7 Press PAGE DOWN to view page 5 of the RS232C port program PORT 1 PROGRAM PG5 PRINTER TYPE 0 2 SAM4S ELLIX 20 3 SAM SRP 250 4 SAM SRP 350 5 CITIZEN 3550 3551 6 CITIZEN 810 7 CITIZEN 230 8 Press PAGE DOWN to view page 6 of the RS232C port program PORT 1 PROGRAM PG6...

Page 124: ...TYPE 0 14 STAR SP 200 15 STAR SP 298 16 STAR SP 300 17 STAR TSP 200 10 Press PAGE DOWN to view page 8 of the RS232C port program PORT 1 PROGRAM PG8 POLE DISLAY TYPE 0 0 EPSON 1 ICD RESERVED 11 Refer to RS232C Settings Screen Program Notes on the next page to fill the fields for each port 12 Press the CLEAR key to finalize and return to the SERVICE MODE screen ...

Page 125: ...t from the code numbers displayed The device function codes are 1 PC Communications 2 Scale 3 Remote Journal Printer 4 Remote Printer 5 Liquor 6 Scanner 7 Coin Dispenser 8 Reserved 9 Remote Pole Display 10 EFT i e DataTran 11 PDC PRINT LINE ON GUEST CHECK 0 50 Enter the number of lines that represent the maximum that can be printed on a single guest check SCALE TYPE Select the digit that represent...

Page 126: ...SD slot 3 Enter the digit 1 7 corresponding to the function you wish to access A complete explanation of each function follows Read Carefully Store Name Notes The store name you set on System Option page 18 is used to identify program and report data on the SD card Note that the default store name is STORE_A If you are using the SD Card to move information to a PC or use the program or report data...

Page 127: ...maller SD cards must be formatted as FAT 32 CAUTION Formatting the SD card will clear all data on the SD card and prepare it for use 1 Start Windows Explorer 2 Select the SD card drive right click and select Format Win XP screen shown slightly different procedures are used with different operating systems 3 From the Format dialog you must select the File System FAT32 Select Format ...

Page 128: ...BACK STORENAME where store name is the name programmed on page 18 of system options In the example below the store name is 1719 5 After a short pause the register will print confirmation of the successful upload with the message UPLOAD PASS for each program segment Below is an Explorer view of the backed up files Restore Program from the SD Card CAUTION Memory allocation must be set the same as th...

Page 129: ...h the time of the report For example CLK2332 represents a Clerk report taken at 23 32 in a 24 hour time format In this manner multiple reports backed up at different times in the same day will collect in the same date folder To Save Reports 1 Turn the control lock to the S position 2 From the second page of the Service Mode menu select 9 SD Card Operation 3 From the SD Card Operation menu select 3...

Page 130: ...ust be no larger than 384 pixels wide by 192 pixels high If the image size in pixels is greater than the maximum you must resize your image a Click OK to exit the Attributes dialog b Select your image Choose Select All from the Edit menu c Using the handles of the selected image resize the image Keep the image in the upper left corner of the screen d Choose Attributes from the Image menu The Attri...

Page 131: ...tility menu The Bmp dialog box displays 6 Click FILE OPEN Select the bitmap image you wish to use from the Open dialog and click the Open command button 7 Click the SAVE AS PRE IMG or SAVE AS POST IMG button 8 When the image is selected click OK Verify that the message Save As UserPre Img or Save As UserPost Img displays If the file is too large and cannot be loaded the message File Size Error dis...

Page 132: ...om the SD Card Operation menu select 4 PRE_IMAGE LOGO LOAD 5 The message PREAMBLE LOGO LOADED will print on the receipt printer Saving Images from an SPS 300 to an SD Card 1 Insert the SD card in the register s SD slot 2 Turn the control lock to the S position 3 From the second page of the Service Mode menu select 9 SD Card Operation 4 From the SD Card Operation menu select 5 PRE_IMAGE LOGO BACKUP...

Page 133: ...ecurity screw and open the flap securing the SD slot Insert the SD card until you hear a click and the SD card is locked in Boot Area Update 4 At the SPS 300 turn the control lock to the S position 5 Power off the SPS 300 6 Press and hold the Numeral 1 key on the keyboard While continuing to hold the Numeral 1 key turn on the power switch 7 A rapid beep beep beep will be heard Release the Numeral ...

Page 134: ...ram SPS300 bin PC Connection Cable YOU MUST USE Port 1 Use the following cable CRS Part 522120 Register DB 9MF COM 1 to PC DB 9F Update Boot Area 1 Connect the Serial Cable From ECR to PC 2 At the register turn the control lock to the S position 3 Turn the power switch to the OFF position 4 Press and hold the CASH and CLERK keys Use the keys in their default locations the upper right and lower rig...

Page 135: ... to the OFF Update Program Area 1 Connect the Serial Cable From ECR to PC 2 At the register turn the control lock to the S position 3 Turn the power switch to the OFF position 4 Press and hold the CASH and CLERK keys Use the keys in their default locations the upper right and lower right keys on the keyboard 5 While continuing to hold the CASH and CLERK keys turn the power switch to the ON positio...

Page 136: ...will close At the ECR when the load is complete a rapid beep beep beep will be heard and the display will flash rapidly Turn the power switch to OFF the program update is complete 12 Disconnect the PC cable 13 Perform a memory all clear on the ECR The ECR is now ready to program or to load a previously saved end user program Clear Current Batch The clear batch command erases all the current batch ...

Page 137: ...hod SPS 320 SPS 340 This method is the default descriptor program method for the flat keyboard models SPS 320 and SPS 340 When the descriptor field is selected on the program screen you can simply type the descriptor placing a copy of the overlay over the keyboard Press enter to finalize your descriptor 1 11 21 31 41 51 61 71 81 91 FEED JOURNA L FEED 2 12 22 32 42 52 62 72 82 92 q w e r t y u i o ...

Page 138: ...iptor programming is available by setting the program option Because SPS 345 key labels are inserted individually underneath the key cap the overlay function should accompany the key s normal function on the key check perhaps by placing the alpha function in a corner of the key The keyboard below shows the placement of alpha function on the expanded SPS 345 keyboard A H O V SPACE FEED JOURNA L FEE...

Page 139: ...tional character type the code and press the decimal key Each character will be displayed as it is entered 3 Press CASH when the descriptor is complete Program Example To program the descriptor APPLE type 65 80 80 76 69 CASH A P P L E Note For lower case enter 98 after the descriptor code For example a 6598 CASH For DOUBLE wide characters enter 99 after the descriptor code For example A 6599 CASH ...

Page 140: ...ol lock to the PGM position The first page of the PROGRAM MODE menu displays PROGRAM MODE 0 PLU 1 GROUP 2 SALES TAX 3 SYSTEM OPTION 4 PRINT OPTION 5 FUNCTION KEYS 6 CLERK Press PAGE DOWN to view the remainder of the PROGRAM MODE menu PROGRAM MODE 7 LOGO DESCRIPTOR 8 NLU CODE PROGRAM 9 DOWNLOAD PROGRAMS 00 MORE ...

Page 141: ...to view the MORE PROGRAMS menu PROGRAM MODE P1 0 CLERK IN OUT 1 PLU STOCK 2 DRAWER LIMIT 3 CHECK CHANGE LIMIT 4 TIME DATE 5 TARE WEIGHT 6 MACRO Press PAGE DOWN to view the remainder of the PROGRAM MODE page 2 menu PROGRAM MODE P2 7 MACHINE NO 8 PC SCHEDULE TIME 9 TRAINING MODE P W 00 SCAN ...

Page 142: ...PLU Add Modify PLU 1 Press 0 to add or modify a PLU The PLU NUMBER screen displays PLU NUMBER ENTER PLU NUMBER AND PUSH PLU OR PRESS A PLU KEY ON THE KEYBOARD 0 2 To view the PLU PROGRAMMING screen enter the number of the PLU you wish to program or press a PLU key on the keyboard or press a modifier key followed by a the PLU key on the keyboard or scan the barcode on an item 3 Refer to PLU Options...

Page 143: ...y or by using the descriptor code method see page 117 The overlay is automatically activated when the cursor is pointing at the DESC field Press PAGE DOWN to view the second PLU Programming screen Press PAGE UP once to return to the first option on a screen Press PAGE UP again to return to the previous screen Press ENTER to advance the arrow to the next option Press YES NO to toggle from Y to N fo...

Page 144: ...rogramming screen PLU Options Reference Information Option Entry Description DESC Alpha numeric 12 character You can program a descriptor for each PLU Type the descriptor using the Program Overlay or by using the descriptor code method see page 117 The overlay is automatically activated when the cursor is pointing at the DESC field The default descriptors are PLU 1 PLU 2 etc PRESET Y or N Choose Y...

Page 145: ...For each of three group assignments enter a group where this PLU s sales will accumulate The number of groups available is determined by memory allocation NEGATIVE ITEM Y or N Select Y to register items that subtract rather than add to the sale total HASH Y or N Items designated with HASH status add to the current sale but do not add to the registers grand total HASH items may or may not add to th...

Page 146: ...INT ON RECEIPT PRINT ON DISPLAY PRINT ON CHECK Y or N Select N if you wish to suppress printing or display of the item at the designated location PRT PRICE ON RCPT Y or N Select N if you wish to suppress printing of the item s price on the receipt PRT PRICE ON CHK Y or N Select N if you wish to suppress printing of the item s price on the check DISABLE PROMO Y or N Select Y to block the PROMO func...

Page 147: ... Press 0 to delete an individual PLU The PLU NUMBER screen displays PLU NUMBER ENTER PLU NUMBER AND PUSH PLU OR PRESS A PLU KEY ON THE KEYBOARD 0 3 Enter the number of the PLU you wish to delete or press a PLU key on the keyboard or press modifier key followed by a the PLU key on the keyboard The CONFIRM DELETE screen displays CONFIRM DELETE ARE YOU SURE YOU WISH TO DELETE PLU CASH DELETE CLEAR AB...

Page 148: ...creen press 1 for to display the DELETE PLU screen DELETE PLU 0 DELETE ONE PLU 1 DELETE PLU RANGE 2 Press 1 to delete a range of PLUs The PLU NUMBER screen displays PLU NUMBER ENTER NUMBER OF THE FIRST PLU IN THE RANGE AND PUSH PLU 0 3 Enter the number of the first PLU in the range you wish to delete and press PLU The screen prompts for the last PLU in the range PLU NUMBER ENTER NUMBER OF THE LAST...

Page 149: ...splays CONFIRM DELETE ARE YOU SURE YOU WISH TO DELETE PLU 1234 TO 1240 CASH DELETE CLEAR ABORT 5 Press CASH to delete the PLU press CLEAR to return to the PLU DELETE screen without deleting the PLU Note Before a PLU can be deleted all report information must be cleared It may be necessary to run a Z1 and Z2 PLU Report and if the PLU is an inventory item you must change the stock to zero ...

Page 150: ...ps If a PLU sends totals to more than one group the group total that appears on the Group report will not represent PLU sales Therefore you also have the option of deciding whether each group s total will add to the group total on the Group report To Program Groups 1 At the PGM control lock position menu press 1 for GROUP The GROUP PROGRAMMING screen displays The maximum group number is set by mem...

Page 151: ...at the DESC field The default descriptors are GROUP 1 GROUP 2 etc ADD TO GROUP TOTAL Y or N Select N if you do not wish this groups total to be added to the total of all groups on the Group report SEND TO KP Y or N Select Y if you wish to send PLUs reporting to this group to a kitchen printer KP PORT Y or N For SAT Select Y or N to direct items to the device attached to port 1 4 of the server regi...

Page 152: ...sting gift card select 2 for add For normal PLU registrations use the default value of 0 AGE VERIF 0 5 When an item in this group is registered first time in a transaction only the register will prompt the operator to enter the customer s date of birth The sale of the item will be registered only if the customer has reached the appropriate age Set 0 for no age requirement Set 1 to 5 to check the d...

Page 153: ...ram test for accuracy by entering several transactions of different dollar amounts Carefully check to make sure the tax charged by the cash register matches the tax amounts on the printed tax chart for your area As a merchant you are responsible for accurate tax collection If the cash register is not calculating tax accurately or if you cannot program your tax properly from the information in this...

Page 154: ...DE screen Programming a Tax Table In some cases a tax that is entered as a percentage does not exactly follow the tax charts that apply in your area even if the tax chart is based on a percentage In these cases we recommend that you enter your tax using tax table programming This method will match tax collection exactly to the break points of your tax table Before programming obtain a copy of the ...

Page 155: ... AMOUNT Enter the highest amount where no tax is charged For this example the entry is 0 10 OF NON REPEAT BRK Enter the number of Non repeat breaks For this example the entry is 5 OF REPEAT BREAK Enter the number of repeat breaks For this example the entry is 3 6 After entering the OF REPEAT BRK field the next TAX TABLE PROG screen will display Using the printed copy of your tax table enter inform...

Page 156: ...en should look like the following screen Note that this screen should look exactly like the corresponding part of the printed tax table TAX TABLE PROGRAMMING TAX SALE AMT RANGE 0 06 0 92 1 08 0 07 1 09 1 24 0 08 1 25 1 41 8 After you have completed entering the SALES AMOUNT RANGE information the TAX PROG screen will return prompting you to enter the next tax if necessary Continue to program additi...

Page 157: ...termine when the break points begin to repeat Mark the beginning break points that do not fit a pattern as non repeat breaks Mark the break points that are repeating in a pattern as repeat breaks Count the number of repeat and non repeat breaks Tax Charged Sale Amount Range Break point Differences 0 00 0 00 0 10 0 01 0 11 0 21 11 0 02 0 22 0 38 17 0 03 0 39 0 56 18 Non Repeat 0 04 0 57 0 73 17 0 0...

Page 158: ...BER field enter the number of the tax you wish to program There are four taxes available enter 1 2 3 or 4 The arrow will move to the TAX TYPE field 4 Enter 2 for VAT The appropriate TAX PROGRAMMING screen displays TAX 1 PROGRAMMING TAX RATE 0 000 5 When the arrow is pointed at the TAX RATE field enter the VAT rate For example if the tax is 6 percent enter 6 000 or 6 0 If the tax is 7 5 percent ent...

Page 159: ...will move to the TAX TYPE field 4 Press CASH The TAX 4 PROGRAMMING screen displays TAX 4 PROGRAMMING TAX RATE 0 000 GST IS TAXABLE BY RATE 1 N RATE 2 N RATE 3 N 5 When the arrow is pointed at the TAX RATE field enter the GST rate For example if the tax is 6 percent enter 6 000 or 6 0 If the tax is 7 5 percent enter 7 500 or 7 5 using the decimal key If the tax is 10 percent enter 10 000 or 10 0 Pr...

Page 160: ...s PAGE DOWN to view the 2nd System Option screen Press ENTER after making a change or press ENTER to advance the arrow to the next option without making a change Press PAGE UP to return to the previous screen NOTE Be sure to press ENTER after changing a selection If you do not press ENTER the change will not be accepted Press YES NO to toggle from Y to N for yes or no decisions SYSTEM OPTION P3 SE...

Page 161: ...sure to press ENTER after changing a selection If you do not press ENTER the change will not be accepted Press YES NO to toggle from Y to N for yes or no decisions SYSTEM OPTION P7 AND TAX CALCULATION 0 SPLIT PRICE CALCULATION 0 CALCULATION CHART 0 ROUND UP AT 0 50 1 ROUND UP 2 ROUND DOWN SYSTEM OPTION P8 COMPULSORY EAT IN T OUT D THRU BEFORE TENDERING N HASH IS Y Y NORMAL N NON ADD ALLOW PRINT SC...

Page 162: ... System Option screen Press PAGE DOWN to view the 11th System Option screen Press ENTER after making a change or press ENTER to advance the arrow to the next option without making a change Press PAGE UP to return to the previous screen NOTE Be sure to press ENTER after changing a selection If you do not press ENTER the change will not be accepted SYSTEM OPTION P13 PRICE LEVEL IS 0 0 POP UP AFTER I...

Page 163: ... OPTION P16 EUROPEAN ROUNDING N START END VALUE 1 00 00 0 2 00 00 0 3 00 00 0 4 00 00 0 5 00 00 0 Press PAGE DOWN to view the 16th System Option screen SYSTEM OPTION P17 DISABLE NOT FOUND PLU N EMBEDED PRICE BAR CODETYPE 0 1 3 4 7 CLERK INTERRUPT N PROGRAM DESC BY CODE N AUTO CUTTER N USE SPOOL N Press PAGE DOWN to view the 17th System Option screen SYSTEM OPTION P18 MCR CLERK SIGN ON N USE TRACK ...

Page 164: ...REGISTER PIN PAD TYPE Y Y DUKPT N ROTAT PIN PAD 0 4 0 Press PAGE DOWN to view the 21th System Option screen SYSTEM OPTION P22 NO SIGN IF TRANSACTION 0 00 TTL LESS THAN DATATRAN WAIT VALUE 2 ON REMOTE REGISTER MGR REQUIRED TO OPEN CHECKS N Press PAGE DOWN to view the 22nd System Option screen System Options Reference Information Option Entry Description BEEPER ACTIVE Y or N Select N for a silent ke...

Page 165: ...r ALLOW MULPTIPLE RECEIPT Y or N Set to Y if you wish to issue more than one copy of a transaction receipt CASH DECLARATION REQ BEFORE REPORTS Y or N Select Y to enforce a cash declaration function before a financial clerk or cash in drawer report can be generated MGR CONTROL TO TEND NEGATIVE BALANCE ZERO BALANCE Y or N Select Y if you wish to control negative transactions when cash is removed fro...

Page 166: ...2 at 3 for 1 00 calculations 0 for round up at 0 5 of a penny 0 005 1 for always round up or 2 for always round down COMPULSORY EAT IN T OUT D THRU BEFORE TENDERING Y or N Choose Y if you wish to enforce use of one of the destination keys EAT IN TAKE OUT or DRIVE THRU before the sale is finalized HASH IS Y NORMAL N NON ADD Y or N Y Hash adds to all totals except the gross and net sales totals on t...

Page 167: ... level key you have the option of the level key applying only to the next item 0 having the same level key apply to any subsequent item registered in the same transaction 1 or having the same level key apply to any subsequent item on any subsequent transaction 2 ELEC JOURNAL Y or N Select Y to enable the electronic journal The electronic journal captures in memory what you would print line by line...

Page 168: ...pe 3 embedded bar codes without a check sum 7 Choose 7 if you are embedding a weight rather than a price Use weight when different items are sold in bulk such as nut bolts in a hardware store When a weight embedded bar code is scanned the weight is displayed and must be extended by a price at the cash register CLERK INTERRUPT Y or N PRG DESC BY CODE Y or N When N program descriptors by pressing th...

Page 169: ...et EFT DRAFT to Y DATATRAN for a normal draft Set EFT DRAFT to N FINE DINING for a draft with a tip entry line MSR CONNECTED 0 1 or 2 Set MSR CONNECTED to 0 if the MSR is connected to the DATATRAN Set to 1 if the MSR is connected to the PDC Set to 2 if connected to the register PIN PAD TYPE Y or N Choose Y DUKPT is only type supported PIN PAD 0 4 0 4 Indicate port where PIN PAD is connected NO SIG...

Page 170: ...ORT N PRINT SALE ITEM NO N Press PAGE DOWN to view the 2nd Print Option screen Press ENTER after making a change or press ENTER to advance the arrow to the next option without making a change Press PAGE UP to return to the previous screen NOTE Be sure to press ENTER after changing a selection If you do not press ENTER the change will not be accepted Press YES NO to toggle from Y to N for yes or no...

Page 171: ...t option without making a change Press PAGE UP to return to the previous screen NOTE Be sure to press ENTER after changing a selection If you do not press ENTER the change will not be accepted Press YES NO to toggle from Y to N for yes or no decisions PRINT OPTION P7 PRINT TAX AMOUNT Y PRT TAXABLE TOTAL N PRINT TAX RATE N VAT BREAKDOWN N PRINT TRAIN MODE TITLE IN TRAINING MODE Y PRINT OPTION P8 CU...

Page 172: ...e next option without making a change Press PAGE UP to return to the previous screen PRINT OPTION P12 PRINT ON FINANCIAL REPORT AVG ITEM CUST Y AVG CUST Y BUFFER RECEIPT ISSUE WHEN RECEIPT IS ON N PRIORITY PRINT BY GROUP ON KP KV N Press PAGE DOWN to view the 11th Print Option screen PRINT OPTION P11 PRINT PREAMBLE Y PRINT POSTAMBLE Y MESSAGE ON RECEIPT PRINT PREAMBLE N PRINT POSTAMBLE N ON THE GU...

Page 173: ...the next option without making a change Press PAGE UP to return to the previous screen PRINT OPTION P15 PRE FEED LINE RECEIPT 0 5 0 POST FEED LINE RECEIPT 0 5 0 PRINT IN HIGH DENSITY N PRINT DATE ON SERVICE N ON HARD CHECK PRINT TAX CHARGED N FOR LAST SERVICED ITEMS Press PAGE DOWN to view the 15th Print Option screen PRINT OPTION P16 NOT PRINT WHEN POLLING REPORT N PRINT WHEN PROGRAM UP DOWN N AD...

Page 174: ... PRT CLERK REPORT AFT FINANCIAL RPT Y or N Select Y if you wish to include the clerk report information at the end of the financial report PRINT PLU WITH ZERO TOTALS ON REPORT Y or N By default the register prints only totals with information other than zero Select Y if you wish to print the contents of all the PLUs even if the total is zero PRINT SUBTOTAL WHEN PRESSED Y or N Select Y if you wish ...

Page 175: ...inancial report resetting Z report PRINT SUBTOTAL W O TAX Y or N If you hand write credit card slips you may find it useful to print the merchandise subtotal Select Y if you wish to print the subtotal without tax on the receipt TAX AMOUNT IS Y COMBINE N ITEMIZE Y or N Select Y if you are calculating and reporting more that one sales tax rate separately and you wish to print just the total of multi...

Page 176: ...mat on the kitchen requisition For example if Y 2 HAMBURGERS if N 1 HAMBURGER and 1 HAMBURGER CONSOLIDATION ON CHECK TRACK Y or N Consolidation of like items can be selected for soft guest check printing For example if three rounds of drinks are served the check will print 3 TAP BEER rather than 1 TAP BEER three times VOLUME UNIT 0 GAL 1 LTR 0 or 1 If gallonage is selected in PLU programming choos...

Page 177: ...PORT Y or N Determines whether PLU is displayed on the report GRAND TOTAL IS Y NET N GROSS Y or N Choose Y if you wish the grand total to accumulate daily net sales totals Choose N if you wish the grand total to accumulate daily gross sales totals SEND ORDER TO KP AT SUBTOTAL Y or N Choose Y to print orders on the KP when the SUBTOTAL key is pressed Choose N to print orders on the KP when the orde...

Page 178: ...on the screens provided 4 After making new entries or changes for a function key press the CLEAR key to finalize and return to the PROGRAM MODE screen Clerk Programming Reference Information Option Entry Description NAME Alpha numeric 12 character You can program a descriptor for each clerk The name you program will print on the receipt in place of the default CLERK 1 99 Type the descriptor using ...

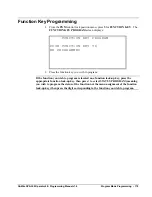
Page 179: ...EY PROGRAM PUSH FUNCTION KEY TO BE PROGRAMMED 2 Press the function key you wish to program If the function you wish to program is located on a function look up key press the appropriate function look up key then press 1 to select STATUS PROGRAM meaning you wish to program the status of the function not the menu assignment of the function look up key then press the digit corresponding to the functi...

Page 180: ... SALE AFTER NON ADD N 2 Press CASH from the last field or press PAGE DOWN to view the second page of NS function key options NS KEY PROG ENFORCE ENTRY AT START OF SALE N PRINT ON N S Y NON ADD PROHIBIT N COMP NON ADD MUST MATCH MAX DIGIT N MAX DIGIT 0 8 0 3 Press CASH from the last field to return to the FUNCTION KEY PROGRAM screen or press CLEAR at any time to return to the FUNCTION KEY PROGRAM s...

Page 181: ... INHIBIT NO SALE AFTER NON ADD Y or N Select Y if you want disable the NO SALE function after a non add number is entered ENFORCE ENTRY AT START OF SALE Y or N Select Y if you wish to enforce the entry of a non add number at the beginning of each transaction For example to track the number of customers in each sale or to identify a customer number with each sale PRINT ON N S Y or N Select N to sto...

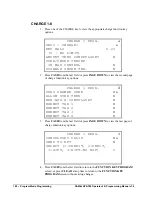
Page 182: ...N N 2 Press CASH from the last field or press PAGE DOWN to view the second page of function key options 1 PROGRAMMING OVERRRIDEABLE N POS Y NEG N N TAXABLE BY TAX1 N TAXABLE BY TAX2 N TAXABLE BY TAX3 N TAXABLE BY TAX4 N F S ELIGIBLE N 3 Press CASH from the last field or press PAGE DOWN to view the next page of function key options 1 PROGRAMMING ALLOW ONLY ONE TIME SUBTOTAL ENTRY N ALLOW MULTIPLE A...

Page 183: ...ction is an amount enter an amount from 0 to 999 99 If not zero the amount will be the preset coupon amount If the function is a percentage enter a percentage from 0 to 99 999 If not zero the percentage will be the preset percentage KEY DISABLE Y or N Select Y to disable this function UNDER MGR CONTROL Y or N Select Y if you do not want the operator use this function in REGISTER mode When selected...

Page 184: ... to reduce increase the food stamp subtotal by the amount of entry ALLOW ONLY ONE TIME SUBTOTAL ENTRY Y or N If Y you can enter only a single coupon and you must press the SUBTL key before the coupon entry ALLOW MULTIPLE AMOUNT DISCOUNT COUPON WITHOUT SUBTOTAL ENTRY Y or N If you set a key to be used for vendor coupons i e amount negative and sale status then choose Y to allow the function to be o...

Page 185: ...ut saving changes ADD CHECK Key Program Notes Option Entry Description DESC Alphanumeric 12 character You can program a unique descriptor The default descriptor is ADD CHECK KEY DISABLE Y or N Select Y to disable this function COMPULSORY BEFORE TENDERING Y or N Select Y if you want to force the operator to use the ADD CHECK function before tendering CONSECUTIVE NUMBERADV ANCED Y or N Select Y if y...

Page 186: ...N KEY PROGRAM screen without saving changes CANCEL Key Program Notes Option Entry Description DESC Alpha numeric 12 character You can program a unique descriptor The default descriptor is CANCEL HALO 7 digit amount You can limit errors by setting the maximum amount that can be used with this function 0 means that there is no entry limit KEY DISABLE Y or N Select Y to disable this function UNDER MG...

Page 187: ...escriptor The default descriptor is CASH HALO 7 digit amount You can limit errors by setting the maximum amount that can be tendered 0 means that there is no entry limit AMOUNT TEND COMP Y or N Select Y if you want to force the operator to enter the tendered amount and let the register calculate the change OVER UNDER TENDER IN MGR CONTROL Y or N Select Y if you do not want the operator to tender m...

Page 188: ...to view the second page of charge function key options CHARGE 1 PROG DOES DRAWER OPEN N ALLOW OVER TEND N NON ADD COMPULSORY N EXEMPT TAX 1 N EXEMPT TAX 2 N EXEMPT TAX 3 N EXEMPT TAX 4 N 3 Press CASH from the last field or press PAGE DOWN to view the last page of charge function key options CHARGE 1 PROG COMPULSORY VALID N SEND TO EFT N SELECT 1 CREDIT 2 DEBIT 3 GIFT 4 GIFT NO NSF 0 4 Press CASH f...

Page 189: ...E UNDER TEND Y or N Select Y if you do not want the operator to tender less than the amount of the sale DOES DRAWER OPEN Y or N Select N if you do not want the drawer to opened with this key ALLOW OVER TEND Y or N Select Y if you wish to allow tender greater than the amount of the sale NON ADD COMP Y or N Select Y if you wish to enforce the entry of a non add number prior to tendering EXEMPT TAX 1...

Page 190: ...meric 12 character You can program a unique descriptor The default descriptor is CHKCASH HALO 7 digit amount You can limit errors by setting the maximum amount that can be used with this function 0 means that there is no entry limit KEY DISABLE Y or N Select Y to disable this function UNDER MGR CONTROL Y or N Select Y if you do not want the operator use this function in REGISTER mode When selected...

Page 191: ...rn to the FUNCTION KEY PROGRAM screen without saving changes CHECK ENDORSEMENT Key Program Notes Option Entry Description DESC Alpha numeric 12 character You can program a unique descriptor The default descriptor is CHKENDOR KEY DISABLE Y or N Select Y to disable this function PRINT CHECK AMT IN THE ENDORSEMENT Y or N Choose Y to print the amount of the check as well as the endorsement message Cho...

Page 192: ...or press PAGE DOWN to view the second page of check function key options CHECK KEY PROG DOES DRAWER OPEN N EXEMPT TAX 1 N EXEMPT TAX 2 N EXEMPT TAX 3 N EXEMPT TAX 4 N COMPULSORY CHECK ENDORSEMENT N 3 Press CASH from the last field or press PAGE DOWN to view the third page of check function key options CHECK KEY PROG COMPULSORY VALID N 4 Press CASH from the last field to return to the FUNCTION KEY ...

Page 193: ...or to tender more than the amount of the sale and issue change When selected over tendering is allowed only in the X control lock position DISABLE UNDER TEND Y or N Select Y if you do not want the operator to tender less than the amount of the sale DOES DRAWER OPEN Y or N Select N if you do not want the drawer to open with this key EXEMPT TAX 1 EXEMPT TAX 2 EXEMPT TAX 3 EXEMPT TAX 4 Y or N Select ...

Page 194: ...E DOWN to view the second page of check track function key options CHECK TRACK PROGRAMMING PRINT CHKS ON RP Y ALLOW ONLY ONE CHK PER TABLE N CHECK ASSIGNED BY REGISTER N DRIVE THRU FEATURE ENABLED N 3 Press CASH from the last field or press PAGE DOWN to view the second page of check track function key options CHECK TRACK PROG LENGTH OF CHECK 0 9 0 SCAN CHECK N 4 Press CASH from the last field to r...

Page 195: ...LOW ONLY ONE CHK PER TABLE Y or N If Y you can begin only one check with the same table CHECK ASSIGNED BY REGISTER Y or N If Y press the CHECK key to automatically assign the next sequential check Check numbers will begin with 1 and continue until the open check report is reset at which point the check number will be reset and start at 1 again DRIVE THRU FEATURE ENABLED Y or N If you wish to imple...

Page 196: ...The default descriptors are CONV 1 4 RATE 5 digits Enter the exchange rate of up to 5 digits do not enter the decimal point See the examples on the next page NUMBER OF DEC 1 6 Enter a number from 0 to 6 to indicate the decimal position of the exchange rate Count the decimal position from the right See the examples below Currency Exchange Rate Programming Examples Note Foreign currency exchange rat...

Page 197: ...M screen without saving changes EAT IN TAKE OUT DRIVE THRU Key Program Notes Option Entry Description DESC Alpha numeric 12 character You can program a unique descriptor The default descriptors are EATIN TAKE OUT and DRIVE THRU EXEMPT TAX 1 EXEMPT TAX 2 EXEMPT TAX 3 EXEMPT TAX 4 Y or N If you wish to automatically exempt a tax for a particular type of sale select Y for the appropriate tax For exam...

Page 198: ...the FUNCTION KEY PROGRAM screen without saving changes ERROR CORRECT Key Program Notes Option Entry Description DESC Alpha numeric 12 character You can program a unique descriptor The default descriptor is ERRCORR HALO 7 digit amount You can limit errors by setting the maximum amount that can be used with this function 0 means that there is no entry limit KEY DISABLE Y or N Select Y to disable thi...

Page 199: ... POSTING N 2 Press CASH from the last field to return to the FUNCTION KEY PROGRAM screen or press CLEAR at any time to return to the FUNCTION KEY PROGRAM screen without saving changes FINALIZE Key Program Notes Option Entry Description DESC Alpha numeric 12 character You can program a unique descriptor The default descriptor is FINALIZE CHARGE POSTING Y or N Choose Y to enable charge posting funct...

Page 200: ...Alphanumeric 12 character You can program a unique descriptor The default descriptor is F S TEND HALO 7 digit amount You can limit errors by setting the maximum amount that can be used with this function 0 means that there is no entry limit EXEMPT TAX 1 4 Y or N If taxes are exempted automatically on food stamp sales as is most often the case select Y for each tax that is actively used and needs t...

Page 201: ...d on each function look up key and you can also access these functions for option programming 1 Press the FUNCTION LOOK UP 1 or FUNCTION LOOK UP 2 key to view the appropriate function program menu screen FUNC 1 PROGRAM 0 MENU ASSIGNMENT 1 STATUS PROGRAM 2 Press 0 to select the menu assignment on the function look up key or press 1 to program the options for a function on the function look up key I...

Page 202: ...SIGN MENU NUMBER 1 CURRENT ASSIGNMENT CANCEL ENTER NEW FUNC CODE PRESS CASH 0 4 Type the code for the function you wish to place on the function look up key menu press CASH See Function Key Codes in the Service Mode Programming chapter or press PAGE DOWN to view a list of functions and codes 5 Go to step 2 above and continue to program menu numbers for the function look up key or press CLEAR to re...

Page 203: ...creen without saving changes GUEST Key Program Notes Option Entry Description DESC Alpha numeric 12 character You can program a unique descriptor The default descriptor is GUEST COMPULSORY FOR GUEST CHECK Y or N Select Y to enforce an entry into the GUEST key before a tracking number can be accessed for the first time COMPULSORY FOR ALL SALES Y or N Select Y to enforce an entry into the GUEST key ...

Page 204: ...CASH from the last field to return to the FUNCTION KEY PROGRAM screen or press CLEAR at any time to return to the FUNCTION KEY PROGRAM screen without saving changes LEVEL 1 5 Key Program Notes Option Entry Description DESC Alpha numeric 12 character You can program a unique descriptor The default descriptors are LEVEL1 LEVEL2 etc SEND DESCRIPTION TO KP Y or N Determines whether the level descripto...

Page 205: ...e FUNCTION KEY PROGRAM screen without saving changes RETURN Key Program Notes Option Entry Description DESC Alpha numeric 12 character You can program a unique descriptor The default descriptor is MDSE RETURN HALO 7 digit amount You can limit errors by setting the maximum amount that can be used with this function 0 means that there is no entry limit KEY DISABLE Y or N Select Y to disable this fun...

Page 206: ... CONTROL N AFFECT PLU N PRINT ON CHECK N PRINT ON RECEIPT N AFFECT DIGIT 1 14 OF PLU 0 2 Press CASH from the last field or press PAGE DOWN to view the second page of modifier function key options MOD 1 PROGAMMING VALUE OF AFFECTED DIGIT 0 9 0 3 Press CASH from the last field to return to the FUNCTION KEY PROGRAM screen or press CLEAR at any time to return to the FUNCTION KEY PROGRAM screen without...

Page 207: ...est check PRINT ON RECEIPT Y or N Select N to suppress printing of the modifier descriptor on the receipt AFFECT DIGIT 1 14 1 14 Preceding a PLU with a Size and or Modifier key manipulates the PLU code assigned to the PLU key causing a different PLU to be registered when the PLU key is pressed Enter the digit of the PLU number you wish to be changed when using this key Digit 1 is the rightmost dig...

Page 208: ... PROGRAM screen or press CLEAR at any time to return to the FUNCTION KEY PROGRAM screen without saving changes PBAL Key Program Notes Option Entry Description DESC Alpha numeric 12 character You can program a unique descriptor The default descriptor is PBAL ENTER ANY TIME Y or N Select Y to allow the PBAL entry at any time Select N to allow a PBAL entry only at the start of a sale REQUIRE AT START...

Page 209: ... Key Program Notes Option Entry Description DESC Alpha numeric 12 character You can program a unique descriptor The default descriptors are PO 1 3 HALO 7 digit amount You can limit errors by setting the maximum amount that can be used with this function 0 means that there is no entry limit KEY DISABLE Y or N Select Y to disable this function UNDER MGR CONTROL Y or N Select Y if you do not want the...

Page 210: ...t saving changes PRINT CHECK Key Program Notes Option Entry Description DESC Alpha numeric 12 character You can program a unique descriptor The default descriptor is PRINT CHECK CHECK PRINT COMM PORT 0 2 0 2 Select the port 1 or 2 where the check print printer is attached If 0 is selected the check will print on the receipt printer AUTO SERVICE CHK Y or N Select Y if you want the Check Print funct...

Page 211: ...M screen without saving changes PROMO Key Program Notes Option Entry Description DESC Alpha numeric 12 character You can program a unique descriptor The default descriptor is PROMO KEY DISABLE Y or N Select Y to disable this function UNDER MGR CONTROL Y or N Select Y if you do not want the operator use this function in REGISTER mode When selected the function is allowed only in the X control lock ...

Page 212: ... ON ACCT 1 3 Key Program Notes Option Entry Description DESC Alpha numeric 12 character You can program a unique descriptor The default descriptors are RA 1 3 HALO 7 digit amount You can limit errors by setting the maximum amount that can be used with this function 0 means that there is no entry limit KEY DISABLE Y or N Select Y to disable this function UNDER MGR CONTROL Y or N Select Y if you do ...

Page 213: ...r You can program a unique descriptor The default descriptor is SCALE KEY DISABLE Y or N Select Y to disable this function UNDER MGR CONTROL Y or N Select Y if you do not want the operator use this function in REGISTER mode When selected the function is allowed only in the X control lock position KEY IS MAN ENTRY Y or N Select Y if you wish to scale key to enter a manual weight Select N if you wis...

Page 214: ...tion Entry Description DESC Alphanumeric 12 character You can program a unique descriptor The default descriptor is SERVICE NON ADD COMP Y or N Select Y if you wish to force the entry of a non add number i e a tax exempt before the key is used PRINT ON RECEIPT Y or N Select N to not print on the receipt NEGATIVE BALANCE IN MGR CONTROL Y or N Select Y if you do not want the operator use this functi...

Page 215: ...r press CLEAR at any time to return to the FUNCTION KEY PROGRAM screen without saving changes TABLE Key Program Notes Option Entry Description DESC Alpha numeric 12 character You can program a unique descriptor The default descriptor is TABLE ENFORCE ON CHECK TRACK Y or N If Y you must enter the table number before opening a new check track ENFORCE ON ALL SALES Y or N If Y you must enter the table...

Page 216: ... to return to the FUNCTION KEY PROGRAM screen without saving changes TARE Key Program Notes Option Entry Description DESC Alpha numeric 12 character You can program a unique descriptor The default descriptor is TARE KEY DISABLE Y or N Select Y to disable this function UNDER MGR CONTROL Y or N Select Y if you do not want the operator use this function in REGISTER mode When selected the function is ...

Page 217: ...TION KEY PROGRAM screen without saving changes TAX EXEMPT Key Program Notes Option Entry Description DESC Alpha numeric 12 character You can program a unique descriptor The default descriptor is TAXEXMT EXEMPT TAX 1 EXEMPT TAX 2 EXEMPT TAX 3 EXEMPT TAX 4 Y or N Select Y or N for each tax to determine which tax or taxes are exempted when this key is used NON ADD COMP Y or N Select Y if you wish to ...

Page 218: ...FUNCTION KEY PROGRAM screen without saving changes TIME IN OUT Key Program Notes Option Entry Description DESC Alpha numeric 12 character You can program a unique descriptor The default descriptor is TIME IN OUT KEY DISABLE Y or N Select Y to disable this function UNDER MGR CONTROL Y or N Select Y if you do not want the operator use this function in REGISTER mode When selected the function is allo...

Page 219: ...en or press CLEAR at any time to return to the FUNCTION KEY PROGRAM screen without saving changes TIP Key Program Notes Option Entry Description DESC Alpha numeric 12 character You can program a unique descriptor The default descriptor is TIP KEY DISABLE Y or N Select Y to disable this function TYPE IS 1 AMOUNT 0 0 or 1 Select 0 if the tip is to be a calculated percentage based on a percentage ent...

Page 220: ...ime to return to the FUNCTION KEY PROGRAM screen without saving changes VALIDATE Key Program Notes Option Entry Description DESC Alpha numeric 12 character You can program a unique descriptor The default descriptor is VALIDATION SLIP OUTPUT COMM PORT 0 4 0 4 If validation is used identify the communications port 1 4 where the validating printer is attached Enter 0 if validation is not used KEY DIS...

Page 221: ...NCTION KEY PROGRAM screen without saving changes VOID ITEM Key Program Notes Option Entry Description DESC Alpha numeric 12 character You can program a unique descriptor The default descriptor is VOID HALO 7 digit amount You can limit errors by setting the maximum amount that can be used with this function 0 means that there is no entry limit KEY DISABLE Y or N Select Y to disable this function UN...

Page 222: ...Notes Option Entry Description DESC Alpha numeric 12 character You can program a unique descriptor The default descriptor is WASTE HALO 7 digit amount You can limit errors by setting the maximum amount that can be used with this function 0 means that there is no entry limit KEY DISABLE Y or N Select Y to disable this function UNDER MGR CONTROL Y or N Select Y if you do not want the operator use th...

Page 223: ...check 1 From the LOGO DESC PROGRAM screen press 0 to display the PREAMBLE screen PREAMBLE LINE 1 LINE 2 LINE 3 2 Using the alpha numeric keyboard overlay SPS 320 SPS 340 type the descriptor For the SPS 345 use the descriptor code method see page 117 Each line can be up to 32 characters If you make a mistake press the BACKSPACE key on the alpha overlay or enter the backspace code 97 if you are usin...

Page 224: ...the bottom of each receipt and or guest check 1 From the LOGO DESC PROGRAM screen press 0 to display the POSTAMBLE screen POSTAMBLE LINE 1 LINE 2 LINE 3 2 Using the alpha numeric keyboard overlay SPS 320 SPS 340 type the descriptor For the SPS 345 use the descriptor code method see page 117 Each line can be up to 32 characters If you make a mistake press the BACKSPACE key on the alpha overlay or e...

Page 225: ...ocedure continue programming each line as necessary Press CLEAR at any time to exit After programming the third line the fourth fifth and sixth lines display POSTAMBLE LINE 4 LINE 5 LINE 6 4 When the last line has been entered press CASH to accept the line and return to the LOGO DESC PROGRAM screen ...

Page 226: ...ters If you make a mistake press the BACKSPACE key on the alpha overlay or enter the backspace code 97 if you are using the descriptor code method to erase the previous character After you have completed typing the first line press CASH to accept the new message and advance to the second line or press CLEAR to return to the LOGO DESC PROGRAM screen without making any changes 3 Using the same proce...

Page 227: ...he alpha numeric keyboard overlay SPS 320 SPS 340 type the descriptor For the SPS 345 use the descriptor code method see page 117 Each descriptor can be up to 12 characters If you make a mistake press the BACKSPACE key on the alpha overlay or enter the backspace code 97 if you are using the descriptor code method to erase the previous character After you have completed typing the first descriptor ...

Page 228: ... 340 type the descriptor For the SPS 345 use the descriptor code method see page 117 Each descriptor can be up to 12 characters If you make a mistake press the BACKSPACE key on the alpha overlay or enter the backspace code 97 if you are using the descriptor code method to erase the previous character After you have completed typing the first descriptor press CASH to accept the new message and adva...

Page 229: ...escriptor can be up to 12 characters If you make a mistake press the BACKSPACE key on the alpha overlay or enter the backspace code 97 if you are using the descriptor code method to erase the previous character After you have completed typing the first descriptor press CASH to accept the new message and advance to the next descriptor or press CLEAR to return to the LOGO DESC PROGRAM screen without...

Page 230: ...cters If you make a mistake press the BACKSPACE key on the alpha overlay or enter the backspace code 97 if you are using the descriptor code method to erase the previous character After you have completed typing the first line press CASH to accept the new message and advance to the next line or press CLEAR to return to the LOGO DESC PROGRAM screen without making any changes 3 Press CASH repeatedly...

Page 231: ... the NLU keys 1 From the PGM control lock position menu press 8 for NLU CODE PGM The NLU CODE PROGRAM screen displays NLU CODE PROGRAM PRESS THE NLU KEY ON THE KEYBOARD YOU WISH TO PROGRAM PRESS CLEAR TO EXIT 2 Press the NLU key on the keyboard you wish to program or press CLEAR to exit NLU CODE PROGRAM CURRENT PLU CODE 1 ENTER NEW PLU CODE 0 3 The current PLU code number displays Type the new PLU...

Page 232: ...oad only to selected registers press 1 PROGRAM DOWN 0 IRC ALL 1 IRC SELECT 1Y 2N 3N 4N 5N 6N 7N 8N 3 If you pressed 1 to download to selected registers the PROGRAM DOWN screen now displays Y or N for each of the eight possible registers in an IRC system For example if your IRC system consists of 3 registers the default Y will display for register 1 2 and 3 The cursor arrow points at the first regi...

Page 233: ...that 00 downloads all programs PROGRAM DOWN 7 LOGO DESC 8 NLU CODE PGM 9 TIME DATE MISC 00 ALL 5 Press the digit that represents your selection This display will indicate the number of the machine that the program is downloading to The printer at the receiving register will indicate PROGRAM DOWN and PASS or FAIL to indicate if the download is successful Note If there is a failure in IRC communicat...

Page 234: ...00 00 00 00 00 TIME WORKED 00 00 4 The cursor will point at the date for the first time punch Press CASH until the cursor points at the field you wish to edit Note that you can edit the last 20 time punches although only 6 dates times display on the screen at one time When you leave the last field displayed on the current screen your view will shift to the next 6 dates times If you wish to edit a ...

Page 235: ...tory quantity Inventory is kept in decimal units two digits beyond the decimal For example if 1 75 pounds are multiplied times the PLU with the preset price per pound of apples 1 75 is subtracted from the PLU representing apples To Program Inventory 1 From the PGM control lock position menu press 00 for MORE The PROGRAM MODE page 2 screen displays 2 From the PROGRAM MODE page 2 screen press 1 for ...

Page 236: ...rawer exceeds the limit you program here a warning will display on the screen You must press CLEAR to remove the warning and continue operations The warning will continue to appear at the completion of every transaction with the limit exceeded until you use the PAID OUT function to remove cash from the drawer Set the drawer limit to 0 to disable the drawer limit warning 1 From the PGM control lock...

Page 237: ... sale For example if the check change limit is 10 00 the maximum amount that can be tendered into the check key on a 5 00 sale is 15 00 1 From the PGM control lock position menu press 00 for MORE The PROGRAM MODE page 2 screen displays 2 From the PROGRAM MODE page 2 screen press 3 for CHECK CHANGE LIMIT The CHECK LIMIT PGM screen displays CHECK LIMIT PROGRAM CHECK CHANGE LIMIT 0 00 3 Type the amou...

Page 238: ...and ending daylight savings time 1 From the PGM control lock position menu press 00 for MORE The PROGRAM MODE page 2 screen displays 2 From the PROGRAM MODE page 2 screen press 4 for TIME DATE The SET DATE TIME screen displays SET DATE TIME SET TIME HH MM MILITARY 09 01 SET DATE MM DD YY 09 21 11 3 Type the current time in 24 hour format i e military time where 13 00 is 1 00 PM Press CASH 4 Type t...

Page 239: ...ose to use tare 5 for manual tare weight entry do not enter a weight for tare 5 See TARE on page 216 1 From the PGM control lock position menu press 00 for MORE The PROGRAM MODE page 2 screen displays 2 From the PROGRAM MODE page 2 screen press 5 for TARE WEIGHT The TARE WEIGHT PROG screen displays with the cursor arrow pointed at the weight for tare 1 TARE WEIGHT PROGRAM TARE 1 0 000 TARE 2 0 000...

Page 240: ...f the 10 possible macro keys Note You can also program macros in function key programming 1 From the PGM control lock position menu press 00 for MORE The PROGRAM MODE page 2 screen displays 2 From the PROGRAM MODE page 2 screen press 6 for MACRO The MACRO PROGRAM screen displays MACRO PROGRAM 0 MACRO 1 1 MACRO 2 2 MACRO 3 3 MACRO 4 4 MACRO 5 5 MACRO 6 6 MACRO 7 3 Press the digit that represents th...

Page 241: ... After selecting a new macro to program the screens displays with the arrow pointing at the first macro line 1 2 3 4 5 6 7 8 2 Press the first key of the macro sequence for example press 1 numeric one 1 ONE 2 3 4 5 6 7 8 3 The keystroke is recorded on the screen and the cursor moves to the next keystroke ...

Page 242: ... 302 THREE 303 FOUR 304 FIVE 305 5 With the key code list displayed press PAGE DOWN and PAGE UP to find the function you wish to add to the macro Type the numeric code number press CASH The function is added to the macro Editing an Existing Macro 1 After selecting a macro to program the screen displays the keystrokes currently programmed 1 ONE 2 TWO 3 THREE 4 FOUR 5 6 7 8 2 Press the YES NO key to...

Page 243: ...HINE NO The MACHINE PROG screen displays MACHINE PROGRAM MACHINE 0 3 Type the machine number up to 5 digits press CASH Training Mode Password If you wish to use training mode you must program a password that you will use to enter training mode The password may be up to 4 digits long however if you choose to use a password less that for digits you must enter preceding zeros to complete a 4 digit en...

Page 244: ... 2 screen press 00 for SCAN The PROGRAM SCAN screen displays PROGRAM SCAN 0 PROGRAM SCAN 1 ALL PROGRAM SCAN 3 Press 1 to initiate a printout of all programs Press 0 to select the program you wish to print from the PROGRAM SCAN screen PROGRAM SCAN P1 0 PLU 1 GROUP 2 SALES TAX 3 SYSTEM OPTION 4 PRINT OPTION 5 FUNCTION KEYS 6 CLERK 4 Press PAGE DOWN to view the remainder of the program scan selection...

Page 245: ... PROGRAM SCAN P1 0 CLERK I O 1 PLU STOCK 2 DRAWER LIMIT 3 CHECK CHANGE LIMIT 4 TIME DATE 5 TARE WEIGHT 6 MACRO 6 Press PAGE DOWN to view the remainder of the program scan selections When you see the program you wish to print press the digit representing that program PROGRAM MODE P2 7 MACHINE NO 8 PC SCHEDULE 9 TRAINING MODE P W ...

Page 246: ...246 Program Mode Programming SAM4s SPS 300 Operator s Programming Manual v1 4 ...

Page 247: ...1 TAX3 1 18 TAX4 2 18 XMPT1 SALES 7 00 XMPT2 SALES 1 50 XMPT3 SALES 7 95 XMPT4 SALES 7 50 EATIN TTL 1 10 12 TAKEOUT TTL 2 40 77 DRTHRU TTL 1 3 04 ITEM DISC 3 0 48 continued Total and count of all positive PLUs Total and count of all Negative PLUs Total of PLU and PLU sales Total of Non taxable sales Total of tax eligible sales for each sale tax Total of tax collected for each tax Total exempted sa...

Page 248: ... 00 GROSS SALES 375 63 CASH SALES 13 133 49 CHECK SALES 1 23 05 R A 1 1 145 00 R A 2 0 0 00 R A 3 0 0 00 P O 1 1 140 00 P O 2 0 0 00 P O 3 0 0 00 continued Net Sales Credited tax for each tax Tax is credited for negative taxable sales i e mdse return transactions Food stamp change credited to sales Total and count for each type of transaction correction Gross Sales Totals and counters for CASH and...

Page 249: ...G6 IN D 2 13 09 CHG7 IN D 0 0 00 CHG8 IN D 1 3 04 CHG1 SALES 0 0 00 CHG2 SALES 1 8 43 CHG3 SALES 1 8 52 CHG4 SALES 2 1 60 CHG5 SALES 1 2 67 CHG6 SALES 2 13 09 CHG7 SALES 0 0 00 CHG8 SALES 1 3 04 continued Total and count of items sold with HASH status Count of No Sales Total of numbers entered into the non add key Total and count of expected CASH CHECK in drawer Declaration amounts and over short ...

Page 250: ...000209 00000 Total number of guests served Total and count of balances entered into PBAL key Total and count of balances paid Total and count of items serviced Average number if items per customer and average dollar sales per customer Grand total Total of CASH CHECKS and CHARGES in drawer Total and count for PROMO and WASTE Number of transactions and total activity in Training Mode Total and count...

Page 251: ...T 00001 TIME 13 00 14 00 CNT 17 SALES AMT 183 85 SALES RATE 65 39 14 00 15 00 CNT 9 SALES AMT 97 33 SALES RATE 34 61 TOTAL CNT 26 TOTAL AMT 281 18 KELLY No 000236 00000 Time Period Number of Transactions Net sales in this period Percentage of total sales Number of Transactions all periods Net sales in all periods ...

Page 252: ...T 26 38 85 SALES RATE 14 46 PLU 5 SPRITE CNT 18 13 42 SALES RATE 5 00 PLU 7 ROAST CNT 19 16 30 47 SALES RATE 11 34 PLU 28 UNLEADED CNT 32 85 39 39 SALES RATE 14 66 PLU 29 RETURNS CNT 10 20 00 SALES RATE 7 44 PLU 33 NAILS CNT 15 55 24 72 SALES RATE 9 20 TOTAL CNT 189 56 TOTAL AMT 268 60 KELLY No 000213 00000 PLU number PLU Descriptor Count and sales total Percentage of total sales Total activity fo...

Page 253: ...g DATE 11 10 2011 WED TIME 15 36 X 1 REPORT 00001 ALL CLERK KELLY NET SALE 10 155 23 DRWR TTL 109 81 ZACH NET SALE 5 45 14 DRWR TTL 43 22 ANNA NET SALE 4 78 75 DRWR TTL 67 03 LAURA NET SALE 2 0 00 DRWR TTL 18 64 PEGGY MOLLY NET SALE 5 2 06 DRWR TTL 22 01 KELLY No 000218 00000 Clerk Name Number of Transactions Net sales for this clerk Drawer total for this clerk ...

Page 254: ...SALES AMT 141 75 GROUP 2 DRINK CNT 44 SALES AMT 52 27 GROUP 3 REST CNT 112 SALES AMT 194 02 GROUP 5 STORE CNT 19 16 SALES AMT 30 47 GROUP 8 MDSE CNT 58 40 SALES AMT 44 11 GROUP 9 STORE MDSE CNT 77 56 SALES AMT 74 58 TOTAL CNT 189 56 TOTAL AMT 268 60 KELLY No 000237 00000 Clerk Name Group Descriptor Number of Transactions Number of items sold in this group Net sales for this clerk Net sales for thi...

Page 255: ...TE 50 00 DAY 12 CNT 2 SALES AMT 6 00 SALES RATE 50 00 TOTAL CNT 4 TOTAL AMT 12 00 CLERK 1 No 00047 0000 Stock DATE 11 10 2011 WED TIME 15 47 X 1 REPORT 00001 ALL PLU STOCK PLU 1 HAMBURGER CNT 26 PLU 2 DBL BURGER CNT 15 PLU 7 ROAST CNT 25 96 PLU 28 UNLEADED CNT 1488 47 PLU 33 NAILS CNT 161 25 KELLY No 000228 00000 DATE 11 10 2011 WED TIME 15 47 PLU number PLU Descriptor Current inventory count Coun...

Page 256: ...8 TIME WORKED 0014 25 ANNA TIME IN 11 09 2011 12 52 TIME OUT 11 09 2011 15 42 TIME IN 11 10 2011 06 44 TIME OUT 11 10 2011 14 55 TIME WORKED 0011 01 LAURA TIME IN 11 09 2011 02 33 TIME OUT 11 09 2011 07 55 TIME IN 11 09 2011 12 44 TIME OUT 11 09 2011 18 44 TIME IN 11 10 2011 09 55 TIME WORKED 0011 22 PEGGY TIME IN 11 10 2011 13 52 TIME WORKED 0000 00 MOLLY TIME IN 11 09 2011 01 05 TIME OUT 11 09 2...

Page 257: ...3 24 07 MOLLY CHECK 4 45 42 KELLY CHECK 5 24 50 KELLY CHECK 6 28 33 KELLY KELLY No 000243 00000 PLU Zero Sale DATE 11 10 1999 WED TIME 15 59 X 1 REPORT 00001 PLU ZERO SALE ITEM PLU PLU11 11 PLU14 14 PLU15 15 PLU16 16 PLU19 19 PLU20 20 CLERK 1 No 000243 00000 Open check number and balance Clerk responsible for the check PLU Descriptor PLU Number ...

Page 258: ...Tax 2 Tax 3 Tax 4 Sale Coupon Amounts Sale Percent Discounts Sale Surcharge Amounts Net Sales Gross Sales Example Net Sales Negative PLU Total Item Coupon Total Item Percent Discount Sale Coupon Amounts Sale Percent Discounts Credit Tax 1 Credit Tax 2 Credit Tax 3 Credit Tax 4 Merchandise Return Void Position Total Gross Sales ...

Page 259: ...ecommended to open a new batch right after closing today s batch so it is ready to go for the next day 1 Turn the control lock to the Clear Totals position to display the RESET REPORT MODE menu RESET REPORT MODE 0 Z REPORTS 1 RESET E J 2 PC COMMUNICATION 3 PLU LOOKUP PGM 4 AGE VERIFICATION 5 KP STARTING NO 00 DATATRAN 2 Press 00 to display the DataTran Operation menu DATATRAN OPERATION 0 INITIALIZ...

Page 260: ...amming Manual v1 4 3 If necessary press PAGE DOWN to display the second page of the DataTran Operation menu DATATRAN OPERATION 7 ISSUE BATCH STATUS 8 DIAL IN LOAD 9 DIAL OUT LOAD 4 Press 1 to open the batch The message WAITING RESP displays No printing takes place ...

Page 261: ...RESP displays until the card verification is complete REGISTER MODE 2 PLU1 T1 2 00 WORKING TAX 0 00 SUBT 2 00 3 When verification is complete the draft is printed Note If multiple documents are to be printed the message PRESS CASH TO CONTINUE displays Tear off the printer paper and press CASH to resume printing Sample Draft 5 26 04 10 10 00001 SALE 2 00 6301 APP VITAL8 REF 41415013334 REC NO 1 X__...

Page 262: ...entry line see System Option programming page 18 and select the option EFT DRAFT IS to N no 5 26 04 10 10 00001 SALE 2 00 6301 APP VITAL8 REF 41415013334 REC NO 1 TIP_____________________________ TOTAL___________________________ X___________________________ I AGREE TO PAY ABOVE TOTAL AMOUNT ACCORDING TO CARD ISSUER AGREEMENT ...

Page 263: ...t read press Clear once the message ENTER ACCT NO displays REGISTER MODE 2 PLU1 T1 2 00 ENTER ACCT NO TAX 0 00 SUBT 2 00 3 Enter the account number and press CASH or press Clear twice to abort the transaction REGISTER MODE 2 PLU1 T1 2 00 ENTER EXP DATE TAX 0 00 SUBT 2 00 4 When verification is complete the draft is printed Note If multiple documents are to be printed the message PRESS CASH TO CONT...

Page 264: ...00 SLIDE CARD TAX 0 00 SUBT 12 00 2 Swipe the card The message WAITING RESP displays until the card verification is complete REGISTER MODE 1 PLU1 T1 1 00 1 PLU1 T1 1 00 WAITING RESP TAX 0 00 SUBT 2 00 3 When verification is complete the draft is printed Note If multiple documents are to be printed the message PRESS CASH TO CONTINUE displays Tear off the printer paper and press CASH to resume print...

Page 265: ...ate CHARGE key The message SLIDE CARD displays 4 Swipe the card The message ENTER APP CODE displays VOID MODE 2 PLU1 T1 2 00 ENTER APP CODE TAX 0 00 SUBT 12 00 5 Enter the authorization code printed for the transaction to be voided press CASH The message ENTER REF NO displays VOID MODE 2 PLU1 T1 2 00 ENTER REF NO TAX 0 00 SUBT 12 00 6 Enter the Reference number from the transaction to be voided pr...

Page 266: ... MODE menu 2 Press 00 to display the DataTran Operation menu 3 Press Page Down to view the second page of the DataTran Operation menu 4 Press 00 Tip Operation to enter tips TIP OPERATION ENTER REC NO ORIG TRAN AMOUNT TIP AMOUNT 5 Enter the record number of the transaction and press CASH 6 Enter the original transaction amount and press CASH 7 Enter the tip amount and press CASH 8 If the record num...

Page 267: ...SET REPORT MODE 0 Z REPORTS 1 RESET E J 2 PC COMMUNICATION 3 MIX MATCH PROGRAM 4 MIX MATCH SCAN 5 PLU LOOKKUP PROGRAM 6 AGE VERIFICATION 2 Press PAGE DOWN to view the next page of the RESET REPORT MENU RESET REPORT MODE 9 DATATRAN DEBIT 00 DATATRAN 3 Press 00 to display the DataTran Operation menu or if the application is using debit press 9 DATATRAN OPERATION 0 INITIALIZE EFT 1 OPEN BATCH 2 CLOSE...

Page 268: ... the default settings 2 See System Option Programming on page 160 Press PAGE DOWN until SYSTEM OPTION pg 21 displays Set EFT DRAFT to Y DATATRAN for a normal draft Set EFT DRAFT to N FINE DINING for a draft with a tip entry line Set MSR CONNECTED to 0 if the MSR is connected to the DATATRAN SET to 1 if the MSR is connected to the PDC or set to 2 if the card reader is internal 3 See Print Option Pr...

Page 269: ... 6 ISSUE TRANSACTION 3 If necessary press PAGE DOWN to display the second page of the DataTran Operation menu DATATRAN OPERATION 7 ISSUE BATCH STATUS 8 DIAL IN LOAD 9 DIAL OUT LOAD 00 TIP OPERATION 4 Review the explanations that follow and select the appropriate operation Initialize EFT Select Initialize EFT to verify communications software versions and installed networks DATE 5 24 2011 THU TIME ...

Page 270: ...e totals within the ER 650 ER 600 system wide report before the Settle Batch is attempted DATE 5 24 2011 WED TIME 10 55 LOCAL TOTAL REPORT AMEX 00 0 VISA 120 32 5 MASTER 00 0 DISCOVER 00 0 PRIVATE LABEL 00 0 DINERS 00 0 JCB 00 0 DEBIT 00 0 TOTAL 120 32 5 CLERK 1 000069 00000 Issue Transaction The Local Transaction Report contains details of each transaction in the current batch Example See Appendi...

Page 271: ...evice cannot be loaded If it is being installed at a location where the Internet is not currently operational and the customer wants to use the dial out method for approvals the procedure below must be done at a location where the internet is working To load a TwinTran using a Sam4s register With the TwinTran connected to the register and an active Ethernet line enter into the Dial Out mode At the...

Page 272: ...1 Alphanumeric V PS2000 Transaction ID or 15 15 Alphanumeric MIC Banknet Reference Number 9 9 Alphanumeric MIC Banknet Authorization Date 4 4 Numeric MIC POS Entry Mode 1 1 Alphanumeric MIC Mag Stripe Error Code 1 1 Alphanumeric W PS2000 Validation Code 4 4 Alphanumeric X Authorization Response Code 2 2 Alphanumeric Y PS2000 Authorization Currency Code or 3 3 Alphanumeric MIC Entry Mode Change Ind...

Page 273: ... this field to return the customer s departure date entered in each accessed transaction Formats MMDDYY MM month DD day and YY year N Gratuity Amount When available the DataTran will use this field to return the gratuity amount entered in each accessed transaction Format 9999999 99 decimal point required O Media Type The DataTran will use this field to return the media type used in each accessed t...

Page 274: ...turn the authorization currency code of each accessed transaction Z Merchant Category Code When available the DataTran will use this field to return the merchant category code of each accessed transaction AA Entry Mode When available the DataTran will use this field to return the entry mode of each accessed transaction BB Original Authorization Amount When available the DataTran will use this fiel...

Page 275: ...ster is equipped with a standard Ethernet style network connector Up to eight registers can be connected to an Ethernet switch in a simple star topology configuration Optionally in a 2 unit installation shown below ECRs can be connected with a crossover cable eliminating the need for the Ethernet switch CRS supplies 5 port p n 140114 and 8 port p n 140115 switches Ethernet Switch Crossover Cable ...

Page 276: ...ng function will remain available Device Sharing Limited device sharing is available for remote printers and Datatran integrated payment appliances and polling Through IRC traffic from satellite registers is sent to the Datatran or printer that is attached to one of the registers in the network In the case of polling the PC can access satellite registers through the connection to one of the regist...

Page 277: ...for SPS 2000 SPS 5X0 system NOTE Higher rated cables such as Cat 6 are also acceptable CAT 5e STP Shielded Twisted Pair cable is a high quality general purpose data communications cable that supports standard transmission protocols such as 232 422 485 and 10 100 Base T Ethernet communications CAT 5e STP cable consists of 4 pairs of stranded twisted pair wire with an overall shield foil Note CRS su...

Page 278: ... then they must ensure that there is 3 feet 1m of cable left for this purpose If the CAT 5 communications cabling system is to be terminated by a cabling specialist then the cabling companies must conform to the EIA TIA 568B termination standard Communication Cable Termination Straight Thru Cable Color Coding and Terminal Connection Pin Color Pin Color 1 Orange White 1 Orange White 2 Orange 2 Oran...

Page 279: ...munications Appendix 279 Crossover Cable Color Coding and Terminal Connection Pin Color Pin Color 1 Green White 1 Orange White 2 Green 2 Orange 3 Orange White 3 Green White 4 Blue 4 Blue 5 Blue White 5 Blue White 6 Orange 6 Green 7 Brown White 7 Brown White 8 Brown 8 Brown ...

Page 280: ...ion Check that the crimped connection is not about to come apart and check to see if the wires are flat against the front of the plug If even one of these is incorrect you will have to start over Test the Ethernet cable Ethernet Cable Tips A crossover is used to connect two Ethernet devices without a switch A crossover has one end with the Orange set of wires switched with the Green set Odd number...

Page 281: ...d is safety rated for air plenums Conduit is only needed when the communication cable is exposed in areas of high traffic or harsh conditions exterior mounted cables Terminal and Printer locations in kitchen and bar areas etc Direct Burial Cable For exterior use Category 5 direct burial cable is specially designed for direct burial with a durable covering for protection ...

Page 282: ......

Page 283: ...the customer Typically management wants to know merchandise sales levels for each clerk in order to monitor productivity account for cash and other media and or pay commissions The default program provides operation for 15 clerks however up to 99 different clerks can used by changing the default memory allocation Compulsory When an operation is programmed compulsory the appropriate entry must be p...

Page 284: ... report Currency Conversion Use the currency conversion function to convert and display the value of the transaction in foreign currency Only cash tender is allowed after pressing the currency conversion function Change is calculated and issued in home currency Decimal Multiplication If you sell weighed goods yard goods or any merchandise sold in fractions of a unit the decimal multiplication feat...

Page 285: ...ially stable and reliable In the case that the register s program is improved or updated the Flash ROM can be updated by a qualified service technician through a utility in the register Food Stamp Note Many areas now administer food stamp payments through EBT cards rather than traditional food stamp coupons The SPS 300 Series is not capable of accepting EBT electronic payments at this time Merchan...

Page 286: ...ting is available on the group report HALO The high amount lock out HALO limits the amount allowed to be entered in a PLU or function key HASH Merchants often sell non merchandise items such as lottery tickets or bottle deposits that they do not wish to account for as reportable revenue HASH PLUs are useful to account for non revenue income They will add to the appropriate totals on the PLU report...

Page 287: ...board PLU will look up the appropriate numeric PLU beginning with PLU 1 for Keyboard PLU key 1 and continuing sequentially through the keyboard However this numbering sequence may be impractical for some applications For example Keyboard PLU 1 may represent a can of Diet Pepsi The merchant may wish to have the Keyboard PLU look up the UPC code number for Diet Pepsi which is 120500 Using this progr...

Page 288: ...n Post Tendering is allowed the operator can re enter a cash tender and the register will re calculate the change To post tender after finalizing the sale enter the cash amount presented by the customer and then press CASH The amount of change due to the customer is then displayed This is a calculation function only and no totals or counters are updated by the use of this feature Preamble Postambl...

Page 289: ... activity counter as a stock counter If used as a stock counter each PLU activity will reduce the count A separate program allows you to add to the stock count or enter a new stock count Stock counts are not reset when PLU Z reports are taken Surcharge Item An item percent surcharge adds a percentage to the price of an item This addition nets the PLU total Surcharge Sale A sale percent surcharge a...

Page 290: ...ne of the clerks for training You must clear Z the register before the training clerk can be used When that clerk is signed on the register is in training mode Transaction Number See consecutive number VAT Value Added Tax VAT is a tax collection system where a portion of the item s sale price is tax VAT is different than most sales taxes where tax amounts are calculated and added on to the sale Va...

Page 291: ...1 1 02 20 2012 Update Basic features functions Power switch cover options described Added charge posting operations function key programs Updated FLASH update procedures Default store name is STORE_A V1 2 04 26 2012 IRC Appendix information added V1 3 05 15 2012 Version 1 027 Puerto Rico System Option added V1 4 05 16 2012 Not Found PLU operation updated Store Name notes added ...

Reviews: