26
Chapter 5 – Hasselblad H1
Installation Procedures
The procedures in this section together constitute the basic installation
process.
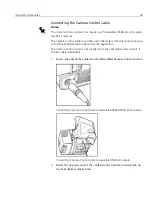
Installing the Focusing Screen
The focusing screen enables you to view the exact area that the Leaf digital
camera back captures. Before you can install the supplied focusing screen,
you must remove the camera’s original viewfinder screen.
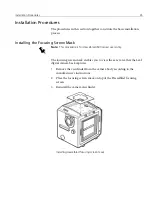
To remove the original viewfinder screen:.
1.
Remove the Hasselblad viewfinder.
2.
Place a pointed instrument into the viewfinder screen removal lug,
and pull upwards to remove the viewfinder screen.
To install the focusing screen:
1.
Position the right side of the focusing screen so that it sits correctly in
the recess.
2.
Place the tip of a pointed instrument into the viewfinder screen
replacement indentation, and then press downwards until the
viewfinder screen snaps into place.
Focusing screen installation
Summary of Contents for Leaf Valeo
Page 1: ...www creo com leaf Installation Guide 653 00683B EN Rev A Leaf Valeo...
Page 2: ......
Page 9: ......
Page 13: ......
Page 17: ......
Page 21: ......
Page 25: ......
Page 29: ......
Page 33: ......
Page 37: ......
Page 38: ...YL HDI 9DOHR YLL YLL YLL...
Page 40: ...HDI 9DOHR xxxvii HDI 9DOHR HDI 5 3URWHFWLYH 5 LOWHU ODVV...
Page 41: ......
Page 42: ...ZN GCH 8CNGQ ZNK ZNK ZNK...
Page 44: ...GCH 8CNGQ xli GCH 8CNGQ GCH 8CNGQ 4 HDI 5 5 Protective IR Filter Glass...
Page 45: ......
Page 46: ...xliv Leaf Valeo Digital Camera Back xlv xlv xlv...
Page 49: ......
Page 50: ...Introduction About This Document 2 Product Overview 2...
Page 52: ...Connecting the FireWire Cable Connecting the FireWire Cable 4 Attaching the Repeater 5...
Page 55: ......
Page 71: ......
Page 79: ......
Page 91: ......
Page 103: ......
Page 119: ......
Page 135: ......
Page 136: ...Diffusion Filter Attaching the Diffusion Filter to the Camera 88...
Page 142: ......
Page 143: ...www creo com...

