68
Chapter 9 – Large Format
5.
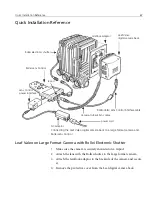
Attach the Leaf Valeo digital camera back to the Graflock adaptor.
6.
Attach the Lens Control flex holder to the tripod.
7.
Attach the Rollei Lens Control to the flex holder.
8.
Connect the cable of the Rollei Lens Control to the Rollei electronic
shutter cable.
9.
Connect the Rollei Lens Control power interface battery to the Rollei
Lens Control.
10.
Insert the AC adaptor into the input on the Rollei Lens Control power
interface and connect the other end of the power supply cable to the
power outlet.
11.
Connect one end of the Rollei-Valeo Lens Control interface cable to
the B port of the Rollei Lens Control and the other end to the Camera
Control jack of the Leaf digital camera back.
12.
Insert one end of the Camera-to-Sync cable into the Rollei Lens
Control Sync jack and the other end into the Camera-to-Back Sync
jack of the Leaf digital camera back.
13.
Install the Leaf Capture V8 application from the CD.
14.
Insert the Live Video View software access key into the USB port of
the computer.
15.
Start the Leaf Capture V8 application.
16.
Connect the FireWire cable between the computer and the Leaf digital
camera back.
After you connect the cable, the application automatically connects to
the Leaf digital camera back. When the connection is established, the
LED indicator on the Leaf digital camera back turns from orange to
green.
Notes:
If you want to work with an external flash, connect the Flash Sync cable between
the Leaf digital camera back and the flash or strobe unit.
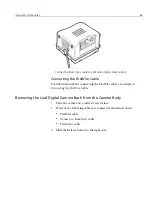
For information about connecting the FireWire cable, see
Chapter 2,
Connecting the FireWire Cable
.
Summary of Contents for Leaf Valeo
Page 1: ...www creo com leaf Installation Guide 653 00683B EN Rev A Leaf Valeo...
Page 2: ......
Page 9: ......
Page 13: ......
Page 17: ......
Page 21: ......
Page 25: ......
Page 29: ......
Page 33: ......
Page 37: ......
Page 38: ...YL HDI 9DOHR YLL YLL YLL...
Page 40: ...HDI 9DOHR xxxvii HDI 9DOHR HDI 5 3URWHFWLYH 5 LOWHU ODVV...
Page 41: ......
Page 42: ...ZN GCH 8CNGQ ZNK ZNK ZNK...
Page 44: ...GCH 8CNGQ xli GCH 8CNGQ GCH 8CNGQ 4 HDI 5 5 Protective IR Filter Glass...
Page 45: ......
Page 46: ...xliv Leaf Valeo Digital Camera Back xlv xlv xlv...
Page 49: ......
Page 50: ...Introduction About This Document 2 Product Overview 2...
Page 52: ...Connecting the FireWire Cable Connecting the FireWire Cable 4 Attaching the Repeater 5...
Page 55: ......
Page 71: ......
Page 79: ......
Page 91: ......
Page 103: ......
Page 119: ......
Page 135: ......
Page 136: ...Diffusion Filter Attaching the Diffusion Filter to the Camera 88...
Page 142: ......
Page 143: ...www creo com...


