Preparing for Installation 2-49
Initial Configuration Information
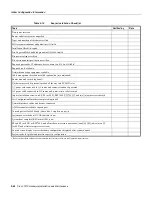
Table 2-16
Component List
Component
Description
Rec’d
Chassis Router
chassis
Accessories
The following accessories may arrive in separate shipping containers:
Rack-mount kit
Two chassis ears, four M4 x 10-mm Phillips flathead screws, and eight 10-32 x 3/8” slotted screws
Cable management kit
Two brackets and six M3 x 6-mm Phillips screws for attaching the brackets to the chassis
Power cable
One power cable
EIP port jackscrews
One jackscrew conversion kit for each Ethernet port
FEIP port jackscrews
One jackscrew conversion kit for each Fast Ethernet port
FSIP interface cables
Verify that you receive 1 of the following adapter cables for each FSIP port:
EIA/TIA-232 DTE or DCE serial port adapter cable, 1 per port required
EIA/TIA-449 DTE or DCE serial port adapter cable, 1 per port required
V.35 DTE or DCE serial port adapter cable, 1 per port required
X.21 DTE or DCE serial port adapter cable, 1 per port required
EIA-530 DTE serial port adapter cable, 1 per port required
One pair of M-30 metric thumbscrews with each cable type except V.35
Optional interface cables
AUI or Ethernet transceiver cable, 1 per EIP port required
One jackscrew conversion kit for each Ethernet AUI ports (install only if needed)
Token Ring interface cable, 1 per TRIP port required
FDDI interface cables, 1 or 2 multimode, 2 or 4 single-mode for each FIP
HSSI interface cable, 1 per port required
Null modem cable for back-to-back HSSI connections
MIP cables, 1 per port required
AIP cables and types, 1 per AIP port required
Other optional equipment
Ethernet transceiver or 802.3 attachment unit
Fast Ethernet transceiver or 802.3 attachment unit
Flash memory card
MAU, CSU/DSU for network connections
Documentation
Cisco 7000 User Guide and UniverCD (ship with chassis), and any printed documentation as
ordered
System components:
Processor slots 5 and 6 should contain an SP (or SSP) and RP, or an RSP7000 (slot 5) and an
RSP7000CI (slot 6), and any combination of 5 interface processors or blank interface processor
fillers
RP
Installed in the RP slot (top slot)
SP
Installed in SP slot instead of SSP (immediately below the RP)
SSP
Installed in SSP slot instead of SP (immediately below the RP)
RSP7000
Installs in the SP (or SSP) slot (slot 3) instead of the SP (or SSP). Used with the RSP7000CI.
RSP7000CI
Installs in the RP slot (slot 4) instead of the RP. Used with the RSP7000.
AIPs
Enter slot locations and port addresses on Configuration Worksheet
CIPs
Enter slot locations and port addresses on Configuration Worksheet
EIPs
Enter slot locations and port addresses on Configuration Worksheet
Summary of Contents for TelePresence Server 7010
Page 10: ...x Cisco 7010 Hardware Installation and Maintenence ...
Page 14: ...iv Cisco 7010 Hardware Installation and Maintenance Document Conventions ...
Page 148: ...3 36 Cisco 7010 Hardware Installation and Maintenance Using the Flash Memory Card ...
Page 158: ...4 10 Cisco 7010 Hardware Installation and Maintenance Troubleshooting the Processor Subsystem ...
Page 242: ...5 84 Cisco 7010 Hardware Installation and Maintenance Replacing Internal Components ...
Page 258: ...A 16 Cisco 7010 Hardware Installation and Maintenance MIP Interface Cable Pinouts ...
Page 270: ...B 12 Cisco 7010 Hardware Installation and Maintenance Interface Processor LEDs ...
Page 274: ...C 4 Cisco 7000 Hardware Installation and Maintenance ...
Page 287: ...Index 13 ...


