C
HAPTER
4 C
ONFIGURING
FOR
A
B
ENCH
T
EST
4.1 B
ENCH
T
EST
– CNC12 S
OFTWARE
C
ONFIGURATION
Relevant
martyscncgarage
video:
Centroid CNC Oak CNC12 4 14 Software Install and Oak Benchtest
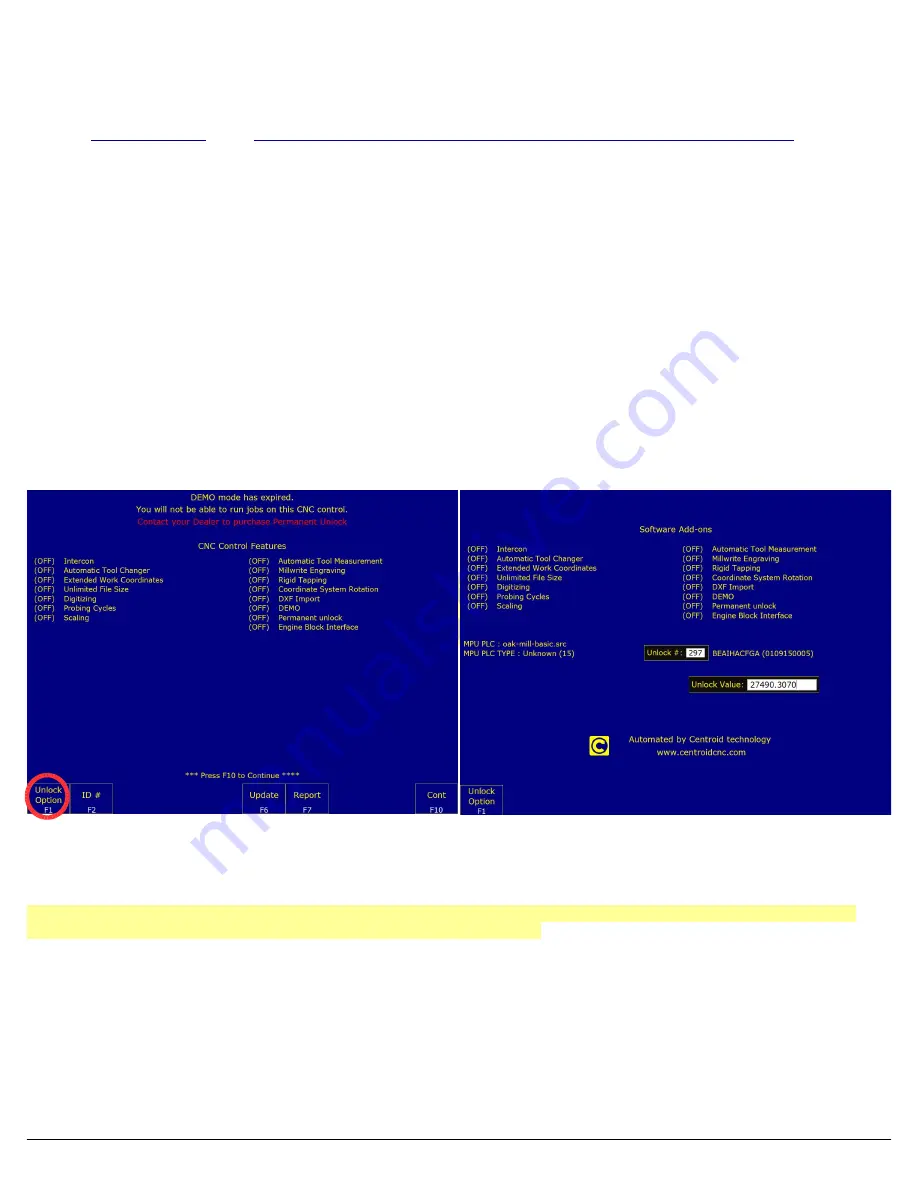
Start the CNC12 Software, you should see the screen in figure 4.1.1.
1.
Enter the Software Unlock Demo Code
To enter a software unlock press
F1-Unlock Option
as shown in Figure 4.1.1.
In “Enter Unlock #:” enter
297
for demos or
298
for permanent unlocks as shown on your unlock sheet
.
Press
ENTER.
Look at the value in the “Software Unlocks” sheet that shipped with control. Enter the value next to the unlock number.
Press
ENTER
. Continue to the main menu.
2.
Did you install the correct PLC program?
Access the options screen again by pressing
F7 – Utility
→
F8-Option
→
F1-Unlock Option
. This time the options screen should contain some additional information. Look for a box labeled “
MPU
PLC
” as shown in Figure 4.1.2, check to make sure the correct PLC program is installed. For a mill, the PLC program
should read “
Centroid-Mill-Standard-OAK-r4.src
” or newer. If your program is not version 2 or newer, it does not
support over-riding of the I/O. Therefore, older versions are not support by this documentation.
3.
Install All Other Unlocks
Enter all unlocks provided on your unlock sheet using
F1-Unlock Option
like you did earlier. If
you have a permanent unlock
AND
a demo mode code, install
both
. This will put the features you did not purchase into
“Demo mode” allowing you to try out such features as rigid tapping, Intercon, or DXF Import. When the demo expires, the
software add-ons labeled “
DEMO
” will go away and any options labeled “
ON
” will remain. To get back to the main menu
from the Software Add-Ons
menu screen press the Esc key.
In general, when using CNC12, you can always go back one
menu level by pressing the escape key (
ESC
). Tapping escape
multiple times from any menu will take you back to the main
menu.
From now on when using CNC12, you can always go up one menu level by pressing the escape key (
ESC
). Tapping escape
multiple times from any menu will eventually take you back to the main menu.
Page 23 of 86
Chapter 4 Configuring for a Bench Test
Figure 4.1.1
Options screen
Figure 4.1.2
Entering Unlocks
Summary of Contents for 13126
Page 1: ...CENTROID Oak Board Install Manual Last revised 6 3 2021 Page 1 of 86...
Page 10: ...1 3 OVERVIEW Page 10 of 86 Chapter 1 What s included...
Page 22: ...Page 22 of 86 Chapter 3 Software Installation...
Page 41: ...Page 41 of 86 Electrical Cabinet Wiring Figure 5 8 1 Sample VFD Wiring...
Page 42: ...Page 42 of 86 Electrical Cabinet Wiring Figure 5 8 2 Spindle Wiring...
Page 63: ...APPENDIX B TECHNICAL INFORMATION...
Page 64: ......
Page 65: ......
Page 66: ......
Page 67: ......
Page 68: ......
Page 69: ......
Page 70: ......
Page 71: ......
Page 72: ......
Page 73: ......
Page 74: ......
Page 75: ......
Page 76: ......
Page 77: ......
Page 78: ......
Page 79: ......
Page 80: ......
Page 81: ......
Page 82: ......
Page 83: ...APPENDIX C 3RD PARTY DRIVE CABLE INFORMATION Yaskawa Drives Page 83 of 86 Appendices...
Page 84: ...Delta Drives Page 84 of 86 Appendices...


