10
Section 1 - Outdoor Furnace Installation
Temporary Above Ground or Winter
Installations
For temporary above ground or winter installations in
which the supply and return lines can not immediately be
buried underground, Central Boiler recommends using
ThermoPEX. Be sure that both the insulation and the
supply and return lines will not be exposed to ultraviolet
rays. The ThermoPEX black exterior jacket has UV
protection but the insulation and water lines inside do
not. Use a ThermoPEX termination cap at each end of
the installation to protect and seal the insulation from
water.
NOTE: Bury the ThermoPEX as soon as conditions
permit (e.g., once the ground has thawed).
NOTE: If ThermoPEX is installed temporarily
above ground, provisions should be made to
prevent possible risk of fire coming into contact
with the ThermoPEX. ThermoPEX is constructed
of materials that can burn and transfer a fire.
CAUTION
If ThermoPEX is installed temporarily above
ground, do not cover with combustible materials
(e.g., straw, hay, leaves, etc.).
Digging the Trench
WARNING
Before digging, be sure to call for utility locator
service.
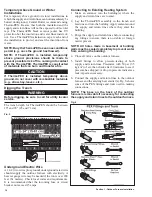
The trench depth for ThermoPEX should be between
10" and 28" (25 and 71 cm).
Fig. 5
Underground Electric Wire
A 14-2 (two wires plus ground) underground rated wire
should supply the outdoor furnace with electricity. A
heavier gauge wire may be needed if the run is over 200
feet (61 meters). Check local codes and requirements.
It is recommended that the incoming fuse or circuit
breaker not exceed 15 amps.
Connecting to Existing Heating System
1. Make an entrance into the building(s) where the
supply and return lines are to enter.
2. Lay the ThermoPEX assembly in the trench and
feed one end into the building. Apply sealant around
the supply and return lines where they enter the
building.
3. Purge the supply and return lines before connecting
any fittings to ensure there is no debris or foreign
matter present.
NOTE: All holes made in basement or building
walls must be sealed completely to prevent water
from entering the building.
4. Close all valves on the outdoor furnace.
5. Install fittings to allow pressure-testing of both
supply and return lines. Pressurize with 50 psi (3.5
kg/cm
2
) of air; then check after 30 minutes to see if
pressure has dropped. A drop in pressure indicates a
leak; repair as necessary.
6. Connect the supply and return lines to the outdoor
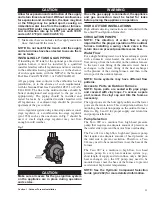
furnace and the existing heat emitter(s). Fig. 6 shows
some of the PEX fittings and tools used in making
connections.
NOTE: The base on the back of the outdoor
furnace is removable if necessary for connecting
the supply and return lines to the outdoor furnace.
Fig. 6
Summary of Contents for e-Classic 1450 IR
Page 17: ...15 Section 1 Outdoor Furnace Installation...
Page 29: ...27 Section 1 Outdoor Furnace Installation Fig 30 Fig 31...
Page 30: ...28 Section 1 Outdoor Furnace Installation Fig 32 Fig 33...
Page 66: ...64 E CLASSIC 1450 WIRING DIAGRAM Section 6 General Information...
Page 67: ...65 Section 6 General Information E CLASSIC 1450 WIRING DIAGRAM OPTIONAL POWER IGNITION...
Page 69: ...67 NOTES...
Page 70: ...68 NOTES...
Page 71: ...69 NOTES...


