


8
Section 1 - Outdoor Furnace Installation
GENERAL INSTALLATION INFORMATION
Foundation
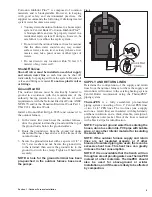
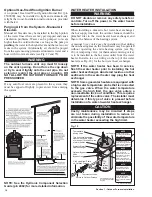
The outdoor furnace may be installed directly on stable,
level ground without the necessity of a foundation.
If the ground is unstable, one option is to use patio
blocks under the perimeter of the base. Another option
is to pour a concrete foundation.
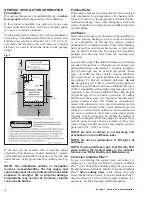
To install the outdoor furnace on a concrete foundation,
refer to Fig. 3 for dimensions and for the location of the
hollowed-out area for each model. A 4" to 6" (10 to 15
cm) thick concrete slab works well; however, a thicker
slab may be used to obtain the desired door opening
height.
Fig. 3
If the area for the concrete slab is unstable and/or
affected by frost heaving, consider installing 2" closed-
cell insulation beneath the front portion of the slab and
under the area of the ground used for walking (see Fig.
3).
NOTE: The installation surface or foundation
must be noncombustible. The hot supply and
return lines must also be protected from possible
exposure to sunlight, fire or physical damage.
Foundations may consist of concrete, crushed
rock or patio blocks.
Potable Water
If the outdoor furnace is to heat potable water associated
with commercial food preparation or for heating milk-
house hot water, it is recommended to install a double-
wall heat exchanger. Also, when filling the system with
water, a backflow preventer must be installed in the line
used for filling.
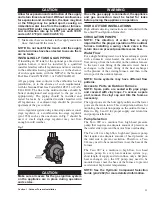
Antifreeze
Most outdoor furnaces are installed without antifreeze
when an existing heating system is in place and there
is no anticipation of leaving the outdoor furnace
unattended for extended periods of time. If the building
being heated has an alternate heat source, system water
may be kept from freezing by running the circulating
pump(s) and drawing heat from the existing heat
emitter(s).
To prevent freezing if the outdoor furnace is not fired for
extended time periods or if lengthy power outages are
anticipated during cold weather, a nontoxic propylene
glycol boiler-type may be used in the system. Some
types of antifreeze that contain various inhibitors
have been known to create problems like coagulation
and jelling. To prevent potential problems, do not
use propylene glycol that is premixed with unknown
inhibitors. Central Boiler Corrosion Inhibitor Plus (p/n
1650) is compatible with straight propylene glycol. It is
important to use Corrosion Inhibitor Plus with straight
propylene glycol for corrosion protection. If adding
antifreeze to the system, it is imperative that the entire
system contain at least 30% antifreeze concentration
mixed with softened water to prevent bacterial growth
and minimize minerals in the system. Bacterial growth
is likely to occur with low antifreeze concentrations and
can cause corrosion in the furnace water jacket and/or
clogging of heat exchangers. To confirm the antifreeze
solution is adequate, allow the pumps to circulate for at
least 24 hours and then obtain a sample of the system
water. Using an antifreeze tester, the solution must be
protected to 0˚F (-18˚C) or below.
NOTE: Be sure to adhere to all warnings and
precautions on the antifreeze label.
NOTE: Do not use automotive or RV types of
antifreeze.
NOTE: If using antifreeze, use Test Kit (p/n 597)
when testing the treated water in the outdoor
furnace (see Water Quality and Maintenance).
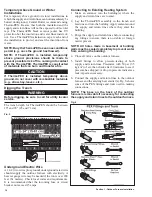
Corrosion Inhibitor Plus™
To aid in protecting the system from corrosion, it is
imperative to add Central Boiler Corrosion Inhibitor
Plus™ (p/n 1650). When initially filling the system (see
Finalizing the Installation), add the Corrosion Inhibitor
Plus™ before adding water to the system. Any time
water is added to the system, Corrosion Inhibitor Plus™
must be added if a tested water sample indicates it is
necessary (see Water Quality and Maintenance).
Summary of Contents for e-Classic 1450 IR
Page 17: ...15 Section 1 Outdoor Furnace Installation...
Page 29: ...27 Section 1 Outdoor Furnace Installation Fig 30 Fig 31...
Page 30: ...28 Section 1 Outdoor Furnace Installation Fig 32 Fig 33...
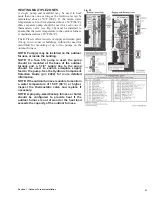
Page 66: ...64 E CLASSIC 1450 WIRING DIAGRAM Section 6 General Information...
Page 67: ...65 Section 6 General Information E CLASSIC 1450 WIRING DIAGRAM OPTIONAL POWER IGNITION...
Page 69: ...67 NOTES...
Page 70: ...68 NOTES...
Page 71: ...69 NOTES...


