


37
Section 2 - Operating Instructions
LOAD WOOD TO REDUCE CONDENSATION
For the best results, it is best to burn seasoned split
wood less than 25% moisture by weight. Burning wood
with a high moisture content increases maintenance
requirements and can lower the service life of the
outdoor furnace.
To reduce condensation and creosote formation and to
increase efficiency, the recommendation is to load the
outdoor furnace with only enough wood to maintain the
fire for your heat load requirements for 12 hours. There
should be enough wood left at the end of 12 hours to
re-ignite the fire.
Adding more wood than is needed between fills causes
increased condensation in the firebox. Condensation
reduces efficiency and increases the amount of
combustion by-products like creosote. Air flow can also
be restricted because too much wood in the firebox will
create excessive coals or too deep of a coal bed.
CAUTION
Do not burn wood with an excessively high
moisture content and/or operate the outdoor
furnace frequently or for extended periods of
time with the water temperature below 150˚F
as this will result in more condensation in the
firebox that can lead to excessive corrosion.
NOTE: Operating at temperatures of 170˚F or
more will decrease condensation in the firebox.
As a result, the outdoor furnace will operate with a
greater efficiency and require less maintenance.
Failure to follow proper operating instructions
may result in furnace damage.
NOTE: To reduce flare-ups when opening the
firebox door to reload with wood, it is best to
wait 15 minutes or more after a burn cycle has
completed.
CAUTION
To reduce condensation, DO NOT overload the
firebox with wood.
1. Slowly lift and push the bypass door handle toward
the back of the outdoor furnace to open the bypass
door; then wait for about 15 seconds.
NOTE: The alarm is a reminder that the bypass
door is open.
WARNING
Keep your face away and stay as far away as
possible from the firebox door area when opening
the door.
2. Unlatch the firebox door; then stay as far away
as possible as the firebox door is opened because
smoke and hot gases escaping through the firebox
door opening could ignite. From a safe distance,
observe the fuel load.
WARNING
Use extreme care when adding wood when wood
or coals are already present. Very hot gases may
be coming out of the firebox door opening.
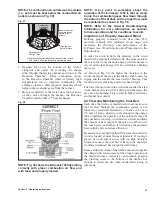
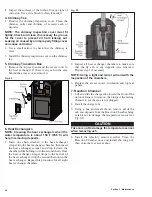
3. Using Fig. 42 as a reference, push the cleaning rod
back and forth through the ash, coals and remaining
wood in the bottom of the firebox to loosen it up,
including a pass on each side of the air charge tube.
NOTE: Neglecting to push the cleaning rod
through the ash and coals as described in Step
3 each time before wood is loaded can cause the
ash bed to deepen and become compacted. This
can result in poor heat output and combustion
because of restricted airflow. Compacted ash will
not fall into the Reaction Chamber; it will need to
be removed with a shovel.
4. Some ash in the bottom and the angled sides of the
bottom of the firebox (but not alongside the charge
tube) is necessary for the proper operation of the
outdoor furnace. Ash acts as an insulator, keeping
the glowing coals in the bottom of the firebox hot
enough to restart the fire. When using the cleaning
rod, some of the ash will fall into the Reaction
Chamber and some ash with coals will remain. The
coals remaining around the mixing channel (the area
alongside the secondary air charge tube) will create
a clean, efficient burn.
5. The combustion air outlets must be kept open and
clear of ash and coals to allow the furnace to operate
properly. If needed, remove enough ash to keep the
combustion air outlets free of obstruction.
WARNING
When adding wood to the firebox, be careful not
to get pinched between the wood and the door
frame or any part of the outdoor furnace. Use
extreme care with large pieces of wood that may
be difficult to handle.
6. Each time wood is loaded, visually check the
condition of the coal bed and ash content and,
if needed, use the cleaning rod to make sure the
system is not plugged. Inspect the firebox for crusty
deposits on the walls and in the corners and use a
Wonder Bar or similar type of tool to scrape and
remove.
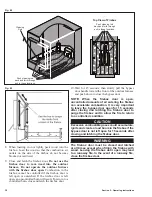
7. Use the hoe to scrape the inside front corners of the
firebox, down each side and across the top, as shown
in Fig. 43.
Summary of Contents for e-Classic 1450 IR
Page 17: ...15 Section 1 Outdoor Furnace Installation...
Page 29: ...27 Section 1 Outdoor Furnace Installation Fig 30 Fig 31...
Page 30: ...28 Section 1 Outdoor Furnace Installation Fig 32 Fig 33...
Page 66: ...64 E CLASSIC 1450 WIRING DIAGRAM Section 6 General Information...
Page 67: ...65 Section 6 General Information E CLASSIC 1450 WIRING DIAGRAM OPTIONAL POWER IGNITION...
Page 69: ...67 NOTES...
Page 70: ...68 NOTES...
Page 71: ...69 NOTES...


