background image

CDE360 Vector Control AC Drive                                                            Chapter 3 Mechanical and Electrical Installation


-

19

Chapter 3

 Mechanical and Electrical Installation 

3.1 Mechanical Installation 

3.1.1 Requirements of Installation Environment 

Item 

Requirements 

Item 


Good ventilation. 

5


Free from direct sunlight. 

Ambient temperature: -10

40

6


Free from combustible, corrosive gas and liquid. 

Free  from  high  temperature,  humidity  (less 
than 95%RH), no rainwater or other liquid drip. 

7


Free from dust, oil dirt, floating fiber and metal powder. 

Free from combustible objects, such as woods. 

8


The installation base is stable with no vibration. 


9


Free from magnetic interference.   

3.1.2 Installation Direction and Clearance


To ensure the heat dissipation of the product, please install the product vertically according to the 
following figure and never invert the installation. 
When the installation is in the cabinet, try to use the mode of side-by-side installation. At the same 
time, to facilitate the heat dissipation, you should ensure that there is enough space around. 

B

B

A

A


≥100mm


Single unit mode                                                  Up and down mode 

Figure 3- 1    CDE360 installation diagram 

Table 3- 1    The dimension size of the installation clearance 

AC drive power class 

kW


Installation size

mm


≤ 15 

≥ 30 

≥ 100 

18.5

30 

≥ 50 

≥ 200 

≥ 37 

≥ 300 

Remarks during the mechanical installation: 
1) Please install the AC drive vertically. If there are several AC drives in the cabinet, try to use the 

mode of side-by-side installation. When the cooling space can be guaranteed, please consider 
the cooling requirements of other components. 

2) As for the installation clearance, please refer to Table 3-1. 
3) For occasions which have upper and lower installation, please refer to Figure 3-1 and install the 

insulation guidance plate. 

4) Please use the installation holder which contains incombustible materials. 
5) For occasions which have metal powder, it is suggested that the heat sink is installed outside the 

cabinet.

Guide plate 

Summary of Contents for CDE360 Series

Page 1: ...n installation parameter setting field debugging fault diagnostics and daily maintenance Read and understand the user manual before use and forward the manual to the end user Notes The drawings in the...

Page 2: ...voltage V b2 01 Digital setting frequency Hz 1 2 Start stop the AC drive by pressing the RUN STOP key on the keypad Example 2 Start stop the AC drive by digital input X terminals and set frequency thr...

Page 3: ...mmunication Modbus RTU protocol RS485 interface Operating steps 3 1 Connect the control device to the AC drive directly if it supports RS485 interface Otherwise please add an communication adapter box...

Page 4: ...5 Run the AC drive slave address is 1 forward by writing the data to the register 0x6401 with the communication function code 0x06 Frame Address Function Code Register Address Register Content Check...

Page 5: ...CDE360 Vector Control AC Drive Introduction Induction motor flow chart by first using...

Page 6: ...allation 19 3 1 1 Requirements of Installation Environment 19 3 1 2 Installation Direction and Clearance 19 3 1 3 Removal and Installation of the Keypad and Cover 20 3 2 Electrical Installation 24 3 2...

Page 7: ...ation Setting 82 L1 Point point Communication 83 L2 Encoder Setting 83 P0 User defined Parameters 84 P1 Debug Parameters 85 P2 Factory Parameters 85 Chapter 6 Parameters Description 86 Group A0 Monito...

Page 8: ...ault Detection and Diagnostics 225 7 1 Faults and Solutions 225 7 2 Common Faults and Solutions 233 Chapter 8 Communication Protocol 234 8 1 Protocol Comment 234 8 2 Networking Mode 234 8 3 Bus Struct...

Page 9: ...oper operation 1 1 Safety Information and Precautions Before installation DANGER Do not install the equipment if you find water seepage component missing or damage upon unpacking Do not install the eq...

Page 10: ...not control the run or stop of the AC drive by turning on or off the input power supply DANGER Pay attention to marks of the wiring terminals Never connect the power cables to the output terminals U V...

Page 11: ...eck the temperature Failure to comply will result in personal burnt Signal detection must be performed only by qualified personnel during operation Failure to comply will result in personal injury or...

Page 12: ...Thermal protection of the motor If the rated capacity of the motor selected does not match that of the AC drive especially when the rated power of the AC drive is greater than that of the motor please...

Page 13: ...aker b The leakage protection devices should choose the types which are not sensitive to high level harmonic or special ones for the AC drive sensitivity is above 30mA If common leakage protectors sho...

Page 14: ...fan or replace it with variable frequency motor in applications where the motor overheats easily 3 Standard motor parameters have been configured inside the AC drive It is necessary to perform motor...

Page 15: ...ion Run mode Keypad Control terminals two line three line Serial communication RS485 The user can perform switch over between these sources in various ways V F curve Straight line type Multiple point...

Page 16: ...e running frequency the feedback energy of the load can compensate the voltage drop of the DC bus As a result the AC drive can keep running for a short time Peripheral terminals Reference power 10V 30...

Page 17: ...mbustible gas and corrosive gas Altitude If the altitude is equal or lower than 1000 meters the AC drive can be used normally If the altitude is higher than 1000 meters it is necessary to de rate the...

Page 18: ...tion Rules Remarks 1 Designation only has the main specification of the AC drive 2 As for the configuration information of the brake unit and DC reactor please refer to Sector 2 4 CDE360 Model and tec...

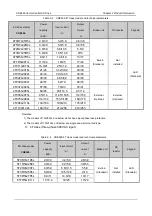
Page 19: ...20V AC input Table 2 2 CDE360 2S class model and technical parameters AC drive model CDE360 Power capacity KVA Input current A Output current A Brake unit DC reactor Keypad 2S0R7 1 5 8 2 4 Built in Op...

Page 20: ...045L 57 69 78 93 76 91 External Optional External Optional 4T045G 055L 69 85 93 114 5 91 112 4T055G 075L 85 114 114 5 153 5 112 150 4T075G 090L 114 134 153 5 180 150 176 4T090G 110L 134 160 180 214 1...

Page 21: ...dard 5T015G 018L 21 24 31 2 39 2 30 38 5T018G 022L 24 30 39 2 46 5 38 45 5T022G 030L 30 40 46 5 62 45 60 5T030G 037L 40 57 62 78 60 76 External Optional External Optional 5T037G 045L 57 69 78 93 76 91...

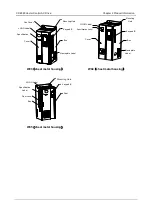
Page 22: ...sheet metal housing W05 sheet metal housing Mounting Hole Keypad B Door LOGO Label Specification Label Door Lock Box Nameplate Label Mounting Hole Keypad B Box Fan Cover LOGO Label Specification Labe...

Page 23: ...CDE360 Vector Control AC Drive Chapter 2 Product Information 2 5 1 2 Wall mounted Type Dimensional Drawing C02 C03 A B D H1 W H...

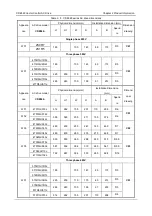
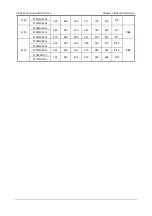
Page 24: ...AC drive model CDE360 Physical dimension mm Installation dimension mm Dimensi onal drawing H H1 W D A B Apertu re W01 4T011G 015L 312 282 155 201 110 298 6 C01 W02 4T015G 018L 390 360 205 211 150 376...

Page 25: ...360 205 211 150 376 6 5T018G 022L W03 5T022G 030L 480 450 250 243 180 460 7 C02 5T030G 037L 5T037G 045L 530 500 280 243 210 510 7 W05 5T045G 055L 535 500 360 298 240 515 9 5 C03 5T055G 075L 5T075G 090...

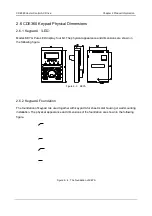
Page 26: ...t The physical appearance and dimensions are shown in the following figure Figure 2 3 KEYA 2 6 2 Keypad A Foundation The foundation of keypad A is used together with keypad A for sheet metal housing o...

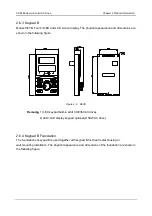
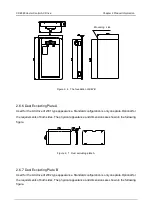
Page 27: ...in the following figure Figure 2 5 KEYB Remark 1 LED keypad built in all of CDE360 AC drives 2 LED LCD display keypad optional 15KW AC drive 2 6 4 Keypad B Foundation The foundation of keypad B is us...

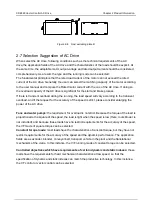
Page 28: ...plate Optional for the requirements of both sides The physical appearance and dimensions are shown in the following figure Figure 2 7 Dust excluding plate A 2 6 7 Dust Excluding Plate B Used for the...

Page 29: ...overload And if the request for the accuracy of the speed is strict please consider enlarging the power of the AC drive Fans and water pumps the requirement for overload is not strict Because the tor...

Page 30: ...T011G 015L 1 5 43 4T015G 018L 2 0 32 4T018G 022L 2 5 30 4T022G 030L 3 24 4T030G 037L 3 7 16 4T037G 045L 5 14 External Optional 60A 4T045G 055L 4T055G 075L 7 10 External Optional 80A 4T075G 090L 8 5 8...

Page 31: ...rtia rapid deceleration time and frequent braking the brake resistor with high power and small resistance should be selected Selection of the Resistance The consumption of the regenerative energy of t...

Page 32: ...the cabinet try to use the mode of side by side installation At the same time to facilitate the heat dissipation you should ensure that there is enough space around B B A A 100mm Single unit mode Up a...

Page 33: ...ion of Arrow 1 Then press down the keypad refer to the direction of Arrow 2 until hear a snap And the installation is completed Figure 3 2 Keypad A removal installation 3 1 3 2 Keypad B Removal and In...

Page 34: ...shell Then follow the direction of the arrow 2 and press down the cover When the click is heard it shows that the cover is connected in place and the installation is completed Figure 3 4 Cover remova...

Page 35: ...r Control AC Drive Chapter 3 Mechanical and Electrical Installation 22 As a result the installation of the cover is complete Figure 3 5 Cover removal installation of the wall mounted sheet metal housi...

Page 36: ...kwise Pull the door open according to the shown direction of the arrow 2 And the door is open Close As shown on the following right figure Hold the buckle of the door key and turn it to the horizontal...

Page 37: ...llation 24 3 2 Electrical Installation Figure 3 7 Connection diagram of peripheral devices Three phase asynchronous motor Output AC reactor Earthing Output noise filter Brake unit Brake resistance AC...

Page 38: ...lance between the power phases Input Noise filter Input side of the AC drive 1 Reduce the external conduction and radiation interference of the AC drive 2 Decrease the interference flowing from the AC...

Page 39: ...63 4T022G 030L 100 63 10 10 10 4T030G 037L 125 100 16 16 16 4T037G 045L 160 100 AC drive voltage power classes Breaker MCCB A Contactor A Input wire mm2 Output wire mm2 Ground wire mm2 Control wire mm...

Page 40: ...CDE360 Vector Control AC Drive Chapter 3 Mechanical and Electrical Installation 27 5T090G 110L 250 160 70 35 35 5T110G 132L 350 350 120 120 60...

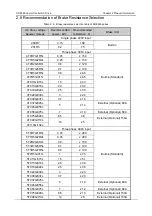
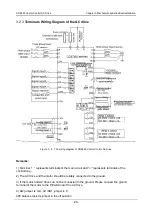
Page 41: ...1 Terminal represents terminals of the main circuit and represents terminals of the control loop 2 The AC drive and the motor should be reliably connected to the ground 3 If the motor and AC drive can...

Page 42: ...is consistent with the one of the AC drive Otherwise the AC drive may be damaged Ensure that the rated capacity of the motor matches the one of the AC drive Otherwise it may result in the damage to t...

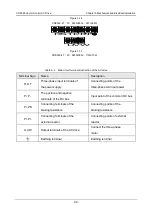
Page 43: ...R S T Three phase input terminals of the power supply Connecting points of the three phase AC input power P P The positive and negative terminals of the DC bus Input point of the common DC bus P PB Co...

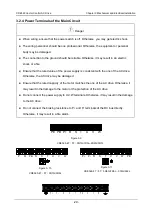
Page 44: ...uld be consistent with the recommended values and the cable length should be less than 5 meters Otherwise it may result in the damage to the AC drive Do not connect the braking resistance to the DC bu...

Page 45: ...rwise it may result in the malfunction of the device or even the damage to the device Do not connect the earthing terminal to the neutral wire of the power supply 3 2 5 Control Terminals and Wiring De...

Page 46: ...AC Drive Chapter 3 Mechanical and Electrical Installation 33 Figure 3 15 Terminal arrangement of the control board Noted AI1 AO1 jumper is V voltage AI2 jumper is mA current 485 balance resistor jumpe...

Page 47: ...GND Analog Output Terminal 1 Voltage Input range 0 10V load 10mA Current Input range 0 20mA load 500 The output signal can be used for the voltage or current type Jumper CJ3 on the control board is us...

Page 48: ...A TC1 TA1 T1 normally open terminal TB2 TA2 T2 normally close terminal TC2 TA2 T2 normally open terminal Communication 485 The positive terminal of RS485 differential signal RS485 communication betwee...

Page 49: ...d be installed at the analog signal source As shown in the following diagrams Figure 3 96 Wiring diagram 1 of analog input Figure 3 17 Wiring diagram 2 of analog input Digital Input Terminal Generally...

Page 50: ...ector Control AC Drive Chapter 3 Mechanical and Electrical Installation 37 Table 3 18 The stem nodes connection mode of common cathode II The connection mode of source Table 3 19 The connection mode o...

Page 51: ...tor Control AC Drive Chapter 4 Operation Display and Application 38 Chapter 4 Operation Display and Application 4 1 Keypad Interface Figure 4 1 LED Keypad Keypad A Figure 4 2 LED and LCD display Keypa...

Page 52: ...Indicator ON Run state OFF Stop state FLASH Deceleration state DIR Direction Indicator OFF Forward direction ON Reverse direction TRIP Fault state Indicator AC drive being alarm or fault state Note Ma...

Page 53: ...creen shows non character dEFt Being restoring default settings of the parameters LCD screen will show Restoring default setting Load Being uploading the parameters LCD screen will show Uploading Plea...

Page 54: ...XX 0000 PRG PRG PRG Enter Enter PRG Enter Change Group Viewing Parameters Status Level 1 Change function code Level 2 Change parameter value Level 3 Figure 4 3 The three level menu operation procedure...

Page 55: ...rmined by C0 18 can also be changed by adjusting the rotary knob And the keypad interface will return to show monitor parameters again 3 seconds after the adjustment The keypad interface will return t...

Page 56: ...ill be active again if there is no keypad operation 5 minutes after entering the correct password Set H0 00 to zero for the 2 time in a row and the password will be cleared Meanwhile the LED will disp...

Page 57: ...ameters 1 User defined parameters Display group P0 only 2 Non factory setting parameters Display the parameters which have been modified For example A Steps of changing menu type from basic to user de...

Page 58: ...ut C5 Virtual Digital Input Output Group d Motor Control d0 Motor Control d1 Motor Parameters d2 Speed Control d3 Torque Control d5 Motor 2 Parameters d6 Motor 2 Speed Control Group E Expanding Applic...

Page 59: ...ready Bit1 running Bit2 fault Bit3 warning Bit4 running direction Bit6 Bit5 control source Bit7 run Enable Bit8 bypass Bit9 frequency reached Bit11 Bit10 Acc Dec status Bit12 JOG running Bit13 auto tu...

Page 60: ...0 1m Min This parameter shows the linear speed and its unit is m Min A0 28 Remaining time 0 0 6553 5 0 0 0 1Min This parameters will show the remaining time when the timing function is enabled A0 29...

Page 61: ...rol mode A0 40 Communication setting 100 00 100 00 0 00 0 01 Display the value located in 0x6400 sent by communication A0 41 Point to point send data 100 00 100 00 0 00 0 01 Indicate the data sent fro...

Page 62: ...ration trip during acceleration 15 IGBT saturation trip during deceleration 16 IGBT saturation trip during constant speed 17 Heatsink of rectifier overheat 18 Heatsink of inverter overheat 19 Input ph...

Page 63: ...ower on time upon 1st latest fault 0 65535 0 1Min Same As A0 52 A1 09 Running time upon 1st latest fault 0 0 6553 5 0 0 0 1Min Same As A0 53 A1 10 Accumulative running day upon 1st latest fault 0 9999...

Page 64: ...5535 0 1 A1 31 Inverter module temperature upon 3rd fault 40 0 125 0 0 0 0 1 A1 32 Power on time upon 3rd fault 0 65535 0 1Min A1 33 Running time upon 3rd fault 0 0 6553 5 0 0 0 1Min A1 34 Accumulativ...

Page 65: ...Deceleration mode 0 1 0 1 0 Linear 1 S Curve b1 01 Time proportion of S curve start segment 0 0 100 0 b1 02 30 0 0 1 b1 02 Time proportion of S curve end segment 0 0 100 0 b1 01 30 0 0 1 b1 03 Startup...

Page 66: ...erse disabled b1 21 Stop key function 0 1 1 1 0 STOP RESET key enabled only in operation keypad control 1 STOP RESET key enabled in any operation mode b1 22 Startup protection 0 1 1 1 0 No 1 Yes If th...

Page 67: ...g the frequency source together with Terminal control source Hundred s digit Binding the frequency source together with Communication control source b2 07 Frequency resolution 1 2 2 1 1 0 1Hz 2 0 01Hz...

Page 68: ...or 3 interlock input 51 Motor 4 interlock input 52 User Defined fault 1 input 53 User Defined fault 2 input 54 static auto tune 55 rotational auto tune 56 Force main frequency source A to PID 57 Force...

Page 69: ...g 7 Frequency reached 8 Frequency upper limit reached 9 Frequency lower limit reached no output at stop 10 FDT1 detection output 11 FDT2 detection output 12 Torque limited 13 Fault output AC drive sto...

Page 70: ...housand s digit T4 C1 12 T5 T6 active state logic 00 11 00 1 0 positive logic 1 Negative logic Unit s digit T5 Ten s digit T6 C1 13 Y1 output delay time 0 0 3000 0 0 0 0 1Sec C1 14 Y2 output delay tim...

Page 71: ...C2 10 0 00 0 01V C2 09 Corresponding setting of AI curve 2 minimum input 100 0 100 0 0 0 0 1 C2 10 AI curve 2 maximum input C2 08 10 00 10 00 0 01V C2 11 Corresponding setting of AI curve 2 maximum in...

Page 72: ...torque 11 PID setting 12 PID feedback 13 PID output 14 Actual length 15 Count value 16 Communication setting 17 Feedback speed C3 03 AO2 function 0 17 2 1 Same As C3 02 C3 04 AO curve selection 11 22...

Page 73: ...kHz C4 10 Corresponding setting of FO output maximum frequency C4 08 100 0 100 0 0 1 C5 Virtual Digital Input Output Function Code Name Range Default Step Description C5 00 VX1 function 0 58 0 1 Same...

Page 74: ...Step Description d0 00 Motor control mode 0 2 0 1 0 V f 1 Open loop vector control 2 Close loop vector control d0 01 Carrier frequency Module dependent Module dependent 0 1kHz d0 02 Carrier frequency...

Page 75: ...ction 0 9 0 1 0 Linear V F 1 Multi point V F 2 1 2 power V F 3 1 4 power V F 4 1 6 power V F 5 1 8 power V F 6 Square V F 7 V F complete separation 8 V F half separation 9 Flux Optimization d0 17 Mult...

Page 76: ...ficient 2 0 000 1 000 0 700 0 001 Flux weakening coefficient at 50 flux current d1 08 Motor weaken flux coefficient 3 0 000 1 000 1 000 0 001 Flux weakening coefficient at 80 flux current d1 15 Auto t...

Page 77: ...1 AI1 2 AI2 3 AI3 4 X6 FI 5 Communication 6 MIN AI1 AI2 7 MAX AI1 AI2 d2 14 Preset upper torque limit of forward generating 0 0 300 0 150 0 0 1 d2 15 Upper torque limit Source of reverse generating 0...

Page 78: ...05 Speed limit mode 0 5 0 1 0 Minimum frequency to maximum frequency 1 Minimum frequency to running frequency 2 Negative running frequency to positive running frequency 3 Running frequency to maximum...

Page 79: ...tor 2 Parameters Function Code Name Range Default Step Description d5 00 Motor 1 2 selection 0 1 0 1 0 Motor 1 1 Motor 2 d5 01 Motor 2 control mode 0 2 0 1 0 V f 1 Open loop vector control 2 Close loo...

Page 80: ...onal gain Kp1 1 100 30 1 d6 01 Motor 2 ASR integration time Ti1 0 01 10 00 0 50 0 01Sec d6 02 Motor 2 ASR proportional gain Kp2 1 100 20 1 d6 03 Motor 2 ASR integration time Ti2 0 01 10 00 1 00 0 01Se...

Page 81: ...4 X6 FI 5 Communication 6 MIN AI1 AI2 7 MAX AI1 AI2 d6 14 Motor 2 Preset upper torque limit of forward generating 0 0 300 0 150 0 0 1 d6 15 Motor 2 Upper torque limit Source of reverse generating 0 7...

Page 82: ...2 Skip frequency 2 High limit E1 03 b0 00 0 00 0 01Hz E1 03 Skip frequency 2 Low limit 0 00 E1 02 0 00 0 01Hz E2 Multi Reference Function Code Name Range Default Step Description E2 00 Reference 0 sou...

Page 83: ...0 3 0 1 Same As E3 04 E3 09 Running time of simple PLC reference 3 0 0 6553 5 0 0 0 1Sec E3 10 Acc dec time of simple PLC reference 3 0 3 0 1 Same As E3 04 E3 11 Running time of simple PLC reference 4...

Page 84: ...cc Dec Time Function Code Name Range Default Step Description E4 00 acceleration time 2 0 1 6000 0 Module dependent 0 1Sec E4 01 deceleration time 2 0 1 6000 0 0 1Sec E4 02 acceleration time 3 0 1 600...

Page 85: ...5 08 PID feedback filter time 0 00 60 00 0 00 0 01Sec E5 09 PID proportion gain Kp1 0 0 999 9 2 0 0 1 E5 10 PID integral time Ti1 0 01 99 99 0 50 0 01Sec E5 11 PID differential time Td1 0 000 9 999 0...

Page 86: ...0 0 0 1Sec E5 33 Upper limit of PID feedback detection E5 03 E5 02 100 0 0 1 Unit Decimal depends on E5 00 E5 01 E5 34 Lower limit of PID feedback detection E5 03 E5 02 0 0 0 1 E5 35 Detection time o...

Page 87: ...functions 00 11 00 1 Interlock function is used to indicate whether each motor is connected to multi pump control logic or not Unit s digit interlock enable 0 disabled 1 enabled Ten s digit interlcok...

Page 88: ...06 Designated count value 1 E7 05 1000 1 E7 07 Set length 0 65535 1000 1m E7 08 Number of pulses per meter 0 1 6553 5 100 0 0 1 E8 Droop Control Function Code Name Range Default Step Description E8 0...

Page 89: ...me after external brake on 0 00 10 00 2 50 0 01Sec Eb Supervision Function Code Name Range Default Step Description Eb 00 Timing function 0 1 0 1 0 Inactive 1 Active Eb 01 Timing duration source 0 3 0...

Page 90: ...18 Zero current detection delay time 0 01 600 0 0 0 10 0 01Sec Eb 19 Output overcurrent threshold 0 0 300 0 200 0 0 1 100 is motor rated current Eb 20 Output overcurrent detection delay time 0 00 600...

Page 91: ...09 Under load protection 0 1 0 1 0 Disabled 1 Enabled F0 10 Detection level of Under load 0 0 100 0 40 0 0 1 F0 11 Detection time of Under load 0 0 60 0 1 0 0 1Sec F0 12 Motor temperature sensor type...

Page 92: ...22 Fault protection action selection 4 0000 2222 0000 1 Unit s digit Too large speed deviation same as unit s digit Ten s digit motor over speed same as unit s digit Hundred s digit flux postion detec...

Page 93: ...PID setting 8192 Bit14 PID feedback 16384 Bit15 Count value 32768 H0 02 LED display running parameters 2 0 2047 0 1 Bit0 FI input frequency 1 Bit1 Linear speed 2 Bit2 Load speed 4 Bit3 Actual length 8...

Page 94: ...tion filter cut off frequency 1 0 10 300 00 50 00 0 01Hz H0 16 Dead zone compensation filter cut off frequency 2 0 10 300 00 200 00 0 01Hz H0 17 Dead zone compensation switchover frequency 1 0 10 H0 1...

Page 95: ...I3 display voltage 2 6 000 9 999 Factory setting 0 001V H1 12 AO1 display voltage 1 0 500 4 000 Factory setting 0 001V H1 13 AO1 actual voltage 1 0 500 4 000 Factory setting 0 001V H1 14 AO1 display v...

Page 96: ...1 00 0 01 L1 05 Zero offset of received data 99 9 100 0 0 0 0 1 L2 Encoder Setting Function Code Name Range Default Step Description L2 00 Encoder type 0 4 0 1 0 ABZ incremental Encoder 1 UVW increme...

Page 97: ...ly used parameters into user defined groupt to access them quickly H0 05 Menu display type 1 User defined parameters keypad only show P0 group defined parameters Example P0 00 P0 14 defined A0 00 A0 1...

Page 98: ...application P0 15 User defined Parameter 15 H0 05 H0 05 H0 05 P0 15 can not be revised P1 Debug Parameters Function Code Name Range Default Step Description P1 00 P1 15 Debug parameter i i 0 1 2 3 15...

Page 99: ...frequency A0 02 Range 0 0 3000 0 Default 0 0 DC bus voltage Unit V It displays the drive s bus voltage A0 03 Range 0 1500 Default 0 Output voltage Unit V It displays the drive s output voltage in the...

Page 100: ...ontrol 10 Communication control 11 Invalid value Bit 6 Bit 7 No signal of run enable Received a signal of run enable Bit 8 Drive control Bypass control Bit 9 Running frequency have not reached setting...

Page 101: ...status 0 Disable 1 Enable Bit0 X1 1 Bit5 X6 32 Bit1 X2 2 Bit6 X7 64 Bit2 X3 4 Bit7 X8 128 Bit3 X4 8 Bit8 X9 256 Bit4 X5 16 Bit9 X10 512 For example A0 16 55 The number of 55 is consist of 32 16 4 2 1...

Page 102: ...03 60 0 E5 03 3 6 Mpa 0 0 100 0 E5 02 E5 03 60 0 A0 20 Figure 6 2 The relationship of PID setting and engineering unit A0 21 Range 0 0 100 0 Default 0 0 PID feedback Unit the unit is equal to engineer...

Page 103: ...display the output frequency multiply by H0 08 the min unit is decided by H0 09 For example in place of machine tool the drive is not trail the equipment indirectly it connect with a variable machine...

Page 104: ...ctual output voltage in the V F separation state A0 38 Range 300 0 300 0 Default 0 0 Target torque Unit It displays the current torque upper limit A0 39 Range 0 0 300 0 Default 0 0 Upper torque limit...

Page 105: ...e running day of the drive It add A0 57 is equal to the total accumulative running time A0 57 Range 0 00 23 99 Default 0 00 Accumulative running hour Unit h It is used to display the accumulative runn...

Page 106: ...ration 35 PID feedback over range 9 Hardware over current during deceleration 36 EEPROM R W fault 10 Hardware over current during constant speed 37 Parameter setting fault 11 Software over current dur...

Page 107: ...A1 05 Range 0 511 Default 0 Y terminals state upon latest fault Same as A0 17 A1 06 Range 0 65535 Default 0 VFD state upon latest fault Same as A0 10 A1 07 Range 40 0 125 0 Default 0 0 Inverter tempe...

Page 108: ...setting b0 02 Range b0 03 b0 00 Default 50 00 Digital setting of upper limit frequency Unit Hz The upper limit frequency is used to set the maximum allowable output frequency its value should be less...

Page 109: ...wer is the same with AC drive rated power G type For example If the AC drive type is 4T 3R7G 5R5L then the default value of motor rated power is 3 7kW If the AC drive type is 4T 5R5G 7R5L then the def...

Page 110: ...d JOG reverse JOG and so on by configure the X terminal functions control mode can be two line or three line about detail please see the parameter of C0 17 If the terminal is command source then the l...

Page 111: ...ls 2 Two decimals E5 02 Maximum setting of PID engineering unit 1 00 MPa 1 00 MPa E5 05 PID digital setting 0 50 MPa 0 50 MPa E5 26 PID deviation limit 1 0 1 0 E5 36 Wake up level 50 0 50 0 E5 37 Wake...

Page 112: ...deceleration period Please see the figure above T1 T3 and T2 T4 At the beginning of section T1 T3 and end of section T2 T4 slope of acceleration and deceleration is gradually changing Within the time...

Page 113: ...rotation and reverse rotation the startup frequency holding time is disabled The holding time is not included in the acceleration time The holding time is included in the running time of PLC b1 05 Ra...

Page 114: ...1 09 Range 30 0 100 0 Default 100 0 V f coefficient for flying start Unit When drive is tracking the motor speed v f curve will multiply by the parameter it could restrain the output current and impro...

Page 115: ...drive is stopping it is a percentage relative to the base value the base value is motor rate current If the parameter value is bigger than drive rate current then the output brake current will be limi...

Page 116: ...action when setting frequency lower than frequency lower limit 0 Run at frequency lower limit 1 Run at zero speed 2 Stop 3 Stop restart when setting frequency higher than lower limit b1 18 Range 0 1...

Page 117: ...ctional mode 0 STOP RST key enabled only in keypad control 1 STOP RST key enabled in any operation mode Because the key of STOP RST is multiplexed when the key is used to reset fault it is enabled alw...

Page 118: ...0V 680V 630V 770V Three phase 480V 750V 660V 870V Note In actual application you can combine dynamic braking flux braking and overvoltage stall control to optimize braking effect For example Set V F o...

Page 119: ...e mode 10v 10v or current mode 0 20mA by CJ1 and CJ2 on control board The corresponding relationship between the analog input value and the setting frequency please see the group C2 4 X6 FI The freque...

Page 120: ...source A and auxiliary frequency source B must not be set to same value 2 If frequency source selection is set to main frequency source A and auxiliary frequency source B operation relationship The Un...

Page 121: ...uency source A as the aim frequency If X terminal function of 29 is valid then the result of main frequency source A and auxiliary frequency source B operation as the aim frequency 4 Switchover betwee...

Page 122: ...s digit Note Different running command sources can be bound to the same frequency source if a command source has a bound frequency source the frequency source set in b2 00 to b2 05 no longer takes ef...

Page 123: ...the terminal JOG status depended on E0 00 JOG frequency E0 01 JOG acceleration time E0 02 JOG deceleration time E0 03 JOG stop mode 2 Reverse JOG RJOG 3 Forward RUN FWD When the run source is DI b0 11...

Page 124: ...otor is running under high frequency immediately switch into DC braking may cause the over current fault 12 Deceleration DC braking When the configuration for X terminal for this function is effective...

Page 125: ...equipment If set to 24 when the terminal state is valid the AC drive display the external fault according to the fault protection operation mode for fault treatment If set to 25 when the terminal sta...

Page 126: ...nd X2 is invalid the command source is the next setpoint of b0 11 When the X1 is invalid and X2 is valid the command source is the previous setpoint of b0 11 The range of b0 11 is 0 2 the next of 0 is...

Page 127: ...D integral pause If the configuration of this function is effective the PID integrator stops accumulating keep the current constant When the terminal is invalid PID resume to integrator 40 PID paramet...

Page 128: ...erminal When the corresponding X terminal of motor receive s a effective signal the AC drive will take the motor into multi pump control logic otherwise always treat this motor not join the system 49...

Page 129: ...terminal 2 Multi reference terminal 1 Setting frequency OFF OFF OFF OFF Multi reference 0 E2 01 OFF OFF OFF ON Multi reference 1 E2 02 OFF OFF ON OFF Multi reference 2 E2 03 OFF OFF ON ON Multi refere...

Page 130: ...If the 24V connect to CMX when the terminal and COM short connection indicate effectively 1 Disconnect effective If the 24V connect to CMX when the terminal and COM disconnected indicate effectively C...

Page 131: ...setting and then the AC drive takes action X terminals except X1 X2 X3 haven t the delay timing function All X terminals include virtual and logic output shall be functional exclusion C0 17 Range 0 3...

Page 132: ...When K2 closed the AC drive run reverse When K1 and K2 have the same status the AC drive stopped Both X1 X2 are level active K2 K1 Run command 0 0 Stop 1 1 Stop 0 1 Run forward 1 0 Run reverse Figure...

Page 133: ...value C0 17 Terminal command mode 2 Three lines 1 C0 01 X1 terminal function 3 Forward run C0 02 X2 terminal function 4 Reverse run C0 03 X3 terminal function 5 Three lines run control By the forward...

Page 134: ...C0 01 X1 terminal function 3 Run forward C0 02 X2 terminal function 4 Run reverse C0 03 X3 terminal function 5 Three lines run control The wiring is shown in the following figure Among them For norma...

Page 135: ...CDE360 Vector Control AC Drive Chapter 6 Parameters Description K Run direction 0 Forward 1 Reverse Figure 6 12 Three lines 2...

Page 136: ...ed as PID reference C0 19 Range 00 11 Default 11 UP DOWN adjustment memory Units Retentive at stop Tens Retentive at power down 0 No 1 Yes C0 20 Range 0 01 100 00 Default 1 00 Terminal UP DOWN ramp ra...

Page 137: ...the terminal output ON signal 8 Frequency upper limit reached When the AC drive output frequency reaches the upper limit frequency the terminal output ON signal 9 Frequency lower limit Reached no outp...

Page 138: ...tive power on time day threshold is set to 0 the cumulative power on timing function is disabled and output OFF signal 24 Accumulative running time reached When A0 56 Accumulative running time day A0...

Page 139: ...ion E5 30 E5 35 38 PID sleep status indication The terminal output ON signal when the PID in dormant sate Please reference to dormancy logic parameters description E5 38 E5 41 39 Frequency limited Whe...

Page 140: ...Range 0000 1111 Default 0000 T1 T4 terminals valid state logic Define the relays T1 T4 valid state same as C1 10 Unit T1 Tens T2 Hundreds T3 Thousands T4 C1 12 Range 00 11 Default 00 T5 T6 terminals...

Page 141: ...rminal Y3 C1 16 Range 0 0 3000 0 Default 0 0 T1 output delay time Unit Sec Define the output delay time of relay T1 C1 17 Range 0 0 3000 0 Default 0 0 T2 output delay time Unit Sec Define the output d...

Page 142: ...s state is effective hopes that the output state of the terminal is time length adjustable and not only a level signal The holdoff time of terminal s effective state is only available after the output...

Page 143: ...be defined by a specific curve Enter to this parameter can do the curve selection of AI1 AI2 through the LED s unit and tens bits 1 AI curve 1 Two points reference to C2 04 C2 07 2 AI curve 2 Two poi...

Page 144: ...The relationship between AI curve 2 maximal input signal and the percentage of set value Both curve 1 and curve 2 are two point curves AI1 AI2 can select 10 10V voltage input or 0 20mA current input t...

Page 145: ...in input Curve max input AI analog value V Figure 6 16 AI curve 1 2 normal setting C2 12 Range 10 00 C2 14 Default 0 00 AI curve 3 minimum input Unit V AI curve 3minimal input signal size C2 13 Range...

Page 146: ...AI3 input corresponding setting Unit Jump amplitude of AI3 input corresponding setting Jump range includes lower and upper limit defined as following Jump lower limit Jump point Jump amplitude Jump up...

Page 147: ...0 00 Default 0 00 AO1 filter time Unit Sec The parameter is used to set the software filter time of AO1 If the analog output is liable to interference increase the value of this parameter to stabilize...

Page 148: ...th 0 Sett length E7 07 15 Count value 0 Set count value E7 05 16 Communication setting 0 0 100 0 17 Feedback frequency 0 Max frequency b0 00 C3 04 Range 11 22 Default 21 AO curve selection AO curve sp...

Page 149: ...0 00 Hz AO curve selection C3 04 21 AO1 curve selection 1 AO curve 1 minimum output C3 05 1 00V AO curve 1 minimum output corresponding setting C3 06 5 AO curve 1 maximal output C3 07 9 00V AO curve 1...

Page 150: ...Input Output When the parameter of C0 06 set to 31 the pulse input function is enabled The curve relationship can be set by parameters C4 00 C4 04 The maximum pulse input signal is 100KHz the percent...

Page 151: ...lse output function is enabled Increase the value of this parameter to stabilize pulse output C4 06 Range 0 17 Default 1 FO function When C1 00 set to 0 the pulse output function is enabled the functi...

Page 152: ...ate mode selection This defines signal source for virtual digital input 0 VYn VYn 1 VXn function is active VYn 0 VXn function is inactive n 1 4 1 C5 05 2 AI1 3 AI2 4 AI3 Unit s digit VX1 Hundred s dig...

Page 153: ...X3 0 Same as Y digital output terminal usage refer to C1 01 C5 12 Range 0 45 Default 0 VY4 function 0 Corresponding to the status of X4 0 Same as Y digital output terminal usage refer to C1 01 C5 13...

Page 154: ...g must be performed before first running Motor parameters which calculated from auto tuning shall be store in Group d1 If vector control is selected the rated power between AC drive and motor cannot m...

Page 155: ...fault 1 Carrier frequency adjustment with temperature 0 disable 1 enable It is used to set whether the carrier frequency is adjusted based on the temperature When this parameter is set to enable it ca...

Page 156: ...red d0 09 Range 0 250 Default 64 V F over excitation gain It can increase flux current to exhaust the regenerating energy It can shorten the actual decelerating time when motor is running in regenerat...

Page 157: ...Disable overvoltage stall function 0 enable overvoltage stall function When motor rotor speed is greater than synchrony frequency motor running in regenerating mode In this situation the DC voltage of...

Page 158: ...This could lead to under exciting the motor resulting in a large increase in motor current during under voltage conditions Unit s digit Under voltage control enable 0 Disabled 1 Enabled Ten s digit Ov...

Page 159: ...f output frequency rated V motor rated voltage rated f motor rated frequency 9 Flux Optimization It is recommended that the motor keeps running with light or no load d0 17 Range 0 00 40 0 Default 1 5...

Page 160: ...V2 V3 F1 F2 F3 Output voltage V Motor rated voltage Output frequency Hz 0 d0 15 V0 f1 d0 16 d0 17 V1 f2 d0 18 d0 19 V2 f3 d0 20 d0 21 V3 Motor rated frequency Figure 6 21 multi point V f curve d0 24 R...

Page 161: ...for current limiting operation d0 32 Range 0 50 2 20 Default 2 00 CBC current limit Unit 0 01 This defines the CBC current limit point that CBC current control function is active 1 00 of the setting...

Page 162: ...chronous motor leakage inductance d1 04 motor mutual inductance Range 0 1 6553 5 drive power 55kW 0 01 655 35 drive power 55kW Default Model dependent Unit mH asynchronous motor mutual inductance d1 0...

Page 163: ...15 to 1 then press the running key static auto tune will be running d1 15 will resume to 0 after auto tune automatically 2 rotational auto tune No load The motor must be disconnected from the load whe...

Page 164: ...ault 5 00 Unit Hz switchover frequency1 d2 05 High speed switchover frequency Range d2 04 b0 00 Default 10 00 Unit Hz switchover frequency2 The speed dynamic response characteristics in vector control...

Page 165: ...peed error is small Therefore speed overshot or oscillation can be avoided when the Ti is small d2 07 Range 50 120 Default 100 Vector control slip gain Unit Setting this parameter properly can improve...

Page 166: ...ce as upper torque to limit the motor output torque when the motor is running reverse in motoring mode More information see d2 12 d2 12 Range 0 0 300 0 Default 150 0 Preset upper torque limit of rever...

Page 167: ...I1 AI2 This parameter allows user to select the desired source as upper torque to limit the motor output torque when the motor is reverse forward in generating mode More information see d2 16 d2 16 Ra...

Page 168: ...current loop d2 20 Range 0 60000 Default 400 Integration time of torque current loop Integration time of torque current loop Note The system dynamic response characteristics in vector control can be a...

Page 169: ...active d3 01 Range 0 7 Default 0 Torque reference source 0 d3 02 UP DOWN 1 AI1 2 AI2 3 AI3 4 X6 FI 5 Communication 6 MIN AI1 AI2 7 MAX AI1 AI2 When this parameter is set to 0 the torque reference can...

Page 170: ...frequency to running frequency 2 Negative running frequency to positive running frequency 3 Running frequency to maximum frequency 4 Running frequency windows 5 0Hz to output frequency In torque contr...

Page 171: ...o the value of d3 09 d3 09 Range b0 00 b0 00 Default 50 00 Digital setting of minimum frequency Unit Hz Digital setting of minimum frequency d3 10 Range 0 00 50 00 Default 5 00 Window positive error U...

Page 172: ...ing frequency to positive running frequency speed limit mode is shown by Fig6 D9 Positive running frequency Negative running frequency Speed control is active t Speed control is active Torque control...

Page 173: ...to running frequency d3 12 Range 0 0 100 0 Default 0 0 Static torque compensation Unit To overcome the static friction static torque compensation is helpful 100 of the setting corresponds to rated mot...

Page 174: ...of motor parameters User can switch the desired motor to run with the related motor parameters The defines and usage is the same as motor 1 More detail information refer to b0 d1 d2 d5 00 Range 0 1 De...

Page 175: ...r 2 rated speed d5 08 Motor 2 rotor resistance Range 0 001 65 535 drive power 55kW 0 0001 6 5535 drive power 55kW Default Model dependent Unit asynchronous motor 2 rotor resistance d5 09 Motor 2 stato...

Page 176: ...e 0 No action 1 Static auto tune 2 rotational auto tune Group d6 Motor 2 Speed Control The AC drive can store two groups of speed control parameters Group d2 is for motor 1 and group d6 is for motor 2...

Page 177: ...e d6 08 Range 0 1023 Default 0 Motor 2 ASR filter time It need not be adjusted generally and can be increased in the case of large speed fluctuation In the case of motor oscillation decrease the value...

Page 178: ...tor output torque when the motor is running forward in generating mode More information see d6 14 d6 14 Range 0 0 200 0 Default 150 0 Motor 2 Preset upper torque limit of forward generating Unit When...

Page 179: ...E0 JOG JOG function is useful and convenient for equipment debugging it can make the AC drive working at any output frequency temporarily E0 00 Range 0 00 b0 00 Default 5 00 JOG frequency Unit Hz E0...

Page 180: ...chanical resonance point of the load The AC drive supports two skip frequencies If both are set to 0 the skip frequency function is disabled E1 00 Range E1 01 b0 00 Default 0 00 Skip frequency 1 high...

Page 181: ...efault 0 Reference 0 source 0 Set by E2 01 1 Set by b2 01 modified via UP DOWN 2 AI1 3 AI2 4 AI3 5 X6 FI 6 PID It determines the setting channel of reference 0 You can perform convenient switchover be...

Page 182: ...ve keeps the final running frequency and direction after running one cycle 2 Repeat after the AC drive runs one cycle The AC drive automatically starts another cycle after running one cycle and will n...

Page 183: ...3 07 Running time of simple PLC reference 2 E3 23 Running time of simple PLC reference 10 E3 08 Acceleration deceleration time of simple PLC reference 2 E3 24 Acceleration deceleration time of simple...

Page 184: ...wing figure E4 07 Range 0 00 b0 00 Default 0 00 Frequency switchover point between deceleration time 1 2 Unit Hz See the following figure The AC drive can switchover automatically between Acceleration...

Page 185: ...3 Default 1 PID engineering unit resolution 0 No decimal 1 One decimal 2 Two decimal 3 Three decimal This parameter determined the resolution of the following parameter E5 05 PID digital setting E5 33...

Page 186: ...ering unit its value is 3 040 MPa 38 0 E5 02 E5 03 E5 03 100 0 0 Engineering unit E5 02 E5 03 Figure 6 35 The relationship between the value with engineering unit and the percentage value in AC drive...

Page 187: ...02 Default 50 0 PID digital setting Unit This parameter is used for PID setting value when E5 04 0 The unit and resolution will be changed according to E5 00 and E5 01 E5 04 is used to select the cha...

Page 188: ...1 00 second means the PID output will change with a speed of 10 0 Sec when the deviation between PID feedback and PID setting is 10 0 00 second means the PID regulator is a proportional and differenti...

Page 189: ...for PID two groups parameters selection 0 No switchover Always use the first group parameters E5 09 E5 11 1 Switchover via X terminals Use the first group parameters E5 09 E5 11 when the X terminal is...

Page 190: ...nit Sec E5 18 is invalid if setting E5 19 to 0 00 second E5 20 Range 0 00 60 00 Default 0 00 PID output filter time Unit Sec The PID output signal will be filtered by a first order filter This paramet...

Page 191: ...of the AC drive E5 23 and E5 24 respectively correspond to the maximum absolute value of the output deviation in forward direction and in reverse direction E5 24 Range 0 00 99 99 Default 1 00 Maximum...

Page 192: ...fect If it is set to invalid integral separated remains invalid no matter whether the DI allocated with function 39 PID integral pause is ON or not Ten s digit Whether to stop integral operation when...

Page 193: ...imit of PID feedback detection Unit Unit Decimal depends on E5 00 E5 01 The AC drive will not report any error when the PID feedback is between E5 34 E5 33 Otherwise when the lasting time exceeds E5 3...

Page 194: ...eeds E5 41 1 Base on PID feedback The AC drive enters sleep mode when PID feedback is higher than E5 39 and the lasting time exceeds E5 41 E5 39 Sleep level Range 0 0 200 0 Default 0 0 Unit Range depe...

Page 195: ...100 0 Unit PID setting high limit PID setting value higher limit of internal operation E5 43 Range 0 0 100 0 Default 0 0 Unit PID setting low limit PID setting value lower limit of internal operation...

Page 196: ...time no used The motor startup sequence will return to initial status when AC drive stops or re power on There are two ways for adding a pump 1 Directly connecting the auxiliary pumps to power grid mo...

Page 197: ...motor will be directly connected to power grid when adding a pump 2 Frequency pump fixed Support auto change Base on mode 1 auxiliary motors can be auto changed 3 Frequency pump circulation No auto ch...

Page 198: ...Frequency pump fixed wiring configuration Parameter Configuration C1 04 T1 function 40 Motor1 Control output C1 05 T2 function 41 Motor2 Control output C1 06 T3 function 42 Motor2 Control output AC dr...

Page 199: ...s will be added one by one as the water consumption increasing Reference step is E6 02 when the first auxiliary pump starts Reference step is the sum of E6 02 and E6 03 when the second auxiliary pump...

Page 200: ...tem runs again 1 2 3 4 E6 06 Range 0000 1111 Default 0000 Digital setting of Motor interlock 0 Not connected to multi pump system 1 Connected to multi pump system Unit s digit Motor1 Ten s digit Motor...

Page 201: ...0 00 E6 10 E6 11 First auxiliary pump ON OFF E6 16 Figure 6 45 Schematic diagram of adding pump logic E6 11 Range 0 00 E6 10 Default 25 00 Reduce pump frequency 1 Unit Hz The frequency to remove the f...

Page 202: ...lasting time exceeds E6 16 E6 13 Range 0 00 E6 12 Default 25 00 Reduce pump frequency 2 Unit Hz The frequency to remove the second auxiliary pump controlled via a Y T terminal with No 42 function Moto...

Page 203: ...Unit Sec Define the delay time of electromagnetic switch action E6 19 Range 0 00 b0 00 Default 50 00 Switchover frequency from AC Drive to grid Unit Hz Define the motor switchover frequency from AC dr...

Page 204: ...6 18 AC drive will stop by coasting mode and disconnect motor 1 if whole system can not meet the demand Then motor 2 will be started by AC drive After the time set by E6 18 motor 1 will be connected t...

Page 205: ...contactor will be disconnected And motor 1 stop working Multi pump control logic will make sure the total numbers of operating motor is the same before and after auto change Group E7 Swing Frequency T...

Page 206: ...of skip frequency amplitude to swing frequency amplitude Skip frequency Jw Swing amplitude frequency Dw E7 02 E7 03 Range 0 1 3000 0 Default 10 0 Swing frequency cycle Unit Sec The time of a complete...

Page 207: ...omes effective 1 2 3 X1 Count pulses input Y1 Designated count value reached output Y2 Set count value reached output X2 Counter reset 7 1 A0 25 3 A0 25 7 Figure 6 48 Reaching the set count value and...

Page 208: ...or this motor implementing workload balancing between multiple motors Please see the description of Figure below E8 00 Range 0 00 10 00 Default 0 00 Droop control Unit Hz This parameter sets the droop...

Page 209: ...e through 0 Disabled 1 Enabled E9 01 Range 40 0 150 0 Default 80 0 Action judging voltage at power loss ride through Unit The AC drive begins to decelerate when the DC bus voltage is lower than E9 01...

Page 210: ...l brake control becomes OFF when the lasting time exceeds EA 03 3 Then the AC drive keeps running at the frequency of EA 01 and begins to accelerate to set frequency when the lasting time reaches the...

Page 211: ...en the Y terminal allocated with function No 44 External brake control becomes OFF Then it begins to accelerate Please set this parameter to suitable value according to the release time of mechanical...

Page 212: ...0 6500 0 Default 0 0 Current running time reached Unit Min The Y terminal allocated with function No 25 Current running time reached becomes ON when the AC drive current running time reaches the valu...

Page 213: ...me A0 56 A0 57 reaches the set value Eb 06 Eb 07 And the AC drive will act as the thousand s digit setting of F0 21 Eb 07 Range 0 00 23 99 Default 0 00 Accumulative running time hour threshold Unit h...

Page 214: ...z If the output frequency of the AC drive is within the positive and negative amplitudes of Eb 11 the Y terminal allocated with function No 27 Frequency 2 reached becomes ON See the description of Fig...

Page 215: ...gure below Eb 16 Range 0 0 100 0 Default 5 0 Frequency detection hysteresis2 FDT hysteresis2 Unit This is a percentage of the hysteresis frequency to Eb 15 See the parameter description of Eb 15 Hz t...

Page 216: ...ON The output over current detection function is shown in the following figure Eb 20 Range 0 00 600 00 Default 0 00 Output over current detection delay time Unit Sec Please see the description of the...

Page 217: ...nt Please see the description of the following figure t Y ON ON ON OFF OFF OFF OFF Figure 6 57 Any current reaching detection diagram Eb 25 Range 0 00 Eb 26 Default 3 70 AI1 input voltage lower limit...

Page 218: ...350 280 550 Three phase 1140 1350 1100 1500 F0 01 Range Model dependent Default Model dependent Over voltage threshold It is used to set the overvoltage threshold for the drive The default value and r...

Page 219: ...s enabled protecting action will be performed when motor current and duration exceed the threshold The characteristic curve of the motor overload protection is shown in figure below Protecting action...

Page 220: ...tion 0 Disable 1 Enable If the under load protection function is enabled when the motor current is less than the detection level F0 10 b0 08 and the lasting time exceeds the detection time F0 11 prote...

Page 221: ...ed detection time Unit Sec If the over speed detection time is 0 0s the over speed detection function is disabled F0 17 Range 0 0 50 0 Default 20 0 Detection value of too large speed deviation Unit Th...

Page 222: ...F0 19 Thousand s digit Accumulative running time reached Same as unit s digit in F0 19 F0 22 Range 0000 2222 Default 0000 Fault protection action selection 4 Unit s digit Too large speed deviation Sam...

Page 223: ...the frequency source is PID then system increases a value of F0 28 to PID setting otherwise drive run with the frequency of F0 27 If drive is in fire mode control system displays fire mode alarm code...

Page 224: ...etting times and the drive still fail to run the AC drive will remain in the fault state F1 01 Range 0 1 100 0 Default 1 0 Time interval of fault auto reset Unit Sec It is used to set the waiting time...

Page 225: ...of values converted from the values of H0 01 H0 03 in the decimal format Bit0 running freq 1 Bit1 setting freq 2 Bit2 Dc link voltage 4 Bit3 output current 8 Bit4 output voltage 16 Bit5 output torque...

Page 226: ...ameter upload to keypad 4 Parameter download from keypad H0 05 Range 0 2 Default 0 Menu display selection 0 Display all parameter 1 Display user defined parameters More details please see the P0 group...

Page 227: ...efault 1 Load speed display decimal digits 0 0 decimal place 1 1 decimal place 2 2 decimal places 3 3 decimal places H0 10 Range 0 1 Default 0 G L setting 0 G type AC Drive allows 1min 10min overload...

Page 228: ...angle size when current across zero the 3640 equivalent to 20 degrees H0 15 Range 0 10 300 00 Default 50 00 Dead zone compensation filter cut off frequency 1 Unit Hz To improve the precision of the o...

Page 229: ...2 ABZ OC Push pull type optional 5V 12V 24V 7 COM1 RS485 Modbus RTU AI3 Y3 X7 X8 8 COM2 Profibus 9 COM3 CANopen 10 COM4 GPRS 11 COM5 Modbus TCP H0 20 Range 000 999 Default Model dependent Product seri...

Page 230: ...codes H1 00 H1 11 then the AC drive will automatically perform AI zero offset and gain calibration H1 00 H1 03 are used to calibrate AI1 H1 04 H1 07 are used to calibrate AI2 H1 08 H1 11 are used to c...

Page 231: ...ion codes H1 12 H1 19 then the AC drive will calibrate AI zero offset and gain automatically H1 12 H1 15 are used to calibrate AO1 H1 16 H1 19 are used to calibrate AO2 When drive restore factory defa...

Page 232: ...rity check 1 stop bit 8 E 1 3 8 data bit odd parity check 1 stop bit 8 O 1 L0 02 Range 1 247 Default 1 Slave address Set the drive communication address The slave address of zero is broadcast address...

Page 233: ...onds to max frequency b0 00 3 Feedback frequency 100 corresponds to max frequency b0 00 L1 02 Range 0 1 Default 0 Point point communication enable 0 Disable 1 Enable L1 03 Range 00 11 Default 00 Usage...

Page 234: ...ol L2 02 Range 0 1 Default 0 A B phase sequence of ABC incremental Encoder 0 Positive 1 Negative This parameter is valid only for ABZ incremental encoder L2 00 0 and is used to set the A B phase seque...

Page 235: ...n the fault of encoder fault Er45 is displayed L2 09 Range 0 4 Default 0 Motor 2 Encoder type 0 ABZ incremental encoder 1 UVW incremental encoder 2 Rotational resolver encoder 3 Sine and cosine Encode...

Page 236: ...eak detection function is disabled 0 0 The encoder wire break detection function is enabled Group P0 User defined Parameters In user defined parameters Group users can add some parameters to P0 group...

Page 237: ...Parameter 7 A0 07 P0 14 User defined Parameter 14 A0 14 P0 15 Range H0 05 H0 05 Default H0 05 User defined Parameter 15 The parameter is map to H0 05 always it is used to modify the display mode for k...

Page 238: ...rmal range Er02 Hardware over voltage during deceleration The deceleration time is too short Increase the deceleration time The inertia of the load is too large Use dynamic brake The output circuit is...

Page 239: ...ust the voltage to normal range The inertia of the load is too large Select the dynamic brake resistor properly Er10 Hardware over current during constant speed Load change suddenly when drive is runn...

Page 240: ...is short circuit Check motor wiring The fan is blocked or damaged Clean the air filter or Replace the damaged fan The AC drive module is abnormal Contact with technical service Switch power supply is...

Page 241: ...ons Er18 Heatsink of inverter overheat Same as Er17 Same as Er17 Er AL19 Input phase loss The input voltage of R S and T have some losses Check the input voltage and the wiring Er AL20 Output phase lo...

Page 242: ...en drive in V F control Set the parameters of V F curve and torque boost properly The selected drive power grade is too small Select drive power grade properly Er AL25 Motor overload The input voltage...

Page 243: ...ice Er AL32 Optional card communicati on fault The communication of optional card with external device is abnormal Check the line and the optional card Er33 Optional card connection fault The communic...

Page 244: ...med Perform the motor auto tuning The motor over speed check parameters are set incorrectly Set the motor over speed check parameters correctly based on the actual situation Er AL42 Motor over speed T...

Page 245: ...all protective current AL49 Motor in voltage stall status Motor is in voltage stall control Check whether the dc link is exceed the overvoltage stall protective current AL50 Motor in frequency drop st...

Page 246: ...1 Check whether the output current of U V W are in unbalance status 2 Check whether the motor is damage or stalling 3 Check whether the motor parameters set proper value The display is normally at po...

Page 247: ...esponse frame is the same If the error occurs in the received frame from the host or can t complete the host required action the slave machine will organize a fault frame as a response to feedback to...

Page 248: ...DBUS internal least frame agreed between idle as follows 1 The frame head and frame end is defined through the bus idle time is equal to or greater than 3 5 bytes of time 2 The frame after the start t...

Page 249: ...d the range of function code parameters maximum minimum observe the instructions of AC drive using manual Non functional code parameters including the run command running state run stop parameters and...

Page 250: ...0x18 F0 0x2F C4 0x19 F1 0x30 C5 0x1A H0 0x31 C6 0x1B H1 0x32 d0 0x1C L0 0x33 d1 0x1D L1 0x34 d2 0x1E L2 0x35 d3 0x1F L3 0x36 d4 0x20 L4 0x37 d5 0x21 L5 0x38 d6 0x22 L6 0x39 E0 0x23 L7 0x3A E1 0x24 P0...

Page 251: ...ne set the address value the data range is 10000 10000 correspond to the given value for 100 00 100 2 Run command Wirte only Run command address Usage 6401H b0 11 2 0001 Run forward 0002 Run reverse 0...

Page 252: ...error info 6407H 0 No error 1 Hardware accelerate over voltage 2 Hardware decelerate over voltage 3 Hardware constant speed over voltage 4 Software accelerate over voltage 5 Software decelerate over v...

Page 253: ...munication error 33 Optional card connection error 34 Motor self tuning error 35 PID feedback out of range 36 EEPROM read write error 37 Parameter set error 38 Accumulative power up time error 39 Accu...

Page 254: ...low 02 H Register number high 00 H Register number low 02 H CRC low 6E H CRC high 4F H Slave response frame ADR Slave address 01 H CMD Function code 03 H Byte number 04 H Register 0x2302H comment hig...

Page 255: ...gh byte 23 H Register ID low byte 02 H Register comment high byte 13 H Register comment low byte 88 H CRC low byte 2E H CRC high byte D8 H Slave response frame ADR Slave address 01 H CMD Function code...

Page 256: ...nge 04H Operation error 05H Frame length error 5 CRC check The RTU frame include a CRC check field CRC used to check the correctness of the whole frame It include two bytes filed The master calculates...

Page 257: ...mal noise Motor Generate heat Generating heat is normal Noise The noise is uniform AC drive Generate heat due to vibration Stable vibration and rational temperature Noise Normal noise Lead and termina...

Page 258: ...nergized once for every two years and each lasting time must be no less than one hour The input voltage must be increased slowly to the rated value by using the regulator Warranty Agreement 1 Free war...

Page 259: ...O1 Terminal Symbol Description T3 A Relay 3 common port T3 C Relay 3 normally open port T4 A Relay 4 common port T4 C Relay 4 normally open port T5 A Relay 5 common port T5 C Relay 5 normally open por...

Page 260: ...cription AI3 Analog input 3 GND Ground of AI3 and 10V 10V 10V reference supply Y3 Digital output 3 COM Ground of Y terminal and 24V X7 Digital input 7 X8 Digital input 8 X9 Digital input 9 X10 Digital...

Page 261: ...e 10 3 Optional card IO3 Terminal Symbol Description X7 Digital input 7 X8 Digital input 8 X9 Digital input 9 X10 Digital input10 CMX1 X7 X10 common port 24V 24V supply COM Ground of 24V T3 A Relay 3...

Page 262: ...4 Terminal Symbol Description R1 1st group wring terminals for PT100 PT1000 Rm1 R1 R2 2nd group wring terminals for PT100 PT1000 Rm2 R2 R3 3rd group wring terminals for PT100 PT1000 Rm3 R3 X7 Digital...

Page 263: ...rview Input ports for A B Z differential signal Optional supply 5V 12V and 15V for encoder Pin description Table 10 5 Optional card PG1 Terminal Symbol Description A Encoder output signal A Positive A...

Page 264: ...control AC drives which is produced by our company Functional overview Input ports for A B Z signal Optional supply 5V 12V 15V and 24V for encoder Pin description Table 10 6 Optional card PG2 Terminal...

Page 265: ...252 Appendix Records of Version Changes Date Version The content of changing 2017 5 V1 0 The first version is released officially...

Page 266: ...o Ltd Product Warranty Card Customer Information Company Address Company Name Zip code Contact person Telephone Product Information Product type Body bar code Name of agent Fault Information Maintenan...

Page 267: ...in accordance with the user manual d Repair or modification without prior permission e Faults caused by the improper safekeeping f Faults due to the operation of abnormal functions g Fire salt corros...

Reviews: