background image


The Menu System


Chapter 15

The Menu System


15-3


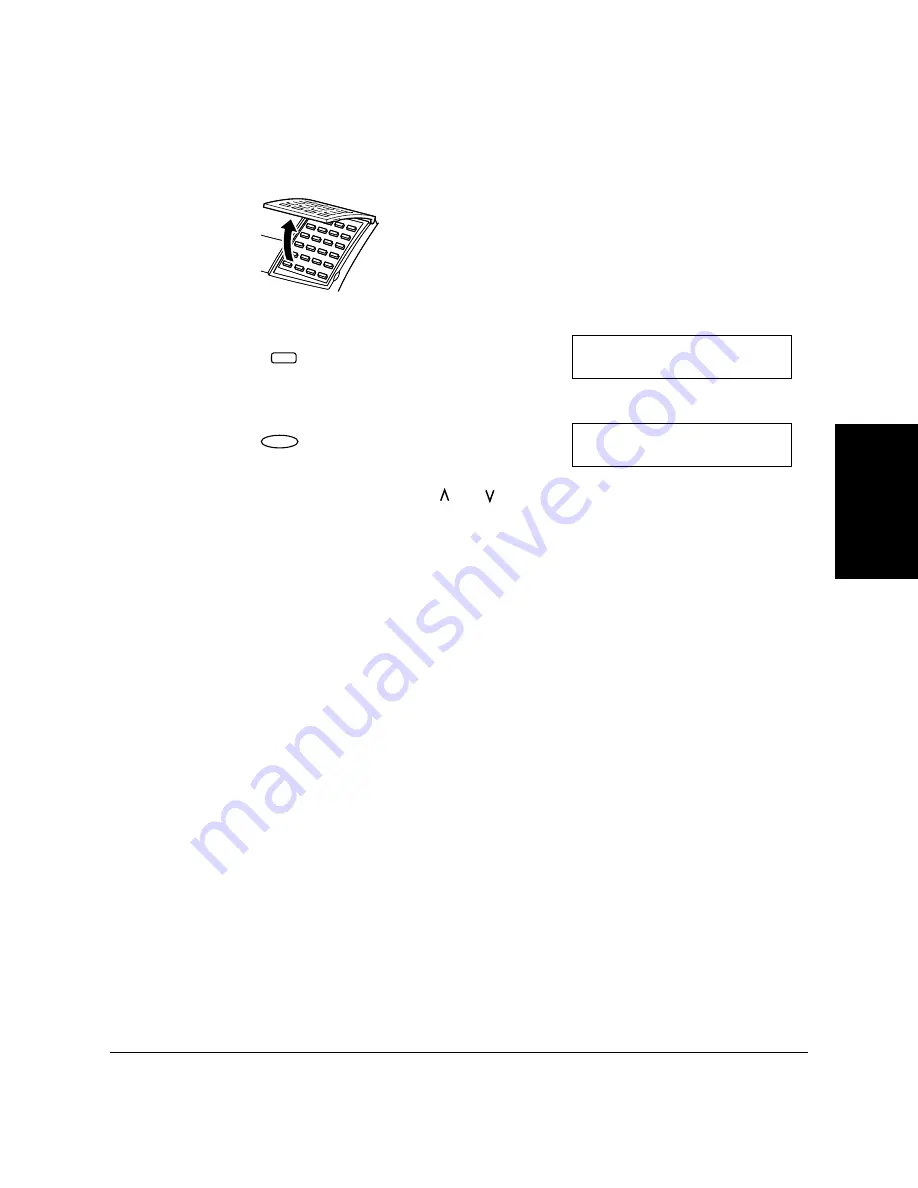
Accessing the USER SETTINGS Menu


1.

Open One-Touch Speed Dial panel.

2.

Press 


Data Registration


.

3.

Press 


Set


.

4.

Press 


Set


, then use the 

 or 

 to display the item you want to set or 

change.

Data

Registration

R E G  I  S T R A T  I  O N

1  .  D A T A R E G S T R A T  I O N

Set

D A T A R E G S T R A T  I O N

1  .  U S E R S E T T  I  N G S

Summary of Contents for L360

Page 1: ...n Inc IMPORTANT Appendix D describes important information exclusively for specified countries If you find your country name in Appendix D be sure to read it This equipment conforms with the essential...

Page 2: ...Energy Star guidelines for energy efficiency Super G3 is a phrase used to describe the new generation of fax machines that use ITU T V 34 standard 33 6Kbps modems Super G3 High Speed Fax machines allo...

Page 3: ...ser This fax is classified as a Class 1 Laser Product under EN 60825 1 1994 200V 240V model The label shown below is attached to the laser scan unit on the fax This fax has been classified under EN608...

Page 4: ...X L360 2 3 Dimensions 2 4 Unpacking Your FAX L360 2 5 Do You Have Everything 2 5 Lifting the FAX L360 2 6 Removing Shipping Materials 2 7 Replaceable Parts 2 9 Assembling the FAX L360 2 10 Attaching C...

Page 5: ...tion 3 4 Using the One Touch Speed Dial button One Touch Speed Dial Panel 3 5 Using the Special Function Buttons 3 5 Using the Menu System 3 6 Personalising Your FAX L360 3 8 Identifying Your Document...

Page 6: ...p Dialling 5 27 Chapter 6 Sending Faxes 6 1 Preparing to Send a Fax 6 3 Document Requirements 6 3 Scanning Area 6 5 Selecting Automatic Manual Document Feed 6 6 Loading Documents for Automatic Feed 6...

Page 7: ...ax Tel Mode 7 5 What Happens When Fax Tel Mode is Selected 7 7 Receiving Faxes Manually MANUAL MODE 7 10 Receiving Faxes Automatically FAX ONLY MODE 7 11 Using an Answering Machine ANS MACHINE MODE 7...

Page 8: ...egistering the Access Type and Outside Line Access Number Under the R button 10 2 Long Distance Dialling 10 4 How to Enter Pauses 10 4 Confirming a Dial Tone 10 5 Using Tone Dialling On a Pulse Line 1...

Page 9: ...Printing Problems 13 33 Print Quality Problems 13 35 General Problems 13 36 If the Power Goes Out 13 37 Error Codes Messages and Solutions 13 38 Chapter 14 Maintaining Your FAX L360 14 1 Cleaning the...

Page 10: ...2 UK GERMANY FRANCE IRELAND C 3 AUSTRALIA NEW ZEALAND HONG KONG MALAYSIA SINGAPORE C 4 Appendix D Country specific Features D 1 United Kingdom D 2 Connecting External Device D 2 Ringer Equivalence Num...

Page 11: ...xii Contents Glossary G 1 Index I 1...

Page 12: ...comes with the unit and gives important safety instructions Welcome 1 2 The Main Features of the FAX L360 1 3 Plain Paper Fax Features 1 3 Printer Features 1 4 Copier Features 1 5 Telephone Features...

Page 13: ...X L360 Chapter 1 Welcome Thank you for purchasing the new Canon FAX L360 We are sure that your FAX L360 will meet your printing and copying needs easily and conveniently as well as your fax and phone...

Page 14: ...es UHQ Image Processing System The FAX L360 uses Canon s Ultra High Quality Image Processing System to provide enhanced definition in faxed photos Error Correction Mode ECM Using the FAX L360 s Error...

Page 15: ...dialling methods One Touch Speed Dialling Coded Speed Dialling and Group Dialling The FAX L360 also enables you to broadcast faxes or send faxes at a preset time to as many as 133 locations at once Fl...

Page 16: ...legal size documents onto A4 size paper for example Telephone Features Automatic dialling The FAX L360 s three automatic dialling methods One Touch Speed Dialling Coded Speed Dialling and Group Diall...

Page 17: ...ndows 98 Windows Me Windows 2000 or Windows XP System Requirements The following hardware and software are necessary to operate the printer driver with the FAX L360 These are the minimum requirements...

Page 18: ...MB of available hard disk space Disk Drive CD ROM drive or access to one over a network connection Monitor 256 colour SVGA monitor or greater Printer Cable A USB cable 5 meters 16 4 feet in length or...

Page 19: ...earn about the FAX L360 s main features and for guidelines on using the unit safely Carefully follow the instructions in Chapter 2 to get your unit unpacked and assembled properly Read Chapter 3 to le...

Page 20: ...ns Used in This User s Guide This user s guide follows the conventions below to emphasize certain information that will help you use your FAX L360 correctly and safely Cautions tell you how to avoid a...

Page 21: ...technology to provide trouble free operation If you encounter a problem with the unit s operation try to solve it by using the information in Chapter 13 If you cannot solve the problem or if you thin...

Page 22: ...X L360 from overheating which can cause it to operate abnormally and create a fire risk take care not to block or cover these openings Do not operate the unit on a bed sofa rug or other similar soft s...

Page 23: ...aning it Whenever you unplug the FAX L360 wait at least five seconds before you plug it back in Keep the FAX L360 away from direct sunlight as this can damage it If you have to place it near a window...

Page 24: ...oes not operate normally when you follow the operating instructions Adjust only those controls that are covered by the operating instructions in this user s guide or you can damage the unit and requir...

Page 25: ...1 14 Introducing the FAX L360 Chapter 1...

Page 26: ...g Materials 2 7 Replaceable Parts 2 9 Assembling the FAX L360 2 10 Attaching Components 2 10 Attaching the Paper Loading Warning Label 2 10 Attaching the Extension Tray 2 11 Straightening the Multi Pu...

Page 27: ...h Speed Dial panel open 2 27 The Toner Cartridge 2 29 Handling and Storing Cartridges 2 29 Installing Replacing the Toner Cartridge 2 31 Loading Recording Paper 2 37 Loading Paper in the Cassette 2 39...

Page 28: ...and 80 Keep the FAX L360 away from direct sunlight If possible place the FAX L360 near an existing telephone outlet to allow for an easy connection of the telephone line to the unit Place the FAX L36...

Page 29: ...to allow paper to flow freely into and out of the unit The figure below shows the minimum space required for the unit If you need help installing your FAX L360 or have any questions about it contact y...

Page 30: ...se you want to move or ship the unit in the future Carefully remove all items from the box You should have someone help by holding the box while you lift the FAX L360 and its protective packaging out...

Page 31: ...you have purchased the optional handset see Appendix B for the items included In addition to the items shipped with your FAX L360 if you wish to use the FAX L360 as a printer you will need a USB cabl...

Page 32: ...low these steps 1 Remove all pieces of shipping tape from the outside of the FAX L360 2 Open the operation panel by grasping it with both hands and gently pulling it toward you Remove protective sheet...

Page 33: ...p Your FAX L360 Chapter 2 3 Open the front cover by lifting the right side release latch of the unit Lift the cover forward to its open position 4 Remove all pieces of shipping tape from the inside of...

Page 34: ...from inside the paper cassette Replaceable Parts The only component of the FAX L360 that needs regular service or replacement is the FX 3 toner cartridge Although Canon manufactures many types of ton...

Page 35: ...unit and components To see how the FAX L360 will look fully assembled see Getting Acquainted With Your FAX L360 on page 2 21 Attaching Components Attaching the Paper Loading Warning Label The paper lo...

Page 36: ...the tab into the corresponding slot as shown in the illustration below Pull the inside extension tray towards you Make sure the tab is inserted into the slot finally not to come off Straightening the...

Page 37: ...tall this support insert the tabs into the corresponding slots above the face down delivery slot making sure that the smaller tab is on the left The other support tray holds documents as they are fed...

Page 38: ...ring machine and then the answering machine to your FAX L360 If you connect a data modem to your FAX L360 and you use it extensively or others access your PC frequently through the data modem you may...

Page 39: ...to a telephone line as follows 1 Connect one end of the supplied telephone line to the jack marked on the left side of the FAX L360 2 Connect the other end of the line to your wall telephone jack Conn...

Page 40: ...ing Machine Connect the end of the extension phone or answering machine cord to the jack marked If you connect an answering machine to the FAX L360 be sure to read your answering machine s manual You...

Page 41: ...ling on the plug itself Never pull on the cord Do not plug the FAX L360 into an outlet shared with an appliance such as an air conditioner computer electric typewriter or copier These devices generate...

Page 42: ...60 is warming up the message PLEASE WAIT appears in the LCD display When you connect the power cord to an AC outlet for the first time after purchase DISPLAY LANGUAGE will appear in the LCD display af...

Page 43: ...n installed yet the message CHECK COVER CART alternates with the standby mode display In this case install the toner cartridge See Installing Replacing the Toner Cartridge on page 2 31 N C H E C K CO...

Page 44: ...and country After connecting the power cord the display changes from PLEASE WAIT to the DISPLAY LANGUAGE menu 1 Open One Touch Speed Dial panel 2 Use or to select the preferred language for the LCD d...

Page 45: ...connect the power cord To check the settings made by the country selection you can print the USER S DATA LIST See User s Data List on page 12 14 You can change the display language or country setting...

Page 46: ...over the diagrams on these pages to become familiar with the unit s components Front View SUPPORT TRAYS AUTOMATIC DOCUMENT FEEDER ADF DOCUMENT GUIDES OPERATION PANEL PAPER DELIVERY SELECTOR PAPER RES...

Page 47: ...2 22 Setting Up Your FAX L360 Chapter 2 Inside View FIXING ASSEMBLY PAPER RELEASE LEVER FX 3 TONER CARTRIDGE COMPARTMENT TRANSFER CHARGING ROLLER DO NOT TOUCH FRONT COVER...

Page 48: ...Setting Up Your FAX L360 Chapter 2 Setting Up Your FAX L360 2 23 Rear View HANDSET JACK TELEPHONE LINE JACK POWER CONNECTOR EXTENSION PHONE JACK REAR COVER USB PORT...

Page 49: ...t for automatic document feed or to the right for manual document feed 01 02 03 04 05 06 07 08 09 10 11 12 13 14 15 16 17 18 19 20 21 22 23 24 T WXYZ TUV PQRS MNO JKL GHI DEF ABC 1 2 3 4 5 6 7 8 9 0 C...

Page 50: ...t is set for pulse dialling See page 10 6 for details Numeric buttons Use these buttons to enter numbers and names when registering information and to dial fax telephone numbers that are not registere...

Page 51: ...Stop button Press this button to cancel sending receiving or any other operation Set button Press this button to select a menu item when registering information One Touch Speed Dial panel Open this p...

Page 52: ...t a document for polling sending and to poll the other fax to receive a document Memory Reference button Use this button to delete or resend documents stored in memory or to print a list of documents...

Page 53: ...are registering information Clear button Use this button to clear an entire entry during information registration Search buttons Use these buttons to scroll the display so you can see other options an...

Page 54: ...becomes caked in the cartridge it may prove impossible to free it even by shaking the cartridge Keep the cartridge away from computer screens disk drives and floppy disks The magnet inside the cartri...

Page 55: ...rtridge in the unit Save the protective bag You may need to repack and transport the cartridge at a later date Do not store the cartridge in salty air or where there are corrosive gases such as from a...

Page 56: ...uted Before replacing the cartridge follow the instructions on page 13 35 to evenly distribute the toner If after doing this the message remains displayed or the print quality is low replace the cartr...

Page 57: ...ease latch as this may cause damage to your unit 4 If replacing a used cartridge hold the cartridge by its handle and remove it as shown Dispose of the toner cartridge properly To recycle your used ca...

Page 58: ...protective bag Save the protective bag the cartridge comes in You may need to repack the cartridge later 6 Gently rock the cartridge from side to side several times to distribute the toner evenly ins...

Page 59: ...surface and steady it with one hand Remove the seal by gently pulling on the plastic tab with your other hand Use a firm even pull to remove the plastic seal To avoid breaking the seal do not jerk on...

Page 60: ...ign the tabs on the left and right sides of the cartridge with the rails inside the unit Slide the cartridge into position Always hold the cartridge by its handle when inserting it in the unit 9 Gentl...

Page 61: ...2 36 Setting Up Your FAX L360 Chapter 2 10 Close the front cover Use both hands to lift the cover back to its closed position...

Page 62: ...aper so that the top and bottom edges and sides are straight and even before placing it in the paper cassette the multi purpose tray Do not print on both sides of the paper Doing so may cause several...

Page 63: ...se can withstand high temperatures Make sure the paper is free of dust lint and oil stains To keep the paper from curling do not open paper packs until you are ready to use the paper Store unused pape...

Page 64: ...sette slightly and pull it out Remove the paper cassette being careful not to drop it as you pull it out Filling the paper cassette without removing it completely from the fax may cause the paper to m...

Page 65: ...hapter 2 3 Load the stack of paper into the paper cassette Make sure the paper stack is not higher than the limit marks on the sides of the cassette Check all corners and edges of the paper stack to b...

Page 66: ...t completely disconnect then connect the power cord When the PLEASE WAIT message is no longer displayed try inserting the paper cassette again If you pull out the paper cassette with paper remaining i...

Page 67: ...ese steps to load paper in the multi purpose tray Let the paper run out before you refill the multi purpose tray See page 2 37 1 Before loading paper stack it so that the leading edge and sides of the...

Page 68: ...g you and top edge first into the multi purpose tray Insert the stack until it stops but do not force it in 4 Adjust the paper guides to the width of the paper Make sure there is no space between the...

Page 69: ...te the multi purpose tray you can make sure the FAX L360 is printing properly by making several copies of a document For instructions see Chapter 11 Making Copies Note the following If the printed she...

Page 70: ...ntering Information 3 2 Entering Numbers Letters and Symbols 3 2 Editing Information 3 4 Using the One Touch Speed Dial button One Touch Speed Dial Panel 3 5 Using the Special Function Buttons 3 5 Usi...

Page 71: ...seconds the FAX L360 returns to standby mode and loses all information you had entered up to that point You will then have to start again Entering Numbers Letters and Symbols Each numeric button has...

Page 72: ...de 1 appears in the upper right corner Entering a single letter For example you would enter a lowercase letter b like this 1 Press until an a appears in the upper right corner 2 Press 2 twice to displ...

Page 73: ...r 2 Press 2 once to display the first A 3 Press to enter the A and move the cursor to the right 4 Press 2 once to display the second A Editing Information If you make a mistake while entering a name y...

Page 74: ...se speed dialling Using the Special Function Buttons Open the One Touch Speed Dial panel to access the Special Function buttons These Special Function buttons consist of Delayed Transmission button Re...

Page 75: ...unit to print a report every time you send or receive a fax and also contains options for printing summary reports TX SETTINGS Contains items that let you customize how your unit sends documents RX SE...

Page 76: ...y and select items from the menu system as follows 1 Open One Touch Speed Dial panel 2 Press Data Registration 3 Use the or to change the menu display 4 Press Set to select an item from the menu or pr...

Page 77: ...d your TTI Transmit Terminal Identification and appears at the top of the faxed document in small type By identifying the documents you send the receiving party can recognize your fax messages at a gl...

Page 78: ...nd precede single digits with a zero If you make a mistake open One Touch Speed Dial panel and press clear then re enter the value 5 Press Set to save the date and time 6 Press Stop to return to stand...

Page 79: ...ric buttons You can enter up to 20 digits for your fax telephone number You can enter spaces with the Space button to make the number easier to read To enter a plus sign before the fax telephone numbe...

Page 80: ...buttons to type in your name or business name For more details on entering letters see page 3 3 You can enter up to 24 characters for your name or business name You can delete the entire entry by open...

Page 81: ...se or to select the correct telephone line type 6 Press Set to save the telephone line type The default setting varies depending on the country For details see Appendix C Default Settings for Each Cou...

Page 82: ...tem and set the day and time when the summer time begins and ends 1 Open One Touch Speed Dial panel 2 Press Data Registration 3 Press Set 4 Use or to select 7 SYSTEM SETTINGS 5 Press Set then use or t...

Page 83: ...tarts and ends 7 Press Set for three times 8 Use or to select the month in which the summer time begins 9 Press Set twice 10 Use or to select the week when the summer time begins You can select from t...

Page 84: ...r the time when the summer time begins 15 Press Set and set the day and time when the summer time ends in the same manner as setting the begin date and time 16 Press Stop to return to standby mode D A...

Page 85: ...3 16 Registering Information in the FAX L360 Chapter 3...

Page 86: ...form Guidelines for Selecting Print Media 4 2 Plain Paper 4 4 Envelopes 4 4 Labels 4 5 Transparencies 4 5 The Paper Path 4 6 Selecting Paper Delivery 4 8 Face Down Delivery 4 9 Face Up Delivery 4 10 L...

Page 87: ...mm stack height Letter 215 9 279 4 mm 64 90 g m2 250 sheets Max 27 5 mm stack height Type Size Weight Capacity Plain paper 94 127 mm to 216 356 mm 64 90 g m2 100 sheets Max 10 mm stack height A4 210...

Page 88: ...Max 10 mm stack height CUSTOM2 SHORT 216 254 mm to 216 270 mm 64 90 g m2 100 sheets Max 10 mm stack height Envelopes European DL 220 110 mm 7 envelopes U S Commercial No 10 9 5 4 1 in 7 envelopes Labe...

Page 89: ...t print well Damp curled wrinkled or torn paper can cause paper jams or poor print quality For paper sizes other than A4 letter and legal be sure to use face up delivery See page 4 10 for details Enve...

Page 90: ...rating from the backing sheet or that are wrinkled or damaged in any way Do not use label sheets with the backing sheet exposed such as labels with any spaces between them When feeding labels be sure...

Page 91: ...beam draws the print image on the drum then the drum applies toner to the page The page then travels to the fixing assembly where the toner is fused to the page The page then exits the unit from the f...

Page 92: ...se a paper jam may occur Make sure there is enough room for the paper to exit from the face up delivery slot Never pull the paper as it comes out of the unit When using face up delivery let the paper...

Page 93: ...ery Received faxes copies and prints can be delivered through the face up or face down delivery slots Choose paper delivery according to the job the FAX L360 is performing and the type of print media...

Page 94: ...s used for most jobs and when using plain paper only 64 90 g m2 Printed pages are stacked in the order printed in the face down delivery slot This slot holds up to approximately 50 sheets of plain pap...

Page 95: ...bels and envelopes Be sure to use face up delivery when feeding print media other than standard plain paper Move the paper delivery selector forward to the mark When using face up delivery you must re...

Page 96: ...ving a large number of pages In this case remove the extension tray and place the unit on the edge of a table This will allow the pages to fall away from the unit and avoid blocking the face up delive...

Page 97: ...weight is within the range 64 90 g m2 To load the paper follow the steps in Loading Recording Paper on page 2 37 When receiving faxes the default setting is the paper cassette with same size paper re...

Page 98: ...m Be sure to use face up delivery when printing on envelopes See page 4 10 for details 1 Prepare the envelopes Arrange the stack of envelopes on a firm surface and press down firmly on the edges to ma...

Page 99: ...o the approximate width of the stack of envelopes 3 Insert the stack of envelopes print side facing you into the multi purpose tray Insert the stack until it stops but do not force it FACE DOWN DELIVE...

Page 100: ...andling 4 15 4 Adjust the paper guides to the stack of envelopes 5 Move the paper delivery selector forward to the mark Be sure to use face up delivery when printing on envelopes Your FAX L360 is now...

Page 101: ...use or to select 2 PAPER SIZE 5 Press Set and use or to select 2 MP TRAY 6 Press Set and use or to select paper size You can select from the following A4 LTR LGL CUSTOM Data Registration R E G I S T...

Page 102: ...n the paper size for CUSTOM1 LONG and CUSTOM2 SHORT 9 Press Set 10 Press Stop to return to standby mode P R I N T E R S E T T I NG S 3 E CONOMY P R T Set 3 1 1 2 2 0 0 2 T U E 1 0 0 0 F a x O n l y S...

Page 103: ...4 18 Paper Handling Chapter 4...

Page 104: ...toring Numbers for One Touch Speed Dialling 5 3 Changing a Number Name Stored Under a One Touch Speed Dialling Button 5 7 Using One Touch Speed Dialling 5 10 Coded Speed Dialling 5 12 Storing Numbers...

Page 105: ...alling Dial a fax telephone number by pressing the Coded Dial button followed by a two digit code assigned to that number Group Dialling Send a document to a pre defined group of fax numbers The numbe...

Page 106: ...r to select 2 TEL REGISTRATION 4 Press Set twice 5 Use or the One Touch Speed Dialling button to select a One Touch Speed Dialling button between 01 and 32 If a number is already stored under the butt...

Page 107: ...e in the number press the Redial Pause button one or more times 8 Press Set 9 Press Set again then use the numeric buttons to enter the name you want to store For details on entering letters see page...

Page 108: ...ct the transmission type items The TX TYPE menu includes these items Set 1 T OU C H S P D D I A L 3 O P T I ON A L S E T T I NG Set O P T I ON A L S E T T I NG ON Set O P T I ON A L S E T T I NG 1 T X...

Page 109: ...ess Set then use the numeric buttons to enter a password 18 Press Set to store a password 19 To continue registering numbers names and TX type repeat steps 5 to 18 or If you have finished registering...

Page 110: ...ng button or if you want to delete all information stored under a button 1 Open One Touch Speed Dial panel 2 Press Data Registration 3 Use or to select 2 TEL REGISTRATION 4 Press Set twice 5 Use or th...

Page 111: ...ft to delete the digits you want to change The numbers will be deleted with the passing of the cursor If you only want to change the name ignore this step and go to step 8 8 Press Set twice to display...

Page 112: ...me name do not enter a new name and go to step 10 10 Press Set 11 To change additional numbers and or names press Data Registration and repeat steps 5 to 10 or If you have finished changing numbers an...

Page 113: ...e details 2 Press the One Touch Speed Dialling button assigned to the number to which you wish to fax The name registered under that One Touch Speed Dialling button is displayed If no name is register...

Page 114: ...nd automatically you need to change the TIME OUT setting See pages 15 7 and 15 8 for more details If an error occurs during sending the FAX L360 will print an error report If this happens try sending...

Page 115: ...se or to select 2 TEL REGISTRATION 4 Press Set 5 Use or to select 2 CODED SPEED DIAL 6 Press Set Using Search buttons 7 Use or to select a two digit code 00 99 in the display Data Registration R E G I...

Page 116: ...r The number can be up to 120 digits long Press the Space button to enter spaces between numbers spaces are optional and are ignored during dialling If you want to clear a mistaken entry press the Cle...

Page 117: ...top here and register another code Press Data Registration Repeat the procedure from step 7 To end the procedure and return to standby mode Press Stop 13 Press Set then use or to select ON 14 Press Se...

Page 118: ...s Set then use the numeric buttons to enter a password REGULAR TX Designates the transaction as a normal transmission with no special features You can cancel the currently set PSWD SUB ADDRESS by sele...

Page 119: ...To continue registering numbers names and TX type repeat steps 7 to 20 or If you have finished registering numbers names and TX type press Stop to return to standby mode Set COD E D S P E E D D I A L...

Page 120: ...gistration 3 Use or to select 2 TEL REGISTRATION 4 Press Set 5 Use or to select 2 CODED SPEED DIAL 6 Press Set Using Search buttons 7 Use or to select a two digit code 00 99 in the display Data Regist...

Page 121: ...elete the number then press Set When you delete a number the name registered for that number is also deleted 10 Press Stop to return to standby mode COD E D S P E E D D I A L 0 4 1 4 3 2 2 0 6 0 Coded...

Page 122: ...he name use and the numeric buttons to enter the new name over the previous name For details on entering letters see page 3 2 You can enter up to 16 characters for the name If you want to keep the sam...

Page 123: ...hange additional numbers and or names press Data Registration and repeat steps 7 to 12 or If you have finished changing numbers and or names press Stop to return to standby mode 3 1 1 2 2 0 0 2 T U E...

Page 124: ...numeric buttons to enter the two digit code assigned to the fax number The name registered under that coded speed dialling code is displayed If no name is registered the number registered under that...

Page 125: ...atically you need to change the TIME OUT setting See pages 15 7 and 15 8 for more details If an error occurs during sending the FAX L360 will print an error report If this happens try sending the fax...

Page 126: ...ling buttons or Coded Speed Dialling codes Each group is stored under a One Touch Speed Dialling button or a Coded Speed Dialling code Create groups for group dialling as follows 1 Open One Touch Spee...

Page 127: ...ROUP DIAL or CODED SPEED DIAL is displayed To continue storing under a Coded Speed Dialling code you can use or also Each One Touch Speed Dialling button or Coded Speed Dialling code can store either...

Page 128: ...not been registered for one touch or coded speed dialling You can review the numbers registered under the group by pressing the or button If you want to delete one of these numbers from the group pre...

Page 129: ...the name 11 Enter the name using the numeric buttons for the group 12 Press Set 13 To enter additional groups repeat steps 7 to 12 or If you have finished registering groups press Stop to return to s...

Page 130: ...alling code s If you make a mistake when selecting a group press the Stop button and start again The name registered under that One Touch Speed Dialling button or Coded Speed Dialling code is displaye...

Page 131: ...automatically If you have entered more than one speed dialling button or code the FAX L360 waits for 10 seconds before it begins sending If you do not want the FAX L360 to send automatically you need...

Page 132: ...Setting the Scanning Resolution 6 13 Setting the Scan Contrast 6 14 Sending Methods 6 15 Manual Sending Via the Handset 6 15 Memory Sending 6 15 Dialling Methods 6 17 Sending Documents 6 18 Manual Sen...

Page 133: ...6 Sequential Broadcasting 6 31 Sending a Document to More Than One Destination 6 31 Sending a Document Using Group Dialling 6 33 Delayed Sending 6 34 Sending Other Documents While the FAX L360 is Set...

Page 134: ...cument feed lever is set to Automatic Document Feed Size Maximum 216 355 9 mm W L Minimum 148 105 mm Quantity Up to 30 A4 size 30 letter size or 20 legal size pages 1 page for sizes other than these T...

Page 135: ...to the Automatic Document Feeder ADF Make sure any glue ink or correction fluid on the paper is completely dry before loading the document into the Automatic Document Feeder ADF If you have a document...

Page 136: ...s 6 5 Scanning Area The margins of 3 0 mm on both sides of the sheet and 4 0 mm on the top and bottom are outside the FAX L360 s scanning area Make sure your document s text and graphics do not extend...

Page 137: ...documents such as photos business cards or documents on other special types of paper Manual document feed will allow you to scan your document with minimum damage to the surface of the document Use th...

Page 138: ...uments for Automatic Feed 1 Make sure the document feed lever is set to automatic document feed Be sure to pull the feed lever towards you before sliding it to the left 2 If the document has multiple...

Page 139: ...8 Sending Faxes Chapter 6 3 Adjust the document guides to the width of the document 4 Gently insert the document face down top of the document first into the Automatic Document Feeder ADF until it sto...

Page 140: ...s the pages one by one from the bottom of the stack Wait until all pages of your document have been scanned completely before starting a new job Trouble With Multipage Documents If you have trouble fe...

Page 141: ...trouble with page jams while feeding see Jams in the Automatic Document Feeder ADF on page 13 5 You cannot feed a multipage document of thick media such as postcards or business cards Use manual feed...

Page 142: ...ending Faxes Chapter 6 Sending Faxes 6 11 Loading Documents for Manual Feed 1 Make sure the document feed lever is set to manual document feed 2 Adjust the document guides to the width of the document...

Page 143: ...l it stops The document is now ready for scanning Wait until your document has been scanned completely before starting a new job The length of the document is slightly reduced when copying or sending...

Page 144: ...ographs With this setting areas of the document that contain photos are automatically scanned with 64 levels of grey rather than just two black and white This gives a much better reproduction of the p...

Page 145: ...ult setting and is adequate for most documents To darken a light original set to DARKER to lighten dark originals use LIGHTER 1 Open One Touch Speed Dial panel 2 Press Data Registration 3 Press Set tw...

Page 146: ...sending See page 6 18 for more details on manual sending via the handset For manual sending via the handset you need to have the optional handset or a telephone connected to your FAX L360 Memory Sendi...

Page 147: ...6 16 Sending Faxes Chapter 6 Since the FAX L360 is multitasking you can even scan a document into the memory while sending a document receiving a document or printing a report...

Page 148: ...ter 5 Speed Dialling for details on registering and using One Touch Speed Dialling Coded Speed Dialling Press Coded Dial and enter the two digit code 00 to 99 under which you have registered the numbe...

Page 149: ...ing your document See page 6 6 for details 1 Prepare the document and load it face down into the Automatic Document Feeder ADF Once the document is loaded the LCD display shows the following If necess...

Page 150: ...s voice they are ready to receive your document Go to step 6 4 Ask the other party to press the start button on their fax and then hang up their handset 5 After the other party presses the start butto...

Page 151: ...6 for details 1 Prepare the document and load it face down into the Automatic Document Feeder ADF Once the document is loaded the LCD display shows the following If necessary you can adjust the resol...

Page 152: ...ns to the document and is used to identify the document in transaction reports The display continues to show these three displays in order while the fax is sending When the FAX L360 finishes sending t...

Page 153: ...is set to automatic document feed If your document has more pages than this you can add pages while the FAX L360 is scanning 1 Wait until the last sheet in the Automatic Document Feeder ADF starts fee...

Page 154: ...memory the following appears in the display 2 To cancel sending press If you change your mind and want the unit to continue sending press the button The FAX L360 will continue sending normally After...

Page 155: ...om the Automatic Document Feeder ADF 1 Open the operation panel by gently pulling it toward you 2 Remove the document by pulling it out from the top or bottom Do not pull the document without opening...

Page 156: ...Sending Faxes 6 25 3 When you are finished close the operation panel by pressing it down from the centre as shown Be sure to close the operation panel until it locks into place Otherwise the unit will...

Page 157: ...dial the fax number again if the receiving fax machine does not answer or if the line is busy You can also control how many times the FAX L360 will redial the number and how long it will wait between...

Page 158: ...redialling cannot be cancelled with the Stop button while the unit is waiting to redial To cancel do the following steps If you press Stop button in waiting to redial the LCD displays standby mode bu...

Page 159: ...Memory on page 8 8 Setting Up Automatic Redialling You can set up the following options for automatic redialling The number of times the FAX L360 attempts redialling The time interval between redialli...

Page 160: ...Set 7 Press Set again then use or the numeric buttons to enter the number of times you want the unit to redial 8 Press Set Data Registration R E G I S T R A T I ON 1 D A T A R E G S T R A T I ON Set...

Page 161: ...t the time interval between rediallings 10 Press Set 11 Press Stop to return to standby mode Set R E D I A L I N T E R V A L 2 M I N or WXYZ TUV PQRS MNO JKL GHI DEF ABC 1 2 3 4 5 6 7 8 9 0 Set T X S...

Page 162: ...the One Touch Speed Dialling and Coded Speed Dialling destinations in any order You can also include one destination that you dial manually using the numeric buttons or Redial Pause button To send a f...

Page 163: ...Coded Speed Dialling code you have five seconds to enter another speed dialling button or code before the FAX L360 begins sending automatically If you have entered more than one speed dialling button...

Page 164: ...e FAX L360 memory becomes full while scanning your document MEMORY FULL appears in the LCD display If this happens remove the remainder of the document from the Automatic Document Feeder ADF You may n...

Page 165: ...t face down into the Automatic Document Feeder ADF If necessary you can adjust the resolution and contrast See page 6 13 for more details 2 Open One Touch Speed Dial panel then press Delayed Transmiss...

Page 166: ...u can only enter one number with the numeric buttons 6 When you finish entering numbers press Start Copy The FAX L360 begins scanning the document into memory If the FAX L360 memory becomes full while...

Page 167: ...ing The FAX L360 is a multitasking unit so you can send receive print and copy other documents even when you have set the FAX L360 for delayed sending To print copy or send other documents after setti...

Page 168: ...one Calls Automatically Fax Tel Mode 7 5 Setting Up Fax Tel Mode 7 5 What Happens When Fax Tel Mode is Selected 7 7 Receiving Faxes Manually MANUAL MODE 7 10 Receiving Faxes Automatically FAX ONLY MOD...

Page 169: ...ne the FAX L360 rings to alert you to pick up the optional handset or telephone to answer the call This mode is economical in that it allows you to have phone and fax service without the expense of an...

Page 170: ...machine to the FAX L360 to receive faxes and phone messages The FAX L360 then receives incoming faxes normally and routes incoming phone calls to the answering machine Once you have decided which mod...

Page 171: ...r to select item If you select FAX TEL AUTO SW go to step 6 on page 7 8 to complete the setting If you select FAX ONLY MODE press Set and then press Stop to return to standby mode Data Registration R...

Page 172: ...L360 handles incoming calls by adjusting the settings described below Setting Up Fax Tel Mode When you select Fax Tel Mode from the Data Registration menu you can also set the following options RING...

Page 173: ...ing fax machine that a fax is coming For those cases the unit may think that the call coming in is a voice call and rings to alert you of the call the amount of time it is going to ring is determined...

Page 174: ...k If you don t pick up the handset within 22 sec DEFAULT ACTION Choose between RECEIVE factory default setting and DISCONNECT DISCONNECT RECEIVE Factory default setting fax tone is detected and the FA...

Page 175: ...to enter a time between 0 and 30 seconds This setting determines how many seconds the unit waits before ringing when it receives a call Data Registration R E G I S T R A T I ON 1 D A T A R E G S T R A...

Page 176: ...one picks up the handset within the specified ring time set in step 9 Select RECEIVE to receive the call and DISCONNECT to disconnect the call 12 Press Set 13 Press Stop to return to standby mode Set...

Page 177: ...12 for details If you use your FAX L360 with MANUAL MODE answer incoming calls as follows 1 When the optional handset or the telephone rings pick up the receiver If you hear a person s voice 2 Start y...

Page 178: ...curity code for this function may be the same as the two digit ID code described above If so make sure you change the FAX L360 two digit ID code to make it distinct from the answering machine s securi...

Page 179: ...nly and connect that line to the FAX L360 Using the FAX L360 With an Answering Machine Follow these guidelines when using the FAX L360 with an answering machine Set the answering machine to answer on...

Page 180: ...Memory If the FAX L360 receives a document into its memory the LCD displays one of the following messages These messages show the action you must take to correct the problem Cause The toner cartridge...

Page 181: ...g or Printing Since the FAX L360 is a multitasking device it can receive faxes and phone calls while you are entering your user information making copies or printing If you receive a fax while you are...

Page 182: ...ng Fax To cancel an incoming fax follow this procedure 1 Press Stop 2 Press to stop receiving or to resume receiving the fax 3 Press Stop to return to standby mode C A N C E L D U R I NG T X R X Y E S...

Page 183: ...7 16 Receiving Faxes Chapter 7...

Page 184: ...er shows you how to use the memory features of the FAX L360 Documents Stored in Memory 8 2 Printing a List of Documents Stored in Memory 8 2 Printing Documents Stored in Memory 8 3 Method 1 8 3 Method...

Page 185: ...ce you know the transaction number of a document in memory you can delete it This procedure is described later in this chapter To print a list of documents stored in memory follow this procedure 1 Ope...

Page 186: ...3 Press Set 4 Use or to select the TX RX number which you want to print You can check the documents stored in memory by pressing or 5 Press Set 6 Press for the first page only or for all pages N Memo...

Page 187: ...2 Use or to select 3 PRINT 3 Press Set 4 Use or to select the TX RX number which you want to print 5 Press Set 6 Press for the first page only or for all pages 3 1 1 2 2 0 0 2 T U E 1 0 0 0 F a x O n...

Page 188: ...Using the Memory Features Chapter 8 Using the Memory Features 8 5 7 Press Stop to return to standby mode 3 1 1 2 2 0 0 2 T U E 1 0 0 0 F a x O n l y S T A N D A R D...

Page 189: ...to select the TX RX number which you want to send You can check the documents stored in memory by pressing or 5 Press Set Memory Reference MEMOR Y R E F E R E N C E 1 DOC MEMOR Y L I S T MEMOR Y R E F...

Page 190: ...s Coded Speed Dialling Press Coded Dial then enter the two digit code 00 99 using the numeric buttons Be sure to press Coded Dial before each code Regular Dialling Enter the number using the numeric...

Page 191: ...the documents stored in memory by pressing or If you are not sure of the TX RX number you want to delete print the list of documents stored in memory See page 8 2 for details 5 Press Set 6 Press to de...

Page 192: ...ber you want to delete 5 Press Set 6 Press to delete the fax or to cancel deleting 7 Press Stop to return to standby mode 3 1 1 2 2 0 0 2 T U E 1 0 0 0 F a x O n l y S T A N D A R D Delayed Transmissi...

Page 193: ...8 10 Using the Memory Features Chapter 8...

Page 194: ...ties cannot be in the office at the same time What s Polling 9 2 Before You Use Polling Receiving 9 2 Polling to Receive Faxes 9 3 Requesting Another Fax to Send a Document 9 3 Cancelling a Polling 9...

Page 195: ...l faxes You can dial up to 133 telephone numbers and poll those faxes to receive documents that they are holding You can poll a document at any time but you may find it more useful to set your fax for...

Page 196: ...ds to make sure the document is on his fax machine and ready to be sent when your FAX L360 polls that machine the document is sent automatically The FAX L360 can poll any fax machine that supports pol...

Page 197: ...re to press Coded Dial before each code Regular Dialling Enter the number using the numeric buttons or Redial Pause button You can only enter one number with the numeric buttons It is not possible to...

Page 198: ...elling a Polling To cancel an incoming fax follow this procedure 1 Press Stop 2 Press to stop receiving or to resume receiving the fax 3 Press Stop to return to standby mode C A N C E L D U R I NG T X...

Page 199: ...onal Your TX PASSWORD must match the ITU T password attached when the other party calls you Confirm that the TX PASSWORD on your fax matches the ITU T password attached when the other party calls you...

Page 200: ...ct the polling box setup file press Set 8 Use the numeric buttons to enter a four digit password D A T A R E G S T R A T I ON 1 U S E R S E T T I NG S D A T A R E G S T R A T I ON 6 P O L L I NG B O X...

Page 201: ...symbols and 12 Press Set 13 Press Set 14 Use or to select ON or OFF ON The document in the memory box is erased after it is sent once in response to polling by another fax OFF The document in the memo...

Page 202: ...age 6 13 for more details 2 Open One Touch Speed Dial panel 3 Press Polling 4 Press Set Your machine will scan the document automatically When another party polls your fax to receive a document stored...

Page 203: ...9 10 Setting Up and Using Polling Chapter 9 If no password is registered for the document in the polling box and the other party s polling request contains a password then the document is not sent...

Page 204: ...GE DATA If you have not set the operation password please skip the next step 7 Press Set then enter the four digit password using the numeric buttons R E G I S T R A T I ON 1 D A T A R E G S T R A T I...

Page 205: ...e item you want to change 10 Press Set then change the setting Follow the same procedures you used to set up the polling box setup file 11 Press Stop to return to standby mode C H A NG E D A T A 1 F I...

Page 206: ...Dial panel 2 Press Data Registration 3 Press Set 4 Use or to select 6 POLLING BOX 5 Press Set 6 Use or to select 3 DELETE FILE If you have not set the operation password please skip the next step N R...

Page 207: ...using the numeric buttons 8 Press Set 9 Press Stop to return to standby mode D E L E T E F I L E P A S SWOR D _ Set WXYZ TUV PQRS MNO JKL GHI DEF ABC 1 2 3 4 5 6 7 8 9 0 Set D A T A R E G S T R A T I...

Page 208: ...L360 Special Dialling 10 2 Dialling Through a Switchboard 10 2 Registering the Access Type and Outside Line Access Number Under the R button 10 2 Long Distance Dialling 10 4 How to Enter Pauses 10 4 C...

Page 209: ...r the type of access and the outside line access number under the R button so that you only have to press the R button before dialling the number you wish to reach Follow the instructions below to reg...

Page 210: ...go to step 8 6 Press Set then use the numeric buttons to enter the outside line access number up to 20 digits 7 Press Redial Pause 8 Press Set then press Stop to return to standby mode Set P B X HOO K...

Page 211: ...or dialling use the numeric buttons to enter the number 2 To enter a pause within a number press Redial Pause To enter a pause at the end of a number press the Redial Pause button and then press the S...

Page 212: ...number or using regular dialling use the numeric buttons to enter the first part of the number until dial tone detection is required 2 When a dial tone detection is required press D T Where the dial...

Page 213: ...if you have installed the optional handset or Press Hook The In Use Memory lamp blinks green and you will hear the dial tone 2 Dial the telephone number using the numeric buttons The unit connects us...

Page 214: ...dialling after the phone connection is made After the number 123456 is dialled it will pause for 6 seconds ppp to allow the other party to answer and then it will switch to tone T Now you can follow...

Page 215: ...Set If the prompt PASSWORD is displayed Enter the password using the numeric buttons 5 Press Set 6 Press Set then use or to set LOCK PHONE to ON Data Registration R E G I S T R A T I ON 1 D A T A R E...

Page 216: ...current password enter a four digit number then press Set or To keep the current password press Set 9 Press Stop to return to standby mode Set Set D A T A R E G S T R A T I ON 1 U S E R S E T T I NG S...

Page 217: ...on 2 Press Set 3 Use or to select 7 SYSTEM SETTINGS 4 Press Set 5 Use or to select 2 RX RESTRICTION 6 Press Set 7 Use or to select the setting you want To enable restriction select ON then go to the n...

Page 218: ...o allow reception from the numbers registered for speed dialling WITH SENDER INFO To allow reception only when the caller gives its telephone numbers 10 Press Set then press Stop to return to standby...

Page 219: ...10 12 Special Features Chapter 10...

Page 220: ...Making Copies Chapter 11 Making Copies 11 1 Chapter 11 Making Copies This chapter describes how to make copies with your FAX L360 Making Copies 11 2...

Page 221: ...display shows the following 2 Press Start Copy The display now shows COPY the reduction size the copy will be printed at the default is 100 and the number of copies the default is 01 and the selected...

Page 222: ...i for multiple copies For high resolution copying make one copy at a time 5 Use or to select the paper supply You can select the paper cassette or the multi purpose tray when paper is remaining in bot...

Page 223: ...ument Feeder ADF on page 13 5 If MEMORY FULL appears in the display while you are making multiple copies of a document you will not be able to use the multiple copy feature for copying the document In...

Page 224: ...f registered numbers list of user s data registered in the FAX L360 and the memory clear report Activity Report 12 2 Transmission TX Reports 12 4 Error TX Report 12 4 TX Report 12 5 Multi TX RX Report...

Page 225: ...med FAX L360 prints sending and receiving transactions together in the same report When sending a document to many locations Broadcast the transaction number will be the same for each transmission in...

Page 226: ...732 2233 ADAM BOOK CPA 0007 TRANSMIT ECM 1 OK 00 06 31 12 08 49 1 213 978 3314 BELZER INC 5005 AUTO RX ECM 1 NG 00 20 1 STOP 31 12 09 08 1 213 978 3314 R LOUIS 0008 TRANSMIT 2 NG 00 00 0 995 31 12 09...

Page 227: ...cument using memory you can also select whether the first page of the document is printed with the report See page details on setting these options Error TX Report See the following pages for an expla...

Page 228: ...ber in the ACTIVITY REPORT you can find out exactly how many attempts were made to send the document how many pages were sent in each attempt as well as the usage time for each attempt THE SLEREXE COM...

Page 229: ...no pages were transmitted after two retries Multi TX RX Report If you used sequential broadcasting to send a document the Multi TX RX Report is printed If you set your unit to print activity reports T...

Page 230: ...he FAX L360 to print the RX Report every time you receive a document or only if an error occurs during receiving See pages 15 5 and 15 6 for details on setting this option RECEPTION OK TX RX NO 5008 C...

Page 231: ...list of documents deleted from the memory as a result of the power failure is printed automatically If there are one or more documents in the image memory when the power is cut off the machine will pr...

Page 232: ...ling codes including Group Dialling numbers Follow this procedure to print the lists 1 Open One Touch Speed Dial panel 2 Press Report 3 Use or to select 2 SPEED DIAL LIST 4 Press Set 5 Use or to selec...

Page 233: ...rinted in order of the Speed Dial numeric list from the lowest number to the highest number YES The CONNECTION ID name column is sorted and the One Touch or Coded Speed Dial list is printed in alphabe...

Page 234: ...OBERT STUART REGULAR TX 01 1 914 438 3619 SEYMOUR GREEN REGULAR TX 1 TOUCH SPD DIAL LIST 1 31 12 2002 10 32 FAX 8334423 WORLD ESTATE INC 001 SORTED 01 CONNECTION TEL 1 914 438 3619 CONNECTION ID SEYMO...

Page 235: ...ULAR TX 08 732 2233 ADAM BOOKS CPA REGULAR TX CODED SPEED DIAL LIST 1 31 12 2002 10 32 FAX 8334423 WORLD ESTATE INC 001 NOT SORTED NO CONNECTION TEL CONNECTION ID TX TYPE 08 732 2233 ADAM BOOKS CPA RE...

Page 236: ...TYPE REGULAR TX 31 12 2002 13 36 FAX 833 4423 WORLD ESTATE INC 001 08 CONNECTION TEL 732 2233 CONNECTION ID ADAM BOOKS CPA TX TYPE REGULAR TX 06 CONNECTION TEL 761 1298 CONNECTION ID JOHN BARRISTER TX...

Page 237: ...tion you may have entered such as your name and number the date and time and all other settings currently selected Follow this procedure to print the User s Data List 1 Open One Touch Speed Dial panel...

Page 238: ...SYSTEM SETTINGS UN LOCK PHONE LOCK PHONE OFF RX RESTRICTION OFF DATE SETUP DD MM YYYY DISPLAY LANGUAGE ENGLISH TX START SPEED 33600bps RX START SPEED 33600bps COUNTRY SELECT ENGLISH SUMMER TIME ON BE...

Page 239: ...ORY LIST 4 Press Set Report R E P OR T 1 A C T I V I T Y R E P OR T R E P OR T 4 DOC MEMOR Y L I S T Set P R I N T I NG R E P OR T 31 12 2002 09 58 FAX 8334423 WORLD ESTATE INC 001 DOC MEMORY LIST TX...

Page 240: ...ons in this chapter to try to solve the problem If You Cannot Solve the Problem 13 2 Problems Index 13 3 Paper Jams 13 5 Problems Feeding Paper into the FAX L360 13 21 Faxing Problems 13 24 Telephone...

Page 241: ...thorised Canon dealer or the Canon help line Do not attempt to disassemble or repair the unit yourself Attempting to repair the FAX L360 yourself may void the limited warranty Before contacting your l...

Page 242: ...13 21 Transparencies do not feed correctly 13 22 The paper jams repeatedly 13 22 Envelopes will not feed 13 23 Faxing Problems Sending Faxes 13 24 Cannot send a fax 13 24 Images on faxes received fro...

Page 243: ...e copies 13 32 Printing Problems 13 33 The Alarm lamp comes on and the FAX L360 beeps while printing 13 33 Nothing prints 13 33 Printout does not match paper size 13 34 The printout curls 13 34 The pa...

Page 244: ...one of the following procedures You do not need to unplug the FAX L360 while clearing paper jams Jams in the Automatic Document Feeder ADF Use this procedure if the document in the FAX L360 s Automat...

Page 245: ...does not pull out easily do not force it Contact your local authorised Canon dealer or the Canon help line 4 When you are finished close the operation panel by pressing it down from the centre as show...

Page 246: ...eds in the output slots If this happens the message CLEAR PAPER JAM appears in the LCD display 1 Gently pull any jammed paper out of the unit as shown 2 If you are using the multi purpose tray remove...

Page 247: ...emove any documents or printed pages from the fax before removing the paper jam 1 Remove the paper cassette Be careful not to drop the cassette as you pull it out 2 If there is any jammed paper inside...

Page 248: ...inserting the paper cassette If the paper jam occurred while receiving a document the remainder of the document is received in memory Once the paper jam is cleared the document in memory will automati...

Page 249: ...ms Inside the Unit 1 Open the front cover by lifting the release latch on the right side of the unit Lift the cover forward to its open position Do not open the front cover without lifting the release...

Page 250: ...ly Asked Questions 13 11 2 Hold the cartridge by its handle and remove it from the unit Cover the cartridge with its original protective bag or a cloth to protect it from the light 3 Move the paper re...

Page 251: ...Chapter 13 4 Locate the jammed piece of paper First check the inside of the unit and then the front area The fixing assembly shaded becomes extremely hot when the unit is in use Be very careful not to...

Page 252: ...the unit Do not tear the jammed paper If the paper tears remove the paper scraps from the unit Be careful not to spill the toner that is on the jammed sheet of paper The toner has not been fused to t...

Page 253: ...e top edge of the paper is in the fixing assembly First move the jammed paper towards the unit 1 then pull it towards you to remove it 2 Be very careful not to touch the fixing assembly shaded as it b...

Page 254: ...p edge of the paper has passed through the fixing assembly 1 Pass the paper under the roller as shown 2 Use both hands to carefully pull the jammed paper Be sure to pull gently otherwise the paper may...

Page 255: ...paper has jammed near the face up delivery slot Hold the front cover and gently pull the sheet through the exit slot Do not close the front cover while removing a jammed sheet of paper This will retur...

Page 256: ...n the unit is in use Be very careful not to touch it as injury may result When removing the jammed paper be careful not to touch the transfer charging roller as its surface is very delicate and suscep...

Page 257: ...er 13 Jams in the Rear Cover of the Unit 1 Open the rear cover Lift the paper cassette slightly and pull it out a little to help pulling out jammed paper 2 Gently pull out any jammed paper from the re...

Page 258: ...Frequently Asked Questions Chapter 13 Frequently Asked Questions 13 19 3 Close the rear cover make sure it clicks in place Gently insert the paper cassette into the fax until it clicks into position N...

Page 259: ...unit 4 Load paper in the paper cassette or the multi purpose tray If you are experiencing repeated paper jams it may be due to the paper you are using Tap the paper on a flat surface before stacking...

Page 260: ...contain too many sheets Make sure the multi purpose tray is not filled past the limit See page 2 37 Paper may not be inserted correctly in the multi purpose tray Make sure paper is inserted all the w...

Page 261: ...you use meets the requirements for media given on page 4 2 Let the paper run out before you refill the multi purpose tray Avoid mixing new paper with paper remaining in the multi purpose tray Transpar...

Page 262: ...e are no more than 7 envelopes in the multi purpose tray The correct envelope size may not be selected in your printer driver Make sure you select the correct envelope size in the Paper Setting dialog...

Page 263: ...have pulse tone Make sure the FAX L360 is set for the type of telephone line you have See page 3 12 If you are not sure what type of line you have contact your local telephone company The document ma...

Page 264: ...X L360 for at least five seconds then plugging it back in If the problem persists contact your local authorised Canon dealer or the Canon help line Please note that any documents stored in memory will...

Page 265: ...ECM reception call the other party and have them check if ECM reception is turned on ECM sending on the FAX L360 may be turned off Turn ECM sending on See pages 15 7 and 15 8 ECM TX setting Errors oc...

Page 266: ...lay for an error message See page 13 38 for a listing of the FAX L360 s error messages Print an activity report and look for an error code See page 12 2 The paper cassette the multi purpose tray may b...

Page 267: ...In such cases you will have to receive the document manually See page 7 10 The FAX L360 will not receive faxes manually You may not have pressed the Start Copy button before hanging up the handset Al...

Page 268: ...ve been installed properly Make sure the toner cartridge is installed correctly See page 2 31 The toner cartridge may need to be replaced See page 2 31 Received faxes are blotched or uneven The teleph...

Page 269: ...s occur frequently while receiving The telephone lines may be in poor condition or you may have a bad connection Lower the speed at which the unit receives faxes in the RX START SPEED setting See page...

Page 270: ...e line may not be connected properly Make sure the telephone line is securely connected to the FAX L360 See page 2 14 The FAX L360 may not be set for the type of telephone line you have pulse tone Mak...

Page 271: ...nd the LCD display shows DOCUMENT READY The handset may be off its hook Make sure the handset is on its cradle The FAX L360 may not be operating properly Print a document from your PC to make sure the...

Page 272: ...may have a paper jam Clear any paper jams as described earlier in this chapter If the FAX L360 has no paper jam unplug it wait five seconds then plug it in again If the problem is fixed the Alarm lam...

Page 273: ...per is loaded correctly See page 2 37 The printout curls Your pages may include a large amount of toner Remove the printout as soon as it exits the FAX L360 and then roll it in the direction opposite...

Page 274: ...the paper Many types of paper have a correct side for printing If your paper does make sure that side is facing up If the paper has no obvious correct side try turning the paper over and printing on t...

Page 275: ...ected to an outlet and turned on The power cord may not be supplying power Check the power cord by substituting it with another or by using a voltametre to test it for continuity Nothing appears in th...

Page 276: ...stored in its fax memory will be retained for approximately one hour by a built in battery While power is out you can only use the FAX L360 to receive telephone calls if you have the optional handset...

Page 277: ...the document Wait for the unit to automatically redial the fax number See page 6 26 BUSY NO SIGNAL 018 The telephone number you dialled is busy Try sending the document again later The fax number dia...

Page 278: ...ssage remains replace the toner cartridge See page 2 31 The toner cartridge is empty Replace the toner cartridge See page 2 31 CHECK COVER CART The toner cartridge is not installed properly Make sure...

Page 279: ...subaddress and or password has been entered on the other party s machine or the subaddress and or password do not match the settings on your FAX L360 Contact the other party to enter the correct subad...

Page 280: ...ine CHK SUBADDR PSWD 083 102 You attempted to send a document or poll another fax machine with the incorrect subaddress and or password Contact the other party to check their settings Change your sett...

Page 281: ...ECM RX setting ECM TX The FAX L360 is sending a fax using ECM If your local lines are in bad condition ECM transmissions may take longer than normal transmissions Turn off ECM if you find transmission...

Page 282: ...f the memory contains any faxes you do not need print send or delete them MEMORY USED nn Shows how much of the FAX L360 s memory is in use If you need more space wait for the unit to send any faxes Al...

Page 283: ...ir settings If their fax machine does not support reception with a password delete the password you have registered See page 5 7 5 12 REC D IN MEMORY The paper or toner ran out or a paper jam occurred...

Page 284: ...ed See page 5 7 5 12 TX RX CANCELLED You pressed the Stop button to cancel the transmission TX RX NO nnnn When the FAX L360 sends or receives a fax it assigns a unique identification number to it Writ...

Page 285: ...13 46 Frequently Asked Questions Chapter 13...

Page 286: ...FAX L360 Your FAX L360 requires no maintenance other than periodic cleaning and replacing of the toner cartridge as needed Cleaning the FAX L360 14 2 Cleaning the FAX L360 Exterior 14 2 Cleaning the...

Page 287: ...cument you will have to set the FAX L360 to send your document again once you finish cleaning the unit However when you have set a document for delayed transmission the FAX L360 holds the document in...

Page 288: ...nting clean the inside of the FAX L360 periodically as follows When you unplug the unit any documents stored in memory will be erased if you leave the unit unplugged for one hour or more Be sure to pl...

Page 289: ...dge in its protective bag to avoid exposure to light 4 Use a clean soft dry lint free cloth to remove any toner or paper debris from the shaded area Do not touch the transfer charging roller black at...

Page 290: ...ve finished cleaning the FAX L360 replace the toner cartridge Gently press the cartridge into the unit as far as it will go Press down and back on the cartridge s handle 6 Close the front cover Use bo...

Page 291: ...anning glass and rollers When you unplug the unit any documents stored in memory will be erased if you leave the unit unplugged for one hour or more Be sure to plug in the unit after cleaning to avoid...

Page 292: ...t scanning glass and rollers are dirty the documents you send or print will also be dirty Clean with a soft cloth that will not scratch the glass or rollers 4 Clean the shaded areas of the operation p...

Page 293: ...wipe up paper dust around the rollers 6 When you are finished close the operation panel by pressing it down from the centre as shown Be sure to close the operation panel until it locks into place Oth...

Page 294: ...position 5 Disconnect the optional handset telephone or answering machine if you have connected one to the unit 6 Disconnect the power cord from the unit 7 Hold the flap of the paper rest down and pre...

Page 295: ...14 10 Maintaining Your FAX L360 Chapter 14...

Page 296: ...e to help you customize operations your unit performs Understanding the Menu System 15 2 Accessing the USER SETTINGS Menu 15 3 Accessing the REPORT SETTINGS Menu 15 5 Accessing the TX SETTINGS Menu 15...

Page 297: ...unit operates The menu system consists of seven menus each containing settings that control different functions of your FAX L360 This chapter outlines the various menus and shows you how to use them T...

Page 298: ...nu 1 Open One Touch Speed Dial panel 2 Press Data Registration 3 Press Set 4 Press Set then use the or to display the item you want to set or change Data Registration R E G I S T R A T I ON 1 D A T A...

Page 299: ...outside the image area See page 3 8 OUTSIDE IMAGE INSIDE IMAGE TELEPHONE MARK Selects the prefix for the unit number See page 3 8 FAX TEL 5 SCAN CONTRAST Selects the scanning contrast See page 6 14 ST...

Page 300: ...ata Registration 3 Press Set 4 Use or to select 2 REPORT SETTINGS 5 Press Set then use the or to display the item you want to set or change Data Registration R E G I S T R A T I ON 1 D A T A R E G S T...

Page 301: ...RROR ONLY OUTPUT YES OUTPUT NO OUTPUT YES Prints a report every time you send a document OUTPUT NO No report is printed PRINT WITH IMAGE If you select PRINT ERROR ONLY or OUTPUT YES above this setting...

Page 302: ...s Data Registration 3 Press Set 4 Use or to select 3 TX SETTINGS 5 Press Set then use the or to display the item you want to set or change Data Registration R E G I S T R A T I ON 1 D A T A R E G S T...

Page 303: ...entered within a fax telephone number with the Redial Pause button 2 SEC 1 to 15 3 AUTO REDIAL Enables disables automatic redialling if the other party s line is busy on the first attempt See page 6 2...

Page 304: ...s Data Registration 3 Press Set 4 Use or to select 4 RX SETTINGS 5 Press Set then use the or to display the item you want to set or change Data Registration R E G I S T R A T I ON 1 D A T A R E G S T...

Page 305: ...gs before the FAX begins receiving 2 TIMES 1 to 99 4 MAN AUTO SWITCH When the receive mode is set to MANUAL MODE this setting determines if the FAX switches to fax receive mode after it rings for a sp...

Page 306: ...ta Registration 3 Press Set 4 Use or to select 5 PRINTER SETTINGS 5 Press Set then use the or to display the item you want to set or change Data Registration R E G I S T R A T I ON 1 D A T A R E G S T...

Page 307: ...oading in the paper cassette CUSTOM1 LONG CUSTOM2 SHORT MP TRAY Select the size of paper you are loading on the multi purpose tray If you select CUSTOM here you can select from CUSTOM1 LONG and CUSTOM...

Page 308: ...ss Data Registration 3 Press Set 4 Use or to select 6 POLLING BOX 5 Press Set then use the or to display the item you want to set or change Data Registration R E G I S T R A T I ON 1 D A T A R E G S T...

Page 309: ...o protect the polling box settings 0000 to 9999 TX PASSWORD Enter a 20 digit max standard ITU T password ERASE AFTER TX Tell the FAX L360 how to handle the document after it is polled and sent ON OFF...

Page 310: ...Data Registration 3 Press Set 4 Use or to select 7 SYSTEM SETTINGS 5 Press Set then use or to display the item you want to set or change Data Registration R E G I S T R A T I ON 1 D A T A R E G S T R...

Page 311: ...00 to 9999 2 RX RESTRICTION Restricts reception of faxes to the numbers registered for speed dialling on your FAX See page 10 10 OFF ON If you select ON you can select additional sub settings 3 DATE S...

Page 312: ...Settings 7 COUNTRY SELECT Select the country where you are using FAX L360 to automatically switch the selectable settings and the default settings to suit the selected country UK GERMANY FRANCE ITALY...

Page 313: ...15 18 The Menu System Chapter 15...

Page 314: ...ecifications The specifications for the FAX L360 are listed in this section General A 2 Plain Paper Fax A 4 Copier A 6 Telephone A 7 Printer A 8 Printable Area Papers A 9 Printable Area Envelopes A 10...

Page 315: ...displays memory used Uses direct transmission when memory is full Liquid crystal display 20 2 Display languages ENGLISH FRENCH SPANISH GERMAN ITALIAN DUTCH FINNISH PORTUGUESE NORWEGIAN SWEDISH DANISH...

Page 316: ...Specifications Appendix A Specifications A 3 Applicable standards Electrical safety GS Radiation CISPR Pub 22 Class B PTT Energy Star compliant CE Marking Interface USB...

Page 317: ...mum Automatic document feed 216 355 9 mm Manual document feed 216 mm Approx 1 m Minimum Automatic document feed 148 105 mm Manual document feed 148 105 mm Document thickness Automatic document feed 0...

Page 318: ...inting Recording paper size A4 210 297 mm Letter 8 5 11 in Legal 8 5 14 in Custom1 216 317 mm to 216 340 mm Custom2 216 254 mm to 216 270 mm Recording paper weight 64 90 g m2 Fax printing speed Approx...

Page 319: ...ansactions Non delivery report TTI Transmit Terminal Identification Toner saver Economy mode for printing received faxes approximately 1 5 times the cartridge life Resolution 600 600 dpi The FAX L360...

Page 320: ...AX TEL switchover Answering machine connection CNG detecting signal Telephone connection Optional handset connection Remote reception by telephone Default reception ID 25 Tone button Redial Pause butt...

Page 321: ...14 in Custom1 216 317 mm to 216 340 mm Custom2 216 254 mm to 216 270 mm Envelope sizes European DL envelope 220 110 mm U S Commercial No 10 envelope 9 5 4 1 in Media type Plain paper Envelope Europea...

Page 322: ...he following figure shows the printable area for papers Printable area A4 size Letter size Legal size a 210 mm b Max 4 0 mm c Max 5 0 mm d 297 mm e Max 4 0 mm f Max 10 0 mm a 8 5 b Max 0 24 c Max 0 28...

Page 323: ...igure shows the printable area for envelopes Printable area For some envelope types the edges of the envelope can not be printed on European DL U S Commercial No 10 a 110 mm b Max 4 0 mm c Max 4 0 mm...

Page 324: ...llowing illustrations show the largest and smallest documents you can feed into the FAX L360 A MAXIMUM OF 32 MINUTES FOR EACH PAGE OR APPROX 1 METRE IN LENGTH A MAXIMUM OF 32 MINUTES FOR EACH PAGE OR...

Page 325: ...below shows how much of a A4 letter or legal size document the FAX L360 scans when faxing or scanning The margins of 3 0 mm on both sides of the sheet and 4 0 mm on the top and bottom are outside the...

Page 326: ...Windows Me A 150 MHz Pentium processor or higher Windows 2000 A 133 MHz Pentium processor or higher Windows XP A 233 MHz Pentium processor or higher At least 32 MB of RAM for Windows 98 Me 64 MB of R...

Page 327: ...A 14 Specifications Appendix A...

Page 328: ...ndset to the FAX L360 B 1 Appendix B Attaching the Optional Handset to the FAX L360 This section describes how to attach the optional handset to your FAX L360 unit Handset B 2 Attaching the Handset to...

Page 329: ...formation on purchasing this option Please note that the shape of your handset may differ from the one shown in this section However both handsets have exactly the same functions and performance Make...

Page 330: ...dset to the FAX L360 B 3 Attaching the Handset to Your Unit To attach the handset to your unit follow these steps 1 Use a screwdriver to remove the two covers on the left side of the FAX L360 2 Remove...

Page 331: ...dle in the holes on the unit If you have difficulty inserting the plugs turn the unit so that the left side is facing you and the right side is placed against a wall This will allow you to insert the...

Page 332: ...the FAX L360 Appendix B Attaching the Optional Handset to the FAX L360 B 5 5 Connect the handset cord to the input jack marked at the left side of the unit When carrying the unit do not lift it by the...

Page 333: ...e type of handsets you can connect is different depending on the area you use your FAX L360 Maintaining Your Handset Follow these guidelines to maintain your handset in top working condition Do not le...

Page 334: ...Country Appendix C Default Settings for Each Country C 1 Appendix C Default Settings for Each Country Default Settings for Each Country C 2 UK GERMANY FRANCE IRELAND C 3 AUSTRALIA NEW ZEALAND HONG KO...

Page 335: ...tings for Each Country Appendix C Default Settings for Each Country The default settings in the menus depend on the country you have purchased the FAX L360 For details on each setting see Chapter 15 T...

Page 336: ...MING RING RING COUNT MAN AUTO SWITCH F T RING TIME REMOTE RX REMOTE RX ID MEMORY RX RX PAGE FOOTER ON FAX ONLY MODE OFF 2 OFF 15SEC ON 25 ON OFF ON FAX ONLY MODE OFF 2 OFF 15SEC ON 25 ON OFF ON FAX ON...

Page 337: ...MIN ON ON 2SEC ON 2 2MIN ON ON 2SEC ON 2 2MIN ON RX SETTINGS ECM RX RX MODE INCOMING RING RING COUNT MAN AUTO SWITCH F T RING TIME REMOTE RX REMOTE RX ID MEMORY RX RX PAGE FOOTER ON FAX ONLY MODE OFF...

Page 338: ...Standards D 3 Connecting the Telephone Line Cord D 3 Connecting a Telephone D 4 Connecting an Answering Machine D 4 Customer Support D 5 Australia D 6 For your safety D 6 Telstra FaxStream Duet D 6 S...

Page 339: ...o connect them as follows Ringer Equivalence Number R E N Your British Telecom line has a maximum R E N capacity of 4 Your FAX has an R E N value of 1 unless otherwise stated and so does the optional...

Page 340: ...n CISPR Pub 22 Class B Other PTT Energy Start compliant CE Marking Telefax Standard DTS Connecting the Telephone Line Cord Follow the procedure below to connect the telephone line cord THIS JACK DOES...

Page 341: ...ne By connecting an answering machine to the same telephone line jack on the wall as the FAX you can not only receive documents from another fax but also receive voice calls If you use an answering ma...

Page 342: ...s Appendix D Country specific Features D 5 Customer Support If you cannot solve the problem or if you think your FAX needs servicing contact to the following phone numbers or URLs Canon Hotline 0180 5...

Page 343: ...fe For your safety if in any doubt about the effective earthing of the power point consult a qualified electrician Telstra FaxStream Duet In Australia Telstra offers the FaxStream Duet capability If y...

Page 344: ...5 Press Set then use or to select NET SWITCH 6 Press Set then press Stop to return to standby mode When the RX MODE setting is set to NET SWITCH no other receive mode can be selected with the Receive...

Page 345: ...ed below When you hear the telephone call ring pattern Pick up the handset and talk normally If you hear a slow beep it means the call is from a fax machine trying to send a fax Press Start Copy to re...

Page 346: ...nearest service agent 4 To relocate this equipment please 1 Disconnect the equipment from the Telecom connection 2 Disconnect the equipment from the power source 3 Reconnect the equipment to the powe...

Page 347: ...ay at the caller s end Contact Telecom for connection information Setting the FAX L360 for Network Switch Follow this procedure to set the receive mode to NET SWITCH 1 Open One Touch Speed Dial panel...

Page 348: ...receive calls however the unit will respond slightly differently as described below When you hear the telephone call ring pattern Pick up the handset and talk normally If you hear a slow beep it means...

Page 349: ...D 12 Country specific Features Appendix D...

Page 350: ...binary bits and 1 parity bit Auto FAX TEL switching See FAX TEL switching Automatic dialling Dialling fax or telephone numbers by pressing one or three buttons To use automatic dialling you must regis...

Page 351: ...ommittee for International Telegraph and Telephone CCITT has been replaced by the International Telecommunications Union Telecommunications sector ITU T a committee created to set international standa...

Page 352: ...n of 600 dpi Dual access Multitasking Enables the FAX L360 to receive a fax even if it is copying or printing a document Also enables you to load other faxes into memory make copies print out reports...

Page 353: ...t of data that needs to be transmitted thus reducing transmission time G3 fax machines can transmit one page in less than one minute Encoding schemes for G3 fax machines are Modified Huffman MH Modifi...

Page 354: ...your FAX L360 used to connect the FAX L360 to the telephone line answering machine handset or telephone M Manual receiving A method of receiving faxes in which you answer all incoming calls using the...

Page 355: ...eration panel marked the same as a standard telephone keypad Press them to perform regular dialling You also use the numeric buttons to enter numbers and letters when you register numbers and names an...

Page 356: ...n the paper On this unit the printing area varies depending on the type of paper being used Printer driver The printer driver allows you to use the FAX L360 as a printer for your PC with Windows 98 Wi...

Page 357: ...o receive fax documents in many ways Receive fax documents only FAX ONLY MODE Receive both telephone calls and fax documents on the same line Fax Tel Mode Receive telephone calls and fax documents man...

Page 358: ...reception Report A document printed by the FAX L360 and containing information about the faxes it has sent or received Resolution The density of dots for any given output device Expressed in terms of...

Page 359: ...e and sent over telephone lines in the form of electrical pulses to another facsimile machine Also called TX or Transmit Sending speed The rate at which faxes are transmitted through the phone line Se...

Page 360: ...graphic mechanism Toner saver You can enable or disable economy printing toner saving feature By enabling the ECONOMY PRT setting toner consumption can be decreased by as much as 30 40 percent resulti...

Page 361: ...G 12 Glossary...

Page 362: ...FaxStream Duet D 6 AUTO REDIAL description 6 26 message 13 38 setting 15 8 Automatic document feed document requirements 6 3 loading documents 6 7 selecting 6 6 Automatic Document Feeder ADF 2 21 add...

Page 363: ...ting answering machine 2 15 optional handset 2 15 power cord 2 16 telephone 2 15 telephone line 2 14 Contrast DARKER 6 14 LIGHTER 6 14 setting 6 14 STANDARD 6 14 Conventions type 1 9 Copying 11 2 feat...

Page 364: ...6 24 requirements 6 3 scanning area 6 5 sending 6 18 size 6 3 stored in memory 7 13 8 2 thickness 6 3 trouble with multipage 6 9 weight 6 3 Document feed automatic 6 3 6 6 6 7 lever 2 24 6 6 manual 6...

Page 365: ...1 3 plain paper fax 1 3 printer 1 4 telephone 1 5 Feeding paper Fixing assembly 2 22 Front cover 2 21 2 22 problems 13 21 G Group dial list sample 12 13 Group dialling 5 2 5 23 creating groups 5 23 d...

Page 366: ...ial 12 9 12 13 one touch speed dial 12 9 12 11 speed dialling 12 8 user s data 12 14 LOAD PAPER message 7 13 Loading documents 6 7 6 11 multi purpose tray 2 37 4 12 recording paper 2 37 4 12 Location...

Page 367: ...3 7 14 N Name changing 5 7 5 17 registering your 3 10 New Zealand FaxAbility D 10 NO RX PAPER message 13 43 NO TEL message 13 43 NOT AVAILABLE message 13 43 Numbers changing 5 7 5 17 entering 3 2 sto...

Page 368: ...9 6 canceling polling box setup 9 13 changing polling box setup 9 11 to receive 9 3 POLLING BOX accessing the menu 15 13 15 14 setting 9 6 Power cord 2 5 connecting 2 16 Power cut 13 37 Power switch 2...

Page 369: ...setting 15 8 Redial Pause button explanation 2 25 Redialling 6 26 cancelling 6 27 manual 6 26 setting up 6 28 Reduction when copying 11 2 11 3 Registering access number 10 2 access type 10 2 date 3 9...

Page 370: ...6 S Safety instructions 1 11 SCAN CONTRAST setting 15 4 Scanning area 6 5 cleaning components 14 6 contrast 6 13 6 14 resolution 6 13 SCANNING P nnnn message 13 45 Search buttons explanation 2 28 Sele...

Page 371: ...upport trays 2 5 2 21 attaching 2 12 Switchboard dialling through 10 2 SYSTEM SETTINGS menu accessing 15 15 description 3 6 setting 15 16 T TEL LINE TYPE setting 15 4 TEL REGISTRATION menu description...

Page 372: ...3 6 13 UK B T adaptor D 2 UN LOCK PHONE setting 10 8 15 16 unable to solve 13 2 Unit assembling 2 10 cleaning 14 2 components 2 5 2 21 dimensions 2 4 front view 2 21 inside view 2 22 lifting 2 6 main...

Page 373: ...I 12 Index W Weight document 6 3 paper 4 2...

Page 374: ......

Reviews: