


119
Figure 4-49
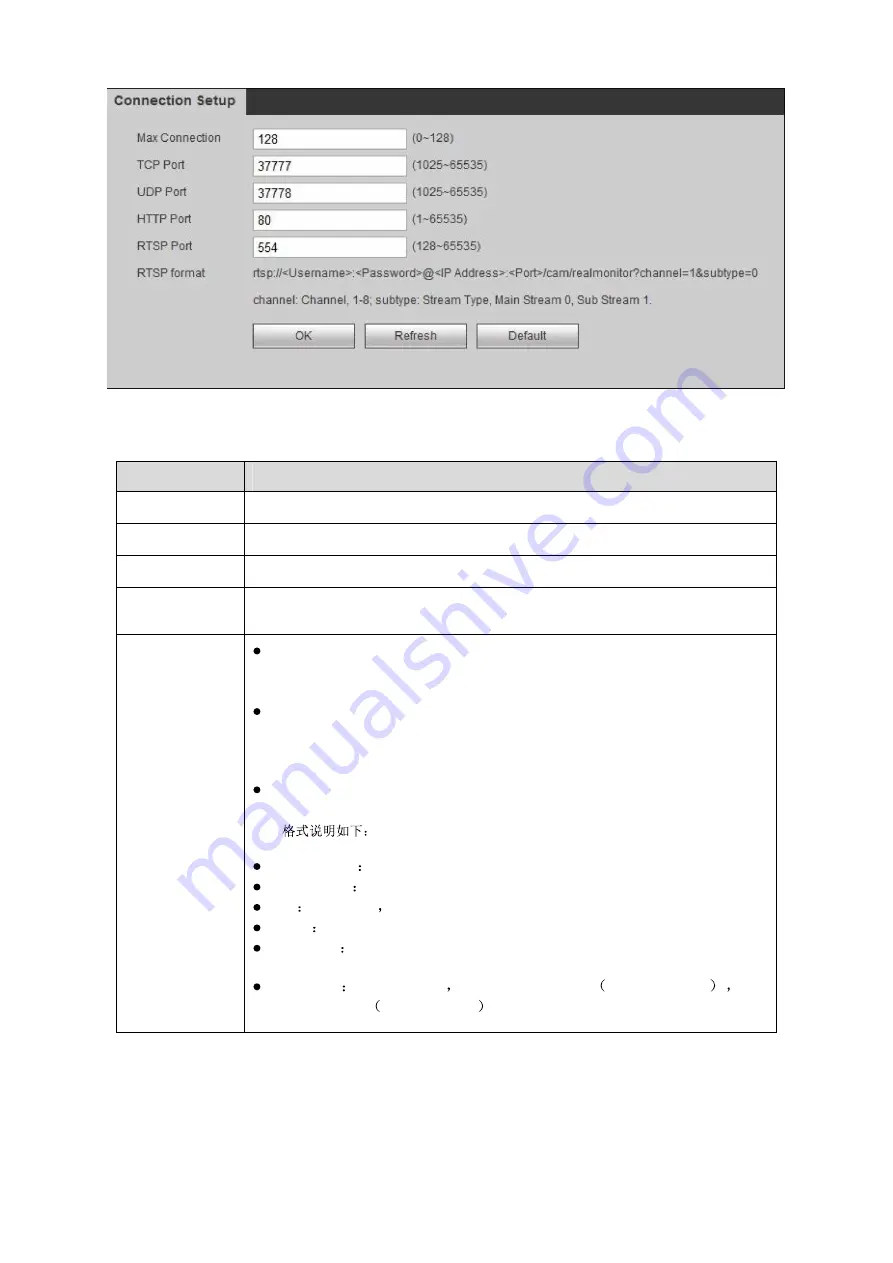
Step 2. Set port value.
Parameter
Note
Max Connection
The number of clients allowed to log in at the same time (for example, WEB client, platform
client, mobile client, etc.). The default value is 128.
TCP Port
TCP protocol port to provide communication services, according to the actual needs of users,
the default is 37,777.
UDP Port
User packet protocol port, according to the actual needs of the user settings, the default is
37,778.
HTTP Port
HTTP communication port can be set according to the actual needs of the user, the default is
80, if set to other values, use the browser login need to add a modified port number after the
address.
RTSP Port
RTSP port number is 554 by default. The following formats can be
used to play back real-time monitoring using QuickTime or VLC in
Apple's browser. Blackberry also supports this feature.
Live stream URL format, request real-time monitoring streaming
RTSP streaming media services, the URL should be specified in the
request channel number, stream type, if you need authentication
information, you also need to provide a user name and password.
Users to use the BlackBerry to access, the need to stream encoding
mode is set to H.264B, resolution is set to CIF, and turn off the audio.
URL
rtsp://username:password@ip:port/cam/realmonitor?channel=1&subtype=0
Username username,such as admin.
password password, such as admin.
ip device IP such as 10.7.8.122.
port Port number, the default is 554, if the default can not fill out.
channel
Channel number, starting with 1. For channel 2, channel =
2.
subtype
stream type
main stream is 0
as subtype=0
sub
stream as 1 as subtype=1 .
Note:
Except max connection, after you modify other parameters, you shall reboot device.
Summary of Contents for KSC-USB-NET
Page 1: ...i Video Matrix Platform V 2 0 0 ...
Page 4: ...iv 5 DSS OPERATION 169 6 FAQ 170 6 1 FAQ 170 6 2 Maintenance 173 APPENDIX A MOUSE CONTROL 174 ...
Page 34: ...28 Figure 3 9 Switch to input device list Please see Figure 3 9 ...
Page 37: ...31 Figure 3 12 Step 2 Click add You will see Figure 3 13 Figure 3 13 ...
Page 70: ...64 Figure 3 54 Buzzer Buzzer rings when motion detection alarms 3 2 4 6 2 Video Loss ...
Page 74: ...68 Display is shown below as in Figure 3 59 Figure 3 60 and Figure 3 61 Figure 3 59 ...
Page 75: ...69 Figure 3 60 ...
Page 88: ...82 Figure 3 80 Click Add to add new Raid Select corresponding level Figure 3 81 ...
Page 139: ...133 Figure 4 68 Figure 4 69 ...
Page 148: ...142 Figure 4 81 Select slot and channel OSD Custom Step 1 Check Custom OSD see Figure 4 82 ...
Page 173: ...167 ...
Page 174: ...168 ...
Page 182: ......
Page 183: ......
Page 184: ......
Page 185: ......
Page 186: ......
Page 187: ......
Page 188: ......