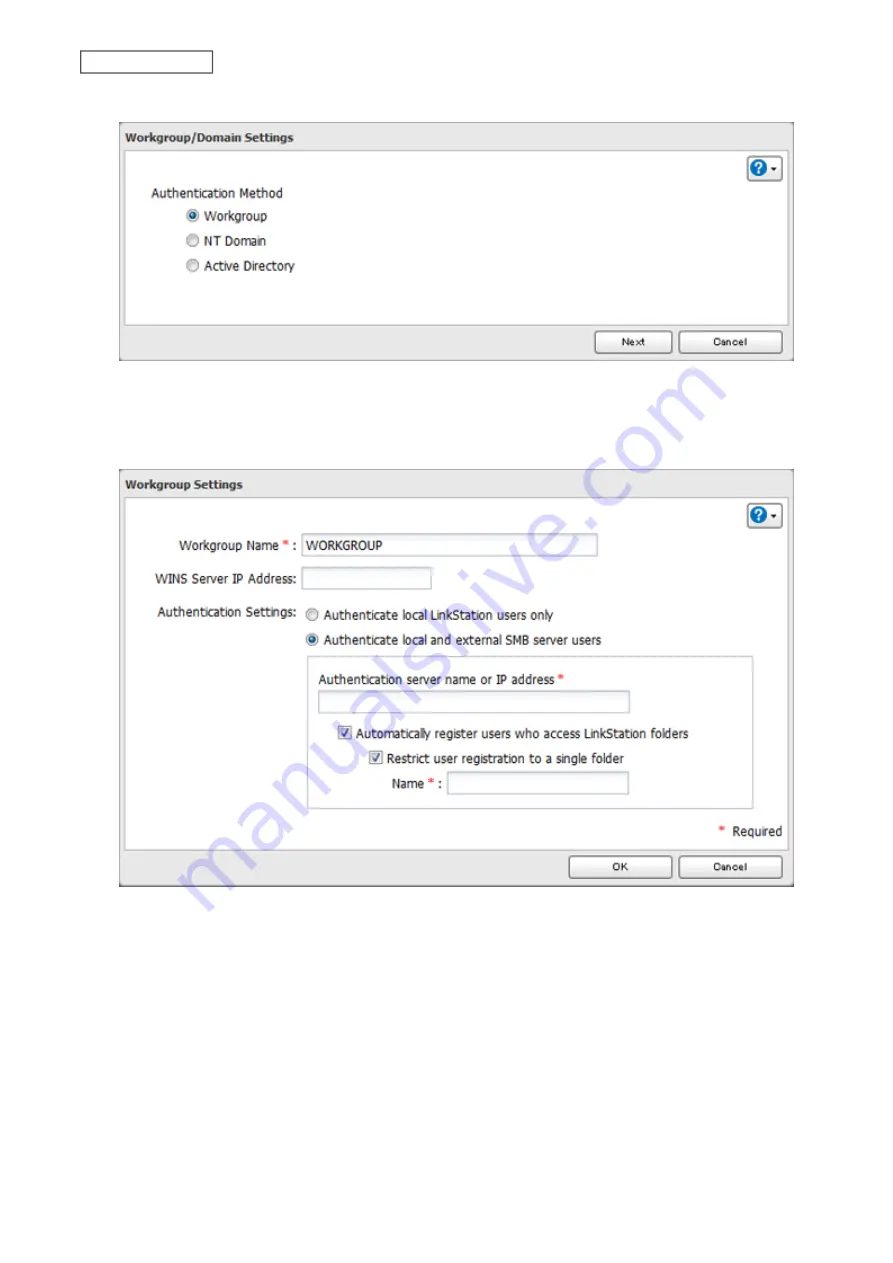
4
Select “Workgroup”, then click
Next
.
5
Click
Yes
.
6
Enter a workgroup name. Select “Authenticate local and external SMB server users” and enter the SMB server’s
IP address. You can also specify a server from another subnet.
7
If “Automatically register users who access LinkStation folders” is checked, users that access any of the
LinkStation’s folders will be automatically registered as external users. This process only applies with folders
that have access restrictions disabled. After new external users are added, disable this option to limit the
number of authenticated user accounts.
If “Restrict user registration to a single folder” is checked, the LinkStation will automatically create a read-
only shared folder. Enter the shared folder name. Users that access this specific folder will be automatically
registered as external users. If this setting is de-selected at a later time, the LinkStation will automatically
delete the folder.
Note:
Connect to the authentication folder via SMB, not FTP or AFP. Automatic user registration may not
work with macOS 10.8 (or later) the first time. If this occurs, try rebooting the LinkStation, then access the
authentication shared folder again.
32
Chapter 3 File Sharing
Summary of Contents for LinkStation 200B
Page 24: ...3 Click Add Group 23 Chapter 3 File Sharing...
Page 60: ...4 Enter the backup password and click OK 5 Click Create New Job 59 Chapter 6 Backup...
Page 67: ...6 Click Time Machine 66 Chapter 6 Backup...
Page 68: ...7 Click Select Backup Disk 8 Select the shared folder then click Use Disk 67 Chapter 6 Backup...
Page 85: ...4 Select the desired Ethernet frame size and click OK 84 Chapter 8 Advanced Features...
Page 89: ...2 Tap Create User 88 Chapter 9 Configuring from Mobile Devices...
Page 100: ...3 Tap NAS Setup 99 Chapter 9 Configuring from Mobile Devices...
Page 104: ...6 Enter the BuffaloNAS com name and tap Set 103 Chapter 9 Configuring from Mobile Devices...


