background image

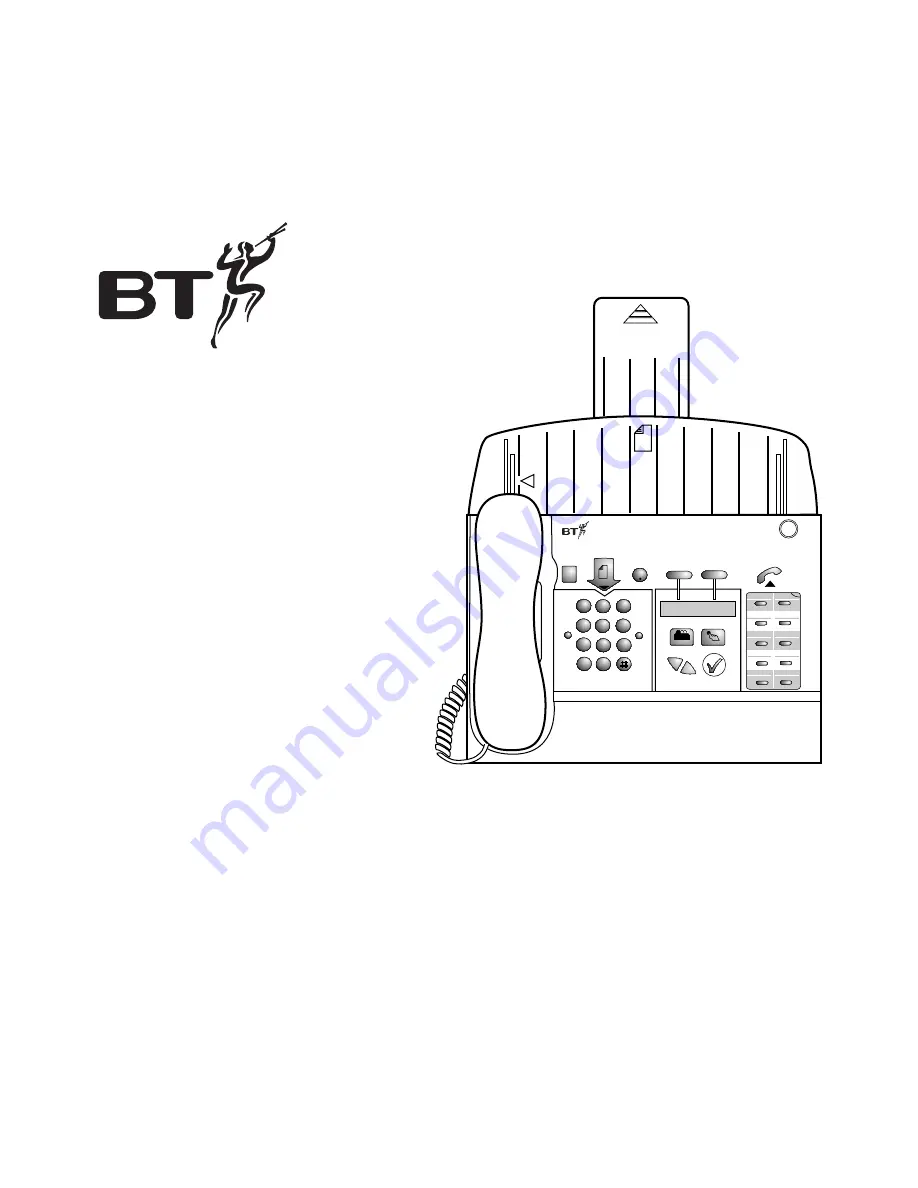
Image 350 combined fax,
copier and telephone

User guide

STOP

FAX

BACK

PUSH

TO

OPEN

Call Return

Call Divert

START

DIRECTORY

REDIAL

SET UP

RECEIVE

MODE

1

2

AB

C

3

DE

F

5

JKL

6

MN

O

8

TUV

9

WX

Y

Z

0

4

GH

I

7

PQR

S

P

R

1

2

3

4

7

8

9

10

5

6

Image 350

Combined Fax Copier & Telephone

Summary of Contents for IMAGE 350

Page 1: ...one User guide STOP FAX BACK PUSH TO OPEN Call Return Call Divert START DIRECTORY REDIAL SET UP RECEIVE MODE 1 2 AB C 3 D E F 5 JK L 6 M N O 8 TU V 9 W X Y Z 0 4 G H I 7 PQ R S P R 1 2 3 4 7 8 9 10 5 6 Image 350 Combined Fax Copier Telephone ...

Page 2: ...Please open this page for an at a glance guide to your Image 350 fax machine ...

Page 3: ...ment from a fax machine set ready for polling START Press to begin sending or copying a document STOP Press to stop faxing or copying Also takes you back to standby mode during programming REDIAL Redials phone and fax numbers SET UP Use to enter sub menus when changing fax settings RECEIVE Use to access the receive mode MODE options DIRECTORY Stores up to 40 names phone and fax numbers Moves the c...

Page 4: ... paper Automatic document feeder Holds up to 5 pages ready to be faxed Keypad Use to dial numbers and to enter names and numbers in the memory Handset Paper support Supports paper in the paper holder Open button Press to open the front panel when accessing the document scanner unit or inserting a new print ribbon Display Displays names telephone and fax numbers One touch panel Stores ten one touch...

Page 5: ...ne 25 Additional features 29 Help 43 Technical specification 51 Technical information 52 Index 54 Hints and tips boxes In this user guide we ve included helpful tips and useful notes They are shown in grey boxes Customer Helpline If you have problems with your Image 350 call the BT Helpline on Freefone 0800 854 726 ...

Page 6: ...ervice Please read these instructions carefully before use and keep this user guide for future reference For your records Date of purchase Place of purchase Serial number on base of unit Purchase price Proof of purchase is required for warranty purposes so please keep your receipt Introduction Customer Helpline If you have problems with your machine call the Image 350 Helpline on Freefone 0800 854...

Page 7: ...pFollow these steps to get your Image 350 up and running and ready to use Electrical storm warning We advise you to disconnect your Image 350 during electrical storms as it may be damaged If a fault occurs during the 12 month warranty period due to accidental or wilful damage including lightning and electrical damage BT will not replace or repair the equipment free of charge If any damage of this ...

Page 8: ...pening the front panel will reveal the document scanner unit Push up the green buttons marked 1and 2 8 Setting up Once the front panel is open take care not to touch the optical scanner as this can result in poor quality outgoing faxes and copies A 20m starter print ribbon is included with your Image 350 however when it needs replacing a 60m ribbon should be used A 20m ribbon will print about 53 A...

Page 9: ... end of the front roll into which the spigot must be inserted has two grooves cut into it Insert the spigot right up to the shoulder making sure the keys fit into the grooves Open the document scanner unit by pulling it forward as shown below Remove the print ribbon from it s packaging and insert the cog and the spigot supplied into the front roll as shown below Insert the cog here Insert the spig...

Page 10: ...same side as the cog inside the print ribbon compartment Insert the fully assembled print ribbon into the print ribbon compartment inside the base unit as shown below Place the end of the back roll over the spring loaded green spindle inside the compartment Push the print ribbon up against the spindle 1 and lower the other end of the ribbon into the compartment 2 Spring loaded green spindle Print ...

Page 11: ...cket on the handset Plug the handset cord into the socket on the base unit If you feel any resistance when closing the document scanner unit check that the front ribbon roll is fully inserted 3 Plug the telephone line cord into the main unit 4 Plug your Image 350 into the BT socket If you do not have a BT socket call Freefone 0800 800 150 and ask for a BT engineer to come and fit the correct socke...

Page 12: ...297mm Extend the paper support Insert the paper as shown below STOP FAX BACK PUSH TO OPEN Call Return Call Divert START DIRECTORY REDIAL SET UP RECEIVE MODE 1 2 AB C 3 DE F 5 JK L 6 M N O 8 TU V 9 W X Y Z 0 4 G H I 7 PQ R S P R 1 2 3 4 7 8 9 10 5 6 If your image 350 is connected to the mains power supply before paper is inserted into the paper holder it will beep three times and the display will s...

Page 13: ...utton until the letter you want is shown For example to enter the name JOHN Press the 5 button until display shows J Press the 6 button until O is shown Press the 4 button until H is shown Press the 6 button until N is shown When you have entered your name press the button the display shows ENTER FAX NO Using the keypad enter your fax number You can enter a number of up to 20 digits When you have ...

Page 14: ...button display shows SENDER ID Press the or buttons until the display shows CALL BACK TEL NO Press the button display shows the currently set call back number if one has been previously set 14 Setting up SET UP Using the keypad enter your call back telephone number You can enter a number of up to 20 digits When you have entered your call back telephone number press the button to confirm the new en...

Page 15: ...the new date and time setting After each digit is entered the cursor will automatically move on to the next digit space SET UP When the correct date and time is shown in the display press the button to confirm the new setting The display shows USER DATA Press the STOP button twice to return to standby mode Use the button to move forward through the display Use the button to delete characters If yo...

Page 16: ...ay shows DIAL MODE Press the button display shows DIAL MODE Press the button display shows TONE Press the or buttons to change between TONE and PULSE When the setting you require is shown in the display press the button to confirm the new setting Press the STOP button four times to return to standby mode The T P T TONE P PULSE selector on the underside of your Image 350 base unit must also be swit...

Page 17: ... call and receive the fax 12 Setting the receive mode Your Image 350 answers calls and receives faxes in one of four modes MANUAL AUTOFAX TEL FAX or ANS FAX To change the receive mode The currently set receive mode is shown in the the display Press the RECEIVE MODE button until the setting you want is shown in the display The available options are MANUAL AUTOFAX TEL FAX ANS FAX The option displaye...

Page 18: ...an try again by lifting the handset or pressing the button then pressing the REDIAL button Setting the speaker volume Your Image 350 has an in built speaker for use when dialling hands free or monitoring the progress of a call The speaker has three available settings Low Medium and High To set the volume Press the button the display will show IN USE Press the button to increase the speaker volume ...

Page 19: ...9 W X Y Z 0 4 G H I 7 PQ R S P R 1 2 3 4 7 8 9 10 5 6 For example to enter the name JOHN Press the 5 button until display shows J Press the 6 button until O is shown Press the 4 button until H is shown Press the 6 button until N is shown Press the button to confirm your entry the display shows ENTER FAX NO The display will then clear for you to enter a fax number You can now enter the fax number a...

Page 20: ...edited the name press the button display shows EDIT FAX NO followed by the fax number You can now edit the fax number When you have edited the fax number press the button display shows EDIT TEL NO followed by the telephone number You can now edit the telephone number When you have edited the number press the button display shows SELECT BUTTON You can now edit further entries or return to standby m...

Page 21: ...e associated fax and telephone numbers are automatically deleted SET UP Directory names and numbers You can store up to 40 names in alphabetical order along with their associated fax and telephone numbers The names can be recalled to the display for dialling If you re making a phone call the telephone number is dialled if you have inserted a document ready to send the fax number is dialled To stor...

Page 22: ...y where you need to insert a pause press the PAUSE button The display will show Continue to store the rest of the number as normal P Using the telephone 22 DIRECTORY Press the 6 button until O is shown Press the 4 button until H is shown Press the 6 button until N is shown Press the button to confirm your entry the display shows ENTER FAX NO you can now enter a fax number Use the keypad to enter a...

Page 23: ...t the name Use the button to move forward through the display Use the button to delete characters If you pause for more than one minute when entering your ID name number and call back number your Image 350 will revert to standby mode and the changes will not be saved When the name shown has been edited press the button display shows EDIT FAX NO followed by the fax number Use the keypad and the and...

Page 24: ... display shows SELECT ENTRY Use the keypad and the and buttons to select the entry you want to delete When the entry you want to delete is displayed press the button display shows DELETE ENTRY Press the button the entry is deleted and the display shows DELETE ENTRIES You can now choose to delete further entries or press the STOP button twice to return to standby mode When deleting an entry the nam...

Page 25: ...to suit the way you work The most commonly preferred settings are pre selected as standard You can alterorchoose new settings as desired Warning do not try to send or copy documents which are still wet with ink or correcting fluid very thick or very thin paper should be between 70 90 gsm for best results stapled or clipped together torn folded crumpled or with punched holes on carbon paper or glos...

Page 26: ...t the entry you want to dial Press the START button Your fax is sent automatically To redial the last number Your Image 350 will redial a fax number for you Load the document Press the REDIAL button the display shows the last number dialled The number is dialled automatically To stop a fax you are sending If you choose you can stop a fax during transmission Press the STOP button once to halt the t...

Page 27: ...ocument will be copied and printed automatically Press the STOP button to halt copying To receive a fax Your Image 350 is pre set to AUTO FAX which means it is ready to receive faxes automatically Remember to make sure there is paper in the automatic sheet feeder When a call is received your Image 350 display shows CONNECTING The fax is received and printed After the last sheet is printed your Ima...

Page 28: ...time Set the time you want the document to be sent using the keypad When you have entered the time press the button display shows ENTER FAX NO Enter the fax number to which the delayed fax is to be sent Press the button to confirm the setting display shows SET DELAYED TX and the transmission time you have set To cancel delayed fax setting Press the STOP button display shows CANCEL DEL TX Press the...

Page 29: ...es photographs or drawings which contain colours or varying shades of grey To change the resolution for individual faxes Insert the document to be sent Press the SET UP button display shows SET RESOLUTION Press the button display shows NORMAL Use the or buttons to change the RESOLUTION setting When the setting you require is shown in the display press the button to confirm the new setting display ...

Page 30: ...equired resolution is displayed press the START button to begin copying Contrast You can choose different resolution settings to ensure improved quality when sending or copying a document The available contrast settings are NORMAL DARK ORIGINAL LIGHT ORIGINAL The pre set default contrast setting for both sending and copying a document is NORMAL The contrast can be changed manually for each documen...

Page 31: ...FF Press the button to confirm the new setting Press the STOP button twice to return to standby mode SET UP SET UP Press the or buttons until the display shows SET CONTRAST Press the button display shows NORMAL You can now use the or buttons to change the CONTRAST setting When the setting you require is shown press the button to confirm it display shows DOCUMENT READY You can now send or copy the ...

Page 32: ...on Polling begins automatically Polling This allows your Image 350 to retrieve a document from another fax machine or another fax machine to retrieve a document from your Image 350 To set up a document to be polled by another machine Insert the document Press the SET UP button display shows SET RESOLUTION Press the or buttons until the display shows POLLING Press the button display shows SET POLL ...

Page 33: ...nder ID information will be printed over the top of the fax CUT OVER LENGTH In this mode if a fax is larger than A4 your Image 350 will cut off and not print the excess image area To change the incoming fax size Press the SET UP button display shows SET RESOLUTION Press the or buttons until the display shows USER SET UP SET UP Using PASSWORDS Press the SET UP button display shows SET RESOLUTION Pr...

Page 34: ... reports confirmation reports a list of names and numbers stored in the directory and a list of functions To print a list of settings This will give you a list of your Image 350 s user setable functions and their current settings Press the SET UP button display shows SET RESOLUTION Press the or buttons until the display shows PRINT OUTS Press the button display shows SETTINGS Press the button your...

Page 35: ...TOP button three times to return to standby mode SET UP To set individual transmission report Your Image 350 is pre set to automatically print out a report if a fax transaction fails If required this can be changed to print a report after every transmission TX and or every reception RX It can also be switched off completely Press the SET UP button display shows SET RESOLUTION Press the or buttons ...

Page 36: ...E REPORT You can now either press the STOP button three times to return to standby mode or press the button to get a printed report detailing the last transaction SET UP To print a list names and numbers stored in your Image 350 s telephone directory Press the SET UP button display shows SET RESOLUTION Press the or buttons until the display shows PRINT OUTS Press the button display shows SETTINGS ...

Page 37: ...se the keypad to change the ring response When the new ring response is shown press the button to confirm the setting Press the STOP button three times to return to standby mode SET UP Setting the ring response The ring response is the time that your Image 350 allows before answering a call To set the fax ring response This is the setting for use in AUTOFAX mode Press the SET UP button display sho...

Page 38: ...trying to receive faxes from abroad you may find that you need to shorten your outgoing message further To change the fax detector Press the SET UP button display shows SET RESOLUTION Press the or button until the display shows ANSWERPHONE Press the button display shows FAX DETECTION Answering machine or phone line cord BT socket Image 350 STOP FAX BACK PUSH TO OPEN Call Return Call Divert START D...

Page 39: ...tches to FAX in error you may need to change the silence detect period or switch it off To set the silence detector Press the SET UP button display shows SET RESOLUTION Press the or buttons until the display shows ANSWERPHONE Press the button display shows FAX DETECTION Press the or buttons until the display shows SILENCE DETECTOR Press the button display shows ON You can now choose to change the ...

Page 40: ...s the button display shows ON Press the or buttons to change from ON to OFF When the required setting is shown press the button to confirm it Press the STOP button three times to return to standby mode Using the recall button If you have an ordinary telephone extension to a PBX you would normally use the RECALL button to put a call on hold and transfer it to another extension The RECALL button can...

Page 41: ...ng callback During a fax transaction you can request voice contact by pressing the TEL button This will prompt the other party to pick up their handset after the last page has been sent or received If they respond to your request your Image 350 will alert you with tones and the display will show LIFT HANDSET Lift the handset to speak to the other party there may be a short delay before connection ...

Page 42: ...ramme your Image 350 to divert incoming calls to another number You can use Call Diversion to divert calls If they aren t answered within 15 seconds If your phone is engaged If they aren t answered or your phone is engaged Lift the handset or press the button Press the CALL DIVERSION button display shows 21 Follow the instructions given over the network Replace the handset or press the button Char...

Page 43: ...roblems using your Image 350 this section will give you the most common solutions Paper jam If paper should get jammed You must first remove any loose sheets from the paper holder Open the front panel as for a document jam Push up the green buttons marked 1and 2 Pull forward the document scanner unit as shown below Document scanner unit Optical scanner Button 2 Button 1 Once the front panel is ope...

Page 44: ...f sent faxes and copies are not clear your Image 350 s optical scanner may need cleaning Remove the handset press the PUSH TO OPEN button and pull the front panel open as shown below Clean the glass of the optical scanner with a cloth such as a VDU Screen Wipe or cloth dampened with a specific glass cleaning product Dry the glass carefully Do not pour or spray cleaning product onto the glass Close...

Page 45: ...off when the panel is open Open your Image 350 by pressing the PUSH TO OPEN button on the front of the main unit 45 Help PUSH TO OPEN Pull the front panel open as shown below Opening the front panel will reveal the document scanner unit Push up the green buttons marked 1 and 2 Once the front panel is open take care not to touch the optical scanner as this can result in poor quality outgoing faxes ...

Page 46: ...the print roll out of the compartment 2 Help 46 1 2 Spring loaded green spindle 1 2 Open the document scanner unit by pulling it forward as shown below The hook located at the rear of the print ribbon compartment is for use when removing the print ribbon Hook Please note When removing the print ribbon make sure to remove and save the cog and spigot from the front roll as these will need to be inse...

Page 47: ...the main unit Pull the front panel open as shown below Opening the front panel will reveal the document scanner unit Push up the green buttons marked 1 and 2 Once the front panel is open take care not to touch the optical scanner as this can result in poor quality outgoing faxes and copies A 60m replacement ribbon will print about 160 A4 sheets PUSH TO OPEN Button 1 47 Help Document scanner unit O...

Page 48: ...roll into which the spigot must be inserted has two grooves cut into it Insert the spigot right up to the shoulder making sure the keys fit into the grooves Open the document scanner unit by pulling it forward as shown below Remove the print ribbon from it s packaging and insert the cog and the spigot from your old print ribbon into the front roll as shown below Insert the cog here Insert the spig...

Page 49: ...same side as the cog inside the print ribbon compartment Insert the fully assembled print ribbon into the print ribbon compartment inside the base unit as shown below Place the end of the back roll over the spring loaded green spindle inside the compartment Push the print ribbon up against the green spindle 1 and lower the other end of the ribbon into the compartment 2 Spring loaded green spindle ...

Page 50: ...uality at far end due to line conditions 05 Sending stopped due to problem with far end If you feel any resistance when closing the document scanner unit check that the front ribbon roll is fully inserted 1 2 Help 50 06 Compatibility problems between machines STOP Stop button pressed Receiving Error code Meaning 11 Failure during call set up negotiations prior to receiving first page 12 Out of pap...

Page 51: ...t image sensor Thermal print head via transfer ribbon 60m ribbon will print approximately 160 A4 sheets 9600 7200 4800 2400 bps with automatic fallback MH and MR coding STANDARD mode 3 58 line mm FINE mode 7 7 line mm SUPERFINE mode 15 4 line mm PHOTO mode 16 grey scales Width 210 to 216mm Length 150mm to 600mm Weight 70 to 90 gsm 210mm A4 210 x 297mm Weight 70 to 90 gsm W 280mm x D 220mm x H 275m...

Page 52: ...de Auto manual answer Polling Single document feeder Fax switch Simple telephone Answer machine You may connect it To direct exchange lines To extensions with new plug and socket arrangements provided with these direct exchange lines To compatible switchboards You may NOT connect it To shared service party lines The connection to the telecommunication system must be unplugged before the earth is d...

Page 53: ...ntainer of the apparatus Difficulty may be experienced when making calls from other apparatus These difficulties in making a call problems in telephone conversation being experienced by both parties to the call Connecting to switchboards Your Image 350 is approved only for use with a compatible switchboard including those which do not provide secondary proceed indication If you do have a compatibl...

Page 54: ... Entering a pause 22 Names and numbers 21 Print out 36 Storing 21 Distinctive ring 40 Document jam 43 Error codes 50 Electrical storm warning 7 Fax detector 38 Fax machine 25 Delaying a fax 28 Loading documents 25 receiving a fax 27 Sending a fax 26 Stopping a fax 26 Fax size incoming 33 Fax ring response 37 Faxback 32 Front panel opening 8 Functions list print out 36 Hands free dialling 18 Handse...

Page 55: ...x 17 Manual 17 Tel fax 17 Recording paper Jam 43 Loading 12 Redial 18 26 Resolution fax 29 Default 29 Fine 29 Normal 29 Photo 29 Super fine 29 Resolution copy 30 REN 52 Ring response 37 Select Services 41 Sender ID 13 Silence detector 39 Speaker volume 18 Technical information 52 Technical specification 51 Time 15 Transmission report print out 35 Telephone 18 Tone 16 Volume in built speaker 18 ...

Page 56: ...services described in this publication are subject to availability and may be modified from time to time Services and equipment are provided subject to British Telecommunications plc s respective standard conditions of contract Nothing in this publication forms any part of any contract British Telecommunications plc 1997 Registered Office 81 Newgate Street London EC1A 7AJ Registered in England No ...

Reviews: