background image

20

Auto-threading device

5

1

2

3

5

2

1

1

5

3

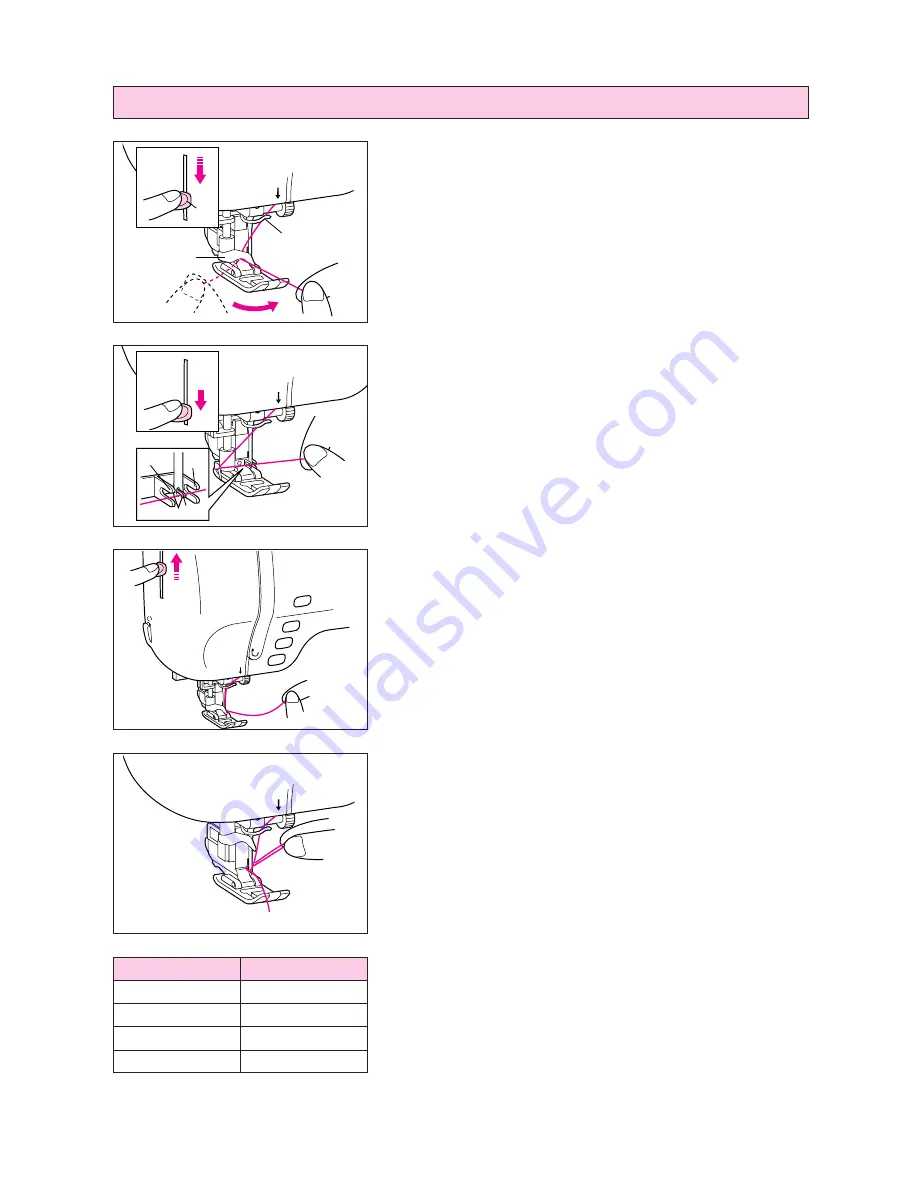
1. Guide the thread through the wire loop and gently pull the

thread towards you.

1

Needle threader lever

2

Guide (Large hook)

3

Wire loop

*

Lowering the presser foot will engage the automatic tension
and will allow you to grip the thread as you proceed.

2. Lower the needle threader lever all the way down using your

left index finger. Check that the thread is held by the guide
(large hook) and that the hook on the needle threader has
passed through the eye of the needle.

1

Second set of hooks

2

Third hook

3. As you lower the needle threader lever drape the thread to

the left and the large hook will catch the thread. When the
needle threader lever is in the lowest position, drape the
thread across the eye of the needle.

*

Rotating your right hand slightly to check that the thread is
engaged.

4. While gently holding the thread, raise the needle threader

lever.

5

5. Pull the thread towards the rear to finish the upper

threading.

6. Pass the thread underneath the presser foot and pull it out

from the rear of the machine by about 5 cm (1-15/16”).

Note

The auto-threading device cannot be used with the
combinations shown at left.
Transparent nylon thread can be used regardless of the chart
providing needle used in 90/14 to 100/16.

Needle

Thread (cotton)

65/9

#30, 50, 60

75/11

#30

90/14

#30

100/16

#20

Summary of Contents for PC-8200

Page 1: ...echanical adjustment 4 Never operate the sewing machine with any air openings blocked Keep ventilation openings of the sewing machine and foot control free from the accumulation of lint dust and loose cloth 5 Never drop or insert any object into any opening 6 Do not use outdoors 7 Do not operate where aerosol spray products are being used or where oxygen is being administered 8 To disconnect turn ...

Page 2: ...o BS 1362 i e carrying the mark rating as marked on plug Always replace the fuse cover never use plugs with the fuse cover omitted WARNING DO NOT CONNECT EITHER WIRE TO THE EARTH TERMINAL WHICH IS MARKED WITH THE LETTER E BY THE EARTH SYMBOL OR COLOURED GREEN OR YELLOW The wires in this main lead are coloured in accordance with the following code Blue Neutral Brown Live As the colours of the wirin...

Page 3: ...ler 4 Plug the machine directly into the wall Do not use extension cords For a longer service life 1 When storing your sewing machine avoid direct sunlight and high humidity locations Do not store the sewing machine beside a space heater iron or other hot objects 2 Use only neutral soaps or detergents to clean the case Benzene thinner and scouring powders can damage the case and machine and should...

Page 4: ...atic reinforcement stitching 35 2 UTILITY STITCHES 42 STRAIGHT STITCHES 42 For reinforcement or stretch fabric 43 Changing the stitch length 43 Changing the needle position 43 ZIGZAG STITCHES 44 Overcasting using a zigzag stitch 44 Applique using a zigzag stitch 44 Patchwork for crazy quilt 44 OVERCASTING 45 When using or stitches 45 When using or stitches 45 OVERCASTING When using the side cutter...

Page 5: ...ing a single color pattern when MULTI COLOR is displayed 115 Changing the stitch density for characters and some frame patterns 115 MOVING THE LOCATION LAYOUT 116 Moving the embroidery location 117 Checking the embroidering area 117 Embroidering from a specific starting point 118 Changing the pattern direction 118 Reversing patterns 119 Using the IMAGE key 119 Changing the size of characters and f...

Page 6: ... shuttle 154 CHANGING THE LIGHT BULB 156 RELATED CHART OF SEWING FABRICS THREAD AND NEEDLE 157 ERROR MESSAGES 158 Warning messages 158 Instruction messages 163 Alarms 164 TROUBLESHOOTING 165 USING THE OPERATION GUIDE KEY 165 Trouble with threads and stitches 166 Mechanical trouble 167 PATTERNS MEMORY CARD 175 One point mark embroidery pattern 175 PATTERNS PROGRAMMED IN MACHINE 171 Utility stitches...

Page 7: ...er 5 Thread cutter 6 Buttonhole lever 7 Needle threader 8 Presser foot 9 Feed dog 10 Bobbin cover 11 Feed dog adjustment lever 12 Bobbin winder device 13 Balance wheel 14 Speed range control lever A Main power switch and connectors B Accessory compartment C Selection keys Refer to page 9 D L C D Liquid Crystal Display E Operation buttons Refer to page 10 ...

Page 8: ... outlet only one way If the plug does not fit fully in the outlet reverse the plug If it still does not fit contact a qualified electrician to install the proper outlet Do not modify the plug in any way B FLAT BED ATTACHMENT WITH ACCESSORY COMPARTMENT I Tilt the lid of the accessory compartment toward you to open II Each presser foot has a symbol 1 Presser foot symbol III ACCESSORY LIST The locati...

Page 9: ...arge XA2209 001 24 Embroidery set Small SA421 X80904 102 25 Embroidery frame Small XA2174 001 26 Embroidery sheet Small XA2215 101 27 Screw 132730 251 28 Foot controller 234522 001 29 Embroidery unit 30 Hard case XA1821 001 7 OTHER INCLUDED ACCESSORIES 1 2 3 4 5 6 7 8 9 10 11 12 20 15 16 28 29 30 18 17 19 22 23 25 26 21 24 No Part Name Part Code U S A Others Use the same screw when installing both...

Page 10: ...e SA304 X59322 001 No 8 Holiday SA305 X59357 001 6 No 9 Hobby Craft SA306 X59511 001 No 10 Monogram Emblem SA307 X59567 001 No 11 Frame SA311 XA0257 001 No 12 Transportation SA312 XA0275 001 No 13 Sports Emblem SA313 XA0517 001 No 14 Large Floral SA314 XA1223 001 No 15 Cute Kids SA315 XA1325001 No 16 Dogs Cats SA316 XA1406 001 No 17 Nintendo SA317 XA1434 001 No 19 Marine SA319 XA2452 001 No 20 Pet...

Page 11: ...Y Use this key to sew alphabetical characters and other decorative stitches 3 EMBROIDERY KEY Use this key when using a memory card and when embroidering pre programmed patterns When you insert or remove the memory card from the machine the main power switch should always be turned off 4 EMBROIDERY EDIT KEY Use this key for embroidering patterns which are combinations of other patterns 5 OPERATION ...

Page 12: ...einforcement stitch The reverse stitch function stitches backward The reinforcement stitch function stitches three times in the same position See page 35 for full instructions 4 START STOP BUTTON The button illuminates green when the machine is ready to be started and while sewing or embroidering If starting is not possible it illuminates red In addition it illuminates orange when the bobbin threa...

Page 13: ...he original screen CLOSE If another screen is being displayed over the top of an advice screen for example touch this key to remove the topmost screen RETURN Touch this key to return to the previous screen END Touch this key to stop using the function CONFIRM Touch this key to start a function working About the screen NOTES All or parts of the screen may become darker or lighter at times because o...

Page 14: ...tion keys EMBROIDERY EDIT OPERATION GUIDE or MEMORY RECALL The LCD will become darker each time one of these keys is touched If you would like to make the LCD lighter touch any one of the upper three selection keys UTILITY STITCH CHARACTER DECORATIVE STITCH or EMBROIDERY 3 After you have finished adjusting turn the power off and back on again once more Adjusting the brightness of the LCD 1 Touch t...

Page 15: ...nguage Example To change the display language to Spanish 1 Touch the key 2 Touch ESPAÑOL SPANISH This will change the language setting to Spanish 3 The display will then return to the screen which was previously being displayed Note When the key is used to set the display language error messages will also be displayed in the language selected The display language can be selected from a list of 13 ...

Page 16: ... key 2 Touch the key 3 Touch the ENGLISH key This will cancel the Spanish language setting and return all screen displays and error messages to the English language CAUTION This function should not be used as a translation function If the power supply is turned off the current language setting will be retained and will not be cleared ...

Page 17: ...he spool cap closest to the thread spool size should be used to hold the spool securely on the spool pin 1 Spool cap 2 Spool 3 Spool pin The spool cap should be pushed on as far as it will go Note If using a fine thread such as cross wound thread slightly separate the spool cap small from the thread on the spool before using 1 Cross wound thread 2 Spool cap small 3 Guide the thread through the mac...

Page 18: ... end press the START STOP button Wind the thread a few times around the bobbin and press the START STOP button again Trim the excess thread from the top of the bobbin after the machine stops 6 Set the speed to maximum 7 Press the START STOP button The machine will stop automatically when the bobbin is full Press the START STOP button to stop at any time or when the bobbin has stopped moving and th...

Page 19: ...read direction as noted in the diagram 3 Guide the thread end through the slit then pull the thread toward you to cut off any excess thread 1 Built in thread cutter 1 2 4 Close the bobbin cover by placing the left end in place and pressing down lightly on the right end so that it snaps into place Sewing can begin without pulling out the bobbin thread ...

Page 20: ...esser foot is not raised the upper thread cannot be threaded 2 Press the NEEDLE POSITION button to raise the needle to the up position 3 Set the thread spool The thread end should come from the bottom front of the spool The spool cap closest to the thread spool size should be used to hold the spool securely on the spool post ...

Page 21: ...roidering with metallic thread 1 Insert the extra spool pin into the end of the bobbin winder shaft 2 Install the spool felt and the thread spool in that order and then thread the upper thread 1 Insert the extra spool pin into the end of the bobbin winder shaft 2 Spool felt 3 Thread spool When setting the thread spool set it so that the thread winds off from the front of the spool If using metalli...

Page 22: ...the needle threader lever drape the thread to the left and the large hook will catch the thread When the needle threader lever is in the lowest position drape the thread across the eye of the needle Rotating your right hand slightly to check that the thread is engaged 4 While gently holding the thread raise the needle threader lever 5 5 Pull the thread towards the rear to finish the upper threadin...

Page 23: ...e machine will run at a low speed When the pressure on the foot controller is increased the machine s speed will increase When pressure on the foot controller is released the machine will stop Care should be taken that nothing is placed on the foot controller when the machine is not in use Note For U S A only Foot controller Model J2 This foot controller can be used for sewing machine model PC 820...

Page 24: ...the stitch width Touch the stitch width setting key The stitch width setting value will increase each time you touch the key Decreasing the stitch width Touch the stitch width setting key The stitch width setting value will decrease each time you touch the key ...

Page 25: ... selection keys in the right side of the machine Touch the key on the LCD screen If you touch the CLOSE key the display will return to the previous screen Stitch length Increasing the stitch length Touch the stitch length setting key The stitch length setting value will increase each time you touch the key ...

Page 26: ...is less than 1 mm the stitch length is automatically changed to 4 0 mm at the sewing start to prevent gathering even if you set the length to 5 0 mm Sewing characters and patterns using satin stitches Press the CHARACTER DECORATIVE STITCH key from the selection keys on the right side of the machine Touch the key to adjust If you touch the CLOSE key the display will return to the previous screen ...

Page 27: ...titch 0 0 1 16 1 16 1 8 5 0 3 0 5 0 0 4 0 3 1 0 3 16 1 8 3 16 1 64 1 64 1 16 5 0 3 0 5 0 0 4 0 2 1 0 3 16 1 8 3 16 1 64 1 64 1 16 6 0 3 0 6 0 1 0 0 5 2 0 1 4 1 8 1 4 1 16 1 32 1 16 6 0 3 0 6 0 1 5 1 0 3 0 Buttonhole 1 4 1 8 1 4 1 16 1 16 1 8 7 0 3 0 7 0 0 5 0 3 1 0 1 4 1 8 1 4 1 32 1 64 1 16 Darning 7 0 2 5 7 0 2 0 0 4 2 5 1 4 3 32 1 4 1 16 1 64 1 16 Bar tack 2 0 1 0 3 0 0 4 0 3 1 0 1 16 1 16 1 8 ...

Page 28: ... 0 2 4 0 1 8 0 0 1 4 1 16 1 64 1 16 0 0 0 0 7 0 2 5 1 0 4 0 0 0 0 1 4 3 32 1 16 3 16 5 0 1 5 7 0 1 0 0 2 4 0 3 16 1 16 1 4 1 16 1 64 3 16 Lateral sewing Straight Lateral sewing Zigzag 6 0 1 5 7 0 2 5 1 5 4 0 1 4 1 16 1 4 3 32 1 16 3 16 5 0 2 0 7 0 1 6 1 0 4 0 3 16 1 16 1 4 1 16 1 16 3 16 Heirloom 5 0 1 5 7 0 4 0 1 5 4 0 3 16 1 16 1 4 3 16 1 16 3 16 3 5 1 5 7 0 3 0 1 6 4 0 1 8 1 16 1 4 1 8 1 16 3 1...

Page 29: ...spective of the chosen fabric and thread Correct tension is important because too much or too little tension will weaken your seams or cause your fabric to pucker Loosen tension by touching Weak Touch the thread tension setting key The thread tension value will decrease become weaker 1 4 2 3 1 Bobbin thread 2 Upper thread 3 Surface 4 Locks appear on surface of fabric ...

Page 30: ...sion value will increase become stronger Except UTILITY STITCH 1 Touch the TENSION key 2 Change the upper thread tension If you touch the CLOSE key the display will return to the previous screen 1 2 4 3 1 Upper thread 2 Bobbin thread 3 Reverse side 4 Locks appears on reverse side of fabric ...

Page 31: ...SITION button to raise the needle and then turn off the power 2 Raise the presser foot lever 3 While pressing the black button to the left of the presser foot holder pull the presser foot holder downward to remove it 1 3 Press the black button located at the back of the presser foot holder to release the foot 1 Presser foot holder 1 2 4 Place the presser foot pin directly below the holder end and ...

Page 32: ...ssing the black button to the left of the presser foot holder push the presser foot holder upward with both hands as far as it will go to install it CAUTION Be careful not to touch the needle during this time otherwise injury may result Changing the embroidery foot With the accessory compartment off the machine the feed dog adjustment lever can be seen on the base of the sewing machine Sliding the...

Page 33: ...d check whether the space is parallel or not 2 Flat surface Needle plate glass ruler etc If the space is not parallel then the needle is bent and should be thrown away to prevent damage to your project or to the machine 1 4 With the flat side of the needle facing the back insert the needle as far as it will go against the needle stopper Fasten the screw securely with a screwdriver 1 Needle stopper...

Page 34: ...oot 3 Touch this key to find out how to replace the needle 4 Touch this key to find out how to thread the upper thread 5 Touch this key to find out how to wind the bobbin thread 6 Touch this key to find out how to select the language 7 Touch this key to find out how to embroider 8 Touch this key to find out which thread and needle to use for different fabrics 9 Touch this key if the screen is diff...

Page 35: ...esser foot with the letter indicated 2 This indicates the pattern being selected 3 If you touch this key before sewing reverse stitches reinforcement stitches will be sewn automatically Refer to page 35 4 If you touch this key before sewing the thread will be automatically cut at the finish of sewing Refer to page 36 5 An advice screen will appear if you touch this key while sewing Refer to page 3...

Page 36: ... bobbin thread 5 3 4 Lower the presser foot Press the REVERSE STITCH button to sew a reverse stitch and then press the START STOP button The machine will start to run at slow speed 5 3 5 When sewing is completed press the REVERSE STITCH button to sew a reverse stitch 5 6 Press the THREAD CUTTER button to cut the threads 6 Cut thick thread thicker than 30 with the cutter on the side of the machine ...

Page 37: ...ng reinforcement stitch will not be sewn The fabric may be turned or adjusted required Press the START STOP button again to restart sewing 4 When sewing is completed press the REVERSE STITCH button to sew a reinforcement stitch and stop 1 Automatically stops Fabric should be placed 3 to 4 stitch lengths behind the presser foot before sewing the reinforcement stitch Touching the automatic reinforce...

Page 38: ...ad cutting is convenient for use on buttonholes bar tacking and other areas 1 START STOP 3 Press the START STOP button A reinforcement stitch will be sewn before sewing starts 4 When sewing is completed press the REVERSE STITCH button to sew a reinforcement stitch and trim the thread 1 Automatically trims the thread and stops Fabric should be placed 3 to 4 stitch lengths behind the presser foot be...

Page 39: ... Touch the BUTTONHOLE key 4 Select the desired application The stitches available and sewing procedure appears on the screen step by step 5 Touch the key to display the next part of the procedure Follow the procedure to sew the buttonhole stitches Touch the END key to return to the original screen ...

Page 40: ...38 ...

Page 41: ... key 1 Touch the key If the key is touched while the stitch is selected the following screen will be displayed 2 Touch the key to display the next part of the procedure Touch the CLOSE key to return to the original screen ...

Page 42: ...lded fabric or cardboard under the back of the presser foot Lower presser foot and continue stitching Sewing curves 5 3 Sewing a curve with a straight stitch Sew slowly while keeping the seams parallel with the fabric edge as you guide the fabric around the curve 6 For short stitches which are less than 0 5 cm 3 16 Before you begin to sew set a basting thread at the corner point When you change di...

Page 43: ...en raise the presser foot and carefully turn the fabric while keeping it level with the presser foot Lower the presser foot and continue sewing Sewing thin fabric 5 3 Place thin paper or stabilizer material under the fabric and then start sewing Use a straight stitch foot optional accessory item SA108 or X80823001 to eliminate any puckering Remember to select the center needle position Additional ...

Page 44: ...reverse sewing 5 3 2 Sew at slow speed near the end and then press the REVERSE STITCH button to sew a reinforcement stitch and stop 3 Cut the thread by pressing the THREAD CUTTER button When the automatic thread cutting and automatic reinforcement stitch are preset reinforcement stitches will be sewn automatically at the start of sewing Press the REVERSE STITCH button to sew a reinforcement stitch...

Page 45: ...iginal length 2 5 mm 1 3 Shorter For thin material which is less than 1 mm 1 16 the stitch length will be set to 4 0 mm 3 16 automatically during sewing even if you set the length to 5 0 mm 3 16 Changing the needle position 1 2 3 Touch the and stitch width setting keys to adjust the needle position 1 Left needle position 0 mm 0 2 Center needle position 3 5 mm 1 8 3 Right needle position 7 0 mm 1 4...

Page 46: ...point Overcasting using a zigzag stitch 5 Attach the applique using adhesive or basting then sew it Sew a zigzag stitch while positioning the right hand needle drop point just outside the edge of the fabric Applique using a zigzag stitch 5 3 Turn back the desired width of fabric and position it over the lower fabric then sew so that the stitch bridges both pieces of fabric 1 Upper fabric 2 Lower f...

Page 47: ...he thread automatically at the finish of sewing CAUTION After the stitch width has been adjusted turn the balance wheel by hand and check that the needle does not touch the presser foot If it does touch the needle may break and injury could result When using or stitches Attach presser foot J and let the needle drop slightly past the edge of the fabric before starting sewing When the automatic thre...

Page 48: ...essing the black button to the left of the presser foot holder pull the presser foot holder downward to remove it 5 3 2 1 4 Set the screw of the needle into the fork of the operating lever 1 Screw of the needle 2 Operating lever Make sure that the screw is held firmly by the fork 5 3 5 With the presser foot raised align the presser foot holder screw hole directly with the notch in the side cutter ...

Page 49: ...by hand to check that the needle does not touch the side cutter If the needle touches the side cutter it may cause the needle to break When sewing straight stitches only The seam margin should be about 0 5 cm 1 Seam margin Make sure that you touch the key when using the side cutter Clean the side cutter after use otherwise dust and scraps of thread will build up on it Add a small amount of oil as ...

Page 50: ...just the needle position using the stitch width setting keys so that needle slightly catches the fold of the hem and then sew the fabric 1 Needle drop position When the automatic thread cutting and automatic reinforcement stitch are preset a reinforcement stitch will be sewn automatically at the start of sewing Press the REVERSE STITCH button to sew a reinforcement stitch and trim the thread autom...

Page 51: ...needle slightly catches the fold of the hem A If the needle catches the fold of hem too much Touch the stitch width setting key This moves the needle away from the fold B If the needle does not catch the fold of hem enough Touch the stitch width setting key This moves the needle closer to the fold 1 Reverse side 2 Surface A B ...

Page 52: ...5 1 5 3 3 Raise the presser foot and adjust the fabric so that the red mark on the foot is over the starting mark of your buttonhole Lower the presser foot into position 1 Mark on fabric for buttonhole position 2 Red mark on presser foot After the presser foot lever has been lowered set the presser foot so that there is no gap behind the section marked with an A otherwise the size of the stitch wi...

Page 53: ... instance because it is too thick touch the stitch length setting key to increase the stitch length 6 Open the buttonhole Normal buttonhole and rounded buttonhole Insert a pin in front of the inside edge of both bar tacks Insert the seam ripper into center of buttonhole Cut towards the first pin Then cut toward the other pin 1 Pin Keyhole buttonhole Make a hole using the small eyelet punch in the ...

Page 54: ...y 1 Hook the gimp thread onto the end of presser foot A insert it into the groove at the front of the presser foot and temporarily tie it there 1 Upper thread 2 Bobbin thread 5 2 Lower the presser foot and start sewing Set the stitch width to match the diameter of the gimp thread 3 Once sewing is completed pull the gimp thread gently to remove any slack and trim any surplus length ...

Page 55: ...in one scale 6 0 5 cm 3 16 Buttons that do not fit into the guide plate Odd shaped buttons Changing the stitch length 3 2 1 Touch the and stitch length setting keys to adjust the stitch length 1 Longer 2 Normal length 0 4 mm 1 64 3 Shorter If the fabric will not feed for instance because it is too thick touch the stitch length setting key to increase the stitch length Changing the stitch width 2 1...

Page 56: ...nt with the corner of the pocket to be stitched and move the pocket back 2 mm 1 16 as shown below After the presser foot lever has been lowered set the presser foot so that there is no gap behind the section marked with an A otherwise the size of the stitch will not be correct To do this push the presser foot towards the back of the machine as shown in the figure Pass the thread underneath the pre...

Page 57: ...hick fabrics 1 2 Place another piece of fabric or cardboard at the back as thick as original This sets the presser foot to the same height and allows for easier feeding 1 Presser foot 2 Cardboard Changing the bar tack stitch length 3 1 2 Touch the and stitch length setting keys to adjust the stitch length 1 AUTO length 0 4 mm 1 64 2 Longer 3 Shorter If the fabric will not feed for instance because...

Page 58: ...here is no gap behind the section marked with an A otherwise the size of the stitch will not be correct To do this push the presser foot towards the back of the machine as shown in the left figure Pass the thread underneath the presser foot 5 3 5 3 1 4 Start sewing while holding the upper thread by hand The machine stops automatically after sewing a reinforce ment stitch When automatic thread cutt...

Page 59: ...r less dense 3 Shorter more dense If the fabric will not feed for instance because it is too thick touch the stitch length setting key to increase the stitch length Changing the bar tack stitch width 2 1 Touch the and stitch width setting keys to adjust the stitch width 1 AUTO 7 0 mm 1 4 2 Narrower Darning stitch cycle 1 1 1 Reinforcement stitch ...

Page 60: ...in thread to obtain the desired amount of gather 2 Place the tape on top of the seam which you have just sewn and secure it with pins 3 Select pattern and then sew along the top of the tape 4 Pull out the straight stitch thread TAPE ATTACHING 1 Patchwork stitch 2 Elastic zigzag stitch 1 2 J These stitches are used for attaching tape to thin and medium fabric ...

Page 61: ...art sewing 1 Needle drop point The machine stops automatically after sewing a reinforcement stitch When automatic thread cutting is set the machine trims both threads automatically after sewing is completed 3 Make a hole at the center with an eyelet punch EYELET STITCH N Stitch for making eyelet on belts etc Size of eyelet Actual size A B C A Large 7 0 mm 5 16 B Medium 6 0 mm 1 4 C Small 5 0 mm 3 ...

Page 62: ...original position pull the bobbin thread at the sewing end down and pull the upper thread at the sewing end through to the reverse side of the fabric Then tie the thread ends together and cut the threads at the sewing start 2 Attach button fitting foot M place the button into the presser foot and then lower the presser foot 6 3 Turn the balance wheel to check that the needle goes into each of the ...

Page 63: ...n sew them in the same way Attaching a shank to the button 6 1 1 Pull the shank lever toward you and then start sewing 1 Shank lever 2 Hold the upper thread ends at the sewing start and sewing end which are between the button and the fabric wind them around the shank and then tie them firmly together 3 Tie the ends of the bobbin thread together at the reverse side of the fabric ...

Page 64: ...tch be started with a reinforcement stitch by pressing the REVERSE STITCH button You can change the length of one stitch to between 5 mm and 30 mm 3 16 to 1 3 16 1 5 mm to 30 mm 3 16 to 1 3 16 2 Sew while keeping the fabric taut 3 End sewing with a reinforcement stitch J 1 ...

Page 65: ... with a basting stitch in the middle 1 Zipper 2 Basting 3 Reverse side 3 Select the stitch and then touch the key The necessary adjustment for zipper insertion will be carried out automatically 5 4 Put the right side of presser foot I into the holder Topstitch 1 cm 3 8 from the seamed edge of the fabric and then remove the basting 1 Surface Centered application ZIPPER INSERTION CENTERED AND SIDE A...

Page 66: ...r 4 Slider on head of zipper 5 Crotch end Base of zipper 3 Select the stitch and then touch the key The necessary adjustment for zipper insertion will be carried out automatically I 4 Put the left side of presser foot I into the holder and then sew the bottom layer to the crotch end base of zipper When the automatic thread cutting and automatic reinforcement stitch are preset reinforcement stitche...

Page 67: ...pper to the fabric 1 Reverse side I 6 Turn the fabric over to the right side and sew a straight stitch 5 cm from the end stop the machine lower the needle raise the presser foot and then remove the basting stitches 1 Surface 7 Move the zipper pull and sew the remaining part 1 Surface ...

Page 68: ...e fabric 1 Basting If automatic reinforcement stitching is preset a reinforcement stitch will automatically be sewn at the sewing start 2 Do not sew a reverse stitch at end Cut the thread at the end leaving 5 cm 1 15 16 and then tie both ends together 3 Insert the ends of the thread into the dart with a needle 4 Iron the dart to one side so that it is flat J ...

Page 69: ...6 and the thread tension will be set automatically to weak 1 2 3 2 Attach presser foot J Pull out the bobbin and upper threads by 5 cm 1 15 16 1 Upper thread 2 Bobbin thread 3 About 5 cm 1 15 16 3 Sew two rows of straight stitches parallel to the seam line then trim excess thread leaving 5 cm 1 15 16 1 Seam line 2 1 0 to 1 5 cm 3 8 to 9 16 3 About 5 cm 1 15 16 4 Pull the bobbin threads to obtain t...

Page 70: ... the direction of the arrow and leave it there without cutting it 1 Shuttle The bobbin cover should still be removed 5 2 While holding the upper thread press the NEEDLE POSITION button twice and then pull out the bobbin thread 3 Replace the bobbin cover Pulling out the bobbin thread ...

Page 71: ...essing the key I 4 Put the right end of presser foot I into the holder and sew a straight stitch along the fold 1 Width for pintuck 2 Reverse side 3 Surface When the automatic thread cutting and automatic reinforcement stitch are preset reinforcement stitches will be sewn automatically at the start of sewing Press the REVERSE STITCH button to sew a reinforcement stitch and trim the thread automati...

Page 72: ...70 5 Iron the folds toward the same direction ...

Page 73: ...nforcement stitch are preset reinforcement stitches will be sewn automatically at the start of sewing Press the REVERSE STITCH button to sew a reinforcement stitch and trim the thread automatically at the finish of sewing 2 Spread out the fabric along the finish line 1 Finish line 2 Reverse side 3 Lay both seam allowances to the shorter one s cut one side and iron them 1 Reverse side 4 Fold the lo...

Page 74: ...72 Finished flat fell seam 1 Surface ...

Page 75: ...hen the automatic thread cutting and automatic reinforcement stitch are preset reinforcement stitches will be sewn automatically at the start of sewing Press the REVERSE STITCH button to sew a reinforcement stitch and trim the thread automatically at the finish of sewing 3 Finish 1 Applique 2 Needle drop point J Sewing the applique around corners 1 Stop the machine and position the needle just out...

Page 76: ... the fabric over and sew basting stitches around the edge Attach monogramming foot N and then sew around the edge while dropping the needle as close to the edge as possible When the automatic thread cutting and automatic reinforcement stitch are preset reinforcement stitches will be sewn automatically at the start of sewing Press the REVERSE STITCH button to sew a reinforcement stitch and trim the...

Page 77: ...atic thread cutting and automatic reinforcement stitch are preset reinforcement stitches will be sewn automatically at the start of sewing Press the REVERSE STITCH button to sew a reinforcement stitch and trim the thread automatically at the finish of sewing 2 Trim along the stitches carefully so as not to cut the stitches There are products in the marketplace that will seal the trimmed areas This...

Page 78: ...a weak setting Then sew straight stitches at intervals of 1 cm 1 About 1 cm 3 8 2 Pull the bobbin threads to obtain the desired amount of gather and then smooth the gathers by ironing them J 3 Attach presser foot J and sew over the top of the straight stitches selecting from one of the two decorative stitches shown above 4 Pull out the straight stitch threads ...

Page 79: ...Open seam allowance about 1 cm 3 8 and press flat 1 Straight stitch 2 Seam allowance 3 1 cm 3 8 4 Reverse side 5 2 Attach presser foot J Set the center of the presser foot on the seam lines of the joined fabrics and then sew over the seam using one of the decorative stitches shown above 1 Surface 2 Seam J ...

Page 80: ...hin paper or water soluble stabilizer sheet 1 Basting stitch 2 0 4 cm 3 16 3 Thin paper or stabilizer sheet 5 2 Attach presser foot J Set the center of the presser foot on the centers of both fabrics and begin sewing 1 Basting stitch Use thick thread After sewing remove the paper ...

Page 81: ...y quilts and for decorating hems Shell tacking 1 Attach presser foot J select and set the thread tension to a strong setting 2 Fold the fabric in half diagonally Use a thin fabric 5 3 Drop the needle slightly to the outside of the edge of the fabric and then start sewing 4 Open out the fabric and iron the fold down to one side ...

Page 82: ...l not touch the presser foot before starting sewing hem stitching 1 Pull out several threads from one area on a piece of fabric This will leave the fabric frayed in this one area About 5 or 6 threads will leave a 3 mm 1 8 area 2 Attach presser foot N With the reverse side of the fabric facing up sew one edge of the frayed part 3 With the back side of the fabric continuing to face you turn the fabr...

Page 83: ...reads leave five threads and then pull out four threads the width of five threads is approximately 4mm 3 16 or less 1 Approx 4 0 mm 3 16 or less 2 Four threads Pull out 3 Five threads Leave 2 Sew the decorative stitch on the center of the five threads created above Wing needle is a option 3 Illustration of finished product ...

Page 84: ...abrics and can also be used to sew diagonally Slide the flat bed attachment off the machine to create the free arm 1 3 4 2 1 1 Attach presser foot N Sew with the stitch to the point required 1 Start point 2 2 Select the stitch and then sew until you reach the desired length ...

Page 85: ...he stitch again and press the REVERSE STITCH button 4 4 Select the stitch and then sew until you reach the starting point Lateral zigzag sewing should be carried out using the same procedure as lateral straight sewing ...

Page 86: ...ion 3 Touch this key to save a pattern combination to memory Refer to page 94 4 Touch this key to change the character size Refer to page 89 L Larger S Smaller 5 Touch this key to cancel your last entry 6 An advice screen will appear if you touch this key while sewing Refer to page 39 7 Touch this key to cut the thread automatically after sewing is completed Refer to page 36 8 Touch this key to co...

Page 87: ...er by mistake touch the CLEAR key to clear the character selection 2 Touch abc to switch to lowercase 3 Touch u and s Any combination of 70 characters or spaces can be accepted at one time 1 Space key Combinations of characters Try entering Bus 1 ...

Page 88: ...n 3 Touch this key to select single or repeat sewing Refer to page 89 4 Touch this key to change the pattern size Refer to page 89 5 Touch this key to move to the next screen 6 Touch this key to return to the previous screen 7 An advice screen will appear if you touch this key while sewing Refer to page 39 3 Select the pattern Touch the key to display the next decorative stitch pattern selection s...

Page 89: ...e 89 6 Touch this key if you would like to change the pattern length without changing the stitch width or stitch length settings Refer to page 90 7 Touch this key to move the pattern up by about half of it s finished height when sewing Refer to page 92 8 Touch this key to move the pattern down by about half of it s finished height when sewing Refer to page 92 9 Touch this key to cancel your entry ...

Page 90: ...o page 94 4 Touch this key to select single or repeat sewing Refer to page 89 5 Touch this key to cancel your entry 6 An advice screen will appear if you touch this key while sewing Refer to page 39 7 Touch this key to confirm your entry Refer to page 94 3 Touch the pattern that you would like to use The pattern you touch will then be selected for use If you select the wrong pattern by mistake tou...

Page 91: ... Touch the large small key to change the pattern size Signle repeat sewing Touch the repeat single key to sew one stitch pattern only or to repeat same stitch pattern 1 Select the pattern 2 Touch the repeat single key The selected stitch pattern will be single 1 Single sewing 2 Repeat sewing ...

Page 92: ...pattern in five steps without changing the stitch width or stitch length 1 2 3 4 5 1 2 1 Actual size 2 Pattern length Elongation 1 To change the length of the pattern touch the key to change the number The number shown in reverse indicates the current setting 2 Select the pattern ...

Page 93: ...justed according to the application Touch the key The stitch width and stitch length setting screen will be displayed Touch the stitch width and stitch length setting keys to change the settings Refer to pages 22 to 24 The thread may easily become knotted when certain types of fabric or thread are used therefore the upper thread tension should be adjusted according to the application Changing the ...

Page 94: ...ouch of the down key will move the stitch pattern down half of it s finished height Example Satin stitch pattern 1 Select the pattern 2 Touch the key The next pattern will move up half of it s finished height 3 Select the pattern Customize patterns by combining satin stitches using the and keys ...

Page 95: ...93 4 Touch the key The next pattern will move down half of it s finished height Making various pattern combinations Stitch pattern Operation ...

Page 96: ...fter you have combined characters or patterns touch the key Once the pattern has been saved the display will return to the previous screen Refer to page 141 for details on how to retrieve characters and patterns which have been saved in memory CAUTION Do not turn off the power while the word Saving is displayed on the screen If you turn off the power during this time the data being stored may be d...

Page 97: ...es a pocket which has a pattern saved in it 2 If you touch pockets the pattern which is saved in that pocket will be displayed 3 Touch this key to delete a saved pattern 4 Touch this key to cancel the erasing of a saved pattern 2 Touch a pocket key to select the pattern to delete and then touch the DELETE key 3 Touch the CONFIRM key The new pattern will then be saved automatically To cancel the de...

Page 98: ... interfacing to the reverse side If you do not wish to attach interfacing place the fabric onto some thin paper such as tracing paper before starting to sew This acts as a stabilizer 50 60 Thin and medium fabrics 75 11 Embroidery Thick fabrics 90 14 Embroidery Stretch fabrics 14 golden needle 2 N 3 1 1 Align the picture on the pattern sheet with the place where the pattern is to be sewn on the fab...

Page 99: ... the side and then lower the presser foot 1 If you used the pattern sheet to make positioning marks on the fabric place the fabric so that the marks are aligned with the needle reference points in the presser foot and pull the upper thread out to the side before lowering the presser foot 1 Needle hole reference line 3 Press the START STOP button Sewing will then start ...

Page 100: ...inuous patterns press the START STOP button to stop the sewing machine and then press the REVERSE STITCH button to sew a reinforcement stitch 5 When sewing is completed trim any excess thread CAUTION When sewing some patterns the needle will stop in the raised position while the fabric is fed due to the needle bar separation mechanism which is used in this sewing machine At such times a clicking s...

Page 101: ...titch pattern if necessary 1 Touch the OPERATION GUIDE key 2 Touch the FINE ADJUSTMENT OF STITCH key 3 Attach presser foot N and then start embroidering A trial pattern for adjustment purposes can then be embroidered Adjust shape of stitch using the and keys From 9 to 9 4 Touch the END key when the adjustment is finished Stitch pattern Remedy Correct shape Vert Vert Horiz Horiz ...

Page 102: ...the plug connector and socket of the sewing machine 3 Do not touch the connector of embroidery unit 4 You cannot use a foot controller when the embroidery unit is operational 5 Always keep the embroidery unit and the memory card in designated case 6 Do not carry the machine while the embroidery unit is connected 7 Always set your machine on a level surface The sewing speed is controlled by the mac...

Page 103: ...face and slide the embroidery unit towards the machine Fitting embroidery unit 1 Make sure that the embroidery frame has been removed touch the EMBROIDERY key or the EMBROIDERY EDIT key and then touch the EMBROIDERY ARM STORAGE POSITION key The carriage will move to the removal position CAUTION If the above procedure is not carried out the embroidery unit cannot be removed and placed in the case 1...

Page 104: ...carriage will move in order to initialize the embroidery unit CAUTION Do not place your hands near the embroidery arm otherwise injury may result Furthermore the embroidery arm may make some noise while initialization is being carried out but this is normal If the initialization could not be carried out normally a buzzer will sound If this occurs make sure that the embroidery frame is not attached...

Page 105: ...hange the thread tension and the stitch density Refer to page 27 and page 115 2 Touch this key when you want to change the color of each character sewn When displayed in reverse the machine will stop after each character is embroidered 3 Touch this key if the thread breaks during sewing or if you would like to sew again from the beginning Refer to page 121 4 Touch this key to move the sewing posit...

Page 106: ...ach pattern is for reference For details about the color change table refer to page 175 3 Touch this key if you would like to sew each pattern in separate parts with same color Refer to page 115 4 Touch this key to move the sewing position Refer to page 116 5 Touch this key if the thread breaks during sewing or if you would like to sew again from the beginning Refer to page 121 6 Touch this key to...

Page 107: ...memory card has been inserted touch the EMBROIDERY key first and then touch the frame pattern key 2 Select the desired shape for the frame The frame pattern will be selected and the stitch pattern selection screen will be displayed If you touch the RETURN key the previous screen will be displayed 3 Select the desired type of stitch to form the frame The combined pattern is then shown on the LCD sc...

Page 108: ... 6 Touch this key to return to the previous screen pattern selection screen 7 This shows the amount of time required to embroider the pattern and the total amount of time remaining It does not include the time needed to change colors The totals are calculated and displayed after a pattern is selected 8 Indicates the current pattern size 1 2 3 4 5 6 7 8 1 Touch the key If another screen is being di...

Page 109: ...ime required to embroider the pattern and the total amount of time remaining It does not include the time needed to change colors The totals are calculated and displayed after a pattern is selected 8 This shows the size of the pattern 1 2 3 4 5 6 7 8 1 Hold the memory card so that the arrow is facing toward you and then insert it all the way into the slot on the right side of the sewing machine CA...

Page 110: ...ed below each pattern is for reference 3 Touch this key to change the thread tension 4 Touch this key if you would like to move the sewing position Refer to page 116 5 Touch this key if the thread breaks during sewing or if you would like to sew again from the beginning Refer to page 121 6 Touch this key to return to the previous screen pattern selection screen 7 This shows the amount of time requ...

Page 111: ...e display will return to the previous screen Do not turn off the power while a pattern is being saved while Saving is displayed It takes approximately 10 seconds for a pattern to be saved For details on retrieving a pattern which has been saved refer to page 141 If the pattern cannot be saved Refer to page 95 MEMORY Saving a pattern combination in memory Memorizing combined pattern in memory for l...

Page 112: ... Refer to page 8 Bobbin thread Brother poly 60 bobbin thread Refer to page 8 75 11 Embroidery 2 Setting the fabric into the embroidery frame Three types of embroidery frames are available Large medium and small Embroidering area for large frame 18 cm H 13 cm W Embroidering area for medium frame 10 cm H 10 cm W Embroidering area for small frame 2 cm H 6 cm W for embroidering initials CAUTION Depend...

Page 113: ...n the inner frame with the mark on the outer frame 1 Tighten 1 2 3 Place the embroidery sheet into the inner frame while matching lines on the sheet with mark on fabric For best results lay the outer frame on a flat table surface and lay the fabric on top of it 1 Inner frame 2 Standard line 4 Press down into the outer frame so that the mark doesn t move out of place 1 Outer frame 2 Inner frame 3 S...

Page 114: ... and then press the frame into the embroidery unit frame holder until a click is heard 1 Embroidery arm frame holder 2 Pins Be sure to insert both pins If only the forward or the back pin is inserted the pattern may not turn out correctly 1 Removing the embroidery frame While pushing the lever of the embroidery frame holder to the left lift the embroidery frame up to remove it 1 Lever Be sure to w...

Page 115: ...r before threading the needle 5 3 Lower presser foot lever and start embroidering After 5 to 6 stitches have been sewn stop the sewing machine and cut off any surplus thread from the end of the seam If you are using the embroidery unit the foot controller cannot be used at this time Sewing can start even if is being displayed 4 Start the sewing machine once more The part indicated by 1 in the illu...

Page 116: ...ng machine will once more stop automatically 1 2 3 6 Replace the upper thread with the thread for the third color and then start the sewing machine again After the part indicated by 3 has been embroidered the sewing machine will once more stop automatically The display will return to the original condition 7 Trim any excess thread Embroidering order for pattern parts ...

Page 117: ...ch density adjustment is not available for all patterns Patterns other than the characters and some frame patterns are not adjustable 1 Touch the TENSION key 2 1 3 2 The stitch density will become further apart coarser each time the key is touched The stitch density will become closer together finer each time the key is touched 1 AUTO 2 Fine stitches closer together 3 Coarse stitches farther apart...

Page 118: ...key the embroidery frame will move so that you can check the embroidering position 5 If you touch this key the pattern image will be displayed 6 If you touch this key the pattern will be reversed horizontally This function cannot be used with some patterns 7 Touch this key to rotate the selected pattern in 90 steps 8 If you touch this key the display will change from the layout screen back to the ...

Page 119: ... then move 1 Shows the distance from the center position If you touch the CENTER key the embroidering position will return to the center Use the hole on the embroidery foot as a guide and never lower the needle while it is moving Example To move the embroidering position to the upper right Touch the key If the TRIAL key is touched the embroidery frame will move and the presser foot will trace the ...

Page 120: ...will move to the starting position The embroidery frame will move 3 Use the arrow keys to align the mark with the hole in the embroidery foot and then start embroidering Embroidering from a specific starting point ABC ABC The pattern will be rotated clockwise in 90 steps as shown in the illustration at left each time the key is touched Some patterns may be too long to be rotated 90 In such cases t...

Page 121: ...hat the pattern has been reversed horizontally showing a mirror image The key will not be displayed for some patterns Reversing patterns 1 If you touch the IMAGE key a scale showing the size of the pattern will be displayed If you touch this key once more the display will return to the original screen Using the IMAGE key ...

Page 122: ...ther if they are rotated 90 3 After adjustment is competed touch the END SIZE CHANGE key CAUTION After the size of a character or frame pattern has been changed check the display to see which embroidery frames can be used If an embroidery frame which is not displayed is used the embroidery foot may touch the frame or injury may result Changing the size of characters and frame patterns You can chan...

Page 123: ...g screen 3 Touch the BACK key to move back a short way past the point where the thread broke If the machine stops moving backward before you reach the point where you need to resume embroidering touch the REVERSE SEARCH key and the FORWARD key When you reach the point at which you would like to resume embroidering press the START STOP button 4 Lower the presser foot lever and start embroidering Th...

Page 124: ...122 1 Touch the HOME key The needle will return to the embroidery start position 2 Lower the presser foot lever and start embroidering When sewing again from the beginning ...

Page 125: ...c to the position where DE is to be embroidered 1 The embroidery end position Match the line of embroidery with reference lines on the embroidery sheet that fits the frame you are using 3 Select DE then touch the LAYOUT key and touch the key to highlight START 4 Use the arrow keys to move the needle to the embroidery end position for ABC 5 Press the START STOP button and start embroidering Linking...

Page 126: ...the embroidery frame Cut neatly around the outside of the shape made by the stitches 3 Embroider a base fabric in the same way using the same frame pattern shape and the stitch as in step 2 1 4 Apply a thin layer of fabric glue to the rear of the applique material which is created in step 2 and then attach it to the base fabric so that it follows the frame shape just stitched 1 Fabric glue 5 Witho...

Page 127: ...125 1 1 Satin stitch Finished applique on the project ...

Page 128: ...izer fabric which is designed specially for embroidering Case A 1 Fabric 2 Attach the stabilizer fabric by ironing If you do not wish to iron attach the stabilizer fabric with a basting stitch 3 Stabilizer 2 1 Case B 1 Fabric 2 Stabilizer 1 2 Case C 1 Ribbon Secure with double sided tape 2 Stabilizer Embroidering onto small pieces of fabric or onto corners ...

Page 129: ...how you can use the EMBROIDERY EDIT key to combine characters and patterns and how to combine two or more patterns to create your own original patterns One point pattern and frame pattern combinations HAND MADE MADEHAND G SWEET HOME One point pattern and character combinations KID S CLUB One point pattern frame pattern and character combinations You can create other interesting pattern combination...

Page 130: ... characters can be increased and decreased Character and frame pattern size adjustment The sizes of characters and frame patterns can be changed Pattern rotation Patterns can be rotated in steps of 90 Horizontal pattern reversing The patterns can be reversed horizontally not applicable for all patterns ABC Pattern deletion A pattern which had been edited can also be deleted ...

Page 131: ...s key is used to switch to another pattern to be edited Refer to page 137 5 If you touch this key the pattern will be reversed horizontally This function cannot be used with some patterns 6 This key can be used to rotate patterns clockwise in steps of 90 Refer to page 133 7 Touch this key to move to the next step 5 The pattern selected will be displayed in the center of the embroidery area Touch t...

Page 132: ...nges the size of patterns 8 Touch the key to move the word HAPPY down so that it is in balance with the flower 1 Increases or decreases the spacing between characters 2 Changes the size of characters 9 Once you have finished moving the word HAPPY touch the END key 10 Select the frame pattern Touch the key 11 Select the frame pattern 1 2 1 ...

Page 133: ...then decrease the size of the frame so that it encloses the pattern Move the pattern with the key 14 Touch the END key 15 This completes the editing So now touch the END EDIT key The display will then return to the sewing screen Refer to page 136 for details on sewing patterns ...

Page 134: ...wing position The arrow will move on the screen 1 Touch the CHARACTER SPACING key 2 Touch the key if you would like to increase the character spacing Touch the key if you would like to decrease the character spacing Once you have changed the character spacing touch the END SPACING EDIT key Changing the character spacing ...

Page 135: ... key Changing the sizes of characters and frame patterns Touch the key The pattern will be rotated 90 clockwise The direction of the arrow indicates the direction of rotation Some frame patterns can be enlarged further if they are rotated 90 If tall characters and patterns have been moved they may be too long to be rotated 90 In such cases they can be rotated by 180 only Rotating patterns ...

Page 136: ...y will be displayed Touch the key The pattern will then be reversed This is also known as mirror imaging Not applicable for all patterns Reversing patterns horizontally Touch the DELETE key The current pattern will then be deleted Deleting patterns ...

Page 137: ...chine Do not insert the card in any direction other than that described above and do not force it into the slot otherwise the card or the slot may become damaged Refer to page 107 2 Touch the key The memory card pattern selection screen will be displayed The illustration at left shows the Transportation card No 12 SA312 XA00275 001 option 3 Select the desired pattern For an example of the editing ...

Page 138: ...r in this case will be the one point pattern and HAPPY followed by the frame pattern 1 Touch the END EDIT key A screen such as the left will be displayed First embroider the one point pattern Embroider in the order shown by the color changes For details on how to carry out embroidering refer to pages 113 to 114 2 Once embroidering is completed a screen such as the left will be displayed Now embroi...

Page 139: ... key and select the characters Refer to page 120 for details on how to change the character size The currently selected pattern will appear darker than the other patterns 2 Touch the SIZE key and then change the size If you would like to continue editing other patterns touch the SELECT key once more 3 Once you have finished correcting the pattern touch the END SIZE CHANGE key Modifying one pattern...

Page 140: ...elect the characters 4 Touch the CHARACTER SPACING key and change the character spacing Refer to page 132 for details on how to change the character spacing If you would like to continue editing other patterns touch the SELECT key once more 5 Once you have finished correcting the pattern touch the END SPACING EDIT key Correcting a pattern after editing is finished ...

Page 141: ...how to retrieve characters and patterns which have been saved to memory Do not turn off the power while the word Saving is displayed on the screen If you turn off the power during this time the data being saved may be deleted If no more patterns can be saved There are already 12 patterns in the memory The data currently stored has filled the entire memory area To delete a pattern that is already s...

Page 142: ... indicates how much data space is needed 2 Touch the pocket to select the pattern to be deleted and then touch the DELETE key 3 Touch the CONFIRM key If the amount of space needed becomes enough then the new pattern will be saved automatically If there still is not enough space to save the pattern repeat the above procedure to delete another pattern To cancel the deleting of a pattern touch the CA...

Page 143: ...embroidery unit if retrieving patterns saved on the sewing side of the machine 1 Release button Make sure that the power is turned off before doing this 1 Touch the MEMORY RECALL key A screen such as the left will be displayed 2 Touch the CHARACTER DECORATIVE STITCH key The symbol indicates a pocket which has a pattern saved in it Touch the to display the saved pattern 1 Touch this key to delete t...

Page 144: ...Touch the pocket to display the saved pattern 1 The display will indicate that the patterns are saved on the memory card Touch after inserting the memory card on which the pattern is saved 2 Touch this key to delete the saved pattern 3 Touch this key to retrieve the saved pattern 3 Touch the pockets in order to retrieve the desired patterns and then touch the RETRIEVE key 4 The characters or patte...

Page 145: ...uch the pocket to display the saved pattern 1 The numbers indicate the amount of data for each pattern 2 Touch this key to delete the saved pattern 3 Touch this key to retrieve the saved pattern 4 This indicates how much data space remaining 3 Touch the pocket in order to retrieve the desired patterns and then touch the RETRIEVE key 4 The patterns will then be retrieved The retrieved patterns can ...

Page 146: ... the pattern to be deleted and then touch the DELETE key To delete a pattern which is stored inside a pocket on a memory card that particular memory card must be inserted into the sewing machine at the time 4 Touch the CONFIRM key If you touch the CANCEL key the display will return to the original screen DELETING A STORED PATTERN ...

Page 147: ...illustration onto the grid sheet SA500 X80948 001 1 Start point 2 End point 3 Intersection Simplify the drawing so that it can be drawn as a continuous line If sewing continuous patterns the height of the start point and end point should be the same You can obtain a more attractive finish if you make the intersections cross over to make a closed design Grid sheet 5 0 0 5 10 15 20 25 30 35 40 45 50...

Page 148: ...11 10 09 08 06 06 03 02 00 02 Stitch 31 32 33 34 35 36 37 38 39 40 41 42 43 44 45 16 19 23 22 17 22 23 19 42 01 00 00 06 10 06 00 00 00 Stitch 1 2 3 4 5 6 7 8 9 10 11 12 13 14 15 00 03 05 08 12 17 20 24 27 29 31 32 30 27 24 00 05 08 11 13 14 14 13 12 11 09 06 03 01 00 Stitch 16 17 18 19 20 21 22 23 24 25 26 27 28 29 30 21 18 16 15 15 16 18 21 25 28 33 37 41 43 44 00 01 03 05 08 10 12 13 14 14 13 1...

Page 149: ... have drawn on the grid sheet First select whether to sew one stitch or three stitches with the key between each point To sew one stitch touch the key so that it appears as to sew three stitches touch the key so that it appears as This can be set between each point 4 Use the arrow keys to set the coordinates on the input screen to the same coordinates as the points which were made on the grid shee...

Page 150: ...itch If entering a one point pattern and sewing the pattern continuously make sure that you input the data for the linking stitch so that the patterns do not overlap 1 Linking stitch If you have entered points which is too close together the fabric may not feed properly Edit the points to make the space between each point larger 1 ...

Page 151: ...this key if you would like to insert a point 3 Touch this key to move the back to the starting position 4 Touch this key to move the back one point 5 Touch this key to move the forward one point 6 Touch this key to move the to the last point EDITING AN EXISTING 3 2 1 5 6 4 1 Touch the or key to move the to the point which you would like to move 2 Touch the 8 directional arrow keys to move the poin...

Page 152: ...to the start point which you like to move 2 Touch the BLOCK MOVE key The points behind the will be enclosed by a This indicates the area which are to be moved Moving part or all of a pattern 1 Touch the or key to move the to the point before the place where you would like to enter a new point Inserting new points ...

Page 153: ...e desired point 4 Touch the SET key when you are finished making the changes at this coordinate point Repeat step 1 2 3 4 for additional editing 3 The sewing screen will then be displayed 1 Touch the END EDIT key The display will return to the input screen You can then continue to enter the pattern 2 Touch the END key Once you have finished editing ...

Page 154: ... will return to the previous screen Refer to the next page for details on how to retrieve a pattern which has been stored CAUTION Do not turn off the power while the word Saving is displayed The data being stored may be deleted Refer to page 95 for details on what to do if the pattern cannot be stored because the memory is already full STORING THE WHICH YOU HAVE ENTERED ...

Page 155: ...tern saved in it If you touch a the pattern which is saved in that pocket will be displayed 3 Touch a to select a saved pattern and have it displayed 1 Touch this key to delete a saved pattern 2 Touch this key to retrieve a saved pattern 4 Touch the RETRIEVE key to make the selected stitch available for sewing To delete a pattern touch the DELETE key 5 The sewing screen for that stitch will then b...

Page 156: ...lectric shocks may result If the surface of the sewing machine is dirty lightly soak a cloth in neutral detergent squeeze it out firmly and then wipe the surface After cleaning it once in this way wipe it again with a dry cloth Cleaning the sewing machine surface CAUTION Disconnect the power cord from the wall socket before cleaning the shuttle otherwise injury and electric shocks may result Sewin...

Page 157: ...ate 6 5 2 1 1 2 4 Take out the shuttle 5 Remove accumulated lint and thread from the inner shuttle and race with a brush or a vacuum cleaner 1 Race 2 Shuttle 6 Set the shuttle by aligning the shuttle projection with spring of the stopper 1 Projection 2 Spring Lint and dust accumulated in the race will sometimes cause poor stitching or malfunction of bobbin thread sensor ...

Page 158: ...ctric outlet prior to changing the bulb 2 Loosen the screw on the reverse side of sewing head 3 Remove the end cap 1 Screw 2 End cap 1 4 Replace the snap in the light bulb with a new one 1 Light bulb Light bulbs are available through your dealer 12V 5W Parts code XA2037001 1 2 5 Set the end cap 6 Tighten the screw 1 Screw 2 End cap ...

Page 159: ... 16 Synthetic mercerized Synthetic mercerized Synthetic mercerized Synthetic mercerized Thread for knit Stretch Golden needle 11 14 14 16 In case of top stitch thread For sewing on the popular stretch variety of fabrics embroidery and decorative stitch sewing Golden needle should be used Today there are many different types of needles to suit a variety of sewing needs Be sure to select the correct...

Page 160: ...the START STOP or AUTOMATIC THREAD CUTTER button is pressed while the presser foot or embroidery foot is raised This message is displayed if the CARD key is touched while there is no memory card inserted into the slot Warning messages ERROR MESSAGES If the machine is not properly set and the START STOP button is pressed or a correction of your operating procedure is required the machine will not s...

Page 161: ...ead by this machine is inserted This message is displayed when you tried to retrieve a pattern from one memory card while a different memory card was inserted into the slot This message is displayed when you tried to combine more than 71 patterns This message is displayed when the EMBROIDERY key or BASIC SEWING key is pressed when in utility stitch mode When REVERSE STITCH button is pressed in emb...

Page 162: ...hen the NEEDLE POSITION or AUTOMATIC THREAD CUTTER button is pressed while the bobbin winding shaft is pushed to the right This message is displayed if the sizes of the patterns you are editing exceed the maximum size limit This message is displayed when the MULTI COLOR or LAYOUT key is touched during embroidering or if the machine is stopped between color changes This message is displayed when a ...

Page 163: ...on is touched when in editing mode This message is displayed if a non buttonhole pattern is selected and the START STOP button or REVERSE STITCH button is pressed while the buttonhole lever is lowered This message is displayed if a buttonhole pattern is selected and the START STOP button or REVERSE STITCH button is pressed while the buttonhole lever is raised This message is displayed when the emb...

Page 164: ...acters if you rotate the pattern 90 This message is displayed when any of the following are pressed while no pattern has been selected START STOP button REVERSE STITCH button key TENSION key key SET key This message is displayed if the frame pattern for embroidering has not been completely input and when the START STOP button is pressed when in editing mode ...

Page 165: ... bobbin thread is running out This message is displayed during bobbin winding This message is displayed while the embroidery unit is initializing This message is displayed when a pattern which is stored in memory is deleted This message is displayed if a pattern is selected while a help topic is being displayed Instruction messages ...

Page 166: ...on One beep Incorrect operation Two or four beeps This message is displayed when the memory is full and no more patterns can be stored This message is displayed when a pattern is being retrieved in embroidery mode Alarms ...

Page 167: ...OTING 1 Touch the OPERATION GUIDE key and then touch the TROUBLE CHECK key 2 Select the heading which corresponds to the problem you are having 3 Check the information displayed If you are not sure of the correct method of operation touch the key beside the check heading The method of operation will then be displayed in steps Example If you touch the key the upper threading method is explained Tou...

Page 168: ...ook of needle threader does not fit into the eye of the needle 1 Upper threading is not correct 2 Set of bobbin thread is not correct 3 Combination of fabric thread and needle is not correct 4 Check if the thread tension is set at AUTO position Remedy 1 Re thread upper thread 2 Remove thread ends in the race or shuttle 3 Set spool of thread correctly 4 Change to proper needle 5 Contact service cen...

Page 169: ...roidery unit properly to the machine 3 Turn off the power then insert the memory card 4 Refer to ERROR MESSAGES on page 158 5 Refer to page 102 Probable cause 1 Stitch length is set at no feeding 2 The combination of selected stitch and presser foot is not correct 3 Correct needle is not being used 4 Thread is entangled 1 Needle is not correctly inserted 2 Correct needle is not used 3 The combinat...

Page 170: ...ork stitches decorative stitching Fagoting decorative stitching Fagoting decorative stitching General sewing for reinforcement Overcasting Patchwork Overcasting medium thick and stretch fabrics Tape attaching darning Overcasting medium and stretch fabrics Tape attaching darning Reinforcing of thin and medium fabric Reinforcing of thick fabric Reinforcing of medium stretch fabric and thick fabric d...

Page 171: ...OT USE REINFORCEMENT STITCH KEY STITCH WIDTH BY STITCH ADJUSTING KEY STITCH LENGTH BY STITCH ADJUSTING KEY AUTOMATIC THREAD CUTTING AUTOMATIC REINFORCE MENT STITCHING UTILITY STITCH DECORATIVE STITCH Decorative stitching Decorative stitching Decorative stitching For attaching applique on tubular part Decorative hems Decorative hems Decorative hems Decorative hems Decorative hems Decorative stitchi...

Page 172: ...stable Non adjustable L M S or L S Pattern size can be changed L Large M Medium S Small T When the automatic reinforcement stitch is preset reinforcement stitches will be sewn automatically at the start of sewing Press the REVERSE STITCH button to sew a reinforcement stitch automatically at the finish of sewing T Reinforcement stitches will be sewn automatically at the start of sewing Press the RE...

Page 173: ...171 Utility stitches Character sewing PATTERNS PROGRAMMED IN MACHINE Alphabet Block style Size L Large 11 mm 7 16 S Small 7 mm 1 4 Alphabet Italic style Size L Large 11 mm 7 16 S Small 7 mm 3 8 ...

Page 174: ...172 Satin stitches Cross stitches Size cannot be changed Alphabet Cursive hand writing style Size L Large 27 mm 1 S Small 15 mm 3 8 ...

Page 175: ...173 Decorative stitch Size can be set to L Large or S Small ...

Page 176: ...174 Character embroidering chart Sizes L 30 mm 1 3 16 M 15 mm 9 16 S 7 5 mm 1 4 Frame pattern embroidering chart Sizes can be enlarged or reduced Frames Stitch ...

Page 177: ...5 3 4 4 0 1 9 1 5 1 3 2 0 3 0 3 0 5 8 1 9 0 0 1 9 0 0 2 2 0 5 3 8 0 0 4 3 2 3 5 9 0 0 1 3 3 9 2 0 5 8 3 8 4 3 4 9 0 0 1 4 0 5 2 9 0 0 3 0 0 5 4 7 0 4 1 4 0 5 2 5 0 7 3 8 0 0 4 2 0 5 1 8 4 3 2 9 0 0 3 0 1 9 1 2 0 5 2 0 1 9 3 9 0 0 1 0 0 1 2 9 0 0 1 0 7 9 2 8 0 0 3 2 0 8 4 9 0 0 1 0 0 5 2 7 0 7 1 5 1 3 2 5 0 7 1 9 0 0 1 6 1 4 1 0 8 6 1 0 0 1 2 5 1 5 3 5 0 7 1 0 0 1 2 9 0 0 1 5 1 3 2 3 2 8 3 5 1 5 4 ...

Page 178: ...176 ...

Page 179: ... 4 070 5 612 6 205 1 017 2 513 3 070 4 810 5 205 6 612 1 017 2 513 3 205 4 612 5 070 6 810 1 017 2 513 3 612 4 810 5 205 6 070 1 017 2 513 3 612 4 810 5 070 6 205 1 017 2 513 3 612 4 810 5 070 6 205 1 017 2 513 3 810 4 612 5 205 6 070 1 017 2 513 3 810 4 205 5 612 6 070 1 017 2 513 3 205 4 612 5 810 6 070 1 017 2 513 3 070 4 810 5 612 6 205 1 017 2 513 3 612 4 810 5 070 6 205 ...

Page 180: ... 810 6 205 1 017 2 513 3 810 4 612 5 205 6 070 1 017 2 513 3 810 4 205 5 612 6 070 1 017 2 513 3 810 4 612 5 070 6 205 1 017 2 513 3 810 4 070 5 612 6 205 1 017 2 513 3 612 4 810 5 070 6 205 1 017 2 513 3 070 4 810 5 205 6 612 1 017 2 513 3 070 4 810 5 612 6 205 1 017 2 513 3 810 4 205 5 612 6 070 ...

Reviews: