background image

SELECTING/EDITING/SAVING PATTERNS

141

5

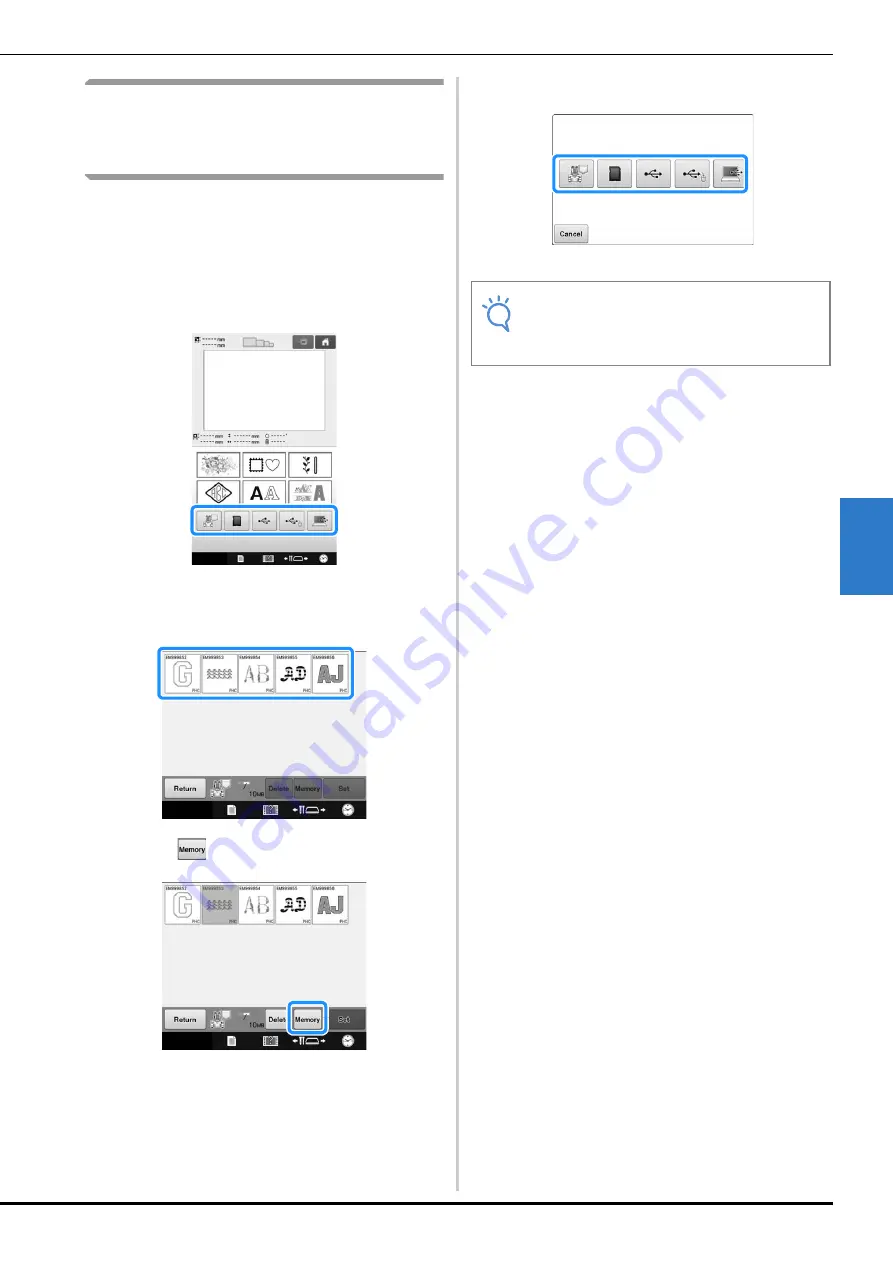
Saving embroidery patterns from 
any memory source to another 
memory

Embroidery patterns saved in the machine’s 
memory, USB memory, SD card, or PC can be 
transferred to each other.

a

On the home screen, press the key you 
want to retrieve/recall from.

b

Touch the key of the pattern you want to 
save.

c

Touch .

d

Choose the memory you want to save.

Embroidery pattern is saved.

Note

• When saving the embroidery pattern to USB 

media/SD card, the pattern is saved in the 
“bPocket” folder.

Summary of Contents for 884-T20

Page 1: ...Product Code 884 T20 Operation Manual Embroidery Machine Be sure to read this document before using the machine We recommend that you keep this document nearby for future reference ...

Page 2: ...ness Machines Corporation Microsoft and Windows are registered trademarks or trademarks of Microsoft Corporation Each company whose software title is mentioned in this manual has a Software License Agreement specific to its proprietary programs All other brands and product names mentioned in this manual are registered trademarks of their respective companies However the explanations for markings s...

Page 3: ...nected to an AC power source within the range indicated on the rating label Do not connect it to a DC power source or inverter If you are not sure what kind of power source you have contact a qualified electrician This machine is approved for use in the country of purchase only 4Never operate this machine if it has a damaged cord or plug if it is not working properly if it has been dropped or dama...

Page 4: ...tion keep your hands away from the needle bar case and all moving parts near the needle bar case otherwise injuries may result Switch the machine to the symbol O position to turn it off when making any adjustments in the needle area such as changing the needle Do not use a damaged or incorrect needle plate as it could cause the needle to break 7This machine is not a toy Your close attention is nec...

Page 5: ...S This appliance is not intended for use by persons including children with reduced physical sensory or mental capabilities or lack of experience and knowledge unless they have been given supervision or instruction concerning use of the appliance by a person responsible for their safety Children should be supervised to ensure that they do not play with the appliance FOR USERS IN CENELEC COUNTRIES ...

Page 6: ...rantee that interference will not occur in a particular installation If this equipment does cause harmful interference to radio or television reception which can be determined by turning the equipment off and on the user is encouraged to try to correct the interference by one or more of the following measures Reorient or relocate the receiving antenna Increase the separation between the equipment ...

Page 7: ...r use at any one time Reproduce modify publish distribute sell rent sublicense or otherwise make available to others CONTENT Distribute rent sublicense lease sell transfer or assign the media card or CONTENT Decompile disassemble or otherwise reverse engineer the CONTENT or assist others to do the same Alter translate modify or adapt the CONTENT or any part thereof for business commercial or indus...

Page 8: ... The following warning labels are on the machine Be sure to observe the precautions described in the labels 1 2 Warning Labels Label locations Please put a drop of oil onto the hook once a day before use ...

Page 9: ...ssigned to the same thread color based on the needle bar assignments from the previous pattern in order to reduce the number of thread spool changes For more professional embroidering using a manual color sequence allows the needle bar assignments to easily be specified manually Thread color and needle bar combinations can be selected manually to create a menu so that the needle bar assignments ca...

Page 10: ...taining six or less colors If total colors are less than six colors and if total color change is more than seven times machine will come back to the needle that the machine is already used and sew the same color again automatically Automatic sewing reduces sewing time Except to change the thread spools with patterns containing seven or more colors once the machine is started it continues to operat...

Page 11: ...s to a single computer at a same time Refer to Sending Embroidery Patterns From a Computer to the Machine Link Function on page 142 Embroider while replacing the thread spool a minimal number of times Before starting to embroider touch the thread color sorting key to rearrange the embroidery order and sort it by thread colors For example when embroidering after simply arranging the same pattern to...

Page 12: ...specify a part of the embroidery pattern or a specific color not to be sewn you can arrange the sewn embroidery without editing the pattern Safety mechanism The machine is equipped with a locking mechanism that helps prevent injuries from accidental operation The machine can only be started after the machine is unlocked The color of the start stop button changes to inform you of whether or not the...

Page 13: ...ble as standard equipment By connecting a computer to the machine using the included USB cable embroidery patterns can be transferred to from the computer Refer to Saving embroidery patterns in the computer on page 136 If the machine is positioned at a distance that prevents the USB cable from reaching the computer embroidery patterns can be transferred from the computer by temporarily saving them...

Page 14: ...o use the manual color sequence Refer to Selecting Managing Thread Colors for Each Needle Bar Manual Color Sequence on page 108 Various built in patterns Many built in character patterns embroidery patterns and frame patterns enable you to start embroidering right after purchasing this machine Embroidery pattern editing Lettering and embroidery patterns can be combined or a text arrangement can be...

Page 15: ...hapter 6 Basic Settings and Help Feature This chapter contains descriptions on the use of the settings key and the machine operations key Details on changing the basic embroidery machine settings and viewing operations on the LCD will be provided Chapter 7 Appendix This chapter provides descriptions of techniques for various embroidering operations pointers for creating beautiful embroidery and de...

Page 16: ...ing the fabric in the embroidery frame 42 7 Attaching the Embroidery Frame to the Machine 44 Attaching the embroidery frame 45 Continuing to the embroidering settings screen 46 8 Specifying Embroidering Setting 46 9 Checking the Embroidery Area 47 Temporarily stopping to check the area 48 Continuing to the embroidering screen 48 10 Upper Threading 48 Checking the needle bars and thread colors 48 U...

Page 17: ...patterns in the machine s memory 135 Saving embroidery patterns to USB media SD card 135 Saving embroidery patterns in the computer 136 Retrieving patterns from the machine s memory 137 Recalling from USB media SD card 138 Recalling from the computer 139 Saving embroidery patterns from any memory source to another memory 141 Sending Embroidery Patterns From a Computer to the Machine Link Function ...

Page 18: ...99 Color thread table 200 Colors of Tajima dst embroidery data 200 Creating Beautiful Embroidery 201 Threads 201 Stabilizers backing 202 Hooping techniques 203 Fabric stabilizer compatibility chart 204 Using the Optional Bobbin Winder 205 Precautions 205 Optional bobbin winder and its accessories 205 Setting up the optional bobbin winder 206 Connecting the AC adapter 206 Winding the bobbin 207 Mai...

Page 19: ...he tension of the thread 2 Needle bar case Moves to the left and right to move the needle to the embroidering position 3 Lower thread guide 4 Carriage Attach the embroidery frame to the carriage When the machine is turned on or when the machine is embroidering the carriage moves forward backward left and right 5 Hook cover Hook Open the hook cover and then insert the bobbin case into the hook 6 Fe...

Page 20: ...r supply plug 7 Ventilation slots 8 Handwheel Rotate the handwheel to move the needle up and down Be sure to rotate the handwheel toward the LCD panel counterclockwise Operation panel 1 Start Stop button Press the start stop button to start or stop the machine The lighting status and color of the button changes depending on the operation condition of the machine 2 Thread trimming button Press the ...

Page 21: ...hanging tool Threader XF2212 001 10 Needle plate spacer XC6499 151 11 Spacer on machine XF1978 001 12 Phillips screwdriver XC6543 051 13 Standard screwdriver X55468 051 14 Allen screwdriver XC5159 051 15 Offset screwdriver XC6545 051 16 Disc shaped screwdriver XC1074 051 17 Wrench 13 mm 10 mm XC6159 051 18 Oiler XZ0206 051 XG3677 001 for Europe and Turkey 19 Cleaning brush X59476 051 20 Weight L X...

Page 22: ...oidery sheet small 40 mm H 60 mm W 1 1 2 inches H 2 3 8 inches W XC5761 051 32 Embroidery frame holder A with white corner cover XF2222 001 33 Embroidery frame holder B with light gray corner cover XF2223 001 34 Operation Manual This manual 35 Quick reference guide XG8272 001 36 Embroidery Design Guide XG8276 001 37 Power cord Visit your authorized Brother dealer 38 Bobbin case on machine XC7206 0...

Page 23: ... PRPRF100 Americas PRPRF100 XE8427 001 Other area 11 Round frame 130 mm 5 inches PRPRF130 Americas PRPRF130 XE8430 001 Other area 12 Round frame 160 mm 6 inches PRPRF160 Americas PRPRF160 XE8433 001 Other area 13 Embroidery frame holder C with dark gray corner covers PRPARMC Americas PRPARMC XE8436 001 Other area 14 Flat frame 200 mm H 300 mm W 7 7 8 inches H 11 3 4 inches W PRF300 Americas PRF300...

Page 24: ...A50 115D02E000E Europe PRMFA50AP 115D02E700E Other area 23 Magnetic frame 50 mm H x 50 mm W 2 inches H x 2 inches W PRMH50 Americas PRMF50 115D02E000F Europe PRMF50AP 115D02E700F Other area 24 Embroidery Table PRWT1 Americas PRWT1 XE8417 001 Other area 25 Embroidery Stand PRNSTD2 Americas VRPRNSTD 115Z05E0005 Europe VRPRNSTD 115Z05E7005 Other area 26 Metal bobbin 100376 051 27 Weight S XC6631 051 ...

Page 25: ...so that the machine is level Do not block the ventilation slots at the back and on the rear underside of the machine by such as putting anything under the embroidery machine and do not allow lint or dust to accumulate in the ventilation slots otherwise the machine s motor may overheat resulting in a fire or in damage to the machine The machine weight is approximately 38 kg 84 lb The transporting o...

Page 26: ...es More than 250 mm 9 1 32 inches CAUTION In order to prevent malfunctions or damage do not set up the machine in a location exposed to the following conditions Insufficient space Liquids such as water 1 Direct sunlight 2 Objects within the moving range of the embroidery frame 3 Extremely high or extremely low temperatures The operating environment should be between 5 C 40 F and 40 C 104 F 4 Extre...

Page 27: ...own on each corner of the embroidery machine to check that it is stable If it is still unstable perform steps c through e again to adjust the legs Adjusting the operation panel position Adjust the orientation and angle of the operation panel so it can easily be operated a Loosen 2 thumb screws to bring the operation panel forward 1 Thumb screws b Adjust the operation panel to an easy to operate po...

Page 28: ... screws on the left side of the thread guide assembly support so that the thread guide assembly can be raised Remove screw 1 and then turn screw 2 three or four times to loosen it 1 Remove the screw 2 Turn the screw three or four times to loosen it b Raise thread guide into position and tighten screw 2 on the left Insert screw 1 into right side of the thread guide assembly support and tighten 1 In...

Page 29: ... the thumb screw and then open up the spool stand to the left and right 1 Thumb screw 2 Spool stand b After the spool stand is fully opened up tighten the thumb screw Secure the spool stand in the opened position Note If the screws are not loosened enough it may not be easy to move the thread guide assembly support and the thread guide Do not apply extreme force when moving the thread guide assemb...

Page 30: ...broidery frame holder 3 Corner covers d Secure the embroidery frame holder with the two thumb screws removed in step b 1 Thumb screws This completes the preparation of the machine Memo Each embroidery frame holder has different color of corner cover Holder A White corner covers Holder B Light gray corner covers Holder C Dark gray corner covers Optional Note Using the disc shaped screwdriver includ...

Page 31: ... Do not plug this machine in with extension cords or multi plug adapters with any other appliances plugged into them otherwise a fire or an electric shock may result Do not plug in or unplug the power supply cord with wet hands otherwise an electric shock may result When unplugging the power supply cord be sure to first turn off the machine and then grasp the plug when unplugging the cord Pulling ...

Page 32: ...bstitute Use of any other needles may break the needle or thread or damage the needle threading mechanism or result in injuries Never use bent needles Bent needles can easily break possibly resulting in injuries 1 Flat side 2 Needle type marking Good needle 3 Flat surface Bad needle If the distance between the needle and the flat surface is not even the needle is bent Do not use a bent needle 3 Fl...

Page 33: ...fabric that is up to 2 mm 5 64 inch thick If thicker fabric is sewn the needle may bend or break When embroidering overlapping stitches it is difficult for the needle to penetrate the fabric possibly resulting in the needle bending or breaking Attach stabilizers to thin or stretch fabrics Refer to Attaching Iron On Stabilizer Backing to Fabric on page 84 for information When embroidering large pie...

Page 34: ...es are provided on pages 29 to 31 These precautions must be strictly observed in order for the machine to function properly Make sure to read these precautions Basic Procedures Step Operation Tutorial Reference Page Operating Precaution Reference Page 1 Install the bobbin p 33 p 30 2 Turn on the machine p 35 p 29 3 Select an embroidery pattern p 38 4 Edit the embroidery pattern p 40 5 Check the pr...

Page 35: ...e machine does not indicate how much bobbin thread is remaining Before starting to embroider make sure that there is enough bobbin thread for the pattern Make sure to clean the bobbin case every time the bobbin is changed For details on cleaning the bobbin case refer to Cleaning the bobbin case on page 212 Memo Thread picker is a device that is used to hold the thread when beginning to sew or when...

Page 36: ...g 1 About 50 mm 2 inches For adjusting the tension of the bobbin thread refer to Adjusting the tension of the bobbin thread on page 102 Installing the bobbin case a Insert the bobbin case into the hook Insert the bobbin case while aligning the tab on the bobbin case with the notch in the hook as shown in the illustration 1 Tab 2 Notch b Fully insert the bobbin case until it snaps into place c Clos...

Page 37: ...ghts up in red f The carriage moves to its initial position If the number 1 needle bar is not already at the embroidering position the needle bar case moves and the number 1 needle bar moves to the embroidering position 2 Turning ON the Machine CAUTION Be sure to use the included power cord for this machine Using any other power cord may result in damage CAUTION Make sure to keep your hands and ot...

Page 38: ...operation panel For precautions concerning the use of the touch panel refer to page 31 Note The time date you set may be cleared if you don t turn on the machine for an extended period of time Time setting is also available by pressing on the bottom right of the LCD screen 3 1 2 4 No Display Function Page Key Name 1 Touch this key to cancel all operations previously performed and return to the ini...

Page 39: ...ing screen edit the pattern Refer to page 40 66 1 Touch this key to return to the pattern type selection screen and add another pattern 2 Touch this key to continue to the embroidering settings screen In the embroidering settings screen if it is a combined pattern edit the entire pattern specify the embroidering settings and check the embroidery area Refer to page 46 68 1 Touch this key to return ...

Page 40: ...gs screen 2 Unlock key After the embroidery pattern is sewn a Finished embroidering message screen appears Touch to return to the embroidering settings screen Refer to page 46 68 As an example we will select the pattern shown below In the pattern type selection screen select a pattern category type Pattern type selection screen For details on the keys and other information on the screen refer to p...

Page 41: ... image from the pattern list screen Touch to preview the image prior to selecting Touch to return to the pattern list screen Selecting an embroidery pattern a Touch to select the embroidery patterns category The embroidery pattern categories appear Sub category keys may appear for some pattern categories Touch the key for the sub category containing the desired pattern b Select an embroidery patte...

Page 42: ... top value shows the height and the bottom value shows the width If the embroidery pattern consists of multiple patterns that have been combined the size of the entire pattern including all patterns is shown 2 Highlights the sizes of embroidery frames that can be used to sew the currently selected embroidery pattern 3 Shows the size of the currently selected embroidery pattern The top value shows ...

Page 43: ... select the embroidery frame you are going to use After determining the type of embroidery frame holder and size of embroidery frame that are best for your embroidery change the embroidery frame holder and embroidery frame that are installed The machine will automatically detect the embroidery frame holder and embroidery frame and change the display c Touch to check the embroidering order The stit...

Page 44: ... fabric refer to page 31 Hooping the fabric in the embroidery frame a Select an embroidery frame From the sizes of embroidery frames indicated in the screen select the embroidery frame that you wish to use Embroidery frames that can be used appear lighter embroidery frames that cannot be used appear darker Memo The embroidery can be sewn while the preview image is displayed in the embroidering scr...

Page 45: ... iron on stabilizer backing be used for embroidering Refer to Attaching Iron On Stabilizer Backing to Fabric on page 84 d Press the inner frame into the outer frame Be sure that there are no wrinkles in the fabric after it is positioned in the embroidery frame e Lightly tighten the screw and then pull the edges of the fabric Icon Name Embroidering area Extra large embroidery frame 200 mm H 300 mm ...

Page 46: ... to the embroidery machine Embroidery frame holders A and B are included accessories with this machine Install embroidery frame holder A when an included embroidery frame is to be used See Correctly Using the Embroidery Frames on page 80 for the details about the embroidery frame holders 7 Attaching the Embroidery Frame to the Machine CAUTION If the embroidery frame is not correctly attached it ma...

Page 47: ...y loosen the thumb screws a maximum of 2 turns counterclockwise Do not remove the screw b Move the left arm to align the screw on the right side with the mark for the embroidery frame to be installed and then tighten the thumb screws For this example align with mark 4 1 Mark for extra large embroidery frame 2 Mark for large embroidery frame 3 Mark for medium embroidery frame 4 Mark for small embro...

Page 48: ...Design Page shows image size rotation number of thread changes and measured position of image within the embroidery area 4 Touch for additional editing functions 5 Returns to the pattern editing screen 6 Touch to store the pattern in memory 7 The embroidering area guide in the pattern display area indicates the size of the embroidery frame that is actually installed 8 Touch these keys to specify h...

Page 49: ...attern are indicated by changing direction Carefully watch the movement of the embroidery frame and check that the embroidery is sewn in the desired location and that the embroidery frame does not hit the presser foot Note Available keys are not the same if you set Manual Color Sequence to ON in the settings screen For details on the keys and other information on the screen refer to page 70 Memo I...

Page 50: ...play the embroidering screen Check the thread colors in this screen Change thread spools message will appear if the thread spools from the previous embroidery project need to be changed If you set Manual Color Sequence to ON in the settings screen the message does not appear even if the thread spools need to be changed Refer to Selecting Managing Thread Colors for Each Needle Bar Manual Color Sequ...

Page 51: ...the length of time until the machine will stop 3 Shows the thread colors embroidering order and number of the needle bar assigned to the thread colors A red triangle appears beside the thread color being embroidered In addition the box changes to gray and it will scroll off the page when embroidering is finished 4 Touch and to view the embroidering order and needle bar number for thread colors tha...

Page 52: ...k key in the embroidering screen is touched the start stop button begins flashing in green and the embroidery machine can start sewing If the upper threading is being performed or the needle is being threaded be careful that the embroidery machine is not accidentally started otherwise injuries may result CAUTION When threading the upper thread carefully follow the instructions If the upper threadi...

Page 53: ...ectly thread the needle bars b Pass the thread through the number 1 hole in the thread guide just above the spool and then pass the thread through the number 1 hole in the thread guide toward the front of the machine 1 Number 1 hole in the thread guide above the spool 2 Number 1 hole in the thread guide toward the front of the machine c Pass the thread through the hole in the number 1 upper thread...

Page 54: ...ins as indicated on the machine g Slip the thread under the number 1 middle thread guide plate from the right 1 Middle thread guide 2 Thread guide pin The path from the upper thread guide around the thread tension disc and to the middle thread guide steps e through f differs depending on the spool number Passing the thread from the left to the right through the thread guide pins is designed to pre...

Page 55: ...to left 1 Thread take up lever i Pass the thread down through the slot to the lower thread guide and then through the hole in the number 1 lower thread guide 1 Hole in lower thread guide j Use the included threader to pass the thread into the number 1 needle bar thread guide 1 Needle bar thread guide 2 Needle changing tool Threader ...

Page 56: ...eedle is not fully inserted the hook of the automatic needle threading mechanism will not pass through the eye of the needle during automatic needle threading and the hook may bend or the needle cannot be threaded If the hook of the automatic needle threading mechanism is bent or damaged contact your authorized Brother dealer While the hook of the automatic needle threading mechanism is passed thr...

Page 57: ...ar move screen appears b Touch the key for the needle bar that you wish to move or thread The selected needle bar moves to the position of embroidery Note If the thread is not correctly passed through the groove in the thread cutter the message Wiper error appears and the needle cannot be threaded Be sure to securely pass the thread through the groove If enough thread is not pulled out the thread ...

Page 58: ...ing it over the spool It may be necessary to adjust thread tension when using the spool net 1 Spool net 2 Thread Memo In the embroidering screen a blue frame appears around the thread information box of the selected needle bar Note If the thread is not taut it may come out of the thread tension disc After upper threading is finished check again to make sure that the thread is correctly passed into...

Page 59: ... the start stop button is not pressed within 10 seconds after unlocking the embroidery machine the machine becomes locked again b Press the start stop button Press the start stop button while it is flashing in green If the start stop button returns to being lit in red perform this procedure again from step a The start stop button lights up in green and begins sewing the first color 1 The thread co...

Page 60: ...d the embroidery machine automatically stops The embroidering settings screen reappears The start stop button lights up in red No thread trimming operations at the beginning of stitching and at the end of stitching are necessary Continuing embroidering To sew the same pattern again touch The embroidering screen appears so the same pattern can be sewn again To select a new pattern touch The pattern...

Page 61: ...rned off a Press the start stop button The embroidery machine stops and the start stop button lights up in red The thread is not trimmed b Touch to unlock the embroidery machine c Press the thread trimming button The bobbin and upper threads are trimmed Before turning off the embroidery machine be sure to trim the threads Memo If the Reserve Stop key is touched while embroidery is being sewn the m...

Page 62: ...he embroidery frame holder and then slightly lift up the frame The pins on the arms of the embroidery frame holder should come out of the holes in the sides of embroidery frame Memo The machine can be stopped at any time even while it is embroidering however if the machine is stopped when the thread color is changed it is not necessary to go back through the stitching when embroidering is continue...

Page 63: ...ned off and the display and the start stop button indicator goes off b Unplug the power supply cord from the electrical outlet Grasp the plug when unplugging the power supply cord c If necessary unplug the power supply cord from the machine Store the power supply cord in a safe place 13 Turning OFF the Machine Note If a power outage occurs while the embroidery machine is being operated turn off th...

Page 64: ... turned off while it is sewing embroidering can continue when the machine is turned on again Refer to Resume Embroidering After Turning Off the Machine on page 101 Turned off while embroidering Turned on After the opening movie ...

Page 65: ...ded in the tables below Key displays The appearances of the keys have the following meanings all keys work in the same manner Example Screen Quick Reference Guide Normal color display This key is not selected but can be selected Dark colored display This key is selected Gray display This key cannot be selected ...

Page 66: ...terns can be selected Large buttonhole patterns can be selected from small medium and large sizes p 127 Utility embroidery pattern Large buttonhole pattern key 6 Various character patterns such as floral characters appliqué characters and so on can be selected p 133 Decorative alphabet key A 0 5 1 2 9 3 7 4 8 6 7 Recalls patterns from USB media p 138 USB media keys 8 By using the included USB cabl...

Page 67: ...ey 5 Displays an image of the pattern that is to be embroidered so it can be previewed p 41 Preview key 6 Shows the number of thread colors for the currently selected embroidery pattern Number of thread colors 7 The character information of an entered character pattern can be checked here Since characters will be entered after the red cursor use and to change the input position p 132 Text preview ...

Page 68: ...e height and the bottom value shows the width Size 4 Deletes the pattern If touched the pattern being edited is deleted p 171 Delete key 5 Adds a pattern If touched the pattern group selection screen appears p 146 Add key 6 Displays an image of the pattern so that it can be previewed p 41 Preview key 7 Shows the vertical distance that the pattern being edited is moved p 148 Distance from center ve...

Page 69: ...ray key 0 Touch to change the font of the character pattern being edited p 156 Font Type key A Touch to change the size and font of individual characters in the character pattern being edited p 156 Letter Edit key A 4 0 7 2 B I 6 E C D 3 H 1 F G 5 8 9 B Flips the pattern being edited horizontally p 149 Horizontal mirror image key C Changes the density of the pattern that is being edited can only b...

Page 70: ...mbroidery pattern consists of multiple patterns that have been combined the size of the entire pattern including all patterns is shown Pattern size 2 Shows the sizes of embroidery frames that can be used to sew the embroidery pattern currently displayed in the pattern display area p 42 Embroidery frame indicators 3 Shows the vertical distance that the pattern being combined edited is moved p 89 Di...

Page 71: ...nning of sewing after thread trimming p 112 Lock stitching beginning key 7 Touch to return to the pattern editing screen Edit key 8 Save a pattern in the machine s memory USB media or a computer p 135 p 136 Memory key 9 Displays an image of the pattern that is to be embroidered so it can be previewed p 41 Preview key 7 6 2 C 9 A 0 8 D 4 3 5 B 1 0 Moves the sewing position of the whole pattern in t...

Page 72: ...illustration appears when the sewing machine is in the Manual Color Sequence mode p 108 Manual color sequence mode icon 2 Touch to change the needle bar color setting This key appears when you set Manual Color Sequence to ON in settings screen p 109 Manual color sequence key 1 2 ...

Page 73: ... the thread color sequence display Region display 4 Shows the order for the thread color changes During embroidering this display scrolls automatically so that the color of the thread currently being sewn appears at the top Thread color sequence display 5 This red line indicator shows when the thread spools will need to be changed The thread spools will need to be changed at the point between the ...

Page 74: ...the start stop button flashes in green p 57 Unlock key 2 5 9 3 8 6 4 7 0 1 7 Touch a key to move the needle bar position to the selected needle bar number Use when threading the needle with the automatic needle threading mechanism Needle bar key Thread color set up display Shows the color and the thread color name number for the thread on the needle bar indicated on the key Thread the machine as i...

Page 75: ...ads after embroidering un necessary Refer to page 55 Patterns Following patterns can be processed by the machine to embroider Use USB media or SD cards to transfer the embroidery data with pen pes phc or dst format to the machine Using the USB cable the data can be transferred from the PC to the machine Optional embroidery cards Embroidery patterns created by digitizing software program The patter...

Page 76: ...e becomes separated from the carriage Make sure that the positioning pins are placed into the frame s positioning slot and hole Refer to page 45 To insure proper registration of pattern for embroidery turning off the machine and turning it back on will allow the embroidery arm to reset it s registration points Unable to detach the frame from the machine Touch and to move the carriage then the fram...

Page 77: ...d however some USB media may not be usable with this machine Please visit our website http s brother cpbac for more details Depending on the type of USB media being used either directly plug the USB device into the machine s USB port or plug the USB media Reader Writer into the machine s USB port Note The connectors on the USB cable can only be inserted into a port in one direction If it is diffic...

Page 78: ...en click the left mouse button 1 Pointer Changing pages Rotate the mouse wheel to switch through the tabs of the pattern selection screens Memo Double clicking has no effect 1 Memo If page numbers and a vertical scroll bar for additional pages are displayed rotate the mouse wheel or click the left mouse button with the pointer on to display the previous or next page ...

Page 79: ...ed Rotate the mouse wheel toward you to enlarge the pattern in the same way as when is touched Rotating the pattern Refer to Adjusting the angle on page 91 and Rotating a pattern on page 152 a Touch b Rotate the pattern Rotate the mouse wheel away from you to rotate the pattern 10 degrees to the left in the same way as when is touched Rotate the mouse wheel toward you to rotate the pattern 10 degr...

Page 80: ...78 ...

Page 81: ...nd then hold the Allen screw driver in your right hand and turn the needle set screw counterclockwise Do not apply extreme force when loosening or tightening the needle set screw otherwise the machine may be damaged c With the flat side of the needle toward the back of the machine insert the needle all the way up until it touches the needle bar stopper Pass the needle through the hole in the press...

Page 82: ...ery frame holder B is used with the optional embroidery frames In addition if you purchase optional round frame set clamp frame set or compact frame set specified frame holder C D or E is included For details on which embroidery frame can be installed on each embroidery frame holder refer to Types of embroidery frames frame holders and their applications on page 82 CAUTION Be sure to insert the ne...

Page 83: ...optional When difficult to replace the embroidery frame Depending on the position of the needle bars it may be difficult to replace the embroidery frame In that case follow the procedure described below to move the embroidery frame a Touch The needle bar move screen appears b Touch The carriage automatically moves to a position where the embroidery frame can easily be replaced Touch to close the n...

Page 84: ...100 mm W 4 inches H 4 inches W Refer to 6 Hooping the Fabric in the Embroidery Frame on page 42 Use when embroidering standard sized patterns Small embroidery frame 40 mm H 60 mm W 1 1 2 inches H 2 3 8 inches W Use when embroidering small sized patterns such as nametags Embroidery frame holder B Quilt frame optional 200 mm H 200 mm W 7 7 8 inches H 7 7 8 inches W Consult your nearest authorized Br...

Page 85: ...used with hats having a front area of 60 mm 2 3 8 inches or less such as sun visors and children s hats In addition these cannot be used with hats that have a brim longer than 80 mm 3 1 8 inches Advanced cap frame 50 mm H 130 mm W 2 inches H 5 1 8 inches W Consult your nearest authorized Brother dealer Use when embroidering caps Baseball golf caps tulip hats and bucket hats can be embroidered with...

Page 86: ...tabilizer backing for embroidering If iron on stabilizer backing is not used while embroidering the needle may bend or break or the pattern may become misaligned Note Use a piece of iron on stabilizer backing that is larger than the embroidery frame When framing the fabric in the embroidery frame be sure that the stabilizer backing is clamped on all edges in order to prevent wrinkles in the fabric...

Page 87: ...e same way lightly pull the fabric in the direction indicated by arrow C and insert corner C and then lightly pull the fabric in the direction indicated by arrow D and insert corner D Be sure that there are no wrinkles in the fabric after it is stretched in the embroidery frame d While stretching the fabric even more securely tighten the screw so that the fabric is taut After stretching the fabric...

Page 88: ...ess the inner frame into the outer frame Remove the embroidery sheet Large small pieces of fabric This section provides information on embroidering fabric that is either much larger or much smaller than the embroidery frame Embroidering large pieces of fabric or heavy clothing When embroidering large pieces of fabric or heavy pieces of clothing use a clothespin or binder clip to fasten the excess ...

Page 89: ... fabric adhesive to attach the corner of the fabric to stabilizer backing and then hoop the stabilizer backing in the embroidery frame With fabrics where you do not wish to use spray adhesive baste the fabric to the stabilizer backing 1 Fabric 2 Stabilizer backing Embroidering narrow pieces of fabric such as ribbon When embroidering narrow pieces of fabric use spray fabric adhesive to attach the f...

Page 90: ...y frames with an embroidering area smaller than the pattern Patterns that extend out of the embroidering area of the frame In either of these cases a message appears on the embroidery machine warning that the embroidery frame must be changed A message indicating that the embroidery frame be replaced may appear even if no embroidery frame is installed The embroidery machine detects which embroidery...

Page 91: ...ng area for moving the embroidery frame or for starting embroidering is touched The embroidery frame will move Since the embroidery frame is moved to the correct position and paused touch the desired key again If the pattern extends out of the embroidering area for the frame after the frame is moved a message appears indicating that the embroidery frame should be replaced Either replace the embroi...

Page 92: ...r the needle bar down till needle bar stops then clicks into the lock position The needle and presser foot are locked in the down position b Touch the arrow keys in the embroidering settings screen to move the embroidery frame so that the needle drop point is at the center of the area where you wish to embroider With a USB mouse your finger or the touch pen drag the pattern to move it When specify...

Page 93: ...the pattern so that it is correctly positioned on the fabric a Touch The following screen appears Example Original angle Rotates 90 degrees to the right Rotates 10 degrees to the right Rotates 1 degree to the right Rotates 0 1 degree to the right Rotates 90 degrees to the left Rotates 10 degrees to the left Rotates 1 degree to the left Rotates 0 1 degree to the left Moves the pattern in the direct...

Page 94: ...o page 47 e After making the desired changes touch The embroidering settings screen appears again 1 Memo With this operation fine adjustments can be made to the angle also this operation is particularly useful when embroidering items such as bags and tubular items that have limitations to being hooped in the embroidery frame Example When embroidering a pillowcase Rotate the pattern 90 degrees to t...

Page 95: ...ion touch the same needle number again d Touch to switch the two thread colors e After making the desired changes touch To cancel the thread color settings for all previously stitched design a Touch The thread color setting is canceled b Touch Thread colors are assigned by the machine again regardless of the previous spool setting Switching the Thread Colors on the Screen Memo This function is not...

Page 96: ...d colors on needle bars 1 3 and 6 will be used again after the thread spools are changed they will not be replaced However different colors are assigned to the other needle bars Checking if thread spool changes are necessary When selecting a pattern the number of thread changes can be viewed however which thread colors are used in the pattern cannot be checked on this screen Whether or not and whe...

Page 97: ... After reaching the first color in the thread color sequence display the last color is selected c After checking the desired information touch or the top of the scroll bar to return to the first color This section contains details on understanding the change thread spools message and on easily changing the thread spools Change thread spools message When it is necessary to replace the thread spool ...

Page 98: ...d threading a selected needle bar on page 55 When the embroidering screen appears the needle bar settings are saved If the needle bar settings are saved and the next pattern that is opened contains thread colors that are the same as those from the previous pattern the same needle bars will be assigned the same thread colors from the previous pattern If you wish to delete all assigned color on disp...

Page 99: ...You can also touch the specific point of the embroidery progress bar to move the stitch count to the desired point If the needle bar is moved back too far through the stitching touch or to go forward through the stitching 1 Each touch of this key moves one stitch forward through the stitching 2 Each touch of this key moves ten stitches forward through the stitching d Touch The embroidering screen ...

Page 100: ...eaks or runs out a Touch and then press the thread trimming button The upper thread is trimmed If the bobbin thread breaks or runs out also trim the upper thread b Remove the stitches sewn only with the upper thread Pull the trim end of the upper thread If the stitches cannot be cleanly removed trim the thread with scissors Memo Touch to reset the stitch number and embroider from the first stitch ...

Page 101: ...h the stitching by thread color or by stitch to start stitching at any position of the pattern a Press the start stop button to stop the machine If necessary trim and remove the sewn stitches b Touch The stitch navigating screen appears Note If the embroidery frame is removed before embroidering of the pattern is finished take caution otherwise the pattern may become misaligned Do not apply extrem...

Page 102: ...electing the stitch from where embroidering is to begin touch The embroidering screen appears again f Touch and then press the start stop button to begin embroidering Embroidering begins from the specified point Specifying a stitch number a In step d on page 100 touch b Use the number keys to enter the desired stitch number and then touch The embroidery frame moves to the specified stitch c Touch ...

Page 103: ...s turned on again however some of the stitches that were already sewn may be sewn again a Set the main power switch to I to turn on the machine b When the machine is turned on the opening movie is played Touch anywhere on the screen to display the message below c Touch A message appears asking if you wish to continue embroidering or start a new operation d Touch 1 Touch to cancel embroidering and ...

Page 104: ...s continued The machine can also be set to stop when the thread color is changed For details refer to Setting the Machine to Stop at Color Changes on page 117 1 Adjusting the Thread Tension of both the Bobbin and Upper Thread Note Be sure to check the tension of the bobbin thread each time that the bobbin is changed Depending on the bobbin thread type and whether a prewound bobbin is used the tens...

Page 105: ...roidering with all needle bars to check the thread tension Adjusting the tension of the upper thread When embroidering the thread tension should be set so that the upper thread can slightly be seen on the wrong side of the fabric a Turn the thread tension knobs 1 Thread tension knobs 2 Tighter 3 Looser 4 Mark If the thread tension is not still correctly adjusted turn the upper thread guide pretens...

Page 106: ...he red line is visible the thread tension cannot be decreased any further Increase the tension of the bobbin thread For details refer to page 102 Upper thread is too loose The tension of the upper thread is too loose resulting in a loose upper thread loose thread locks or loops appearing on the right side of the fabric 1 Right side 2 Wrong side Turn the knob in the direction of the arrow to increa...

Page 107: ...o cancel the setting touch Basting is added to the beginning of the sewing order e Touch to continue to the embroidering screen f Touch and then press the start stop button to begin embroidering g When embroidering is finished remove the basting stitching 1 Basting stitching Basting Embroidery Note It is recommended to finish combining and editing the pattern before selecting the basting setting I...

Page 108: ... are recommended to make the appliqué piece Depending on the pattern and fabric used lighter weight fabrics may cause the stitching to appear smaller For best results be sure to use stabilizer material for embroidering Select a frame that matches the pattern size Frame options are displayed on the LCD screen Finish combining and editing the pattern before selecting the appliqué setting If the patt...

Page 109: ...iqué stitching 1 Cutting line for appliqué 2 Position of pattern placement on garment 3 Appliqué stitching We recommend using thread for the cutting line APPLIQUE MATERIAL that is closest to the color of the fabric Note Depending on the pattern density and fabric used there may be shrinking of the pattern or the appliqué may be misaligned with the placement line We recommend cutting slightly outsi...

Page 110: ...mation for DST files refer to Colors of Tajima dst embroidery data on page 200 When the same combination of thread colors is always used If specific thread colors are assigned to certain needle bars the thread color settings can be changed with the needle bar number assignments even when the pattern is changed The operation is simplified if the same thread colors are always used When continuously ...

Page 111: ...ith the manual color sequence all 6 needle bars can be assigned thread colors For details on specifying the settings refer to Reserved Needle Bar and Sewing Speed Settings on page 120 Needle bar number settings The needle bar used with each thread color can be specified a In the embroidering settings screen touch A screen appears allowing the needle bar numbers to be selected b From the thread col...

Page 112: ...ffected by the thread color information from the previous pattern Precautions on the manual color sequence When embroidering a pattern containing 7 or more colors With the manual color sequence the machine does not monitor the timing for replacing thread spools Since the machine does not automatically stop and no message indicating that the thread spool be changed appears as with the normal needle...

Page 113: ...ted 1 2 Memo If the deselect region setting is applied to a character pattern all characters in the pattern will not be sewn To deselect region for a single character separate the character pattern refer to page 154 or use the Multi Color key refer to page 156 If the Multi Color key is used to specify that thread colors not be sewn multi color text cannot be turned off The parts with the deselect ...

Page 114: ...h so that it changes to Touch or to select the desired setting Each touch of the key turns the setting either on or off Automatic Lock Stitch Setting Automatic lock stitch setting turned on Automatic lock stitch setting turned off Memo If the first stitch length is less than 0 8 mm the lock stitch won t be inserted If Thread Trimming is set OFF in the settings screen the lock stitch won t be inser...

Page 115: ...n 2 Specifies the ending position Touch a key to select the setting The highlighted key shows the currently selected setting Example 3 Touch this key to close this screen Specifying the starting position b Touch the key for the desired starting position setting When a starting position is selected the ending position is automatically set to the same position The embroidery frame moves to the start...

Page 116: ...ery pattern Touch to display the embroidering screen and then touch and press the start stop button 1 Starting position 2 Ending position c After embroidering is finished the machine stops at the lower right corner of the pattern d Touch and repeat steps b and c three times Note If the next embroidery pattern of the series will be stitched outside the embroidery field the following screen will app...

Page 117: ...roidering settings screen and then touch to continue to the embroidering screen changes to while the starting point is set in the lower left corner of the pattern e Touch and then press the start stop button to begin embroidering f After the characters are embroidered cut the threads remove the embroidery frame and then attach the embroidery frame again so that the remaining characters DEF can be ...

Page 118: ...spm Maximum sewing speed The maximum sewing speed setting is specified from the embroidering screen When the embroidery machine is purchased the maximum sewing speed is set to 1000 spm Cap frame Cylinder frame or Clamp frame for 600 spm For the types of embroidery frames refer to Types of embroidery frames frame holders and their applications on page 82 a To increase the sewing speed touch To decr...

Page 119: ...n the machine is turned on again Touch to continue embroidering Refer to Resume Embroidering After Turning Off the Machine on page 101 Memo You can also specify a maximum sewing speed to a certain needle bar in the reserved needle bar settings refer to page 120 When you set the slower sewing speed to a certain needle bar the sewing speed set with the procedure described in this page will not chang...

Page 120: ...ppears to indicate where the machine will stop 1 mark To cancel the setting touch again d Repeat steps b and c for each pause that you wish to specify Any number of pauses can be specified e After specifying the desired settings touch If the machine is temporarily turned off when it is stopped at the specified location after embroidering you will be asked if you wish to continue sewing or select a...

Page 121: ...ing monochrome A selected pattern can be stitched out in one color instead of multicolor The machine will hesitate but not stop between color steps and then continue till the pattern is completed a Touch the key for the needle bar threaded with the thread you wish to embroider uninterruptedly b Touch for the multicolor steps to become shaded and the selected pattern will embroider in a single colo...

Page 122: ...the number of the needle bar that you wish to specify 1 Indicates the number of the selected needle bar c Select the color to be assigned to the needle bar Touch and or directly touch a color to select the desired color 1 The color that appears enlarged is the color that is selected 2 Displays the color that is selected and its name 3 Highlighting a color square moves in the direction of the arrow...

Page 123: ...rst cancel it and then select the new setting a Touch any of the key from to for the number of the needle bar whose setting you wish to cancel 1 Indicates the number of the selected needle bar b Touch 1 disappears from the thread spool This cancels the manual needle bar setting Memo Decrease the sewing speed to 400 spm when you specially set a specialty thread such as a metallic thread to the assi...

Page 124: ...ancel the cancel needle threading setting touch again 1 Disable needle threader key Memo Follow the procedure from step c on page 120 to assign the other thread color to the needle bar you canceled the setting 1 ...

Page 125: ...e 26 letters of the alphabet uppercase and lowercase the numbers 0 through 9 and _ Embroidery data larger than 200 mm H 300 mm W approx 7 7 8 inches H 11 3 4 inches W cannot be used All patterns must be within the 200 mm H 300 mm W approx 7 7 8 inches H 11 3 4 inches W pattern field size pes files saved with the number of stitches or the number of colors exceeding the specified limits cannot be di...

Page 126: ... on the USB media is not flashing refer to Saving embroidery patterns to USB media SD card on page 135 For additional information refer to the instruction manual included with the USB media that you have purchased Do not unplug a USB device media from this machine immediately after it has been plugged in Be sure to wait at least 5 seconds before unplugging the USB device media Various embroidery p...

Page 127: ...If there is more than one page touch or until the desired page is displayed 7 Touch to return to pattern type selection screen to change category 8 Touch to confirm the pattern and move to the pattern editing screen Changing the size of pattern keys The size of pattern keys can be set to Small Medium or Large When the embroidery machine is purchased Medium is selected 1 Large pattern key size 1 Sm...

Page 128: ...to select a different pattern touch the desired pattern d Touch This confirms the pattern selection The pattern editing screen appears Frame patterns a Touch The list of frame patterns appears b From the upper tabs of the screen select the desired shape for the frame Touch the desired frame shape The available frame patterns appear in the lower half of the screen c Select a frame pattern Touch the...

Page 129: ...ouch the desired pattern category The list of patterns of the selected category appears c Select a pattern Touch the desired pattern The selected pattern appears in the pattern display area d If necessary edit the pattern 1 Large buttonhole patterns can be selected from small medium and large sizes 2 Touch this key to mirror the pattern e Touch This confirms the pattern selection The pattern editi...

Page 130: ... selection screen The selected characters appear in the text preview area and the pattern display area 1 Text preview area 2 Pattern display area 3 If the wrong character was selected or you wish to select a different character touch to delete the last character selected and then touch the desired character 4 Line feed key d If necessary edit the characters For details on editing characters refer ...

Page 131: ...elected in either the text preview area or the pattern display area 1 Directly select a character 2 Touch and to move the cursor and select a character e Touch This confirms the character selection The pattern editing screen appears Next we will combine the letters with a frame f Touch The pattern type selection screen appears g Touch The design selection screen appears h Touch The list of frame p...

Page 132: ...sired set of characters 1 Uppercase letters 2 Lowercase letters 3 Numbers symbols 4 Accented characters 5 Touch this key to change the character font The text input screen for the characters shown on the tab appears To change the character font touch to return to the font selection screen d Enter L The selected characters appear in the text preview area and the pattern display area Memo Due to siz...

Page 133: ...he size of the entire pattern can be changed from the pattern editing screen f Touch and enter ucky 1 If the wrong character was selected or you wish to select a different character touch to delete the last character selected and then touch the key for the desired character Each touch of deletes the last character of the text 2 Touch to enter a space g Touch to enter a line feed h Touch and enter ...

Page 134: ...can be entered Memo The color of the text is set to black To change the color refer to Specifying multi color text on page 156 and Changing the colors of the pattern on page 157 1 2 Arranges the text on a straight line Arranges the text on the outside of a wide curve Arranges the text on the inside of a wide curve Arranges the text on a slanted line Arranges the text on the outside of a sharp curv...

Page 135: ... key displayed as text is aligned to the center When the key displayed as text is aligned to the right Decorative alphabet patterns a Touch The list of decorative alphabet categories appears b Select a decorative alphabet category Touch the desired category The list of the patterns in the selected category appears c Select an embroidery pattern Touch the desired pattern The selected pattern appear...

Page 136: ...ative alphabet categories appears b Touch The list of appliqué alphabets appears c Select an embroidery pattern Touch the desired pattern 1 Touch this button to change the character size The selected pattern appears in the pattern display area If the wrong pattern was selected or you wish to select a different pattern touch the desired pattern d Touch This confirms the pattern selection The patter...

Page 137: ... previously saved pattern then you can save the current pattern Refer to Retrieving patterns from the machine s memory on page 137 Saving embroidery patterns to USB media SD card When sending embroidery patterns from the machine to USB media SD card plug the USB media SD card into the machine s USB port SD card slot a Touch when the pattern you want to save is displayed in the embroidery settings ...

Page 138: ...the machine The USB cable can be plugged into the USB ports on the computer and embroidery machine whether or not they are turned on 1 USB port for computer 2 USB cable connector The Removable Disk icon will appear in Computer My Computer on the computer Note Do not insert anything other than USB media into the USB media port Otherwise the USB media drive may be damaged Do not insert anything othe...

Page 139: ...thout saving The pattern will be temporarily saved to Removable Disk under Computer My Computer e Select the pattern s phc file in Removable Disk and copy the file to the computer Retrieving patterns from the machine s memory a Press The machine displays the patterns currently in the memory b Touch the key of the pattern you want to retrieve c Touch Touch to delete the embroidery pattern The embro...

Page 140: ...played c Touch when there is a subfolder to sort two or more stitch patterns to USB media SD card the embroidery pattern in the subfolder is displayed 1 Folder name 2 Embroidery patterns in USB media SD card 3 Path The path to show the current folder at the top of the list Embroidery patterns and subfolders within a folder are displayed Press to return to the previous folder Use the computer to cr...

Page 141: ...machine Refer to Saving embroidery patterns in the computer on page 136 b On the computer open Computer My Computer then go to Removable Disk c Move copy the pattern data to Removable Disk Pattern data in Removable Disk is written to the machine d Press The patterns in the computer are displayed on the selection screen e Touch the key of the pattern you want to recall Note While data is being writ...

Page 142: ...f embroidery patterns can be saved in the Removable Disk Pattern data cannot be recalled if that data amount is exceeded 1 Shows the amount of free space in the USB area of the machine If pattern data with this size is added it can be recalled temporarily written To recall a pattern larger than the amount of space available delete any currently written patterns and then place the pattern that you ...

Page 143: ...mory USB memory SD card or PC can be transferred to each other a On the home screen press the key you want to retrieve recall from b Touch the key of the pattern you want to save c Touch d Choose the memory you want to save Embroidery pattern is saved Note When saving the embroidery pattern to USB media SD card the pattern is saved in the bPocket folder ...

Page 144: ... included USB cable to connect the embroidery machine to a computer Operations available with the Link function Send multiple embroidery patterns to connected embroidery machines Check the sewing status of the embroidery machine this model from the computer Example of multiple machines connected Sending Embroidery Patterns From a Computer to the Machine Link Function Memo When connecting multiple ...

Page 145: ...chine to the computer e Turn on the machine f Using embroidery editing software provided with the Link function such as PE DESIGN NEXT or later from a computer send the embroidery pattern to the machine in the Link mode g When the following message appears touch A message appears in the machine s LCD while the machine is connecting to PC Note Embroidery data in the PES format pes and the PEN forma...

Page 146: ...ng error message appears the type of embroidery frame installed on the machine is not compatible with the size of the pattern Replace the embroidery frame with one compatible with the size of the pattern Memo While the embroidery machine is connected to the computer the machine s status can be displayed by using a function of the embroidery editing software If multiple embroidery machines are conn...

Page 147: ...l To open another pattern sent from the computer touch and then repeat the procedure starting from step h to continue embroidering To stop embroidering or to embroider the same pattern again touch Disabling the Link function a Touch and then touch and to display page 5 of the settings screen b Touch to disable the Link function When the following message appears touch c Turn off the machine Note T...

Page 148: ... 125 150 or 200 Touch and on the pattern display area to view the hidden area of the pattern c To return the pattern to its normal size continue pressing until the enlargement ratio is 100 Combining patterns Various patterns such as embroidery patterns frame patterns built in alphabet patterns and patterns on embroidery cards can easily be combined a Touch The pattern type selection screen appears...

Page 149: ...e order or the opposite order that they were added to the pattern 1 Red frame indicating the pattern to be edited Selecting multiple patterns at the same time Multiple patterns can easily be edited for example when moving patterns that are combined if they are all selected together a Touch The Multiple Selection screen appears Memo The position of individual patterns and other editing operations c...

Page 150: ...broidery frame the pattern will be embroidered If multiple patterns are combined move each pattern to lay out the design a Touch the key for the direction where you wish to move the pattern The pattern moves in the direction of the arrow on the key Memo Multiple patterns can be selected or deselected from the multiple selection screen Touch or to check the patterns to be selected and then touch Th...

Page 151: ... in the screen with your finger or the touch pen Flipping a pattern horizontally a Touch so that it changes to The pattern is flipped horizontally Each touch of the key turns the setting either on or off Memo If you wish to group combined patterns refer to Grouping multiple selected patterns on page 148 Memo The pattern can also be moved by touching the arrow keys in the screens that appear when a...

Page 152: ...rn or character Depending on the pattern or character if it is rotated 90 degrees it may be enlarged even more If the pattern is rotated the vertical and horizontal directions may be reversed To return the pattern to its original size touch Example Original angle Reduces without changing the height to width proportion Reduces only in the vertical direction Reduces only in the horizontal direction ...

Page 153: ... the pattern check the icons for the embroidery frames that can be used and use only the indicated frames If a frame other than those indicated are used the presser foot may hit the embroidery frame and cause injuries Note In order to check the finished embroidery before sewing on your project sew trial embroidery using the same fabric and thread as those in your project This function cannot be us...

Page 154: ...Touch to make the pattern more dense Note Depending on the pattern embroidering may not be possible at the appropriate thread density Before sewing on your project be sure to embroider a trial sample on a piece of scrap fabric that is the same as the fabric used in the project using the same needle and embroidery thread If the pattern is enlarged and there is space between stitches a better effect...

Page 155: ...n editing screen appears again Changing the character spacing The spacing between the characters can be made wider or narrower a Touch The character spacing screen appears CAUTION After changing the angle of the pattern check the icons for the embroidery frames that can be used and use only the indicated frames If a frame other than those indicated are used the presser foot may hit the embroidery ...

Page 156: ...e arrow keys to adjust the position of the pattern For more details refer to page 148 d After making the desired changes touch Separating combined character patterns Combined character patterns can be separated to adjust the character spacing or to separately edit the patterns after all character have been entered a Touch The following screen is displayed b Use to select where the pattern is to be...

Page 157: ...character patterns Two separated lines of character patterns can be combined The characters can be aligned to the specified order You cannot combine the lines of character patterns if the text contains a line feed using the Line Feed function a Touch The following screen is displayed b Select the group of character patterns that you want to combine You can select the patterns by touching them on t...

Page 158: ...y turns the setting either on or off For details on changing the thread color refer to Changing the colors of the pattern on page 157 Changing the character font In the pattern editing screen the font used in the selected pattern can be changed a Touch b Use to select the character pattern whose font is to be changed and then select the desired font c Touch Changing the font and size of individual...

Page 159: ...of a key slightly increases or decreases the thread density To return to the original thread density standard select 100 c After making the desired changes touch The pattern editing screen appears again Changing the colors of the pattern The colors of the pattern can be changed and previewed on the screen By changing the colors of the pattern the same pattern can be viewed in various ways If your ...

Page 160: ...the next color in the thread color sequence display 9 Touch this key after selecting a color 0 Touch this key to return the colors to those before this screen appeared b From the thread color sequence display select the thread color whose color is to be changed If the desired thread color is not displayed use the scroll bar on the right side to display it 1 Scroll bar The selected thread color is ...

Page 161: ...rt in the pattern with the same thread color in the original color scheme will be changed to the same thread color in the new color scheme displayed by the machine OFF ON Memo The color thread table can be changed to a custom thread table that you create to reflect the thread colors that you have Refer to Creating a custom thread table on page 167 Note This function may not be available depending ...

Page 162: ...olor scheme from samples Touch to display the new schemes 1 Touch to review the previous schemes after touching Note You cannot select more thread colors than the number in the selected color group 2 1 3 1 2 Memo Selection for the desired number of colors must stay within the range for the number of thread changes for the pattern you selected When using this function the PES data pattern recalled ...

Page 163: ...ead colors from the palette 2 The selected thread colors appear in the list 3 Push pins appear on the colors used in the color scheme Touch the pinned color twice to unpin the unwanted color With Gradient Only one thread color can be selected A gradient will be created with the selected color 1 Select the thread color from the palette 2 The selected thread color appear in the list 3 A push pin app...

Page 164: ...and sort it by thread colors Embroidery screen Embroidering settings screen Embroidery screen The embroidery color order is rearranged and sorted by thread colors Touch to cancel the color sorting and embroider with the embroidery color order Designing repeated patterns Using the border function you can create stitches using repeated patterns a Touch Note This function does not work on overlapping...

Page 165: ...ted pattern To widen spacing touch To tighten spacing touch 1 Touch to change a repeated pattern back to one single pattern e Complete repeated patterns by repeating steps b through d f After making the desired changes touch The pattern editing screen appears again 3 5 1 4 5 2 Memo You can only adjust the spacing of patterns included in the red frame Memo When there are two or more patterns all pa...

Page 166: ...ed patterns a Choose the direction in which the repeated pattern will be cut Touch to cut horizontally Touch to cut vertically The pattern direction indicator will change depending on the direction selected b Use and to select the cut line The cut line will move c Touch The repeated pattern will be divided into separate elements d Touch e Use and to select the element to repeat f Repeat the select...

Page 167: ...ating the repeated pattern rehoop the embroidery frame and keep sewing for the next pattern Note Once you have cut a repeated pattern into separate elements you cannot return to the original repeated pattern Each element can be edited separately in the edit screen Refer to Selecting the pattern to be edited on page 147 Memo When repeatedly sewing individual patterns thread marks can be sewn around...

Page 168: ...page 89 j If the pattern position cannot be aligned using the positioning keys rehoop the fabric and then try again to align the position with the positioning keys k Touch to return to the previous screen l Remove the thread mark m Touch n Touch and then press the start stop button to start embroidering Note Adjust the position of the fabric so that the embroidering area for the next pattern is wi...

Page 169: ...then touch b Use to choose where to add a color on the custom thread table You can choose color box from the custom thread from the custom thread table by directly touching the screen You can scroll through 100 colors at a time using and on the custom thread table 1 Custom thread table c Use to select one of the thread brands in the machine Note Some machine models may already have an additional 3...

Page 170: ...om the palette touch To delete all specified thread colors from the palette touch g Touch to return to the original screen Adding a color to the custom thread table from the list a Repeat the previous step a on page 167 b Touch to display the thread list c Use to select a thread color 1 Thread list 2 Thread brand d Touch Note If is not touched the thread color number will not be changed 2 1 1 Note...

Page 171: ...ng the screen 1 Shows the number of thread color changes The top value shows the position in the sewing order for the color selected in the thread color sequence display and the bottom value shows the total number of thread color changes 2 The part of the pattern in the thread color surrounded with a blue box in the thread color sequence display is the part whose color is being changed 3 Moves to ...

Page 172: ... the USB media containing the custom thread table data into the USB port for media b Touch and then touch c Touch The Saving screen is displayed When the data is loaded to the machine the display returns to the original screen automatically Note Custom thread table data can only be saved to USB media You cannot save the data in the machine s memory or in the computer Custom thread table data is sa...

Page 173: ...pping the original pattern as well as offset downward and to the right 1 Duplicated pattern Deleting a pattern a Touch The screen shown below appears b Touch The pattern is deleted To quit deleting the pattern touch 1 Note If multiple patterns are displayed only the pattern selected will be deleted ...

Page 174: ...an be rotated a Touch The screen shown below appears 1 Enables the entire pattern to be rotated 2 Enables the embroidery frame to be moved 3 Select the speed to move the frame For more details refer to page 89 4 Touch this key to close this screen b Touch the keys to adjust the pattern to the desired angle For more details refer to page 152 c If necessary touch the arrow keys to adjust the positio...

Page 175: ...abet pattern which we will then edit Example a Touch b Select c Select This pattern will be positioned at the center of the embroidery area d To select the pattern touch The pattern editing screen appears e Touch The pattern type selection screen appears again f Touch Editing a Combined Pattern ...

Page 176: ... To change the size of the pattern select o and then touch to select the desired size To change the text arrangement touch and then select the desired text arrangement i Type to enter a line feed j Type Job k Touch to align the text to the left l After selecting the characters touch The pattern editing screen appears m Touch and adjust the position of the letters so that they are well balanced ...

Page 177: ...the left mouse button In addition patterns can be selected by directly touching the screen with your finger or touch pen Example To reduce size o Touch and to move the red frame around p Touch q Touch to reduce the pattern proportionately r After reducing the pattern touch to return to the pattern editing screen To adjust other parts of the pattern touch and again and then adjust the pattern as de...

Page 178: ... touch and then The embroidering settings screen appears To return to the pattern editing screen and continue editing the pattern touch Memo Touch to group this combined pattern Refer to Grouping multiple selected patterns on page 148 ...

Page 179: ...ry editing software Refer to page 183 6 Embroidery Background Color Thumbnail Background Color Depending on the color of the embroidery changing the background color of the pattern display area and thumbnails may make them more visible and easier to select Refer to page 183 Page 2 7 DST Setting Specifies whether or not jumpstitches are cut In addition when using Tajima embroidery data dst you can ...

Page 180: ...hine is turned on The initial pattern type selection screen appears after touching the screen If you set the Opening Screen to OFF the initial pattern type selection screen appears when the machine is turned on When the embroidery machine is purchased ON is selected F LED Pointer The LED pointer function can be set on or off G Light The brightness of the sewing light can be adjusted The brightness...

Page 181: ... number increases When the embroidery machine is purchased 4 is selected O LANGUAGES The language setting can be specified Page 6 P The Total Count counter shows the total number of stitches sewn and the Trip Count counter show the number of stitches that have been sewn since the machine s last maintenance Q The Total Time counter shows the total amount of time that the machine has been used and t...

Page 182: ...ting for Cap frame Cylinder frame is displayed Refer to Types of embroidery frames frame holders and their applications on page 82 Size of the embroidery frame The machine automatically detects the type of embroidery frame that is installed and displays it Embroidery frame holder A included Embroidery frame holder B included Embroidery frame holder C Optional Embroidery frame holder D Optional Emb...

Page 183: ...m H 90 mm W 3 inches H 3 1 2 inches W Round frame optional ø 160 mm ø 6 inches Round frame optional ø 130 mm ø 5 inches Round frame optional ø 100 mm ø 4 inches Clamp frame M optional 100mm H x 100mm W 4 inches H x 4 inches W Clamp frame S SL SR optional 24mm H x 45mm W 7 8 inch H x 1 3 4 inches W Compact frame 70 optional 41mm H x 70mm W 1 5 8 inches H x 2 3 4 inches W Compact frame 50 optional 5...

Page 184: ...ead number or the embroidering time b When the thread number 123 is displayed touch and to select from six embroidery thread brands pictured below Sample displays Centerpoint marker and grid lines 10 mm spacing Centerpoint marker and grid lines 25 mm spacing Centerpoint mark with cross grid lines No centerpoint marker or grid lines Thread color number 123 Madeira Poly Polyester Madeira Rayon Rayon...

Page 185: ... of the pattern display area and pattern thumbnails Depending on the pattern color select the desired background color from the 66 settings available Different background colors can be selected for the pattern display area and pattern thumbnails When the embroidery machine is purchased white color is selected The background color settings can be specified from page 1 of the settings screen a Touch...

Page 186: ...e converted to the trim code But sequential 2 jump codes will not be converted to the trim code it will be sewed as the feed jump stitch Deleting short stitches If embroidery data other than our original patterns are used the stitch length may be too short possibly resulting in the thread or the needle breaking In order to prevent this problem from occurring the machine can be set to delete stitch...

Page 187: ... machine power by setting the eco mode or the shutoff support mode If you leave the machine without using for a specified period of time the machine enters in one of these modes Eco Mode Machine will enter a sleep mode Touch the screen or Start Stop button to continue embroidering Shutoff Support Mode Machine will turn off after set period of time Turn machine off and then back on to restart embro...

Page 188: ...d The screen saver settings can be specified from page 4 of the settings screen a Touch b Touch c Connect the USB media or the computer using a USB cable that contains your personal image to the USB port of the machine Refer to page 74 about USB connectivity d Touch to select the first image The images will appear in a list in this screen Select the desired number to specify the image Compatible i...

Page 189: ...lect image and then touch The selected image is stored on your machine Touch to return to the previous screen g Following the same procedure from step d select the remaining images This machine contains information based on the contents of the Operation Manual such as basic machine operations Touch machine operations guide key and then select either to view the operation guides or to play tutorial...

Page 190: ...The machine operations guide screen appears b Touch c Touch The list of basic operations appears d Touch The procedure for threading the upper thread appears e Read the instructions Touch to display the next page Touch to display the previous page and may appear in some pages Touch these keys to scroll up or down through the page f Touch may appear in some pages ...

Page 191: ...e desired tutorial video The selected tutorial video begins playing d Play the tutorial video 1 Number of seconds elapsed Total number of seconds Operation keys e After you are finished playing the video touch Play Stop Pause Skip back 10 seconds Skip forward 10 seconds Return to beginning Repeat Delete video when playing from the machine s memory Save to machine when playing from USB media Memo A...

Page 192: ...e machine To return to the previous screen touch d Select the video that you want to play To return to the previous screen touch e Play the video Use the operation keys as described in Playing a tutorial video on page 189 f After you are finished playing the video touch MP4 file format Video H 264 MPEG 4 AVC Audio AAC Size 450 H 800 W Memo MP4 file size will be changed to fit the screen If you vie...

Page 193: ...ppliqué Position or Appliqué 1 appears in the screen at places where the machine is stopped Procedure for sewing appliqués a Place stabilizer on the back of the appliqué fabric material b Frame the fabric for the appliqué from step a in the embroidery frame and then sew an APPLIQUE MATERIAL pattern The line that indicates where the appliqué will be cut out is sewn and then the machine stops c Remo...

Page 194: ... piece sew an APPLIQUE pattern The appliqué is finished Depending on the pattern an APPLIQUE pattern may not be available In this case sew the appliqué using thread in the color of a part of the embroidery g Finish sewing the embroidery Using a frame pattern to create appliqués 1 Appliqués can be created by sewing two frame patterns of the same size and shape one sewn with straight stitches and th...

Page 195: ...he fabric in the embroidery frame The appliqué can be created by sewing two frame patterns of the same size and shape one sewn with straight stitches and the other sewn with satin stitches a Select a frame pattern sewn with straight stitches to embroider onto the base fabric b Place the appliqué fabric over the embroidery sewn in step a Make sure that the area surrounded by the stitching is not la...

Page 196: ...e pattern with the same shape f Attach the embroidery frame removed in step d and then finish embroidering the appliqué Note Leave the fabric in the embroidery frame when cutting off the excess appliqué fabric In addition do not apply extreme pressure to the framed fabric otherwise the fabric could become loose Note If the size or sewing position of the straight stitched frame pattern is changed b...

Page 197: ...on recalling patterns refer to Recalling from USB media SD card on page 138 and Recalling from the computer on page 139 A screen appears so that a section of the large size embroidery pattern can be selected b Select section to be embroidered then touch Select the sections in alphabetical order A maximum of 10 sections can be displayed in one page with normal thumbnail size If there are 11 or more...

Page 198: ...op the fabric for the next design section aligning on the alignment stitching In this case align the left side of the hoop on the right side of the design section embroidered in step f 1 Alignment stitching Memo The pattern can be rotated to either the left or right when is touched Note The last step of the stitching of the pattern section will be an alignment stitching Use this stitching for plac...

Page 199: ...vides descriptions to operations useful in the operation of this machine Checking the thread tension of built in patterns We will sew this pattern to check the thread tension a Touch The embroidery pattern categories appear b Touch The list of embroidery patterns appears Helpful Tips for the Operation of the Machine ...

Page 200: ... then press the start stop button to begin embroidering h Correct thread tension On the wrong side of the fabric the bobbin thread should be about one third of the stitch width as a standard Note If adjustment is necessary refer to instructions on page 102 103 ...

Page 201: ...es the fabric pattern the embroidering position can be adjusted a Touch in the embroidering settings screen b Set the beginning of stitching in the lower left corner The frame moves so that the needle drop point aligns with the beginning of stitching c With a fabric marker mark this point on the fabric d Set the beginning of stitching in the lower right corner The frame moves so that the needle dr...

Page 202: ...he patterns in your own thread colors Refer to Creating a custom thread table on page 167 and Choosing a color from the custom thread table on page 169 for the change thread color function Normal thread color display Thread color display using a custom thread Colors of Tajima dst embroidery data Tajima data dst does not contain pattern color information The data is created by combining only shapes...

Page 203: ...rtant to remember that prolonged exposure to these harmful sources may also cause the colors of cardboard boxes and other objects to fade Temperature and humidity also pose a threat to embroidery threads The ideal conditions are between 59 F and 77 F or 15 C and 25 C Humidity should be between 40 and 60 These conditions should be kept as constant as possible in order to prevent mildew from forming...

Page 204: ...good as the outside Black stabilizer is very useful on similarly colored garments of lightweight fabrics The black backing is less likely to show through as compared to white backing 3 Tear away stabilizer can be used on mediumweight woven fabrics and sturdy fabrics such as canvas poplin and denim This stabilizer will hold many stitches especially when used in two or more layers This type of stabi...

Page 205: ... for embroidering Hooping fabric The framed fabric and backing should be perfectly flat and free of wrinkles or bubbles If there are bubbles or wrinkles that must be removed be sure that you pull on the fabric and backing together Pull no more than is necessary to make the fabric flat and smooth Overstretching the fabric during this process may cause puckers around the finished design when the fra...

Page 206: ... also for piqué knits Canton fleece 1 tear away Optional Use a topping if the garment has a textured surface such as a basketweave or pronounced twill Canvas 1 tear away None Frame tightly Corduroy 1 tear away 1 water soluble A higher stitch density or more understitches as well as a topping may be necessary to prevent stitches from sinking into the fabric Lingerie or silk 1 or 2 lightweight tear ...

Page 207: ...n a level stable surface Only use the bobbins supplied with this bobbin winder Part Name Part Code 1 Bobbin winder PRBW1 1 Main power switch 2 Bobbin winder shaft 3 Hole for thread guide 4 Hole for spool pin 5 DC input connector 2 Spool pin XC5949 051 3 Spool cushion XA0679 050 3 4 1 2 5 4 Thread guide XC6644 151 5 AC adapter 6 Power supply cord 7 Metal bobbin 5 100376 051 8 Spool cap 130012 054 9...

Page 208: ...insert the thread guide as far as possible and make sure that it is secure Connecting the AC adapter a Insert the plug of the power supply cord into the AC adapter b Plug the cord on the AC adapter into the DC input connector of the bobbin winder and then insert the plug of the power supply cord into a household electrical outlet Be sure to firmly insert the plug on the AC adapter into the DC inpu...

Page 209: ...t b Set the thread spool on the spool pin 1 Thread spool 2 Spool pin c Pass the thread through the hole in the left of the thread guide toward the front of the winder 1 Hole in the thread guide d Pass the thread around the tension disc as shown in the illustration Make sure that the thread is correctly fed into the tension disc 1 Tension disc Note When using a small spool remove the spool cushion ...

Page 210: ...read 1 Guide slit 2 Bobbin winder seat h Slide the bobbin holder until it clicks into place 1 Bobbin holder i Press the main power switch to start winding the bobbin Start winding the bobbin j The bobbin will stop rotating automatically when it is done winding and the bobbin holder will return to its original position Note Be sure to follow the procedure described If the bobbin is wound without th...

Page 211: ... correctly otherwise the needle may break or the thread tension will be incorrect Be sure to clean the bobbin case each time that the bobbin is changed Thread wax and dust easily collect around the hole in the tension adjusting spring on the bobbin case resulting in an incorrect thread tension For details refer to Cleaning the bobbin case on page 212 Be sure to check the tension of the bobbin thre...

Page 212: ...riodically remove lint and dust for better performance from Hook race area Use the included cleaning brush a Turn off the embroidery machine b Open the hook cover and remove the bobbin case Refer to page 33 c Use the included cleaning brush to remove any lint and dust from the hook and its surrounding area d After cleaning is finished insert the bobbin case into the hook and then close the hook co...

Page 213: ... remove the needle plate and then open the hook cover 1 Needle plate 2 Hook cover c Remove the spacer 1 Spacer d Use the included cleaning brush to remove any lint and dust from the moving knife the fixed knife the thread retaining plate and their surrounding areas 1 Remove all lint in this area e After cleaning is finished install the spacer back First position the spacer so that it hooks around ...

Page 214: ...ove the bobbin case and then remove the bobbin Refer to page 33 b Slide the paper under the tension adjusting spring to remove any dust Use a corner of the paper to remove any dust from around the hole 1 Tension adjusting spring 2 Hole 3 Paper c Use the included cleaning brush to remove any lint and dust from inside the bobbin case d After cleaning is finished insert the bobbin into the bobbin cas...

Page 215: ... thread guide plates for both the upper thread guides and the middle thread guides 1 Upper thread guide 2 Middle thread guide 1 Thread guide plate Disassembling and cleaning the tension unit a To remove tension dial turn dial counterclockwise as shown on illustration 1 Tension dial b Using the included cleaning brush remove any lint and dust from the two pieces of felt washers top bottom inside th...

Page 216: ...Note When reassembling the tension unit be sure not to install the tension disc upside down There is a magnet on the bottom Bottom Top 1 Magnet When reassembling the tension unit be careful not to lose any parts or install any parts in an incorrect order The machine may not operate correctly if the tension units are incorrectly reassembled When reassembling the tension unit only tension number 4 h...

Page 217: ...lockwise bringing the needle bar to its lowest position Put one drop of oil as high as possible on the needle bar above the felt washer 1 Apply oil here Too much oil may drip onto sewing project Front angle view Side view Note Put a drop of oil onto the hook once a day before use Apply one drop of oil on the lower needle bar above the felt washer every 40 50 hours of sewing time Apply only sewing ...

Page 218: ... performed Please take the time to arrange for the maintenance that your machine requires once this message appears Such steps will help to ensure you receive continued uninterrupted hours of machine operation for the future On screen troubleshooting This embroidery machine is equipped with an easy to use troubleshooting feature for problems during sewing Touch the key that shows the problem and t...

Page 219: ...stop button p 57 The embroidery frame cannot be attached to the machine The embroidery frame holder attached to the machine is not appropriate for the selected embroidery frame Select the appropriate embroidery frame holder for the embroidery frame p 80 The embroidery frame cannot be removed or attached Depending on the position where the machine s carriage has stopped it may be difficult to remov...

Page 220: ...t does not run Decrease the upper thread tension and make sure tension disc rotates when pulling on thread p 103 A bobbin designed specifically for this machine is not used Use the correct bobbin p 30 The needle and the hook are not correctly passing each other Hook timing may be OFF There is backlash play forward backward in the needle bar case The thread density of the embroidery data is too fin...

Page 221: ...ve the loose thread If the thread is tangled in the hook clean the hook p 210 The play between the hook and the race is too much The hook does not rotate smoothly Remove lint clean and apply oil p 210 p 214 The space between the hook stopper and the hook cannot be adjusted The upper thread is not threaded correctly Pull the upper thread by hand from below the presser foot and check that the thread...

Page 222: ...ped The upper thread is not threaded correctly Thread the upper thread correctly p 50 The needle is bent or blunt Replace the needle with a new one p 30 p 79 The needle is not installed correctly Correctly install the needle p 79 Dust has accumulated under the needle plate or in the hook Clean the hook and the needle plate p 210 p 211 The needle and the hook are not correctly passing each other Th...

Page 223: ...hat the thread tension knob was tightened If the thread tension cannot be adjusted thread wax and dust may have collected in the upper or middle thread guide plates causing the thread tension guide plates to rise Clean the thread tension guide plates p 213 Thread is not correctly threaded around upper thread tension discs Clean upper thread tension disc Rethread and make sure tension disc rotates ...

Page 224: ...abric is too delicate The simple penetration of the needle could damage delicate fabrics Use stabilizer on top of fabric p 204 Symptom Probable Cause Remedy Page There is puckering in the fabric The thread tension is too tight Adjust the tension according to the type of fabric and thread being used Polyester thread will stretch during sewing especially if the tensions are set too high After the st...

Page 225: ...fer to page 42 The upper thread broke the thread came out of the thread tension disc or a thread guide or the machine is not threaded correctly Check that the thread passes under the upper and middle thread guides and correctly thread the upper thread Refer to page 50 If the thread is not broken clean the thread guides and the tension unit Refer to page 213 The bobbin thread broke or ran out Check...

Page 226: ...eedle bar case The needle bar case motor has locked up Touch to automatically reset the needle bar case The automatic needle threading mechanism did not operate correctly Remove the thread entangled in the automatic needle threading mechanism and then touch Another operation was performed while the automatic needle threading mechanism was threading the needle Press the automatic needle threading b...

Page 227: ...ition and sew the remainder of the pattern was touched while thread colors were being changed A saved combined pattern is being rotated in the embroidering settings screen Color sorting for the combined border pattern will be canceled when is touched In addition the thread marks will be removed even if they have been set The thread picker did not operate correctly Remove the thread entangled on th...

Page 228: ... Touch to automatically reset the needle bar case The combined character pattern is too large for the embroidery frame Rotate the pattern 90 degrees and then continue combining characters The combined character pattern is too large to fit in the extra large embroidery frame Change the character pattern combination The motor has locked up due to tangled thread or for other reasons related to thread...

Page 229: ... the embroidery area An unusable embroidery card is inserted Remove the embroidery card The file format is incompatible with this machine Check the list of compatible file formats Refer to page 186 The file size exceeds the data capacity of the machine Confirm the file size and format Refer to page 186 A large size split embroidery pattern was selected to be combined with another embroidery patter...

Page 230: ...may have accumulated within the moving cutter Clean the moving cutter Refer to page 211 An error has occurred with the USB media You tried to recall or save a pattern while no USB media is loaded Load USB media ...

Page 231: ...APPENDIX 229 7 If any of the following messages appear consult your nearest authorized Brother dealer ...

Page 232: ... numbered cross to show variables If the buzzer sounds when cross number 13 is touched an error occurred during setting and ERROR appears on the screen Touch the crosses again starting with the number indicated on the screen c After making the necessary touch panel adjustment SUCCESS will show on the screen d Turn the machine off and on again CAUTION Be sure to use the included touch pen to adjust...

Page 233: ... Maximum Tubular 1 000 spm Cap 600 spm Speed range Max 1 000 spm Min 400 spm Hook Type Vertical rotary hook Hook size Normal size Type L Needle HA130EBBR 11 Number of needle 6 needles Thread tension Manual Cap sewing Option 60 mm H 130 mm W 2 3 8 inches H 5 1 8 inches W Tubular sewing 4 frames available 200 mm H 300 mm W 7 7 8 inches H 11 3 4 inches W 130 mm H 180 mm W 5 1 8 inches H 7 1 8 inches ...

Page 234: ...oaded e Remove the USB media and turn the machine off and on again Note The access lamp will begin blinking after inserting USB media and it will take about 5 to 6 seconds to recognize the media Time will differ depending on the USB media Note If an error occurs a red text error message will appear When the download is performed successfully following message will appear ...

Page 235: ...thread density 157 thread spools 95 units of measurements 179 Checking needle bars and thread colors 48 preview image 41 thread spool changes 94 Cleaning around the needle plate 211 bobbin case 212 hook 210 LCD 210 machine surface 210 maintenance message 216 oiling machine 214 thread paths 213 Clock set 36 37 Color information 182 Color shuffling 159 Color thread table 200 Combining patterns 146 1...

Page 236: ...nance 188 210 Manual color sequence 108 Manual needle bar settings 120 Maximum sewing speed key 72 116 Memory key 135 136 Monogram and frame designs 127 Mouse pointer shape 179 Moving a pattern 148 Moving needle 56 MPEG 4 MP4 videos 190 Multi color key 67 156 N Names of machine parts 17 Needle 30 changing 79 threading 54 Needle bar case 17 Needle bar key 49 72 Needle bar Frame move key 36 Needle p...

Page 237: ...ch simulator screen 41 Stopping embroidering 59 at color changes 117 pause 118 Sweater knit 204 Sweatshirt 204 T Tajima data 184 200 Temporary needle bar setting key 72 119 Tension dial 103 Terry cloth 204 Thread 30 31 50 201 Thread color 200 Thread color display 182 Thread color set up display 72 Thread color sorting 162 Thread density 157 Thread guide 17 Thread guide assembly 26 Thread mark 165 ...

Page 238: ......

Page 239: ......

Page 240: ......

Page 241: ......

Page 242: ......

Page 243: ......

Page 244: ...Please visit us at http s brother cpbac where you can get product support and answers to frequently asked questions FAQs English 884 T20 Printed in Taiwan XG8257 1011 ...

Reviews: