21
BINKS EMS | OPERATION MANUAL
8.2
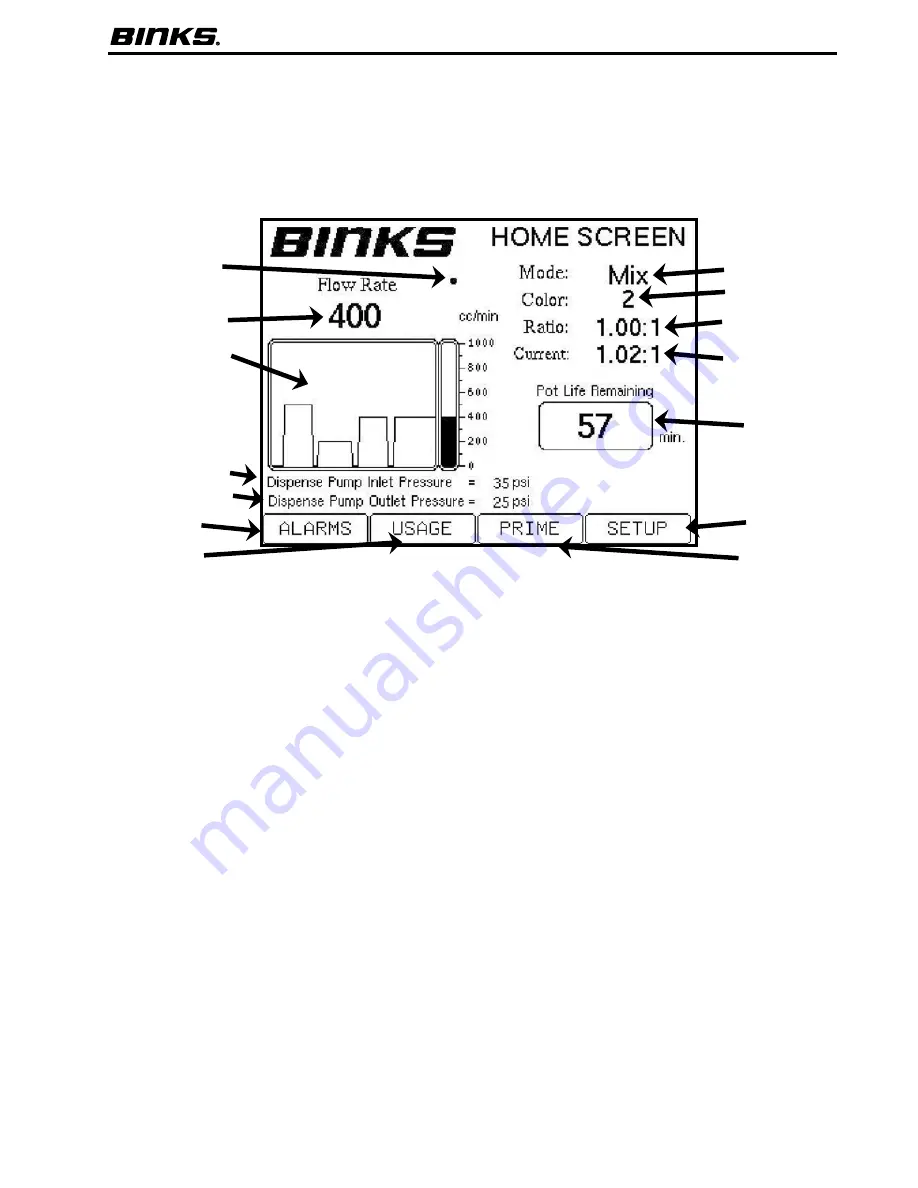
Home Screen
The Home Screen is the main monitoring screen of the Binks EMS. It provides real time data to the user and tells the user
vital information such as Flow Rate, Pot Life, Current Mix Ratio, and Current Color.
1. Resin Flow Indicator
A dot icon indicating resin
flow currently detected.
2. Current flow rate
Flow rate (cc/minute) also
displayed on the graph below.
3. Flow rate graph
Adjustable graph that will
show the amount of volume (cc) that is or has just
been sprayed.
4. Dispense Pump Inlet Pressure
Monitors the
inbound supply pressure to the Dispense Pump
from the hardener supply. The upper and lower
pressure transducers are used to measure the
pressure depending on the direction of the
Dispense Pump piston.
5. Dispense Pump Outlet Pressure
Monitors the
outbound pressure from the Dispense Pump to
the mix manifold. The upper and lower pressure
transducers are used to measure the pressure
depending on the direction of the Dispense Pump
piston.
6. Current Mode
Displays whether the system is in
mix, standby, flush, or alarm state.
7. Current Color
This is the color that is currently
loaded. Zero will be displayed if solvent is loaded,
or if a failed color changed occurred.
8. Set Ratio
This is the pre-set ratio defined in the
SETUP screen for the current color.
9. Current Ratio
This is the current real-time
calculated ratio for the color currently in use.
10. Pot Life display
This Icon will display the
active pot life remaining. A -- in place of a
number indicates the unit is flushed and no pot
life is in effect.
11. ALARMS screen
By pushing F1 (ALARMS), the
active alarm screen will be shown. Alarms may
be reset from the ALARMS screen.
12. USAGE screen
By pushing F2 (USAGE), the
accumulated color usage screen will display.
This will display the total amount of resin and
hardener used for each color.
13. PRIME screen
The prime screen will be shown
if F3 (PRIME) is pushed. This screen allows
manual load of paint components to the system
in order to bleed out air pockets without
alarming.
14. SETUP
Pushing F4 (SETUP) will display the first of
the set up screens. Additional screens to change
settings are outlined in the following pages.
1
4
5
11
13
12
14
10
9
8
7
6
3
2


