4–3
System Setup and Setpoints – 4
5. Press
ENTER,
the following will be dis
-
played:
COM1 SETUP
COM1 com2 com3 com_adr
6.
Press the Right arrow pushbutton until
the following is displayed:
COMM ACCESS CODE
dly ACCSS eth eth_ip
7. Press
ENTER,
the following will be dis
-
played:
COMM ACCESS CODE
9999
8.
Input the desired Comm Access Code
as follows:
a. Utilizing the Up and Down arrow push
-
buttons select the desired first digit.
b. Press the Left arrow pushbutton once,
then repeat the previous step as neces-
sary to input the desired Comm Access
Code digits.
c. When the desired Comm Access Code
has been input, then press
ENTER
.
The following will be displayed:
COMM ACCESS CODE
ACCESS eth eth_ip
9. Press
Exit.
IPScom User Access Code Setup
The relay includes three levels of access codes. De-
pending on their assigned code, users have varying
levels of access to the relay features and functions.
1.
Level 1 Access
= Read setpoints,
monitor status, view status history.
2.
Level 2 Access
= All of level 1 privi-
leges, plus read & change setpoints,
target history, set time clock.
3.
Level 3 Access
= All of level 2 privi-
leges, plus access to all configuration
functions and settings.
Each access code is a user-defined one-to-four
digit number. Access codes can only be altered by
a Level 3 user.
If the Level 3 Access Code is set to 9999, the access
code feature is disabled. When access codes are
disabled, the access screens are bypassed, and all
users have full access to all the relay menus. The
device is shipped from the factory with the access
code feature disabled.
To setup the relay User Access Codes perform the
following:
NOTE
: Communication must be established with
the target relay for this procedure.
1.
From the IPScom Main Screen menu
select
Tools/Security/Change User
Access Code
. IPScom will display
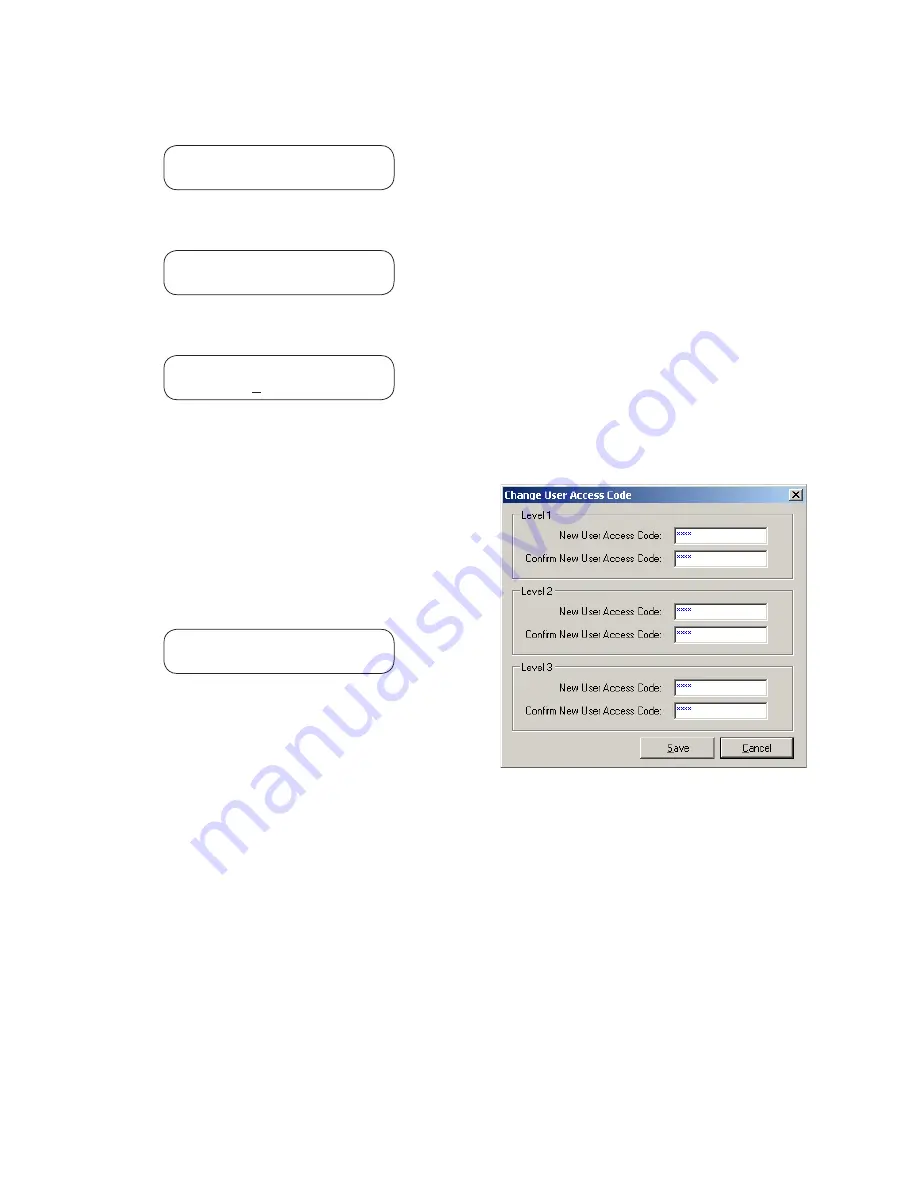
the Change User Access Code dialog
screen (Figure 4-4).
Figure 4-4 Change User Access Code Dialog
Screen
2.
Enter the desired User Access Code(s)
(1-9999), then re-enter (confirmation)
the desired User Access Code(s).
3. Select
Save
, IPScom will display an Ac
-
cess Code change Confirmation Screen
(Figure 4-2).
4. Select
Yes
, IPScom will display an Ac
-
cess Code Was Changed Successfully
Confirmation Screen (Figure 4-3).
5. Select
OK
, IPScom will return to the
Main Screen.
Summary of Contents for M?3311A
Page 1: ...Instruction Book M 3311A Transformer Protection Relay ...
Page 30: ... 29 M 3311A Transformer Protection Relay This Page Left Intentionally Blank ...
Page 55: ...M 3311A Instruction Book 1 6 This Page Left Intentionally Blank ...
Page 87: ...M 3311A Instruction Book 2 32 This Page Left Intentionally Blank ...
Page 89: ...M 3311A Instruction Book 3 2 Figure 3 2 IPScom Main Screen ...
Page 107: ...M 3311A Instruction Book 3 20 Figure 3 22 Setup System Dialog Screen 2 3 Winding ...
Page 108: ...IPScom 3 3 21 Figure 3 23 Setup System Dialog Screen 4 Winding ...
Page 112: ...IPScom 3 3 25 Figure 3 29 I O Map Screen 4 Winding ...
Page 114: ...IPScom 3 3 27 Figure 3 31 Display All Setpoints Screen 4 Winding ...
Page 119: ...M 3311A Instruction Book 3 32 Figure 3 38 View Sequence of Events Recorder Screen ...
Page 127: ...M 3311A Instruction Book 3 40 This Page Left Intentionally Blank ...
Page 150: ...4 23 System Setup and Setpoints 4 Figure 4 14 Setup Sequence of Events Recorder Dialog Screen ...
Page 163: ...4 36 M 3311A Instruction Book Figure 4 15 IPScom Relay Setup System Dialog Screen 2 3 Winding ...
Page 166: ...4 39 System Setup and Setpoints 4 Figure 4 18 IPScom Selection Screen for Input Settings ...
Page 179: ...4 52 M 3311A Instruction Book Figure 4 28 Example of V Hz Capability and Protection Curves ...
Page 187: ...4 60 M 3311A Instruction Book Figure 4 33 49 Function Overload Curves ...
Page 229: ...4 102 M 3311A Instruction Book Table 4 5 Transformer Connections ...
Page 231: ...4 104 M 3311A Instruction Book Table 4 7 Custom Transformer and CT Configuration ...
Page 243: ...M 3311A Instruction Book 5 6 Figure 5 5 Mounting Dimensions for GE L 2 Cabinet H3 and H4 ...
Page 383: ...A 50 M 3311A Instruction Book This Page Left Intentionally Blank ...
Page 389: ...M 3311A Instruction Book B 6 This Page Left Intentionally Blank ...
Page 393: ...D 2 M 3311A Instruction Book Figure D 1 Volts Hz 24IT Inverse Curve Family 1 Inverse Square ...
Page 394: ...Inverse Time Curves Appendix D D 3 Figure D 2 Volts Hz 24IT Inverse Family Curve 2 ...
Page 395: ...D 4 M 3311A Instruction Book Figure D 3 Volts Hz 24IT Inverse Time Curve Family 3 ...
Page 396: ...Inverse Time Curves Appendix D D 5 Figure D 4 Volts Hz 24IT Inverse Curve Family 4 ...
Page 399: ...D 8 M 3311A Instruction Book Figure D 5 Definite Time Overcurrent Curve ...
Page 400: ...Inverse Time Curves Appendix D D 9 Figure D 6 Inverse Time Overcurrent Curve ...
Page 401: ...D 10 M 3311A Instruction Book Figure D 7 Very Inverse Time Overcurrent Curve ...
Page 402: ...Inverse Time Curves Appendix D D 11 Figure D 8 Extremely Inverse Time Overcurrent Curve ...
Page 439: ...F 28 M 3311A Instruction Book This Page Left Intentionally Blank ...


