13. Servicing
A
B
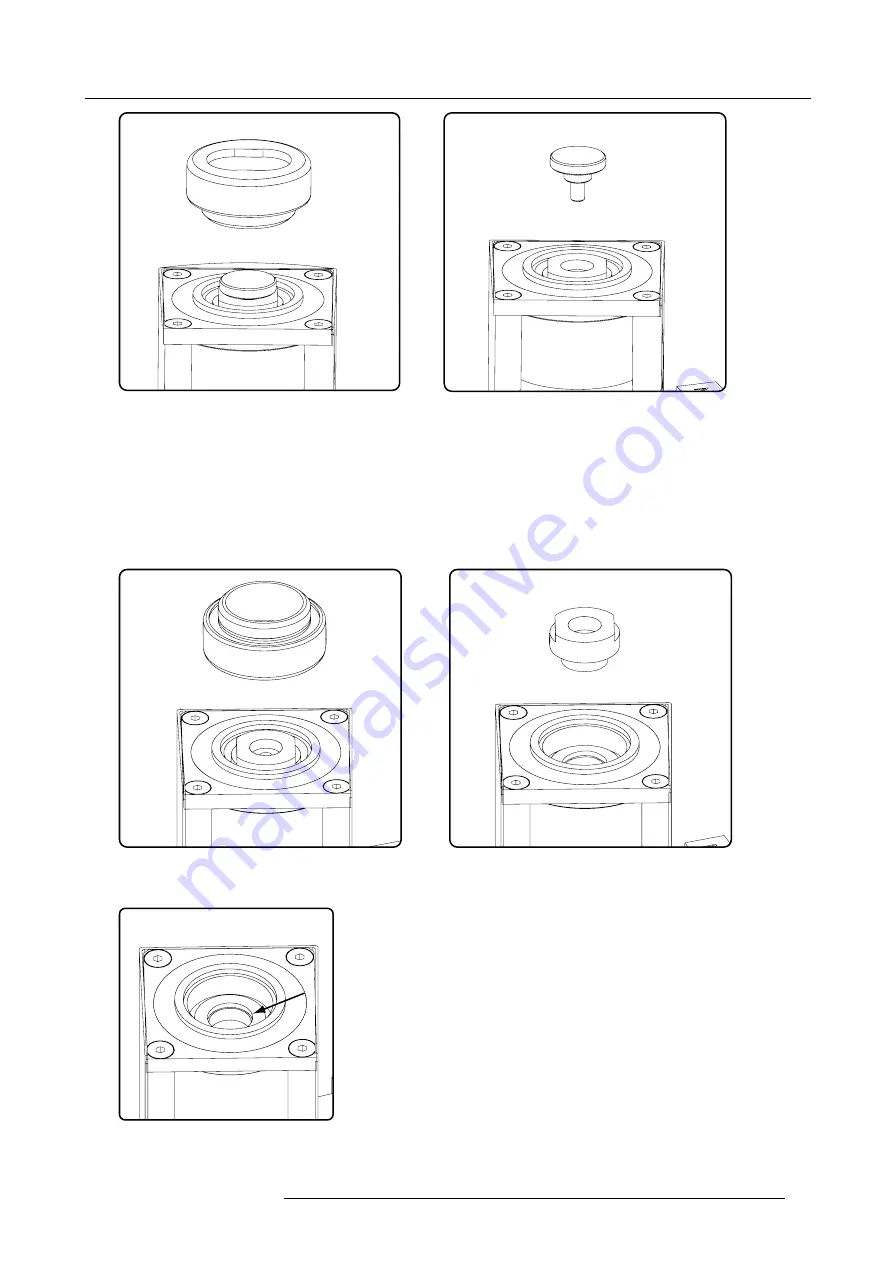
Image 13-30
Open reservoir
5. Loosen the bleed lid a little so that air can enter and close the bleed lid again. Turn the reservoir again in its horizontal position.
6. Turn on the bolt so that the white indication line is in the
Open
area (membrane is at the bottom of the reservoir).
7. Rotate the reservoir until it is in a vertical position.
Note:
Be careful not to kink the tubing. If necessary, remove the cable tie around the tubing and pull on the tubes while rotating
the reservoir.
8. Turn the bleed lid a little and take it out (B)
9. Turn out the third lid using the back of the main lid.
C
D
Image 13-31
Remove third lid
10.Top-up the reservoir with cooling liquid until the level is somewhat higher than the hole in the reservoir.
Image 13-32
Top-up reservoir
R59770208 DML-1200 06/11/2009
89
Summary of Contents for DML-1200
Page 1: ...DML 1200 User guide R9050120 R59770208 04 06 11 2009...
Page 12: ...1 Safety 8 R59770208 DML 1200 06 11 2009...
Page 30: ...4 Connections 26 R59770208 DML 1200 06 11 2009...
Page 32: ...5 Start up of the Adjustment mode 28 R59770208 DML 1200 06 11 2009...
Page 37: ...6 Input menu Image 6 18 Image 6 19 Image 6 20 R59770208 DML 1200 06 11 2009 33...
Page 38: ...6 Input menu 34 R59770208 DML 1200 06 11 2009...
Page 52: ...8 Control menu 48 R59770208 DML 1200 06 11 2009...
Page 62: ...9 Service menu 58 R59770208 DML 1200 06 11 2009...
Page 66: ...10 Moving light control via DMX 62 R59770208 DML 1200 06 11 2009...
Page 76: ...12 Maintenance 72 R59770208 DML 1200 06 11 2009...
Page 98: ...A DMX chart 94 R59770208 DML 1200 06 11 2009...
Page 104: ...C Troubleshooting 100 R59770208 DML 1200 06 11 2009...
Page 106: ...D Specifications 102 R59770208 DML 1200 06 11 2009...
Page 108: ...E Order info 104 R59770208 DML 1200 06 11 2009...


