Appendix
97
APPENDIX 7 NETWORK SETTING
A
A
7
7
.
.
1
1
.
.
C
C
o
o
n
n
n
n
e
e
c
c
t
t
i
i
n
n
g
g
v
v
i
i
a
a
L
L
A
A
N
N
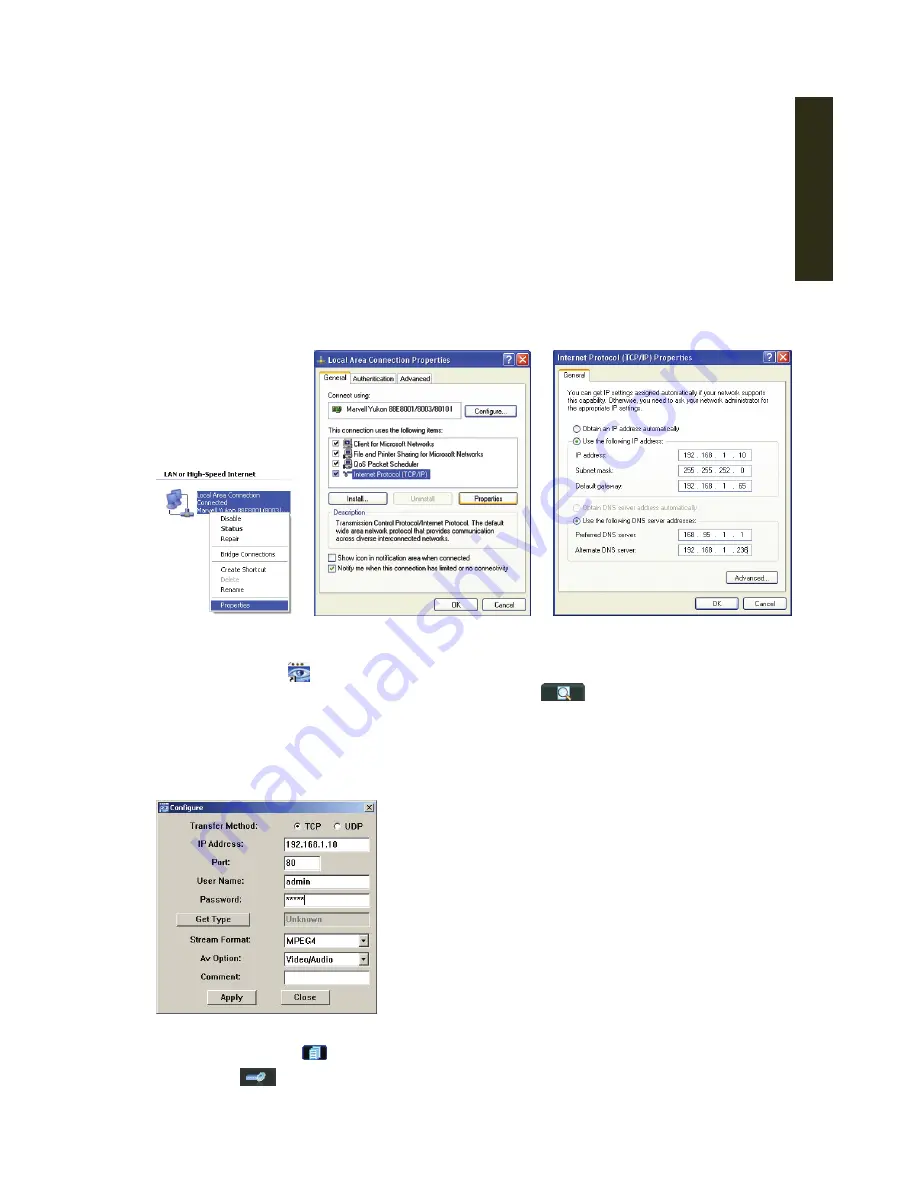
Build a local area network by connecting the DVR and PC or laptop with a RJ45 cable.
Step1: Connect your PC / notebook to your DVR with a RJ45 cable.
Step2: From your PC, click
Start
Control Panel
→
Network Connection
.
Step3: Right click
LAN or High-Speed Internet
, and select
Properties
(Figure 1).
Step4: In General, select
Internet Protocol (TCP/IP)
→
Properties
(Figure 2)to set the IP address
of your PC / notebook as 192.168.1.
XX
(1~255 except 10) (Figure 3).
Step5: Click
OK
to apply.
<Figure 1>
<Figure 2>
<Figure 3>
Step6: Double click
on the desktop to enter the “Video Viewer” screen. The interface of IP
address book will be shown. Click the Search button
to search for the available
IP addresses. After a while, the searched items will be listed.
Step7: Double click the target IP address, and a dialog box will be shown as follows.
Input the default password: admin (The same as the User Name), and set the Stream
Format as MPEG4. Then click
Apply
.
Step8: Now this IP address will be added into the address book. Double click it to access the
DVR, and click
to open the “Miscellaneous Control” panel.
Step9: Click
Network
, and you will see 3 network types:
Static IP
/
PPPOE
/
DHC
P
.
If you have a static IP address obtained from the local ISP, you can set the
IP Type
as
Static IP
. Otherwise, apply for a DDNS account to appoint a fixed domain name for the
Summary of Contents for AVD 714
Page 1: ......
Page 2: ...Version Information Manual V0 9 Firmware 1227 1012 1032 1018 M1 6C1B Video Viewer 0086...
Page 6: ......
Page 16: ...System Overview 6...
Page 28: ...Installation Connection 18...
Page 42: ...Basic Operation 32...
Page 92: ...Web Browser 82...
Page 100: ...Appendix 90...
Page 102: ...Appendix 92...
Page 104: ...Appendix 94...
Page 106: ...Appendix 96...
Page 113: ...Appendix 103...
Page 114: ......


