background image

NOTE

The support can only be placed along the beam.

7

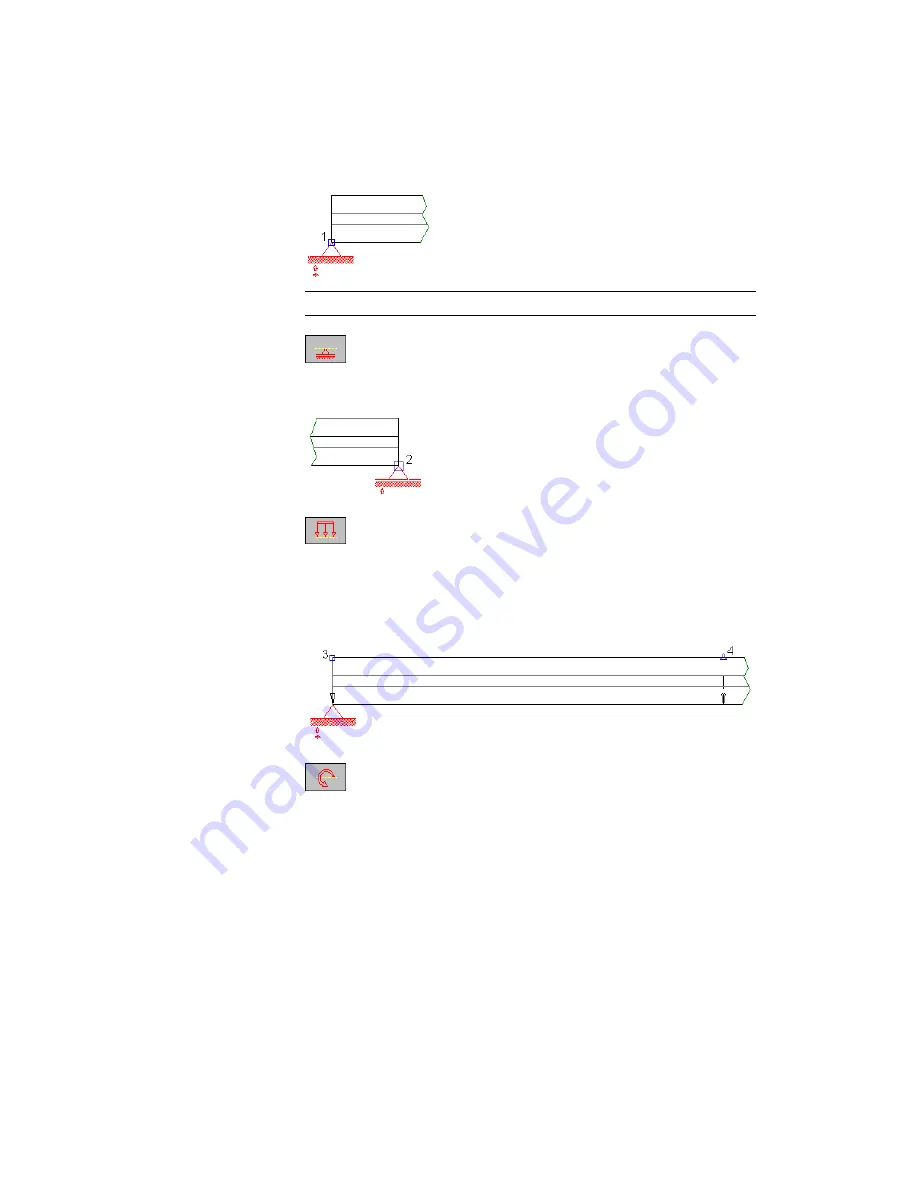
 Click the Movable Support icon, and then respond to the prompt

as follows:

Specify insertion point:

Select the right edge of the beam (2)

8

 Click the Uniform Load icon, and then respond to the prompts

as follows:

Specify insertion point:

Select the left edge of the beam (3)

Specify endpoint:

Select the midpoint of the beam using midpoint snap (4)

Line Load [N/mm]<50>:

Enter 

10

,

press 

ENTER

9

 Click the Moment icon, and then respond to the prompts as

follows:

Specify insertion point:

Select a point in the center of the uniform load (5)

Bending moment (Nm)<10>:

Enter

 3

, press 

ENTER

Calculating Deflection Lines | 281

Summary of Contents for 057A1-09A111-1001 - AutoCAD LT 2009

Page 1: ...AutoCAD Mechanical 2009 User s Guide January 2008 ...

Page 2: ...View DXF EditDV Education by Design Exposure Extending the Design Team FBX Filmbox FMDesktop Freewheel GDX Driver Gmax Heads up Design Heidi HOOPS HumanIK i drop iMOUT Incinerator IntroDV Inventor Inventor LT Kaydara Kaydara design logo LocationLogic Lustre Maya Mechanical Desktop MotionBuilder Mudbox NavisWorks ObjectARX ObjectDBX Open Reality Opticore Opticore Opus PolarSnap PortfolioWall Powere...

Page 3: ...tures in AutoCAD Mechanical 5 Mechanical Structure 5 Associative Design and Detailing 6 External References for Mechanical Structure 7 Associative 2D Hide 7 Autodesk Inventor link 8 2D Design Productivity 8 Engineering Calculations 9 Machinery Systems Generators 9 Intelligent Production Drawing and Detailing 10 Detailing Productivity 10 Annotations 11 Standard Mechanical Content 11 Standard Parts ...

Page 4: ... Nesting Folders 57 Instance vs Occurrence 59 Selection Modes 60 Components and Component Views 62 Creating Part Components 62 Creating Assembly Components 64 Modifying Assembly Components 67 Using Folders with Component Views 71 Mechanical Browser Display Options 72 Mechanical Browser and BOMs 74 Browser Restructure and Ghost Components 76 External Reference Components 82 Inserting External Compo...

Page 5: ...Subassemblies in New Layouts 131 Chapter 7 Dimensioning 135 Key Terms 135 Adding Dimensions to Drawings 136 Adding Multiple Dimensions Simultaneously 137 Editing Dimensions with Power Commands 140 Breaking Dimension Lines 144 Inserting Drawing Borders 144 Inserting Fits Lists 147 Chapter 8 Working with 2D Hide and 2D Steel Shapes 151 Key Terms 151 Working with 2D Hide and 2D Steel Shapes 152 Openi...

Page 6: ... In Parts Lists 222 Collecting Balloons 225 Sorting and Renumbering Items In Parts Lists 227 Using Filters 231 Chapter 11 Creating Shafts with Standard Parts 235 Key Terms 235 Creating Shafts 236 Configuring Snap Options 237 Configuring Shaft Generators 238 Creating Cylindrical Shaft Sections and Gears 240 Inserting Spline Profiles 244 Inserting Chamfers and Fillets 245 Inserting Shaft Breaks 246 ...

Page 7: ... Terms 299 Calculating Springs 300 Starting Spring Calculations 301 Specifying Spring Restrictions 302 Calculating and Selecting Springs 305 Inserting Springs 308 Creating Views of Springs with Power View 309 Chapter 16 Calculating Screw Connections 311 Key Terms 311 Methods for Calculating Screws 311 Using Stand Alone Screw Calculations 313 Selecting and Specifying Screws 313 Selecting and Specif...

Page 8: ...sults 356 Autodesk Inventor Link 359 Chapter 19 Using Autodesk Inventor Link Support 361 Key Terms 361 Linking Autodesk Inventor Part Files 362 Shading and Rotating Geometry 363 Inserting Drawing Borders 364 Creating Drawing Views 367 Working with Dimensions 372 Exporting Drawing Views to AutoCAD 377 Linking Autodesk Inventor Assembly Files 378 Accessing Parts from the Browser 379 Accessing iPrope...

Page 9: ...view of the product capabilities a summary of commands with their toolbuttons and descriptions and a summary of new and revised commands in this release of AutoCAD Mechanical In addition Part I includes information about methods to access commands AutoCAD Mechanical Help and product support and training resources 1 ...

Page 10: ...2 ...

Page 11: ...nt production drawing and detailing features decrease the time required to create and change 2D production designs AutoCAD Mechanical introduces many 3D concepts in a familiar 2D environment It is powered by AutoCAD with its easy to use palette interface and time saving xref functionality The AutoCAD Mechanical design software package includes both AutoCAD Mechanical and AutoCAD You can use one Op...

Page 12: ... Mechanical provides information about AutoCAD Mechanical with the power pack The Help is formatted for easy navigation and includes Content organized by the major functional areas of AutoCAD Mechanical with Concept Reference and Procedure pages for each functional area Procedure pages provide step by step instructions on how to execute a given task The linked Concept page provides background info...

Page 13: ... Sources for product support are listed on the AutoCAD Mechanical Product Information Web page From the AutoCAD Mechanical Web site at http www autodesk com autocadmech navigate to the Support Knowledge Base You can also navigate to the Community page which contains links to various communities including the AutoCAD Mechanical Discussion Group Design Features in AutoCAD Mechanical This section pro...

Page 14: ...m up recommended middle out the most flexible and common workflow and top down not the primary workflow Associative Design and Detailing The browser is used to manage and reuse data in both the design and detailing drafting stages Many functions can be performed in the browser including the following You can instance components and assemblies multiple times The live BOM database in AutoCAD Mechani...

Page 15: ...projects that reference the same drawing are able to obtain the most updated design from the externally reference component Ability to set up design specific reference directories as libraries for different applications Associative 2D Hide The 2D hide situation tool in AutoCAD Mechanical automates the process to accurately represent parts and features which are partially or completely hidden in dr...

Page 16: ...s increase productivity and reduce the number of steps needed to complete mechanical designs AutoCAD Mechanical provides an intelligent customizable layer management system that puts objects on the appropriate layers automatically Entities that are not on the current layer group or entities that are on a locked layer group can be displayed in a different color to reduce screen clutter 2D hidden li...

Page 17: ...rings belts and chains and cams These tools ensure that you get the design right the first time With the shaft generator you can create drawing views of solid and hollow shafts Common shaft features supported include center holes chamfers cones fillets grooves profiles threads undercuts and wrench fittings Common standard parts supported include bearings gears retaining rings and seals With the sp...

Page 18: ...nize standard parts You can format item numbers on parts lists Standard sized drawing borders and customizable title blocks are available Intelligent and associative hole tables show a total count of each type of hole along with a description of them A second chart lists the coordinates for each of the holes selected Any update to the holes is reflected in the charts A language converter translate...

Page 19: ...andard content includes parametrically generated intelligent geometry that you can use to generate an object from scratch The following are available About 600 000 standard parts including screws nuts washers pins rivets bushings rings seals bearings keys and others can be quickly incorporated into any design About 8 000 standard features including center holes undercuts keyways and thread ends ca...

Page 20: ...s the entire extended manufacturing enterprise Autodesk Streamline functionality includes the following Members can view and interact with the 3D data set published on Autodesk Streamline without waiting for the data to download Using Streamline many people can share design information and collaborate online Functionality includes instant messages e mail notifications polling voting discussion thr...

Page 21: ...f description of each and the associated toolbutton Some commands do not have an associated toolbutton This list does not contain AutoCAD commands In some cases where some of the task specific toolbars are available in a more comprehensive format from the Main toolbar at View Toolbars it is noted in the table Description Command Name Toolbut ton Provides layer group support within the Auto CAD Des...

Page 22: ...ANNOTE Suits an existing hatch to a changed contour AMASSOHATCH Displays or attaches non attached symbols AMATTACHSYM Automatically creates construction lines on selected drawing elements AMAUTOCLINES Creates an external detail drawing xref of selected elements from an assembly drawing AMAUTODETAIL Creates chain baseline ordinate in both axes shaft or symmetric dimensions AMAUTODIM Creates and pla...

Page 23: ...th item num bers and lists of like items in a BOM AMBOM Breaks a line polyline or a spline on a speci fied point AMBREAKATPT Draws a special spline to show the breakout borders AMBROUTLINE Switches the mechanical browser on and off AMBROWSER Switches the mechanical browser on AMBROWSEROPEN Switches the mechanical browser off AMBROWSERCLOSE Creates a blind slot AMBSLOT2D Creates and calculates cam ...

Page 24: ...raws a centerline cross in a hole AMCENCRINHOLE Draws a centerline cross AMCENCROSS Draws centerline cross on a plate AMCENCRPLATE Draws a centerline in between two lines AMCENINBET Creates a centerhole AMCENTERHOLE2D Creates a centerline and center marks through selected circles and arcs while in Drawing mode AMCENLINE Draws a centerline AMCENTLINE 16 Chapter 2 Commands in AutoCAD Mechanical ...

Page 25: ...ghlights and edits dimensions with overridden text AMCHECKDIM Creates a clevis pin AMCLEVISPIN2D Locks or unlocks the construction line layer AMCLINEL Switches construction lines on or off AMCLINEO Designs calculates and inserts compression springs and places spring specification tables in drawings AMCOMP2D Draws construction lines Design Toolbar De sign Toolbar Draw Construction for more construc...

Page 26: ...ur AMCONTRACE Converts the current drawing AMCONVDWG Copies a user specified layer group or selected geometry into a new layer group AMCOPYLG Copies views to the same layout or to a differ ent layout AMCOPYVIEW Creates a cotter pin AMCOTTERPIN2D Creates a standard related counterbore AMCOUNTB2D Creates a standard related countersink AMCOUNTS2D Creates a countersunk rivet AMCRIVET2D 18 Chapter 2 Co...

Page 27: ...E Deletes views and its dependent views AMDELVIEW Creates associative and scaled detail frames of selected parts of a drawing AMDETAIL Aligns linear rotated aligned ordinate or angular dimensions that have a base dimen sion of the same type AMDIMALIGN Rearranges individual dimensions that lie along one axis in respect to a reference point AMDIMARRANGE Creates breaks in an existing dimension AMDIMB...

Page 28: ...ons at the same time AMDIMMEDIT Resizes objects by stretching shrinking linear and symmetric dimensions AMDIMSTRETCH Creates a single drill bushing AMDRBUSH2D Creates a drill bushing and the corresponding hole AMDRBUSHHOLE2D Creates views of Autodesk Inventor linked models while in Drawing mode AMDWGVIEW Creates edge symbols AMEDGESYM Edits balloons parts lists and symbols AMEDIT Displays or selec...

Page 29: ...cture environment into its component objects AMEXPLODE Designs calculates and inserts extension springs and inserts spring specification tables in drawings AMEXT2D Creates an external thread AMEXTHREAD2D Creates feature control frame symbols AMFCFRAME Calculates stress and deformation in a plane for plates with a given thickness or in a cross AMFEA2D section with individual forces and stretching l...

Page 30: ...ove in a shaft AMGROOVE2D Creates a grooved drive stud AMGROOVESTUD2D Creates a 135 degree and 11 mm 0 4 inch hatch AMHATCH_135_11 Creates a 135 degree and 2 7 mm 0 11 inch hatch AMHATCH_135_2 Creates a 135 degree and 4 7 mm 0 19 inch hatch AMHATCH_135_4 Creates a 45 degree and 13 mm 0 5 inch hatch AMHATCH_45_13 Creates a 45 degree and 2 5 mm 0 1 inch hatch AMHATCH_45_2 Creates a 45 degree and 5 m...

Page 31: ...f inertia for cross sections of cylinders hollow cylinders rectan gular prisms or hollow rectangular prisms AMINERTIAPROF Recreates the associative link between a dwg file and an Autodesk Inventor assembly iam or part ipt document AMIVLINK Selects an Autodesk Inventor Project ipj file to use as the active project file for opening Autodesk Inventor assembly iam files AMIVPROJECT Rereads associated ...

Page 32: ...ERGROUP Switches invisible lines on or off AMLAYINVO Moves lines to another layer AMLAYMOVE Moves lines to parts layers AMLAYMOVEPL Moves lines to working layers AMLAYMOVEWL Switches standard parts on or off AMLAYPARTO Switches part reference on or off AMLAYPARTREFO Resets all layers AMLAYRESET Switches the border and title block on or off AMLAYTIBLO 24 Chapter 2 Commands in AutoCAD Mechanical ...

Page 33: ...OVE Displays the Library dialog box AMLIBRARY Lists information about a selected view while in Drawing mode AMLISTVIEW Creates a lubricator AMLUBRI2D Dynamically moves and rotates selected geom etry along around the X Y Z axes AMMANIPULATE Makes a contour visible AMMCONTV Displays the browser in the mechanical struc ture environment AMBROWSER Creates marking and stamping symbols AMMARKSTAMP Comman...

Page 34: ...association to the drawing view geometry AMMOVEDIM Moves a drawing view to another location in the drawing or to another layout while in Drawing mode AMMOVEVIEW Describes holes fits and standard parts and creates associative notes to the drawing with a leader AMNOTE Creates a nut AMNUT2D Creates new objects at specified distances from an existing object or through a specified point AMOFFSET Sets c...

Page 35: ... shaft or in a housing AMPLBEAR2D Inserts the current date in the lower right corner of the title block AMPLOTDATE Creates a plain rivet AMPLRIVET2D Creates a plug AMPLUG2D Copies an object with its internal information to another position in the drawing AMPOWERCOPY Creates power dimensions or assigns toler ances or fits to power dimensions AMPOWERDIM Creates aligned linear dimensions AMPOWERDIM_A...

Page 36: ... AMPOWERDIM_BAS Creates a linear angular or arc length dimen sion from the second extension line of an ex isting dimension AMPOWERDIM_CHAIN Creates diameter dimensions for arcs and cir cles AMPOWERDIM_DIA Creates horizontal linear dimensions AMPOWERDIM_HOR Creates radius dimension with a jog at a con venient location and the origin of the dimen sion at any location you wish AMPOWERDIM_JOG Creates ...

Page 37: ...created to create a new object AMPOWERRECALL Sets object snap modes polar snap and filters for object snaps AMPOWERSNAP Creates top or side views of standard parts AMPOWERVIEW Creates a projection crosshairs used for creat ing orthographic views AMPROJO Controls the scale of all drawing symbols AMPSCALE Sets user defined snap settings on tab 1 AMPSNAP1 Sets user defined snap settings on tab 2 AMPS...

Page 38: ...naps to a reference point AMPSNAPREF Snaps to a relative point AMPSNAPREL Snaps to a virtual intersection point of two lines AMPSNAPVINT Switches snapping of the Z coordinate on or off AMPSNAPZO Creates a rectangle by defining its starting and endpoint See Appendix A Design Toolbar AMRECTANG Draw Rectangle for more rectangle com mands Saves REFEDIT working set changes AMREFCLOSE 30 Chapter 2 Comma...

Page 39: ...REV Inserts a revision list into a drawing or adds an additional revision line to an existing revi sion list AMREVLINE Updates revision lists AMREVUPDATE Creates plain and countersunk rivets AMRIVET2D Inserts a radial or axial roller bearing on a shaft or in a housing AMROLBEAR2D Selects folder s or view folder s in mechanical structure and sets them as the active edit tar get AMSACTIVATE Specifie...

Page 40: ...OPEN Closes the structure catalog dialog box AMSCATALOGCLOSE Views and edits the scale of scale areas or viewports AMSCMONITOR Copies the definitions of instanced folders components or views in the mechanical structure environment AMSCOPYDEF Creates components component views fold ers and annotation views in drawings in the mechanical structure environment AMSCREATE Creates a screw or bolt AMSCREW...

Page 41: ...he mechanical structure en vironment AMSEDIT Sets up a drawing AMSETUPDWG Moves a structure component from the cur rent drawing to a new drawing file and con verts it to an external reference component AMSEXTERNALIZE Creates rotationally symmetric shaft parts and inner and outer shaft contours AMSHAFT2D Calculates deflection line bending moment torsion moment supporting force torque ro AMSHAFTCALC...

Page 42: ...him ring on a shaft AMSHIMRING2D Creates seam and fillet simple welds AMSIMPLEWELD Inserts a new instance of a component view folder or annotation view in model space in the mechanical structure environment AMSINSERT Converts an external reference component to a local component on the current drawing AMSLOCALIZE Moves objects and their associated occur rences in one or more folders or views to an ...

Page 43: ...ical structure environ ment Replaces the definition of a folder or view with another definition of objects in the mechanical structure environment AMSREPLACEDEF Opens the Standard Parts Database dialog box for selection AMSTDPLIB Opens the Standard Parts Database dialog box for editing AMSTDPLIBEDIT Changes the representation of a standard part AMSTDPREP Creates a steel shape AMSTLSHAP2D Changes t...

Page 44: ...YMLEADER Draws symmetrical lines AMSYMLINE Creates a standard related tapped blind hole AMTAPBHOLE2D Creates a taper hole with an external thread AMTAPETHREAD2D Creates a taper hole with an internal thread AMTAPITHREAD2D Creates a taper pin AMTAPERPIN2D Creates a standard related tapped through hole AMTAPTHOLE2D Creates a taper or slope symbol AMTAPERSYM 36 Chapter 2 Commands in AutoCAD Mechanical...

Page 45: ...ters text horizontally and vertically AMTEXTCENT Centers text centered horizontally around the selected point AMTEXTHORIZ Aligns mtext to the right AMTEXTRIGHT Sets text to its default size in model space and layout and defines a height for an inserted text AMTEXTSIZE Creates text with the text style to TXT AMTEXTTXT Creates a standard related through hole AMTHOLE2D Creates a thread end AMTHREADEN...

Page 46: ... contours on construction lines AMTRCONT Creates a standard related through slot AMTSLOT2D Creates a user defined blind hole AMUBHOLE2D Creates a user defined blind slot AMUBSLOT2D Creates a user defined counterbore AMUCOUNTB2D Creates a user defined countersink AMUCOUNTS2D Creates an undercut on a shaft AMUNDERCUT2D Inserts a user defined hatch AMUSERHATCH 38 Chapter 2 Commands in AutoCAD Mechani...

Page 47: ...lower left quarter of the drawing AMVIEWLL Zooms the predefined lower right quarter of the drawing AMVIEWLR Zooms the predefined upper left quarter of the drawing AMVIEWUL Zooms the predefined upper right quarter of the drawing AMVIEWUR Creates a viewport in layout AMVPORT Creates viewports automatically AMVPORTAUTO Resets the viewports to the default scale factor AMVPZOOMALL Creates a washer AMWA...

Page 48: ...rols the representation of xrefs AMXREFSET Draws zigzag lines AMZIGZAGLINE Displays a selected area in another viewport AMZOOMVP Saves a file into a different file format for use in more than one version of AutoCAD Mechan ical SAVEAS 40 Chapter 2 Commands in AutoCAD Mechanical ...

Page 49: ... and productivity The lessons include step by step instructions and helpful illustrations You learn how to work with templates and layers mechanical structure model space and layouts dimensions steel shapes bills of material BOMs and parts lists Instructions on how to prepare your designs for final documentation are also included 41 ...

Page 50: ...42 ...

Page 51: ... or related items in a drawing A major advantage of working with layer groups is that you can deactivate a specific layer group layer group and a complete component The drawing and its overview are enhanced with a reduction in regeneration time A layer where the standard parts are put All standard parts layers have the suffix AM_ N part layers A file with predefined settings to use for new drawing...

Page 52: ...cks borders and logos dimension and text styles linetypes and lineweights If you start a drawing from scratch AutoCAD Mechanical reads the system defaults from the registry The system defaults have a predefined standard If you create a new drawing based on an existing template and make changes to the drawing those changes do not affect the template To begin working with templates immediately you c...

Page 53: ...r the Enable Structure check box and then choose Apply 3 On the AM Standards tab specify Standard ISO Measurement Metric Model Scale 1 1 Click OK NOTE All settings in this dialog that are stored in the drawing template are marked with this icon The current standard and all related settings are listed in the right section Setting Mechanical Options 45 ...

Page 54: ...ows Specify lower left corner or ON OFF 0 00 0 00 Press ENTER Specify upper right corner 420 00 297 00 Enter 841 1189 press ENTER The limits are expanded to A0 format SavingTemplates Save the previously changed drawing as a template To save a template 1 Start the Save As command On the command line enter SAVEAS 2 In the Save Drawing As dialog box specify Files of type AutoCAD Mechanical Drawing Te...

Page 55: ...n the Template Description dialog box specify Description Tutorial Template Measurement Metric Click OK 4 Close the drawing UsingTemplates Use the previously created template to start a new drawing Using Templates 47 ...

Page 56: ...pen Start the new drawing using the settings of the previously saved template Setting Default StandardsTemplates Specify your template as the default template To set a default template 1 Start the Mechanical Options command On the command line enter AMOPTIONS 2 In the Options dialog box AM Standards tab choose Browse 48 Chapter 3 Working with Templates ...

Page 57: ...ifferent default template NOTE The default standards template is used if a drawing does not contain any AutoCAD Mechanical configuration If a drawing already contains AutoCAD Mechanical configuration data or a new drawing has been created using an AutoCAD Mechanical template the default template does not affect the drawing This is the end of this tutorial chapter Setting Default Standards Template...

Page 58: ...50 ...

Page 59: ...m A folder that contains one or more component views dedicated to annotating and detailing parts and subassemblies annotation view In mechanical structure the implication that a change to one instance of a definition is reflected in all other instances of that definition including the definition itself associative A browser that contains the hierarchy of components compo nent views annotation view...

Page 60: ...g that represent the shape and size of a part or assembly geometry Geometry that is included in a hide situation hidden geometry An iteration of a definition as it appears in mechanical structure instance Used variously to describe any item in mechanical structure whether a component folder or geometry object Placement of a component usually in multiple level assemblies where a component is replic...

Page 61: ...E and press ENTER 2 Respond to the prompts as shown Enter workspace option setCurrent SAveas Edit Rename Delete SEttings Enter C and press ENTER Enter name of workspace to make current Current Workspace Enter Structure and press ENTER Even though you switch to the Structure Workspace mechanical structure is not switched on automatically To enable mechanical structure Click the STRUCT status bar bu...

Page 62: ...ortions are not important 2 Use the Rectangle tool to draw a rectangle around the circle 3 Right click anywhere in the browser and select New Folder 4 Respond to the prompts as shown Enter folder name Folder1 Press ENTER Select objects for new folder Select the circle and then the rectangle and press ENTER Specify base point Pick the lower left corner of the rectangle Modifying Folders While folde...

Page 63: ...ents of structure by cycling through a selection and the tooltip tells you what you are selecting In the next exercise you copy the folder to demonstrate structure selection To copy the folder 1 Press ESC to clear any preselection 2 On the command line enter COPY and press ENTER 3 Continue clicking the circle until you see the word Folder1 1 in the tooltip window 4 Press ENTER to complete selectio...

Page 64: ...rcle is deleted from both instances Next you add new geometry to a folder Before you add geometry you must activate the folder to make it the active edit target This ensures that geometry is added to the folder and not to model space To activate and add geometry 1 In the browser right click Folder1 1 and select Activate The geometry that does not belong to this folder is dimmed out 2 Use LINE to d...

Page 65: ...ch is about the only restriction on folder nesting 1 Draw a small circle in the lower triangle in the second instance of the folder 2 Draw a line from the center of the circle to the 3 o clock quadrant of the circle 3 In the browser right click Folder1 2 and select New Folder 4 Respond to the prompts as shown Enter folder name Folder2 Press ENTER Nesting Folders 57 ...

Page 66: ...lder was created 6 In the browser right click Folder1 2 again and select Insert Folder 7 Respond to the prompts as below Enter folder name to insert or Enter Folder2 press ENTER Specify the insertion point or change Base point Rotate 90 Click in the triangle on the right in the second instance of Folder1 Specify rotation angle 0 Enter 45 press ENTER 58 Chapter 4 Using Mechanical Structure ...

Page 67: ...een instances and occurrences To override properties 1 In the browser right click Folder1 1 and select Property Overrides 2 In the Property Overrides dialog box select the Enable overrides check box 3 Select the Color check box The default color changes to red 4 Click OK Note how the entire instance inclusive of the nested folders is now red Also note how the color change did not have an effect on...

Page 68: ...lick Folder1 1 and select Visible The folder is visible again 3 In the browser right click Folder1 1 Folder2 2 and select Visible Notice that unlike the property overrides both instances of Folder2 are visible in Folder1 2 That s because visibility is occurrence based Selection Modes There are three status bar buttons that control the different selection modes These buttons are not visible by defa...

Page 69: ... to clear any preselection 2 Click the BTM UP TOP DN button and ensure that the text on the button reads TOP DN 3 Click one of the circles in Folder1 1 Note the tooltip indicates that you selected the folder Folder1 1 and not the circle 4 Click the circle again Note the tooltip indicates that you selected the nested folder 5 Click the circle again Note the tooltip indicates that you have finally m...

Page 70: ...aling with components and component views Component Views are basically folders with some extra rules that make them more suitable for mechanical design You typically need more than one view to fully describe a part or assembly Folders and blocks before them don t offer any mechanism other than naming to associate multiple views of the same part Components and views solve this by allowing you to c...

Page 71: ...base point Pick the lower left corner of the rectangle Note that the Mechanical Browser now displays the component COMP1 1 and that it contains the component view Top below it To add a new view to a component 1 In the browser right click COMP1 1 and select New Component View 2 Accept the default name for the component view 3 Select the smaller rectangle and press ENTER 4 To specify a base point cl...

Page 72: ...new instance of a component 1 In the browser right click a vacant area and select Insert Component 2 Respond to the prompts as shown Enter component name or Enter COMP1 and press ENTER Enter component view name or Top Enter Front and press ENTER Specify the insertion point or change Base point Rotate 90 select next View Pick point 1 the top left corner of the larger rectangle Specify rotation angl...

Page 73: ...s shown Specify the insertion point or change Base point Rotate 90 select next View Pick point 2 the lower left corner of the front view of COMP1 1 Specify rotation angle 0 Press ENTER To assemble components 1 Right click anywhere In the browser and select New Component Creating Assembly Components 65 ...

Page 74: ...cidentally select the wrong view you can cancel the selection by selecting the view again with the SHIFT key pressed Specify base point Pick the lower left corner of the combined view The Component Restructure dialog box is displayed 3 In the Destination Components list right click a vacant area and select Create New View 4 Respond to the prompts as shown Enter new view name Top Press ENTER Select...

Page 75: ...3 Respond to the prompts as follows Enter new view name Right Enter Side and press ENTER Select objects for new component view Don t pick anything press ENTER Specify base point Pick the lower left corner of the rectangle 4 In the browser right click COMP1 1 and select New Component View 5 Respond to the prompts as shown Enter new view name Right Enter Side press ENTER Specify parent view or Front...

Page 76: ...cify parent view or Front Enter Side press ENTER Specify the insertion point or change Base point Rotate 90 select next View Enter R press ENTER Specify the insertion point or change Base point Rotate 90 select next View Pick a place close to the other view Specify rotation angle 90 Press ENTER 8 Move the view into the correct position 68 Chapter 4 Using Mechanical Structure ...

Page 77: ...rcle on the top view of the assembly 2 In the browser right click ASSY 1 Top and select New Component 3 Respond to the prompts as shown Enter new component name COMP2 Press ENTER Enter new view name Top Press ENTER Select objects for new component view Select the circle press ENTER Specify base point Click the center of the circle Modifying Assembly Components 69 ...

Page 78: ... Component View 6 Respond to the prompts as shown Enter new view name Front Enter Side press ENTER Specify parent view or Front Press ENTER Select objects for new component view Select the rectangle press ENTER Specify base point Pick the midpoint of the lower edge of the rectangle 70 Chapter 4 Using Mechanical Structure ...

Page 79: ...ng Folders with ComponentViews When folders are used in conjunction with component views you can do several useful things This section shows two examples You can use folders to contain drawing items that would otherwise not be accounted for with a default component view folder In the following example a folder Groove 1 was created to contain the upper groove and arrayed to create the others Becaus...

Page 80: ... captured and organized with these folders Mechanical Browser Display Options The Mechanical Browser shows the hierarchical organization of components within a drawing In this section you use browser options to show data in different ways to get a better understanding of components and component views The default view of the Mechanical Browser shows the hierarchical organization of components as w...

Page 81: ... 2 In the View Tree section select the Display Tree check box 3 In the Component Tree section clear the Component Views check box 4 Click OK 5 Right click a vacant area in the Mechanical Browser and select Expand All In this view the hierarchy of components as well as views are shown Mechanical Browser Display Options 73 ...

Page 82: ... hierarchy of components component views as well as indicates which component owns a given component view In practice you can work with the view settings that makes most sense to you Mechanical Browser and BOMs Components not only group component views they hold bills of material BOM attributes as well In the next exercise you insert a parts list and in the process explore the BOM of the simple as...

Page 83: ...Press ENTER 3 In the BOM dialog box click the plus sign in the first column to expand ASSY 4 Click the Insert Parts list button on the toolbar of the BOM dialog box 5 In the Parts List dialog box click OK and click inside the drawing to indicate where to insert the parts list 6 In the BOM dialog box click OK Mechanical Browser and BOMs 75 ...

Page 84: ...re and Ghost Components In the next exercise you restructure COMP1 1 and COMP2 1 to be parts of an assembly named SUB ASSY To do this you must create SUB ASSY first To create a component 1 Right click a vacant area in the Mechanical Browser and choose New Component 2 Respond to the prompts as follows Enter new component name COMP3 Enter SUB ASSY press ENTER Enter new view name Top Press ENTER 76 C...

Page 85: ... you see the component view name in the tooltip window If you accidentally select the wrong view you can cancel the selection by selecting the view again with the SHIFT key pressed Specify base point Pick the lower left corner of the combined view The Component Restructure dialog box is displayed 3 Observe the Mechanical Browser Browser Restructure and Ghost Components 77 ...

Page 86: ...nts that are in an intermediate state of restructure To learn how to resolve ghost components you must stop creating SUB ASSY at this point 4 Click OK You now have two ghost components in the Mechanical Browser Before you start resolving ghost components you must add two component views to the component SUB ASSY 5 In the Mechanical Browser right click SUB ASSY 1 and select New Component View 6 Res...

Page 87: ... Mechanical Browser right click SUB ASSY 1 and select New Component View again 8 Respond to the prompts as shown Enter new view name Right Enter Side press ENTER Select objects for new component view Don t pick anything press ENTER Specify base point Pick the lower left corner of the assembly displayed in the lower right of the drawing Browser Restructure and Ghost Components 79 ...

Page 88: ...g box is displayed 3 In the Source Component Views list with the CTRL key pressed select COMP1 1 Front and COMP2 1 Side 4 Drag to SUB ASSY1 Front The views move from the Source Component Views list to the Destination Component Views list 5 Drag the remaining views in the Source Component Views list to SUB ASSY1 Side in the Destination Component Views list 6 Click OK 80 Chapter 4 Using Mechanical S...

Page 89: ...1 to be a subassembly of ASSY1 To restructure components 1 In the Mechanical Browser drag SUB ASSY 1 Front to ASSY 1 Front The Restructure components dialog box is displayed 2 Drag SUB ASSY 1 Top to ASSY 1 Top and SUB ASSY 1 Side to ASSY 1 Side 3 Click OK SUB ASSY1 is restructured as a subassembly of ASSY 1 Browser Restructure and Ghost Components 81 ...

Page 90: ...ual parts and subassemblies in external files and share them between designs When a part is modified the changes are propagated to all instances ensuring that assembly drawings are always synchronized with their related part drawings 82 Chapter 4 Using Mechanical Structure ...

Page 91: ...LOG 4 In the Files tab navigate to the tutorials folder and select Tut_Gripper dwg NOTE The path to the tutorials folder is Windows Vista C Users Public Public Documents Autodesk ACADM 2009 Acadm Tutorial Windows XP C Documents and Settings All Users Shared Documents Autodesk ACADM 2009 Acadm Tutorial The structure panel shows the mechanical structure components in the drawing and the preview pane...

Page 92: ...rom Xref Drawing Component View Top 2 Respond to the prompts as shown Specify the insertion point or change Base point Rotate 90 Select nextView Pick the upper left corner of the larger rectangle Specify rotation angle 0 Press ENTER To insert more instances of the xref component 1 On the command line enter MIRROR and press ENTER 2 Respond to the prompts as shown 84 Chapter 4 Using Mechanical Struc...

Page 93: ...mn of the Component View Instance Created dialog box select New A new instance of the component GRIPPER 2 is created You will now mirror the top views of GRIPPER 1 and GRIPPER 2 to draw two more grippers on the top view of the plate 4 On the command line enter MIRROR and press ENTER 5 Respond to the prompts as follows Select objects Ensure that the selection mode is set to TOP DN and in model spac...

Page 94: ...area in the Mechanical Browser and select New Component 2 Respond to the prompts as shown Enter new view name Top Enter Front and press ENTER Select objects for new component view Ensure that the selection mode is set to TOP DN and window select the smaller rectangle and the two grippers connected to it and press ENTER Specify base point Pick the intersection of the construction line with the uppe...

Page 95: ...t and press ENTER Specify base point Pick the intersection of the two construction lines 5 Save the file as Gripper Assembly dwg Editing External Components In place In AutoCAD Mechanical you can edit xref components in place Although this is very convenient if you accidently modify a component the mistake effects all drawings that use this xref component As a precaution you must do one of the fol...

Page 96: ... In the Chamfer dialog box select 10 as the first and second chamfer lengths and click OK 5 Respond to the prompts as shown Select first object or Polyline Setup Dimension Setup Select the left vertical line of the gripper lever 1 Select second object or Return for polyline Select the lower horizontal line of the gripper lever 2 Select object to create original length Press ESC 6 In the Mechanical...

Page 97: ...the link with the xref file is severed To localize an xref component 1 From the Window menu switch to the Gripper Assembly drawing 2 In the Mechanical Browser right click the GRIPPER assembly node and select Localize 3 In the Xref Info message box click Yes The Gripper is no longer an xref component To detail a part without loosing associativity between the detail and assembly you can externalize ...

Page 98: ...Layout New layout existing Layout Press ENTER Enter existing layout name Layout1 Press ENTER Enter scale or Calculate 1 2 Press ENTER Switch to Paperspace Restoring cached viewports Regenerating layout Create labels for all subviews Yes No No Press ENTER Specify base point Select a point at the center of the A3 paper for the annotation views Specify the insertion point or change Base point Rotate ...

Page 99: ...nter AMAUTODIM The Automatic Dimensioning dialog box is displayed 2 In the Type drop down list select Chain and click OK 3 Respond to the prompts as follows Select objects Block Window select the larger of the two views in the annotation view Select objects Block Press ENTER First extension line origin Pick the upper left corner of the geometry Specify dimension line location or Options Pickobj Se...

Page 100: ... Browser right click LEVER AV1 1 and select Zoom to Note that the Lever shape is changed and the dimensions are updated Associative Hide Mechanical structure is all about reuse especially reuse of components in an assembly to show multiple instances of a component and reuse of component views in the assembly and in the part detail Component view instances are often obscured in the assembly sometim...

Page 101: ...DM 2009 Acadm Tutorial The drawing contains three instances of a folder where two overlap each other 2 Start the Associative Hide command On the command line enter AMSHIDE 3 Respond to the prompts as follows Select foreground objects Ensure that the selection mode is set to TOP DN and click the upper rectangle 1 Select foreground objects Press ENTER 4 In the Hide Situation dialog box expand Level1...

Page 102: ...e Send to Back button on the toolbar of the dialog box Note that the position of Level1 changes in the tree and model space reflects the change immediately 10 Click OK In the next exercise you edit the hide situation and add the third folder to the hide situation To edit a hide situation 1 In the Mechanical Browser if a node named Hide Situations is not visible a Right click TUT_AMSHIDE on the Mec...

Page 103: ...4 In the Toolbar of the Hide Situation dialog box click the button Level3 is added to the top of the tree 5 Click to select objects for Level3 6 Respond to the prompts as follows Select objects Ensure that the selection mode is set to TOP DN and click the rectangle on the extreme right Select objects Press ENTER 7 Click OK 8 Use the MOVE command to move the contents of Folder 1 3 on top of Folder1...

Page 104: ...Vista C Users Public Public Documents Autodesk ACADM 2009 Acadm Tutorial Windows XP C Documents and Settings All Users Shared Documents Autodesk ACADM 2009 Acadm Tutorial The drawing contains an assembly of a robotic arm and has external references to the gripper assembly you created during the exercise for external references To create a hide situation between the gripper and the axis of the robo...

Page 105: ...objects Continue clicking 2 until you see AXIS 1 Front in the tooltip Select objects Press ENTER 7 In the tree view of the Create Hide Situations dialog box click the Hide node In the next step you select where in the Mechanical Browser the hide situation is stored The most logical place to store the hide situation is on the Front view of the ROBOT 1 assembly 8 In the Store Hide Situation on list ...

Page 106: ...98 ...

Page 107: ... example center points of holes into other views or drawing areas A line or an arc created with construction lines Using construc tion geometry in 2D drawings helps define the shape of a contour construction geometry A portion of a design drawing that cannot be clearly displayed or dimensioned in the overall representation but can be en larged to show the details detail To give the dimensions in a...

Page 108: ...near radial and diameter dimensions which minimizes the number Power Dimensioning of the individual actions required while generating a dimen sion Power Dimensioning selects the type of linear dimension horizontal vertical or aligned based on the selected point and the dimensions of the drawing can have a uniform style using the distance snap Extending Designs First you start a new drawing templat...

Page 109: ...brary 3 Respond to the prompt as follows Specify insertion point Specify any point in the drawing 4 Start the Zoom Window command On the command line enter ZOOM Respond to the prompts as follows All Center Dynamic Extents Previous Scale Window Object real time Enter window press ENTER Specify first corner Specify first corner 1 Specify opposite corner Specify opposite corner 2 Using Libraries to I...

Page 110: ...ich can be configured separately for a quick switch to a different snap setting For example you can use different snap settings for detailing or general design NOTE The snap defaults can be set in the Options dialog box on the AM Preferences tab To configure Power Snap settings 1 Start the Power Snap settings On the command line enter AMPOWERSNAP 2 In the Power Snap Settings dialog box In the Powe...

Page 111: ...T key and right click Creating Construction Lines C Lines Construction lines are very useful when you start your design process With their help you draw a design grid with your defined values for distance and angles After generating the design grid you simply trace your contour with the contour layer Now insert the construction lines which will help you draw the contour lines To create constructio...

Page 112: ...ne cross 5 Start the Draw Construction Lines command On the command line enter AMCONSTLINES The Construction Lines dialog box is displayed 6 In the Construction Lines dialog box choose the option next to Parallel construction line with full distance icon shown below and click OK 7 Respond to the prompts as follows Select line ray or xline Select line c 1 Specify insertion point or Distance xx xx x...

Page 113: ...g additional C Lines AutoCAD Mechanical offers a large choice of C line options To create additional construction lines 1 Activate snap setting 2 On the command line enter AMPSNAP2 2 Start the Draw Construction Lines command On the command line enter AMCONSTLINES The Construction Lines dialog box is displayed 3 In the Construction Lines dialog box choose the option next to the Construction line by...

Page 114: ...raw Construction Lines command On the command line enter AMCONSTLINES The Construction Lines dialog box is displayed 7 In the Construction Lines dialog box choose the option next to the Construction line circle tangent to 2 lines icon shown below and click OK 8 Draw the two circles by responding to the prompts as follows Select first tangent Select tangent point 1 Select second tangent Select tang...

Page 115: ...responding to the prompts as follows Specify start point Specify the intersection point 1 Specify next point or Arc Halfwidth Length Undo Width Specify next point 2 Specify next point or Arc Close Halfwidth Length Undo Width Enter A press ENTER Specify endpoint of arc or Angle CEnter CLose Direction Halfwidth Line Radius Second pt Undo Width Specify next point 3 Specify endpoint of arc or Angle CE...

Page 116: ...nes by calling one command 3 Erase all C Lines On the command line enter AMERASEALLCL NOTE You can switch construction lines on and off temporarily by choosing Assist Layer Layergroup Construction Line On Off 4 Apply a fillet to the corner of the triangle On the command line enter AMFILLET2D 5 Respond to the prompts as follows Dimension mode OFF Trim mode Current fillet radius 2 5 Select first obj...

Page 117: ...up Dimension Setup Enter P press ENTER Select polyline Select a point on the polyline near the corner 9 Press ESC to cancel the command The triangular contour is complete Save your file Trimming Projecting Edges on Contours Now you create another part of the contour and trim projecting edges Trimming Projecting Edges on Contours 109 ...

Page 118: ...oint or Undo Hold down the SHIFT key right click and choose Perpendicular from the menu _per to Select line e Specify next point or Undo Drag the cursor to the right crossing over line c and select intersection point 4 Specify next point or Close Undo Press ENTER Now trim the projecting edges at the upper edge of the lever 4 Start the Trim command On the command line enter TRIM 5 Respond to the pr...

Page 119: ...rim 3 Select object to trim or shift select to extend or Project Edge Undo Select object to trim 4 Select object to trim or shift select to extend or Project Edge Undo Press ENTER 6 Zoom to the extents of the lever The contour is complete and looks like this Save your file Trimming Projecting Edges on Contours 111 ...

Page 120: ...r 1 Start the Hatch command using an angle of 45 degrees and 2 5 mm 0 1 inch spacing On the command line enter AMHATCH_45_2 2 Respond to the prompt as follows Select additional boundary or point in area to be hatched or Select objects Click a point inside the contour outside the cutouts The lever is hatched It looks like this Save your file Dimensioning Contours Now dimension the lever using the P...

Page 121: ...ain Options Update select object Select the first corner point of the lever opening 1 Specify second extension line origin Select the second corner point 2 Specify dimension line location or Horizontal Vertical Aligned Rotated Placement options Drag the dimension line to the left until it is highlighted in red click 3 4 In the Power Dimensioning dialog box click the Add Tolerance button and specif...

Page 122: ... OK 5 Press ENTER twice to finish the command The lever looks like this Save your file Creating and Dimensioning DetailViews Now define a detail of the upper part of the lever 114 Chapter 5 Designing Levers ...

Page 123: ...ick a point in the center of the area to be detailed 1 Specify radius or Diameter Drag the radius to the appropriate size click 2 3 In the Detail dialog box specify Detail View Detail in Current Space 4 Click OK and respond to the prompts as follows Place the detail view Select a location to the right of the lever Creating and Dimensioning DetailViews 115 ...

Page 124: ... the detail 5 Start the Power Dimensioning command On the command line enter AMPOWERDIM 6 Respond to the prompts as follows Specify first extension line origin or Linear Angular Radial Baseline Chain Options Update select object Press ENTER Select arc line circle or dimension Select the radius 1 116 Chapter 5 Designing Levers ...

Page 125: ...or the dimension 8 In the Power Dimensioning dialog box click the tolerances button to deactivate the tolerances Click OK 9 Press ENTER twice to finish the command Now your lever looks like this Creating and Dimensioning DetailViews 117 ...

Page 126: ...cale area If you dimensioned the radius in the original drawing the dimension value would be the same The text height is also the same as per the selected drafting standard This is the end of this tutorial chapter Save your file 118 Chapter 5 Designing Levers ...

Page 127: ...rs are repeated in every layer group base layer Enlargement of a portion of the design drawing that cannot be clearly displayed or dimensioned The overall representation surface texture symbols etc can be enlarged detail A layout of drawing views in model space or layout drawing A group of associated or related items in a drawing A major advantage of working with layer groups is that you can deact...

Page 128: ...ed in a layout viewport The scale of a base drawing relative to the model scale Also the scale of dependent views relative to the base view view scale The layer where you are currently working working layer Working with Model Space and Layouts Using model space and layouts you can create different views with different scales from the same model The main advantage of working with layouts is that vi...

Page 129: ... stroke engine Save your file under a different name or to a different directory to preserve the original tutorial file Creating Scale Areas To generate correct views with correct zoom factors in a layout you must define a scale area in model space Create the scale area To create a scale area 1 Start the Viewport Scale Area command On the command line enter AMSCAREA 2 Respond to the prompts as fol...

Page 130: ...3 In the Scale Area dialog box specify Scale 1 1 Click OK Since you now have a defined scale area you can automatically create a viewport 122 Chapter 6 Working with Model Space and Layouts ...

Page 131: ... the viewport on the left inside the drawing border Save your file Creating DetailViews There are two types of detail views associative and non associative In this exercise you create an associative detail because you use a viewport Create an associative detail of the valve To create a detail 1 Start the Detail command On the command line enter AMDETAIL The viewport is activated automatically 2 Re...

Page 132: ...ius or Diameter Drag the radius to the desired size 4 3 In the Detail dialog box specify the settings shown in the illustration Click OK 4 Respond to the prompt as follows Select target position Return for current position Place the detail to the right of the current viewport 124 Chapter 6 Working with Model Space and Layouts ...

Page 133: ...Start the Viewport Scale Area command On the command line enter AMVPORT 2 Respond to the prompts as follows Specify first point or Circle Border Object Select point 5 in the drawing Specify second point Select point 6 in the drawing 3 In the View dialog box specify Scale 5 1 Choose Midpoint Generating NewViewports 125 ...

Page 134: ...pace so that you can define the midpoint 4 Respond to the prompt Select view center Select the endpoint of the centerline 5 In the View dialog box Click OK Your drawing looks like this 126 Chapter 6 Working with Model Space and Layouts ...

Page 135: ...a user through hole in the previously created viewport To insert a through hole 1 Activate the previously created viewport On the command line enter MSPACE The viewport has a thick highlighted frame 2 Start the Through Hole command On the command line enter AMTHOLE2D 3 In the Select a Through Hole dialog box scroll to and select User Through Holes and then click Front View Inserting Holes WithinVi...

Page 136: ...tion point Hold down the SHIFT key and right click and then choose Midpoint 5 Specify insertion point _mid of Select the midpoint of the housing 1 Specify hole length Select the endpoint of the hole 2 128 Chapter 6 Working with Model Space and Layouts ...

Page 137: ...ks like this Because of the associativity the through hole created in the viewport also appears in the original view In the next step you dimension the through hole diameter in the viewport Since the dimension is to appear only in the detail view you generate the dimension directly in the layout without having a viewport active Inserting Holes WithinViewports 129 ...

Page 138: ...extension line origin Select the second edge of the hole 2 Specify dimension line location or Horizontal Vertical Aligned Rotated Placement options Drag the dimension line toward point 3 until it turns red and then click 4 In the Power Dimensioning dialog box Click OK 5 Continue to respond to the prompts as follows Specify first extension line origin or Linear Angular Radial Baseline Chain Options...

Page 139: ...roups in a viewport so that only the detail or subassembly is visible Before you create a subassembly in a new layout freeze the model and other views Then when you create a new viewport in Layout 2 only the specified subassembly is displayed and objects are not hidden in the model and other views To freeze the model and other layouts 1 Select the Layout 2 tab on the bottom of your drawing area La...

Page 140: ...rea Layout 2 is displayed 2 Start the Viewport Scale Area command On the command line enter AMVPORT 3 Respond to the prompts as follows Specify first point or Circle Border Object Select point 7 in the drawing Specify second point Select point 8 in the drawing 4 In the View dialog box specify Scale 5 1 Choose Midpoint 132 Chapter 6 Working with Model Space and Layouts ...

Page 141: ...int as shown in the following drawing 6 In the View dialog box Click OK In the new viewport only the subassembly you specified is visible AutoCAD Mechanical freezes the Base Layer Group Your drawing looks like this Creating Subassemblies in New Layouts 133 ...

Page 142: ...en you plot the drawing the red viewport frame is turned off automatically If you have a plotter or printer driver installed use the plot command and preview the drawing This is the end of this tutorial chapter Save your file 134 Chapter 6 Working with Model Space and Layouts ...

Page 143: ...l object centerline A standardized frame that is used for technical drawings drawing border Range of tightness or looseness in mating parts for example shafts or holes Tolerances in these dimensions are expressed in standard form fit Name of the selected fit for example H7 fit name An option where you determine a selection set of dimensions and edit them together multi edit Power Dimensioning is a...

Page 144: ...tes can be completed with new values title block The total amount by which a given dimension nominal size may vary for example 20 0 1 tolerance Adding Dimensions to Drawings AutoCAD Mechanical offers various dimensioning tools Use automatic dimensioning to add dimensions to a bushing and then change these dimensions To open a file Open the file tut_bushing dwg in the tutorials folder On the comman...

Page 145: ...aneously Dimension the bushing using automatic dimensioning To dimension a contour 1 Start Automatic Dimensioning On the command line enter AMAUTODIM 2 In the Automatic Dimensioning dialog box Parallel tab specify Type Baseline Click OK 3 Respond to the prompts as follows Select objects Block Adding Multiple Dimensions Simultaneously 137 ...

Page 146: ...ement options Drag the dimensioning downwards until it snaps in highlighted red and then click Starting point for next extension line Press ENTER to end the command Generate the diameter dimensions using shaft dimensioning To dimension a shaft 1 Start Automatic Dimensioning On the command line enter AMAUTODIM 2 In the Automatic Dimensioning dialog box Shaft Symmetric tab specify Type Shaft Front V...

Page 147: ... ENTER Select Centerline or new starting point Select the centerline of the bushing 1 Specify dimension line location or Placement options Drag the dimensioning to the right until it snaps in highlighted red and then click 4 Continue responding to the prompt Starting point for next extension line Adding Multiple Dimensions Simultaneously 139 ...

Page 148: ... delete the dimensions that you don t need To delete dimensions 1 Start Power Erase On the command line enter AMPOWERERASE 2 Respond to the prompt as follows Select objects Select baseline dimensions 2 and 61 and diameter dimensions 12 14 and 36 press ENTER The dimensions are deleted and the remaining dimensions are rearranged Your drawing looks like this 140 Chapter 7 Dimensioning ...

Page 149: ...cify first extension line origin or Linear Angular Radial Baseline Chain Options Update select object Select the first point 1 Specify second extension line origin Select second point 2 Specify dimension line location or Horizontal Vertical Aligned Rotated Placement options Drag the dimensioning to the left until it is highlighted red and then click Editing Dimensions with Power Commands 141 ...

Page 150: ...1 Respond to the prompts as follows Specify first extension line origin or Linear Angular Radial Baseline Chain Options Update select object Enter A press ENTER Single Select arc circle line or Baseline Chain eXit specify vertex Select the line 1 Select second line Select the second line 2 Specify dimension arc line location Drag the dimension to a suitable position and then click 142 Chapter 7 Di...

Page 151: ...and line enter AMDIMMEDIT 2 Respond to the prompts as follows Select dimensions Select the dimensions 18 and 30 Select dimensions Press ENTER 3 In the Power Dimensioning dialog box choose the Add Fit button and then specify Fit Symbol h7 Click OK The fit description h7 is added to the dimensions Save your file Editing Dimensions with Power Commands 143 ...

Page 152: ...e enter AMDIMBREAK 2 Respond to the prompt as follows Select dimension or extension line to break Multiple Press ENTER Select dimensions Select baseline dimension 10 and 13 and diameter dimensions 18 30 and 40 press ENTER Select Objects Restore Automatic Press ENTER The selected dimensions are broken automatically and your drawing looks like this Save your file Inserting Drawing Borders Insert a d...

Page 153: ...the Drawing Borders with Title Block dialog box specify Paper Format A4 297x210mm Title Block ISO Title Block A Scale 1 1 Click OK 3 Respond to the prompt as follows Specify insertion point Enter 150 0 press ENTER 4 In the Edit Attributes dialog box specify Drawing Title Bushing Inserting Drawing Borders 145 ...

Page 154: ...cts Select the complete bushing including dimensions Select Objects Press ENTER New location for objects Click Zoom Extents New location for objects Place the bushing in the middle of the drawing border Your drawing looks like this 146 Chapter 7 Dimensioning ...

Page 155: ... list 1 Start the Fits List command On the command line enter AMFITSLIST 2 Respond to the prompts as follows Fits lists Update all Order New New Press ENTER Specify insertion point Specify the upper right corner of the title block The fits list is inserted above the title block and looks like this Inserting Fits Lists 147 ...

Page 156: ...n 1 In the drawing double click the diameter dimension not the dimension line 18 h7 2 In the Power Dimensioning dialog box specify Fit symbol g6 Click OK 3 In the AutoCAD Question dialog box choose Yes The fits list is updated too Save your file 148 Chapter 7 Dimensioning ...

Page 157: ...This is the end of this tutorial chapter Inserting Fits Lists 149 ...

Page 158: ...150 ...

Page 159: ...that is covered by another contour or by objects that are lying behind another contour in the 3D sense A background may be a foreground for an additional contour background Objects which are lying in front of another contour in the 3D sense A foreground may also be a background for an additional contour foreground Line that is not visible in a specified view For example in a front view lines behin...

Page 160: ...er 1 Enter AMBROWSER in the command prompt and press ENTER 2 When prompted enter ON and press ENTER Opening the initial drawing To open a drawing 1 Open the file tut_steelshape dwg in the Tutorial folder at Windows Vista C Users Public Public Documents Autodesk ACADM 2009 Acadm Tutorial Windows XP C Documents and Settings All Users Shared Documents Autodesk ACADM 2009 Acadm Tutorial 2 Zoom in to t...

Page 161: ...ne a 2D hide situation 1 Start the Hide Invisible Edges command On the command line enter AM2DHIDE 2 Respond to the prompts as follows Select objects for foreground Select the chain Select objects for foreground Press ENTER 3 In the Create Hide Situation dialog box Background tab specify Representation of Hidden Objects Dashed Choose Preview Defining 2D Hide Situations 153 ...

Page 162: ...ain contour is defined as foreground Define the 2D hide situation in a way that the chain has an inner contour 4 Respond to the prompt as follows Accept preview and exit command Yes No Yes Enter N press ENTER 5 In the Create Hide Situation dialog box Foreground tab click Select Inner Contours 154 Chapter 8 Working with 2D Hide and 2D Steel Shapes ...

Page 163: ...e inner contour of the chain is displayed green 7 Respond to the prompt as follows Select point inside a hole or select a loop to remove Press ESC 8 In the Create Hide Situation dialog choose Preview The sprocket is no longer displayed as a hidden line and the chain drive is displayed correctly Defining 2D Hide Situations 155 ...

Page 164: ...le Inserting 2D Steel Shapes Steel Shapes can easily be inserted through a selection dialog box where you can define the standard profile size and length of the steel shape Insert a steel shape with a square hollow section on the left edge of the I shaped girder To insert a 2D steel shape 1 Start the Zoom All command On the command line enter ZOOM 2 Start the Steel Shape command On the command lin...

Page 165: ... and then select ISO 657 14 1982 Rectangular and Top View 4 Respond to the prompts as follows Specify insertion point Select point P1 Specify rotation angle 0 Press ENTER 5 In the ISO 657 14 1982 Rectangular Size Selection dialog box specify Select a Size 90x90x4 0 Inserting 2D Steel Shapes 157 ...

Page 166: ...to the prompt as follows Drag Size Select point P2 The steel shape is inserted Your drawing looks like this Save the file Modify the steel shapes using the Power Commands 158 Chapter 8 Working with 2D Hide and 2D Steel Shapes ...

Page 167: ...w 4 Respond to the prompts as follows Specify insertion point Select point P3 Specify rotation angle 0 0 press ENTER The steel shape is inserted in the top view of the assembly Your drawing looks like this Copy the previously inserted view to the other edge of the girder 5 Start the Power Copy command On the command line enter AMPOWERCOPY 6 Respond to the prompts as follows Select object Select th...

Page 168: ...the 2D hide situation To edit a 2D hide situation 1 Start the Edit Hidden Edges command On the command line enter AM2DHIDEDIT 2 Respond to the prompts as follows Edit the behind situation modifY Move Restore Genius12 Update Enter Y press ENTER Select objects Select the square hollow section on the left Select objects Press ENTER 3 In the Modify Hide Situation dialog box Foreground tab choose Selec...

Page 169: ...e I shaped girder Select objects for foreground Press SHIFT while you click the square hollow section on the left to deselect it Select objects for foreground Press ENTER 5 In the Modify Hide Situation dialog box Background tab choose Select View Editing 2D Hide Situations 161 ...

Page 170: ...he behind situation modifY Move Restore Genius12 Update Press ENTER Select objects Press ENTER The 2D hide situation is corrected Save your file Copying and Moving 2D Hide Situations If you copy or move assemblies that contain 2D hide situations the 2D hide information is not lost Copy the girder assembly To copy a 2D hide situation 1 Select the I shaped girder and the two square hollow sections 2...

Page 171: ...bly To move a 2D hide situation 1 Start the Move command On the command line enter MOVE 2 Respond to the prompts as follows Select objects Select the complete chain drive using a window Select objects Press ENTER Specify base point or displacement Select point P6 Specify second point of displacement or use first point as displacement Select point P7 The complete chain drive is moved to the top vie...

Page 172: ...the Hide Invisible Edges command On the command line enter AM2DHIDE 2 Respond to the prompts as follows Select objects for foreground Select the complete chain drive Select objects for foreground Press ENTER 3 In the Create Hide Situation dialog box Click OK 164 Chapter 8 Working with 2D Hide and 2D Steel Shapes ...

Page 173: ...Now the girder assembly is hidden by the chain drive Your drawing looks like this Save your file This is the end of this exercise Copying and Moving 2D Hide Situations 165 ...

Page 174: ...166 ...

Page 175: ...te in both directions or infinite starting at a point which can be inserted into the drawing area You use C C line construction line lines to transfer important points for example center points of holes into other views or drawing areas A chamfered hole that allows bolt and screw heads to be flush or below the part surface countersink The act of determining the size of a standard part with the cur...

Page 176: ...Power Recall A command where you can quickly and easily create a standard part top view or bottom view of a side view and vice versa Power View Standard parts representation in a drawing in normal simplified or symbolic mode representation Working with Standard Parts AutoCAD Mechanical provides a large selection of standard parts to work with including regular and fine threads many types of holes ...

Page 177: ...dd standard components and show how easy it is to edit standard parts with an automatic update of the background objects Before you proceed you must enable mechanical structure If you proceed without mechanical structure enabled some command line prompts will differ from the prompts in the exercise 2 Zoom in to the area of interest On the command line enter ZOOM 3 Respond to the prompts as follows...

Page 178: ...torial file Inserting Screw Connections Insert a screw connection in the differential gear housing To insert a screw connection 1 Start the Screw Connection command On the command line enter AMSCREWCON2D 2 In the Screw Connection dialog box click Screws 170 Chapter 9 Working with Standard Parts ...

Page 179: ...3 In the Select a Screw dialog box select Socket Head Types Inserting Screw Connections 171 ...

Page 180: ...4 Select ISO 4762 and Front View 172 Chapter 9 Working with Standard Parts ...

Page 181: ...ical and ISO 273 normal 6 In the Screw Connection Front View dialog box click the lower Holes button Then select Tapped Holes Blind and ISO 262 Regular Thread NOTE The screw types available and the order depend on the standard selected to be active in AMOPTIONS AM Standard Parts 7 In the Screw Connection dialog box specify the size M4 Inserting Screw Connections 173 ...

Page 182: ...t 8 Respond to the prompts as follows Specify insertion point of first hole Specify first point 1 Specify endpoint of first hole Gap between holes Specify second point 2 174 Chapter 9 Working with Standard Parts ...

Page 183: ...9 In the Screw Assembly Representation Front View dialog box click Next 10 In the Screw Assembly Grip Representation Front View dialog box click Finish Inserting Screw Connections 175 ...

Page 184: ...d in the status bar where the coordinates are usually displayed The background is automatically hidden and your drawing looks like this Save your file Copying Screw Connections with Power Copy With Power Copy you can copy complete objects including the information attached to those objects In the case of a screw connection you copy the whole screw connection to another location The background is a...

Page 185: ...Y 2 Respond to the prompts as follows Select object Select the previously inserted screw Specify insertion point Specify a point 1 Specify direction Press ENTER The screw is copied to the specified location Your drawing looks like this Save your file Copying Screw Connections with Power Copy 177 ...

Page 186: ...er ZOOM 2 Respond to the prompts as follows All Center Dynamic Extents Previous Scale Window Object real time Enter E press ENTER 3 Zoom in to the coverplate On the command line enter ZOOM 4 Respond to the prompts as follows All Center Dynamic Extents Previous Scale Window Object real time Enter W press ENTER Specify first corner Specify first corner point 1 Specify opposite corner Specify second ...

Page 187: ...1 Start the Screw Connection command On the command line enter AMSCREWCON2D 2 In the Screw Connection dialog box click the Screws button 3 In the Select a Screw dialog box select Countersink Head Type Creating Screw Templates 179 ...

Page 188: ...4 Select ISO 10642 and Front View 180 Chapter 9 Working with Standard Parts ...

Page 189: ...on Then select Countersinks and ISO 7721 6 In the Screw Connection Front View dialog box click the lower Holes button Then select Tapped Holes Blind and ISO 262 7 In the Screw Connection Front View dialog box click Back to store the screw template Creating Screw Templates 181 ...

Page 190: ...8 In the Screw Assembly Templates dialog box click the Save icon Your screw connection is stored as a template and is added to the list Click Next 182 Chapter 9 Working with Standard Parts ...

Page 191: ...ngths 9 In the Screw Connection dialog box click the Pre calculation icon 10 In the Screw Diameter Estimation dialog box specify Material Class 10 9 Applied Force 1500 Nature of Load Static and Centric applied Axial Force upper left icon Method for Tightening Screw Mechanical Screw Driver Creating Screw Templates 183 ...

Page 192: ... Result field displays a nominal diameter size of M4 Click OK 11 In the Screw Connection Front View dialog box the precalculation routine has marked M4 Click Next 184 Chapter 9 Working with Standard Parts ...

Page 193: ...Front View dialog box click Next 14 In the Screw Assembly Grip Representation Front View dialog box click Finish 15 Respond to the prompts as follows Drag Size Drag screw connection dynamically to size M4 x 12 and then click Drag Size Enter 8 press ENTER The screw connection is inserted with a screw length of 12 mm and a blind hole depth of 8 mm Your drawing looks like this Creating Screw Template...

Page 194: ...ated in your drawing with an automatic background update Change the screw connections to the appropriate length To edit a screw connection that is not yet structured 1 Start the Power Edit command On the command line enter AMPOWEREDIT 2 Respond to the prompts as follows Select object Select the lower screw of the coverplate NOTE You can also start Power Edit by double clicking the desired part 3 I...

Page 195: ... list or select it and click the Load the template icon The Screw Connection New Part Front View Front View dialog box contains the screw connection as it has been stored in the template 5 Select the size M4 and then click Next Editing Screw Connections with Power Edit 187 ...

Page 196: ... box Location representation click Next 8 In he Screw Connection New Part Front View Front View dialog box Grip representation click Finish Drag Size Drag the screw connection dynamically to the size M4 x 12 and then click Drag Size Enter 8 press ENTER The screw connection is edited to a screw length of 12 mm and a blind hole depth of 8 mm Your drawing looks like this 188 Chapter 9 Working with St...

Page 197: ... of the coverplate you have to zoom into it To zoom to the cover plate 1 Zoom to the extents of the drawing On the command line enter ZOOM 2 Respond to the prompts as follows All Center Dynamic Extents Previous Scale Window Object real time Enter E press ENTER 3 Zoom in to the coverplate On the command line enter ZOOM 4 Respond to the prompts as follows Working with PowerView 189 ...

Page 198: ...nd corner point 2 Use Power View to insert the screws into the top view of the coverplate To insert a standard part using Power View 1 Start the Power View command On the command line enter AMPOWERVIEW 2 Respond to the prompt as follows Select object Select the screw at cover plate 1 The AutoCAD Mechanical message box is displayed 190 Chapter 9 Working with Standard Parts ...

Page 199: ...2 The top view of the screw connection is inserted into the top view of the coverplate Your drawing should look like this 4 Repeat steps 1 and 2 to insert the top view of the screw at the other three centerline crosses of the top view of the coverplate The coverplate should look like this Working with PowerView 191 ...

Page 200: ...the standard part to delete 1 Zoom to the extents of the drawing On the command line enter ZOOM 2 Respond to the prompts as follows All Center Dynamic Extents Previous Scale Window Object real time Enter E press ENTER 3 On the command line enter ZOOM 4 Respond to the prompts as follows All Center Dynamic Extents Previous Scale Window Object real time Ener W press ENTER Specify first corner Specify...

Page 201: ...rase command To delete a standard part 1 Start the Power Erase command On the command line enter AMPOWERERASE 2 Respond to the prompts as follows Select object Select the screw 1 Select object Press ENTER Deleting with Power Erase 193 ...

Page 202: ... is deleted and the lines and hatch are restored Save your file Inserting Holes Replace the previously deleted screw connection with a pin First you insert a blind hole for the pin 194 Chapter 9 Working with Standard Parts ...

Page 203: ... enter AMBHOLE2D 2 In the Select a Blind Hole dialog box select Acc to ISO 273 and Front View 3 Respond to the prompts as follows Specify insertion point Specify insertion point 1 Specify rotation angle 0 Specify a point to define insertion angle 2 Inserting Holes 195 ...

Page 204: ...ter dialog box select a size of 5 and then click Finish 5 Continue to respond to the prompts as follows Drag Size Enter 20 press ENTER The blind hole is inserted Your drawing should look like this 196 Chapter 9 Working with Standard Parts ...

Page 205: ...g Pins Insert a pin into the blind hole To insert a pin 1 Start the Cylindrical Pins command On the command line enter AMCYLPIN2D 2 In the Select a Cylindrical Pin dialog box select ISO 2338 and Front View Inserting Pins 197 ...

Page 206: ...llows Specify insertion point Specify insertion point 1 Specify rotation angle 0 Specify a point to define insertion angle 2 4 In the ISO 2338 Nominal Diameter dialog box select a size of 5 198 Chapter 9 Working with Standard Parts ...

Page 207: ...P option off to snap to the correct pin size 6 In the Select Part Size dialog box select 5 h8 x 16 B and then Click OK You inserted the blind hole first and then the pin This results in overlapping centerlines In order to have a correct plot turn one centerline off To turn off a centerline 1 Select the previously inserted cylindrical pin Inserting Pins 199 ...

Page 208: ...anical Options dialog box On the command line enter AMOPTIONS 2 On the AM Standard Parts tab clear the Draw Centerlines check box Click Apply and then Click OK Hiding Construction Lines For a better overview you can hide the construction lines by turning them off temporarily Zoom to the extents of the drawing To zoom to the extents 1 Zoom to the extents of the drawing On the command line enter ZOO...

Page 209: ...between different representation types without losing object or part information Change the representation of the differential gear screws To change the representation of a standard part 1 Start the Change Representation command On the command line enter AMSTDPREP 2 Respond to the prompts as follows Select objects Select the differential gear with a window 1 2 Select objects Press ENTER Simplifyin...

Page 210: ...itch Representation of Standard Parts dialog box select Symbolic Click OK The representation of the selected standard parts is symbolic Your drawing should look like this 202 Chapter 9 Working with Standard Parts ...

Page 211: ...All of the standard parts you inserted in this exercise are listed in the mechanical browser Save your file This is the end of this tutorial chapter Simplifying Representations of Standard Parts 203 ...

Page 212: ...204 ...

Page 213: ...bill of material balloon A dynamic database containing a list of all the parts in an assembly Used to generate parts lists that contain associated attributes such as part number manufacturer and quantity bill of material An entity that contains attributes by default the attribute is invisible that can add information to and describe details of a part in the BOM attribute drawing The values of thes...

Page 214: ... open a drawing 1 Open the file tut_pts_list in the Tutorial folder at Windows Vista C Users Public Public Documents Autodesk ACADM 2009 Acadm Tutorial Windows XP C Documents and Settings All Users Shared Documents Autodesk ACADM 2009 Acadm Tutorial The drawing contains a shaft with a housing 2 Zoom in to the area of interest On the command line enter ZOOM 3 Respond to the prompts as follows All C...

Page 215: ...the BOM database for creating a parts list Use the part reference command to enter part information for your part To insert a part reference 1 Start the Part Reference command On the command line enter AMPARTREF 2 Respond to the prompts as follows Select point or Block Copy Reference Specify a point on the part 1 3 In the Part Reference dialog box specify Description Housing Partition Standard Siz...

Page 216: ...TREF 2 Respond to the prompts as follows Select point or Block Copy Reference Enter R at the command prompt to select Reference 3 In the drawing select the previously inserted part reference to create a reference NOTE You can use the option Copy to create a new part with similar text information 4 Respond to the prompts as follows Enter an option Next Accept Accept Press ENTER 208 Chapter 10 Worki...

Page 217: ...the part Subsequently when you generate the parts list it shows a quantity of 2 for this item Save your file Editing Part References In this exercise you edit an existing part reference To edit a Part Reference 1 Start the Part Reference Edit command On the command line enter AMPARTREFEDIT 2 Respond to the prompts as follows Select pick object Specify the part reference of the left bolt 3 Editing ...

Page 218: ...cept Accept Press ENTER 3 In the Part Reference dialog box Reference Quantity field enter 3 and then click OK 4 Zoom to the extents to display the entire drawing Save your file 210 Chapter 10 Working with BOMs and Parts Lists ...

Page 219: ...nless specifically instructed the commands create only the main BOM database For the purpose of this tutorial you must create a BOM database to contain part references held within the border a border BOM This is why you are instructed to type B to trigger the set BOM option of the AMBALLOON command NOTE To create and edit a database manually use the AMBOM command Select border annotation view or s...

Page 220: ...Select part assembly or auTo autoAll set Bom Collect arrow Inset Manual One Renumber rEorganize annotation View Enter R Enter starting item number 1 Press ENTER Enter increment 1 Press ENTER Select balloon Select the balloons in numerical order from 1 to 7 Select balloon Press ENTER NOTE Since the right most balloon contains the same number as another balloon you already selected there is no need ...

Page 221: ...mber rEorganize annotation View Enter E Select balloon Select the six balloons on the right Select balloon Press ENTER Align Angle Standalone Horizontal Vertical Vertical Enter h press ENTER 3 Move the cursor through the center of balloon 1 to get the horizontal tracking line NOTE Make sure that the OTRACK function is active 4 Move the cursor to the right and snap along the tracking line until you...

Page 222: ...ter AMBALLOON 2 Respond to the prompt as follows Select part assembly or auTo autoAll set Bom Collect arrow Inset Manual One Renumber rEorganize annotation View Enter M press ENTER Select point or Block Copy Reference Select a point on the shaft NOTE Instead of selecting a point to create a part reference you can use Copy or Reference from the Manual option to get the information from an existing ...

Page 223: ...the balloon in the center of the part reference 5 Move the cursor through the center of balloon 1 to get the tracking line and the snap distance and then click the insertion point NOTE Instead of entering the insertion point you can select another point to create an extended leader line Placing Balloons 215 ...

Page 224: ... Parts List command On the command line enter AMPARTLIST 2 Respond to the prompt as follows Select border annotation view or specify BOM to create use Main MAIN Move the cursor over the border until tooltip ISO_A2 is displayed click the highlighted border The Parts List dialog box is displayed 216 Chapter 10 Working with BOMs and Parts Lists ...

Page 225: ...arts list appears dynamically on the cursor 3 Move the cursor to position the parts lists above the title block and then click to insert the parts list The parts list looks like the following Creating Parts Lists 217 ...

Page 226: ...dialog box From there you can select a particular border and view the associated parts list In the next exercise you edit balloon and parts list information using several methods To edit parts list information 1 Start the Edit Part List Balloon command On the command line enter AMPOWEREDIT 2 Respond to the prompt as follows Select object Select balloon 2 3 In the Balloon dialog box Material column...

Page 227: ... Apply to see the results in the drawing immediately without leaving the dialog box All changes made in the dialog box are associative and change the data in the drawing immediately 4 Double click the parts list The Parts List dialog box is displayed Creating Parts Lists 219 ...

Page 228: ...You can edit your data in this dialog box Some examples are shown next 5 Select the Hex Nut entry and then choose the Set values icon 220 Chapter 10 Working with BOMs and Parts Lists ...

Page 229: ...6 In the Set Value dialog box specify Column Material Value 8 Creating Parts Lists 221 ...

Page 230: ...terial of the second bolt and nut accordingly NOTE Use the shortcut menu inside a field to cut copy and paste Merging and Splitting Items In Parts Lists Use the Parts List function to merge like items that are listed repeatedly 222 Chapter 10 Working with BOMs and Parts Lists ...

Page 231: ...f item 6 2 Click the Merge Items toolbar button The two rows are merged In the Parts List dialog box Item 6 now has a quantity of 2 and item 1 is missing You can select several rows to merge or split items To merge rows the part data in the selected rows must be the same 3 Click Apply to display the changes in the drawing Note how the balloon changes to reflect the same item number Merging and Spl...

Page 232: ...do it now because in the next exercise we replace the two separate balloons with a single balloon that points to both Needle Roller Bearings Click OK to exit the Parts List dialog box To delete a balloon 1 Use Power Erase and select the left balloon with the item number 1 or 6 as the case may be 2 Press ENTER to delete the balloon 224 Chapter 10 Working with BOMs and Parts Lists ...

Page 233: ...and respond to the prompts as follows Select object to attach Select the left bearing Next point or F for first point Select a point inside the balloon 1 The leader is added and your drawing should look like the following Save your file Collecting Balloons You can collect balloons to place balloons of related parts to one leader line For example you can place the balloons of a screw and a nut to o...

Page 234: ... Select pick object or balloon Select the part reference of the left nut 4 Continue to respond to the prompts as follows Select pick object or balloon Press ENTER Select balloon Select balloon 2 Pick orientation Select a vertical orientation 5 Repeat the collect balloon command for the screw and nut on the right side The result should look like this Save your file 226 Chapter 10 Working with BOMs ...

Page 235: ...updated item numbers To sort a parts list 1 Zoom to the extents of the drawing 2 Double click the parts list to display the Parts List dialog box 3 Choose the Sort icon The Sort dialog box opens NOTE You can sort within a selection set otherwise you are sorting all items Sorting and Renumbering Items In Parts Lists 227 ...

Page 236: ... shown in the following image Click OK The result should look like this In the next step you renumber the items To renumber parts list items 1 Click the column heading for the Item column 228 Chapter 10 Working with BOMs and Parts Lists ...

Page 237: ...2 Click the Set values button 3 In the Set Value dialog box specify Column Item Start value 10 Step 10 Sorting and Renumbering Items In Parts Lists 229 ...

Page 238: ...ck OK to return to the Parts List dialog box 5 Choose Apply to see the results The result should look like the following 6 Choose OK to return to the drawing 230 Chapter 10 Working with BOMs and Parts Lists ...

Page 239: ...parts list you have inserted in the drawing To use filters in a parts list 1 Double click the parts list to display the Parts List dialog box 2 Right click the blank list in the Filters and groups section 3 Select Add Filter to display the List of Filters dialog box Using Filters 231 ...

Page 240: ...m and click OK The details for this filter are displayed in the Filter and groups section of the Parts List dialog box 5 Set the following values to define the filter 232 Chapter 10 Working with BOMs and Parts Lists ...

Page 241: ...d The filtered parts list is displayed in the drawing The defined filters are saved with the parts list and can be used again later To print only the filtered list choose the Print icon 8 Deactivate the custom filter and then click OK to close the dialog box The filter is used in this drawing The result looks like the following Using Filters 233 ...

Page 242: ...Save your file This is the end of this tutorial chapter 234 Chapter 10 Working with BOMs and Parts Lists ...

Page 243: ...red for a revolving bearing The result is the Adjusted Rating Life This is the life associated with 90 reliability with contemporary commonly dynamic calculation used material and under conventional operating conditions With the number of revolutions you get the life in working hours The act of determining the size of a standard part with the cursor while inserting it into a side view The standard...

Page 244: ...break Tool to draw rotationally symmetrical parts A shaft is usually created from left to right using different sections These sections are positioned automatically shaft generator one after the other Additionally any shaft section can be inserted deleted or edited Creating Shafts In this section you use the shaft generator to create a shaft with standard parts You also perform a bearing calculati...

Page 245: ...d for this tutorial exercise Ensure that mechanical structure is enabled To enable mechanical structure 1 Click the STRUCT status bar button and latch it down to enable mechanical structure 2 If the mechanical browser is not visible on the command line enter AMBROWSER 3 When prompted enter ON Configuring Snap Options Configure the snap options Configuring Snap Options 237 ...

Page 246: ...haft Generators In the next steps you start and configure the shaft generator To start and configure the shaft generator 1 Start the Shaft Generator command On the command line enter AMSHAFT2D 2 Respond to the prompts as follows Enter shaft component name Shaft1 Press ENTER Specify starting point or select center line Enter 150 150 press ENTER Specify centerline endpoint Enter 240 150 press ENTER ...

Page 247: ... Generator dialog box click Options 4 In the Shaft Generator Configuration dialog box specify For Segment inserted Insert Stationary Shaft End Left Adjust Centerline Yes Front View Radius Reflection Line Check contour Side and Sectional Views Sectional with Background Always update View of Interrupt Hatch If shaft is in background hide standard part too Yes Configuring Shaft Generators 239 ...

Page 248: ...er Contour tab is selected To create shaft segments 1 Click the lower cylinder button to define a cylinder section and respond to the prompts as follows Specify length 50 Enter 12 press ENTER Specify diameter 40 Enter 20 press ENTER 2 Click the gear button and then enter the values for module number of teeth and length as shown in the following figure 240 Chapter 11 Creating Shafts with Standard P...

Page 249: ...hanical browser 1 In the mechanical browser right click the file name node the root node and click New Component 2 Respond to the prompts Enter new component name COMP1 Enter shaftassembly press ENTER Enter new view name Top Enter front press ENTER Select objects for new component view Select the shaft with a window Select objects for new component view Press ENTER Specify base point Specify a poi...

Page 250: ...ess ESC 3 Click the lower cylinder button to define a further cylinder section and respond to the prompts as follows Specify length 10 Enter 5 press ENTER Specify diameter 20 Enter 20 press ENTER 4 Click the gear button and then enter the values for module number of teeth and length as shown in the following figure 242 Chapter 11 Creating Shafts with Standard Parts ...

Page 251: ...iameter 20 Enter 24 press ENTER 6 Click the lower cylinder button to define another cylinder section and then respond to the prompts as follows Specify length 4 Enter 33 press ENTER Specify diameter 24 Enter 20 press ENTER The first five sections of the shaft are created as represented in the following figure Creating Cylindrical Shaft Sections and Gears 243 ...

Page 252: ...le button 2 In the Profile dialog box click ISO 14 in the Details panel 3 In the Splined Shaft ISO 14 dialog box select the standard size 6 x 13 x 16 and enter a length of 26 Click OK You created another section of the shaft as shown in the following figure 244 Chapter 11 Creating Shafts with Standard Parts ...

Page 253: ...object Select the leftmost cylinder section 1 Specify length max 12 2 5 Enter 2 press ENTER Specify angle 0 79 or Distance 45 Enter 45 press ENTER 2 Click the Fillet button to apply a fillet to a shaft section and then respond to the prompts as follows Select object Select the cylinder section between the two gears near the second gear 1 Enter radius max 10 00 2 50 Enter 2 press ENTER Inserting Ch...

Page 254: ...n the drawing To insert a shaft break Click the Break button to insert a shaft break and then respond to the prompts as follows Specify point Select the midpoint of the cylindrical section 1 Specify length min 4 00 6 Enter 10 press ENTER NOTE You can insert the break to the left if you enter a negative value The shaft break is inserted 246 Chapter 11 Creating Shafts with Standard Parts ...

Page 255: ...lect Right Click OK 3 Respond to the prompt as follows Specify insertion point Press ENTER The right side view is inserted at the proposed position In the mechanical browser the new right side view is listed within the shaft component along with the existing front view The right side view includes its hide situations Creating SideViews of Shafts 247 ...

Page 256: ... the Details panel 2 In the ISO 261 ExternalThreads Regular Thread dialog box select M10 and enter a length of 20 Click OK The thread is added to the shaft which looks like this NOTE If Always Update is unchecked in Options AM Shaft tab you are prompted to update associated views when you close the Shaft Generator 248 Chapter 11 Creating Shafts with Standard Parts ...

Page 257: ...irst cylindrical section 1 Specify length 12 Press ENTER Specify diameter 20 Enter 18 press ENTER The diameter is changed to 18 while the length remains 12 2 Click the Insert button and then respond to the prompt as follows Specify point Select a point after the second gear 1 3 Click the Slope button and then respond to the prompts as follows Specify length or Dialog 20 Enter 4 press ENTER Specify...

Page 258: ...ain To replace a shaft section 1 Click the Undo button The previous slope insertion is undone Replace an existing shaft section To do this change the settings in the configuration 2 Click the Options button to start the shaft generator configuration and then specify For Segment inserted Overdraw 250 Chapter 11 Creating Shafts with Standard Parts ...

Page 259: ...en respond to the prompt as follows Specify length or Dialog 4 Enter D press ENTER 4 In the Shaft Generator Cone dialog box specify the following settings Click OK The slope replaces the cylindrical shaft section Replacing Shaft Sections 251 ...

Page 260: ...andard Parts button and then select Roller Bearings Radial ISO 355 Respond to the prompts as follows Specify insertion point on shaft contour Specify insertion point 1 Direction to Left Select a point to the right 2 2 In the ISO 355 dialog box click Next 252 Chapter 11 Creating Shafts with Standard Parts ...

Page 261: ...3 Specify the loads and activate Work Hours as shown in the following Click Next 4 In the ISO 355 dialog box select the bearing 2BD 20 x 37 x 12 and then click Finish Inserting Bearings 253 ...

Page 262: ... x 37 x 12 and then press ENTER 6 In the Create Hide Situation dialog box click OK The bearing is inserted 7 Close the Shaft Generator dialog box In the mechanical structure browser the roller bearing component is added to the assembly 254 Chapter 11 Creating Shafts with Standard Parts ...

Page 263: ...Save your file This is the end of this tutorial chapter Inserting Bearings 255 ...

Page 264: ...256 ...

Page 265: ...ia and deflection lines create and calculate chains springs and cams The drawing files for each lesson can be found in the Acadm tutorial folder of the AutoCAD Mechanical installation folder These drawing files provide design elements that help you understand several AutoCAD Mechanical concepts 257 ...

Page 266: ...258 ...

Page 267: ...a section a point along the member where bending moment needs to be calculated taken about the horizontal axis of the section bending mo ment Safety to endurance or fracture under repetitive cycles of loads fatigue factor A support that prevents translation as well as rotation about all axes fixed support Any of several arrangements in a machine especially toothed wheels that allow power to be pas...

Page 268: ...ymmetric shaft contour The function provides a static calculation which is important for the design of the shaft and the bearing load In this tutorial you calculate a gearbox shaft The general way to calculate an existing shaft is to define the contour and insert forces and supports The routine calculates all necessary values and draws the respective graphs for moment and deflection Mechanical str...

Page 269: ...te corner Specify the second corner point 2 Save your file under a different name or to a different directory to preserve the original tutorial file Creating Shaft Contours Before you can perform any calculations on a shaft you have to create the shaft contour To create a shaft contour 1 Start the Shaft Calculator On the command line enter AMSHAFTCALC 2 3 Respond to the prompts as follows Select c...

Page 270: ...boundary conditions the material and the representation of the calculation results Specifying Material You specify the material by selecting it from a table containing the most commonly used materials You can also to enter the characteristics for other materials using the option Edit To specify a material 1 In Material click Edit The Material Properties dialog box is displayed TIP There are two Ed...

Page 271: ...alled on your system you can select a different standard but the results may differ from the results in this tutorial For example if you select DIN you can select a similar material like E335 to achieve similar results NOTE Some material properties are not complete In this case you have to complete them to obtain calculation results 5 In the Material Properties dialog box complete the ANSI materia...

Page 272: ...espond to the prompt as follows Specify insertion point Select the midpoint of the leftmost shaft section 2 Select the Fixed Support icon and then respond to the prompt as follows Specify insertion point Select the midpoint of the third cylindrical shaft section The shaft supports are specified and the result looks like this 264 Chapter 12 Calculating Shafts ...

Page 273: ...Axle Shafts transfer torque and rotating axles results in different stress values than static axles results To specify a load 1 From the Calculated Part drop down list click Rotating Shaft 2 Click the Gear icon and then respond to the prompt as follows Specify insertion point Select the midpoint of the second gear from the left 3 In the Gear dialog box Inputs tab specify Gear Load Constant Motive ...

Page 274: ...reflected in the other tab 4 Click the Point Load icon and then respond to the prompts as follows Specify insertion point Select the midpoint of the profile section Specify rotation angle Press ENTER 5 In the Point Load dialog box Resultant tab specify Point Load 2500 266 Chapter 12 Calculating Shafts ...

Page 275: ... respond to the prompt as follows Specify insertion point Select the midpoint of the profile section 7 In the Torque dialog box specify Torque Mt 15 Click OK The loads are specified and the result looks like this Specifying Loads on Shafts 267 ...

Page 276: ...mations button 2 In the Select Graph dialog box specify Bend Bending Moment in Y Axis Deflection in Y Axis Torsion Torsion Moment in X Direction Stresses Result Bending Stress Table Title Shaft Calculation Exercise 3 Click OK and then respond to the prompts as follows Specify insertion point Select an appropriate point to the right of the shaft The result block and the deflection and torsion momen...

Page 277: ...r drawing looks like this The result block provides the most important information about your calculated shaft such as the maximum stress deflection and moment values Calculating and Inserting Results 269 ...

Page 278: ...notch To calculate the strength at a notch 1 Restart the Shaft Calculation On the command line enter AMSHAFTCALC 2 Respond to the prompt as follows Select contour or Create contour Strength Create Select the shaft contour The Shaft Calculation dialog box opens Continue with calculations on the previously specified shaft 270 Chapter 12 Calculating Shafts ...

Page 279: ...tion 1 do not select the endpoint of the cylindrical shaft section NOTE This notch was selected because the calculation established that the highest bending stress is close to this place The Strength Calculation dialog box opens Use the Strength Calculation dialog box to specify the properties of the notch in more detail and display the strength values and factors Calculating Strengths of Shafts 2...

Page 280: ... 4 Respond to the prompts as follows Specify next point Symbol Specify a point below the shaft Specify next point Symbol Press ENTER The result block is inserted in the drawing 272 Chapter 12 Calculating Shafts ...

Page 281: ...tors are greater than 1 0 so the shaft does not need to be redesigned at this notch 5 Close the Shaft Calculation dialog box Save your file This is the end of this tutorial chapter Calculating Strengths of Shafts 273 ...

Page 282: ...274 ...

Page 283: ...f all forces that act on the member to the left of a section a point along the member where bending moment needs to be calculated taken about the horizontal axis of the section bending moment A curve representing the vertical displacement of different points along the member subjected to a load deflection line A load or force that is exerted over a certain length distributed load A support that pr...

Page 284: ...ction line calculation Moment of inertia calculations are performed on cross sections of beams or on other objects that can be represented as closed contours Calculations can be performed on a cross section of any shape as long as the geometry of the cross section forms a closed contour AutoCAD Mechanical determines the center of gravity for a cross section draws the main axes and calculates the m...

Page 285: ...art the calculation for the moment of inertia On the command line enter AMINERTIA 2 Respond to the prompts as follows Specify interior point Click a point inside the profile Specify interior point Press ENTER Is the area filled correctly Yes No Yes Press ENTER The coordinates of the centroid and the moment of inertia along the principle axes are displayed on the command line as follows Coordinates...

Page 286: ... for the calculated profile and locate the block with the calculation data in the drawing 4 Respond to the prompts as follows Enter description Enter Frame Profile press ENTER Specify insertion point Place the calculation block next to the profile Your drawing looks like this NOTE The main axes 1 and 2 are the axes with the most and least deflection The F arrow displays the direction of the force ...

Page 287: ...e the deflection line under a specific load situation To calculate the deflection line 1 Start the deflection line calculation On the command line enter AMDEFLINE 2 Respond to the prompts as follows Select moment of inertia block Select the calculation block 1 Specify starting point or Existing beam Select the left end of the beam 2 Specify endpoint Select the right end of the beam 3 3 In the Beam...

Page 288: ...r preference is also possible but the results will differ from the results in this tutorial exercise For example if you select DIN you can select a similar material like AlMgSi0 5F22 to achieve similar results Click OK Define the supports and the loads 6 Click the Fixed Support icon and then respond to the prompt as follows Specify insertion point Select the left edge of the beam 1 280 Chapter 13 ...

Page 289: ...hen respond to the prompts as follows Specify insertion point Select the left edge of the beam 3 Specify endpoint Select the midpoint of the beam using midpoint snap 4 Line Load N mm 50 Enter 10 press ENTER 9 Click the Moment icon and then respond to the prompts as follows Specify insertion point Select a point in the center of the uniform load 5 Bending moment Nm 10 Enter 3 press ENTER Calculatin...

Page 290: ... figure and then Click OK 12 Respond to the prompts as follows Enter scale for bending moment line drawing unit Nm 1 1 3913 Press ENTER Enter scale for deflection drawing unit mm 37 208 1 Press ENTER Specify insertion point Select a point in the drawing The result looks like this 282 Chapter 13 Calculating Moments of Inertia and Deflection Lines ...

Page 291: ...The calculation result block displays all important data on your calculation Save your file This is the end of this tutorial chapter Calculating Deflection Lines 283 ...

Page 292: ...284 ...

Page 293: ...meter of the pitch circle that passes through the centers of the link pins as the chain is wrapped on the sprocket pitch diameter A roller chain is made up of two kinds of links roller links and pin links alternately and evenly spaced throughout the length of the chain roller chain A toothed wheel that transfers the power from the chain to the shaft or the other way round sprocket Chain Calculatio...

Page 294: ...todesk ACADM 2009 Acadm Tutorial Windows XP C Documents and Settings All Users Shared Documents Autodesk ACADM 2009 Acadm Tutorial 2 Save your file under a different name to preserve the original tutorial file 3 Use a window to Zoom in to the chain housing On the command line enter ZOOM 4 Respond to the prompts as follows All Center Dynamic Extents Previous Scale Window Object real time Enter W pr...

Page 295: ... To calculate the required length of the chain 1 Start the Length Calculation command On the command line enter AMCHAINLENGTHCAL 2 In the Belt and Chain Length Calculation dialog box click Library Performing Length Calculations 287 ...

Page 296: ... 4 In the Select Part Size dialog box specify Standard ISO 606 05B 1 Click OK 5 In the Belt and Chain Length Calculation dialog box Click OK and then respond to the prompts as follows Specify 1st point for tangent or Undo exit Select circle a 1 288 Chapter 14 Calculating Chains ...

Page 297: ...whole numbers of links one sprocket has to be moved to achieve such a length 6 Continue responding to the prompts as follows Select pulleys or sprockets to be moved Select objects Select circle b Select objects Press ENTER Specify base point of displacement Select the center of circle b Specify second point of displacement Select the center of the cross 8 Select pulleys or sprockets to be moved Se...

Page 298: ...of the chain division Save your file Optimizing Chain Lengths To optimize the chain length 1 Start the Length Calculation command Toolbutton Content Chains Belts Length Calculation Menu AMCHAINLENGTHCAL Command 2 In the Belt and Chain Length Calculation dialog box select Auto Optimization and Move and then specify Required Number of Links 122 290 Chapter 14 Calculating Chains ...

Page 299: ...s achieved 4 In the Belt and Chain Length Calculation dialog box Click OK Close the dialog box by clicking Cancel Your drawing looks like this Save your file Inserting Sprockets To insert the sprocket 1 Start the Draw Sprocket Pulley command On the command line enter AMSPROCKET 2 In the Select Pulley and Sprocket dialog box Details panel click Sprockets Front view Respond to the prompts Specify in...

Page 300: ...en click Next 4 In the Sprockets Geometry dialog box specify Geometry of Sprocket Number of teeth 21 Number of Visible Teeth 21 Shaft Diameter 10 Click Finish The sprocket is inserted into the drawing and the Create Hide Situation is displayed 5 In the Hide Situation dialog box click OK 292 Chapter 14 Calculating Chains ...

Page 301: ... tab click Sprockets Front view Respond to the prompts Specify insertion point Select the center of circle b Specify rotation angle 0 Enter 360 press ENTER 8 In the Sprockets Size Selection dialog box select ISO 606 05B 1 and then click Next 9 In the Sprockets Geometry dialog box specify Geometry of Sprocket Number of teeth 13 Number of Visible Teeth 13 Shaft Diameter 10 Inserting Sprockets 293 ...

Page 302: ...ET and press ENTER 12 In the Select Pulley and Sprocket dialog box Details panel click Sprockets Front view Respond to the prompts Specify insertion point Select the center of circle c Specify rotation angle 0 Enter 360 press ENTER 13 In the Sprockets Size Selection dialog box select ISO 606 05B 1 and then click Next 14 In the Sprockets Geometry dialog box specify Geometry of Sprocket Number of te...

Page 303: ...click OK A hide situation is created and is listed in the mechanical browser The last sprocket is inserted as a simplified representation with only three teeth as specified in the dialog box Your drawing looks like this Save your file Inserting Sprockets 295 ...

Page 304: ...t a point on the polyline 3 In the Select a Chain dialog box select ISO 606 Metric 4 In the Chains Size Selection dialog box select ISO 606 05B 1 and then click Next 5 In the Chains Geometry selection dialog box specify Number of Links 121 Click Finish 6 Respond to the prompts Specify direction of Links Flip Accept Accept Press ENTER Specify orientation of Links Flip Accept Accept Enter F press EN...

Page 305: ...in is inserted into the drawing and a hide situation is created Your drawing looks like this The mechanical browser reflects the standard components you created in the drawing Save your file This is the end of this tutorial chapter Inserting Chains 297 ...

Page 306: ...298 ...

Page 307: ...e spring washer A spring type that can be compressed and can absorb pressure forces compression spring The act of determining the size of a standard part with the cursor while inserting the part into a side view The standard dynamic dragging part is displayed dynamically on the screen and can be dragged to the next possible size and length The values sizes are taken from the Standard parts databas...

Page 308: ...ession spring in two different compression situations You calculate and insert the springs in the existing drawing Perform this tutorial with mechanical structure disabled To open a drawing 1 Open the file tut_spring dwg in the tutorials folder at Windows Vista C Users Public Public Documents Autodesk ACADM 2009 Acadm Tutorial Windows XP C Documents and Settings All Users Shared Documents Autodesk...

Page 309: ...ame or to a different directory to preserve the original tutorial file Starting Spring Calculations Specify the spring and the location To specify a spring 1 Start the Compression Spring command On the command line enter AMCOMP2D 2 In the Select Compression Spring dialog box click Standards SPEC Catalog A Front View Starting Spring Calculations 301 ...

Page 310: ...oint Specify the starting point 1 Specify direction Specify endpoint 2 Specifying Spring Restrictions Specify the spring restrictions Use the Compression Springs dialog box to restrict the spring selection in various ways 302 Chapter 15 Calculating Springs ...

Page 311: ...meter Da is added to the restrictions table 2 Click the value field for the diameter Da You can pick a point on the inner spring housing to specify the diameter or enter a value In this instance enter the value 15 Define the initial spring length 3 In the Compression Springs Select from Tables SPEC Catalog A mm dialog box click the value field for the length L1 and then choose the pick icon Specif...

Page 312: ...Select a point on the spring pressure plate 1 Use view B of the lever and spring housing to define the compressed spring length 5 In the Compression Springs dialog box click the value field for the length L2 and then choose the pick icon 304 Chapter 15 Calculating Springs ...

Page 313: ...ect a point on the spring pressure plate in view B 1 The geometric boundary conditions are defined and you can proceed with the calculation Calculating and Selecting Springs Make the calculation settings and calculate the possible springs Calculating and Selecting Springs 305 ...

Page 314: ...m dialog box choose the Additional Calculation Settings button 2 In the Compression Springs Additional Calculation ANSI dialog select the left buckling case and then Click OK 3 In the Compression Springs Select from Tables SPEC Catalog A mm dialog box choose Next 306 Chapter 15 Calculating Springs ...

Page 315: ...lated and the results are displayed in the Compression Springs Select from Tables SPEC Catalog A mm dialog box 4 Choose Select All to select all possible springs for the dynamic dragging process Calculating and Selecting Springs 307 ...

Page 316: ...ooltip To insert a spring 1 Drag the cursor until the tooltip reads SPEC 1 6 x 14 1 x 36 and then click 2 Respond to the prompts as follows Topical Length 14 28 36 Force Deflection 32 01 Select a point on the spring pressure plate 1 3 Continue to respond to the prompts as follows Select rod only closed contours Enter continue Press ENTER The spring is inserted as shown below 308 Chapter 15 Calcula...

Page 317: ... component Use the previously inserted spring in view A to create a spring for view B using the Power View command To create a view of a spring with Power View 1 Start the Power View command On the command line enter AMPOWERVIEW 2 Respond to the prompts as follows Select objects Select the spring in view A 3 In the Select New View dialog box select Front View CreatingViews of Springs with PowerVie...

Page 318: ...w B Topical Length 14 28 36 Force Deflection 32 01 Select the lower contact point of the compressed spring Select rod only closed contours Enter continue Press ENTER The spring is copied into view B in its compressed length Save your file This is the end of this tutorial chapter 310 Chapter 15 Calculating Springs ...

Page 319: ...of the plates which are effective for the calculation contact area The safety factor is the ratio of effective load and safe load safety factor A force perpendicular to the screw axis shear force The force acting on a member or body per unit area stress Methods for Calculating Screws The Screw Calculation provides two different ways to calculate a screw connection Stand alone calculation All data ...

Page 320: ...ntered manually and some are taken directly from the drawing To open the initial drawing 1 Open the file tut_screw dwg in the tutorials folder at Windows Vista C Users Public Public Documents Autodesk ACADM 2009 Acadm Tutorial Windows XP C Documents and Settings All Users Shared Documents Autodesk ACADM 2009 Acadm Tutorial The drawing contains the representation of a screw connection 2 Save your f...

Page 321: ... the command line enter AMSCREWCALC 2 Respond to the prompts as follows Select screw connection Stand alone calculation Press ENTER The Screw Calculation dialog box opens Specify the screw connection Selecting and Specifying Screws In the Definition of SCREW section of the screw calculation you can select the screw standard and size and the material properties You can also enter the geometric prop...

Page 322: ...n click ISO 4017 Regular Thread 3 In the Select a Row dialog box choose the standard M12x45 Click OK The geometric values of the standard screw ISO 4017 M12x45 are entered Specify the property class 4 Click the Material tab and then specify 314 Chapter 16 Calculating Screw Connections ...

Page 323: ...ick Next or the Definition of NUT icon in the top row to proceed Selecting and Specifying Nuts In the Definition of NUT section of the screw calculation you can select a nut standard and size To specify a nut 1 On the Nut tab click Table of Nuts Selecting and Specifying Nuts 315 ...

Page 324: ...etermined by the screw size Specify the washers 3 Click Next Selecting and Specifying Washers In the Definition of WASHERS section of the screw calculation you can select the washer standard and size and the positions of the washers To specify a washer 1 On the Washer under Head 1 tab clear the Washer check box 316 Chapter 16 Calculating Screw Connections ...

Page 325: ...k Next Specifying Plate Geometry and Properties In the Definition of PLATES section of the screw calculation you can select plate materials and their geometric properties To specify the plates 1 On the Plates tab specify Hole dh 13 Number of Plates 2 Height of plate 1 h1 10 Height of plate 2 h2 10 Specifying Plate Geometry and Properties 317 ...

Page 326: ...material Cq 45 and then Click OK 5 Repeat steps 3 and 4 for the other Table button Specify the contact area 6 On the Gaps and Chamfers tab click the pick button of the value gr 7 Respond to the prompts as follows Specify first point Select the point 1 Second point Select the point 2 318 Chapter 16 Calculating Screw Connections ...

Page 327: ...The value for gr is changed to 17 as shown in the illustration 8 Click Next Specifying Plate Geometry and Properties 319 ...

Page 328: ...tric properties of the contact area To specify the contact area 1 On the Contact Area tab click the Type button 2 In the Select the Type of Contact Area dialog box click the third button from the left 3 Select the User Changes check box 4 In the entry field specify ang 22 5 320 Chapter 16 Calculating Screw Connections ...

Page 329: ...ry field and respond to the prompts as follows Specify first point Select the point 1 Second point Select the point 3 Specify the loads and moments 7 Click Next Specifying Loads and Moments In the Definition of LOADS section of the screw calculation you can specify the loads and moments and their points of application To specify loads and moments 1 On the Axial Loads tab clear the Dynamic check bo...

Page 330: ...y Torsion Moment T 185 Nm Radius R 65 Coefficient of Friction mt 0 14 NOTE The torsion moment of 185 Nm results from the total torsion moment of 2405 Nm as given in the terms of reference divided by the 13 bolts 322 Chapter 16 Calculating Screw Connections ...

Page 331: ...fying Settlement Properties In the Definition of SETTLEMENT section of the screw calculation you can specify settlement properties To specify the settlement 1 Click Calculate from Roughness and 1 6 micro m Specifying Settlement Properties 323 ...

Page 332: ... the Definition of TIGHTEN section of the screw calculation you can specify the tightening method and properties To specify the tightening 1 Specify as follows Tightening Factor kA 1 5 Coefficient of Friction in Thread miG 0 12 324 Chapter 16 Calculating Screw Connections ...

Page 333: ...Next Creating and Inserting Result Blocks In the Results section of the screw calculation you can take a look at the results You have a complete overview of the results of the screw calculation Creating and Inserting Result Blocks 325 ...

Page 334: ...e prompts as follows Specify start point Specify a point right of the screw connection Specify next point Symbol Press ENTER The result block is inserted at the specified location Save your file This is the end of this tutorial chapter 326 Chapter 16 Calculating Screw Connections ...

Page 335: ...Element Analysis A calculation routine based on analyzing a rigid body subject to loads and restraints for stress strain and defor mation FEA A support that prevents translation as well as rotation about all axes fixed support Force or moment acting on a member or body load A support that prevents rotation in all axes but allows translation along one axis movable support A single edit command for ...

Page 336: ...e FEA routine uses its own layer group for input and output Note that FEA is not designed for solving all special FEA tasks Its purpose is to provide you with a quick idea of the stress and deformation distributions NOTE The ISO standard parts have to be installed for this tutorial exercise For this exercise work with mechanical structure disabled To open the initial drawing 1 Open the file tut_fe...

Page 337: ...mmand The drawing is regenerated Calculating Stress In Parts Before you calculate the stress in a part specify the border conditions To specify the border conditions 1 Activate the FEA calculation On the command line enter AMFEA2D 2 Respond to the prompts as follows Specify interior point Specify a point inside the contour Calculating Stress In Parts 329 ...

Page 338: ...e Select Standard for Material dialog box in the Details panel click ANSI Material and from the Select Material Type dialog box select Al Alloys Diecast 6 Click the Config button and in the FEA Configuration dialog box and specify Scale Factor for Symbols 0 1 7 Click OK to return to the FEA 2D Calculation dialog box Defining Loads and Supports To perform calculations you need to define the loads a...

Page 339: ...k the movable line support button and respond to the prompts as follows Specify insertion point Enter Dialogbox Hold down SHIFT right click and click Quadrant specify point 3 Specify endpoint Press ENTER to define the starting point as the endpoint 3 Click the line force button and respond to the prompts as follows Specify insertion point Enter Dialogbox Specify point 5 Specify endpoint Specify po...

Page 340: ...r Dialogbox Specify point 6 Specify endpoint Specify point 7 Specify side from endpoint Specify a point to the right of the specified points Enter a new value 1000 N mm Enter 500 press ENTER Calculating Results Before you calculate the results generate a mesh NOTE If you calculate results without creating a mesh in advance the mesh will be created automatically 332 Chapter 17 Calculating Stress Us...

Page 341: ... 2D Isolines Isoareas dialog box select the Graphic Representation button on the right Click OK 4 Respond to the prompts as follows Specify base point Return in boundary Press ENTER to place the isoareas in the boundary Insertion point Select a point to place the table to the left of the part Return Press ENTER to return to the dialog box The result looks like this Calculating Results 333 ...

Page 342: ...ne the mesh near these points to obtain more exact calculation results for the points of interest To refine the mesh 1 In the Refining section click the left refining button and respond to the prompts as follows Specify center point 1 Return Continue Specify a point near point 8 Specify center point 2 Return Continue Specify a point near point 9 Specify center point 3 Return Continue 334 Chapter 1...

Page 343: ...he isolines isoareas button 3 In the FEA 2D Isolines Isoareas dialog box click the Graphic Representation button on the right Click OK 4 Respond to the prompts as follows Specify base point Return in boundary Press ENTER Insertion point To the left of the part select a location for the table Return Press ENTER to return to the dialog box Evaluating and Refining Mesh 335 ...

Page 344: ... button 2 In the AutoCAD Question dialog box click Yes to delete the solutions and results 3 In the AutoCAD Question dialog box click No to keep the loads and supports 4 To start Power Edit to change the radius on the command line enter AMPOWEREDIT and respond to the prompt as follows Select object Select the arc segment at point 8 5 6 In the Fillet dialog box specify Fillet Size 10 Click OK 336 C...

Page 345: ...pecify interior point Specify a point inside the contour Select the thickness and the material of the lever again as you did it before 3 In the Default section enter a thickness of 10 4 Click Table and select the material from your preferred standard table Select Al Alloys Diecast if you prefer to use ANSI materials 5 Click the deformation button in the Results field 6 In the FEA 2D Displacements ...

Page 346: ...The result looks like this Recalculate the stress division of the lever 1 Click the isolines isoareas button 2 In the FEA 2D Isolines Isoareas dialog box click the Graphic Representation button on the right 338 Chapter 17 Calculating Stress Using FEA ...

Page 347: ... the left of the part select a location for the table Return Press ENTER to return to the dialog box 4 Click Close to leave the FEA 2D Calculation The final result looks like this NOTE You can return to the FEA 2D Calculation using Power Edit Save your file This is the end of this tutorial chapter Recalculating Stress 339 ...

Page 348: ...340 ...

Page 349: ...tions that would be difficult to produce otherwise cam Geometric shape of the cam curve path Diagram illustrating the lift or rotation of the follower for each de gree of rotation or translation of the cam plate motion diagram Part of the motion diagram Some sections are defined by design For example the maximum lift of 15 mm is reached at an angle of 90 degrees motion section Numerical Control Us...

Page 350: ... also calculate velocity and acceleration of an existing section of the motion diagram The cam curve path can be determined with the calculated cam sections An existing curve path can be scanned and transferred in the motion diagram A driven element can be coupled to the cam NC data can be created using the curve path In the following exercise you generate a circular cam and a swinging follower wi...

Page 351: ...ulation dialog box on the Cam tab specify Type Circular In the Type of Cam dialog box click the center Circular icon and specify Revolutions 1 min 100 Drawn Select the check box Diameter of Body mm 50 3 Click the Follower button NOTE You can also step through the dialog using the Next button 4 On the Follower tab Movement section click the Translating button Starting Cam Designs and Calculations 3...

Page 352: ...5 In the Type of Follower dialog box click the Swinging button You are returned to the CAM Design and Calculation dialog box Specify the following settings 344 Chapter 18 Designing and Calculating Cams ...

Page 353: ...on for the cam and the follower in the drawing 8 Respond to the prompts as follows Specify center of cam 100 100 press ENTER Specify center of follower swing Undo 100 0 press ENTER Specify start of movement Undo 90 157 36 press ENTER Specify origin of movement diagram Undo Window Window Specify a point next to the cam Specify length of movement diagram Undo 360 0 press ENTER The cam and the follow...

Page 354: ...ned again Defining Motion Sections Define five motion sections to describe the cam To specify motions 1 In the Cam Design and Calculation dialog box click the Motions button and then click the New button 346 Chapter 18 Designing and Calculating Cams ...

Page 355: ...og box you can either insert or append a new motion section 2 Click Append Define the first motion section 3 In the Motion New mode dialog box specify the following settings Position deg from to 0 90 Elevation deg 0 0 Defining Motion Sections 347 ...

Page 356: ...e next motions to describe the cam 1 In the Cam Design and Calculation dialog box Motion tab click New 2 In the Select Method to Add New Segment dialog box click Append 3 In the Motion New mode dialog box specify the following settings Position deg from to 90 150 Elevation deg 0 5 348 Chapter 18 Designing and Calculating Cams ...

Page 357: ... of Follower movement button 5 Click Dwell Constant Velocity second button from left 6 In the Motion New mode dialog box specify the following settings Curve 5th polynomial Velocity rad s 0 2 Defining Motion Sections 349 ...

Page 358: ... Cam Design and Calculation dialog box Motion tab click New 2 In the Select Method to Add New Segment dialog box click Append 3 In the Motion New mode dialog specify the following settings Position deg from to 150 180 Elevation deg 5 8 4 Click the Context of Follower movement button 350 Chapter 18 Designing and Calculating Cams ...

Page 359: ...ialog box Motion tab click New 2 In the Select Method to Add New Segment dialog box click Append 3 In the Motion New mode dialog box specify the following settings Position deg from to 180 220 Elevation deg 10 73 16 4 Click the Context of Follower movement button and then click Constant Velocity Reverse fourth button from left 5 In the Motion New mode dialog box specify the following settings Acce...

Page 360: ...log box click Append 3 In the Motion New mode dialog specify the following settings Position deg from to 220 360 Elevation deg 16 0 4 Click the Context of Follower movement button The routine calculates the correct values for the end position 5 In the Motion New mode dialog box specify the following settings Curve Harmonic Combination 352 Chapter 18 Designing and Calculating Cams ...

Page 361: ...displayed in the list The definition of the geometry is finished Calculating Strength for Springs To calculate the strength for the spring 1 In the Cam Design and Calculation dialog box select the Strength check box and then click the Strength button Calculating Strength for Springs 353 ...

Page 362: ...orce N Fe 20 Reduced Mass of the Follower kg mf 0 1 Reduced Inert Mass kg mi 0 07 3 On the Spring tab specify Preload N F0 10 Mass of Spring kg ms 0 08 Spring Location mm ls 45 Spring Rate Select the User Change check box enter 30 354 Chapter 18 Designing and Calculating Cams ...

Page 363: ...se use the default material 5 On the Arm tab specify Dimensions of Arm mm d 8 NOTE You can choose other types of cross sections for the arms 6 Click Results and then click Calculation All calculation results are displayed on the respective tabs Calculating Strength for Springs 355 ...

Page 364: ... the bottom of the cam Design and Calculation dialog box 2 Click the Results button 3 In the Geometry tab click the Center of Cam button Two hatched open triangles are displayed on the screen 4 Respond to the prompts as follows Press ESC or ENTER to exit or Change center of cam Enter C press ENTER Specify center of cam 100 100 Press ENTER 5 Snap to the apex of the triangle that produces a maximal ...

Page 365: ...k Save The cam is completely designed and calculated 3 To view the results click Finish and then respond to the prompt as follows Specify insertion point of result table Specify a location for the result table The table of results is inserted into the drawing Exporting Cam Data andViewing Results 357 ...

Page 366: ...Save your file This is the end of the tutorial chapter 358 Chapter 18 Designing and Calculating Cams ...

Page 367: ...o import an Autodesk Inventor file and generate drawing views from them for documentation The Autodesk Inventor assembly and part drawings required for this tutorial are available in the Acadm tutorial tut_bracket folder of the AutoCAD Mechanical installation folder 359 ...

Page 368: ...360 ...

Page 369: ...ew value Parametric dimensions can be changed only from Autodesk Inventor A command useful for generating linear radial and diameter dimensions which minimizes the number of individual actions power dimensioning while generating a dimension Power dimensioning automati cally selects the type of linear dimension horizontal vertical or aligned based on the selected point A type of dimension that indi...

Page 370: ...ew scale Linking Autodesk Inventor Part Files With Autodesk Inventor link support you can create views of Autodesk Inventor part files while maintaining full model to drawing associativity Note that the exercises in this chapter can be done only if AutoCAD Mechanical was installed with the Install Autodesk Inventor link option enabled If Autodesk Inventor link support is not installed an error mes...

Page 371: ...s and Settings All Users Shared Documents Autodesk ACADM 2009 Acadm Tutorial 4 Click Holder Bracket ipt then click Open Shading and Rotating Geometry The commands to shade and rotate geometry are on the Mechanical Browser s right click menu If the Mechanical Browser is not visible 1 On the command line enter AMBROWSER and respond to the prompts as follows Desktop browser ON OFf Auto hide ON Enter ...

Page 372: ...ocation inside or on the Arcball 4 Click and hold the left mouse button then rotate the part to a position that resembles the following illustration 5 Right click then click Exit from the menu Inserting Drawing Borders To insert a drawing border 1 Click the Drawing tab in the Mechanical Browser 2 Start the Drawing Title Borders command On the command line enter AMTITLE 3 In the Drawing Borders wit...

Page 373: ...Scale 1 1 4 Choose OK 5 In the Page Setup Manager dialog box select Layout1 then click Modify 6 In the Page Setup Layout1 dialog box specify the following value Inserting Drawing Borders 365 ...

Page 374: ...tup Manager 8 Click Close 9 Respond to the prompt as follows Specify insertion point Enter 0 25 0 75 press ENTER 10 In the Change Title Block Entry dialog box click Next 11 In the next page specify File Name InventorPart 366 Chapter 19 Using Autodesk Inventor Link Support ...

Page 375: ...he part in Autodesk Inventor are automatically updated in the drawing views when the dwg file is updated When you create a drawing view the link reads parametric dimensions from the model and adds them to the view To enable creation of parametric dimensions 1 Open the Options dialog box On the command line enter AMOPTIONS 2 Select the AM Drawing tab 3 Under Parametric Dimension Display select the ...

Page 376: ... base view 1 On the command line enter AMDWGVIEW 2 In the Create Drawing View dialog box specify View Type Base Data Set Select Layout Layout1 Orientation Back Scale 2 0000 368 Chapter 19 Using Autodesk Inventor Link Support ...

Page 377: ...3 Choose OK 4 Respond to the prompts as follows Specify location for base view Click in the lower left corner of the graphics area press ENTER Creating DrawingViews 369 ...

Page 378: ...s extracted from the Inventor Part file are displayed Create an orthogonal view from the base view To create an orthogonal view type 1 On the command line enter AMDWGVIEW 2 In the Create Drawing View dialog box specify View Type Ortho 370 Chapter 19 Using Autodesk Inventor Link Support ...

Page 379: ...ompts as follows Select parent view Select the base view Specify location for orthogonal view Drag to a location above the base view click to select location Specify location for orthogonal view Press ENTER Creating DrawingViews 371 ...

Page 380: ...dundant You may also need to create dimensions for some entities Dimensions you add yourself are called reference dimensions If the part is modified in Autodesk Inventor these dimensions automatically display the correct part size To delete a parametric dimension 1 In the orthogonal view click the dimension that reads 0450 and press DELETE The dimension is deleted 372 Chapter 19 Using Autodesk Inv...

Page 381: ...ater resulting in the redundancy of dimensions To move dimensions 1 Click the diameter dimension of 0 8800 Three grip points are displayed on the dimension 2 Drag the middle grip outside the bracket and click The dimension should be displayed as shown in the following image Working with Dimensions 373 ...

Page 382: ...nsions to tidy up the drawing view To add a hole note 1 Start the Leader note command On the command line enter AMNOTE 2 Respond to the prompts as follows Select object to attach rEorganize 374 Chapter 19 Using Autodesk Inventor Link Support ...

Page 383: ... part file To create a vertical reference dimension 1 Start the power dimensioning command On the command line enter AMPOWERDIM 2 Respond to the prompts as follows Specify first extension line origin or Linear Angular Radial Baseline Chain Options Update select object In the orthogonal view click the end points of the line 1 and 2 Specify dimension arc line location Drag the dimension line to the ...

Page 384: ... the power dimensioning command On the command line enter AMPOWERDIM 2 Respond to the prompts as follows Specify first extension line origin or Linear Angular Radial Baseline Chain Options Update select object Press ENTER Select arc circle line or dimension In the base view click the circle indicating the hole 1 drag the dimension to a placement point 2 and click 376 Chapter 19 Using Autodesk Inve...

Page 385: ...s possible to export a drawing view of a linked drawing such that it can be viewed in AutoCAD or AutoCAD LT To export a drawing view 1 On the command line enter AMVIEWOUT 2 In the Export Drawing Views dialog box from the Source drop down list select Select Views Entities then click Select Exporting DrawingViews to AutoCAD 377 ...

Page 386: ...ort Drawing Views dialog box 4 In the File Name box enter the name of a drawing file to export to 5 Click OK 6 Save the file 7 Close AutoCAD Mechanical start AutoCAD and open the file that you created in step 5 Linking Autodesk Inventor Assembly Files To link an Autodesk Inventor assembly file 1 Select File New Inventor Link 378 Chapter 19 Using Autodesk Inventor Link Support ...

Page 387: ...Mechanical Browser and select 3D orbit 3 Place the cursor in the appropriate location inside or on the Arcball 4 Click and hold the left mouse button then rotate the part to a position that resembles the following illustration Accessing Parts from the Browser To select a part from the browser 1 Click a part in the Mechanical Browser The part is highlighted in model space 2 Right click a part and s...

Page 388: ...ts Bill of Materials BOM To access iProperties 1 On the command line enter AMBOM 2 Respond to the prompts as follows Specify BOM to create or set current Main MAIN Press ENTER The BOM dialog box is displayed 3 Click the sign in the first column to expand the row 380 Chapter 19 Using Autodesk Inventor Link Support ...

Page 389: ...4 Click Settings The BOM Settings dialog box is displayed 5 Click the More button to display More Properties dialog box Accessing iProperties 381 ...

Page 390: ...elect Part Number and click OK You are returned to the BOM dialog box Notice the additional row at the bottom of the Available component properties list 382 Chapter 19 Using Autodesk Inventor Link Support ...

Page 391: ...atically filled with data from the Inventor assembly file 9 Save the file as Inventor Assembly dwg Inserting Drawing Borders To insert a drawing border 1 Click the Drawing tab in the Mechanical Browser 2 On the command line enter AMTITLE 3 In the Drawing Borders with Title Block dialog box specify Paper Format C 17 0x22 0 inch Title Block US Title Block Scale 1 1 Retrieve from Assembly Properties ...

Page 392: ...ting Parts Lists and Balloons You can create a variety of drawing view types for a part but you must create a base view first Subsequent changes made to the assembly file in Autodesk Inventor are automatically updated in the drawing views when the drawing file is updated To create a base view 1 On the command line enter AMDWGVIEW 2 In the Create Drawing View dialog box specify View Type Base Data ...

Page 393: ...ng To create the parts list 1 On the command line enter AMPARTLIST The Part List ANSI dialog box is displayed 2 Click OK 3 Move the cursor to position the parts lists above the title block then click to insert the parts list Creating Parts Lists and Balloons 385 ...

Page 394: ...as follows Select part assembly or auTo autoAll Collect Manual One Renumber rEorganize Enter A Select pick object Window select the entire assembly Select pick object Press ENTER 3 Place the balloons horizontally above the assembly 386 Chapter 19 Using Autodesk Inventor Link Support ...

Page 395: ...the breakout section view is generated you create an isometric view for it To create the base view and orthogonal view 1 Click the Drawing tab in the browser and double click Layout 2 2 Start the Drawing Title Borders command On the command line enter AMTITLE The Drawing Borders with Title Block dialog box is displayed 3 Create a new drawing border for Layout2 following the procedure outlined in I...

Page 396: ...t work axis straight edge or worldX worldY worldZ Enter X Adjust orientation Flip Rotate Accept Press ENTER Specify location of base view Position the view in the lower left corner of the graphics area and click Specify location of base view or Done next view Press ENTER Specify location of projected view or New parent view Drag to a location above the base view click to select location Specify lo...

Page 397: ...start point Click point 1 Specify next point or Arc Halfwidth Length Undo Width Click point 2 Specify next point or Arc Halfwidth Length Undo Width Click point 3 Specify next point or Arc Halfwidth Length Undo Width Enter close press ENTER A closed polyline is created Creating Breakout SectionViews 389 ...

Page 398: ...ase 3 On the Section Tab specify Type Breakout Hatch Selected 4 Click OK 5 Respond to the prompts Select first parent view for breakout view Select the orthogonal view Specify location of base view Drag just above the base view click to select the location press ENTER 390 Chapter 19 Using Autodesk Inventor Link Support ...

Page 399: ...the polyline you created in the previous exercise 1 Select second parent view for depth selection Select the base view 2 Select point for depth of section Select point 3 The breakout section view is created Creating Breakout SectionViews 391 ...

Page 400: ...In the Create Drawing View dialog box specify View Type Iso 3 Choose OK 4 Respond to the prompts Select parent view Select the breakout section view Specify location of base view Drag to the left of the orthogonal view click and press ENTER 392 Chapter 19 Using Autodesk Inventor Link Support ...

Page 401: ...hey would not be visible if you placed the view elsewhere The isometric view is created 5 Move the isometric view to the right of the orthogonal view On the command line enter AMMOVEVIEW 6 Respond to the prompts Select view to move Select the isometric view Specify new view location Drag to the right of the orthogonal view click and press ENTER Creating Breakout SectionViews 393 ...

Page 402: ... must display it first To display the cutline 1 Start the Edit Paper Space Cut Line command On the command line enter AMEDITPSCUTLINE 2 Respond to the prompts Select broken out section view Click the breakout section view Enter an option for paperspace cutline Display Select Display Press ENTER The cut line is displayed 3 Modify the cutline to any shape you want it to be 394 Chapter 19 Using Autod...

Page 403: ... broken out section view Click the breakout section view Enter an option for paperspace cutline Display Select Display Enter S Select polyline to use as cutline Click the edited polyline The breakout section view and the isometric view update Modifying Breakout SectionViews 395 ...

Page 404: ... other views To delete the base view 1 Right click the base view icon in the browser and select Delete The Delete dependent views dialog box is displayed 2 Click No The base view is deleted 3 Save the file and close AutoCAD Mechanical 396 Chapter 19 Using Autodesk Inventor Link Support ...

Page 405: ...hted in yellow Additionally a balloon is displayed on the status bar informing you that a newer version is now available To bring in the modifications you must update the part file To update the part file 1 Use AutoCAD Mechanical to open the Assembly file or Part file that was used in this exercise 2 Observe how the browser indicates the parts and views affected by the part modification 3 Start th...

Page 406: ...398 ...

Page 407: ...lleville spring washers 15 299 Belt and Chain Length Calculation dialog box 287 belts 17 bending moments 33 259 275 bills of material 15 205 blind holes 15 38 194 blind slots 15 38 bolts 32 BOM databases 15 205 211 border conditions in stress calculations 330 break dimensions 19 144 breakout section views assembly files 387 390 breaks in shafts 246 browser 51 mechanical 51 C calculations on bearin...

Page 408: ... 227 229 231 236 238 239 262 263 265 268 279 280 282 287 288 291 313 314 316 330 333 343 344 362 364 368 370 377 379 383 384 388 390 392 Automatic Dimensioning 137 Beam Calculation 279 Belt and Chain Length Calculation 287 Cam Design and Calculation 343 Change Title Block Entry 366 384 Construction Lines 104 Create Drawing view 368 Create Drawing View 370 384 388 390 392 Detail 115 Drawing Borders...

Page 409: ...ance snaps 99 distributed loads 275 327 drawing borders 38 144 364 383 Drawing Borders with Title Block dialog box 145 364 383 drawing views 364 367 377 383 384 export to AutoCAD 377 insert drawing borders 364 383 drawings 44 46 48 135 borders 135 default templates 48 layers 44 limits 44 46 new 47 templates 44 46 drill bushings 20 durability calculations 328 dynamic calculations 235 dynamic draggi...

Page 410: ...L language converter 24 Layer Control dialog box 131 layer groups 25 43 119 layer system 24 layouts 120 leaders 26 36 215 225 length calculations for chains 287 libraries for storage 100 Library dialog box 25 lines 259 279 deflection 259 279 List of Filters dialog box 231 load calculations 21 259 275 321 327 lock washers 34 lubricators 25 M Material dialog box 263 Material Properties dialog box 26...

Page 411: ... 27 plain rivets 27 plugs 27 33 point forces 260 276 Point Load dialog box 266 polylines 107 power commands 100 159 Power Copy 168 176 299 Power Dimensioning 100 120 135 Power Dimensioning dialog box 113 117 130 Power Edit 168 186 300 327 336 Power Erase 136 168 192 224 Power Recall 168 Power Snap Settings dialog box 102 238 Power View 168 189 309 precision in dimensions 113 profiles in shafts 244...

Page 412: ...ox 268 282 Select Part Size dialog box 199 288 Select Template dialog box 100 236 362 379 Set Value dialog box 221 229 settlement properties in screw calculations 323 Shaft Calculation dialog box 262 Shaft Generator dialog box 239 shafts 33 34 38 236 240 241 244 246 249 260 268 breaks 236 246 calculations 260 268 commands that act on 38 contours 33 cylinders 240 generator 236 260 lock nuts 34 modu...

Page 413: ...ialog box 267 torque rotation angles 33 torsion moments 33 torsion springs 38 300 trace contours 38 tracking lines 215 translate text 23 trims 110 Type of Follower dialog box 344 U undercuts 38 V vertical linear dimensions 29 view components 62 View dialog box 125 132 viewports 25 39 120 123 views 90 99 120 123 132 247 367 370 384 387 392 annotation 90 associative 132 base 384 breakout section 387...

Page 414: ......

Reviews: