


SECTION 3 OPERATING THE BIS VIEW MONITORING SYSTEM
______________________________________________________________________
3-12
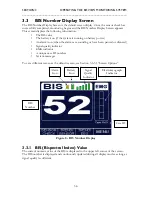
BIS value, no BIS number displays. Note that SR will only appear if the “Display SR” option
was selected in the “Screen Options” menu.
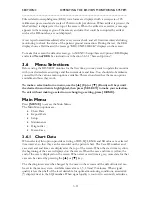
To access
Chart Data:
1.
Press
[MENU]
to access the Main Menu.
2.
Highlight
[Chart Data]
. Press
[SELECT]
. The Chart Data displays.
3.
Use the
[
▲
]
and
[
▼
]
keys to scroll through the data.
To change the Charting Interval, press
[INTERVAL]
to scroll through the available
options (1, 5, 10 or 15 minutes).
To permanently save the charting interval, go to MENU>Setup>Screen Options>Charting
Interval, to select the desired interval, then save using the “Save Settings” option. See
instructions in Section 3.6.3.1 “Screen Options.”
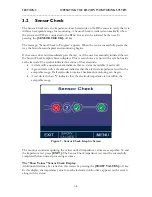
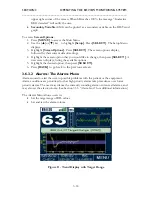
3.6.2
Export Data
This selection allows the user to send data to a removable drive via the USB port (Type A) at
the rear of the monitor, or to a device connected to the monitor’s serial port. Recommended
USB drives include:
•
Sandisk Cruzer Mini and Micro 128, 256, 512 MB or 1 G
•
PNY Attache 256 or 512 MB
•
Memorex TravelDrive 512 MB
•
Kingston DataTraveler 512 MB
•
Aspect 32 MB and Aspect 128 MB
Data that may be exported include:
•
Live Data:
When this option is selected, live case data (BIS values, SQI, EMG, SR
and unfiltered EEG waveforms) are exported.
•
BISx
History Data:
When this option is selected, case data stored in the BISx (BIS
values, SQI, EMG and SR) are exported.
•
Monitor Error Log:
This option reports all system errors, including those related to
the monitor, BISx, PIC or sensor.
Information on the data file format may be obtained by contacting Technical Service. (See
back cover for contact information.)
WARNING:
DO NOT EXPORT BISx HISTORY DATA WHILE A CASE IS IN
PROGRESS.
Before exporting BISx history data:
1.
Disconnect the BISx.
2.
Disconnect sensor from PIC.
3.
Reconnect the BISx only.


