


Connect Cables to the Unit
4-5
4
Connect Cables to the Unit
Caution:
The wireless bridge’s Ethernet port does not support Power over Ethernet
(PoE) based on the IEEE 802.3af standard. Do not try to power the unit by
connecting it directly to a network switch that provides IEEE 802.3af PoE.
Always connect the unit to the included power injector module.
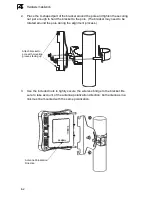
1.
Attach the Ethernet cable to the Ethernet port on the wireless bridge.
Note:
The Ethernet cable included with the package is 30 m (100 ft) long. To wire a
longer cable (maximum 100 m, 325 ft), use the connector pinout information in
Appendix B.
2.
For extra protection against rain or moisture, apply weatherproofing tape (not
included) around the Ethernet connector.
3.
Be sure to ground the unit with an appropriate grounding wire (not included) by
attaching it to the grounding screw on the unit.
Caution:
Be sure that grounding is available and that it meets local and national
electrical codes. For additional lightning protection, use lightning rods, lightning
arrestors, or surge suppressors.
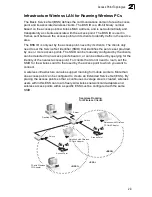
Connect the Power Injector
To connect the wireless bridge to a power source:
Caution:
Do not install the power injector outdoors. The unit is for indoor installation only.
1.
Connect the Ethernet cable from the wireless bridge to the RJ-45 port labeled
“Output” on the power injector.
2.
Connect a straight-through unshielded twisted-pair (UTP) cable from a local
LAN switch to the RJ-45 port labeled “Input” on the power injector. Use
Category 5 or better UTP cable for 10/100BASE-TX connections.
Note:
The RJ-45 port on the power injector is an MDI port. If connecting directly to a
computer for testing the link, use a crossover cable.
Ground Wire
Ethernet Cable
Summary of Contents for AWAP05O
Page 1: ...Dual Band Outdoor Access Point Bridge User Guide ...
Page 2: ......
Page 4: ...AWAP05O ZZ AWAP05OM ZZ F1 1 0 0 E072004 R01 150xxxxxxxxA ...
Page 28: ...Network Configuration 2 6 2 ...
Page 50: ...Initial Configuration 5 8 5 6 Click the OK button to restart the access point ...
Page 200: ...Troubleshooting A 2 A 5 If you forgot or lost the password Contact Technical Support ...
Page 212: ...Specifications B 12 B ...
Page 220: ...Glossary Glossary 4 ...
Page 224: ...Index 4 Index ...
Page 225: ......
Page 226: ...E032004 R01 150xxxxxxxxxA ...


