background image

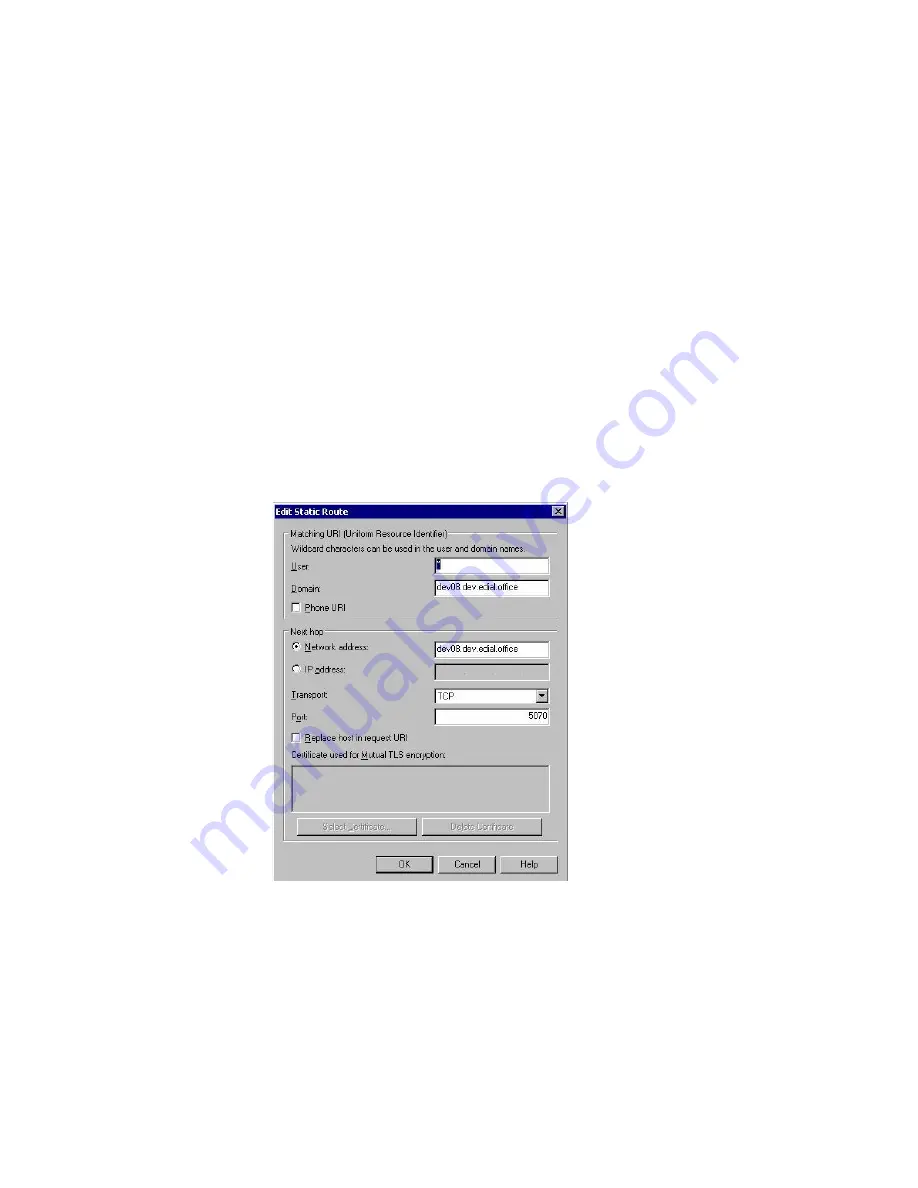
To set up a Static Route

My Teamwork for Microsoft Office Communicator

............................................................................................................................................................................................................................................................

8AL90213USAC ed 01
September 12, 2008

C - 9


............................................................................................................................................................................................................................................................

b.

Domain:

 Provide the Fully Qualified DNS (domain name) of the configured My 

Teamwork server. In the user’s URI, this is the information after the 

@

 in the LCS 

User ID.

c.

Network Address:

 Provide the network address of the configured My Teamwork 

server. You must use the Fully Qualified DNS (domain name). Do 

NOT

 use the IP 

address.

d.

Transport:

 Provide the transport that LCS will use when communicating with the 

My Teamwork server.

Currently, only TCP is supported.

e.

Port:

 Provide the Port number on which My Teamwork’s MID service will be 

receiving communications from LCS. The port number is configured during the 

My Teamwork installation process.

........................................................................................................................................................

E

N D

  O

F

  S

T E P S

Figure C-4

Example of Static Route Information

Summary of Contents for OmniTouch My Teamwork

Page 1: ...OmniTouch My Teamwork for ACS Release 7 1 4 Unified Conferencing and Collaboration Installation Guide 8AL90213USAC ed 01 September 12 2008 ...

Page 2: ...rs The information presented is subject to change without notice Alcatel Lucent assumes no responsibility for inaccuracies contained herein Copyright 2008 Alcatel Lucent All Rights Reserved FCC Interference Statement If equipment has been purchased from Alcatel Lucent this equipment has been tested and found to comply with the limits for a Class B digital device pursuant to Part 15 of the FCC rule...

Page 3: ...atic IP Address 3 11 Using DHCP 3 12 Initial configuration 3 13 4 My Teamwork Licensing Obtaining your license files 4 2 Activating document converter software after a completed installation 4 13 5 Installation Verification For any installation 5 2 Telephony validation tests for VoIP and PSTN 5 3 A OmniTouch My Teamwork Mobile Edition Installation requirements A 1 Devices A 2 Features A 8 B Instal...

Page 4: ...mwork for Microsoft Office Communicator Accessing My Teamwork C 2 LCS integration C 3 Changing Authentication C 11 Setting up users C 13 Editing your registry C 17 Creating the conferencing service C 20 My Teamwork for Office Communicator Online Help C 22 Required CODECs and video formats C 34 Verifying Configuration C 35 ...

Page 5: ... VMware license file 4 5 To re host license keys 4 6 To construct Document Conversion VM 4 7 To activate your document convertor software after an installation has been completed 4 13 5 Installation Verification To add contacts 5 2 To dial out 5 3 To dial out of a conference 5 4 To dial in to a conference 5 5 A OmniTouch My Teamwork Mobile Edition To install OmniTouch My Teamwork Mobile Edition A ...

Page 6: ...l C 11 To add a new user C 13 To modify the registry and enable the My Teamwork tab in Office Communicator 2005 C 18 To define the DWORD value C 20 To modify the registry and enable the My Teamwork tab in Office Communicator 2005 online Help C 22 To activate your registry edits C 25 To configure Office Communicator 2005 C 25 To enter your phone numbers C 27 To enter your My Teamwork server as a tr...

Page 7: ...le 3 7 3 8 Completed Upload 3 8 3 9 Installation Verification Dialog Box 3 8 3 10 Upgrade Status 3 8 3 11 Server Restart 3 9 3 12 After Server Restart 3 9 3 13 Completed Operating System Upgrade 3 10 3 14 Serial Administrator Console Main Menu 3 11 3 15 Web Administration Interface Login 3 13 3 16 Administration Welcome Screen 3 14 4 My Teamwork Licensing 4 1 Licensing Page 4 3 4 2 VMware License ...

Page 8: ...ss B 7 B 12 Updating Trusted Host List B 7 B 13 My Teamwork for IBM Lotus Sametime B 9 B 14 Server Selection B 9 B 15 Domino Program Directory B 10 B 16 Domino Data Directory B 10 B 17 Sametime Server Details B 11 B 18 My Teamwork Server Details B 11 B 19 Final Install Screen B 12 B 20 MyTeamworkProperties xml B 13 B 21 Sametime Web Administration Login B 15 B 22 Meeting Services B 15 B 23 Confere...

Page 9: ... 32 B 43 Available Updates B 33 B 44 IBM Lotus Sametime Connect Restart Dialog Box B 34 C My Teamwork for Microsoft Office Communicator C 1 SIP Proxy C 6 C 2 User Settings C 7 C 3 LCS Tree View C 8 C 4 Example of Static Route Information C 9 C 5 Edit Authorized Host C 10 C 6 Authentication Protocol C 12 C 7 Add User C 13 C 8 Add New User Wizard C 14 C 9 Enable LCS Users C 15 C 10 Enable LCS Users ...

Page 10: ... Advanced Connection Settings Dialog Box C 27 C 21 My Phone Numbers C 28 C 22 Trusted Sites Dialog Box C 29 C 23 View Certificate C 30 C 24 Install Certificate C 31 C 25 Certificate Wizard C 32 C 26 Exiting the Certificate Import Wizard C 33 C 27 Phone Tab C 35 ...

Page 11: ...e following topics OmniTouch Advanced Communications Server ACS Platform This installation guide tells you how to install the My Teamwork software The OmniTouch Advanced Communications Server ACS is the platform where Alcatel Lucent s applications are built and reside The following diagram illustrates the relationship between OmniTouch ACS and the available applications OmniTouch Advanced Communic...

Page 12: ... the ACS Platform You should read this guide in its entirety before you begin the installation process Scope The guide provides basic installation instructions For advanced or nonstandard installations for example stacking refer to the instructions in the Alcatel Lucent OmniTouch Advanced Communications Server ACS Administration Guide ...

Page 13: ...uments Table 2 1 Additional Available Documents Additional documents 2 1 Title P N Alcatel Lucent OmniTouch Advanced Communications Server ACS Administration Guide Release 7 1 4 8AL90208USAD ed 01 Alcatel Lucent OmniTouch Advanced Communications Server ACS Customer Release Bulletin Release 7 1 4 Alcatel Lucent OmniTouch My Teamwork Unified Conferencing and Collaboration Application Site Preparatio...

Page 14: ... documents Related Documentation 2 2 8AL90213USAC ed 01 September 12 2008 Alcatel Lucent OmniTouch Unified Communications Application Suite Compliant Platforms Located at https www technical knowledge base com km ...

Page 15: ...3 2 Installation media 3 2 Installation notes 3 2 Upgrades stacks 3 3 Installation and upgrade 3 3 Assigning an initial IP address 3 10 Initial configuration 3 13 To scratch install or upgrade an existing OmniTouch ACS 6 1 0 2982 installation 3 4 To upgrade an existing OmniTouch ACS 7 1 3 3855 to ACS 7 1 4 3 5 To configure IP Settings 3 10 To continue your installation using the Web Interface 3 12...

Page 16: ...nterprise 4 0 RHE4 platform OmniTouch ACS systems that contain TDM Network Interface TP240 Modules cannot be upgraded to OmniTouch ACS 7 0 or greater because there is no driver support for the TP240 card in RHE4 If you want to upgrade to OmniTouch ACS 7 0 or greater replace the TP240 card with a TP260 which is available from Alcatel Lucent or switch to the IP trunking interface for example SIP Ins...

Page 17: ... Secondary 6 Replicate the database from the Primary Installation and upgrade For OmniTouch ACS 7 1 4 Alcatel Lucent supports both scratch installations and upgrades from OmniTouch ACS 7 1 3 or from OmniTouch ACS 6 1 0 2982 Note When upgrading 6 1 systems to 7 0 or 7 1 x a new license is required for OmniTouch ACS and for VMware When upgrading to OmniTouch ACS 7 1 x from ACS 6 1 the server must ha...

Page 18: ...e Typed letters are not case sensitive 4 The installation begins System runs Anaconda and then the screen turns blue System displays Formatting XXX file system example var System displays Transferring image System displays Package Installation screen System starts installing Red Hat Linux Enterprise Edition in text only mode There should be two 2 progress meters displayed on the screen 1 Top meter...

Page 19: ...ystem After reboot is completed login appears E N D O F S T E P S To upgrade an existing OmniTouch ACS 7 1 3 3855 to ACS 7 1 4 The upgrade is a two step process Step 1 Upgrade the server software Step 2 Upgrade the Operating System from Red Hat Enterprise Linux Release 4 update 3 to Red Hat Enterprise Linux Release 4 update 6 Step 1 Upgrade the server software from 7 1 3 3855 to 7 1 4 a Log in to ...

Page 20: ...mber 12 2008 c Select Configuration Upgrade Server Software Figure 3 2 Upgrade Server Software d Delete any previous upgrade images for example eiab26 tar gz rel_7_1_3b3855 from the Uploaded install images list Figure 3 3 Upgrade Server Software Box e Click OK to permanently delete the file Figure 3 4 Verify Deletion ...

Page 21: ...d f Insert the ACS 7 1 4 DVD into the DVD drive of your PC g Click the Browse button to locate the eiab26 tar gz rel_7_1_4bxxxx file Figure 3 6 Selecting the Latest Install File h Click Upload to add the file to the Uploaded install images list Note The file is very large approximately 400MB and will take some time to upload Figure 3 7 Uploading the Install File ...

Page 22: ... Installation Instructions 3 8 8AL90213USAC ed 01 September 12 2008 i Click Install Figure 3 8 Completed Upload j Click OK The upgrade status will appear in the Wed Administration Console Figure 3 9 Installation Verification Dialog Box Figure 3 10 Upgrade Status ...

Page 23: ...start Step 2 Upgrade the Operating System to RHEL4u6 a Remove the DVD from the local drive and place the DVD into the server drive b Press Ctrl Alt Delete to reboot the server All processes will shut down Figure 3 12 After Server Restart c When the reboot is finished type the letters osu at the displayed prompt Note Typed letters are not case sensitive d The operating system update begins A blue s...

Page 24: ...ing the serial console OmniTouch ACS application To configure IP Settings 1 Log in to the server The first time you log in use the default Login ID and Password Login admin Password changeme All OmniTouch ACS servers are shipped with the same default Login ID and Password For your server s security you should change Password immediately You cannot delete the default Admin user You can add another ...

Page 25: ...tatic IP Address On the next screens enter your TCP IP parameters a Enter a valid hostname for example yourserver1 and select OK b Next enter a valid domain name with extension for example yourcompany com and select OK c Enter the IP address for example 192 168 10 140 and select OK d Enter the netmask for example 255 255 255 0 and select OK e Enter the server s default gateway and select OK f Ente...

Page 26: ...DHCP Note Skip this section if you are using static IP addresses To continue your installation using the Web Interface 1 Select OK Ignore any errors or messages 2 Select OK to return to the main menu 3 Scroll to the Restart Server choice and select OK The following prompt appears Restart Alcatel Lucent server and lose all current calls 4 Select Yes Your system will reboot E N D O F S T E P S ...

Page 27: ...ttps yourserver1 yourcompany com admin A login screen is displayed Figure 3 15 Web Administration Interface Login If the login screen does not appear the most likely cause is that the server is not connected correctly to the network You should try the following Check that the server s primary Ethernet port eth0 is correctly connected to the LAN Be sure that the computer that you are using for mana...

Page 28: ...ange the Password immediately You cannot delete the default Admin user You can add another Admin user with a unique password You are allowed to have two distinct passwords one for console login and one for use to log in to the System Administration Application 4 To change the password go to Provisioning Change current Admin Password To add a new Admin go to Provisioning Add Admin User The followin...

Page 29: ...owing Configuration screens order not important Note Clicking Save for TCP IP Settings and System Options is required for a new installation whether or not changes are made to the screen E N D O F S T E P S TCP IP Settings The settings you configured in the Console will be carried over to this screen which also offers additional configuration parameters Verify and click Save System Options Enter r...

Page 30: ... To connect to the server from a browser on another computer Installation Instructions 3 16 8AL90213USAC ed 01 September 12 2008 ...

Page 31: ...ics Procedures Obtaining your license files 4 2 Activating document converter software after a completed installation 4 13 To acquire the OmniTouch My Teamwork and VMware license files 4 2 To upload and install the My Teamwork license file 4 4 To install the VMware license file 4 5 To re host license keys 4 6 To construct Document Conversion VM 4 7 To activate your document convertor software afte...

Page 32: ...Lucent Support Center will generate the software key and send you this key by email You will also find a VMware license key attached to the email The VMware license key is required if the Web Presentation feature is being offered to end users licensed data conferencing Note Presentations non interactive sharing of Microsoft PowerPoint Word or Excel document is not available in My Teamwork Office E...

Page 33: ... it is possible that the serial number text will paste in white making it invisible on the email page After pasting text into the email convert the text color to black 6 Send the email to the Alcatel Lucent Support Center support center alcatel lucent fr The Alcatel Lucent Support Center uses the System Serial Number to generate the OmniTouch ACS license file The Alcatel Lucent Support Center will...

Page 34: ... request from the Alcatel Lucent Welcome Center In this case the Alcatel Lucent Support Center does not require an Alcatel Lucent Order Number to obtain license keys E N D O F S T E P S Note IRP ECS presence is not available in My Teamwork Office Edition To upload and install the My Teamwork license file 1 From the OmniTouch ACS Web Administration Interface click Configuration 2 Click Licensing 3 ...

Page 35: ...e Browse button to locate the VMware license file for the OmniTouch ACS 7 1 4 supported version of VMware Select that file 3 Click the Submit button You will see a message box which says License uploaded 4 Return to the Licensing page scroll down to the second box and check to ensure that you see a Current VMware Serial Number on the first line Note If you do not see that information the licensing...

Page 36: ...se files p 4 2 and provide your Alcatel Lucent order number first sale or add on order and new hardware IDs new SSN or new MAC address Note If two license keys were generated for the one order number system redundancy indicate which key has to be regenerated may be one or both 3 The Alcatel Lucent Support Center generates the new license key and sends you the key through email This new key s will ...

Page 37: ...h any installed firewalls Note If you do not have TightVNC listener installed on your machine you can use one of the appropriate links at the bottom of the Construct Document Conversion VM page Download Tight VNC for Windows XP or Tight VNC for other OS s to download and install the software and related instructions Accept ALL defaults for the Tight VNC installation Note Although the ACS Web Admin...

Page 38: ... as completed 9 Test the new document sharing virtual machine Installation Procedure 1 Update and store the product keys on the OmniTouch ACS server using the Web Administration interface on your client workstation a Access a web browser on your client workstation and log into the OmniTouch ACS Web Administration interface Select Configuration Advanced Settings Construct Document Conversion VM Fig...

Page 39: ...ument Conversion VM page Enter the name or IP address of your client workstation VNC Client IP and click the Open button Click the OK button in the resulting dialog box c A TightVNC window virtual machine should appear If you do not see a TightVNC window you are not running a listener on your client workstation Or have a firewall on your client workstation blocking the VNC connection 3 Initialize ...

Page 40: ...again e You should see the Windows installation process begin and go through four phases i A black screen where the Windows installation begins ii A blue screen where all files are copied to the virtual machine iii A graphical screen which shows the various steps this shows a time estimate in the lower left indicating how long the Windows installation may take iv When the installation finishes you...

Page 41: ...ct VM Install VMware Tools and select Typical for the type of install Continue the installation process to completion e Reboot the Windows session when requested Do NOT reboot the ACS server 5 Skip this step and proceed to Step 6 if installing US English After rebooting copy a startup file to the virtual machine s hard drive a From the Start button in the VNC window select and open the My Computer...

Page 42: ...ent and select the Nonpersistent radio button e Click OK on the Advanced Hard Disk Options page f Click OK for the Virtual Machine Settings page g Close the TightVNC window 8 Mark the installation as completed a Return to the Web Administration window on the client workstation Select Configuration Advanced Settings Construct Document Conversion VM b Locate the box labeled Step 4 Complete or Cancel...

Page 43: ...on process you can use the following procedure to activate after installation You will need a TightVNC listener installed on your client workstation and access to TightVNC listener through any installed firewalls Note If you do not have TightVNC listener installed on your machine you can use one of the appropriate links at the bottom of the Construct Document Conversion VM page Download Tight VNC ...

Page 44: ...station and locate the box labeled Step 3 option A on the Construct Document Conversion VM page Select only the checkbox labeled Enable Manual Activation Important If you select Initialize or Install Windows and Office your existing document converter will be damaged and a full installation will be required 3 Click the Start button on the Web Administration page and click OK in the resulting dialo...

Page 45: ... 4 15 b Locate the box labeled Step 4 Label VM Construction Complete or Cancel VM Construction at the bottom of the page Click the Complete button and click the OK button in the resulting dialog box Note If you forget step 6 b parts of the Document Conversion system will not start when the OmniTouch ACS server is powered on E N D O F S T E P S ...

Page 46: ... To activate your document convertor software after an installation has been completed My Teamwork Licensing 4 16 8AL90213USAC ed 01 September 12 2008 ...

Page 47: ... ACS functionality Note You must have telephony working to perform these tests This testing does not extensively test each feature Some elements are briefly tested to ensure basic functionality Contents This chapter presents the following topics and procedures Topics Procedures For any installation 5 2 Telephony validation tests for VoIP and PSTN 5 3 To add contacts 5 2 To dial out 5 3 To dial out...

Page 48: ...reen on the phone icon Verify that both phones can talk and listen to each other 6 Hang up all calls Verify that both phone icons change to the disconnected state blue phone To add contacts 1 Create two users e g buddy1 company office and buddy2 company office with separate phone numbers 2 Log Buddy 1 and Buddy 2 into Buddies on different computers 3 As Buddy 1 go to the Tools menu Add Contact 4 I...

Page 49: ...Mute button Verify that Buddy 2 is muted and his or her icon changes to mute 4 As Buddy 1 select Buddy 2 s phone icon and press the Hold button Verify that Buddy 2 is held and his or her icon changes to Held As Buddy 1 select Buddy 2 s phone icon and press the Hold button Verify that Buddy 2 is taken off hold and their icon changes to the green on the phone icon 5 As Buddy 1 click the Record butto...

Page 50: ...is connected into the conference 10 As Buddy 1 press the key twice Verify Buddy 1 hears the options prompt 11 Press the 2 key once to dial out Verify that Buddy 1 hears the Ready to place a call prompt 12 As Buddy 1 enter a phone number to another phone and press the key once Answer the other phone Verify that the number is dialed and Buddy 1 can speak to number dialed 13 As Buddy 1 press the key ...

Page 51: ... s name and press the key once Verify that you hear the You are the only person in this conference Please stay on the line prompt If Music on Hold was configured verify that you hear the To turn off the music press 1 prompt Verify that you hear Music On Hold 7 From a second phone dial in to the system s number Verify that you hear the Welcome prompt 8 Enter the participant s access code and press ...

Page 52: ...icipant s name and press the key Verify that the third caller hears the One moment while your call is being connected prompt Verify that the participant is taken into the conference Verify that the leader and both participants hear the participants name spoken when joining the conference 13 As the leader press the 3 keys Verify that the leader hears a prompt stating there are 3 people in this call...

Page 53: ...tion installation procedure Contents This appendix covers the following topics and procedure Topics Procedure Installation requirements Windows Mobile 6 PocketPC PDA phone PDA with access to the Internet or company Intranet depending on configuration Installation requirements A 1 Devices A 2 Features A 8 To install OmniTouch My Teamwork Mobile Edition A 2 ...

Page 54: ...her comparable Windows Mobile 6 PocketPCs even though they have not been tested To install OmniTouch My Teamwork Mobile Edition 1 From the Administrator Web Console the System Administrator must verify that the user is licensed and enabled for Mobile Note By default My Teamwork user accounts do not support the mobile client The System Administrator needs to enable Mobile Gateway User in the User S...

Page 55: ...To install OmniTouch My Teamwork Mobile Edition OmniTouch My Teamwork Mobile Edition 8AL90213USAC ed 01 September 12 2008 A 3 Figure A 1 User Settings ...

Page 56: ...ork_server md html Example alcatel lucent myteamwork com md html 3 A download HTML page appears Figure A 2 Download Page 4 Click the Download now button A download dialog box appears 5 Click Yes to download the cab file After the download is completed you may be asked to choose a location for the installation Device the Default is required 6 After selecting a location click Install in the lower le...

Page 57: ...tion is successfully completed you will see a message similar to the following on your device screen myTCabs cab was successfully installed on your device If you need more storage space you can remove installed programs 8 Click Start Programs My Teamwork to run My Teamwork The My Teamwork login screen appears Figure A 3 My Teamwork Login Screen ...

Page 58: ... A 6 8AL90213USAC ed 01 September 12 2008 9 To set the server that My Teamwork will use select Menu in the lower right and select Options The Options dialog box appears Figure A 4 Menu 10 In the Options dialog box enter the My Teamwork server URL for example alcatellucent myteamwork com ...

Page 59: ...0213USAC ed 01 September 12 2008 A 7 Figure A 5 Options Dialog Box 11 Click OK in the lower left in the Options dialog box 12 Enter your My Teamwork username and password in the login screen and click Sign In Your contact list appears after all of your contacts are downloaded to the device ...

Page 60: ...features Authentication remembers the login password via cookie at login Logout HTTP over SSL HTTPS View and edit the registered phone number Call Control including hold mute and drop Contact List and Instant Messaging capabilities Can initiate calls from Microsoft Office Outlook contact list Contact List may contain both My Teamwork subscribers and any phone number contacts can only be added via ...

Page 61: ...wnloading to add My Teamwork to the Today screen and allow access to your My Teamwork contacts If you upgrade to a newer version of Internet Explorer Alcatel Lucent recommends resetting your device before installing the new version When upgrading to a new version of My Teamwork Mobile Edition the previous version will be removed and the newest one installed If the upgrade to the new version of My ...

Page 62: ... Features OmniTouch My Teamwork Mobile Edition A 10 8AL90213USAC ed 01 September 12 2008 ...

Page 63: ...sions of My Teamwork for IBM Lotus Sametime Contents This appendix covers the following topic and procedures Topic Procedures Installation requirements B 2 The My Teamwork Plug in for Sametime B 27 Setting the maximum length of Sametime conferences B 34 Installing My Teamwork for IBM Lotus Sametime B 2 Sametime telephony service configuration B 14 To enable the display of Alcatel Lucent My Teamwor...

Page 64: ... Lotus Sametime licenses IBM Lotus Sametime 8 0 Installing My Teamwork for IBM Lotus Sametime 1 From the Administrator Web Console the System Administrator must verify that the user is licensed and enabled for Sametime a Click Configuration Licensing Figure B 1 ACS Administration Console b Locate the maximum number of Sametime licensed users Figure B 2 Sametime Counted LIcenses ...

Page 65: ...n Client_Connector as part of the name This acts a proxy for a Sametime user Every request that a Sametime user makes passes through the client using the Client Connector Username Examples ST_Client_Connector company com Sametime1_Client_Connector company com c Click Create User 3 Configure the Client Connector User Settings Note By default My Teamwork user accounts do not automatically support Sa...

Page 66: ...he Search field enter client_connector and click Submit The list of client connectors is displayed Figure B 5 Client Connector List c Select the Client Connector you want to set as your client connector A list of options appears Figure B 6 Client Connector Options d Click Manage User Settings The Client Connector User Settings page appears ...

Page 67: ...BM Lotus Sametime Installing My Teamwork for IBM Lotus Sametime 8AL90213USAC ed 01 September 12 2008 B 5 Figure B 7 User Settings e Check the Client Connector box f Check the Sametime Conferencing Allowed box g Click Save Changes ...

Page 68: ...01 September 12 2008 4 Configure the Trusted Hosts setting a Return to the ACS Web Administration Console screen and click Configuration Connector Settings Modify Trusted Hosts Note All My Teamwork licenses that are generated enable ECS presence Figure B 8 Configuration Menu Figure B 9 Selecting Connector Settings ...

Page 69: ...AL90213USAC ed 01 September 12 2008 B 7 Figure B 10 Selecting Modify Trusted Hosts b In the Value field enter or append the IP address of the Sametime Server Figure B 11 Entering a Sametime Server IP Address c Click Set to update the list of trusted hosts Figure B 12 Updating Trusted Host List ...

Page 70: ...login names are the same email addresses used by Lotus Domino system users The appropriate users have been licensed within My Teamwork to use Sametime services 6 Shut down the Domino process on the Sametime server 7 Locate the MyTeamworkforSametime exe installation file 8 Before launching the installation file make sure you have the following information available Sametime Fully Qualified Host Nam...

Page 71: ...k for IBM Lotus Sametime 8AL90213USAC ed 01 September 12 2008 B 9 Figure B 13 My Teamwork for IBM Lotus Sametime 10 Click Next and select the Sametime 8 0 x to install Figure B 14 Server Selection 11 Make sure the Domino Program directory and Data directory are correct ...

Page 72: ...My Teamwork for IBM Lotus Sametime B 10 8AL90213USAC ed 01 September 12 2008 Figure B 15 Domino Program Directory Figure B 16 Domino Data Directory 12 When prompted enter the Sametime server s Fully Qualified Host Name 13 Enter the Sametime server information ...

Page 73: ...me 8AL90213USAC ed 01 September 12 2008 B 11 Figure B 17 Sametime Server Details 14 Enter the Sametime server information Note The settings entered here are stored in the MyTeamworkProperties xml which can be found in the Domino telephony_ext directory Figure B 18 My Teamwork Server Details ...

Page 74: ...ing My Teamwork for IBM Lotus Sametime Installing My Teamwork for IBM Lotus Sametime B 12 8AL90213USAC ed 01 September 12 2008 15 When the installation is complete click Finish Figure B 19 Final Install Screen ...

Page 75: ... 12 2008 B 13 16 If the My Teamwork server is part of a stack configuration a Edit the MyTeamworkProperties xml which can be found in the Domino telephony_ext directory b Remove the comment tags to add additional servers Secondary server Figure B 20 MyTeamworkProperties xml 17 Start the Domino server E N D O F S T E P S ...

Page 76: ...tabase using Domino Administrator which must be installed on your desktop 1 Open the Domino Administrator 2 Select the server that stores the databases or templates that you want to sign 3 On the Files tab select the databases or templates that you want to sign 4 Select alstagents nsf file 5 Select Tools Database Sign 6 Select Active Server s ID 7 Select All design documents 8 Click OK After a few...

Page 77: ...and Configuration and click Meeting Services Figure B 22 Meeting Services 12 Locate Allow people to schedule a telephone conference call for a web conference A telephony service provider is required If this item is already checked you may begin using the My Teamwork conferencing integration If this option is not checked check it click Update and restart the Domino Sametime server ...

Page 78: ...me telephony service configuration Installing My Teamwork for IBM Lotus Sametime B 16 8AL90213USAC ed 01 September 12 2008 Figure B 23 Conferencing Integration Option 13 Click on Policies Figure B 24 Policies ...

Page 79: ...Sametime telephony service configuration Installing My Teamwork for IBM Lotus Sametime 8AL90213USAC ed 01 September 12 2008 B 17 14 Click on Sametime Default Policy Figure B 25 Sametime Default Policy ...

Page 80: ...AL90213USAC ed 01 September 12 2008 15 Under Community Services locate Allow telephony for contact lists instant messaging and instant meetings Check this item if it is not already selected Figure B 26 Community Services 16 You can now use My Teamwork Conferencing integration E N D O F S T E P S ...

Page 81: ...You will need a Notes ID that has design access to the STCONF NSF database which is on the Sametime server 1 Disable the STCONF template from overwriting any design changes that are made to the STCONF nsf a Select File Database Open b Select the proper servername c Select Sametime 8 0 x online meeting d Open the STCONF nsf databases with the Lotus Notes Designer e Click the Open button f Select Fi...

Page 82: ...us Sametime Meeting Installing My Teamwork for IBM Lotus Sametime B 20 8AL90213USAC ed 01 September 12 2008 Figure B 28 Template Inheritance 3 Open alstagents nsf using the Domino Designer Client Note You can open the file from a local workstation It does not need to be on the server ...

Page 83: ...Installing My Teamwork for IBM Lotus Sametime 8AL90213USAC ed 01 September 12 2008 B 21 4 On the alstagents nsf database go to the Shared Code Subforms view Figure B 29 Shared Code Subforms 5 Highlight the subform ALConfRecordings 6 Right click and Copy the subform Figure B 30 ALConfRecordings Subform ...

Page 84: ...g Installing My Teamwork for IBM Lotus Sametime B 22 8AL90213USAC ed 01 September 12 2008 7 Switch to the STCONF nsf Shared Code Subforms view Right click and Paste the subform Figure B 31 Pasting the Subform 8 Within the STCONF nsf Shared Code Subforms view double click the WebMeetingDetails subform ...

Page 85: ...ordings within the IBM Lotus Sametime Meeting Installing My Teamwork for IBM Lotus Sametime 8AL90213USAC ed 01 September 12 2008 B 23 9 Scroll down the subform until you see the code shown in the following screen Figure B 32 Web Meeting Details Subform Code ...

Page 86: ...nt My Teamwork recordings within the IBM Lotus Sametime Meeting Installing My Teamwork for IBM Lotus Sametime B 24 8AL90213USAC ed 01 September 12 2008 10 Place the cursor where indicated in the following screen Figure B 33 Cursor Position ...

Page 87: ...stalling My Teamwork for IBM Lotus Sametime 8AL90213USAC ed 01 September 12 2008 B 25 11 Select Create Resource Insert Subform from the menu Figure B 34 Create Menu 12 Select the ALConfRecordings subform and click OK Figure B 35 Insert Subform Dialog Box The new subform is inserted into WebMeetingDetails ...

Page 88: ...n the IBM Lotus Sametime Meeting Installing My Teamwork for IBM Lotus Sametime B 26 8AL90213USAC ed 01 September 12 2008 Figure B 36 Updated WebMeetingDetails Subform 13 Exit the Subform and Save the design changes The design changes are now complete E N D O F S T E P S ...

Page 89: ...clipse features to install the My Teamwork plugin The MyTeamworkSetup exe will install the files into the html folder of your Sametime server The html folder for Domino Servers is located in the data domino directory of your Sametime server Example sametimeserver data domino html Alcatel LucentUpdateSite To configure for automatic installation The advantage of the automatic installation is that al...

Page 90: ... September 12 2008 Figure B 37 Sametime Configurator 3 Open the CommunityClient Document and define the location of your update site by the URL for UIM Provisioning Attribute You must enter the Fully Qualified Hostname of your Sametime Server Figure B 38 URL for UIM Provisioning if installing for Sametime 7 5 x ...

Page 91: ...UIM Provisioning if installing for Sametime 8 0 x 4 The next time a user connects with the Sametime Connect Client the Connect clients update manager will recognize the new features and will start to download them automatically After the new plugin is downloaded the user will be prompted to restart their Sametime Connect Client E N D O F S T E P S ...

Page 92: ... in Installing My Teamwork for IBM Lotus Sametime B 30 8AL90213USAC ed 01 September 12 2008 To manually install the Sametime Plug in 1 From the IBM Lotus Sametime Connect Client select Tools Plug Ins Install Plug Ins Figure B 40 Tools Menu ...

Page 93: ...etime Plug in Installing My Teamwork for IBM Lotus Sametime 8AL90213USAC ed 01 September 12 2008 B 31 In the Install Update dialog box select Search for new features to install and click Next Figure B 41 Install Update Dialog Box ...

Page 94: ...ons and updates to Sametime plug ins This site will be configured during the My Teamwork installation It wil be used for new installations and retrieval of updates 3 Enter the name My Teamwork for Sametime and provide the URL to the Sametime server where you installed the Sametime plug in Example http acme edial com sametime Alcatel LucentUpdateSite site xml Figure B 42 New Update Site 4 Click OK ...

Page 95: ...llation are displayed Figure B 43 Available Updates 6 Select Alcatel Lucent MyTeamwork Plug in x x x where x x x is the version number installed on the server and proceed to accept the license and certificates 7 Click Finish to complete the installation of the plug in 8 After the installation is complete you will be prompted to restart the Sametime Connect Client After the restart the My Teamwork ...

Page 96: ...um length of conferences needs to be set on the Sametime Domino server to match what is set on the ACS server To limit the number of days a meeting can be scheduled in advance the following needs to be enabled in the notes ini file This example uses 10 days Notes ini STScheduleLimitDays 10 This setting also applies to repeating meetings Repeating meetings cannot be scheduled past the number of day...

Page 97: ...port Technote o http www 1 ibm com support docview wss uid swg21285161 o Addresses an issue concerning a failed notification to ACS that a user has deleted a meeting Alcatel Lucent My Teamwork 7 1 x o Always use the latest build o Add the necessary licenses for Sametime Alcatel Lucent My Teamwork for IBM Lotus Sametime application for example build 080512 o Current build is for example May 12 2008...

Page 98: ...es Install Alcatel Lucent My Teamwork for IBM Lotus Sametime application latest build o Sametime FQDN ________________________________________________ o MyTeamwork Server IP or FQDN ___________________________________ o Sametime Client Connector _______________________________________ o Sametime Client Connector Password ______________________________ Sign ALSTagents nsf database Configure Meeting...

Page 99: ...ents This appendix covers the following topics and procedures Topics Procedures Accessing My Teamwork C 2 LCS integration C 3 Changing Authentication C 11 Setting up users C 13 Editing your registry C 17 Creating the conferencing service C 20 My Teamwork for Office Communicator Online Help C 22 Required CODECs and video formats C 34 Verifying Configuration C 35 To install Windows Server 2003 Stand...

Page 100: ...ddition of many capabilities found in the My Teamwork application including Secure leader and participant access codes Join tones Roll call Lecture mode Dial in and dial out access Voice reminder for conference end or extension To set up a Static Route C 8 To authorize the Host C 10 To change the Authentication protocol C 11 To add a new user C 13 To modify the registry and enable the My Teamwork ...

Page 101: ...and the new Live Communications Server sub domain Note When installing Live Communications Server you may enable the Archiving Service However it is not required for My Teamwork Live Communications Server integration You will need to have the following installed on the same server Windows 2003 Active Directory DNS Address Domain Name Server Live Communications Server 2005 Standard Edition with SP1...

Page 102: ...Service Pack 1 to the server 4 Add Active Directory Role to the server 5 Use the Manage Your Server application 6 Select Add or remove a role 7 Select Domain Controller Active Directory 8 Run the Active Directory Wizard a Select Domain controller for a new domain b Configure Active Directory considering existing Active Directories DNS and Active Directory Forests on the network c Enter the fully q...

Page 103: ...It may take a while for the Active Directory configuration to finish 9 Add any additional required server roles for example DHCP if you are building an isolated network that will host client workstations No further services are required for LCS at this time E N D O F S T E P S To install Live Communication Server Install Live Communication Server Standard Edition with SP1 on your server 1 At the i...

Page 104: ...unications Server Middleware Communications Service MidCommun will be automatically installed on the My Teamwork server You will need to configure the MidCommun service to respond appropriately to Live Communication Server requests and provision each user via My Teamwork user settings who requires Live Communications Server integration Note A new SIP proxy must be defined in the My Teamwork ACS 7 ...

Page 105: ... messages destined for a particular My Teamwork user can be referenced and mapped In the My Teamwork ACS Administrator Web interface 1 Select the Provisioning tab 2 Select the List Users item and select a specific user from the resulting list The Manage Users page for that user appears 3 Select Manage User Settings 4 Enter the SIP URI assigned to the user in the Active Directory Live Communication...

Page 106: ...t Console User Interface by typing the following command line into a command prompt window C Windows system32 wrtcsnap2 msc 1 Using the Tree View control navigate through the appropriate Forest and Domain and open the Live Communications servers and pools container lcssrv 2 Right click on the server icon and select Properties Figure C 3 LCS Tree View 2 Select the Routing tab and click the Add butt...

Page 107: ...etwork address of the configured My Teamwork server You must use the Fully Qualified DNS domain name Do NOT use the IP address d Transport Provide the transport that LCS will use when communicating with the My Teamwork server Currently only TCP is supported e Port Provide the Port number on which My Teamwork s MID service will be receiving communications from LCS The port number is configured duri...

Page 108: ...ght click on the server icon and select Properties 2 Select Host Authorization and click the Add button The Edit Authorized Host dialog box appears Figure C 5 Edit Authorized Host 3 Enter either the Network Address FQDN or the IP Address of the My Teamwork server 4 Select Throttle as Server and Treat as Authenticated E N D O F S T E P S ...

Page 109: ...ry domains configured with Kerberos certificates LCS will attempt to authenticate the Kerberos certificate before performing the NTLM authentication Authentication failures can result if the Active Directory that issues the certificate is not recognized or not reachable by LCS Using NTLM authentication only will avoid these failures However there is a potential loss of security To change the Authe...

Page 110: ...hentication protocol My Teamwork for Microsoft Office Communicator C 12 8AL90213USAC ed 01 September 12 2008 Figure C 6 Authentication Protocol 4 Change the Authentication protocol to NTLM 5 Click OK E N D O F S T E P S ...

Page 111: ...will only show users that were added to the Active Directory and previously configured for LCS in the Active Directory Management console You can edit settings for these users by right clicking on a specific user s name and selecting the Properties dialog box To add a new user 1 Right click the User container and select New User Figure C 7 Add User 2 Complete each dialog box in the New User Wizard...

Page 112: ...izard 3 Enable new user s to use LCS using the LCS Enable Users Wizard 3a or by editing the properties of an individual user 3b c Note To enable a group of users select multiple users in the Active Directory by holding down the Ctrl key while clicking on the users a Right click a user and select Enable users for Live Communications ...

Page 113: ...To add a new user My Teamwork for Microsoft Office Communicator 8AL90213USAC ed 01 September 12 2008 C 15 Figure C 9 Enable LCS Users Figure C 10 Enable LCS Users Wizard ...

Page 114: ...nd selecting Properties Figure C 11 User Properties c Set the following User Properties dialog box and click the OK button when completed Enable Live Communications Server for this User Check this box to enable LCS access for this user SIP URI This is the SIP URI by which the Active Directory user will be known to the LCS server Server or pool This must be the fully qualified DNS name of the LCS s...

Page 115: ...oft Office Communicator software installed on their workstation so the registry of the local computer can be modified to enable MOC conferencing features through the My Teamwork server Important Always back up your registry before editing Any damage to your registry could result in significant damage to the software configuration of your computer You can modify your registry using standard Windows...

Page 116: ...AL90213USAC ed 01 September 12 2008 To modify the registry and enable the My Teamwork tab in Office Communicator 2005 1 Open your registry editor from the Start Run menu 2 Search for HKEY_LOCAL_MACHINE SOFTWARE Policies Microsoft Communicator Figure C 13 Registry Editor 3 Right click the Communicator folder and select New String value ...

Page 117: ...e C 14 Registry Editor Communicator 4 Type the following name for the new value TabURL 5 Right click the TabURL entry The Edit String dialog box appears 6 Type the following in the Value data field where acs server uri is the name of your My Teamwork server https acs server uri ics action display display moc_xml Figure C 15 Edit String 7 Click OK The Registry Editor appears ...

Page 118: ... S T E P S Creating the conferencing service You must define a registry DWORD value to reveal the Office Communicator 2005 user interface elements and controls related to conferencing To define the DWORD value 1 Open your registry editor from the Start Run menu 2 Search for HKEY_LOCAL_MACHINE SOFTWARE Policies Microsoft Communicator Figure C 16 Registry Editor ...

Page 119: ... Right click the Communicator folder and select New DWORD value Figure C 17 Registry Editor DWORD 4 Type the following name for the new value EnableConferencingService 5 Right click the EnableConferencingService entry The Edit DWORD Value dialog box appears 6 Use the following settings Value data 1 Base Hexadecimal ...

Page 120: ... 7 Click OK The Registry Editor appears 8 Close the Registry Editor E N D O F S T E P S My Teamwork for Office Communicator Online Help My Teamwork for Office Communicator Online Help is currently available in nine languages To modify the registry and enable the My Teamwork tab in Office Communicator 2005 online Help 1 Open your registry editor from the Start Run menu 2 Search for HKEY_LOCAL_MACHI...

Page 121: ... 8AL90213USAC ed 01 September 12 2008 C 23 3 Right click the Communicator folder and select New String value 4 Type the following name for the new value HelpMenuURL 5 Right click the HelpMenuURL entry The Edit String dialog box appears 6 Type the following in the Value data field where acs server uri is the name of your My Teamwork server ...

Page 122: ...e the Registry Editor In step 6 above you may use any of the following languages instead of US English French http acs server URI content FRE FR htdocs buddies media help moc_index html topic conf_type Italian http acs server URI content ITA IT htdocs buddies media help moc_index html topic conf_type German http acs server URI content DEU DE htdocs buddies media help moc_index html topic conf_type...

Page 123: ...ervationless conference in My Teamwork to obtain information needed by Office Communicator 2005 You will enter the resulting dial in telephone number leader code and participant code in Office Communicator 2005 The Office Communicator 2005 client will use the My Teamwork conference information for ad hoc conferences Note For information on setting up a reservationless conference refer to the My Te...

Page 124: ...tion in the Conferencing information fields 7 Click the Advanced button The Advanced Connections Settings dialog box appears Conferencing Information Fields My Teamwork Reservationless Conference Information Conference ID Participant Code Leader Code Leader Code Participant Code Participant Code Domain My Teamwork Server Domain URL Toll Dial in Phone Number Toll Free Toll free Dial in Phone Number...

Page 125: ...ype the name or IP address of your Live Communication Server in the Server name or IP address field 10 Select TCP 11 Click OK E N D O F S T E P S To enter your phone numbers The phone numbers you enter in Office Communicator 2005 are used by My Teamwork to connect users to conference calls Two examples of typical phone numbers are Mobile Phone Number Office Number 1 Select the Personal tab in the ...

Page 126: ...te Spaces and parenthesis are ignored For details about country region codes refer to your local telephone book E N D O F S T E P S Figure C 21 My Phone Numbers To enter your My Teamwork server as a trusted site You must enter your My Teamwork server domain as a trusted site in Internet Explorer and validate the SSL certificate 1 Open Internet Explorer 2 Open the Tools menu then select Internet Op...

Page 127: ...ent DNS domain allows servers in both DNS domains to be treated as trusted hosts 4 Click OK E N D O F S T E P S To validate your SSL certificate The My Teamwork server needs to be fully accessible in HTTPS by validation of the SSL certificate You validate the certificate through your Internet Explorer IE browser You will need the URL associated with your server 1 Type the following in Internet Exp...

Page 128: ...er s Certificate processing system Clicking the Yes button in the Security Alert dialog box is not sufficient because Office Communicator will not prompt you if the Certificate is not recognized 2 If the SSL certificate is not recognized by Office Communicator 2005 the My Teamwork tab will not be present You must first View and then Install the certificate via the IE Certificate Import Wizard Figu...

Page 129: ...work for Microsoft Office Communicator 8AL90213USAC ed 01 September 12 2008 C 31 Figure C 24 Install Certificate 3 Once Certificate installation begins click Next in each of the Certificate Import Wizard dialog boxes 4 Click the Finish button ...

Page 130: ...icator C 32 8AL90213USAC ed 01 September 12 2008 Figure C 25 Certificate Wizard 5 When the Certificate Import Wizard is completed you will need to click Yes and OK to exit the dialog sequence Important Do NOT click No at any point in the process You will abort the operation ...

Page 131: ...rsion 1 0 tabdata tab image https dev08 dev edial office content ENG US htdocs buddies media alcatel_triangle png image name Alcatel Conferencing name tooltip Alcatel Lucent Conferencing for Microsoft Live Communications Server tooltip contenturl https dev08 dev edial office cgi bin vcs xml withXsl ouput_mode text html xsl content ENG US htdocs buddies moc_conf_list xsl current_vanities settings u...

Page 132: ...rer 2 Open Internet Explorer again 3 Type the following in your browser https acs server uri ics action display display moc_xml You should not be prompted to accept the Certificate and you should be able to view the XML content again E N D O F S T E P S Required CODECs and video formats To ensure proper operation of My Teamwork for Microsoft Office Communicator the following CODECS and video forma...

Page 133: ...12 2008 C 35 Verifying Configuration When you restart Microsoft Office Communicator you should see an extra tab at the bottom of the screen with the Alcatel Lucent phone icon on it To verify that you have properly configured Office Communicator 2005 you should start a conference Figure C 27 Phone Tab ...

Page 134: ... Verifying Configuration My Teamwork for Microsoft Office Communicator C 36 8AL90213USAC ed 01 September 12 2008 ...

Reviews: