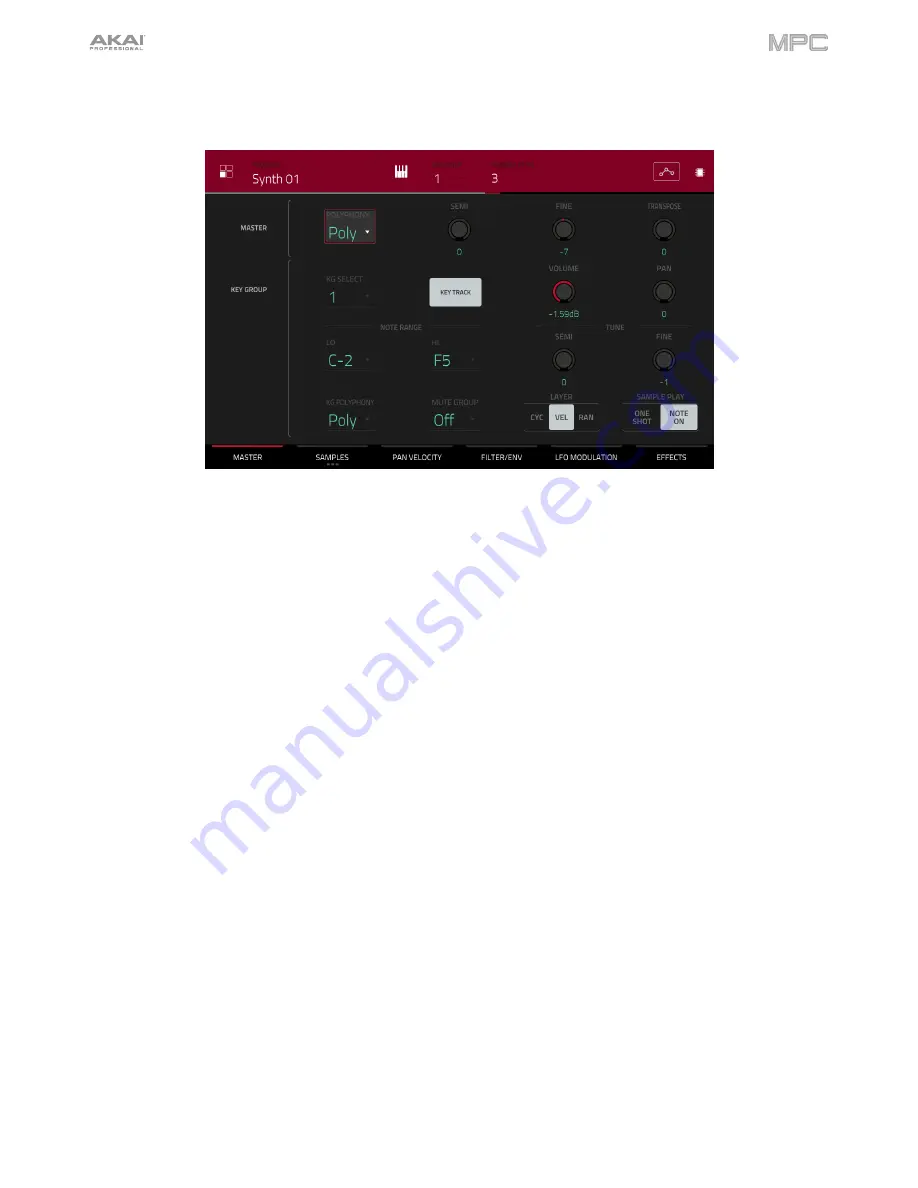
Akai MPC Touch User Manual Download Page 202


202 


Master 

In the Master tab, you can set the playback mode and tuning for the overall program. 


Polyphony

 sets the playback mode for the program’s keygroups. In 

Mono

 Mode, only one keygroup will sound at a 

time. If a keygroup is played while another (or the same one) is still playing its sample/samples, the new keygroup will 
immediately  mute  all  other  currently  playing  keygroups  in  that  program.  In 

Poly

  Mode,  several  keygroups  can  be 

triggered at the same time (limited only by the total number of voices available). 


Semi

 lets you tune the program up to 36 semitones up or down. 


Fine

 provides fine-tuning of the program up to 99 cents up or down. 


Transpose 

shifts the pitch of sample up to 36 semitones up or down. This function is identical to the 

Semi

 knob; it 

does not affect the transposition of any connected MIDI controller hardware.


KG Select

 (Keygroup Select) lets you select a specific keygroup for editing. This parameter works in conjunction with 

the 

Number of KG

 (keygroups) parameter at the top of the screen, which lets you create up to 128 keygroups within 

one  keygroup  program.  A  default  keygroup  program  contains  only  one  single  keygroup.  When  you  have  created 
more  than  one  keygroup  with 

Number  of  KG

,  use 

KG  Select

  to  select  any  keygroup  for  editing. 

All

  selects  all 

available keygroups of a keygroup program for simultaneous editing. 


Key Track

 allows you to switch a sample’s automatic transposition on or off. If this is off, you will always hear the 

same pitch of the sample, no matter which note is triggered by pads or a connected MIDI keyboard. 

Summary of Contents for MPC Touch

Page 1: ...User Guide English Manual Version 2 0 8...

Page 2: ...Live 17 Top Panel 17 Touchscreen 19 Rear Panel 20 MPC Touch 21 Top Panel 21 Touchscreen 23 Rear Panel 24 Basic Concepts 25 Tutorial 26 Starting Up 26 Creating a Drum Kit 26 Creating a Drum Sequence 2...

Page 3: ...es 70 Info 70 Sequencer 70 Sync 71 Hardware 71 Project Defaults 72 Auto Load Save 73 General Other 73 Bluetooth 74 Wi Fi 75 Legal 75 Sync 75 Mode 75 System Resources 76 Time Counter Locate 77 Timing C...

Page 4: ...Envelope 212 LFO Modulation 213 Effects 215 Clip Programs 217 Program 219 Pad 220 Plugin Programs 223 MIDI Programs 224 CV Programs 225 Anatomy of an Envelope 226 List Edit Mode 227 Browser 231 Brows...

Page 5: ...s 300 Phasers 300 HP High Pass Filters 301 LP Low Pass Filters 302 Parametric EQs 303 Distortions 304 Compressors 305 Bit Reducers 306 Other 307 Glossary 308 SATA Drive Installation 313 MIDI Machine C...

Page 6: ...t About This User Guide This manual should help you get familiar with using your MPC X MPC Live or MPC Touch For consistency the terminology throughout is based on the MPC nomenclature We also used sp...

Page 7: ...e MPC software as your host software or as a plugin in another digital audio workstation DAW Before connecting your MPC hardware to your computer install the drivers and software Visit akaipro com to...

Page 8: ...PC software 3 Follow the on screen instructions to authorize your version of MPC 4 You will need an iLok account to complete this You can create an account at ilok com Make a note of the PACE code in...

Page 9: ...urrent operation Touch the touchscreen and use the hardware controls to control the MPC interface See the later Touchscreen section to learn how to use some basic functions Tip If you adjust the angle...

Page 10: ...anks A D Press and hold Shift while pressing these buttons to access Pad Banks E H Alternatively double press one of these buttons 12 Copy Delete Press this button to copy one pad to another When the...

Page 11: ...owser lets you navigate your computer s internal and external hard disks to load samples sequences songs etc Using filter buttons and user definable folders you can easily adapt it to your workflow Yo...

Page 12: ...es the events of the current sequence After the sequence plays through once while recording Overdub will be enabled 38 Overdub Press this button to enable Overdub When enabled you can record events in...

Page 13: ...ar panel When you are not recording we recommend turning this knob all the way to the Main position to hear the full volume playback signal 50 Stereo Mono Use this switch to set whether the signal in...

Page 14: ...of the screen to return to the previous view Spread two fingers to zoom in into a section of a waveform for example Pinch two fingers to zoom out The top of the screen shows the toolbar which contain...

Page 15: ...ding Rear Front switch below the Gain 1 2 knob on the top panel to Front 4 Mix Knob Turn this knob to adjust the balance between the Main and 3 4 signals in your headphones Main is the signal sent fro...

Page 16: ...izer etc To use the 1 4 6 35 mm inputs set the Phono Line switch to Line To use the RCA inputs set the Phono Line switch to Phono Turn the 3 4 Rec Gain knob to set their input levels 8 Phono Line Swit...

Page 17: ...ress this button to select the previous column of Q Link knobs instead Press and hold this button to show the QLink window over the touchscreen s current contents These are the same parameters and set...

Page 18: ...redo the last action you undid 15 Copy Delete Press this button to copy one pad to another When the From Pad field is selected press the source pad the pad you want to copy When the To Pad graphic of...

Page 19: ...t of the screen to return to the previous view Spread two fingers to zoom in into a section of a waveform for example Pinch two fingers to zoom out The top of the screen shows the toolbar which contai...

Page 20: ...ct these inputs to audio sources microphone mixer synthesizer etc To use these inputs set the Line Phono switch to Line Turn the Rec Vol knob to set their input levels 10 Inputs RCA Use a standard RCA...

Page 21: ...d hold Shift and then press this button to select the previous column of Q Link knobs instead Press and hold this button to show the QLink window over the touchscreen s current contents These are the...

Page 22: ...redo the last action you undid 16 Copy Delete Press this button to copy one pad to another When the From Pad field is selected press the source pad the pad you want to copy When the To Pad graphic of...

Page 23: ...t of the screen to return to the previous view Spread two fingers to zoom in into a section of a waveform for example Pinch two fingers to zoom out The top of the screen shows the toolbar which contai...

Page 24: ...1 4 6 35 mm TRS cables to connect these outputs to your speaker system external mixer etc The signal sent out of these outputs is the master mix Turn the Master Vol knob to set the volume level Tip To...

Page 25: ...already contained in the track Also unlike MIDI tracks audio tracks are present in every sequence in the project even if the tracks themselves are empty A sequence on your MPC hardware can contain 8 a...

Page 26: ...he screen Internal is the internal drive of MPC X or MPC Live MPC Documents is a shortcut to the MPC Documents folder on the internal drive of MPC X or MPC Live If you have storage devices connected t...

Page 27: ...er up or down to set the volume level Tap Audition once more to hide the window To show the information for the current drive MPC X MPC Live press and hold Shift and then tap Drive Info at the bottom...

Page 28: ...wo bars After the two bars the recording will automatically activate Overdub the sequence will play again from the beginning and keeps looping allowing you to record further notes Don t stop the recor...

Page 29: ...screen tap the cursor icon on the right edge 3 Use the virtual keyboard that appears to enter a new name e g Drums and then tap Do It To rename your samples 1 Press Menu to enter the Menu and then tap...

Page 30: ...s well To enter a folder double tap it Alternatively turn the data dial or use the buttons to move through the list and press the center cursor or Enter MPC X or the data dial MPC Live MPC Touch to en...

Page 31: ...press the desired pad To move the selected notes tap Nudge at the bottom of the screen and then use the data dial or buttons to shift the notes left or right By default you can position notes only by...

Page 32: ...buttons The numeric value will appear on the screen To show or hide the velocity lane tap the up arrow button in the lower right corner of the screen to show the velocity lane below the grid Each not...

Page 33: ...sion that appears Tap anywhere else to return to the previous screen To adjust its stereo panning tap and drag the Pan knob up or down Alternatively use the data dial or buttons To make finer adjustme...

Page 34: ...p the desired slot A list of effects will appear 2 Swipe up or down to move through the list 3 To load an effect double tap it Alternatively tap it once and then tap Select or push the data dial Let s...

Page 35: ...ess Main to go back to Main Mode 2 Double tap the Track field in the center left part of the screen and then tap Track 2 unused in the list of tracks that appears Alternatively tap the Track button at...

Page 36: ...to switch to Pad Bank D and press Pad 13 You should hear the bass sample played back with its original pitch You can use the other pads to play your sample chromatically Let s add a second layer and...

Page 37: ...ap the Attack or Release knob and turn the data dial to adjust their settings These control the overall level characteristics of the sound Do you want to add an effect Do this in the Effects tab 1 Tap...

Page 38: ...7 Tap the Monitor button to cycle through its three states until it reads Auto you will hear incoming audio while the track is record enabled only 8 Turn the 3 4 Rec Gain MPC X or Rec Vol MPC Live MP...

Page 39: ...n be set to play its sequence at an independent tempo determined by the value in the BPM column Important Each sequence has its own tempo while the project itself may use a different master tempo The...

Page 40: ...field is set to 1 and set the End field to the last bar of your song Tap the Audio Tail field and turn the data dial to set it to 2 seconds As you ll likely share the song online tap the mp3 file for...

Page 41: ...o select a length If you select the minimum value Sequence the track will be however long your sequence is Tip This lets you maintain tracks of different lengths For instance you could play a 1 bar dr...

Page 42: ...gh all loaded samples in the project Alternatively double tap the Sample field and then tap a sample to select it 2 Tap the Trim Chop tab in the lower left corner to switch between Trim Mode and Chop...

Page 43: ...pad will have a recorded note event in the track When you play that track it will play each pad each slice in the original order Press Menu and then tap Grid View to see how the sample appears in you...

Page 44: ...ress Shift Track Mute Pad Mute MPC X 1 Press Play to play the sequence 2 Tap the Program field at the top of the screen and then use the data dial or buttons to select your drum program Alternatively...

Page 45: ...sing the corresponding pad or tapping it on the screen The pad will be lit red You can mute multiple tracks at the same time Tip To mute a track only at precise note intervals quantizing your mutes es...

Page 46: ...ot then select Input 1 2 3 Turn the 3 4 Rec Gain MPC X or Rec Vol MPC Live MPC Touch knob to set the input level while playing your audio source You should now see the level in the meter Make sure it...

Page 47: ...to select it To assign the sample to a pad in the program tap the Assign to Pad field and then press the desired pad Alternatively use the data dial or buttons to select the desired pad number or dou...

Page 48: ...h varying degrees of resolution Alternatively tap and drag the S marker in the waveform You can also double tap the Start field and use the numeric keypad on the screen to enter a value or tap the Sta...

Page 49: ...ch Shift to change the overall pitch of your sample This will transpose the sample without affecting its length 2 To set the pitch shift amount tap and drag the knob in the center of the window up or...

Page 50: ...how long it takes the completely dry signal to reach the wet signal determined by the Wet Dry knob after you touch the XY pad The Release knob determines how long it takes the wet signal determined b...

Page 51: ...nto Controller Mode allowing you to use it to control the software MPC Touch already operates as a controller only The MPC software offers the same features and functionality as the MPC hardware in St...

Page 52: ...can use the cursors to navigate through the controls on the screen The center cursor acts as an Enter key MPC Live MPC Touch As an alternative to double tapping an item on the screen to enter it you c...

Page 53: ...o the previous screen Press and hold Shift while turning the data dial to adjust a value by smaller increments Parameter Values To set the value for a parameter do either of the following Tap the fiel...

Page 54: ...appears examples below tap the desired option Alternatively use the data dial or the buttons to select an option In some windows tap the relevant button at the bottom of the screen to confirm your se...

Page 55: ...is routed to each of four returns each level is shown on a separate tab With each tap you will move to the next tab indicated by the squares below it To select a tab tap it Each time you tap it it wi...

Page 56: ...pe to show a closeup view Tap and drag a handle of an envelope stage in the desired direction Set the numeric value of an envelope stage by adjusting or entering it as a parameter value described earl...

Page 57: ...hange however if you press a pad while Hitting Pad Selects All Events is set to On To select a note tap it To select multiple notes tap and drag across the grid to create a box around them To move a n...

Page 58: ...ap and drag the upper third of it left or right To shorten or lengthen a track region or multiple selected track regions tap its edge and drag it Eraser Erase Mode To select multiple track regions tap...

Page 59: ...Keygroup programs are used to play samples chromatically with a MIDI keyboard or the MPC pads See Keygroup Programs for more information A clip program uses several samples that can be looped clips E...

Page 60: ...and appended with a number e g Program 002 To rename the program tap the cursor icon on the right edge of the Program section Use the virtual keyboard that appears to enter a new name and then tap Do...

Page 61: ...t a layer Tap the Sample field and then use the data dial or buttons to select a sample Alternatively double tap the field for a layer and then tap a sample to select it 1 Press Menu and then tap Prog...

Page 62: ...enter Program Edit Mode Alternatively press Prog Edit MPC X 2 Tap Samples This lets you view the samples assigned to all four layers of the current keygroup as well as tuning and level parameters for...

Page 63: ...make things easy e g you could use the first column for drum clips the second for bass clips the third for keyboard clips and the fourth for vocal clips You can use Program Edit Mode to assign pads to...

Page 64: ...sign clips in a clip program this way 1 Press Browse MPC X or Shift Menu Browse MPC Live MPC Touch to show the Browser Find and select a clip and then tap Load to load it to the program Repeat this fo...

Page 65: ...it Menu See the user guide in the MPC software to learn more click the Help menu select MPC Help and select MPC User Manual To select the MIDI channel the program will use double tap the MIDI Ch field...

Page 66: ...that appears tap the desired option Alternatively use the data dial or the buttons to select an option Note You also have to configure the MIDI ports in the software s Preferences in the Edit Menu See...

Page 67: ...elow If the project already contains a CV program it will be selected automatically and appear in the Program field below To create another CV program tap the icon above the Program field A new CV pro...

Page 68: ...When viewing the Menu do any of the following To enter a mode tap it Important If a sequence is currently playing you will not be able to enter Song Mode Stop playback before entering Song Mode To re...

Page 69: ...lumn as well To enter a folder double tap it Alternatively turn the data dial or use the buttons to move through the list and press the center cursor or Enter MPC X or the data dial MPC Live MPC Touch...

Page 70: ...fects the display resolution not the timing Instant Track Mute When disabled if you mute a track its Note On messages will be ignored and samples and notes that are playing will finish playing their e...

Page 71: ...MIDI Machine Control MMC information When disabled your MPC hardware will not send this information See Appendix MIDI Machine Control MMC to learn about this MTC Frame Rate This determines the frame r...

Page 72: ...will be overwritten with the current time of the host computer Time Zone MPC X MPC Live only This is the current time zone formatted as Continent City which you can change here Project Defaults The se...

Page 73: ...ng a sample will sound when auto previewing it Audition Outputs This determines which pair of outputs will play any auditioned sounds Out 1 2 7 8 in Standalone Mode Out 1 2 31 32 in Controller Mode MP...

Page 74: ...puter and being used your computer s screensaver will be disabled When hardware attached As long as your MPC hardware is connected to your computer and powered on your computer s screensaver will be d...

Page 75: ...information relevant to MPC For complete legal information visit akaipro com product legal Sync Tap the Sync field in the center of the top of the screen and then turn the data dial or use the button...

Page 76: ...to use the Undo button for this due to how the undo history is stored in RAM 2 Save your project 3 Do one of the following and then load your saved project again y In Main Mode tap the folder icon at...

Page 77: ...it Off Auto recording is disabled Punch In You can auto record using punch in and punch out markers enabling you to record over a specified length of time in the track While recording the entire sequ...

Page 78: ...locations in a sequence You can set up to six time markers To set a time marker tap the time counter at the top of the screen find the desired time and then tap Set next to the desired time marker The...

Page 79: ...track regions will be extended or shortened to align with the closest time division marker in the grid The start points will remain untouched You can apply this to MIDI tracks or audio tracks End The...

Page 80: ...vents inside will Use the Strength field to set how strictly events will be quantized i e shifted toward the quantize value Lower values move events a little bit towards the closest quantize value res...

Page 81: ...ff disables the metronome Play enables the metronome sound during playback only Record enables the metronome sound during recording only Record Play enables the metronome to happen in both Record and...

Page 82: ...k by using the program automation button in the channel strip on the left side of the screen in Main Mode and the Channel Mixer Program automation is available for all program types except MIDI progra...

Page 83: ...s the maximum regardless of how hard you press them In the 16 Levels screen that appears use the Type selector to choose the parameter Velocity Tune Filter Layer Attack or Decay To select a pad do any...

Page 84: ...t fields set the start of the time range and the right fields set the end of the time range To select what types of events you erase select one of the Erase options All erases all pad events from the...

Page 85: ...nt to a master output See Send Return Effects to learn more about this Finally you can apply up to four insert effects to each master output a stereo pair of channels Outputs 1 2 Outputs 3 4 etc See I...

Page 86: ...uttons To sort or unsort the effects by type or manufacturer tap Type or Manufacturer in the lower left corner To load an effect double tap it Alternatively tap Select or press the center cursor or En...

Page 87: ...pad insert effect in Main Mode 1 When the MIDI tab is selected in the lower left corner use the Track field to select the track that uses the program with the desired pad the program it uses will be s...

Page 88: ...eld below the Program field 3 Tap the area under Inserts and then use the screen that appears to load or edit effects Alternatively tap the Insert tab at the bottom of the screen tap it multiple times...

Page 89: ...use the Track field to select the track that uses the program with the desired pad the program it uses will be selected automatically 2 If the channel strip is not already shown tap the small eye icon...

Page 90: ...that the effect will be applied to that keygroup only 3 Tap the area under Inserts and then use the screen that appears to load or edit effects Alternatively double tap the desired pad on the screen Y...

Page 91: ...ow settings for the current audio track 4 Tap the area under Inserts and then use the screen that appears to load or edit effects To load an audio track insert effect in the Channel Mixer 1 Use the Mi...

Page 92: ...in Main Mode 1 When the MIDI tab is selected in the lower left corner use the Track field to select the track that uses the program with the desired pad the program it uses will be selected automatica...

Page 93: ...er right corner to show it 5 Use the Preset field to load an effect Use the controls below the Preset field to edit the effect To load a program insert effect in the Channel Mixer 1 Use the Mixer fiel...

Page 94: ...to select Submixes 2 In the touchscreen tap the pad that corresponds to the desired program Alternatively double tap the Submix field below the Mixer field and tap the desired program 3 Tap the area...

Page 95: ...utputs 1 2 Outputs 3 4 etc 4 Tap the area under Inserts and then use the screen that appears to load or edit effects To load a master insert effect in the Channel Mixer 1 Use the Mixer field in the up...

Page 96: ...desired return Alternatively double tap the Return field below the Mixer field 3 Tap the area under Inserts and then use the screen that appears to load or edit effects Alternatively tap the Insert ta...

Page 97: ...gram field at the top of the screen to select the desired program Alternatively use the Track field at the top of the screen to select the desired track the program it uses will be selected automatica...

Page 98: ...Mixer 1 Use the Program field at the top of the screen to select the desired program Alternatively use the Track field at the top of the screen to select the desired track the program it uses will be...

Page 99: ...make finer adjustments double tap the pad on the screen and adjust the larger version of the slider that appears Programs You can set the send levels for programs in the Channel Mixer only To set the...

Page 100: ...use the Mixer field in the upper left corner to select Submixes 2 Tap the Send tab at the bottom of the screen tap it multiple times to select a different send level 3 In the touchscreen tap the pad t...

Page 101: ...2 7 8 in Standalone Mode Submix 1 8 or Out 1 2 31 32 in Controller Mode MPC Live does not use Out 7 8 in Standalone Mode but displays them to maintain compatibility with MPC X which does use them The...

Page 102: ...internal battery which typically has four hours of life depending on CPU and how you re using MPC Live While powering MPC Live from its internal battery the battery icon in upper right corner of the...

Page 103: ...it independently from the project shown on the screen If you tap Cancel you can continue using your MPC hardware in Controller Mode If MPC X or MPC Live is connected to your computer and you want to...

Page 104: ...oller Mode A monitor cable icon will appear in the upper right corner The MPC hardware is communicating with a computer over a USB connection You can save or load files projects samples etc to or from...

Page 105: ...Step Sequencer or XYFX Mode the left edge contains icons to quickly enter one of five modes Using this strip of icons you can easily jump between them To enter Main Mode tap the house icon To enter t...

Page 106: ...mple tap it To immediately select a sample and enter Sample Edit Mode double tap it To save the project tap Save To save the project with another name tap Save As Use the Save window that appears to s...

Page 107: ...metronome icon opens the Click Metro menu which contains all settings regarding the metronome click track See General Features Metronome Click Metro to learn about this The automation button indicate...

Page 108: ...or tap the field to select a different pad Tip This is useful for mixing your pads without having to enter the Pad Mixer The second field shows where the pad is routed which you can change Program the...

Page 109: ...ing the button Important If you have already recorded automation and turn it off the track will still use the effect and its parameter values at the point where you turned it off When set to Read R th...

Page 110: ...nt If you have already recorded automation and turn it off the track will still use the effect and its parameter values at the point where you turned it off When set to Read R the audio track will rea...

Page 111: ...er the BPM field Alternatively press and hold Shift Tap Use the Bars field to adjust the length of the sequence in bars The Loop button shows whether the sequence or a part of it will loop or not To e...

Page 112: ...any of these functions as described below though there are fewer options for audio tracks than for MIDI tracks To return to Main Mode tap Cancel or the left arrow in the upper left corner of the scre...

Page 113: ...s Automation erases only automation from the designated time range Note erases only specific pad events from the designated time range In the diagram of the eight pad banks that appears press each pad...

Page 114: ...ograms and MIDI programs set the range and amount of transposition Range Use the two Note fields to set the range of notes of the events you want to transpose Note events within this range will be tra...

Page 115: ...e at a specified point To select the desired sequence use the Sequence field To set how many bars you will insert use the of Bars field To set the time signature of the inserted bars use the two Time...

Page 116: ...ed point To select the source sequence use the From Sequence field This is the sequence whose bars you want to copy To set the range of bars to copy in the source sequence use the First Bar and Last B...

Page 117: ...ntent of the source sequence will be copied To select the destination track use the To Track field This is the track where the content of the source track will be copied To set where you want to add t...

Page 118: ...ly turn the data dial or use the buttons to move through the list and press the center cursor or Enter MPC X or the data dial MPC Live MPC Touch to enter a folder You can also tap one of the five fold...

Page 119: ...t a clip program tap the play button icon To select a MIDI program tap the bars icon To select a CV program tap the CV icon To select a plugin program tap the plug icon For MPC X and MPC Live plugin p...

Page 120: ...hen set to Auto you will hear incoming audio while the track is record enabled only When on you will hear incoming audio whether or not the track is record enabled When off you will never hear any inc...

Page 121: ...words the track s notes are spread further apart so the track sounds like it is playing at half of the previous speed This does not actually affect the pitches of notes or the tempo The Copy Track fun...

Page 122: ...Live MPC Documents is a shortcut to the MPC Documents folder on the internal drive of MPC X or MPC Live If you have storage devices connected to USB ports or SD card slot of MPC X MPC Live or your co...

Page 123: ...ears The Delete function erases the entire audio track To confirm your choice tap Clear To return to the previous screen tap Cancel The Clear Regions function erases all regions from the audio track w...

Page 124: ...internal drive of MPC X or MPC Live If you have storage devices connected to USB ports or SD card slot of MPC X MPC Live or your computer with MPC Touch they will appear in this column as well To ent...

Page 125: ...lly selected To enter Audio Edit Mode tap Edit Audio This is the same as tapping the waveform and box icon on the left edge of the screen While viewing drum programs the Drum Program field shows the n...

Page 126: ...ms the MIDI Program field shows the name of the program Use the MIDI Port field to select the port over which the program sends its MIDI data Note You also have to configure the MIDI ports in the Pref...

Page 127: ...the screen Alternatively press Main To edit the name of the program tap the top of the screen and use the virtual keyboard that appears The Delete function erases all events from the track and resets...

Page 128: ...ill be asked if you want to overwrite the existing sample with this new one or cancel To continue and save the track over the existing one tap Replace To cancel tap Cancel The Flatten Pad function ren...

Page 129: ...To enter a folder double tap it Alternatively turn the data dial or use the buttons to move through the list and press the center cursor or Enter MPC X or the data dial MPC Live MPC Touch to enter a f...

Page 130: ...ailable when the currently selected track is a MIDI track When an audio track is selected it will show an icon for Audio Edit Mode instead of Grid View To select a MIDI track and enable Grid View pres...

Page 131: ...however if you press a pad while Hitting Pad Selects All Events is set to On To select a note tap it To select multiple notes tap and drag across the grid to create a box around them To move a note t...

Page 132: ...rack When off pressing a pad will simply play its sound without selecting any note events Use the Auto Scroll selector to set how the screen behaves relative to the audio playhead Follow Depending on...

Page 133: ...tion grid tap and hold Don t Snap in the lower left corner of the screen and then use the data dial or buttons to shift the notes In this case each nudge is equivalent to four ticks To adjust the star...

Page 134: ...e velocity lane in the Grid View The taller velocity lane in the Grid View To show or hide the velocity lane 1 Tap the up arrow button in the lower right corner to show the velocity lane 2 Tap the up...

Page 135: ...io Edit option is available when the currently selected track is an audio track When a MIDI track is selected it will show an icon for Grid View instead of Audio Edit Mode To select an audio track and...

Page 136: ...does use them 5 Tap the Monitor button to set how your audio track will be monitored Tapping it will cycle through its three states When set to Auto you will hear incoming audio while the track is rec...

Page 137: ...it the track at two specific points creating a track region on either side and between them tap and drag across the middle third of it to create a translucent white box and then tap the upper third of...

Page 138: ...s tap it Magnifying Glass Navigation Mode To move to another part of the track tap and drag it To zoom in or out spread or pinch your fingers respectively on the grid You can do this vertically horizo...

Page 139: ...track is routed which you can change Out 1 2 7 8 or Out 1 8 in Standalone Mode Out 1 2 31 32 or Out 1 32 in Controller Mode You can also select a submix Sub 1 8 in Controller Mode Note When set to a m...

Page 140: ...lly while you are recording Tip You can quickly set all programs and audio tracks to the same automation by tapping the global automation button in the upper right corner of the screen See General Fea...

Page 141: ...shift the track region In this case each nudge is equivalent to four ticks To adjust the start point or end point of the selected track region without changing its position tap Edit Start at the botto...

Page 142: ...arp algorithms are very CPU intensive and can result in audio drop outs during playback if used too freely Be mindful of how and how often you use the warp function You can reduce the CPU resources re...

Page 143: ...tracks are listed first audio tracks are listed second To move through the list of tracks swipe up or down To collapse or expand each group of tracks tap the up arrow S or down arrow T icon above the...

Page 144: ...sequence program etc will appear To open the Timing Correct settings tap TC at the bottom of the screen See General Features Timing Correct TC to learn about this To open the metronome settings tap C...

Page 145: ...bar bass line Use the Velocity field to set how loudly or quietly a track plays relative to its recorded levels When set to 50 the track will be played with half the velocity it was originally played...

Page 146: ...ll be monitored Tapping it will cycle through its three states When set to Auto you will hear incoming audio while the track is record enabled only When on you will hear incoming audio whether or not...

Page 147: ...The top of the screen shows the track name and information as well as sequence and timing information The Track field shows the name of the current track Use the Track Length field to set how long the...

Page 148: ...rner Alternatively use the Pad Select feature Tap and hold Pad Sel press the desired pad and then release Pad Sel You can also use Pad Select as a latching feature tap Pad Sel so it is activated press...

Page 149: ...bar The velocities will ascend to four peaks one after each quarter of the bar The velocities will descend from a single peak at the start of the bar The velocities will descend from two peaks one aft...

Page 150: ...lley and then ascend back up to the peak In each quarter of the bar the velocities will descend from a peak into a valley and then ascend back up to the peak The fourth button will swap the first half...

Page 151: ...ing Press Menu and then tap XYFX Press XYFX MPC X When you first enter this mode in a project you may be prompted to load XYFX to the program Tap Insert XYFX to do this Note If you already have four i...

Page 152: ...ighlighted as an entire column Effects are differently colored for easy visual distinction beat synchronized effects are blue while manually controlled effects are green XY Mode with a beat synchroniz...

Page 153: ...se the Release knob to set the length of the release phase of the envelope which is triggered when you release the XY pad In other words this determines how long it takes the effect to fully deactivat...

Page 154: ...sample in the list on the right side In the Browser tap the Project button with the P page icon at the bottom of the screen and then double tap a sample in the list on the right side To edit the name...

Page 155: ...These two points define the region of the sample that will be played To move the start point or end point of the selected region do any of the following Tap and drag its marker left or right Use the S...

Page 156: ...selector to set if any audio plays as you move a slice marker As you move the slice marker through the sample waveform you can set it to play the small part of the sample before the slice marker Befor...

Page 157: ...irst column of Q Link knobs Start X1__ if Loop Lock is on or the third column of Q Link knobs Loop X1__ if Loop Lock is off The top most Q Link knobs 13 and 15 provide coarse adjustment The bottom mos...

Page 158: ...atedly using the mode set by the Loop button Forward Reverse or Alternating if the Loop button is off the sample will loop forward repeatedly Press and hold the pad to play it and release the pad to s...

Page 159: ...sequence tempo tap To Sequence This is the same as tapping Match but it also changes the sequence s tempo to the BPM shown in the Tempo field on the right To close the window tap Close To enter a temp...

Page 160: ...to occur only at the waveform s zero crossings This can help to avoid clicks and glitches when playing a sample To enable or disable 0 Snap press and hold Shift and then tap 0 Snap at the bottom of t...

Page 161: ...pad Alternatively press the desired pad Use the Slice Type field to select how the pad s layer settings will be set when the slice is assigned to it see Program Edit Mode to learn more about the param...

Page 162: ...ted and assigned This feature is destructive though the project will still contain your original sample Leave this box unchecked to keep the unused parts of the sample when it is created and assigned...

Page 163: ...all available editing processes You can use any of these functions as described below To return to Sample Edit Mode tap Cancel To return to the Process window tap the top of the screen Note All Slice...

Page 164: ...your current project Use the Edit Name field and the virtual keyboard that appears to name the new sample Tip This is useful if you recorded a drum loop and wanted to remove just a snare drum hit a k...

Page 165: ...cess sets a fade out between the start point and end point The following types are available Linear fades the audio out with a linear curve a straight line between the start and end Log fades the audi...

Page 166: ...ly to adjust the ratio instead use the Ratio field to set the desired ratio The New Tempo fieldwill then change automatically based on the new time stretch factor The Gain Change process raises or low...

Page 167: ...ardless of its start point or end point The Stereo Mono process converts a stereo sample to a new mono sample and saves it as a new sample Use the Edit Name field and the virtual keyboard that appears...

Page 168: ...nk Knob 11 Threshold on MPC X or the second Q Link knob in the third column MPC Live MPC Touch The higher the selected value the more slices will be created Use the Min Time field to set the minimum l...

Page 169: ...the waveform To add a slice at the current playhead position tap Slice at the bottom of the screen You can do this at any point during sample playback To insert a slice marker during sample playback...

Page 170: ...e playhead is useful when manually inserting slice markers You can set its position and behavior to suit your workflow Use the Cue field to adjust the position of the cue playhead Alternatively tap an...

Page 171: ...h ch Use the Slice Type field to select how each pad s layer settings will be set when the slices are assigned to them see Program Edit Mode to learn more about the parameters mentioned below Non Dest...

Page 172: ...ew program will be named after the sample and appended with ch The new samples will be appended with SI where is a consecutive number Check the Crop Samples box to delete the unused parts from the sam...

Page 173: ...but with Pad Loop deactivated Use the Program field to specify the program to which you want to add the slice To convert the sample tap Do It To cancel the operation tap Close If you set the Convert T...

Page 174: ...tion field to select an editing process Double tap it or tap Function at the bottom of the screen to open the Function window which displays an overview of all available editing processes Important Ch...

Page 175: ...l if you recorded a drum loop and wanted to remove just a snare drum hit a kick drum hit etc to use separately in the project The Normalize process increases a sample s level to the highest level poss...

Page 176: ...d end Log fades the audio out with a logarithmic curve quickly rising at the start and flattening out towards the end Exp fades the audio out with an exponential curve slowly rising in the beginning a...

Page 177: ...e following Use the Loop field Tap and drag the start S marker if Loop Lock is on or the loop marker if Loop Lock is off Use the first column of Q Link knobs Start X1__ if Loop Lock is on or the third...

Page 178: ...uence and adjust the sequence tempo tap To Seq This is the same as tapping Match but it also changes the sequence s tempo to the BPM shown in the Tempo field on the right To close the window tap Close...

Page 179: ...gs This can help to avoid clicks and glitches when playing a sample To enable or disable 0 Snap press and hold Shift and then tap 0 Snap at the bottom of the screen To enable or disable the loop funct...

Page 180: ...d Start and Pad End will be set to the slice s start point and end point values and the Loop Position will be set to the slice s start point but with Pad Loop deactivated Use the Program field to spec...

Page 181: ...am Mode is non destructive You can choose the slice edit behavior without destroying your original sample giving you more control over sample playback you can save your sliced sample and but also reus...

Page 182: ...l if you recorded a drum loop and wanted to remove just a snare drum hit a kick drum hit etc to use separately in the project The Normalize process increases a sample s level to the highest level poss...

Page 183: ...d end Log fades the audio out with a logarithmic curve quickly rising at the start and flattening out towards the end Exp fades the audio out with an exponential curve slowly rising in the beginning a...

Page 184: ...more For MPC X and MPC Live these are available only while in Controller Mode For MIDI programs and CV programs skip to MIDI Programs and CV Programs to learn more For more general information on the...

Page 185: ...dited Current Only the currently selected pad can be edited Multiple All selected pads can be edited simultaneously All All pads can be edited simultaneously To close the window tap Close the X or any...

Page 186: ...This function works for drum programs only This is the same as the Flatten Pad process shown in the program editing functions in Main Mode To select the pad press it or use the Pad menu To set the le...

Page 187: ...overall volume level of the loaded sample samples Pan controls the overall panning of the loaded sample samples in the stereo field The Simultaneous Play section lets you set up to four pads that can...

Page 188: ...nge the end point of the previous slice Similarly changing the end point of a slice will also change the start point of the next slice Disable Link Slices if you are trying to create slices that use n...

Page 189: ...s work in conjunction with Chop Mode in Sample Edit Mode Here s how it works When working in Sample Edit Mode and using Chop Mode to divide a sample into slices for your pads you can convert a slice u...

Page 190: ...of Q Link knobs to adjust the loop point The top most Q Link knob provides coarse adjustment The bottom most Q Link knob provides fine adjustment Note When Loop Lock is on the loop position is the sa...

Page 191: ...umber Off The sample will not loop Forward You can hold down the pad to cause that sample to repeat from the Loop Position to the end of the sample Release the pad to stop the repeating playback Rever...

Page 192: ...e Warp algorithms are very CPU intensive and can result in audio drop outs during playback if used too freely Be mindful of how and how often you use the warp function You can reduce the CPU resources...

Page 193: ...ngth of the sample if Warp is off This is the same as the Semi field on the first Samples tab Fine provides fine tuning of each layer by cents This will affect the length of the sample if Warp is off...

Page 194: ...fset for the sample s playback Positive values right of center When the pad is played playback will start immediately but at a later point in the sample specified by the offset value Negative values l...

Page 195: ...the layer respond only to higher velocity levels By assigning several samples of one instrument you can create a realistic sounding multi sample by adjusting the velocity ranges of each layer accordin...

Page 196: ...Tip To give a sound a more distinctive attack increase the Env setting and set low Atk and Decay values as well as a medium low Sust value of the Filter Envelope This will start a sound with the filte...

Page 197: ...eceive MIDI notes the last pad played will silence all other pads in that mute group A mute group affects pads within that program only mute groups do not affect pads in other programs Tip This featur...

Page 198: ...of the corresponding knob A low frequency oscillator LFO generates a periodic waveform with an adjustable frequency and shape which can be used for modulation purposes Use the Wave field to select th...

Page 199: ...l appear 2 Swipe up or down to move through the list You can tap the Type and Manufacturer buttons to sort your effects by those categories 3 To load an effect double tap it or tap Select To close the...

Page 200: ...ignated send levels The return channels will then send the audio to an assigned master output at the designated return levels Use the Send knobs to set the volume level of the signal the pad will rout...

Page 201: ...eygroups e g 88 for a grand piano with every keygroup containing its own sampled note with up to four possible velocity layers Tap the Keygroup field to select a keygroup to edit You can also select A...

Page 202: ...le up to 36 semitones up or down This function is identical to the Semi knob it does not affect the transposition of any connected MIDI controller hardware KG Select Keygroup Select lets you select a...

Page 203: ...ange Remember that Key Group parameters control the overall settings for the sample while Edit Layer parameters control the settings for each layer up to 4 Use the KG Polyphony keygroup polyphony fiel...

Page 204: ...h between layers depending on how hard you press a pad Random Ran Each time the pad is played it will play one of its layer s samples at random Sample Play determines how much of the sample is played...

Page 205: ...change the end point of the previous slice Similarly changing the end point of a slice will also change the start point of the next slice Disable Link Slices if you are trying to create slices that us...

Page 206: ...on with Chop Mode in Sample Edit Mode Here s how it works When working in Sample Edit Mode and using Chop Mode to divide a sample into slices for your pads keygroups you can convert a slice using Non...

Page 207: ...at when Pad Loop is activated Alternatively use the third column of Q Link knobs to adjust the loop point The top most Q Link knob provides coarse adjustment The bottom most Q Link knob provides fine...

Page 208: ...r Off The sample will not loop Forward You can hold down the pad to cause that sample to repeat from the Loop Position to the end of the sample Release the pad to stop the repeating playback Reverse Y...

Page 209: ...ngth of the sample if Warp is off This is the same as the Semi field on the first Samples tab Fine provides fine tuning of each layer by cents This will affect the length of the sample if Warp is off...

Page 210: ...fset for the sample s playback Positive values right of center When the pad is played playback will start immediately but at a later point in the sample specified by the offset value Negative values l...

Page 211: ...igning several samples of one instrument you can create a realistic sounding multi sample by adjusting the velocity ranges of each layer accordingly For example you may have three samples of a piano k...

Page 212: ...Tip To give a sound a more distinctive attack increase the Env setting and set low Atk and Decay values as well as a medium low Sust value of the Filter Envelope This will start a sound with the filt...

Page 213: ...e velocity affects the pitch of the sound Pitch the attack of the filter envelope Attack the volume level of the sound Amp and the panning of the sound Pan When you press a pad softly only minimal mod...

Page 214: ...nd Pitch the cutoff frequency of the filter Filter the volume level of the sound Amp and the panning of the sound Pan The Controller Mod section determines the influence of additional play controllers...

Page 215: ...ffects will overlap in that range as well To add an effect 1 Double tap the desired Inserts slot A list of effects will appear 2 Swipe up or down to move through the list You can tap the Type and Manu...

Page 216: ...e the Send knobs to set the volume level of the signal the program will route to each send effect You can select up to four send effects for each keygroup but remember that they will be applied to tha...

Page 217: ...n clips to pads see Program below The Pad tab is where you determine how each pad plays its clip see Pad below Tap the location icon at the top of the screen between the Program and Pad fields to open...

Page 218: ...uto Scroll selector to set how the screen behaves relative to the audio playhead while viewing the Pad tab Follow Depending on the zoom setting the waveform display will scroll along in the background...

Page 219: ...en use the data dial or buttons to select a clip Alternatively double tap the Sample field and then tap a clip to select it To clear the assigned clip from a selected pad assign a sample to a pad but...

Page 220: ...region of the sample that will be played To move the start point or end point of the selected region do any of the following Tap and drag the S or E marker left or right Use the Start or End fields s...

Page 221: ...beat bar or tick value of the Start or End fields and then use the data dial or buttons to change the value Double tap the beat bar or tick value of the Start or End fields and then use the numeric ke...

Page 222: ...d will not follow any quantization at all Tap Reverse to reverse the clip s audio Coarse lets you transpose the pad up to 36 semitones up or down Fine provides fine tuning of the pad up to 99 cents up...

Page 223: ...omation button indicates the global automation state This is shown in several modes See General Features Automation to learn about this Use the sliders to set the value of each parameter Use the six t...

Page 224: ...sliders to set the value of each parameter Use the six tabs at the bottom of the screen to access the available parameters To assign a parameter to one of the sliders use the MPC software Note To see...

Page 225: ...ral modes See General Features Automation to learn about this Use the sliders to set the value of each parameter Use the six tabs at the bottom of the screen to access the available parameters To assi...

Page 226: ...until the pad is released With AD envelopes the following happens when you trigger a sample 1 Within the period of time you have defined with the attack Atk the sample volume rises to its maximum valu...

Page 227: ...ertouch Select this option to show only aftertouch messages Track Automation Select this option to show only track automation events Program Automation Select this option to show only program automati...

Page 228: ...t Mode The sequence for the track will be shown as a list of events with the following parameters This is the number of the note event Time This is the position of the note event in bars beats and tic...

Page 229: ...27 Track Parameter Automation Aftertouch Pitchbend Channel Pressure or Program Change Program Mixer Automation Volume Pan Mute Solo or Send 1 4 Program Parameter Automation options vary based on the t...

Page 230: ...the Length of an event according to your Timing Correct settings tap the value to select it and then press and hold Shift and use the data dial or buttons to change the value To shift the Pad Note of...

Page 231: ...Touch To browse for files tap Browse in the lower left corner See the Browse section to learn about this To view the project s sample pool and pads tap Sample Assign in the lower left corner See the S...

Page 232: ...Drive Info at the bottom of the screen The drive s information will appear in a new window Tap OK to return to the previous screen To format a storage device to use an exFAT file system select it in...

Page 233: ...ram in the project double tap the Program field at the top of the screen In the list that appears tap the desired program Alternatively tap the Program field and then use the data dial or the buttons...

Page 234: ...ut inputs of your MPC hardware 3 Turn the 3 4 Rec Gain MPC X or Rec Vol MPC Live MPC Touch knob to set the input level while playing your audio source You should now see the level in the meter Make su...

Page 235: ...t be removed from the sound later Learn more about how effects work in General Features Effects Tap the Monitor button to enable or disable input monitoring When on the audio you hear in your headphon...

Page 236: ...coming audio level exceeds the level of the threshold slider Tap Record under the Sample Length counter To disarm the track instead tap Cancel Use the Max Length field to define the maximum sampling t...

Page 237: ...ong sample with different sounds throughout e g a drum loop or a long melodic or harmonic passage To start recording do one of the following Start performing so that the incoming audio level exceeds t...

Page 238: ...l show a few more options after you select a pad Check the Add Event box to automatically add the sample to the currently playing sequence Use the field to select where you want the event to start Sta...

Page 239: ...Length counter To insert a slice marker in a sample while recording press any pad as the sample records Each time you press it a slice marker will be placed at that location The number of the pad tha...

Page 240: ...anything even though it may appear to work With this method pressing a pad immediately starts or continues recording directly to that pad make sure you are using the desired program before you start r...

Page 241: ...ceeds the level of the threshold slider the sample will record to your project s sample pool not to a pad To stop recording release the pad The pad will light green and the sample will continue record...

Page 242: ...ob to set the input level while playing your audio source You should now see the level in the meter Make sure it does not exceed the maximum level the meter should not be peaking constantly 4 Set the...

Page 243: ...removed from the sound later Learn more about how effects work in General Features Effects Tap the Monitor button to enable or disable input monitoring When on the audio you hear in your headphones w...

Page 244: ...equence When you play or record into the Looper it will wait until the sequence starts playing Bar 1 to start Use the Record To selector to determine the loop recording behavior Play Before recording...

Page 245: ...g tap the X Play button on the screen If Sync is off you can also play your audio source so that the input level reaches the threshold value If Sync is on you can also press the Play or Play Start but...

Page 246: ...signing the sample to a program use the Assign to Pad field to assign it to a specific pad Alternatively just press the pad To ignore this feature select Off 5 Use the Root Note field to select the sa...

Page 247: ...vant for clip programs For MIDI programs plugin programs and CV programs this mode is unavailable For more information on how these programs differ please see General Features Programs To enter the Pa...

Page 248: ...its settings in the left side of the screen rather than using the tab buttons at the bottom When viewing the channel strip The first field shows the current pad number Press a pad or double tap the fi...

Page 249: ...l representation of the level Double tap a pad on the screen to open a large version of the level slider and meter Panning When the Pan tab is selected use the data dial or buttons to adjust the panni...

Page 250: ...how a visual representation of the level Double tap a pad on the screen to open a large version of the level slider You can select up to four send effects for each pad You can use various effects incl...

Page 251: ...Important When using keygroup insert effects they will be applied to that keygroup only Keep this in mind if you load insert effects to multiple keygroups with overlapping note ranges the effects will...

Page 252: ...select which mixer you want to view MIDI Tracks Audio Tracks Programs Returns Submixes or Masters Each page has slight differences described in each section The following controls and tabs are availa...

Page 253: ...h Use the buttons Tap the pad on the screen Turn each of the Q Link knobs to mute or unmute each of the pads When a track program return submix or master is muted its M button will light red When Solo...

Page 254: ...ns submixes and masters only When the Insert tab is selected use the data dial or buttons to open a window where you can select an effect for the currently selected audio track program return submix o...

Page 255: ...left side of the screen rather than using the tab buttons at the bottom When viewing the MIDI track channel strip Note This is the same as the MIDI track channel strip in Main Mode The first field sh...

Page 256: ...ed which you can change Out 1 2 7 8 or Out 1 8 in Standalone Mode Out 1 2 31 32 or Out 1 32 in Controller Mode You can also select a submix Sub 1 8 in Controller Mode Note When set to a mono channel t...

Page 257: ...changes to your automation while recording When set to Write W the audio track can record automation If you have any Q Link knobs assigned to automatable parameters make sure not to touch any acciden...

Page 258: ...t program number and name which you can change The second field shows where the program is routed which you can change Out 1 2 7 8 or Out 1 8 in Standalone Mode Out 1 2 31 32 or Out 1 32 in Controller...

Page 259: ...t where you turned it off When set to Read R the program will read automation data but will not record any additional automation over it Think of this as a protective feature to prevent accidental cha...

Page 260: ...tom When viewing the return channel strip The first field shows the current return number which you can change The second field shows where the return is routed which you can change Out 1 2 7 8 or Out...

Page 261: ...When viewing the submixer channel strip The first field shows the current submix which you can change The second field shows where the submix is routed which you can change Out 1 2 31 32 or Out 1 32...

Page 262: ...f the screen You can tap Insert multiple times to cycle through the four available slots When viewing the master channel strip Note This is the same as the master channel strip in Main Mode The first...

Page 263: ...r the current playhead position This is shown in most of the modes See General Features Time Counter Locate to learn about this The automation button indicates the global automation state This is show...

Page 264: ...ad Mute tab in the lower left corner is not already selected tap it 2 Select the desired pad bank Use the Pad Bank Buttons or tap a pad bank shown on the left side of the screen 3 To mute or unmute a...

Page 265: ...r left corner is not already selected tap it 2 Use the Pad Bank buttons to select the desired pad bank 3 To select a pad to add to a mute group press it or tap it on the screen The selected pad is lit...

Page 266: ...r in the upper right corner the current playhead position This is shown in most of the modes See General Features Time Counter Locate to learn about this Time Correct lets you quantize track mutes Thi...

Page 267: ...left corner is not already selected tap it 2 Select the desired pad bank Use the Pad Bank buttons or tap a pad bank shown on the left side of the screen 3 To mute or unmute a track press the correspo...

Page 268: ...left corner is not already selected tap it 2 Select the desired pad bank by using the Pad Bank buttons 3 To select a track to add to a mute group press the corresponding pad or tap it on the screen T...

Page 269: ...he upper right corner the current playhead position This is shown in most of the modes See General Features Time Counter Locate to learn about this The sequence playlist on the left side shows a list...

Page 270: ...the current one ends without having to worry about timing issues To switch to the currently selected sequence immediately tap Sudden The new sequence will start playing whether or not the current sequ...

Page 271: ...that sequence will repeat To open Song Mode do either of the following Press Menu and then tap Song Mode Press Shift Next Seq Song MPC X Important If a sequence is currently playing stop playback befo...

Page 272: ...e sequences assigned to pads in other banks To insert a step 1 Tap a step in the sequence playlist after which you want to insert a step 2 Tap Insert in the lower right corner of the screen Alternativ...

Page 273: ...quence 1 Tap Convert Seq to open the Convert to Sequence window 2 Use the To Sequence field to select which sequence you want the song to export to 3 Use the Track Status field to select whether you w...

Page 274: ...ic Q Link Edit Mode Program Audio Track In this edit mode the Q Link knobs can control 16 program or audio track parameters See the following Program Audio Track section to learn about this specific Q...

Page 275: ...omation to learn about this At any time in any mode you can show the QLinks window over the touchscreen s current contents These are the same parameters and settings as what is shown in Q Link Edit Mo...

Page 276: ...ld to select one of the output pairs Outputs 1 2 7 8 in Standalone Mode or Outputs 1 2 31 32 in Controller Mode MPC Live does not use Out 7 8 in Standalone Mode but displays them to maintain compatibi...

Page 277: ...ilter Attack LFO Rate Amp Env Attack Filter Env Sustain Velocity to Env Amount LFO Sync Amp Env Decay Filter Env Release Velocity to Filter Velocity to Pitch Amp Env Release Layer Level 1 4 LFO to Pit...

Page 278: ...e Type selector to determine whether the Q Link knobs will control the parameters of the entire program Program or for a single pad Pad To select a program use the Track field at the top of the screen...

Page 279: ...parameter but the parameter will immediately return to its original position when you turned Momentary on when you release the Q Link knob When off moving the Q Link knob will adjust its parameter and...

Page 280: ...Program Off Amp Env Hold Layer Sample Pan 1 4 LFO to Filter Velocity to Amp Tuning Amp Env Sustain Layer Semi Tune 1 4 LFO to Amp Velocity to Pan Filter Cutoff Filter Env Attack Layer Fine Tune 1 4 LF...

Page 281: ...o Send 1 4 Program Off Amp Env Hold Layer Sample Pan 1 4 LFO to Filter Velocity to Amp Tuning Amp Env Sustain Layer Semi Tune 1 4 LFO to Amp Velocity to Pan Filter Cutoff Filter Env Attack Layer Fine...

Page 282: ...282 Screen In the Screen Q Link Edit Mode the Q Link knobs will control only the parameter or group of parameters in your currently selected mode e g Main Mode Sample Edit Mode etc...

Page 283: ...ed The pads will be lit with their assigned colors whether you are playing them or not Off Velocity The pads will be unlit when you are not playing them When you press them they will light with their...

Page 284: ...you are assigning Tip To select the color button corresponding a specific pad s color press and hold Shift and then press the pad or tap it on the screen Press a pad on your MPC hardware or tap it on...

Page 285: ...a MIDI controller device In the touchscreen use the fields and selectors to set each control s parameters to your preference The available parameters depend on its type a pad or button a Q Link knob o...

Page 286: ...IDI message that matches the pad When set to Local the LEDs will light up when you press the pad and or MIDI input is received MIDI Channel This determines which MIDI channel 1 16 the pad will use to...

Page 287: ...lways be off When set to MIDI Input the LEDs will light up when the software receives a MIDI message that matches the button When set to Local the LEDs will light up when you press the button and or M...

Page 288: ...es how the Q Link knob will control its parameter Absolute The Q Link knob s current position determines its parameter s value moving it may cause its parameter to snap to a new position if you re usi...

Page 289: ...show this field Mute This button determines whether the axis is muted or not When muted its MIDI output is disabled You must be viewing the Settings to do this MIDI Channel This determines which MIDI...

Page 290: ...Mode do either of the following while using a keygroup program MIDI program plugin program or CV program Press Menu and then tap Pad Perform Press Pad Perform MPC X Although you can enter Pad Perform...

Page 291: ...rder to construct songs quickly The available chords are determined by the Chord field Notes in Pad Perform Mode Chords in Pad Perform Mode Chromatic Chords in Pad Perform Mode Progressions in Pad Per...

Page 292: ...one bank is always one scale degree higher than Pad 16 of the previous bank You can use the buttons at the bottom of the screen to quickly select different Types and Chords Tap Notes to automatically...

Page 293: ...everb Small Reverb Medium Reverb Large Reverb Large 2 Reverb In Gate Reverb Out Gate Reverb Small This is a spatial effect designed to emulate a small room Parameter Value Range Default Value Dry Wet...

Page 294: ...large hall Parameter Value Range Default Value Dry Wet 0 100 dry wet 50 Pre Delay 1 100 50 Early Reflection 0 100 50 Density 0 100 50 Diffuse 0 100 50 Decay 0 100 75 Lo Cut 0 100 10 Hi Cut 0 100 10 Re...

Page 295: ...Out 0 100 0 Delays Delays the original signal for a specified period of time and plays it back over an adjustable period of time Options Delay Mono Delay Mono Sync Delay Stereo Delay Sync Stereo Dela...

Page 296: ...ime 1 bar 1 16 triplets 1 4 Feedback 0 100 50 Damping 0 100 100 Delay LP LP Delay is identical to the Mono Delay but it uses a resonant low pass filter in the delay line Parameter Value Range Default...

Page 297: ...nge Default Value Dry Wet 0 100 dry wet 50 Time 1 bar 1 16 triplets 1 4 Feedback 0 100 50 Ramp 0 100 50 Delay Tape Sync Tape Delay emulates a delay system using an analog tape loop and a series of tap...

Page 298: ...3 0 100 25 Flangers A flanger is a modulated delay to emulate the sound created when running two analog tape machines in parallel with a slight time disalignment Slow Rate settings can produce a whoos...

Page 299: ...0 100 dry wet 100 Delay 0 100 20 Amount 0 100 80 Width 0 100 80 Feedback 0 100 50 Rate 0 100 10 Chorus 4 Voice Parameter Value Range Default Value Dry Wet 0 100 dry wet 100 Delay 0 100 20 Amount 0 10...

Page 300: ...100 Rate 1 bar 1 16 triplets 1 4 Sine to Square 0 100 sine square 0 Phasers The phaser is a classic effect created by multiple ganged all pass filters to create notches or sharp spikes in the frequenc...

Page 301: ...100 dry wet 80 Low Frequency 0 100 50 High Frequency 0 100 100 Resonance 0 100 33 Rate 0 100 10 HP Filter Sync This effect is a high pass filter with its cutoff frequency modulated by an LFO Parameter...

Page 302: ...100 dry wet 80 Low Frequency 0 100 0 High Frequency 0 100 100 Resonance 0 100 33 Rate 0 100 10 LP Filter Sync This effect is a low pass filter with its cutoff frequency modulated by an LFO Parameter V...

Page 303: ...0 Q1 0 100 0 Q2 0 100 0 Low Gain 18 0 18 0 dB 0 0 Gain 1 18 0 18 0 dB 0 0 Gain 2 18 0 18 0 dB 0 0 High Gain 18 0 18 0 dB 0 0 PEQ 4 Band This effect is a powerful four band parametric equalizer with fo...

Page 304: ...razor effect Parameter Value Range Default Value Dry Wet 0 100 dry wet 100 Drive 0 100 50 Output 0 100 50 Low 0 100 50 Low Mid 0 100 50 High Mid 0 100 50 High 0 100 50 Distortion Grimey This is a uniq...

Page 305: ...mpressor Master This is the most transparent compressor able to perform substantial volume adjustments without artifacts Parameter Value Range Default Value Dry Wet 0 100 dry wet 100 Attack 0 100 50 R...

Page 306: ...down samples the incoming signal by removing bits from the digital signal The difference between decimation and resampling is that Decimator does not use any filtering to mask or correct digital artif...

Page 307: ...tivity 0 100 50 Frequency Shifter A frequency shifter changes the frequencies of an input signal by a fixed amount and alters the relationship of the original harmonics This can produce a chorus like...

Page 308: ...project as an audio file as opposed to a MIDI file The MPC hardware lets you bounce sequences tracks or programs as samples saved to your project s sample pool or as full audio tracks saved to your pr...

Page 309: ...portant aspect of a filter is the filter cutoff frequency Filters generally come in four categories low pass high pass band pass and band stop These are the available filters A low pass filter the mos...

Page 310: ...ly respond to incoming messages if its receive channel is set to the same channel as the one the sender is using to transmit data Subsequently the sender can address specific receivers individually MI...

Page 311: ...eform Root Key The root key defines the original pitch of a recorded instrument or of a sample Samples in MPC contain the dedicated root key information This information will be created automatically...

Page 312: ...nal that initiates events Trigger signals are very diverse For instance a MIDI note or an audio signal can be used as a trigger The events a trigger can initiate are also very diverse A common applica...

Page 313: ...l in the center of the bottom panel of your MPC hardware Use a Phillips head screwdriver to remove the screws don t lose them and remove the SATA drive panel 3 Gently pull the SATA connector and cable...

Page 314: ...nces 3 Tap the Sync tab 4 Tap the Send Port 1 field and use the data dial or buttons to select Midi Out A 5 Tap the Send MMC box so it is enabled checked 6 Exit the Preferences 7 Configure your other...

Page 315: ...uts 1 2 2 balanced XLR 1 4 6 35 mm TRS Dynamic Range 114 dB A weighted SNR 112 dB 1 kHz 4 dBu A weighted THD N 0 003 1 kHz 4 dBu 1 dBFS Frequency Response 20 Hz 20 kHz 0 1 0 1 dB Maximum Input Level 2...

Page 316: ...impedance balanced 1 4 6 35 mm TRS Dynamic Range 114 dB A weighted THD N 0 006 1 kHz 1 dBFS Frequency Response 20 Hz 20 kHz 0 0 0 2 dB Maximum Input Level 20 dBu Sensitivity 51 Outputs 5 8 4 impedance...

Page 317: ...Files AIF AIFF MP3 WAV Connections 2 XLR 1 4 6 35 mm TRS inputs Input 1 2 2 1 4 6 35 mm TRS inputs Input 3 4 1 stereo pair 2 1 4 6 35 mm TS instrument inputs Inst 1 2 2 RCA inputs Input 3 4 1 stereo...

Page 318: ...N 0 009 1 kHz 46 dBu 1 dBFS Maximum Input Level 63 mVrms 1 kHz Sensitivity 2 mVrms 1 kHz Master Outputs 1 2 2 impedance balanced 1 4 6 35 mm TRS Dynamic Range 113 dB A weighted THD N 0 002 1 kHz 1 dBF...

Page 319: ...nnections File System Compatibility exFAT read write recommended FAT32 read write NTFS read write EXT4 read write HFS read only Audio Files AIF AIFF MP3 WAV Connections 2 1 4 6 35 mm TRS inputs 1 ster...

Page 320: ...imum Output Level 6 dBu Maximum Power Delivered 12 mW channel Output Impedance 33 Mechanical Pads 16 velocity and pressure sensitive pads RGB backlit 8 banks accessible via Pad Bank buttons Knobs 4 36...

Page 321: ...ny use of such marks by Akai Professional is under license MPC software incorporates lastique Pro V3 by zplane development Apple and macOS are trademarks of Apple Inc registered in the U S and other c...

Page 322: ......

Reviews: