Deployment Guide
39
H
IVE
AP 28 P
RODUCT
O
VERVIEW
Ethernet Port
The HiveAP 28 has a 10/100Base-T/TX PoE (Power over Ethernet) port. Its pin assignments follow the TIA/EIA-568-B
standard (see
Figure 2 on page 30
). The PoE port accepts standard types of Ethernet cable—cat3, cat5, cat5e, or
cat6—and can receive power over this cable from power sourcing equipment (PSE) that is 802.3af-compatible. Such
equipment can be embedded in a switch or router, or it can come from purpose-built devices that inject power into
the Ethernet line en route to the HiveAP. Because the PoE port has autosensing capabilities, the wiring termination
in the Ethernet cable can be either straight-through or cross-over (MDI/MDI-X). For outdoor deployments use
weatherproofed shielded twisted pair (STP) Ethernet cables.
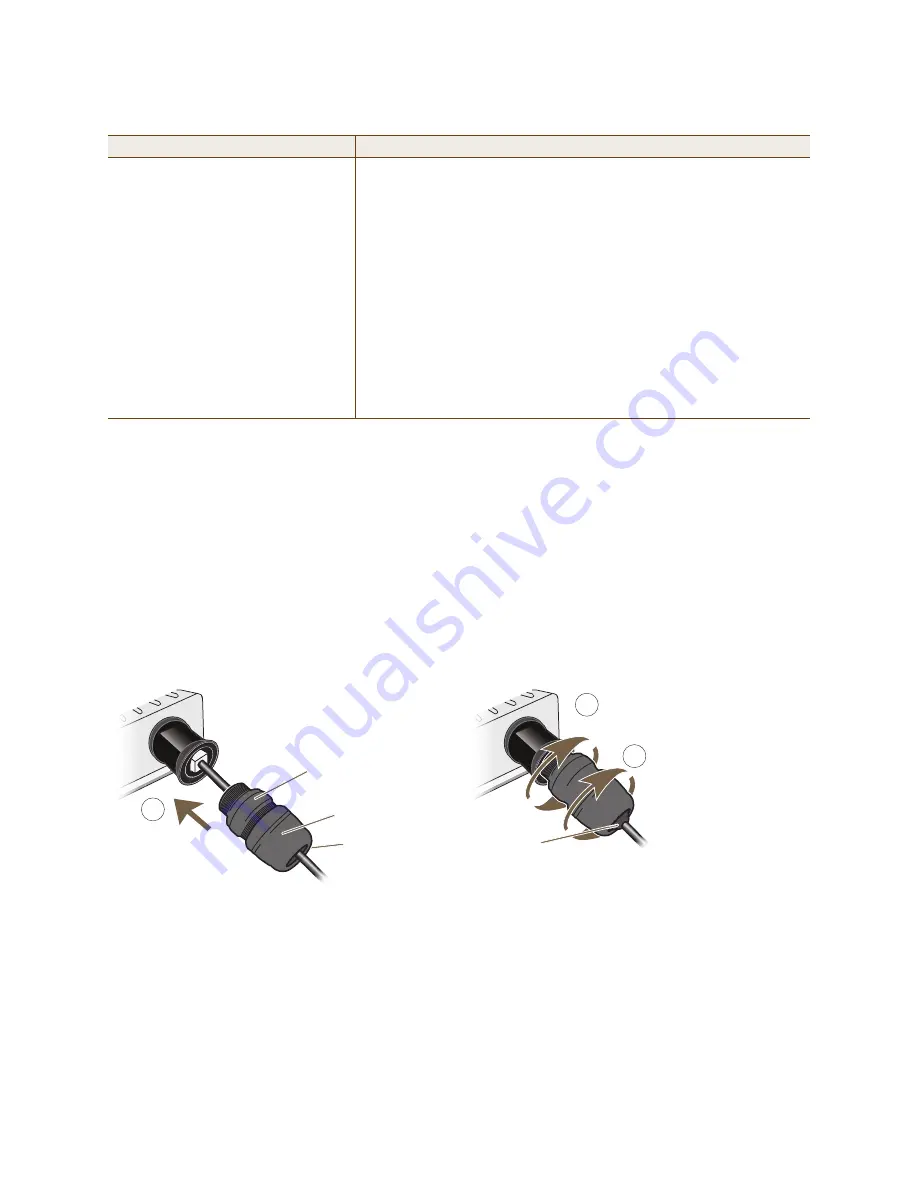
To ensure a waterproof seal for the Ethernet connection, use the RJ-45 connector assembly, which comes in three
parts: a compression nut, end cap, and gasket.
Figure 2
Connecting the Ethernet cable
1. Insert one end of the Ethernet cable through the waterproof RJ-45 connector assembly and plug the cable into
the Ethernet port.
2. Tighten the compression nut by twisting it clockwise into the Ethernet port housing on the chassis.
3. Tighten the end cap by twisting it clockwise onto the compression nut and tighten until the rubber gasket
emerges and wraps itself around the Ethernet cable.
The Ethernet connection is now sealed and waterproof.
10/100 Mbps PoE Port
The 10/100-Mbps Ethernet port supports IEEE 802.3af PoE (Power over
Ethernet) and receives RJ-45 connectors. The HiveAP can receive its
power through an Ethernet connection to PSE (power sourcing
equipment) that is 802.3af-compatible, such as one of the PoE injectors
available as an optional accessory from Aerohive. (If you connect the
HiveAP to a power source through the power connector and PoE port
simultaneously, the device draws power through the power connector and
automatically disables PoE.)
The HiveAP 28 can also connect to the wired network or to a wired device
(such as a security camera) through this port. It is compatible with
10/100Base-T/TX and automatically negotiates half- and full-duplex
connections with the connecting device. It is autosensing and adjusts to
straight-through and cross-over Ethernet cables automatically
(MDI/MDI-X). It also automatically adjusts for 802.3af Alternative A and B
methods of PoE. For details, see
"Ethernet Port"
.
Component
Description
2
Compression Nut
End Cap
Gasket
(inside)
Gasket
(squeezed out)
1
3
Slide the Ethernet cable through the two
halves of the waterproof RJ-45 connector
assembly, screw the halves loosely together,
and then plug the cable into the Ethernet port.
Tighten the compression nut
into the Ethernet port housing
on the chassis.
Tighten the end cap until
the gasket is squeezed out
the opening and forms a
watertight seal around the
cable.
Summary of Contents for access point
Page 1: ...Aerohive Deployment Guide ...
Page 7: ...HiveAP Compliance Information 6 Aerohive ...
Page 13: ...Contents 12 Aerohive ...
Page 37: ...Chapter 2 The HiveAP 20 ag Platform 36 Aerohive ...
Page 71: ...Chapter 4 The HiveAP 340 Platform 70 Aerohive ...
Page 81: ...Chapter 5 The HiveAP 320 Platform 80 Aerohive ...
Page 105: ...Chapter 8 The High Capacity HiveManager Platform 104 Aerohive ...
Page 123: ...Chapter 10 Using HiveManager 122 Aerohive ...
Page 209: ...Chapter 14 Deployment Examples CLI 208 Aerohive ...


