Illustration
Action
xx1900000013
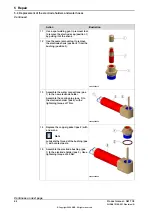
Use a spot welding gun tip removal tool
to remove the electrode cap (position 1)
by pulling it of the shank.
11
Use the same removal tool to remove
the electrode shank (position 2) from the
bushing (position 3).
12
xx2000002658
Assemble the water connections (pos.
1) to the new electrode holder.
Assemble the cooling pipe (pos. 3) to
the electrode holder (pos 2), with a
tightening torque of 7 Nm.
13
xx2000002659
Replace the copper gasket (pos 2) with
a new one.
Note
Lubricate the thread of the bushing (pos
1) with contact paste.
14
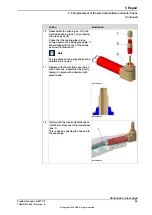
Assemble the electrode bushing (pos.
1) to the electrode holder (pos 3). Use a
tightening torque of 60 Nm.
15
Continues on next page
84
Product manual - GWT C9
3HAA010198-001 Revision: A
© Copyright 2022 ABB. All rights reserved.
5 Repair
5.4 Replacement of the electrode holders and water hoses
Continued
Summary of Contents for GWT C9
Page 1: ...ROBOTICS Product manual GWT C9 ...
Page 62: ...This page is intentionally left blank ...
Page 124: ...This page is intentionally left blank ...
Page 126: ......
Page 127: ......


