


Illustration
Action
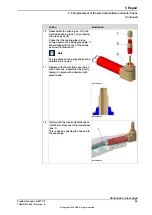
xx2000002664
Reassemble the shank (pos. 2) to the
electrode bushing (pos. 3) by pressing
it in place by hand.
Check that the cooling pipe is long
enough and cut at a 45-degree angle. It
should align with the top of the shank,
as shown in illustration.
Note
The top of the cooling pipe shall not be
deformed in any way.
16
Replace with the electrode cap (pos. 1)
with a new one. Assemble it by gently
taping it in place with a hammer with
plastic head.
17
xx2000002663
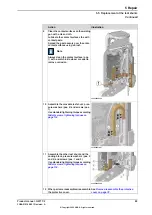
xx2000002665
Gently push the electrode holder back
into the arm. Reconnect the water hoses
(pos. 1).
This is done by pushing the hoses into
the couplings.
18
Continues on next page
Product manual - GWT C9
85
3HAA010198-001 Revision: A
© Copyright 2022 ABB. All rights reserved.
5 Repair
5.4 Replacement of the electrode holders and water hoses
Continued
Summary of Contents for GWT C9
Page 1: ...ROBOTICS Product manual GWT C9 ...
Page 62: ...This page is intentionally left blank ...
Page 124: ...This page is intentionally left blank ...
Page 126: ......
Page 127: ......


