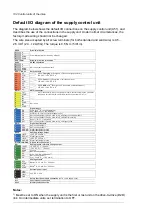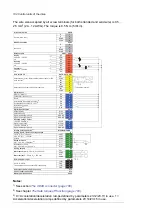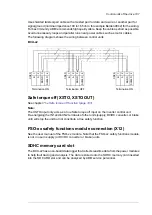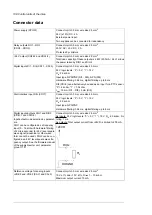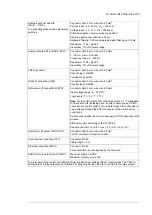
Default I/O diagram of the supply control unit
The diagram below shows the default I/O connections on the supply control unit (A51), and
describes the use of the connections in the supply unit. Under normal circumstances, the
factory-made wiring should not be changed.
The wire size accepted by all screw terminals (for both stranded and solid wire) is 0.5 …
2.5 mm
2
(24…12 AWG). The torque is 0.5 N·m (5 lbf·in).
XD2D
Drive-to-drive link
1
B
Drive-to-drive link (not in use by default)
2
A
3
BGND
4
Shield
D2D.TERM
Drive-to-drive link termination
1)
X485
RS485 connection
5
B
Not in use (not in use by default)
6
A
7
BGND
8
Shield
XRO1…XRO3
Relay outputs
11
NC
XRO1:
Charging
2)
(Energized = Closes charging contactor.)
250 V AC / 30 V DC / 2 A
12
COM
13
NO
21
NC
XRO2:
Fault(-1)
3)
(Energized = Indicates no fault.)
250 V AC / 30 V DC / 2 A
22
COM
23
NO
31
NC
XRO3:
MCB ctrl
2)
(Energized = Closes main contactor/breaker.)
250 V AC / 30 V DC / 2 A
32
COM
33
NO
XSTO
XSTO connector
1
OUT
XSTO connector. Both circuits (power module, control unit) must be closed for
the supply unit to start. (IN1 and IN2 must be connected to OUT.)
4)
2
SGND
3
IN1
4
IN2
5
IN1
Not in use
6
SGND
7
IN2
8
SGND
XDI
Digital inputs
1
DI1
Temp fault
3)
(0 = overtemperature)
2
DI2
Run / enable
3)
(1 = run / enable)
3
DI3
MCB fb
2)
(0 = main contactor/breaker open)
4
DI4
Not in use by default. Can be used for eg, auxiliary circuit breaker fault
5
DI5
Not in use by default. Can be used for eg, earth fault monitoring.
6
DI6
Reset
3)
(0 -> 1 = fault reset)
7
DIIL
Not in use by default. Can be used for eg, emergency stop.
XDIO
Digital input/outputs
1
DIO1
Not in use by default
2
DIO2
Not in use by default
3
DIOGND
Digital input/output ground
4
DIOGND
Digital input/output ground
XD24
Auxiliary voltage output
5
+24VD
+24 V DC 200 mA
5)
6
DICOM
Digital input ground
7
+24VD
+24 V DC 200 mA
5)
8
DIOGND
Digital input/output ground
DICOM=DIOGND
Ground selection switch
6)
XAI
Analog inputs, reference voltage output
1
+VREF
10 V DC,
R
L
1…10 kohm
2
-VREF
-10 V DC,
R
L
1…10 kohm
3
AGND
Ground
4
AI1+
Not in use by default.
0(2)…10 V,
R
in
> 200 kohm
7)
5
AI1-
6
AI2+
Not in use by default.
0(4)…20 mA,
R
in
= 100 ohm
8)
7
AI2-
XAO
Analog outputs
1
AO1
Zero
3)
0…20 mA,
R
L
< 500 ohm
2
AGND
3
AO2
Zero
3)
0…20 mA,
R
L
< 500 ohm
4
AGND
XPOW
External power input
1
+24VI
24 V DC, 2.05 A
2
GND
3
+24VI
4
GND
X12
Safety functions module connection
(not in use in supply units)
X13
Control panel connection
X205
Memory unit connection
Notes:
1)
Must be set to ON when the supply unit is the first or last unit on the drive-to-drive (D2D)
link. On intermediate units, set termination to OFF.
102 Control units of the drive
Summary of Contents for ACS880-37LC
Page 1: ... ABB INDUSTRIAL DRIVES ACS880 37LC drives Hardware manual ...
Page 2: ......
Page 4: ......
Page 78: ...78 ...
Page 116: ...116 ...
Page 134: ...5 Set the real time clock 134 Maintenance ...
Page 144: ...144 ...
Page 167: ... Dimension drawing examples ACS880 37LC 0390A 7 with main contactor Dimensions 167 ...
Page 169: ...ACS880 37LC 1270A 7 with common motor terminal cubicle Dimensions 169 ...
Page 170: ...ACS880 37LC 1940A 7 with common motor terminal cubicle 170 Dimensions ...
Page 172: ...Location and size of input terminals Contact ABB for details 172 Dimensions ...
Page 174: ...Inverter module cubicle with two R8i modules bottom cable exit 174 Dimensions ...
Page 175: ...Inverter module cubicle with three R8i modules bottom cable exit Dimensions 175 ...
Page 176: ...Brake chopper cubicle D150 176 Dimensions ...
Page 178: ...Cubicle width 300 mm top cable exit 178 Dimensions ...
Page 179: ...Cubicle width 400 mm bottom cable exit Dimensions 179 ...
Page 180: ...Cubicle width 400 mm top cable exit 180 Dimensions ...
Page 181: ...Cubicle width 600 mm bottom cable exit Dimensions 181 ...
Page 182: ...Cubicle width 600 mm top cable exit 182 Dimensions ...
Page 198: ...198 ...
Page 200: ...200 ...

