background image

AF6ZP0CA – COMBIAC0 & ACE0 2uC – User Manual 

Page – 41/155 

U


VERY IMPORTANT 
Since the logic unit and the software must be set in the correct way by Zapi 
lines, it is absolutely mandatory to specify in the commercial order the type 
of Hall sensors used (in terms of supply voltage, output voltage and 
number of pulses per revolution), their configuration in the d-axis rotor 
orientation and their sequence around one turn. 

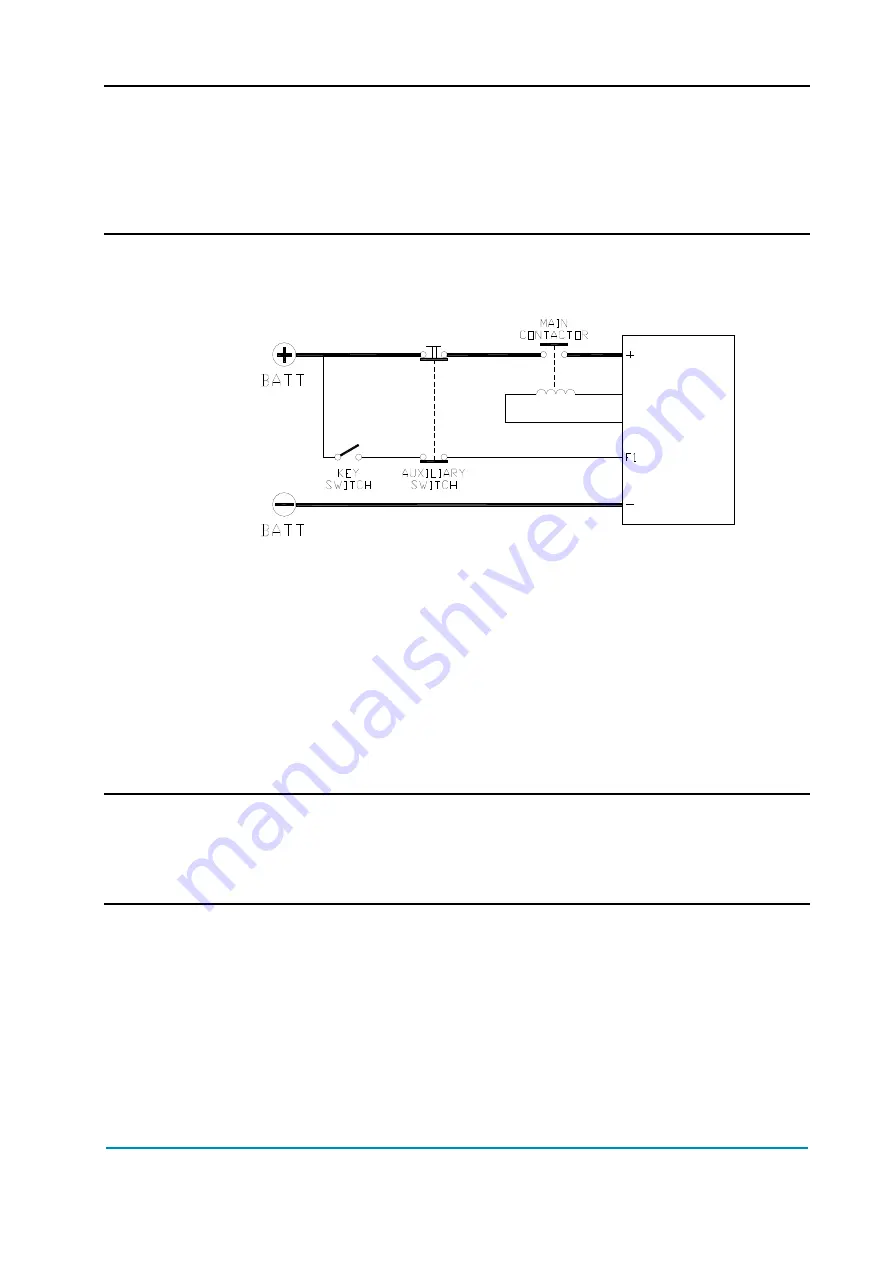
5.2.7  Connection of main contactor and key switch 

Main contactor and key switch can be connected as the following figure. 


Connection of main contactor and key switch. 

The connection of the battery line switches must be carried out following 
instructions from Zapi. 

If a mechanical battery line switch is installed, it is necessary that the key 
supply to the inverter is open together with power battery line; if not, the 
inverter may be damaged if the switch is opened during a regenerative 
braking. 

An intrinsic protection is present against battery voltages above 140% of the 
nominal one and against the key switching off before disconnecting the 
battery power line. 

5.2.8  Insulation of the truck frame 

U


As stated by EN-1175 “Safety of machinery – Industrial truck”, chapter 5.7, 
“there shall be no electrical connection to the truck frame”. So the truck 
frame has to be isolated from any electrical potential of the truck power 
line. 

Содержание ACE0 2mC

Страница 1: ...RIAL EQUIPMENTS CONSTRUCTION Via Parma 59 42028 POVIGLIO RE ITALY Tel 39 0522 960050 r a Fax 39 0522 960259 E mail zapi zapispa it web www zapispa it User Manual ACE0 2 C COMBIAC0 2 C Publication AF6Z...

Страница 2: ...o make changes or improvements to its products at any time and without notice The present publication reflects the characteristics of the product described at the moment of distribution The publicatio...

Страница 3: ...3 3 2 1 AC Traction configuration 13 3 2 2 AC Pump configuration 14 3 2 3 AC CAN Open configuration 15 3 2 4 PMSM Traction configuration 16 3 2 5 PMSM Pump configuration 17 4 I O INTERFACE DESCRIPTION...

Страница 4: ...res 46 7 START UP HINTS 47 7 1 Check prior to initial power up 47 7 2 Configuring motor controller for the application 47 7 3 Set up procedure for AC traction inverter 48 7 3 1 Sin cos sensor case 48...

Страница 5: ...sole configuration 139 13 1 2 Parameter download 141 13 1 3 How to modify the parameters 142 13 1 4 Program Vacc 143 13 1 5 Lift Lower command acquiring 143 13 1 6 Steer acquiring 144 13 1 7 Tester Fu...

Страница 6: ...ous product improvement all data in this document are subject to change or correction without prior notice 1 1 3 Warnings and notes In this manual special attention must be paid to information present...

Страница 7: ...esistor of about 10 100 Ohm between B and B terminals of the inverter 1 2 2 OEM s Responsibility Zapi motor controllers are intended for controlling motors in electric vehicles These controllers are s...

Страница 8: ...th low speed control and zero speed holding control Zapi patented sensorless and sense coil control Driver for a line contactor Low side and high side drivers for an electromechanical brake short circ...

Страница 9: ...sink temperature is measured internally near the power MOSFETs see paragraph 6 6 4 Two minute ratings are referred to an inverter equipped with a base plate No additional external heat sink or fans a...

Страница 10: ...30V 4 Conventionally the controller can be set to operate without alarm in the range from 80 to 120 of the nominal battery voltage With a different DC voltage than specified the controller raises an a...

Страница 11: ...AF6ZP0CA COMBIAC0 ACE0 2uC User Manual Page 11 155 3 DRAWINGS 3 1 Mechanical drawings 3 1 1 Base plate version 0 5 X 45 R 1 1 2 A3 COMBIAC0 AMPSEAL FRAMELESS DIMENSIONS 1 1 AS 26 05 15 AF6ZP7AA...

Страница 12: ...Page 12 155 AF6ZP0CA COMBIAC0 ACE0 2uC User Manual 3 1 2 Longitudinal heat sink version 0 5 X 45 R 1 1 2 A3 COMBIAC0 AMPSEAL FRAMELESS LONGITUDINAL HEAT SINK DIMENSIONS 1 1 AS 26 05 15 AF6ZP7BA...

Страница 13: ...AF6ZP0CA COMBIAC0 ACE0 2uC User Manual Page 13 155 3 2 Connection drawings 3 2 1 AC Traction configuration...

Страница 14: ...Page 14 155 AF6ZP0CA COMBIAC0 ACE0 2uC User Manual 3 2 2 AC Pump configuration...

Страница 15: ...AF6ZP0CA COMBIAC0 ACE0 2uC User Manual Page 15 155 3 2 3 AC CAN Open configuration...

Страница 16: ...Page 16 155 AF6ZP0CA COMBIAC0 ACE0 2uC User Manual 3 2 4 PMSM Traction configuration...

Страница 17: ...AF6ZP0CA COMBIAC0 ACE0 2uC User Manual Page 17 155 3 2 5 PMSM Pump configuration...

Страница 18: ...16 kHz Terminal P is protected by short circuit detection voltage and current measurements Freewheeling diodes to B are built in MOSFETs internal diodes 4 2 Ampseal connector Inverter is equipped with...

Страница 19: ...ated when the external switch is closed By default if HARD SOFT option is ON see 8 2 2Errore L origine riferimento non stata trovata the H S function is activated when the switch is closed A7 Input DI...

Страница 20: ...ted when it is connected to B The default function is as HORN input Closing the switch the horn is activated A20 Input DI6 Digital input DI6 The input is activated when it is connected to B The defaul...

Страница 21: ...DI3 The input is activated when it is connected to B The default function is as FW request Closing this input truck moves forward A33 Output EV3 Driving output for the PWM voltage controlled electrova...

Страница 22: ...s connected to it 10 A fuse is recommended and the current absorption of the KEY input input power below 15 W U The key switch connected to the KEY input must handle the short inrush current spike to...

Страница 23: ...listed below Custom hardware may feature different impedance values Inverter voltage 24 V 36 48 V 80 V Input impedance 4 5 k 14 5 k 30 k 4 Digital inputs DI1 DI2 DI5 DI6 DI7 DI8 and DI9 are normally...

Страница 24: ...n request it is also possible to have the configuration on the right side of next figure potentiometer at rest in the middle still in combination with a couple of travel demand switches Potentiometer...

Страница 25: ...e configuration permits to transform A18 and A21 in an interface for a sense coil or for an absolute sin cos sensor PMSM for special applications that use brushless motor For more details about sensor...

Страница 26: ...ev D 128 pulses rev Encoder resolution can be changed through the dedicated parameters See paragraph 8 2 5 4 4 6 MC output Main or line contactor is operated through an open drain PWM voltage controll...

Страница 27: ...y means of a suppressing device Protected against reverse polarity of the battery Built in diagnostics Overcurrent Driver shorted Driver open Coil open Refer to chapter 10 more details about alarms 4...

Страница 28: ...i e if the return path integrity cannot be guaranteed in all situations external free wheeling diodes must be applied over the inductive loads supplied by the open drain outputs Output features Up to...

Страница 29: ...l free wheeling diode if this is not possible U Use of brushless fans or other loads with built in capacitor can give high inrush current at turn on which can give an open drain over current trip The...

Страница 30: ...rrent modulation at high frequency see paragraph 8 2 4 Dithering is typically used when controlling proportional valves in order to create microscopic movements in the valve to prevent it from stickin...

Страница 31: ...inductive loads are connected such that the path for the free wheeling diode is always intact or use an external free wheeling diode if this is not possible U Use of brushless fan or other loads with...

Страница 32: ...by suppressor device A low pass filter attenuates the noise from the motor Connector position A22 4 4 11 Sensor supply Supply for external motor speed sensors Output voltage is configurable via hardwa...

Страница 33: ...lable for communication with the controller featuring Physical Interface according to ISO 11898 2 Data rate can be 125 250 or 500 kbit s CAN driver is 5 V supplied and provides a rail to rail signal o...

Страница 34: ...rter it is necessary to have the required material for a correct installation Wrong choice of additional parts could lead to failures misbehaviors or bad performance 5 1 1 Connection cables For the au...

Страница 35: ...time For safe operation onto the setup it is recommended to disconnect the battery and to discharge the capacitors by means of a resistor of about 10 100 between terminals B and B of the inverter 5 2...

Страница 36: ...image The best type of cables for CAN bus connections is the twisted pair if it is necessary to increase the immunity of the system to disturbances a good choice would be to use shielded cables where...

Страница 37: ...the preferable connection is the daisy chain U Correct Layout Note Module 1 power Module 2 power Module 3 power The chain starts from the B post of the controller that deals with the highest current...

Страница 38: ...eeds more and more data signal and information must flow from a node to another CAN bus is the solution to different problems that arise from this complexity simple design readily available multi sour...

Страница 39: ...nection of an encoder with zero position signal U VERY IMPORTANT It is necessary to specify in the commercial order the type of encoder used in terms of power supply and electronic output so that the...

Страница 40: ...specify the type of sensor used in terms of power supply electronic output and number of pulses per revolution because the logic unit and the software must be set in the correct way by Zapi 5 2 6 Con...

Страница 41: ...ey switch The connection of the battery line switches must be carried out following instructions from Zapi If a mechanical battery line switch is installed it is necessary that the key supply to the i...

Страница 42: ...SFETs at high frequency which can generate RF energy However wires have the key role to propagate disturbs because they work as antennas so a good layout of the cables and their shielding can solve th...

Страница 43: ...with ferrite beads and bypass capacitors 3 ELECTROSTATIC IMMUNITY Three ways can be followed to prevent damages from ESD PREVENTION when handling ESD sensitive electronic parts ensure the operator is...

Страница 44: ...ain more torque with current control The inverter can drive an electromechanical brake Hydraulic steering function When ACE0 COMBIAC0 works as traction inverter The traction inverter sends a hydraulic...

Страница 45: ...des a driving experience like a car To prevent excessive speed when the load torque is low for example when driving down hill a maximum vehicle speed can be set 6 5 Speed mode In this mode the control...

Страница 46: ...is reduced to half of the maximum current programmed Protection against accidental start up A precise sequence of operations are necessary for the machine to start Operation cannot begin if these ope...

Страница 47: ...ify that the proper motor controller for the application has been installed 2 Verify that the battery voltage matches the motor controller nominal DC supply voltage showed on the product identificatio...

Страница 48: ...ATION and ACCEL DELAY Test the behavior in both directions Set the FREQUENCY CREEP starting from 0 3 Hz The machine should just move when the drive request is active Increase the level accordingly Set...

Страница 49: ...witching the inverter off using the key switch When the procedure is correctly completed the main contactor opens and display shows ACQUIRE END Re cycle the key switch and verify that the motor can ru...

Страница 50: ...o the type of motor thermal sensor adopted Set the acceleration delay ACCEL MODULATION and ACCEL DELAY parameters Test the behavior in both directions Set the FREQUENCY CREEP starting from 0 3 Hz The...

Страница 51: ...parameters To access and adjust all inverter parameters it is necessary to use the Zapi console Since the ACE0 COMBIAC0 has no external serial connector three possibilities are available To use the Za...

Страница 52: ...EED STEERING TYPE THROTTLE Y3 MAP DEBUG CANMESSAGE HYDRO PUMP SPEED 5TH PUMP SPEED M C FUNCTION BAT MIN ADJ CONTROLLER TYPE HYDRO COMPENS HYD PUMP SPEED EBRAKE ON APPL BAT MAX ADJ SAFETY LEVEL PUMP IM...

Страница 53: ...es depending on customer requests 8 2 1 PARAMETER CHANGE PARAMETER CHANGE Parameter Allowable range Description ACC TORQUE DEL T TM P CO 0 1 s 10 s steps of 0 1 s This parameter defines the accelerati...

Страница 54: ...to 0 Hz A special software feature manages the deceleration ramp depending on the starting speed see paragraph 9 5 SPEED LIMIT BRK T TM 0 1 s 25 5 s steps of 0 1 s This parameter defines the decelerat...

Страница 55: ...e It represents a percentage of TOP MAX SPEED CTB STEER ALARM T TM 0 100 steps of 1 This parameter defines the maximum traction speed when an alarm from the EPS is read by the microcontroller if the a...

Страница 56: ...NGAGE DELAY T TM P CO 0 s 12 75 s steps of 0 05 s This parameter defines the delay introduced between the traction request and the actual activation of the traction motor This takes into account the d...

Страница 57: ...0 05 s It determines the deceleration ramp on EVP2 The parameter sets the time needed to decrease the current from the maximum possible value to zero HYDRO SETTINGS COMBIAC0 has the possibility to dri...

Страница 58: ...maximum voltage PU DC COMPENSAT A 0 100 steps of 1 This parameter defines the voltage compensation applied to the motor when the proportional lifting function is active The amount of compensation is a...

Страница 59: ...r counts when the three phase power bridge is active or the DC motor power bridge is active or one of the valve outputs is active HM CUSTOM 2 OPT T TM P CO 0 6 This parameter decides the configuration...

Страница 60: ...s or disables the stop on ramp feature the truck is electrically held in place on a slope for a defined time ON The stop on ramp feature is performed for a time set in the AUXILIARY TIME parameter OFF...

Страница 61: ...The quick inversion function is not managed BRAKE Upon a quick inversion request the motor is braked TIMED The quick inversion function is timed upon a QI request the controller drives the motor in th...

Страница 62: ...ype Low to High High to Low Direction switches Enable switch En dead band 0 11 Same as MAIN POT TYPE see previous parameter 12 No H to L X X 13 15 For future uses 13 15 For future uses 13 15 For futur...

Страница 63: ...This parameter defines the configuration of the NLC output A12 dedicated to the main or line contactor OFF Main contactor is not present Diagnoses are masked and MC is not driven ON Main contactor is...

Страница 64: ...ng to the signal received via CAN bus ON E B is managed by the controller itself ignoring any activation deactivation signal received via CAN bus AUTO LINE CONT CO OFF ON This parameter enables or dis...

Страница 65: ...JUSTMENTS list paragraph 8 2 3 EV3 A ABSENT DIGITAL This parameter defines the behavior of output EV3 A33 ABSENT Output A33 is not enabled DIGITAL Output A33 manages a PWM voltage controlled valve The...

Страница 66: ...to create a custom table It is strongly recommended to consult paragraph 9 13 in order to properly understand how to fill the following parameters If the steering performance of the truck do not match...

Страница 67: ...8 2 3 ADJUSTMENTS ADJUSTMENTS Parameter Allowable range Description SET BATTERY A 24 V 80 V This parameter must be set to the nominal battery voltage The available options are 24V 36V 48V 72V 80V ADJU...

Страница 68: ...ragraph 9 8 THROTTLE X1 MAP T TM P 0 100 steps of 1 This parameter defines the accelerator input curve See paragraph 9 8 THROTTLE Y1 MAP T TM P 0 100 steps of 1 This parameter defines the accelerator...

Страница 69: ...RO VOLT T TM 0 V 25 5 V steps of 0 1 V This parameter records the maximum steering control voltage when it is in the straight ahead position See paragraph 9 3 MAX ANGLE RIGHT T TM 0 90 steps of 1 This...

Страница 70: ...eter defines the CHECK UP NEEDED warning NONE no CHECK UP NEEDED warning OPTION 1 CHECK UP NEEDED warning shown on the hand set and MDI after 300 hours OPTION 2 Like OPTION 1 plus speed reduction inte...

Страница 71: ...s the minimum offset voltage at the sine analog input during the auto teaching procedure It can be compared with the A SENS OFFSET SR entry value A SENS MAX CE Only for BLE0 A Volt This parameter reco...

Страница 72: ...cedure CURR SENS COMP A OFF ON This parameter enables or disables the linear compensation for the current sensors NOTE only Zapi technicians can change this value through a special procedure DIS CUR F...

Страница 73: ...ter defines the electrical frequency at which the switching frequency is changed from PWM AT LOW FREQ to PWM AT HIGH FREQ DITHER AMPLITUDE A 0 13 This parameter defines the dither signal amplitude The...

Страница 74: ...er defines the safety level of the controller i e the functionality of the supervisor microcontroller 0 Supervisor C does not check any signal 1 Supervisor C checks the inputs and the outputs 2 Superv...

Страница 75: ...hutdown due to an undervoltage condition RESOLVER PULSE A Used for special resolvers Reserved Note only Zapi technicians can change this value 8 2 5 HARDWARE SETTING The HARDWARE SETTINGS parameters g...

Страница 76: ...rsion ROTATION CW ENC A OPTION 1 OPTION 2 It defines how the signal sequence coming from the encoder channels is expected by controller OPTION 1 Channel A anticipates channel B OPTION 2 Channel B anti...

Страница 77: ...n The TESTER function gives real time feedbacks about the state of the controller the motor and command devices It is possible to know the state active inactive on off of the digital I Os the voltage...

Страница 78: ...the encoder and expressed in the same unit of FREQUENCY Hz SLIP VALUE A Hertz 0 01 Hz Motor slip i e difference between the current frequency and the motor speed in Hz CURRENT RMS A Ampere 1 A Root me...

Страница 79: ...E is zero TEMPERATURE A Celsius degrees 1 C Temperature measured on the inverter base plate This temperature is used for the HIGH TEMPERATURE alarm MOTOR TEMPERAT A Celsius degrees 1 C Motor windings...

Страница 80: ...n done through a descent proportional valve on A24 not for BLE0 DI7 A35 LFT E DC only for COMBIAC0 T TM OFF ON Status of the digital input 7 pin A35 dedicated to the lift function only for COMBIAC0 DI...

Страница 81: ...7 pin A35 dedicated to the 3 rd pump speed for ACE0 COMBIAC0 configured as pump controller DI8 A17 SPD4 SW P OFF ON Status of the digital input 8 pin A17 dedicated to the 4 th pump speed for ACE0 COM...

Страница 82: ...REQ CO 255 steps Breaking torque setpoint of the AC motor transmitted over CAN bus expressed as percentage of the maximum torque A15 POT 1 A Volt 0 01 V Voltage of the analog input 1 pin A15 A30 POT...

Страница 83: ...s percentage A4 ELEC BRAKE A 1 Voltage applied over the electromechanical brake coil It corresponds to the duty cycle value of PWM applied expressed as percentage CTRAP HW A Units 1 Counter showing th...

Страница 84: ...oder i e encoder with index or zero signal ROTOR POSITION Only for BLE0 A Degrees 0 1 Real time absolute orientation of the rotor expressed in degrees TRUCK SPEED T TM CO km h 0 1 km h Speed of the tr...

Страница 85: ...of the digital input 1 pin A7 DI2 A6 A OFF ON Status of the digital input 2 pin A6 DI3 A32 A OFF ON Status of the digital input 3 pin A32 DI4 A31 A OFF ON Status of the digital input 4 pin A31 DI5 A1...

Страница 86: ...1 pin A15 A30 POT 2 A Volt 0 01 V Status of the analog input 2 pin A30 D11 A18 POT 3 A Volt 0 01 V Status of the analog input 3 pin A18 when the associated hardware is configured as analog input D12...

Страница 87: ...hown Before calibration Vmot percentage is mapped over the default 0 5 V range instead after the adjustment procedure it results mapped over the useful voltage ranges of the potentiometer for both dir...

Страница 88: ...VOLT STEER LEFT VOLT STEER ZERO VOLT See paragraphs 13 1 6 or 13 2 8 for acquiring procedure 9 4 Acceleration time The ACCEL DELAY parameter allows to define the acceleration rate depending on the fi...

Страница 89: ...ck trace in the graph Initial speed 110 Hz Final speed setpoint 10 Hz DECEL BRAKING 2 5 s The deceleration time results 2 5 s Case 2 red trace in the graph Initial speed 60 Hz Final speed setpoint 10...

Страница 90: ...CA COMBIAC0 ACE0 2uC User Manual Braking delay 4 Note This example is valid for all the braking related parameters DECEL BRAKING INVER BRAKING RELEASE BRAKING TILLER BRAKING PEDAL BRAKING SPEED LIMIT...

Страница 91: ...s up to 5 result in smoother accelerations Acceleration smoothness 4 Note This example is valid for ACC SMOOTH BRK SMOOTH INV SMOOTH 9 7 Steering curve Steering related parameters CURVE SPEED 1 CURVE...

Страница 92: ...hen the truck is moving slowly For the definition of such response the following parameters are used THROTTLE 0 ZONE of MAX VACC THROTTLE X1 POINT of MAX VACC THROTTLE Y1 POINT of MAX SPEED THROTTLE X...

Страница 93: ...aph better displays the throttle speed relationship Throttle profile 9 9 NMC NEB output For the NMC output or NEB output there is the possibility to set a pull in voltage and to define a retention vol...

Страница 94: ...of 70 9 10 Battery charge detection During operating condition the battery charge detection makes use of two parameters that specify the full charge voltage 100 and the discharged battery voltage 10 B...

Страница 95: ...er stage is driven Vbatt is evaluated as the average value over a window of time 2 Vbatt is compared with a threshold value which comes as function of the actual charge percentage by this comparison t...

Страница 96: ...ON OFF Valve is dependent by the OPEN DELAY and CLOSE DELAY parameters see paragraph 8 2 1 OPEN DELAY determines the current increase rate on EVP and it sets the time needed to increase the current t...

Страница 97: ...lowering request is applied the current will increase from zero to MAX EVP in the time frame correspondent to OPEN DELAY value In the same way when the lowering request is removed the set point curren...

Страница 98: ...Page 98 155 AF6ZP0CA COMBIAC0 ACE0 2uC User Manual Torque curves...

Страница 99: ...teering table NONE custom steering table according to the following parameters o WHEELBASE MM distance between the front axle and the rear axle of the truck o FIXED AXLE MM axle width of the axle wher...

Страница 100: ...ormed for temperatures between MAX MOTOR TEMP and STOP MOTOR TEMP It acts scaling down the torque profile see paragraph 9 12 by a percentage from 100 to MOT T T CUTBACK When motor temperature reaches...

Страница 101: ...it is possible to stack different types of alarms with the following information 1 the alarm code 2 the number of times each alarm has consecutively occurred 3 the hour meter value at the last occurr...

Страница 102: ...ult In case of fault it produces flash codes displaying all the active faults in a repeating cycle Each code consists of two digits see chapter 10 shown through the following sequence 1 the LED blinks...

Страница 103: ...10 3 Alarms from master C Error code Effect Condition Restart procedure MDI LED CODE CAN OPEN CODE ZAPI CODE WAITING FOR NODE MC is opened EB is applied Traction Pump stopped Start up stand by runnin...

Страница 104: ...applied EVP stopped Start up stand by running Traction Pump request 10 50F3 183 STALL ROTOR Traction Pump stopped Start up stand by running Valves or Traction Pump request 11 FFD3 211 CONTROLLER MISM...

Страница 105: ...227 PUMP VMN NOT OK MC is not closed EB is applied Traction Pump valves stopped Start up Valves or Traction Pump request 33 FFBE 190 HW FAULT EB MC is opened EB is applied Traction Pump stopped Start...

Страница 106: ...request 58 3201 252 CAPACITOR CHARGE MC is not closed EB is applied Traction Pump valves stopped Start up Valves or Traction Pump request 60 3130 60 THERMIC SENS KO Maximum current is reduced accordin...

Страница 107: ...ction request 84 3223 195 VACC OUT RANGE Traction Pump motor is stopped Start up Stand by Running Traction Pump request 85 FFE2 226 VDC OFF SHORTED MC is not closed EB is applied Traction Pump valves...

Страница 108: ...in A2 comes from by choosing a dedicated hardware configuration The parameter POSITIVE E B has to be set in accordance with the hardware configuration see paragraph 8 2 5 because the software makes a...

Страница 109: ...The two digital inputs dedicated to the bumper functionality are high at the same time The alarm can occur only if parameter BUMPER STOP ON and only if the controller is in CAN OPEN configuration see...

Страница 110: ...ed to the driver and ask for assistance to a Zapi technician in order to verify that the maximum current that can be supplied by the hardware is not exceeded In case no failures problems have been fou...

Страница 111: ...to drive the load The device itself or its driver circuit is damaged Troubleshooting This type of fault is not related to external components replace the logic board CONTACTOR OPEN MDI LED code 38 Ca...

Страница 112: ...l down between NMC A12 and B The driver circuit is damaged replace the logic board DRV SHOR EV 02 MDI LED code 21 Cause AUX valve driver is shorted Troubleshooting Check if there is a short circuit or...

Страница 113: ...ry to replace the controller If the alarm disappears the previously stored parameters will be replaced by the default parameters ENCODER D ERR XX MDI LED code 3 Cause This alarm occurs only when the c...

Страница 114: ...leshooting This fault is not related to external components Replace the logic board EVP DRIV SHORT MDI LED code 9 Cause The EVP driver output A24 is shorted The microcontroller detects a mismatch betw...

Страница 115: ...r assistance to Zapi in order to verify that the software diagnoses are in accordance with the type of coil employed If the problem is not solved it could be necessary to replace the controller FIELD...

Страница 116: ...litates Zapi technicians debugging the problem Troubleshooting This type of fault is not related to external components Replace the logic board HW FAULT EV XX MDI LED code 16 Cause At start up the har...

Страница 117: ...it INIT VMN LOW XX MDI LED code 30 Cause Before closing the LC the software checks the power bridge voltage without driving it The software expects the voltage to be in a steady state value If it is t...

Страница 118: ...Fault can be caused by a key input signal characterized by pulses below the undervoltage threshold possibly due to external loads like DC DC converters starting up relays or contactors during switchin...

Страница 119: ...OTOR TEMP if analog see paragraph 8 2 3 Troubleshooting Check the temperature read by the thermal sensor inside the motor through the MOTOR TEMPERATURE reading in the TESTER function Check the sensor...

Страница 120: ...coils Check the wiring If the problem is not solved replace the logic board OVERLOAD MDI LED code 57 Cause The motor current has overcome the limit fixed by hardware Troubleshooting If the alarm condi...

Страница 121: ...no failures problems have been found the problem is in the controller which has to be replaced POSITIVE LC OPEN MDI LED code 35 Cause The positive voltage of LC is different from expected Troubleshoo...

Страница 122: ...the motors the problem is inside the controller C If the alarm occurs during motor running check Motor internal connections If motor windings cables have leakages towards truck frame That the LC powe...

Страница 123: ...ck to zero Troubleshooting Check the motor connection that there is continuity If the motor connection is opened the current cannot flow so the test fails and the error code is displayed If everything...

Страница 124: ...if the resistance of the sensor is what expected measuring its resistance Check the wiring If the problem is not solved replace the logic board SIN COS D ERR XX MDI LED code 3 Cause This alarm occurs...

Страница 125: ...encoder condition Check the wiring Through the TESTER function check if the sign of FREQUENCY and ENCODER are the same and if they are different from zero during a traction request If the problem is...

Страница 126: ...been set in the throttle profile Troubleshooting Set properly the throttle related parameters see paragraph 9 8 TILLER ERROR MDI LED code 64 Cause Input mismatch between the Hard Soft input A6 and the...

Страница 127: ...maximum and minimum potentiometer values through the PROGRAM VACC function If the alarm is still present check the mechanical calibration and the functionality of the accelerator potentiometer If the...

Страница 128: ...ase voltages are expected to be lower than half the battery voltage If one of them is higher than that value this alarm occurs Troubleshooting If the problem occurs at start up the LC does not close c...

Страница 129: ...t due to the fact that the pump motor is not still and show the PUMP VMN NOT OK alarm Troubleshooting If the motor connected to P is still moving just wait for it to be still If not in 30 seconds the...

Страница 130: ...DI LED code 41 Cause At start up the controller checks the battery voltage measured at the KEY input A10 and it verifies that it is within a range of 20 around the nominal value Troubleshooting Check...

Страница 131: ...19 5114 19 INPUT MISMATCH MC is opened EB is applied Traction Pump stopped Start up standby running Key re cycle 58 FFD5 213 W SET TG EB XX Traction Pump motor is stopped Start up stand by running Ke...

Страница 132: ...cian in order to verify that the firmware is correct EEPROM KO MDI LED code 13 Cause A HW or SW defect of the non volatile embedded memory storing the controller parameters This alarm does not inhibit...

Страница 133: ...t condition is triggered even if the power bridge is not driven Troubleshooting The failure lies in the controller hardware Replace the controller NO CAN MSG XX MDI LED code 67 Cause CANbus communicat...

Страница 134: ...th respect to the master C The hexadecimal value XX facilitates Zapi technicians debugging the problem Troubleshooting Check the matching of the parameters between master and supervisor Ask for assist...

Страница 135: ...a wrong setpoint for TG or EB output Troubleshooting Check the matching of the parameters between master and supervisor Ask for the assistance of a Zapi technician If the problem is not solved replace...

Страница 136: ...e problem EVs are coded with a hexadecimal number 02 EV1 A9 04 EV2 A11 08 EV3 A33 20 EV4 A34 80 EV5 A8 If more than one EV circuit is found to be faulty the code shown corresponds to the sum of the si...

Страница 137: ...0CA COMBIAC0 ACE0 2uC User Manual Page 137 155 11 SPARE PARTS Part number Description C12532 AMPSEAL CONNECTOR 35 pins Female C29508 SW 180 24V Single Pole Contactor C29522 SW 180 48V Single Pole Cont...

Страница 138: ...sonnel and any replacement parts used should be original Beware of NON ORIGINAL PARTS The installation of this electronic controller should be made according to the diagrams included in this Manual An...

Страница 139: ...pendix A PC CAN Console user guide Windows Pc CAN Console uses standard Zapi communication protocol to display inverter s information It provides all standard Zapi Console functions with the easier ha...

Страница 140: ...K button Once you have defined the CAN interface you have to choose which CAN device you need to connect to then choose Connection Set Node menu or push the Set Node icon Once you have chosen the node...

Страница 141: ...nce you are connected to the selected node you need to download the inverter s parameters choose Function Parameter menu or push the Parameter icon Then click on Receive button the parameters will be...

Страница 142: ...rameter various kinds of information are available in particular Parameter value as it is saved within controller Value column Parameter value as it is shown by console or similar tools Scaled Value c...

Страница 143: ...ch either forward or backward Press the pedal up to its maximum excursion Displayed values will vary accordingly to operator inputs 13 1 5 Lift Lower command acquiring Once you are connected to the in...

Страница 144: ...13 1 6 Steer acquiring Once you are connected you need to receive the inverter s parameter choose Function Parameter menu or push the Parameter icon Choose Adjustment menu Select the value to acquire...

Страница 145: ...oller For every alarm will be shown the the working hour at which it s occurred the motor temperature and the number of repetitions Four buttons are present Update user can update alarm logbook Clear...

Страница 146: ...Console offers the same serial connection as the well known Console Ultra Main characteristics of this operational mode are Current loop serial communication Console is connected to a single controlle...

Страница 147: ...nd ESC keys OK key is used either to confirm actions or to enter a submenu ESC is used either to cancel an action or to exit a menu F1 F2 F3 keys These buttons have a contextual use The display will s...

Страница 148: ...is ongoing If serial connection fails a NO COMMUNICATION warning will be shown after some seconds press ESC key and look for what is preventing the connection 4 Please notice the red dot appearing on...

Страница 149: ...u inside that there is the parameter that you want to change for example the PARAMETER CHANGE menu With UP and DOWN keys you can scroll the whole list once you have highlighted the parameter that you...

Страница 150: ...rent programmed values When OK is pressed PROGRAM VACC procedure will start console will invite you To select the Enable switch if any Then select the direction switch either forward or backward Press...

Страница 151: ...ect the control switch if any either lift or lower Move the control sensor lift lower potentiometer to the correct position according to what you are acquiring Displayed values will vary accordingly t...

Страница 152: ...cedure to follow is the same described in paragraph 13 2 7 13 2 9 Tester Compared to standard console Ultra the TESTER menu has been modified deeply Now it shows four variables at once use UP DOWN key...

Страница 153: ...it has the possibility to download all parameters inside a USB stick To use this function enter the menu SAVE PARAMETER USB in the MAIN MENU File format The complete list of parameters is saved as a c...

Страница 154: ...it does not work while being in Esc returns to HOME SCREEN OK starts download When saving files the console creates a subdirectory whose name has eight digits First four digits are controller type Fif...

Страница 155: ...ESC and display will return to MAIN MENU USB stick can be removed safely Connect the USB stick to a PC and enter the directory of point 1 There will be a subdirectory with the correct name and inside...

Отзывы: