background image


150 

Note:

 The list of service centres is provided in the Service Book for 

the product, or at 

www.service.powertrain.ru

 and 

www.gazgroup.ru

Conducted maintenance must be confirmed by the corresponding 

records in the Service Book (form, service card) for the engine and the 

vehicle except the cases when the Service Book (form, card) is not 

included in the engine or vehicle delivery package. In case no service 

centres (SC) mentioned above are available in the area where the 

Engine/Powertrain shall be used, the Engine/Powertrain maintenance 

procedure must be agreed upon in written form with «Powertrain –

 GAZ Group» LLC. 
The Engine/Powertrain defects occurring within the warranty period 

due to the Manufacturer’s fault shall be removed at the expense of 

«Powertrain – GAZ Group» LLC. Any defects occurring due to the 

user's failure to follow the storage, operation and mandatory 

maintenance rules, as well as defects removed by replacing the parts 

from the engine SPK (spare parts kit), shall be removed at the user's 

expense.  

ATTENTION! 

ANY DEFECTS WHICH OCCUR DURING THE 

WARRANTY PERIOD AND NEED TO BE REMOVED BY REPLACING 
PARTS FROM THE ENGINE SPK MUST BE REMOVED AT THE 
SERVICE CENTRE (SC). 


Consumable materials (oil, coolants, etc.) shall be warranty 

replenished and replaced only if related to the corresponding 

warranty-covered repair.  

WARRANTY PERIOD 

The warranty period for the new Engine/Powertrain set by the 
manufacturer is as follows: 


The warranty period for the Engine/Powertrain supplied for 

in-vehicle integration is equal to the warranty period and runtime 
of the vehicle into which it is installed.  

The Engine/Powertrain must be installed into the vehicle not later than 

6 months after the date of shipment from «Avtodizel» JSC (YMZ). 

The duration of the Engine/Powertrain stay as part of the vehicle or 

another product at each of the next assembly plants must not exceed 

three months. During this time all the storage, preservation and 

depreservation rules stated in this Operation Manual must be 

followed. The Engine/Powertrain warranty service life and runtime 

start on the date of commencement of the warranty service life and 

runtime of the product into which the Engine/Powertrain is installed.  

Содержание YMZ-536

Страница 1: ... AVTODIZEL JSC Yaroslavl Engine Plant E N G I N E S YMZ 536 YMZ 5361 YMZ 5362 YMZ 5363 YMZ 5364 Operation Manual 536 3902150 В РЭ Yaroslavl 25 01 2012 ...

Страница 2: ... as your wishes and proposals on the very content of this Manual to 150040 Engineering and Design center JSC AVTODIZEL Yaroslavl Prospekt Oktyabrya 75 Due to the constant improvement of the powertrains and engines aimed at increasing their reliability and endurance as well as emissions performance and consumer properties the design may be subject to changes which are not covered in this edition JS...

Страница 3: ...Manual you will have your engine and powertrain work failure free for a long time The plant carries out a continuous work aimed at improved performance of the powertrains and the engines The modifications made after publishing this Manual are specified in the Addendum The Addendum is placed at the end of the Manual or attached separately ATTENTION Before starting the operation please read carefull...

Страница 4: ...low range gears Running the engine at full load before it is warmed up to the operating temperature must be avoided 5 Do not increase the engine speed abruptly immediately after the cold start because cold oil reaches the crankshaft and the turbocharger bearings quite slowly which may cause the engine failure Do not run the engine idle for a long time during warm up or vehicle stops 6 The coolant ...

Страница 5: ...y modification of parameters and systems of the end product that could have an impact on the engine operation should also be approved by JSC Avtodizel Table 1 Engine Model variant Final mounts Basic Model and assembly sets of YMZ 530 YMZ 536 Trucks dumpers rigids and tractors 4 2 4 4 6 2 6 4 6 6 8 4 with GVM up to 36t as well as MAZ tractor and trailer rigs with gross train mass GTM up to 44 t YMZ...

Страница 6: ...er AvtoKrAZ holding YMZ 536 33 Delivery kit with connectability to AC compressor and to retarder AvtoKrAZ holding YMZ 536 40 Articulated municipal buses LiAZ 6212 and LiAZ 6213 type GVM no more than 28 t and suburban bus LiAZ 5256 type GVM no more than 16 tonnes with connectability to ZF automatic transmission type 6HP504 YMZ 536 41 Delivery kit for powertrain with VOITH automatic transmission YMZ...

Страница 7: ...t with AC compressor for flat nose trucks AZ URAL YMZ 53602 100 3 All terrain trucks 6 4 and 6 6 with GVM up to 38t and tractor and trailer rigs with GTM up to 44 t AZ URAL conventional cab vehicle YMZ 53602 101 4 Delivery kit for conventional cab trucks AZ URAL YMZ 53602 110 1 Delivery for flat nose trucks AZ URAL YMZ 53602 111 1 Delivery for flat nose trucks AZ URAL YMZ 53602 120 3 Delivery kit ...

Страница 8: ...M up to 44 t AZ URAL conventional cab vehicle YMZ 53642 101 4 Delivery kit for conventional cab trucks AZ URAL YMZ 53642 110 1 Delivery kit for flat nose trucks AZ URAL YMZ 53642 111 2 Delivery kit for flat nose trucks AZ URAL YMZ 53642 120 3 Delivery kit with AC compressor for conventional cab trucks AZ URAL YMZ 53642 121 4 Delivery kit with AC compressor for conventional cab trucks AZ URAL YMZ 5...

Страница 9: ...n with VOITH automatic gear box LiAZ YMZ 5362 02 Delivery kit for Powertrain with mechanical gear box LiAZ YMZ 53622 10 All terrain trucks 6 4 and 6 6 with GVM up to 26t as well as tractor and trailer rigs with GTM up to 32t AZ URAL conventional cab vehicle YMZ 53622 11 Delivery kit for flat nose trucks AZ URAL YMZ 53622 12 Delivery kit with AC compressor for conventional cab trucks AZ URAL YMZ 53...

Страница 10: ... with AC compressor for flat nose trucks AZ URAL YMZ 53622 131 8 Delivery kit with AC compressor for flat nose trucks AZ URAL Modifications and assembly sets of YMZ 5363 YMZ 5363 Trucks dumpers rigids and log carrier tractors 4 2 4 4 6 2 6 4 6 6 with GVM up to 26t as well as MAZ tractor and trailer rigs with GTM up to 32t YMZ 5363 01 Delivery set with connectability to AC compressor for MAZ vehicl...

Страница 11: ...ery kit with AC compressor for flat nose trucks AZ URAL YMZ 53622 100 3 All terrain trucks 6 6 with GVM up to 30t as well as AZ URAL tractor and trailer rigs with GTM up to 36t conventional cab YMZ 53622 101 4 Delivery kit for conventional cab trucks AZ URAL YMZ 53622 110 1 Delivery kit for flat nose trucks AZ URAL YMZ 53622 111 2 Delivery kit for flat nose trucks AZ URAL YMZ 53622 120 3 Delivery ...

Страница 12: ...x with shift lever without speedometer 6 powertrain with MZF 430 Clutch and YMZ 0905 01 Gear Box with shift lever without speedometer with rear PTO 7 powertrain with MZF 430 Clutch and YMZ 0905 10 Gear Box with remote gear control 250 mm roller overhang to the left without speedometer 8 powertrain with MZF 430 Clutch and YMZ 0905 10 Gear Box with remote gear control 250 mm roller overhang to the r...

Страница 13: ... g m3 up to 1 g m3 for URAL vehicles with engines YMZ 53602 10 see pictures 1 h and 1 i YMZ 53622 10 YMZ 53642 10 and in regions with altitudes up to 1500 m without decreasing power economy and other performance characteristics and also at altitudes up to 4500m above sea level with a possibility to cross mountain passages up to 4650m high with a corresponding decrease in performance The YMZ 536 40...

Страница 14: ...14 Fig 1 YMZ 536 engine right side view ...

Страница 15: ...15 Fig 1 a YMZ 536 engine left side view ...

Страница 16: ...16 Fig 1 b YMZ 536 10 engine right side view ...

Страница 17: ...17 Fig 1 c YMZ 536 10 engine left side view ...

Страница 18: ...18 Fig 1 d YMZ 536 30 engine right side view ...

Страница 19: ...19 Fig 1 e YMZ 536 30 engine left side view ...

Страница 20: ...20 Fig 1 f YMZ 5362 engine right side view ...

Страница 21: ...21 Fig 1 g YMZ 5362 engine left side view ...

Страница 22: ...22 Fig 1 h YMZ 53602 engine right side view ...

Страница 23: ...23 Fig 1 i YMZ 53602 engine left side view ...

Страница 24: ...ear drive of accessory units Number of cylinders 6 Cylinders arrangement in line Ignition sequence 1 5 3 6 2 4 Flywheel Hand of rotation Right Cylinder bore mm 105 Piston stroke mm 128 Displacement l 6 65 Volume ratio 17 5 Speed performance See Fig 2 See Fig 2a See Fig 2b See Fig 2c See Fig 2d Rated power kW hp at least 229 312 198 5 70 176 5 240 176 5 240 210 285 RPM at rated power min 1 2300 25 ...

Страница 25: ... hp h minimum at 1300 100 min 1 197 145 at rated power 213 157 NB The upper deviation of specific fuel consumption is 3 the lower is not limited Hourly fuel consumption at rated power in kg h 50 5 44 39 39 47 Oil consumption to fuel consumption 0 1 0 1 0 2 0 1 0 2 Fuel air mixing method Direct injection Number of valves per cylinder Two intake and two exhaust valves Valve control one rocker arm fo...

Страница 26: ... type with built in fuel pressure sensor model LWR N3 BOSCH model 0 445 226 091 Injectors close type with multijet nozzle operated by quick electromagnetic valve CRIN2 from BOSCH model 0 445 120 178 Fuel filters coarse filter prefilter Full flow sediment bowl with moisture separator manual feed pump and replaceable filtering cartridge model PreLine 270 from MANN HUMMEL In engines for OAO MAZ Full ...

Страница 27: ...ure 0 281 006 102 from BOSCH Fuel pressure in rail 0 281 002 930 from BOSCH Fuel pressure and temperature in the low pressure circuit 0 261 230 112 from BOSCH Electrical bunches Injectors bunch of cables 536 3724010 Engine sensors bunch of cables 536 3724012 Intermediary bunch of cables engine vehicle 536 3724014 Engines for LiAZ are not equipped with intermediary bunch of cables Lubrication Syste...

Страница 28: ...perature 25 C 170 180 C Engine Cooling System The cooling system is based on forced cooling liquid circulation in a close loop It is fitted with a thermostatic device to keep engine temperature in a steady state Uses all season antifreezing carboxylated liquids Water pump Centrifugal type built in the service module driven by polyvee belt Thermostat Two thermostatic devices with solid state filler...

Страница 29: ...start accessory Electrical plugs А 0 102 124 416 RVI model of BERU Relay for switching on the easy start accessory Model V23132 B2002 A100 from Tyco Electronics Exhaust Gas Recirculation E G R E G R throttle Ref 5340 1213015 E G R throttle electromagnetic governer Ref 4088589 9000 024 00 Exhaust gas neutralizer Carbon black filter catalyst embodied in the silencer neutralizer for long haul and int...

Страница 30: ...n at counter pressure 0 8 MPa Steering pump Driven by the pneumatic brakes compressor AC compressor Driven by polyvee belt with tensioner Filling capacities l Engine lubrication system 22 5 Engine cooling system without radiator capacity 14 Engine mass without fluids in accordance with GOST 14846 81 kg 640 Engine mass with oil at delivery 700 Allowable tangage angle degree linear maximum 18 35 18 ...

Страница 31: ...31 Fig 2 Speed performance of YMZ 536 engine Ме gross torque Nе gross specific power ge specific fuel consumption n crankshaft rpm ...

Страница 32: ...32 Fig 2a Speed performance of YMZ 5361 engine Ме gross torque Nе gross specific power ge specific fuel consumption n crankshaft rpm ...

Страница 33: ...33 Fig 2b Speed performance of YMZ 5362 engine Ме gross torque Nе gross specific power ge specific fuel consumption n crankshaft rpm ...

Страница 34: ...34 Fig 2c Speed performance of YMZ 5363 engine Ме gross torque Nе gross specific power ge specific fuel consumption n crankshaft rpm ...

Страница 35: ...35 Fig 2d Speed performance of YMZ 5364 engine Ме gross torque Nе gross specific power ge specific fuel consumption n crankshaft rpm ...

Страница 36: ...rformance1 in g kW h g hp h minimum at 1300 100 min 1 196 144 194 5 143 197 145 at rated power 215 158 213 5 157 213 5 157 Max hourly fuel consumption at rated power kg h 51 50 5 Intermediary bunch of wires for YMZ 536 10 536 3724017 Exhaust gas neutralizer Carbon black filter catalyst embodied in the silencer neutralizer body model 536 1201010 11 or 536 1201010 12 or 5340 1201010 13 for YMZ 536 1...

Страница 37: ...53642 10 Main parameters and characteristics YMZ 53602 10 YMZ 53622 10 YMZ 53642 10 Speed performance see Fig 3c see Fig 3d see Fig 3e Rated power kW hp at least 229 312 176 5 240 210 185 Maximum torque min 1 at least 1226 125 900 92 1130 115 Crankshaft r p m at maximum torque min 1 at least 1300 1600 Torque at r p m 1000 min 1 Nm kgf m at least 980 100 690 70 785 80 Torque at r p m 800 min 1 Nm k...

Страница 38: ... C 180 to 190 C Filling capacities l engine lubrication system 22 5 cooling system without radiator capacity 14 Engine mass without fluids in accordance with GOST 14846 81 kg 620 Engine mass with oil at delivery kg 700 Allowable tangage angle degree linear maximum 35 cross maximum 25 Total oil Fuel consumption ratio in 0 2 The design of YMZ 53602 10 YMZ 53622 10 YMZ 53642 10 is provided for runnin...

Страница 39: ...39 Fig 3 Speed performance of YMZ 536 10 engine Ме gross torque Nе gross specific power ge specific fuel consumption n crankshaft rpm ...

Страница 40: ...40 Fig 3a Speed performance of YMZ 536 30 engine Ме gross torque Nе gross specific power ge specific fuel consumption n crankshaft rpm ...

Страница 41: ...41 Fig 3b Speed performance of YMZ 536 40 engine Ме gross torque Nе gross specific power ge specific fuel consumption n crankshaft rpm ...

Страница 42: ...42 Fig 3c Speed performance of YMZ 53602 10 engine Ме gross torque Nе gross specific power ge specific fuel consumption n crankshaft rpm ...

Страница 43: ...43 Fig 3d Speed performance of YMZ 53622 10 engine Ме gross torque Nе gross specific power ge specific fuel consumption n crankshaft rpm ...

Страница 44: ...44 Fig 3e Speed performance of YMZ 53642 10 engine Ме gross torque Nе gross specific power ge specific fuel consumption n crankshaft rpm ...

Страница 45: ... in pictures 4 8 Fig 4 YMZ 536 arrangement of engine units and overall dimensions front view 1 oil filter 2 surcharge air pressure and temperature sensor 3 fan switching visco coupling 4 AC compressor 5 generator 6 serial number Labeling area 7 file fuel filter ...

Страница 46: ...ft side view 1 fuel pressure and temperature sensor 2 manufacturer plate area 3 damper 4 generator 5 AC compressor 6 pre heater relay 7 high pressure pipes 8 rail 9 E C U 10 high pressure pump 11 pneumatic breaks compressor 12 steering pump 13 oil sump 14 fine fuel filter ...

Страница 47: ...47 Fig 6 YMZ 536 arrangement of engine units and overall dimensions rear view 1 camshaft RPM sensor 2 carter ventilation system 3 EGR flap pneumatic governor 4 flywheel ...

Страница 48: ... turning inspection eye 2 oil pressure and temperature sensor 3 exhausted gases recirculation flap governor 4 coolant temperature sensor 5 turbocharger 6 surcharge air pressure and temperature sensor 7 EGR flap pneumatic governor 8 oil filter 9 engine brake flap pneumatic control valve 10 starter ...

Страница 49: ...49 Fig 7 YMZ 536 arrangement of engine units top view 1 oil level indicator 2 EGR system 3 carter ventilation system 4 crankshaft RPM sensor 5 fuel pressure in the rail sensor 6 oil filler cap ...

Страница 50: ...50 GENERAL DESIGN AND OPERATION Engine s general design and construction is shown in cross Fig 9 and longitudinal section Fig 10 Fig 9 Cross section ...

Страница 51: ...51 Fig 10 Longitudinal section ...

Страница 52: ...52 This page intentionally left blank ...

Страница 53: ...der seat bore and connect the upper and the lower decks of the cylinder part of the block thus providing the required structural stiffness For additional stiffness near each of the crankshaft main bearings on both sides the block has vertical stiffening cavities from the sump to the cylinder head Through these cavities oil from the cylinder head is drained into the oil sump The oil sump cross wall...

Страница 54: ... iron is a block type cylinder head serving six cylinders The cylinder head is fixed with bolts checking the bolts torque during operation is not required To reject heat the cylinder head has a complex cavity for liquid cooling which is connected to the block cavity See Cooling System Section The air intake manifold is single cast with the head The cylinder head contains valves with springs valve ...

Страница 55: ...together form a cavity which contains the oil pump and all drive gears of the accessories located in the rear part of the engine See Accessory Drive Gears section Installed on the gear housing are a high pressure fuel pump and an air break compressor FLYWHEEL HOUSING The flywheel housing isolates the rear of the interior engine cavity from the flywheel The flywheel housing has a sealing collar at ...

Страница 56: ...The shaft is installed into the block onto the main journals through the main sliding bearings the main bearing upper shell 2 and lower shell 7 the connecting rod bearings are lubricated through drilled holes in the journals The crankshaft is dynamically balanced The crankshaft is axially fixed in the engine with two thrust bearing washers 6 in the shape of a horseshoe one on each side installed i...

Страница 57: ...during the manufacturing process left to right three pairs of figures day month year DD MM YY three figures serial number two figures symbols for the sizes of the main and connecting rod journals the next area has an identification discerned by the scanner The diameters of the connecting rod journals and main journals basic and repair dimensions their symbols as well as the corresponding symbols f...

Страница 58: ...N THE JOURNALS FILLETS AND ESPECIALLY WEB FACES UNREMOVED CRACKS WILL CAUSE SHAFT FAILURE IF PROPERLY OPERATED THE CRANKSHAFT HAS A LIFE TIME NOT LESS THAN THAT OF THE ENGINE FLYWHEEL The flywheel is cast in grey cast iron The steel ring gear press fitted onto the flywheel is used to start up the engine with a starter The flywheel is manufactured for the size 430 clutch installed into the SAE 1 ho...

Страница 59: ...e engine ATTENTION OPERATING THE ENGINE WITH THE DEFECTIVE DAMPER WILL RESULT IN THE CRANKSHAFT FAILURE PISTON CONNECTING ROD PISTON The piston See Fig 13 is a single piece design with 3 grooves for the piston rings The groove for the top compression ring is cut in an insert made of heat resistant cast iron Ni resist To increase the piston contact strength the piston pin bosses are ladder shaped t...

Страница 60: ...ession ring is configured as double sided trapezoid ring with a chamfer on the inner diameter at the top end The barrel shaped working surface of the ring has a chrome diamond coating the second compression ring with a rectangular cross section has a chamfer on the inner diameter at the bottom end The ring has a minute angle working surface the third oil control ring is boxy type with a helical ex...

Страница 61: ...G ROD BIG END HAS AN ANGLE SPLIT THEREFORE THE CAPS OF THE CONNECTING RODS ARE NOT INTERCHANGEABLE THE PRESENCE OF NICKS OR DIRT ON THE SPLIT SURFACE IS INACCEPTABLE The way the cap is secured to the connecting rod depends on the split configuration which is different for each connecting rod In the joining area on the long boss side the cap and the connecting rod have embossed match marks as a num...

Страница 62: ... place for the group number А В С 10 marking place for the match marks numbers from 0001 to 9999 BEARING SHELLS The crankshaft main bearing shells and the connecting rod big end bearing shells are replaceable thin walled shells with a bronze coated steel back The upper and the lower shells of the crankshaft main bearing are not interchangeable The upper shell has a hole and a groove for ...

Страница 63: ...15 consists of a housing 1 to which a bracket 3 and an oil feed pipe 5 are soldered The jet is installed into the bore in the horizontal oil channel of the cylinder block and directionally oriented by means of the oval shaped mounting hole in the bracket Fig 15 Piston oil cooling jet 1 jet housing 2 mounting cap 3 bracket 4 oval shaped mounting hole 5 piston oil feed pipe PISTON CONNECTING ROD UNI...

Страница 64: ... the long boss side Make sure that the recess for the cooling jet on the piston is in front of the jet nozzle The arrow on the piston indicates the piston mounting orientation and must be directed towards the fan ATTENTION AS FAR AS THE CONNECTING ROD BIG END HAS AN ANGLE SPLIT ANY DIRT OIL FUEL OR MECHANICAL DAMAGE ON THE MATING SURFACES BEFORE ASSEMBLY MUST BE AVOIDED Bolt tightening must start ...

Страница 65: ...o not have any marks The gear on the crankshaft nose also drives the oil pump through the intermediate gear As the injection pump and the air compressor are located along the cylinder block the drive for all accessories is located in the gear housing mounted on the block rear face The gear housing has high precision bores where the HPFP the air compressor and the compressor intermediate gear are m...

Страница 66: ...ars housing 2 crankshaft gear 3 camshaft gear 4 fuel pump gear 5 pneumatic brakes compressor gear 6 compressor intermediate gear 7 oil pump gear 8 oil pump drive intermediate gear А positioning chrankshaft and camshaft according to marks on the teeth ...

Страница 67: ...er 3 water pump pulley 4 belt 5 fan drive pulley 6 tension roller 7 belt 8 generator pulley 2 Water pump fan generator and AC compressor Fig 17a 3 Water pump and generator Fig 17b In the first two options the pulley on the crankshaft nose drives the fan and the water pump The crankshaft pulley is made as a single piece with the torsional vibration damper The fan pulley second belt drives the gener...

Страница 68: ...engine some bus models In this case the impeller is driven from a pulley additionally mounted by the consumer on the torsional vibration damper and instead of the fan drive a tension roller is installed on the engine Each belt has an identification number on its outer surface 5340 1308170 10 fan and water pump drive belt 5340 3701170 10 generator drive belt on the engines without AC compressor 534...

Страница 69: ...a press fitted ball bearing with shields The bearing is filled with grease for the whole period of the engine lifetime The fixed base of the roller has a special area with three marks and there is one mark on the rotating part Fig 18 The marks are used to check belt stretch elongation In the operating position the mark on the rotating part must be within the area of the three marks on the fixed pa...

Страница 70: ... the area of the two neighboring marks on the fixed part Fig 18 Checking accessory drive belt tensioning 1 mark on the rotating part 2 marks on the fixed part During maintenance check the cleanliness of the belts and pulleys prevent their contact with dirt oil fuel coolant or paint ...

Страница 71: ... train is OHV type with the camshaft below the cylinder head the valves are actuated by means of lifters pushrods rocker arms and yokes Fig 19 Fig 19 Timing mechanism 1 camshaft cam 2 tappet 3 pushrod 4 valves 5 valve seat 6 valve guide 7 valve spring washer 8 valve spring 9 cup type seal 10 valve split cone 11 valve spring cap 12 yoke 13 rocker arm 14 rocker arm shaft 15 rocker arm adjusting scre...

Страница 72: ...dth it is press fitted into the cast iron rear bearing housing with a flange The camshaft axial shift is limited by a steel thrust flange installed between the gear hub and the rear bearing journal The thrust flange is fixed to the rear face of the cylinder block with two bolts through the holes in the rear bearing flange Fig 20 The valve drive system is shown in Fig 21 Tappets are roller type rec...

Страница 73: ...t guides The intake rocker arms are shorter than exhaust rocker arms See Fig 22 From the side of the pushrods the rocker arms have screwed in adjustment screws with a spherical surface on the lower end and lock nuts to adjust valve clearances From the yoke side the rocker arms have press fitted ball pins with cups The rocker arms assembled with the shaft and four shaft supports are bolt fixed to t...

Страница 74: ...th rocker arms and shaft supports 2 pushrod 3 tappet 4 yoke Intake valves are single piece design made of heat resistant alloy steel and heat treated The valve cap diameter is 36 mm Exhaust valves are welded The valve stem is made of alloy steel the valve cap and part of the stem are heat resistant steel The valves are heat treated The valve cap diameter is 34 mm ...

Страница 75: ...es are fixed on the valves by means of a cylinder shaped recess on one side and a groove on the other side ATTENTION THE YOKES ARE INSTALLED ON THE VALVES WITH THE CYLINDER SHAPED RECESS FROM THE ROCKER ARM SHAFT SIDE REVERSE INSTALLATION IS INACCEPTABLE AS IT WILL RESULT IN THE YOKE TOUCHING THE ROCKER ARM Valve springs are made of alloy steel wire 3 9 mm in diameter The intake and exhaust valve ...

Страница 76: ... filter The filtered oil is supplied to the main oil line of the cylinder block located on the right side of the block through the channels in the block and also to the cylinder head through the channel near the rear side of the block In the cylinder head oil is supplied into the hollow rocker arm shaft through the rear shaft support and from the shaft to the rocker arm bushings From the bushings ...

Страница 77: ...e is MANN HUMMEL W 11 102 The filter is installed on the service module with the cap looking down The filter is designed as a non split cartridge with a metal housing The filter has a filter element a safety bypass valve and a non return valve The bypass valve is used to protect the filter element against destruction It is adjusted for the differential pressure of 2 5 kgf cm2 upstream and downstre...

Страница 78: ... sump The valve is installed in the service module housing in the oil line downstream of the L O HE and upstream of the oil filter The valve is adjusted for the start of opening at 5 kgf cm2 The valve is adjusted by preloading the spring and using the adjustment washers under it When this pressure value after the filter is reached clean oil forces the plunger to compress the spring and the dirty o...

Страница 79: ... the cylinder head to the distribution pipe located on the cylinder head For a better cooling effect the cylinder head water jacket is divided into an upper part and a lower part Besides each cylinder is isolated from the adjoining cylinders From the distribution pipe the cooling liquid goes to the upper cavities of the cylinder head to each cylinder directly From the cylinder head the cooling liq...

Страница 80: ...INAGE OF THE COOLING LIQUID FROM THE ENGINE THERE IS ALWAYS SOME AMOUNT OF UNDRAINABLE COOLING LIQUID LEFT IN THE AIR BREAK COMPRESSOR AND ITS PIPES 3 IN EMERGENCY CASES WHEN WATER IS USED AS THE COOLING LIQUID TO PREVENT ENGINE PARTS FROM FREEZING UP AFTER STOPPING THE VEHICLE AND THE ENGINE DRAIN WATER FROM THE VEHICLE AND THE ENGINE COOLING SYSTEM DISCONNECT THE AIR BREAK COMPRESSOR COOLING LIQ...

Страница 81: ... feed pipe from the vehicle radiator 2 cooling liquid feed flange to the thermostat box from the transmission heat exchanger 3 thermostat box 4 oil filter 5 L O HE safety valve 6 service module housing 7 differential valve 8 L O HE cooling liquid outlet pipe 9 water pump ...

Страница 82: ...t 3 L O HE oil feed channel from the block 4 oil filter outlet channel to the block 5 oil channel from the differential valve outlet to the oil sump WATER PUMP The centrifugal water pump is part of the service module The pump is driven by a poly V belt from the pulley installed on the crankshaft front end The water pump design is shown in Fig 25 ...

Страница 83: ...4 water pump volute 5 water pump impeller 6 water pump housing 7 water pump pulley 8 water pump drive spindle 9 end seal 10 drain hole A end seal The water pump suction cavity and the volute are located in the aluminum housing of the service module The pump drive spindle 8 is made as a single piece with the double row ball and roller bearing and ...

Страница 84: ...adiator 1 From the volute cooling liquid comes to the L O HE cavity through the channel in the service module housing LIQUID TO OIL HEAT EXCHANGER The liquid to oil heat exchanger L O HE is used to maintain optimal level of the oil temperature in the engine lubrication system The plate type heat exchanger with one heat transferring element is part of the service module The plate type heat transfer...

Страница 85: ...85 Fig 26 Installation of heat transferring element 1 service module housing 2 heat transferring element 3 heat transferring element fixing bolt 4 joint 5 gasket 6 oil outlet channel ...

Страница 86: ...ervice module housing 13 water pump inlet pipe 14 water pump volute 15 water pump housing 16 water pump pulley 17 water pump drive spindle 18 drain hole A end seal see Fig 25 B L O HE safety valve see Fig 27a In the service module the L O HE is open but when the service module is mounted onto the engine the heat transferring element becomes confined in the closed cavity formed by the module and th...

Страница 87: ...s shown in Fig 27a Fig 27а L O HE safety valve 1 plunger 2 spring 3 adjustment shim 4 plug THERMOSTATS The cooling liquid temperature is controlled by two thermostats located in the service module housing see Fig 28 The valve starts opening at 83 С The valve lift 9 4 mm fully open is reached when the cooling liquid temperature is 98 С ATTENTION AS THE THERMOSTATS ARE ARRANGED IN THE SERVICE MODULE...

Страница 88: ...ine 5 oil channel 6 cooling liquid outlet pipe to the radiator FAN AND FAN DRIVE The engines are equipped with the Borg Warner fan with a viscous coupling The fan is driven by a poly V belt from the pulley mounted on the crankshaft front end The fan drive Fig 29 uses two ball bearings 180206 and one bearing 180205 The bearings are single row with two shields and filled with grease During operation...

Страница 89: ...ith a neck 6 pcs 3 fan drive pulley 4 bolt М8 1 25 6g 25 8 8 with a neck 4 pcs 5 thrust flange 6 bearing 180206 with seals 7 shaft 8 fan drive housing 9 bearing 180205 with seals FUEL SYSTEM GENERAL DESIGN AND PRINCIPLE OF OPERATION The engine uses Common Rail System CRS an accumulator type fuel system with electronically controlled fuel injection by Robert Bosch Germany ...

Страница 90: ...stic and monitoring system through the CAN bus ensures diagnostics performs speed limiting and engine emergency protection functions as well as cruise control and redundant control from the operator s control panel by means of a supplementary controller Fig 30 Main components of Common Rail System The fuel system operates as follows Fig 30 31 the fuel from the fuel tank through the coarse fuel fil...

Страница 91: ...d the fuel pump capacity In the Common Rail system the fuel injection pressure does not depend on the injection start and duration Due to this fact alongside with the main injection which determines the diesel engine torque other injection stages can be implemented pilot injection of a small amount of fuel aimed mainly at reducing combustion noise post injection to reduce exhaust emissions The act...

Страница 92: ...ectronic Control Unit ECU The electronic engine control system ensures self diagnostics of the ECU transmitters sensors and some other vehicle devices When any deviations in the engine operation are detected the malfunction indicator lamp in the driver s cabin turns on In this case apply to the service station to identify the cause of the trouble ATTENTION THE FUEL SYSTEM HARDWARE IS NOT SUBJECT T...

Страница 93: ...eparates water and particles from the flowing diesel fuel The separated water and particles are collected in the sump 7 under the replaceable filter 2 The water is drained through the drain hole with a threaded plug 8 The level sensor 1 is used to check the filling level of the water sump The manual pump 5 allows for easy and fast removal of air from the filter and fuel system e g after maintenanc...

Страница 94: ...tched on off automatically ATTENTION USING DIESEL FUEL MIXED WITH PETROL AND OR OTHER FUELS IS STRICTLY FORBIDDEN MAZ vehicles can be equipped with Racor full flow sump type coarse fuel filters featuring a built in manual priming pump and a water in fuel sensor In this case the filter maintenance must be conducted according to the Operation Manual for MAZ vehicles 1 level sensor 2 replaceable filt...

Страница 95: ...l pressure and temperature in the low pressure line of the engine microprocessor control system HIGH PRESSURE FUEL PUMP The engines use a high pressure fuel pump with a built in priming pump The pump has three HP sections Fig 33 each section is fed through a dosage device with an electric valve The sections are located in the same plane and driven by the same cam on the pump shaft The maximum fuel...

Страница 96: ...96 Fig 33 High pressure fuel pump ...

Страница 97: ... solenoid valve Fig 34 1 Nozzle assy 2 Injector body 3 Nozzle nut 4 Rod 5 Control piston 6 Piston bushing 7 Nozzle spring 8 Adjusting washer 9 Piston bushing sealing 10 Piston bushing nut 11 Ball 12 Ball cup 13 Guide 14 Stroke adjustment washer 15 Residual gap adjustment washer 16 Pusher 17 Armature spring 18 Pusher spring 19 Solenoid assy Fig 34 ...

Страница 98: ...re drop in the control chamber The nozzle needle rod 4 and the control piston go up by about 0 24 mm compressing the spring 7 This spring serves to prevent the needle lift when there is no pressure in the injector and during air compression in the above piston space The fuel injection continues until the solenoid receives the PWM signal To keep the valve open the signal is decreased to 24V 12А Aft...

Страница 99: ...99 Fig 35 Injector control The injector installation in the cylinder head is shown in Fig 36 ...

Страница 100: ...ad sleeve 7 and fixed with a bracket 9 whose bolt is tightened to a certain torque See Appendix A Tightening torques for the main threaded connections A sealing washer 8 is placed under the nozzle nut to prevent gas blow by from the cylinder The injector is centered above the sleeve in the cylinder head Ø28 mm bore Also located here is the rubber sealing ring 6 The fuel is supplied to the injector...

Страница 101: ...illed in the cylinder head connecting the cavities of all injector fittings SENSORS AND HARNESSES The location of the engine sensors and electric harnesses as well as their functions are ahown in Fig 4 8 8a 8e crankshaft speed sensor located on the flywheel housing camshaft speed sensor located on the flywheel housing oil pressure and temperature sensor located on the flywheel housing cooling liqu...

Страница 102: ...lyst integrated with the muffler silencer AIR CLEANER The purpose of the air cleaner is to clean the air entering the engine from dust The air cleaner has a dry filtering diaphragm replaceable with max dust passage 0 2 and a clogging indicator installed on the turbocharger air supply line The underpressure in the clogging indicator installation point during the engine nominal operating mode must n...

Страница 103: ...o leakproofness of the pipes connecting the charge air cooler to the engine EXHAUST GAS RECIRCULATION SYSTEM The engines have an exhaust gas recirculation system Exhaust gases have a high heat capacity and when brought back to the cylinder allow to lower the maximum combustion temperature thus creating unfavourable conditions for nitrogen oxides formation Up to 20 of exhaust gases are sent back to...

Страница 104: ...tic cover of the cylinder head 1 The first preliminary cleaning stage is a complex labyrinth with swirlers 3 at the inlet and a hydraulic lock 4 at the outlet through which the separated oil is drained to the cylinder head The hydraulic lock is designed as two cylinders 5 and 6 one inserted into the other with a drain pipe 7 in the center The drain pipe height maintains the required drain oil colu...

Страница 105: ...pe 8 2nd stage swirlers 9 oil sump with a mushroom shaped drain valve 10 mushroom shaped drain valve 11 diaphragm valve 12 cover 13 a hole in the cover for the atmospheric pressure 14 diaphragm 15 cylindrical spring 16 central outlet pipe Е Е gas outlet pipe to the turbocharger suction From the breather exhaust gases separated from oil are sent to the turbocharger through the diaphragm valve 11 ...

Страница 106: ...pipe 16 When the turbocharger sucks from the engine an excessive amount of crankcase gases underpressure is created inside the engine and the diaphragm 14 under the action of atmospheric pressure sits down onto the central outlet pipe 16 thus closing it ATTENTION THE CRANKCASE VENTILATION SYSTEM DOES NOT REQUIRE MAINTENANCE AND IS NOT MEANT TO BE DISASSEMBLED BEFORE STARTING THE NEW OR REPAIRED EN...

Страница 107: ... an air compressor with the rpm depending on the vehicle movement speed When the exhaust brake throttle valve closes the exhaust path the exhaust resistance and the brake power are increased The exhaust break mountain brake valve has a pneumatic drive It is controlled by means of an electromagnetic valve When the throttle valve closes the exhaust path to the maximum the backpressure in the exhaust...

Страница 108: ...24 Idle RPM of the anchor min 1 Starter mass kg 10 GENERATOR The engines are equipped with a 2 5 kW AC generator 28V 100A having a built in voltage regulator with external leads W D Specifications Rated voltage V 28 Rated current A 100 Current generated with regard to anchor s speed A 2000 min 1 50 3000 min 1 75 4000 min 1 86 5000 min 1 93 Rotation speed at engine s rated RPM min 1 6780 Maximum ro...

Страница 109: ...ith the code of the certification body 3 Market circulation mark to show conformance to the Special Technical Regulations 4 Engine model and assembly variant 5 Year of manufacture which is denoted by the last number of the year e g year 2010 is marked as A 2011 as B 2012 as C etc 6 Serial number 7 Assembly set index 1 2 3 01 7 536000 B0000108 4 5 6 Fig 38 YMZ 536 01 nameplate Year of manufacture a...

Страница 110: ...rding to TS2 0251 018 00044434 2002 Automotive diesel fuel EN 590 according to TS 38 401 58 296 2001 Automotive diesel fuel EN 590 according to TS 38 401 58 296 2005 For YMZ engines used outside Russia it is possible to use diesel fuels of type II and III according to EN 590 2004 standard ATTENTION Fuels that meet GOST P 52368 2005 and EN 590 standards are to be used depending climatic conditions ...

Страница 111: ... SL Fuks Oil Titan Cargo SAE 5W 40 10W 40 15W 40 API CJ 4 For the YMZ engines used outside Russia it is possible to use motor oils of the viscosity grades specified above in p 1 with API performance not below CI 4 ATTENTION The above mentioned motor oils should be used as follows viscosity grades SAE 15W 40 at ambient temperatures minus 20 C and higher without start preheating at temperatures lowe...

Страница 112: ...ell concentrate GlycoShell 2 ALTERNATIVE COOLANTS TOTAL Glaself Auto Supra concentrate Coolelf Auto Supra 37 OOO Obninskorgsintez Coolant К concentrate ОЖ 40 ОЖ 65 TS 2422 047 51140047 2007 Tekhnoform Cool Stream Standard 40 TS 2422 002 13331543 2004 ОАО Sibur Neftekhim Coolant К Sibur Premium concentrate Coolant 40 Sibur Premium Coolant 65 Sibur Premium TS 2422 054 52470175 2006 ZAO Organic Produ...

Страница 113: ...to obtain the adequate liquid at operating temperature not below 40 С 65 concentrate over 35 water to obtain the adequate liquid at operating temperature not below 65 С Coolants mentioned in p 1 main coolants are of conventional type while those in p 2 alternative coolants are of carboxylated type WARNING NEVER MIX UP CONVENTIONAL AND CARBOXYLATED COOLANTS Before using carboxylated coolant elimina...

Страница 114: ...engine start up and operation keep it away from third persons During the engine start up and operation and after its stop it is forbidden to stop the fan propeller by means of any objects at hand Do not lubricate adjust or wipe the running engine Do not work with the fuel related components and electric circuits of the injectors when the engine is running It is very dangerous When conducting techn...

Страница 115: ...inal in order to prevent breakdown of the electronic control system and the regulating relay The welding machine ground cable must be connected in close proximity to the welded seam Take measures to prevent contact of sparks and molten metal drops formed during welding with wiring harnesses fuel pipes and other engine parts and units which are vulnerable to heat damage ATTENTION THE ELECTRONIC CON...

Страница 116: ...ng elements engine repair especially after change or repair of the turbocharger and other pressure lubricated assembly units and parts after major engine repairs If possible initial start up should be conducted in warm premises Start up preparation procedure is as follows 1 Clean off dust and dirt 2 Perform a thorough visual examination of the powertrain the engine and the units mounted on it Chec...

Страница 117: ...thout using starting aids With SAE 15W 40 and SAE 15W 30 oils the engine can be started up at ambient temperature up to 20 С and higher with SAE 10W 40 and SAE 10W 30 oils up to 25 С and higher with SAE 5W 30 oils up to 30 С and higher with electric heating provided by the four glow plugs installed at the intake manifold entrance At ambient temperatures lower than above mentioned it is necessary t...

Страница 118: ...g the engine in cold weather use fuel preheating for details see Vehicle Operation Manual Vehicle Operation Manual Further actions are the same as for the engine start up The engine is supplied with an electric fuel heating system which is activated automatically After the start of the engine the engine should be warmed up to the 80 100ºС working temperature under load Do not warm up the engine by...

Страница 119: ...ne under full load can result in serious damage to the engine When the engine starts reacting to change in the fuel supply it is ready to accept load 3 When the engine is warmed up to the operation temperature of 80 100o С the oil pressure in the engine block oil line must be within the range of 400 550 kPa 4 1 5 6 kgf cm2 at rated speed and not less than 100 kPa 1 0 kgf cm2 at min crankshaft spee...

Страница 120: ...ng the engine break in period full load and high rpm should be avoided During this period parts of the cylinder piston group gears bearings etc are properly aligned and the oil consumption becomes stable Overloading the engine during break in period will have a negative effect on the parts alignment which will reduce the engine service life During the break in period carefully watch the coolant te...

Страница 121: ...ed by the battery having overall capacity of not less than 132 Ah with the clutch pedal fully depressed must be trouble free started up without using engine starting aids at ambient temperature up to 10 С below zero by using an electric heating element at ambient temperature up to 22 С Engine warm up time is 8 minutes at ambient temperature up to 10 С and 10 minutes at temperatures up to 22 С At a...

Страница 122: ...ry 120 000 km ONE TIME MAINTENANCE OPERATIONS Daily maintenance DM is conducted once a day at the end of the work The first maintenance M 1 is conducted after the first 500 hours of the engine operation or 15 000 km run for dump trucks and municipal chassis buses or after 25 000 km run for intercity and international transportation vehicles intercity buses The second maintenance M 2 is conducted a...

Страница 123: ...pump drain hole 8 Check for the presence of water or dirt in the water sump of the coarse fuel filter and drain the sump if necessary FIRST SCHEDULED MAINTENANCE M 1 1 Examine the engine clean off any dirt or dust if necessary 2 Change the oil in the engine lubrication system ATTENTION Change the oil in accordance with the section RECOMMENDED MOTOR OIL GRADES 3 Change the oil filtering elements AT...

Страница 124: ...ke and the rocker arm 7 Check the status and the tension of the drive belts 8 Check the air filter clogging indicator 9 Tighten if necessary threaded connections eliminate possible oil fuel or coolant leakage SEASONAL MAINTENANCE SM 1 Change the fuel for the relevant seasonal fuel it is recommended to rinse out the fuel tank with clean fuel before filling 2 If the engine is filled with all season ...

Страница 125: ...ension pulley of the generator drive AFTER EVERY 800 000 km 1 Change the tension pulley of the fan drive EVERY THREE YEARS 1 Change the coolant in the cooling system see section RECOMMENDED COOLANTS ATTENTION BEFORE STARTING THE OPERATIONS THOUROUGLY CLEAN THE WORK AREA AND TAKE ALL MEASURES TO PREVENT DIRT AND DUST FROM ENTERING THE ENGINE CAVITIES ...

Страница 126: ...e engine is warmed up Follow safety requirements To drain the oil remove the oil filler cap clean it from dirt and dust unscrew the oil drain plug and screw it back after the oil is drained Fresh oil is filled through the fill hole in the cylinder head cover up to the top oil level mark Beforehand the fill hole must be clean from dirt and dust Oil from dispenser machines is filled with dispenser g...

Страница 127: ... unscrew the filter check the status of the sealing ring and the bearing surface of the service module housing ATTENTION USE ONLY REPLACEABLE FILTER ELEMENTS FROM MANN HUMMEL GMBH COMPANY GERMANY FUEL SUPPLY SYSTEM MAINTENANCE ATTENTION THE USER MAY NOT PERFORM THE MAINTE NANCE OF THE INJECTION SYSTEM ON HIS OWN IN CASE ANY MALFUNCTIONING OF THE FUEL SYSTEM HARDWARE IS DETECTED OR THE AJUSTMENT OF...

Страница 128: ...G RISK OF FREEZING DRAIN THE WATER FROM THE SUMP IN ORDER TO AVOID IT 1 Switch off the engine to prevent air from entering the fuel system 2 Unscrew the plug of the drain hole 2 Fig 40 at the bottom of the water sump and let the water drain 3 Screw back the drain plug 2 Fig 40 Water drain 1 water sump 2 drain plug CHANGE OF WATER SUMP The water sump is packaged and supplied together with a special...

Страница 129: ... kgf m While doing this hold the replaceable filter in position so that it should not be over tightened 7 Check if the screw plug of the drain hole is in 8 Flush the fuel system using a manual feed pump 9 Start the engine and check the sump for leakage Fig 41 Change of water sump 1 water sump 2 sealing ring CHANGE OF COARSE FUEL FILTER 1 Switch the engine off 2 Unscrew the water sump and check it ...

Страница 130: ...ent hole 1 Fig 42 7 Pump fuel manually using portable fuel pump 2 8 Pump the fuel until the air stops coming out of the screw plug 9 Screw back the screw plug of the vent hole with torque 6 1 N m 0 6 0 1 kgf m 10 Start the engine and check the filter for leakage Fig 42 Air elimination 1 screwed plug of the vent hole 2 hand fuel supply pump ATTENTION USE ONLY REPLACEABLE FILTER ELEMENTS FROM MANN H...

Страница 131: ...he screws 3 4 Connect the cable 4 Fig 43 Installing the heater 1 cap 2 heater 3 screws 4 cable 5 sealing FINE FUEL FILTER MAINTENANCE CHANGE OF FILTERING ELEMENTS 1 Switch the engine off 2 Unscrew the filtering element 1 Fig 44 In case of difficulty use special remover 3 Lubricate with motor oil the seal ring 2 Fig 44a of the new filtering element 4 Successively screw filtering elements until the ...

Страница 132: ...132 Fig 44 Removal of fuel filter replaceable elements 1 replaceable filtering elements 2 seal ring Fig 44a Mounting of fuel filter replaceable elements 1 replaceable filter elements 2 seal ring ...

Страница 133: ... check the condition of the sealing ring and its bearing seat ATTENTION USE ONLY THE MODEL 50 10 437 143 REPLACEABLE FILTER ELEMENTS MANUFACTURED BY MANN HUMMEL GMBH GERMANY ATTENTION USE ONLY MANN HUMMEL REPLACEABLE FUEL FILTERS WARNING DO NOT START THE ENGINE IF THE FUEL SYSTEM IS NOT FILLED WITH FUEL THAT MIGHT RESULT IN THE HIGH PRESSURE FUEL PUMP FAILURE THE FUEL SYSTEM PRIMING PROCEDURE IS D...

Страница 134: ...4 Start the engine and let it run for 1 or 2 minutes at min idle speed in order to remove airlocks Stop the engine and check the cooling liquid level If the level is below normal and there are no traces of leakage add more cooling liquid To ensure normal engine operation pay attention to a change in the color of the cooling liquid If the liquid becomes brown it means that it is aggressive to the s...

Страница 135: ... adjusted on a cold engine or not earlier than one hour after the engine was stopped Valve clearance adjustment must be performed according to the firing order 1 5 3 6 2 4 The cylinder numeration begins from the fan The clearance between the rocker arm cup and the valve yoke must be for intake valves 0 30 0 40 mm for exhaust valves 0 40 0 50 mm The valves located closer to the fan are intake valve...

Страница 136: ...TDC One piston will be at the compression stroke TDC the pushrods of the intake and exhaust valves can be turned easily by hand the other will be at the exhaust stroke TDC If the pushrods of the 1st cylinder are clutched and will not turn turn the crankshaft one revolution 360о Fig 45 Plugs on the flywheel housing 1 flywheel housing 2 plug 3 plug METHOD 2 Turn the crankshaft until the 1st cylinder...

Страница 137: ...onding to the upper clearance limit value must enter with some force applied During further crankshaft turning an up to 0 05 mm deviation from the valve clearance limit values due to a possible runout of the valve train mating parts is considered to be acceptable 8 Further valve clearance adjustment must be performed according to the firing order i e in cylinders 5 3 6 2 and 4 respectively each ti...

Страница 138: ...m adjustment 1 rocker arm 2 rocker arm setscrew 3 lock nut 4 yoke 5 rocker arm cap 13 Start the engine and make sure that there is no leakage on the junction of the cylinder head cover and the crankcase gas discharge hose pipe ...

Страница 139: ...ine which leads to wear and early failure of the cylinder and piston assembly Trouble free engine operation is ensured by regular maintenance of the air filter as well as by constant attention to the status of its components especially the sealing gaskets and proper installation of the air filter The filtering element should be replaced when the air filter clogging indicator is on or annually New ...

Страница 140: ...the Start Pilot liquid ether based at the connections In case of leakage the rpm increases ATTENTION DO NOT USE PRODUCTS LIKE START PILOTE TO HELP THE ENGINE TO START 2 Let the engine run at minimum idle speed at 1200 min 1 Check the engine turbocharger link for air leakage in pipe junctions and for gas leakage in the exhaust system If necessary change gaskets and tighten collars ...

Страница 141: ...xample blink code 1 2 4 is shown in Fig 47 Press the diagnostic key again to see the blink code of the next malfunction In this manner you can see all malfunctions stored in the ECU memory After displaying the last malfunction stored in memory the ECU shows the first malfunction again Fig 47 Example of blink code 1 2 4 low voltage in on board system A full list of failures with interpretation of e...

Страница 142: ...ywheel housing installation gear housing flange flywheel housing flange Loctite 5900 Loctite 518 Injector sleeve cylinder head thread and rear mounting surface of the injector sleeve Loctite 648 Cylinder head bowl shaped plugs cylinder head holes for the bowl shaped plugs bowl shaped plugs Uniherm 9 Oil sump cylinder block flange oil sump flange Tree Bond 1215J Loctite 5900 Service module heat tra...

Страница 143: ...holes metric studs Uniherm 9 Anaterm 114 Anakrol 202 Anakrol 207 Metric fitting for the oil filter oil filter housing fitting thread Uniherm 9 Service module tapered plug service module housing threaded hole tapered plug thread Anaterm 8K Anakrol 2051 Charge air pressure and temperature transmitter fixing stud inlet pipe thread stud thread Anakrol 2051 Distribution pipe hole for the bowl shaped pl...

Страница 144: ...ns 3 The room where engine preservation is conducted must meet the following requirements a the room must be dry properly ventilated and heated b the relative humidity must not exceed 70 c the temperature in the room must be maintained at a level not below 15 С Sharp fluctuations in temperature and humidity within 24 hours must be avoided d workplace illumination must be not less than 200 lx the l...

Страница 145: ...ve as per GOST 15171 78 d PVK grease as per GOST 19537 83 e ZES preservation grease as per ТU 38 101474 74 f polyacrylamide as per ТU 7 04 01 72 g technical potassium dichromate as per GOST 2652 78 h technical soda ash as per GOST 5100 73 i white spirit as per GOST 3134 78 j 0 2 mm thick polyethylene film as per GOST 10354 82 k polyethylene tape with adhesive layer as per GOST 20477 86 l two layer...

Страница 146: ...eel exterior surfaces with preservation oil mixed with PVK ZES grease wrap with packing paper and fix it with a polyethylene tape with adhesive layer or tie over with twine 6 Wrap the generator with polyethylene film or water impermeable paper and fix it with a polyethylene tape with adhesive layer 7 Seal the water pump drain hole and rubber plugged holes with a polyethylene tape with adhesive lay...

Страница 147: ...ctor _______________________ Date and stamp__________________________________ Packing performed by ____________________________ Date __________________________________________ Checked by quality inspector _______________________ Date and stamp__________________________________ Represervation date ______________________________ Preservation must ensure undamaged condition of the engine supplied for...

Страница 148: ... engine and install it onto the vehicle s chassis or on the stand 2 Remove the packing paper polyethylene film and polyethylene tape with adhesive layer from the parts units and equipment specified in Engine Exterior Preservation section of this Manual 3 Wipe the flywheel surface the surface of the crankshaft pulley grooves the surface of the fan drive the generator and the tensioners with a clean...

Страница 149: ...and the owner s place of residence The subject of warranty is conformity of the Engine Powertrain as packaged by the manufacturer to the quality requirements stipulated by the laws of the Russian Federation and the contract and its fitness for intended use in accordance with the performance specifications provided in this Operation Manual During the warranty covered service life and runtime Powert...

Страница 150: ...e user s expense ATTENTION ANY DEFECTS WHICH OCCUR DURING THE WARRANTY PERIOD AND NEED TO BE REMOVED BY REPLACING PARTS FROM THE ENGINE SPK MUST BE REMOVED AT THE SERVICE CENTRE SC Consumable materials oil coolants etc shall be warranty replenished and replaced only if related to the corresponding warranty covered repair WARRANTY PERIOD The warranty period for the new Engine Powertrain set by the ...

Страница 151: ... on the date when it was installed into the vehicle according to the confirming document In case the date when the engine was put into operation and the date when it was installed into the vehicle are impossible to define the warranty period starts on the date of the engine sale to the end user Mounting of the engine in the final product either initial or in replacement of genuine or similar model...

Страница 152: ...scope as stated in this Operation Manual and Service Book self implemented installation and replacement of the engine powertrain as well as self implemented dismantling disassembly and repair of the engine powertrain its parts and assembly units including any alterations made in the software factory settings and ECU parameters any engine powertrain design modifications if not approved by the manuf...

Страница 153: ...ld do the following Immediately stop the Engine Powertrain operation Without delay contact the nearest dealer SC of Powertrain GAZ Group LLC with a warranty claim which must include the following information a full name of the company using the product b company s postal address region district post office contact phone number name of the nearest railway station or harbour consignee code c manufac...

Страница 154: ...ser shall consider the claim and sign the Damage Claim The claim handling inspection dismantling disassembly etc and a specialist s on site visit shall be provided to the user free of charge only in case the claim is recognized as justified In case the claim is accepted as warranty covered the dealer of SC shall repair the Engine Powertrain within the shortest reasonable time The user shall sign t...

Страница 155: ...f the product owner should be sent by wire or by post to the Warranty and Service Maintenance Department of Powertrain GAZ Group LLC The claim procedure for the products used in military machines shall be implemented according to GOST RV 15 703 2005 Please send your comments on product servicing or issues related to claim refusals at the following address 75 Prospekt Oktyabrya Yaroslavl 150040 Rus...

Страница 156: ... a recycling facility Filter element covers should be removed then the paper should be cut along the generating line The covers and core should be taken to the scrap yard the paper should be pressed and sent to a disposal facility Used cloth removed rubber components and paronite gaskets should be pressed and sent to a disposal facility DISPOSAL OF DISCARDED ARTICLES Before an article is sent for ...

Страница 157: ...led its parts should be sorted out depending on the material All non metal parts should be pressed and sent to a disposal facility There are no other requirements for disposal of powertrains engines clutches and gear boxes The disposal sites must have all the necessary documentation including safety requirements ...

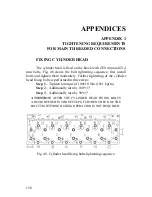
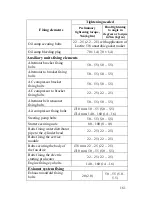
Страница 158: ...s and tighten them moderately Further tightening of the cylinder head fixing bolts is performed in three steps Step 1 Tighten to torque of 100 10 Nm 10 1 kgf m Step 2 Additionally turn by 180º 5º Step 3 Additionally turn by 90º 5º ATTENTION AFTER THE CYLINDER HEAD FIXING BOLTS ARE TIGHTENED IN THREE STEPS FURTHER CHECK OF THE BOLT TIGHTENING DURING OPERATION IS NOT REQUIRED Fig 48 Cylinder head fi...

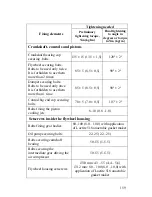
Страница 159: ... once It is forbidden to use them more than 1 time 85 5 8 5 0 5 90º 2º Conrod big end cap securing bolts 70 5 7 0 0 5 115º 2º Bolts fixing the piston cooling jets 8 10 0 8 1 0 Setscrews inside the flywheel housing Bolts fixing gear bodies 80 100 8 0 10 0 with application of Loctite 518 anaerobic gasket maker Oil pump securing bolts 22 25 2 2 2 5 Bolts securing camshaft bearing 50 55 5 5 5 Bolts se...

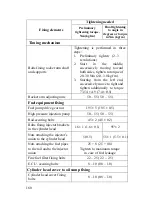
Страница 160: ...onally to torque 73 54 4 9 7 4 0 5 Rocker arm adjusting nuts 50 55 5 0 5 5 Fuel equipment fixing Fuel pump drive gear nut 195 5 19 5 0 5 High pressure injection pump 50 55 5 0 5 5 Rail securing bolts 45 2 4 5 0 2 Bolts fixing injector brackets in the cylinder head 16 1 1 6 0 1 95º 2 Nuts attaching the injector s union to the cylinder head 5 0 5 55 1 5 5 0 1 Nuts attaching the fuel pipes to the rai...

Страница 161: ...lts 50 55 5 0 5 5 AC compressor to bracket fixing bolts 22 25 2 2 2 5 Alternator belt tensioner fixing bolts 50 55 5 0 5 5 Air compressor fixing bolts 10 mm 50 55 5 0 5 5 14 mm 140 160 14 16 Steering pump bolts 50 55 5 0 5 5 Starter securing nuts 80 100 8 10 Bolts fixing water distributor pipe to the cylinder head 22 25 2 2 2 5 Bolts fixing the service module 22 25 2 2 2 5 Bolts securing the body ...

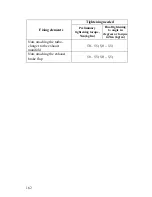
Страница 162: ... elements Preliminary tightening torque Nm kgf m Final tightening to angle in degrees or torque in Nm kgf m Nuts attaching the turbo charger to the exhaust manifold 50 55 5 0 5 5 Nuts attaching the exhaust brake flap 50 55 5 0 5 5 ...

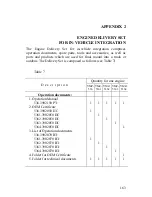
Страница 163: ...osed as follows see Table 7 Table 7 Quantity for one engine D e s c r i p t i o n YMZ 536 YMZ 5361 YMZ 5362 YMZ 5363 YMZ 5364 Operation documents 1 Operation Manual 536 3902150 РЭ 2 OEM Certificate 536 3902050 ПС 5361 3902050 ПС 5362 3902050 ПС 5363 3902050 ПС 5364 3902050 ПС 3 List of Operation documents 536 3902070 ВЭ 5361 3902070 ВЭ 5362 3902070 ВЭ 5363 3902070 ВЭ 5364 3902070 ВЭ 4 Folder for O...

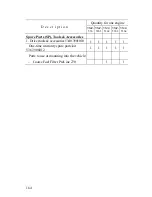
Страница 164: ...536 YMZ 5361 YMZ 5362 YMZ 5363 YMZ 5364 Spare Parts SP Tools Accessories 1 Driver tools accessories 5340 3901010 1 1 1 1 1 One time warranty spare parts kit 536 3906012 1 1 1 1 1 Parts to use at mounting into the vehicle Coarse Fuel Filter PreLine 270 1 1 ...

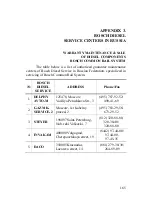
Страница 165: ...icing of Bosch Common Rail System BOSCH DIESEL SERVICE ADDRESS Phone Fax 1 DELPHY AVTO M 125476 Moscow Vasiliya Petushkova Str 3 495 787 92 52 490 41 69 2 GAZ MK SERVICE 2 Moscow 1st Kabelny proezd 2 495 783 29 56 673 29 52 3 STEYER 198097 Saint Petersburg Nab reki Volkovki 7 812 320 88 80 320 30 40 320 88 80 4 INVAKAM 400000 Volgograd Cherepovetskaya street 19 8442 97 44 00 97 44 00 97 45 35 5 DA...

Страница 166: ...TING ROD 61 PISTON OIL COOLING JET 63 PISTON CONNECTING ROD UNIT ASSEMBLY 63 VALVE TRAIN 71 ELECTRICAL EQUIPMENT 108 ENGINE LABELING 109 CONSUMABLES 110 RECOMMENDED FUEL GRADES 110 RECOMMENDED MOTOR OIL GRADES 111 STARTING RUNNING AND STOPPING 116 PREPARATION FOR START UP OF NEW ENGINE AND ENGINE START UP AFTER LONG TERM LAY UP OR REPAIR 116 ENGINE START 117 COLD SEASON START 118 CHECKING ENGINE O...

Страница 167: ... SYSTEM MAINTENANCE 134 VALVE TRAIN CLEARANCE ADJUSTMENT 135 CHECKING INTAKE AND EXHAUST SYSTEM FOR LIKEAGE 140 E C S DIAGNOSTICS 141 SEALANTS 142 ENGINE PRESERVATION AND DEPRESERVATION 144 ENGINE EXTERIOR PRESERVATION 146 ENGINE PACKING 147 ENGINE DEPRESERVATION 148 MANUFACTURER S WARRANTY AND CLAIMING PROCEDURE 149 SCOPE OF WARRANTY 149 WARRANTY PERIOD 150 HOW TO USE THE WARRANTY 153 DISPOSAL 15...

Страница 168: ...168 NOTES ...

Отзывы: