background image

Remote control system

7-38

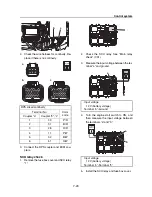
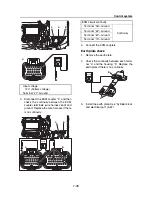
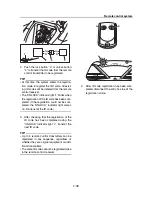
TIP:

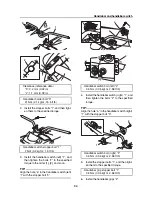
Install the battery (CR2016) “1” with the posi-
tive side “a” facing down.

8.

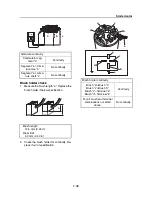
Tighten the screws “1” to the specified
torque in the order [1], [2], and so on.

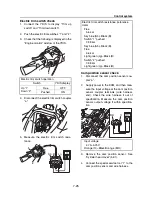
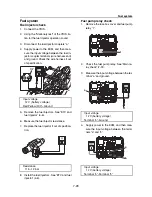
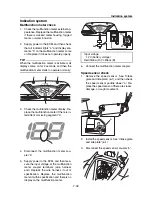
Remote control receiver check

1.

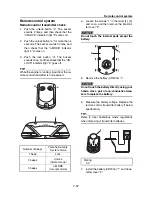
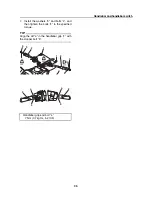
Disconnect the remote control receiver
coupler “a”, and then measure the input
voltage at the remote control receiver cou-
pler terminals (wire harness end).

2.

Connect the remote control receiver cou-
pler.

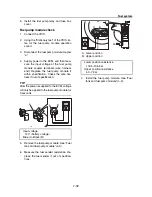
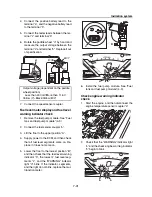
3.

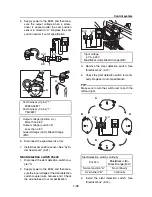
Disconnect the multifunction meter cou-
pler “a” from the remote control receiver.

4.

Supply power to the ECM, and then mea-
sure the remote control receiver output
voltage at the multifunction meter coupler
terminal (wire harness end) and ground.
Replace the remote control receiver if out
of specification.

5.

Connect the multifunction meter coupler.

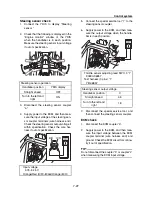
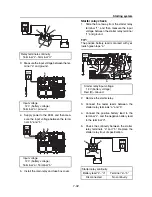
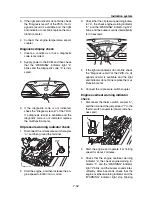
Transmitter registration

TIP:

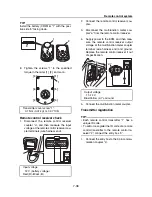
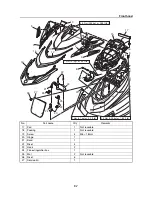
• Each remote control transmitter “1” has a

unique ID code.

• To add or re-register the ID code of a remote

control transmitter to the remote control re-
ceiver “2”, connect the entry box “3”.

1.

Connect the entry box to the 2-pin commu-
nication coupler “a”.

Transmitter cover screw “1”

0.1 Nm (0.01 kgf·m, 0.07 ft·lb)

Input voltage

12 V (battery voltage)

Red (R)–Black (B)

1

2

a

[3]

[6]

[2]

[4]

[5]

[1]

1

4

13

a

Output voltage

11–12 V

Blue/Yellow (L/Y)–Ground

L/Y

a

Содержание Waverunner VXS VX1800

Страница 1: ...SERVICE MANUAL WaveRunner VXS VX1800 F2W VXR VX1800A F2W F2W 28197 ZU 11 ...

Страница 2: ...difications and significant changes in specifica tions and procedures and these are incorporated in successive editions of this manual Also up to date parts information is available on YPEC web Additional information and up to date information on Yamaha products and services are available on Yamaha Service Portal Important information Particularly important information is distinguished in this man...

Страница 3: ...Contents General information 1 Specification 2 Maintenance 3 Fuel system 4 Power unit 5 Jet pump unit 6 Electrical system 7 Hull and hood 8 Troubleshooting 9 Appendix A ...

Страница 4: ... 1 3 Disassembly and assembly 1 3 Identification number 1 4 Primary I D number 1 4 Engine serial number 1 4 Jet pump unit serial number 1 4 Craft identification number C I N Europe 1 4 Hull identification number H I N Oceania 1 4 How to use this manual 1 5 Manual format 1 5 Conditions when testing and adjusting 1 6 Abbreviation 1 6 Adhesive lubricant sealant and thread locking agent 1 8 Symbols 1 ...

Страница 5: ...1 General information RiDE system 1 23 RiDE motor 1 24 ETV system 1 25 Shift control 1 26 Engine control system 1 28 Deck and hull 1 31 Lubrication system 1 32 Hose routing 1 33 Cooling water flow 1 34 ...

Страница 6: ...er Do not hold the impeller with your hands when loosening or tightening the impeller Handling of gasoline Gasoline is highly flammable Keep gasoline and all flammable products away from heat sparks and open flames Gasoline is poisonous and can cause injury or death Handle gasoline with care Never siphon gasoline by mouth If you swallow some gasoline inhale a lot of gasoline vapor or get some gaso...

Страница 7: ...he engine unit using the three point suspension If the engine unit does not have three or more points to be suspended support it using ad ditional ropes or the like so that the engine unit can be lifted and carried in a stable man ner Handling of heat gun Improper handling of a heat gun may result in burns For information on the proper handling of the heat gun see the operation manual is sued by t...

Страница 8: ...zes first and tighten fasteners starting in the center and moving outward Non reusable parts Always use new gaskets seals O rings cotter pins and so on when installing or assembling parts Disassembly and assembly Use compressed air to remove dust and dirt during disassembly Apply engine oil to the contact surfaces of moving parts before assembly Install bearings so that the bearing identifica tion...

Страница 9: ...C I N Europe The C I N is stamped on a plate attached to the boarding platform Hull identification number H I N Oceania The H I N is stamped on a plate attached to the boarding platform 1 Model name 2 Hull type 3 Primary I D number Starting primary I D number F2W 800101 1 Engine name 2 Engine type 3 Engine serial number Starting engine serial number 6EW 1000001 MODEL F2W PRI I D YAMAHA MOTOR CO LT...

Страница 10: ...on where necessary see 5 in the following figure for an example page TIP For troubleshooting procedures see Chapter 9 Troubleshooting 6 12 Impeller housing and impeller duct ASSY Impeller housing and impeller duct ASSY No Part name Q ty Remarks 1 Clamp 1 2 Spout hose 1 3 Bolt 4 M10 125 mm 4 Bracket 1 5 Nozzle 1 6 Impeller housing 1 7 Dowel pin 4 8 Bolt 4 M6 35 mm 9 Water inlet cover 1 10 Gasket 2 ...

Страница 11: ...TDC Before Top Dead Center DOHC Double Overhead Camshaft ECM Electronic Control Module ETV Electronic Throttle Valve EX Exhaust F Forward ID Identification IN Intake ISC Idle Speed Control ISO International Organization for Standardization N Neutral OBD M On Board Diagnostics Marine system OTS Off Throttle Steering PON Pump Octane Number PORT Port side R Reverse RiDE Reverse with Intuitive Deceler...

Страница 12: ...How to use this manual 1 7 UP Upside YDIS Yamaha Diagnostic System Abbreviation Description ...

Страница 13: ... Symbol Name Application YAMALUBE 4W or Yamaha 4 stroke motor oil Lubricant Water resistant grease YAMALUBE MARINE GREASE Lubricant Molybdenum disulfide grease Lubricant Epnoc grease AP 0 Lubricant Silicone grease Lubricant Symbol Name Application ThreeBond 1207B Sealant ThreeBond 1280B Sealant ThreeBond 1322D Thread locking agent ThreeBond 1360 Thread locking agent ThreeBond 1530D Adhesive LOCTIT...

Страница 14: ...DIS2 01 KT is distributed by the Marine Ser vice Division Tool name Tool No Illustration Reference pages Oil filter wrench 90890 06830 Oil filter wrench YB 06830 3 5 3 5 5 8 5 13 Gauge stand 90890 06725 3 12 5 34 5 42 Dial gauge needle 90890 06584 3 12 5 34 5 42 Dial gauge stand set YB 06585 3 12 5 34 5 42 Dial gauge set 90890 01252 3 12 5 34 5 42 Dial indicator gauge YU 03097 3 12 5 34 5 42 Camsh...

Страница 15: ... gauge YU 03153M 4 3 Compression gauge 90890 03160 Compression gauge YU 33223 5 1 Compression gauge extension 90890 06563 5 1 Exhaust pipe wrench 90890 06726 Exhaust pipe wrench YW 06726 5 17 5 17 Coupler wrench 90890 06729 Coupler wrench YW 06729 5 29 5 34 5 40 5 42 5 58 5 58 5 66 5 66 6 20 6 22 Tool name Tool No Illustration Reference pages YU 33223 ...

Страница 16: ...90890 04114 Compressor adapter YM 04114 5 47 5 53 Valve guide remover installer 90890 06801 Valve guide remover YB 06801 5 49 5 50 Valve guide installer 90890 06810 Valve guide installer YB 06810 5 50 Valve guide reamer 90890 06804 Valve guide reamer YM 01196 5 50 Valve lapper 90890 04101 Valve lapping tool YM A8998 5 50 5 53 Tool name Tool No Illustration Reference pages ...

Страница 17: ...6325 5 51 Valve seat cutter 60 90890 06324 5 51 Valve seat cutter 30 90890 06818 5 51 Valve seat cutter 45 90890 06555 5 51 Valve seat cutter 60 90890 06323 5 51 Neway valve seat kit YB 91044 5 51 Crankshaft holder 90890 06732 Crankshaft holder YW 06562 5 58 5 59 5 63 5 64 5 64 5 65 5 66 Tool name Tool No Illustration Reference pages ...

Страница 18: ...wheel puller 90890 06723 Flywheel puller YW 06723 5 60 Rotor puller 90890 01080 Stator rotor puller YM 01080 A 5 60 Sheave holder 90890 01701 Primary sheave holder YS 01880 A 5 60 5 62 Driver rod LS 90890 06606 5 60 5 61 Bearing outer race attachment 90890 06627 5 60 Driver handle small YB 06229 5 60 Bearing and seal installer YW 06356 5 60 Tool name Tool No Illustration Reference pages ...

Страница 19: ...ressure C 90890 02393 5 61 Forward bearing race installer YB 06258 5 61 Piston ring compressor 90890 05158 Piston ring compressor YM 08037 5 86 Drive shaft holder 6 90890 06520 Driveshaft holder YB 06201 6 11 6 11 6 14 6 14 Stopper guide plate 90890 06501 6 11 6 12 6 20 Bearing puller assembly 90890 06535 6 11 6 12 6 20 Tool name Tool No Illustration Reference pages C ...

Страница 20: ...od SL 90890 06602 6 12 Needle bearing attachment 90890 06609 6 12 Driveshaft needle bearing installer and re mover YB 06194 6 12 Oil seal installer attachment 90890 06733 6 13 Oil seal installer attachment YW 06628 6 13 Bearing attachment 90890 06728 Bearing attachment YW 06728 6 13 6 13 6 13 6 21 6 22 Tool name Tool No Illustration Reference pages ...

Страница 21: ...ment 90890 06654 6 21 6 21 6 21 Needle bearing installer YB 06434 6 21 6 21 6 21 Bearing attachment 90890 06727 Bearing attachment YW 06727 6 22 6 22 YDIS2 Hardware Kit 90890 06884 YDIS2 Hardware Kit LIT YDIS2 01 KT 7 9 9 1 Digital circuit tester 90890 03243 Digital multimeter YU 34899 A 7 10 Tool name Tool No Illustration Reference pages ...

Страница 22: ...Test harness 2 pins 90890 06851 7 12 Test harness 3 pins 90890 06870 Test harness 3 pins YB 06870 7 13 Test harness 2 pins 90890 06850 Test harness 2 pins YW 06850 7 13 Vacuum pressure pump gauge set 90890 06945 Pressure vacuum tester YB 35956 B 7 15 7 18 Test harness 3 pins 90890 06877 Test harness 3 pins YB 06877 7 26 Tool name Tool No Illustration Reference pages ...

Страница 23: ...1 18 Special service tool Throttle sensor adjusting lead FWY 3 90890 06857 Test harness 3 pins YB 06857 7 27 Tool name Tool No Illustration Reference pages ...

Страница 24: ...en gine with electronic fuel injection Single throttle body 4 in 1 exhaust system Wet sump lubrication b Jet pump Stainless steel 3 blade ø155 mm 15 6 pitched impeller Impeller turning direction counterclockwise when viewed from the stern Aluminum jet thrust nozzle RiDE system c Electrical Electronic control throttle valve system In tank fuel pump module Multifunction meter L MODE OTS Self diagnos...

Страница 25: ...comparison table Equipped Not equipped Model VXS VXR Total length 3 34 m 131 5 in 3 35 m 131 9 in Width 1220 mm 48 0 in Dry weight 347 kg 765 lb 348 kg 767 lb Reboarding step 1 Front seat 2 Normal seat Cruiser seat A B 2 2 1 A VXS B VXR ...

Страница 26: ...n timing fuel injection timing and vol ume opening angle of the ETV and fail safe function with in formation received from the sensors and switches 5 Thermo sensor Detects the temperature of the exhaust cooling water 6 Oil pressure switch Detects the pressure of the engine oil 7 Thermo switch Detects engine overheating 8 Intake air temperature sen sor Detects the temperature of the intake air 9 In...

Страница 27: ...1 22 Technical tips 13 APS Detects the opening angle of the throttle lever 14 Steering sensor Detects when the handlebar is turned all the way to the right or left Part name Function ...

Страница 28: ...play the trim angle on the multifunction meter The shift function transfers the RiDE lever opening angle into electric signals and then delivers the sig nals to the ECM The ECM controls the engine based on the RiDE lever signals shift position and en gine status and sends a shift request to the RiDE motor When changing the shift the reverse gate operates after the engine speed has dropped and the ...

Страница 29: ...sed on signals transmitted by each sensor and switch and sends signals to SCU Sends information on shift position and trim position to the multifunction meter 5 RiDE motor An assembly that incorporates SCU shift motor SPS trim mo tor and trim position sensor 6 SCU Shift control Transmits a shift position signal to the ECM and drives the shift motor based on the shift request from the ECM Trim cont...

Страница 30: ...er of parts used thereby improving throttle response and serviceability The throttle lever has 2 sensors as per the previous APS the APS 1 and APS 2 which mutually diag nose any failures each system may encounter The APS full close switch detects the fully closed throttle lever position A 3 B 1 2 4 5 6 4 5 APS 1 APS 2 b Ground 5 V b Ground 5 V b Ground APS 1 a APS full close switch 5 V 5 V b Groun...

Страница 31: ...ally adjusts the engine speed even while the throttle lever is being held in position preventing sudden acceleration or sudden shift changes The shift control is also equipped with a learning function that automatically corrects the shift position The learning function corrects the shift position through being connected to the YDIS from an early stage moving the reverse gate from the F position to...

Страница 32: ...Technical tips 1 27 Trolling Neutral Neutral Reverse Engine stopped Condition Lever Reverse gate ...

Страница 33: ...gine speed ex ceeds 4500 r min Opening angle of the ETV is regulated Maximum engine speed is limited to approximately 3000 3300 r min Cancel Stop the engine and wait for 30 seconds or more Engine is restarted and the oil pressure switch is off If the engine is stopped during oil pressure warn ing control it can be re started Cam position sensor failure control Control is activated when the followi...

Страница 34: ...ondi tion Action Normal None Level 1 Ignition is cut off to 1 cylinder Level 2 Ignition is cut off to 2 cylinders Level 3 Ignition is cut off to 3 cylinders Level 4 Ignition is cut off to all cylinders Slant detec tion control Control is activated when all of the follow ing conditions are present Slant detection switch is on Engine speed is 3000 r min or less Ignition and fuel injection are cut to...

Страница 35: ...en all of the follow ing conditions are present Engine speed ex ceeds 6000 r min for a few seconds or more Throttle lever is at the fully closed posi tion Steering sensor is ON Engine speed is increased to approximately 3500 r min for a few seconds Item Condition Action Remarks ...

Страница 36: ...r seating surfaces are wide for passenger comfort c The height of the footwell floor makes it easy for the riders to grip the watercraft using their knees d The hull width provides a feeling of stability e The short strakes provide good turning performance f The shape and position of the handgrip make it easy for the passenger to grasp the handgrip g The reboarding step makes reboarding easy h The...

Страница 37: ...pump ASSY The blowby gas from the cylinder head cover is sent directly to the oil separator tank A 1 2 3 4 5 6 B 7 8 9 10 11 12 13 1 Intake camshaft 2 Exhaust camshaft 3 Cylinder block 4 Crankshaft 5 Oil separator tank 6 Oil pan 7 Oil strainer 8 Oil pipe 9 Oil pump 10 Relief valve 11 Oil cooler ASSY 12 Oil filter 13 Oil pump drive gear A To air intake pipe B Oil flow ...

Страница 38: ... F C A From flushing hose connector B From transom plate C To cooling water pilot outlet D To drain joint transom plate E To drain joint F For water draining when engine is stopped G Cooling water flow H Blowby gas flow I Bilge water flow J Fuel flow ...

Страница 39: ...s Cooling water flow A D E B F C G A From flushing hose connector B From transom plate C To cooling water pilot outlet D To drain joint E To exhaust valve F For water draining when engine is stopped G Cooling water flow ...

Страница 40: ...Technical tips 1 35 MEMO ...

Страница 41: ...hnical data 2 7 Jet pump unit 2 7 Electrical technical data 2 8 Ignition system 2 8 Charging system 2 8 Control system 2 8 Fuel system 2 10 Starting system 2 10 Meter system 2 11 Specified tightening torque 2 12 Torque wrench reading setting value 2 12 General tightening torque 2 12 Cable and hose routing 2 13 Starboard bow view 2 13 Top view 2 14 Port view 2 16 Coupler layout 2 17 ...

Страница 42: ...e Liquid cooled 4 stroke DOHC Number of cylinders 4 Engine displacement 1812 cm Bore stroke 86 0 78 0 mm 3 39 3 07 in Compression ratio 11 0 1 Exhaust system Wet exhaust Lubrication system Wet sump Cooling system Water Starting system Electric Camshaft drive system Chain drive Timing chain tensioning system Automatic Ignition system T C I Ignition timing BTDC25 0 Spark plug NGK LFR6A Spark plug ga...

Страница 43: ...e oil YAMALUBE 4W or 4 stroke motor oil Recommended engine oil grade API API SE SF SG SH SJ SL Recommended engine oil type SAE SAE 10W 30 10W 40 20W 40 20W 50 Engine oil total quantity 5 3 L 5 60 US qt 4 66 Imp qt Engine oil quantity without oil filter replacement 3 5 L 3 70 US qt 3 08 Imp qt Engine oil quantity with oil filter replacement 3 6 L 3 81 US qt 3 17 Imp qt Battery requirement Type Flui...

Страница 44: ...chnical data Fuel system technical data Fuel system Throttle body Manufacturer Mikuni Type quantity F1 IM60 11 1 ID mark 6BH 00 Fuel pump Pump type Electrical Fuel pressure 345 0 355 0 kPa 3 45 3 55 kgf cm 50 0 51 5 psi ...

Страница 45: ...0 9835 in Journal oil clearance 0 020 0 061 mm 0 0008 0 0024 in Limit 0 08 mm 0 0032 in Valve clearance Valve clearance intake cold 0 14 0 23 mm 0 0055 0 0091 in Valve clearance exhaust cold 0 28 0 37 mm 0 0110 0 0146 in Valve Head diameter intake 33 900 34 100 mm 1 3346 1 3425 in Head diameter exhaust 28 900 29 100 mm 1 1378 1 1457 in Face width intake 2 260 2 830 mm 0 0890 0 1114 in Face width e...

Страница 46: ...86 015 mm 3 3858 3 3864 in Limit 86 100 mm 3 3898 in Taper limit 0 080 mm 0 0032 in Out of round limit 0 050 mm 0 0020 in Piston Diameter 85 915 85 930 mm 3 3825 3 3831 in Measuring point 9 5 mm 0 37 in Piston clearance 0 080 0 090 mm 0 0032 0 0035 in Limit 0 200 mm 0 0079 in Ring groove Top ring 1 210 1 230 mm 0 0476 0 0484 in Ring groove 2nd ring 1 210 1 230 mm 0 0476 0 0484 in Ring groove Oil r...

Страница 47: ...nnecting rod Small end inside diameter 22 015 22 028 mm 0 8667 0 8672 in Bearing color code 1 Blue 2 Black 3 Brown 4 Green Big end side clearance 0 160 0 262 mm 0 0063 0 0103 in Limit 0 50 mm 0 0197 in Big end width 26 788 26 840 mm 1 0546 1 0567 in Crankshaft pin width 27 000 27 050 mm 1 0630 1 0650 in Crankshaft Journal diameter 39 976 40 000 mm 1 5739 1 5748 in Pin diameter 41 976 42 000 mm 1 6...

Страница 48: ...35 155 45 mm 6 116 6 120 in Limit 156 45 mm 6 1594 in Impeller clearance 0 350 0 450 mm 0 0138 0 0177 in Limit 0 60 mm 0 0236 in Impeller Material Stainless steel Diameter 155 mm 6 10 in Number of impeller blade 3 Pitch angle 15 6 Drive shaft Runout limit 0 30 mm 0 0118 in Nozzle Diameter 86 6 87 2 mm 3 41 3 43 in ...

Страница 49: ...e data 21 5 V Resistance 459 0 561 0 Ω Ignition coil Input voltage 12 V battery voltage Charging system Stator coil Output peak voltage at cranking unloaded reference data 8 3 V Output peak voltage at 2000 r min unloaded reference data 36 4 V Output peak voltage at 3500 r min unloaded reference data 64 7 V Resistance 0 27 0 40 Ω Rectifier regulator Output peak voltage at 2000 r min loaded referenc...

Страница 50: ...ening angle with the throttle lever fully closed 2 8 Throttle valve opening angle with the throttle lever fully open More than 70 Input voltage 4 75 5 25 V APS APS 1 output voltage with the throttle lever fully closed 0 68 0 74 V APS 2 output voltage with the throttle lever fully closed 0 68 0 74 V APS 1 output voltage with the throttle lever fully open 3 95 4 15 V APS 2 output voltage with the th...

Страница 51: ... voltage 12 V battery voltage Fuel system Fuel injector Input voltage 12 V battery voltage Resistance 11 5 12 5 Ω Fuel pump module Input voltage 12 V battery voltage Fuel sender Lower position resistance 133 5 136 5 Ω Upper position resistance 5 0 7 0 Ω Starting system Fuse SCU 50 A Battery 12 V 30 A Main relay 12 V 20 A Fuel pump relay 12 V 10 A ETV relay 12 V 10 A Remote control receiver 3 A Sta...

Страница 52: ...16 Rating 3 V Remote control receiver Input voltage 12 V battery voltage Output voltage 11 12 V Multifunction meter unit Input voltage 12 V battery voltage Buzzer Input voltage 11 12 V Speed sensor Output voltage dependant on the paddle wheel position Less than 400 mV More than 11 6 V ...

Страница 53: ...e wrench use the following calculation formula to obtain the correct setting value When tightening bolts nuts or parts using an extension to the torque wrench do not set the torque wrench to the specified tight ening torque If an extension is attached to the torque wrench the actual tightening torque will be greater than the setting value on the torque wrench Torque wrench setting value T A m B m ...

Страница 54: ...andlebar switch lead left 6 Fuel tank breather hose fuel tank to water separator 7 Buzzer lead 8 Steering sensor lead 9 Cooling water pilot outlet hose 10 Remote control receiver antenna 11 Remote control receiver lead 12 Fuel tank breather hose water separator to ventilation socket 13 Steering cable 14 Wire harness 15 Speed sensor lead 16 Negative battery lead 17 Positive battery lead ...

Страница 55: ... hose routing 2 14 Top view I I G G B B J J F H H A A E E C C D D 1 2 11 16 17 3 5 6 C F B 10 10 10 5 3 7 3 8 9 7 6 7 6 11 12 16 17 13 10 4 13 14 12 4 A 14 A A B B E E E E E E H H H H I I E E G G J J C C D D 15 ...

Страница 56: ...ead 9 Positive battery lead 10 RiDE motor lead 11 Fuel tank breather hose fuel tank to water separator 12 RPS lead 13 Handlebar switch lead left 14 Trim switch lead 15 Cooling water pilot outlet hose 16 Buzzer lead 17 Steering sensor lead A Route the remote control receiver antenna under the ventilation hose B Fasten the RiDE motor lead at the yellow tape using the hook C Fasten the RiDE motor lea...

Страница 57: ...a 2 Steering sensor lead 3 Buzzer lead 4 Fuel tank breather hose fuel tank to water separator 5 Steering cable 6 Negative battery lead 7 Positive battery lead 8 RiDE motor lead 9 Speed sensor lead 10 Wire harness 11 Fuel tank breather hose water separator to ventilation socket 12 Cooling water pilot outlet hose 13 Remote control receiver lead ...

Страница 58: ...r coupler black 5 Buzzer coupler black 6 Buzzer LED coupler white 7 Communication coupler gray 8 Speed sensor coupler white 9 Fuel sender coupler black 10 Entry box coupler black 11 Engine stop switch coupler black 12 Engine start switch coupler white A Fasten the wire harness using the plastic tie making sure to align the tie with the tape on the harness ...

Страница 59: ...ousing lubrication 3 5 Spark plug check 3 5 Battery and battery lead check 3 6 Steering master check 3 7 Steering cable check 3 7 Trim rod check 3 8 Shift rod and reverse gate check 3 8 Air intake hose check 3 9 Throttle valve lubrication 3 9 Exhaust system check 3 10 Breather hose check 3 10 Impeller check 3 10 Jet thrust nozzle check 3 10 Jet vacuum bilge draining system check 3 10 Drain plug ch...

Страница 60: ...k Check installation and straps 3 3 Water inlet strain er Check for clogs and damage 3 3 Cooling water hos es Check for damage and leakage and check clamps 3 3 Engine oil Replace 3 4 Oil filter Replace 3 5 Intermediate housing Lubricate 3 5 Spark plugs Check 3 5 Battery Check specific gravi ty of electrolyte ter minals bands and breather hose 3 6 Battery leads Check terminals 3 6 Steering master C...

Страница 61: ...ement and lubricate 3 10 Jet vacuum bilge Check hoses for clogs and damage check clamps and clean bilge strainer 3 10 Stern drain plugs Check O rings 3 11 Anode Check for corrosion and clean 2 3 11 Valve clearance Check and adjust 2 3 11 Rubber coupling Check for cracks in dentations loose ness and noise 3 13 Engine mount Check for damage and peeling 3 13 Item Operation Initial Thereafter every Se...

Страница 62: ...cap is fully tightened Replace the fuel filler cap if there is no click sound 3 Check the water separator 1 Drain the water if water has accumulated 4 Check the O ring 2 of the drain plug 3 Replace the O ring if cracked or damaged TIP To drain water from the water separator 1 loosen the drain plug 3 Fuel tank check 1 Check that the fuel tank is secured using the straps Replace the straps if they a...

Страница 63: ... below the minimum level mark remove the oil filler cap 1 and then add sufficient oil of the recommended type to raise it to the correct level 5 If the engine oil is above the maximum lev el mark extract oil using an oil changer to lower it to the correct level 6 Install the oil filler cap 1 Engine oil replacement Be careful when handling the engine oil to avoid burns The engine oil is hot immedi ...

Страница 64: ...oil level check 3 4 Intermediate housing lubrication 1 Lubricate the intermediate housing through the grease nipple 1 Spark plug check 1 Remove the spark plugs Recommended engine oil YAMALUBE 4W or 4 stroke motor oil Recommended engine oil grade API API SE SF SG SH SJ SL Recommended engine oil type SAE SAE 10W 30 10W 40 20W 40 20W 50 Engine oil quantity without oil filter re placement 3 5 L 3 70 U...

Страница 65: ... Flush with water for 15 minutes and get prompt medical attention Batteries produce explosive gases Keep sparks flame cigarettes etc well away If using or charging the battery in an en closed space make sure that it is well ven tilated Always shield your eyes when working near batteries KEEP OUT OF THE REACH OF CHILDREN Be careful not to place the battery on its side Make sure to remove the batter...

Страница 66: ...e battery lead 3 and then connect the negative battery lead 4 Connect the positive battery lead to the bat tery terminal first TIP Apply water resistant grease to the terminals to minimize corrosion Steering master check 1 Turn the handlebar lock to lock and push it back and forth 2 Check for excessive play of the handlebar Check the bushings bolts and nuts if there is excessive play See Steering ...

Страница 67: ...ease 3 Connect the trim rod joints to the ball joints 4 Check the trim rod for rod end disconnec tion and check the locknut for looseness 5 Rise the reverse gate 1 and then con nect the shift rod joint 2 Shift rod and reverse gate check 1 Check the reverse gate Replace if cracked or damaged 2 Check that the reverse gate 1 is in con tact with the reverse gate stopper a at the F position 3 Connect t...

Страница 68: ...itial learning See the YDIS In struction Manual 8 Disconnect the shift rod joint 1 and then lower the reverse gate 2 9 Disconnect the shift rod joint and apply a small amount of grease 10 Check the shift rod for rod end disconnec tion and check the locknut for looseness 11 Connect the shift rod joint to the shift arm 12 Rise the reverse gate 1 and then con nect the shift rod joint 2 Air intake hos...

Страница 69: ...routing and the clamps See Cable and hose routing 2 13 Impeller check Make sure to remove the battery before checking the jet pump unit 1 Check the impeller from the jet intake side Clean if there is foreign material 2 Check the impeller Replace if bent or damaged See Jet pump unit removal 6 3 Jet thrust nozzle check 1 Disconnect the trim rod and steering cable 2 Remove the jet thrust nozzle and n...

Страница 70: ... the hose joint Replace the hose joint if it is open or dam aged 9 Connect the bilge hoses and hose joint 10 Check the bilge hose routing and the clamps Drain plug check 1 Check the O ring 1 of drain plug 2 Re place if cracked or damaged Anode check 1 Remove the cover and anode 2 Check the anode 1 Clean if there is oil or water stain 3 Check the anode for erosion Replace if it is half the original...

Страница 71: ...ble 5 Install the special service tools into spark plug hole 4 6 Position piston 4 at TDC by turning the exhaust camshaft sprocket 180 clock wise Gauge stand 1 90890 06725 Dial gauge needle 2 90890 06584 Dial gauge stand set 2 YB 06585 Dial gauge set 3 90890 01252 Dial indicator gauge 3 YU 03097 1 3 2 1 Camshaft wrench 1 90890 06724 Camshaft wrench 1 YW 06724 Valve clearance intake cold 0 14 0 23 ...

Страница 72: ... Install the cylinder head cover spark plugs and ignition coils See Cylinder head cover 5 31 Rubber coupling check 1 Remove the coupling cover 1 2 Apply force in the directions of the arrow to check that there is no rattling If there is rat tling remove the engine unit and check the rubber coupling See Engine unit remov al 5 7 Engine mount check 1 Check the engine mount Replace if there is damage ...

Страница 73: ...TV and fuel injector 4 6 ETV check 4 7 Fuel injector check 4 7 Fuel rail and injector installation 4 7 Fuel tank and fuel pump module 4 9 Fuel tank removal 4 11 Fuel pump module removal 4 12 Fuel sender removal 4 12 Fuel pump module check 4 12 Check valve check 4 12 Fuel filler cap check 4 13 Fuel sender installation 4 13 Fuel pump module installation 4 13 Fuel tank installation 4 14 ...

Страница 74: ... hose ASSY 1 6 Clamp 4 Not reusable 7 Quick connector 2 8 Corrugated tube 1 9 Fuel hose 1 10 Clamp 1 11 Clamp 2 12 Air intake pipe 1 13 Connection 1 14 Bolt 4 M8 35 mm 15 Air filter case 1 16 Hook 8 1 12 13 10 17 16 20 21 24 23 25 22 18 15 14 19 11 11 7 7 4 6 6 5 8 9 3 2 13 Nm 1 3 kgf m 9 6 ft Ib 17 Nm 1 7 kgf m 12 5 ft Ib 3 5 Nm 0 35 kgf m 2 58 ft lb ...

Страница 75: ...t 1 19 Drain tube 1 20 Collar 4 21 Grommet 4 22 Plastic tie 1 23 Nut 4 24 Washer 4 25 Bracket 1 No Part name Q ty Remarks 1 12 13 10 17 16 20 21 24 23 25 22 18 15 14 19 11 11 7 7 4 6 6 5 8 9 3 2 13 Nm 1 3 kgf m 9 6 ft Ib 17 Nm 1 7 kgf m 12 5 ft Ib 3 5 Nm 0 35 kgf m 2 58 ft lb ...

Страница 76: ...urized fuel could spray out TIP Make sure to clean up any fuel spills 3 Cover the quick connector fuel rail and fuel pipe using plastic bags 1 to protect them from dirt Fuel pressure measurement 1 Disconnect the quick connector from the fuel rail 2 Install the special service tools 1 and 2 3 Start the engine and warm it up for 5 min utes or more at engine idle speed a 1 A Worldwide B U S A and Can...

Страница 77: ... ter element 2 Check the air filter element Replace if damaged or dirty Fuel hose assembly Do not reuse a clamp always replace it with a new one Otherwise fuel could leak 1 Install new clamps 1 and the quick con nector 2 onto the fuel hose 3 TIP Make sure to face the locking slider a on each quick connector in the same direction 2 Crimp the clamps 1 TIP Make sure to align the projection a on the q...

Страница 78: ...4 5 Air filter case and fuel hose Distance b 17 mm 0 67 in Distance c 34 5 mm 1 36 in Distance d 1 mm 0 04 in d 1 1 b c a ...

Страница 79: ...1 Not reusable 5 Bolt 4 M8 25 mm 6 Joint 1 7 Gasket 1 Not reusable 8 Ribbon 1 9 Holder 1 10 Wire harness 1 11 Bolt 3 M8 30 mm 12 Fuel rail 1 13 Fuel injector 4 14 O ring 4 Not reusable 15 Seal 4 Not reusable E 2 7 3 5 4 6 14 13 15 12 11 10 1 9 1 A A 9 8 13 Nm 1 3 kgf m 9 6 ft Ib 24 Nm 2 4 kgf m 17 7 ft Ib LT 242 LT 242 LT 242 ...

Страница 80: ...nd injector installation 1 Install new O rings 1 onto the fuel injec tors and then apply a thin coat of engine oil to the O rings 1 2 While turning the fuel injectors 1 slowly to the left and right install them to the fuel rail 2 Make sure to apply a thin coat of engine oil to the O rings before installing the fuel in jectors to the fuel rail Otherwise the O rings could twist and break causing fue...

Страница 81: ...ire harness and then connect the cam position sensor coupler a fuel injector couplers b and ignition coil cou plers c 5 Fasten the wire harness using the plastic ties 1 Fuel rail bolt 3 13 Nm 1 3 kgf m 9 6 ft lb 2 3 3 1 LT 242 1 1 c c b b a ...

Страница 82: ...ller neck 1 8 Packing 1 Not reusable 9 Fuel filler cap 1 10 Packing 1 Not reusable 11 Screw 1 6 1 2 12 Strap 2 13 Fuel tank 1 14 Pad 1 Not reusable 15 Pad 2 Not reusable 16 Pad 2 Not reusable 7 6 4 4 5 8 13 14 15 17 17 16 16 2 1 3 2 1 9 11 10 12 18 20 20 20 19 19 19 19 28 21 22 27 26 24 23 25 6 Nm 0 6 kgf m 4 4 ft Ib 3 5 Nm 0 35 kgf m 2 58 ft lb 3 5 Nm 0 35 kgf m 2 58 ft lb 7 Nm 0 7 kgf m 5 2 ft I...

Страница 83: ... coupler 1 23 Nut 9 24 Retainer 1 25 Fuel pump module 1 26 Stopper 1 27 Fuel sender 1 28 Packing 1 Not reusable No Part name Q ty Remarks 7 6 4 4 5 8 13 14 15 17 17 16 16 2 1 3 2 1 9 11 10 12 18 20 20 20 19 19 19 19 28 21 22 27 26 24 23 25 6 Nm 0 6 kgf m 4 4 ft Ib 3 5 Nm 0 35 kgf m 2 58 ft lb 3 5 Nm 0 35 kgf m 2 58 ft lb 7 Nm 0 7 kgf m 5 2 ft Ib ...

Страница 84: ...ilter case and fuel hose 4 1 3 Remove the engine unit See Engine unit removal 5 7 4 Remove the plastic ties 1 fuel tank breather hoses 2 and check valve 3 5 Disconnect the fuel sender coupler a and fuel pump module coupler b 6 Remove the clamps 1 and fuel filler hose 2 7 Remove the nut 1 and then remove the fuel filler neck 2 packing 3 and fuel fill er cap 4 8 Remove the straps 1 and then remove t...

Страница 85: ... the tabs a on the fuel sender 1 and then slide the sender in direction b to remove it Fuel pump module check Do not disassemble the fuel pump module 1 Check the fuel pump module 1 Replace if cracked or damaged 2 Check the fuel pump filter a Clean with kerosene or gasoline if clogged or contam inated Check valve check 1 Blow into the end a of the check valve and make sure that airflow from the end...

Страница 86: ...he slots b in the fuel pump module 2 Install the stopper 1 and then connect the fuel sender coupler a TIP Make sure that the hooks b on the stopper 1 are securely hooked onto the fuel pump mod ule Fuel pump module installation 1 Install a new packing and the fuel pump module 1 When installing the fuel pump module make sure that the rubber caps do not come off TIP Make sure to insert the float a in...

Страница 87: ...nnector 1 disconnect the fuel hose and check the O rings for dam age and proper installation 7 Install the service lid See Front hood 8 6 Fuel tank installation 1 Install the fuel tank 1 and then fasten the fuel tank using the straps 2 TIP Install the straps 2 so that the rubber band portions a of the straps are positioned on top Make sure that the metal loops b on the end of the straps 2 are hook...

Страница 88: ...el pump module coupler b 7 Install the fuel tank breather hoses 1 and check valve 2 8 Fasten the fuel tank breather hoses 1 us ing new plastic ties 3 TIP Point the arrow mark c toward the fuel tank 9 Install the engine unit See Engine unit in stallation 5 10 10 Install the air filter case bracket and air fil ter case See Air filter case and fuel hose 4 1 Fuel filler neck nut 4 6 Nm 0 6 kgf m 4 4 f...

Страница 89: ...xhaust pipe disassembly 5 17 Exhaust pipe assembly 5 17 Wire harness 5 18 Electrical box 5 19 Starter motor and wire harness removal 5 21 Thermostat check 5 21 Wire harness and starter motor installation 5 22 Intake manifold 5 24 Oil level pipe installation 5 26 Intake manifold installation 5 26 Oil cooler oil pump and drive gear 5 27 Oil pump and oil pump drive gear removal 5 29 Oil cooler check ...

Страница 90: ...mbly 5 47 Cylinder head check 5 47 Valve spring check 5 47 Valve check 5 48 Valve guide check 5 49 Valve guide removal 5 49 Valve guide installation 5 49 Valve seat check 5 50 Valve seat refacing 5 51 Cylinder head assembly 5 53 Cylinder head installation 5 54 Generator cover ASSY and flywheel magneto 5 55 Generator cover 5 57 Drive coupling removal 5 58 Flywheel magneto removal 5 58 Generator cov...

Страница 91: ...moval 5 75 Crankcase check 5 75 Cylinder block check 5 76 Piston check 5 76 Piston clearance check 5 76 Piston ring check 5 76 Piston pin check 5 78 Connecting rod check 5 78 Crankshaft check 5 78 Crankshaft pin oil clearance check 5 79 Connecting rod big end side clearance check 5 80 Connecting rod bearing selection 5 81 Crankshaft journal oil clearance check 5 81 Crankshaft bearing selection 5 8...

Страница 92: ...tabilizes 8 Measure the compression pressure for all cylinders according to steps 6 and 7 TIP Measuring conditions Ambient temperature 20 C 68 F with spark plugs removed from all cylinders The figures are for reference only 9 If the compression pressure is below spec ification squirt a few drops of engine oil into the cylinder and measure again 10 Install the spark plugs and then tighten them to t...

Страница 93: ...art name Q ty Remarks 1 Screw 2 M6 12 mm 2 Grommet 2 3 Engine cover 1 4 Clamp 1 5 Antenna holder 3 6 Plastic tie 7 7 Clamp 1 8 Clamp 1 9 Plastic tie 1 10 RiDE motor coupler 2 4 1 2 3 1 2 5 5 6 6 8 9 10 7 6 6 6 5 Nm 0 5 kgf m 3 7 ft Ib ...

Страница 94: ...21 26 20 23 25 14 13 13 14 24 10 8 7 7 22 23 5 9 7 7 19 15 16 11 11 12 17 12 2 1 LT 572 LT 572 LT 572 LT 242 LT 242 LT 242 LT 242 13 Nm 1 3 kgf m 9 6 ft Ib 13 Nm 1 3 kgf m 9 6 ft Ib 26 Nm 2 6 kgf m 19 2 ft Ib 23 Nm 2 3 kgf m 17 0 ft lb 42 Nm 4 2 kgf m 31 0 ft lb 1 2 23 Nm 2 3 kgf m 17 0 ft lb 42 Nm 4 2 kgf m 31 0 ft lb 1 2 20 Nm 2 0 kgf m 14 8 ft lb 20 Nm 2 0 kgf m 14 8 ft lb 1 2 35 Nm 3 5 kgf m 2...

Страница 95: ... 12 17 12 2 1 LT 572 LT 572 LT 572 LT 242 LT 242 LT 242 LT 242 13 Nm 1 3 kgf m 9 6 ft Ib 13 Nm 1 3 kgf m 9 6 ft Ib 26 Nm 2 6 kgf m 19 2 ft Ib 23 Nm 2 3 kgf m 17 0 ft lb 42 Nm 4 2 kgf m 31 0 ft lb 1 2 23 Nm 2 3 kgf m 17 0 ft lb 42 Nm 4 2 kgf m 31 0 ft lb 1 2 20 Nm 2 0 kgf m 14 8 ft lb 20 Nm 2 0 kgf m 14 8 ft lb 1 2 35 Nm 3 5 kgf m 25 8 ft lb 3 20 Nm 2 0 kgf m 14 8 ft lb 20 Nm 2 0 kgf m 14 8 ft lb 1...

Страница 96: ...gine unit and coupling cover No Part name Q ty Remarks 1 Bolt 4 M8 28 mm 2 Bolt 1 M6 25 mm 3 Collar 1 4 Coupling cover 1 5 Bolt 4 M8 37 mm 6 Shim As required 6 6 6 6 5 5 2 3 4 1 1 1 5 5 17 Nm 1 7 kgf m 12 5 ft Ib 17 Nm 1 7 kgf m 12 5 ft Ib ...

Страница 97: ...t No Part name Q ty Remarks 1 Bolt 8 M8 35 mm 2 Engine mount 4 3 Liner 4 4 Bolt 2 M6 21 mm 5 Spacer 1 6 Bolt 2 M6 18 mm 7 Spacer 1 LT 572 BOW 2 1 2 1 4 1 2 1 2 7 3 3 3 3 5 6 5 5 Nm 0 55 kgf m 4 06 ft lb 17 Nm 1 7 kgf m 12 5 ft Ib ...

Страница 98: ...move the engine cover 1 6 Remove the oil level gauge 1 7 Remove the plastic tie 2 and then dis connect the quick connector 3 from the fuel rail See Fuel hose disconnection 4 3 8 Remove the breather hose 1 air intake pipe 2 air filter case cover 3 air filter and air filter case 4 9 Remove the antenna holders 1 10 Disconnect the remote control receiver coupler a 11 Remove the wire harness from the p...

Страница 99: ...emove the plastic tie 2 and then dis connect the RiDE motor couplers a and b 19 Place a rag under the oil filter 1 and then remove the oil filter 1 TIP Make sure to clean up any oil spills 20 Remove the plastic tie 1 and then dis connect the thermo sensor coupler a 21 Disconnect the cooling water hoses 1 2 and 3 22 Remove the rectifier regulator 4 a 1 1 a 1 1 1 1 1 Oil filter wrench 2 90890 06830 ...

Страница 100: ...d separate it from the water lock 27 Remove the electrical box 1 28 Remove the coupling cover 1 29 Loosen the engine mounting bolts 1 30 Lift the engine unit slightly remove the shims 2 and then lower the unit 31 Remove the engine mounting bolts 1 TIP Write down the position of each removed shim 2 so that it can be installed in its original posi tion 1 2 4 3 1 3 2 1 1 1 1 1 2 1 2 ...

Страница 101: ...place if cracked or damaged TIP Write down the position of each engine mount so that it can be installed in its original position When replacing the engine mounts make sure to check the coupling clearance Engine unit installation When installing the engine unit take care to avoid causing damage to the hull liner and deck opening 1 Suspend the engine unit using all 3 engine hangers 2 Lower the fron...

Страница 102: ... so that the clearances are within specification 9 Lift the engine unit slightly remove the shims and then lower the engine unit 10 Remove the engine mounting bolts 11 Separate the engine unit from the engine mounts and move it forward to disconnect the coupling 12 Install the rubber coupling 1 13 Install the shims and then adjust the posi tion of the engine unit so that the coupling clearances a ...

Страница 103: ...torques in 3 stages and in the order 1 2 and so on 18 Tighten the clamp 1 to the specified torque TIP Make sure that the pipe on the end of the muf fler is installed securely into the water lock Clearance a Less than 0 5 mm 0 020 in with rubber coupling Clearance b 2 4 mm 0 079 0 157 in Engine mounting bolt 1 17 Nm 1 7 kgf m 12 5 ft lb a b 1 1 1 Electrical box bolt 2 17 Nm 1 7 kgf m 12 5 ft lb Exh...

Страница 104: ...ing the plastic tie 1 25 Install the oil filter 1 and then tighten it to the specified torque 26 Connect the RiDE motor couplers a and b and then fasten the RiDE motor lead using the plastic tie 1 27 Connect the cooling water hose 2 and then fasten it using the clamp 3 28 Connect the cooling water hose 1 and then fasten it using the clamp 2 Clamp 1 2 5 Nm 0 25 kgf m 1 84 ft lb Stay bolt 2 and 3 1s...

Страница 105: ...Install the air filter case 1 and then tight en the air filter case bolts 2 to the speci fied torque 36 Install the air filter air filter case cover 3 and air intake pipe 4 and then tighten the air intake pipe clamps 5 to the specified torque 37 Install the breather hose 6 and then fas ten it using the clamp 7 38 Connect the quick connector 1 to the fuel rail and then install the plastic tie 3 39 ...

Страница 106: ...d then tighten the deck beam nuts 2 to the specified torque 42 Install the service lid 1 43 Fill the engine with engine oil See Engine oil replacement 3 4 44 Connect the positive battery lead and then connect the negative battery lead Engine cover screw 2 5 Nm 0 5 kgf m 3 7 ft lb Deck beam nut 2 16 Nm 1 6 kgf m 11 8 ft lb 2 3 1 2 1 1 2 LT 271 1 ...

Страница 107: ...20 mm 12 Exhaust pipe 1 13 Gasket 1 Not reusable 14 Dowel pin 2 15 Exhaust manifold 1 20 Nm 2 0 kgf m 14 8 ft lb 29 Nm 2 9 kgf m 21 4 ft lb 15 Nm 1 5 kgf m 11 1 ft lb 1 2 7 7 11 10 14 15 13 12 4 5 3 9 6 8 200 Nm 20 0 kgf m 147 5 ft lb 2 5 Nm 0 25 kgf m 2 58 ft lb 20 Nm 2 0 kgf m 14 8 ft lb 20 Nm 2 0 kgf m 14 8 ft lb 35 Nm 3 5 kgf m 25 8 ft lb 20 Nm 2 0 kgf m 14 8 ft lb 20 Nm 2 0 kgf m 14 8 ft lb 3...

Страница 108: ... a heat gun Exhaust pipe assembly 1 Install the exhaust pipe 1 and then tight en it to the specified torque To allow the LOCTITE 648 to set wait ap proximately 1 hour after completing this procedure Exhaust pipe wrench 2 90890 06726 Exhaust pipe wrench 2 YW 06726 1 2 a Exhaust pipe wrench 2 90890 06726 Exhaust pipe wrench 2 YW 06726 Exhaust pipe 1 200 Nm 20 0 kgf m 147 5 ft lb 15 15 15 15 1 2 ...

Страница 109: ...Bolt 2 M8 30 mm 4 Negative battery lead 1 5 Starter motor 1 6 Bolt 2 M6 35 mm 7 Thermostat housing 1 8 Thermostat 1 a Hole 9 Holder 1 10 Grommet 1 11 Plastic tie 1 12 Plastic tie 5 13 Plastic tie 1 14 Wire harness 1 8 2 1 3 4 14 13 5 7 6 UP 8 A A 3 9 10 12 7 Nm 0 7 kgf m 5 2 ft lb a 11 ...

Страница 110: ...10 A 10 Fuse 2 20 A 11 Fuse 2 30 A 12 Fuse 2 50 A 13 Relay 4 Main fuel pump ETV SCU 14 Fuse puller 1 15 Bolt 2 M6 14 mm 16 Stay 1 5 6 4 Nm 0 4 kgf m 3 0 ft lb 20 19 18 27 4 3 1 2 2 5 Nm 0 5 kgf m 3 7 ft lb 5 Nm 0 5 kgf m 3 7 ft lb 5 Nm 0 5 kgf m 3 7 ft lb 5 Nm 0 5 kgf m 3 7 ft lb 25 26 24 23 22 21 5 Nm 0 5 kgf m 3 7 ft lb 5 6 7 3 14 13 11 10 11 10 9 8 9 9 13 12 13 12 17 15 15 16 21 SG ...

Страница 111: ...d 1 24 Starter relay 1 25 Bolt 2 M6 12 mm 26 Holder 1 27 Electrical box 1 No Part name Q ty Remarks 5 6 4 Nm 0 4 kgf m 3 0 ft lb 20 19 18 27 4 3 1 2 2 5 Nm 0 5 kgf m 3 7 ft lb 5 Nm 0 5 kgf m 3 7 ft lb 5 Nm 0 5 kgf m 3 7 ft lb 5 Nm 0 5 kgf m 3 7 ft lb 25 26 24 23 22 21 5 Nm 0 5 kgf m 3 7 ft lb 5 6 7 3 14 13 11 10 11 10 9 8 9 9 13 12 13 12 17 15 15 16 21 SG ...

Страница 112: ...h plate cou plers a oil pressure switch coupler b and pickup coil coupler c 5 Remove the holder 3 6 Remove the plastic ties 1 and then dis connect the thermo switch coupler a en gine temperature sensor coupler b intake air pressure sensor coupler c in take air temperature sensor coupler d cam position sensor coupler e and ETV coupler f 7 Disconnect the ignition coil couplers a and fuel injector co...

Страница 113: ...ing the plastic ties 1 TIP Fasten the wire harness at the gray tape g us ing the plastic tie 3 Install the holder 1 and then connect the pickup coil coupler a oil pressure switch coupler b and earth plate couplers c 4 Install the grommet 2 to the stator coil lead and wire harness and then fasten the grommet 2 using the holder 3 5 Connect the RiDE motor couplers a ECM couplers b starter relay coupl...

Страница 114: ...6 Install the starter motor 1 and then con nect the negative battery lead 2 and starter motor lead 3 7 Tighten the starter motor lead nut 4 to the specified torque Starter motor lead nut 4 7 Nm 0 7 kgf m 5 2 ft lb 3 4 2 1 ...

Страница 115: ... 10 Grommet 1 11 Hose 1 12 Bolt 1 M8 16 mm 13 Oil level gauge 1 14 O ring 1 Not reusable 15 Bolt 2 M6 12 mm 16 Oil level pipe 1 A 1 6 5 5 10 9 2 8 7 11 4 3 14 13 12 15 17 18 19 20 16 6 LT 242 LT 572 LT 572 1322D 1322D 15 Nm 1 5 kgf m 11 1 ft Ib 16 Nm 1 6 kgf m 11 8 ft Ib 31 Nm 3 1 kgf m 22 9 ft Ib 1 2 16 Nm 1 6 kgf m 11 8 ft Ib 31 Nm 3 1 kgf m 22 9 ft Ib 1 2 10 Nm 1 0 kgf m 7 4 ft lb 20 Nm 2 0 kgf...

Страница 116: ...ks A 1 6 5 5 10 9 2 8 7 11 4 3 14 13 12 15 17 18 19 20 16 6 LT 242 LT 572 LT 572 1322D 1322D 15 Nm 1 5 kgf m 11 1 ft Ib 16 Nm 1 6 kgf m 11 8 ft Ib 31 Nm 3 1 kgf m 22 9 ft Ib 1 2 16 Nm 1 6 kgf m 11 8 ft Ib 31 Nm 3 1 kgf m 22 9 ft Ib 1 2 10 Nm 1 0 kgf m 7 4 ft lb 20 Nm 2 0 kgf m 14 8 ft lb 1 2 19 Nm 1 9 kgf m 14 0 ft Ib 4 ...

Страница 117: ... pipe plate bolts 1 5 Tighten the oil level pipe bolt 2 to the specified torque 6 Fasten the grommet 1 using the clamp 2 Intake manifold installation 1 Install the dowels 1 new gaskets 2 and the intake manifold a and then tighten the bolts 3 and nuts 4 to the specified torques in 2 stages and in the order 1 2 and so on Installation distance a reference data 51 0 mm 2 0 in Oil level pipe bolt 2 19 ...

Страница 118: ...g water hose 1 11 Clamp 1 12 Plastic tie 1 13 Cooling water hose 1 14 Bolt 1 M8 55 mm 15 Bolt 2 M8 70 mm 16 Oil cooler ASSY 1 E A A A LT 572 LT 572 LT 572 LT 572 LT 572 LT 572 6 5 4 8 7 7 6 22 17 18 17 17 18 17 22 24 24 13 11 12 23 21 15 20 19 15 19 14 16 3 2 1 19 10 9 9 25 11 Nm 1 1 kgf m 8 1 ft Ib 80 Nm 8 0 kgf m 59 0 ft Ib 19 Nm 1 9 kgf m 14 0 ft Ib 19 Nm 1 9 kgf m 14 0 ft Ib 12 Nm 1 2 kgf m 8 ...

Страница 119: ...er joint 1 No Part name Q ty Remarks E A A A LT 572 LT 572 LT 572 LT 572 LT 572 LT 572 6 5 4 8 7 7 6 22 17 18 17 17 18 17 22 24 24 13 11 12 23 21 15 20 19 15 19 14 16 3 2 1 19 10 9 9 25 11 Nm 1 1 kgf m 8 1 ft Ib 80 Nm 8 0 kgf m 59 0 ft Ib 19 Nm 1 9 kgf m 14 0 ft Ib 19 Nm 1 9 kgf m 14 0 ft Ib 12 Nm 1 2 kgf m 8 9 ft Ib 12 Nm 1 2 kgf m 8 9 ft Ib 20 Nm 2 0 kgf m 14 8 ft Ib 18 Nm 1 8 kgf m 13 3 ft Ib ...

Страница 120: ... rubber plugs 3 2 Apply the specified positive pressure and check that the pressure is maintained If the specified pressure cannot be main tained replace the oil cooler Oil pump check Do not disassemble the oil pump 1 Check that the oil pump driven gear turns smoothly Replace if the movement is rough Oil pump drive gear and oil pump installation 1 Install the oil pump drive gear 1 and then tighten...

Страница 121: ...h the feed port a TIP While turning the oil pump driven gear make sure to fill the oil pump with engine oil up to the brim of feed port 5 Install the dowels 1 a new gasket 2 and the oil pump 3 and then tighten the bolts 4 to the specified torque Oil pump drive gear bolt 1 80 Nm 8 0 kgf m 59 0 ft lb 1 a 4 3 2 1 1 LT 572 Oil pump bolt 4 11 Nm 1 1 kgf m 8 1 ft lb ...

Страница 122: ... 1 6 Bolt 8 M6 30 mm 7 Cylinder head cover 1 8 Gasket 1 Not reusable 9 Oil filler cap 1 10 O ring 1 Not reusable 11 Timing chain guide 1 12 Bolt 2 M6 25 mm 13 Collar 2 14 Grommet 2 10 Nm 1 0 kgf m 7 4 ft Ib 6 Nm 0 6 kgf m 4 4 ft Ib 25 Nm 2 5 kgf m 18 4 ft Ib 1 2 8 11 6 6 9 10 4 5 6 7 12 13 1 2 2 2 3 3 3 3 14 13 14 12 LT 572 LT 572 LT 572 LT 242 A A 1280B 1530D ...

Страница 123: ...m 9 Intake camshaft cap 1 10 Intake camshaft cap 2 11 Exhaust camshaft cap 1 12 Exhaust camshaft cap 2 13 Dowel pin 12 14 Intake camshaft 1 a Light blue paint 15 Exhaust camshaft 1 b Pink paint 16 Bolt 4 M7 11 mm 10 Nm 1 0 kgf m 7 4 ft lb 8 9 13 16 17 14 12 16 1 2 4 5 7 20 21 19 18 6 3 2 17 13 15 b 10 13 8 8 10 13 a 13 8 8 8 12 13 13 13 11 16 2 1 16 Nm 1 6 kgf m 11 8 ft Ib 20 Nm 2 0 kgf m 14 8 ft ...

Страница 124: ...g chain guide 1 Intake side 21 Timing chain 1 No Part name Q ty Remarks 10 Nm 1 0 kgf m 7 4 ft lb 8 9 13 16 17 14 12 16 1 2 4 5 7 20 21 19 18 6 3 2 17 13 15 b 10 13 8 8 10 13 a 13 8 8 8 12 13 13 13 11 16 2 1 16 Nm 1 6 kgf m 11 8 ft Ib 20 Nm 2 0 kgf m 14 8 ft Ib 21 Nm 2 1 kgf m 15 5 ft Ib ...

Страница 125: ... referring to the dial gauge to ensure that the piston has reached TDC TIP Make sure that the punch marks a on the camshafts are aligned with the marks b on the camshaft caps 3 Make marks a on the camshaft sprockets and camshafts 4 Remove the oil pipe 1 gaskets 2 timing chain tensioner 3 and gasket 4 Dial gauge set 1 90890 01252 Dial indicator gauge 1 YU 03097 Dial gauge needle 2 90890 06584 Dial ...

Страница 126: ...bolts 2 2 Remove the intake camshaft sprocket and exhaust camshaft sprocket Camshaft check 1 Check the camshaft lobes Replace if pit ted or scratched 2 Measure the cam lobe height a Replace if out of specification 3 Measure the camshaft journal diameter a 4 Measure the camshaft runout Replace if out of specification 1 3 2 2 4 IN EX 2 1 3 1 2 Camshaft wrench 1 90890 06724 Camshaft wrench 1 YW 06724...

Страница 127: ...P Do not put the Plastigauge over the oil hole in the camshaft journal 4 Install the dowel pins 1 intake camshaft caps 2 and 3 and exhaust camshaft caps 4 and 5 TIP When installing the camshaft caps make sure that the arrow marks a on the camshaft caps point toward the camshaft sprockets 5 Tighten the camshaft cap bolts 1 until camshaft caps contact the cylinder head in the order 1 2 and so on TIP...

Страница 128: ...ing chain tensioner rod a release the tensioner rod slowly until it is locked in place TIP Make sure that the timing chain tensioner rod a is locked in place before releasing the snap ring e 3 Push the timing chain tensioner rod slight ly Check that the snap ring releases the timing chain tensioner rod allowing the tensioner rod to pop out Camshaft sprocket installation 1 Install the exhaust camsh...

Страница 129: ...TDC See Camshaft removal 5 34 2 Install the valve pads 1 and valve lifters 2 in their original positions 3 Install the timing chain guide exhaust side 4 Install the exhaust camshaft 1 intake camshaft 2 and timing chain 3 TIP Make sure that the punch marks a on the camshafts are facing up Make sure that the exhaust side b of the timing chain is taut Camshaft wrench 1 90890 06724 Camshaft wrench 1 Y...

Страница 130: ...ghten the camshaft cap bolts 1 to the specified torque in the order 1 2 and so on 8 Align the punch marks a on the cam shafts with the marks b on the camshaft caps 9 While pushing the timing chain tensioner rod a turn the timing chain tensioner housing b in direction c until the groove d in the tensioner rod is aligned with the snap ring e EX IN b 3 3 2 1 1 1 1 1 1 5 5 4 R R IN IN IN EX EX EX L L ...

Страница 131: ...14 Tighten the oil pipe bolts 6 to the speci fied torque 15 Turn the drive coupling 1 counterclock wise 2 full turns and then check that the camshaft turns smoothly TIP Check that the portion a of the timing chain is taut If the timing chain is not taut turn the drive coupling 1 slightly clockwise and then check that the timing chain is taut again 16 Position piston 1 at TDC See Camshaft removal 5...

Страница 132: ...ve pad number from the Valve pad selection table 5 43 TIP The valve pads are available in 23 thickness es ranging from 1 20 mm to 2 30 mm in 0 05 mm increments 7 Install the selected valve pad 1 and valve lifter 2 8 Turn the valve lifter and check that it turns smoothly 9 Position piston 1 at TDC and then install the camshafts and camshaft caps See Camshaft installation 5 38 10 Measure the intake ...

Страница 133: ...Measure the intake and exhaust valve clearances of the specified cylinders Specified cylinder Not applicable Dial gauge set 1 90890 01252 Dial indicator gauge 1 YU 03097 Dial gauge needle 2 90890 06584 Dial gauge stand set 2 YB 06585 Gauge stand 3 90890 06725 Coupler wrench 2 90890 06729 Coupler wrench 2 YW 06729 1 2 3 4 IN EX 2 1 ...

Страница 134: ...200 205 210 215 220 225 230 0 27 0 31 130 135 140 145 150 155 160 165 170 175 180 185 190 195 200 205 210 215 220 225 230 0 32 0 36 135 140 145 150 155 160 165 170 175 180 185 190 195 200 205 210 215 220 225 230 0 37 0 41 140 145 150 155 160 165 170 175 180 185 190 195 200 205 210 215 220 225 230 0 42 0 46 145 150 155 160 165 170 175 180 185 190 195 200 205 210 215 220 225 230 0 47 0 51 150 155 16...

Страница 135: ...20 225 0 28 e c n a r a e l c d r a d n a t S 7 3 0 0 38 0 40 125 130 135 140 145 150 155 160 165 170 175 180 185 190 195 200 205 210 215 220 225 230 0 41 0 45 130 135 140 145 150 155 160 165 170 175 180 185 190 195 200 205 210 215 220 225 230 0 46 0 50 135 140 145 150 155 160 165 170 175 180 185 190 195 200 205 210 215 220 225 230 0 51 0 55 140 145 150 155 160 165 170 175 180 185 190 195 200 205 ...

Страница 136: ...m 3 Washer 10 4 Cylinder head ASSY 1 5 Gasket 1 Not reusable 6 Dowel pin 2 7 Bolt 1 M10 25 mm 8 Engine hanger 1 9 Bolt 4 M6 12 mm 10 Engine hanger 2 42 Nm 4 2 kgf m 31 0 ft Ib 10 Nm 1 0 kgf m 7 4 ft Ib 12 Nm 1 2 kgf m 8 9 ft Ib 55 Nm 5 5 kgf m 40 6 ft lb 90 1 2 1 9 10 2 3 2 3 10 9 4 5 6 6 7 8 E E LT 242 LT 242 ...

Страница 137: ...ks 1 Valve lifter 16 2 Valve pad 16 3 Valve cotter 32 4 Upper spring seat 16 5 Valve spring 16 6 Lower spring seat 16 7 Intake valve 8 8 Exhaust valve 8 9 Valve seal 16 Not reusable 10 Valve guide 16 Not reusable 11 Cylinder head 1 1 2 3 4 5 6 3 3 1 2 3 4 5 6 9 10 7 11 8 9 10 ...

Страница 138: ...ove the valve seals Cylinder head check 1 Remove carbon deposits from the com bustion chambers 2 Check the cylinder head water jacket Clean if there are mineral deposits or rust 3 Check the cylinder head warpage using a straightedge 1 and thickness gauge 2 in the directions shown Replace if out of specification Valve spring check 1 Measure the valve spring free length a Replace if out of specifica...

Страница 139: ...ength intake 45 58 mm 1 79 in Free length exhaust 45 58 mm 1 79 in Limit 43 30 mm 1 70 in Tilt limit intake 2 5 2 0 mm Tilt limit exhaust 2 5 2 0 mm a a a Face width intake 2 260 2 830 mm 0 0890 0 1114 in Face width exhaust 2 260 2 830 mm 0 0890 0 1114 in Margin thickness intake 0 800 1 200 mm 0 0315 0 0472 in Margin thickness exhaust 0 800 1 200 mm 0 0315 0 0472 in Diameter intake 5 477 5 492 mm ...

Страница 140: ...f the valve guide 3 Do not reuse a valve guide always replace it with a new one 2 Strike the special service tool 1 to drive the valve guide 3 into the cylinder head Runout limit 0 010 mm 0 0004 in Inside diameter intake 5 504 5 522 mm 0 2167 0 2174 in Inside diameter exhaust 5 504 5 522 mm 0 2167 0 2174 in Valve stem to valve guide clearance valve guide inside diameter valve stem diameter Stem to...

Страница 141: ...ng the special service tool 1 4 Measure the valve seat contact width a where the blueing dye is adhered to the valve face Reface the valve seat if the valve is not seated properly or if the valve seat contact width a is out of specifica tion Replace the valve guide if the valve seat contact width a is uneven Valve guide remover installer 1 90890 06801 Valve guide remover 1 YB 06801 Valve guide ins...

Страница 142: ...o turn the cutter evenly using a downward force of 40 50 N 4 0 5 0 kgf 8 8 11 0 lbf Seat contact width intake 1 400 1 600 mm 0 0551 0 0630 in Limit 2 100 mm 0 0827 in Seat contact width exhaust 1 500 1 700 mm 0 0591 0 0669 in Limit 2 200 mm 0 0866 in A Worldwide B U S A and Canada 45 45 30 30 60 60 45 30 B A Valve seat cutter holder 90890 06812 Intake Valve seat cutter 30 90890 06720 Valve seat cu...

Страница 143: ...in the center of the valve face cut the top edge of the valve seat using a 30 cut ter and then cut the bottom edge using a 60 cutter to center the area and set its width If the valve seat contact area is too narrow and situated near the top edge of the valve face cut the top edge of the valve seat using a 30 cutter to center the area and then set its width using a 45 cutter a Slag or rough surface...

Страница 144: ...eat check 5 50 Cylinder head assembly 1 Install a new valve seal 2 Install the valve 1 valve spring seat 2 valve spring 3 and valve spring retainer 4 in this order and then install the special service tools 5 and 6 TIP When installing a new valve always replace the valve guide with a new one Install the valve spring 3 with the larger pitch a toward the camshaft and the smaller pitch b toward the c...

Страница 145: ...stallation 1 Install the dowel pins 1 a new gasket 2 the cylinder head ASSY 3 the washers 4 and the cylinder head bolts 5 and then tighten the cylinder head bolts 5 to the specified torques in 2 stages and in the order 1 2 and so on 2 Install the cylinder head bolts 6 and then tighten them to the specified torque 1 1 1 2 1 Cylinder head bolt 5 M12 1st 55 Nm 5 5 kgf m 40 6 ft lb 2nd 90 Cylinder hea...

Страница 146: ...m 9 Gasket 1 Not reusable 10 Dowel pin 2 11 Shaft 1 12 Idle gear 1 13 Transfer shaft 1 Not reusable 14 Special nut 1 Not reusable 15 Bolt 6 Not reusable M8 20 mm 16 Flywheel magneto 1 Not reusable 50 Nm 5 0 kgf m 36 9 ft lb 60 250 Nm 25 0 kgf m 184 4 ft lb 250 Nm 25 0 kgf m 184 4 ft lb 15 15 14 24 Nm 2 4 kgf m 17 7 ft lb 80 Nm 8 0 kgf m 59 0 ft lb 250 Nm 25 0 kgf m 184 4 ft lb 9 18 17 16 3 2 7 6 5...

Страница 147: ... 1 Not reusable No Part name Q ty Remarks 50 Nm 5 0 kgf m 36 9 ft lb 60 250 Nm 25 0 kgf m 184 4 ft lb 250 Nm 25 0 kgf m 184 4 ft lb 15 15 14 24 Nm 2 4 kgf m 17 7 ft lb 80 Nm 8 0 kgf m 59 0 ft lb 250 Nm 25 0 kgf m 184 4 ft lb 9 18 17 16 3 2 7 6 5 11 10 13 12 1 4 7 6 5 26 Nm 2 6 kgf m 19 2 ft lb 10 19 8 ...

Страница 148: ...2 M6 15 mm 2 Holder 1 3 Bolt 2 M5 15 mm 4 Bolt 1 M5 10 mm 5 Washer 1 6 Bolt 3 M6 30 mm 7 Stator coil 1 8 Oil seal 1 Not reusable 9 Circlip 1 10 Ball bearing 1 Not reusable 11 Generator cover 1 15 Nm 1 5 kgf m 11 1 ft lb 15 Nm 1 5 kgf m 11 1 ft lb 8 9 10 11 5 4 3 3 6 7 1 2 ...

Страница 149: ... by turning it clockwise 3 Hold the transfer shaft 1 using the special service tool 2 and then remove the drive coupling 3 using the special service tool 4 Flywheel magneto removal Use heat resistant gloves Otherwise burns could result 1 Remove the generator cover 2 Heat the transfer shaft 1 for 20 30 min utes using a heat gun 2 Coupler wrench 2 90890 06729 Coupler wrench 2 YW 06729 1 2 3 3 1 2 1 ...

Страница 150: ...agneto 1 using the special service tools 2 and 3 and then remove the transfer shaft 4 using the special service tool 5 5 Remove the flywheel magneto 1 and Woodruff key using the special service tools 2 and 3 Shaft holder 2 90890 06721 Shaft holder 2 YW 06721 Drive handle 3 90890 06722 Drive handle 3 YW 06722 4 3 2 2 1 1 5 5 Shaft holder 2 90890 06721 Shaft holder 2 YW 06721 Drive handle 3 90890 06...

Страница 151: ...arter clutch 1 onto the starter gear 2 and hold the starter clutch 1 2 Turn the starter gear 2 clockwise a and check that it turns smoothly Replace if it does not turn smoothly Flywheel puller 2 90890 06723 Flywheel puller 2 YW 06723 Rotor puller 3 90890 01080 Stator rotor puller 3 YM 01080 A Sheave holder 2 90890 01701 Primary sheave holder 2 YS 01880 A 1 2 3 3 3 4 3 1 2 A Worldwide B U S A and C...

Страница 152: ...p coil 3 and washer 4 and then tighten the holder bolts 5 and stator coil bolts 6 to the specified torques A Worldwide B U S A and Canada Driver rod LS 2 90890 06606 Ball bearing attachment 3 90890 06657 Driver handle large 4 YB 06071 Forward gear outer race installer 5 YB 41446 1 2 a b E 1 3 2 A E 1 5 4 B A Worldwide B U S A and Canada Bearing pressure C 2 90890 02393 Driver handle large 3 YB 060...

Страница 153: ...gear 2 clockwise while install ing it onto the flywheel magneto 1 Flywheel magneto installation Do not reuse a flywheel magneto special nut flywheel magneto bolt transfer shaft or Woodruff key always replace it with a new one 1 Remove any grease from a new special nut 1 and the inner surface of a new transfer shaft 2 and then install the spe cial nut 1 into the transfer shaft 2 until it can no lon...

Страница 154: ... hexagonal portion of the special service tool 1 as reference make marks on the special service tool 2 at 0 60 and 120 7 Make a mark a on the transfer shaft 3 where the shaft is aligned with the 0 mark on the special service tool 2 TIP The angle from one corner of the hexagonal head of the special service tool 1 to another corner is 60 2 1 2 1 1 2 2 a b 1 A Shaft holder 2 90890 06721 Shaft holder ...

Страница 155: ...20 mark on the special service tool If the mark on the transfer shaft passes over the 120 mark on the special service tool repeat the procedure from step 1 The flywheel magneto may not have been in stalled properly Crankshaft holder 1 90890 06732 Crankshaft holder 1 YW 06562 Shaft holder 2 90890 06721 Shaft holder 2 YW 06721 0 120 60 60 2 1 3 a 5 2 4 1 3 60 5 4 Shaft holder 2 90890 06721 Shaft hol...

Страница 156: ...torque Drive coupling installation Remove any grease from the threaded por tions of the transfer shaft and drive coupling making sure that the threads are clean and dry 1 Install a new washer 1 and the drive cou pling 2 Do not reuse a washer always replace it with a new one Crankshaft holder 2 90890 06732 Crankshaft holder 2 YW 06562 Shaft holder 3 90890 06721 Shaft holder 3 YW 06721 Drive handle ...

Страница 157: ...using the spe cial service tool 2 and then turn the hold er 3 counterclockwise to tighten it to the specified torque After tightening do not operate the engine at a speed higher than idling speed for 24 hours Crankshaft holder 1 90890 06732 Crankshaft holder 1 YW 06562 Coupler wrench 3 90890 06729 Coupler wrench 3 YW 06729 Drive coupling 2 250 Nm 25 0 kgf m 184 4 ft lb 2 1 2 3 3 1 1 2 Coupler wren...

Страница 158: ... 6 Bolt 2 M6 16 mm 7 Bolt 4 M8 20 mm 8 Plate 1 9 Gasket 1 Not reusable 10 Bolt 2 M6 16 mm 11 Thermo switch 1 12 Bolt 1 M8 40 mm 13 Anode ASSY 1 14 Bolt 1 M6 20 mm 15 Gasket 1 Not reusable LT 572 LT 572 LT 572 A A 1322D 11 Nm 1 1 kgf m 8 1 ft Ib 19 Nm 1 9 kgf m 14 0 ft Ib 20 Nm 2 0 kgf m 14 8 ft Ib 15 Nm 1 5 kgf m 11 1 ft Ib 6 7 7 8 9 5 2 3 2 4 10 10 18 17 15 14 12 6 7 7 16 19 20 13 11 1 ...

Страница 159: ...Engine temperature sensor 1 20 Gasket 1 Not reusable No Part name Q ty Remarks LT 572 LT 572 LT 572 A A 1322D 11 Nm 1 1 kgf m 8 1 ft Ib 19 Nm 1 9 kgf m 14 0 ft Ib 20 Nm 2 0 kgf m 14 8 ft Ib 15 Nm 1 5 kgf m 11 1 ft Ib 6 7 7 8 9 5 2 3 2 4 10 10 18 17 15 14 12 6 7 7 16 19 20 13 11 1 ...

Страница 160: ...lt 2 M6 14 mm 10 Oil separator tank cover 1 11 Gasket 1 Not reusable 12 Bolt 17 M6 35 mm 13 Bolt 1 M6 20 mm 14 Oil pan 1 15 Dowel pin 2 A A 10 Nm 1 0 kgf m 7 4 ft Ib 2 Nm 0 2 kgf m 1 5 ft Ib 9 Nm 0 9 kgf m 6 6 ft Ib 9 Nm 0 9 kgf m 6 6 ft Ib 12 Nm 1 2 kgf m 8 9 ft Ib 20 Nm 2 0 kgf m 14 8 ft Ib 10 Nm 1 0 kgf m 7 4 ft Ib 0 3 Nm 0 03 kgf m 0 22 ft lb 12 Nm 1 2 kgf m 8 9 ft lb 1 2 4 10 8 8 8 8 25 15 17...

Страница 161: ... plug 1 M8 20 mm 25 Gasket 1 Not reusable No Part name Q ty Remarks A A 10 Nm 1 0 kgf m 7 4 ft Ib 2 Nm 0 2 kgf m 1 5 ft Ib 9 Nm 0 9 kgf m 6 6 ft Ib 9 Nm 0 9 kgf m 6 6 ft Ib 12 Nm 1 2 kgf m 8 9 ft Ib 20 Nm 2 0 kgf m 14 8 ft Ib 10 Nm 1 0 kgf m 7 4 ft Ib 0 3 Nm 0 03 kgf m 0 22 ft lb 12 Nm 1 2 kgf m 8 9 ft lb 1 2 4 10 8 8 8 8 25 15 17 16 15 20 24 23 22 21 12 14 19 13 5 3 7 6 2 1 11 18 9 9 ...

Страница 162: ... the oil pipe bolt 1 to the specified torque for the 2nd stage 5 Install the baffle plate 1 and then tighten the baffle plate bolts 2 to the specified torque 6 Install a new gasket 3 and the oil pan plug 4 and then tighten the oil pan plug 4 to the specified torque Oil separator tank cover installation 1 Install a new gasket 1 and the oil separa tor tank cover 2 and then tighten the oil separator ...

Страница 163: ...Oil separator tank and oil pan 5 72 3 4 4 4 4 4 9 4 1 5 6 10 11 7 2 3 8 ...

Страница 164: ...ton pin clip 8 Not reusable 8 Piston pin 4 9 Piston 4 10 Piston ring set 4 11 Crankshaft 1 12 Crankshaft bearing 10 13 O ring 1 Not reusable 14 Dowel pin 1 15 Bolt 12 M10 30 mm 16 Bracket 2 E Y 1T 2T 6 6 21 15 15 18 13 14 17 16 19 1 17 15 15 18 3 12 18 20 2 15 15 18 11 15 12 16 10 12 12 12 12 8 7 9 4 5 7 50 Nm 5 0 kgf m 36 9 ft Ib 10 Nm 1 0 kgf m 7 4 ft Ib 10 Nm 1 0 kgf m 7 4 ft Ib 30 Nm 3 0 kgf m...

Страница 165: ...21 Cylinder block 1 No Part name Q ty Remarks E Y 1T 2T 6 6 21 15 15 18 13 14 17 16 19 1 17 15 15 18 3 12 18 20 2 15 15 18 11 15 12 16 10 12 12 12 12 8 7 9 4 5 7 50 Nm 5 0 kgf m 36 9 ft Ib 10 Nm 1 0 kgf m 7 4 ft Ib 10 Nm 1 0 kgf m 7 4 ft Ib 30 Nm 3 0 kgf m 22 1 ft lb 90 1 2 51 Nm 5 1 kgf m 37 6 ft lb 90 1 2 ...

Страница 166: ...venly 3 Remove the crankshaft bearings 1 from the crankcase TIP Write down the position of each crankshaft bearing 1 so that it can be installed in its orig inal position Connecting rod and piston removal 1 Remove the connecting rod cap 1 and then remove the connecting rod bearings 2 and piston and connecting rod 3 TIP For reference during installation make identifi cation marks a on the connectin...

Страница 167: ...clearance check 1 Measure the piston diameter See Piston check 5 76 2 Measure the cylinder bore See Cylinder block check 5 76 3 Calculate the piston clearance Replace the piston or crankcase if out of specifica tion Piston ring check 1 Measure piston ring dimensions B and T Replace the piston rings as a set if out of specification a 20 mm 0 79 in b 50 mm 1 97 in c 80 mm 3 15 in Bore size 86 000 86...

Страница 168: ... in Width T 2 600 2 800 mm 0 1024 0 1102 in Oil ring Height B 2 370 2 470 mm 0 0933 0 0972 in Width T 2 500 mm 0 0984 in B T T B T B a b c b a Top ring End gap installed 0 300 0 450 mm 0 0118 0 0177 in Limit 0 700 mm 0 0276 in 2nd ring End gap installed 0 450 0 600 mm 0 0177 0 0236 in Limit 0 850 mm 0 0335 in Oil ring End gap installed 0 100 0 350 mm 0 0039 0 0138 in End gap measuring point 6 0 mm...

Страница 169: ...shaft journal diameter a and crankshaft pin diameter b Re place if out of specification a Top ring side clearance b 2nd ring side clearance c Oil ring side clearance Top ring Side clearance 0 020 0 060 mm 0 0008 0 0024 in Limit 0 110 mm 0 0043 in 2nd ring Side clearance 0 020 0 060 mm 0 0008 0 0024 in Limit 0 120 mm 0 0047 in Oil ring Side clearance 0 040 0 160 mm 0 0016 0 0063 in a b c Outside di...

Страница 170: ...1 in their original positions Fit the protrusion a on each bearing into the slots b in the connecting rod cap 3 and connecting rod 2 3 Put a piece of Plastigauge 1 on the crankshaft pin parallel to the crankshaft TIP Do not put the Plastigauge 1 over the oil hole in the crankshaft pin 4 Clean the connecting rod bolts 5 Lubricate the threads of the connecting rod bolts with molybdenum disulfide gre...

Страница 171: ...e timing chain drive gear b of the crankshaft After installation check that the section c is flush by running your finger across the sur face Do not turn the connecting rod or crankshaft until the crankshaft pin oil clearance mea surement has been completed 9 Tighten the connecting rod bolts to the specified torques in 2 stages 10 Remove the connecting rod cap and mea sure the width a of the compr...

Страница 172: ...Green connecting rod bearing Crankshaft journal oil clearance check 1 Clean the crankshaft bearings crankshaft journals and bearing portions of the crank case and cylinder block Big end side clearance 0 160 0 262 mm 0 0063 0 0103 in Limit 0 50 mm 0 0197 in Big end width 26 788 26 840 mm 1 0546 1 0567 in Crankshaft pin width 27 000 27 050 mm 1 0630 1 0650 in a c b C5 a Calculation formula Connectin...

Страница 173: ...nk shaft TIP Do not put the Plastigauge 1 over the oil hole in the main journals of the crankshaft 6 Install the crankcase 1 and crankcase bolts 2 and then tighten the crankcase bolts 2 to the specified torques in 2 stag es and in the order 1 2 and so on TIP When checking the journal oil clearance re use the removed crankcase bolts 2 Do not turn the crankshaft until the journal oil clearance measu...

Страница 174: ...the same at all positions the size number a is stamped only at the J1 position Example If J1 J5 are different If J1 J5 are the same 2 Check the crankshaft journal size number a on the crankshaft web 3 Select the suitable color a for the crank shaft bearing from the table Crankcase bolt 1 10 Nm 1 0 kgf m 7 4 ft lb Journal oil clearance 0 024 0 053 mm 0 0009 0 0021 in Limit 0 10 mm 0 0039 in 12 11 1...

Страница 175: ...o not allow the piston pin clip ends to align with the piston pin slot c 2 Install the oil ring 1 2nd ring 2 and top ring 3 Do not scratch the pistons or break the pis ton rings 3 Offset the piston ring end gaps TIP Make sure to install the piston rings so that the 1T mark on the top ring 3 and the 2T mark on the 2nd ring 2 face up After installing the piston rings make sure that they move smoothl...

Страница 176: ...alled in step 5 to the crank shaft keeping the present state TIP Tighten the connecting rod bolts while check ing that the sections shown a and b are flush with each other by touching the surface 9 Tighten the connecting rod bolts to the specified torque 10 Loosen the connecting rod bolts and then remove the connecting rod and connecting rod cap keeping the connecting rod bear ings in the present ...

Страница 177: ...to the specified torques in 2 stages When a connecting rod bolt is tightened more than the specified angle do not loosen the connecting rod bolt and then retighten it Replace the connecting rod bolt with a new one and perform the pro cedure again If the mating surfaces between the con necting rod and connecting rod cap are uneven remove the connecting rod bolts and connecting rod bearings and then...

Страница 178: ...ase bolts 2 and then tighten the crank case bolts 2 to the specified torques in 2 stages and in the order 1 2 and so on Do not reuse a crankcase bolt always re place it with a new one 6 Install the crankcase bolts 1 and then tighten them to the specified torque in the order 1 2 and so on a b 1 1 2 Crankcase bolt 2 1st 30 Nm 3 0 kgf m 22 1 ft lb 2nd 90 1 2 2 2 7 5 1 3 9 8 6 2 4 10 1 ...

Страница 179: ...Crankcase connecting rod and piston 5 88 Crankcase bolt 1 10 Nm 1 0 kgf m 7 4 ft lb 12 11 10 4 2 6 8 9 3 1 5 7 1 ...

Страница 180: ...Crankcase connecting rod and piston 5 89 MEMO ...

Страница 181: ...Y 6 9 Impeller drive shaft and impeller duct 6 10 Impeller duct ASSY disassembly 6 11 Impeller housing check 6 12 Drive shaft check 6 12 Impeller duct ASSY assembly 6 12 Impeller duct impeller housing and nozzle installation 6 14 Transom plate and hoses 6 16 Bilge strainer check 6 18 Transom plate installation 6 18 Intermediate housing 6 19 Intermediate housing removal 6 20 Intermediate housing di...

Страница 182: ...s 1 Screw 4 M5 12 mm 2 Speed sensor 1 3 Bolt 10 M8 35 mm 4 Ride plate 1 5 Bracket 2 6 Spacer 1 7 Intake grate 1 8 Bracket 1 9 Bracket 2 2 1 1 1 3 3 7 9 3 3 3 3 8 4 6 5 5 9 SS LT 242 LT 242 LT 242 SS SS SS SS 4 Nm 0 4 kgf m 3 0 ft Ib 17 Nm 1 7 kgf m 12 5 ft Ib 17 Nm 1 7 kgf m 12 5 ft Ib ...

Страница 183: ...lamp 1 9 Bolt 2 M8 18 mm 10 Bolt 1 M6 30 mm 11 Bolt 4 M10 45 mm 12 Dowel pin 2 13 Bolt 2 M8 13 mm 14 Washer 2 15 Gasket 2 Not reusable 16 Bracket 1 12 12 11 16 15 14 13 8 4 9 9 3 5 4 1 2 11 11 10 A LT 572 LT 572 LT 242 1207B LT 572 7 6 17 Nm 1 7 kgf m 12 5 ft Ib 40 Nm 4 0 kgf m 29 5 ft Ib 7 Nm 0 7 kgf m 5 2 ft Ib 15 Nm 1 5 kgf m 11 1 ft Ib 2 5 Nm 0 25 kgf m 1 84 ft lb ...

Страница 184: ...ion shows the case where the disk brake piston tool 3 is used to remove the jet pump unit 1 Impeller check 1 Check the impeller 1 Replace if dam aged 2 Measure the impeller to housing clear ance a Measure the impeller housing in side diameter if the impeller to housing clearance a is out of specification Jet pump unit installation Make sure to remove the battery before in stalling the jet pump uni...

Страница 185: ... the steering and shifting oper ate correctly 9 Initialize the RiDE system using the YDIS See YDIS Instruction Manual Trim rod adjustment 1 Push the unlock button on the remote con trol transmitter so that power is supplied to the ECM and the trim position is set to the N position 2 Disconnect the shift rod joint 1 3 Disconnect the trim rod joints 1 4 Loosen the locknut 2 Jet pump unit bolt M10 45...

Страница 186: ... joints and then tight en the locknut to the specified torque 7 Connect the shift rod joint 1 8 Initialize the RiDE system using the YDIS See YDIS Instruction Manual Jet thrust nozzle angle adjustment 1 Remove the service lid 2 Loosen the locknut 1 3 Disconnect the steering cable joint 2 from the ball joint 3 4 Turn the steering cable joint 2 in or out to adjust distances a and b The steering cabl...

Страница 187: ... and then tighten the locknut to the specified torque 6 Check the difference of distances a and b again 7 Install the service lid Turn in Distance a is increased Turn out Distance b is increased Distance c 8 0 mm 0 31 in or more Locknut 7 Nm 0 7 kgf m 5 2 ft lb b a c b a ...

Страница 188: ...ty Remarks 1 Spring 1 2 Bolt 2 M8 25 mm 3 Collar 2 4 Reverse gate 1 5 Nut 2 6 Washer 3 7 Ball joint 1 8 Bolt 1 M6 35 mm 9 Collar 1 10 Bolt 6 M6 25 mm 11 Reverse gate stay 2 A A A A 20 Nm 2 0 kgf m 14 8 ft Ib 10 11 3 6 5 2 7 6 11 10 1 8 9 5 6 2 3 4 ...

Страница 189: ...Nozzle and nozzle ring No Part name Q ty Remarks 1 Bolt 4 M8 25 mm 2 Collar 4 3 Jet thrust nozzle 1 4 Nozzle ring 1 5 Nut 1 6 Washer 2 7 Ball joint 1 16 Nm 1 6 kgf m 11 8 ft lb 16 Nm 1 6 kgf m 11 8 ft lb 7 4 2 5 1 2 3 2 1 2 1 1 6 ...

Страница 190: ... Spout hose 1 a Yellow paint mark 3 Bolt 4 M10 125 mm 4 Bracket 1 5 Nozzle 1 6 Impeller housing 1 7 Dowel pin 4 8 Bolt 4 M6 20 mm 9 Water inlet strainer 1 10 Gasket 1 Not reusable 11 Impeller duct ASSY 1 7 7 6 7 7 2 1 a 4 3 3 3 11 40 Nm 4 0 kgf m 29 5 ft lb 1 Nm 0 1 kgf m 0 7 ft lb 8 9 10 7 Nm 0 7 kgf m 5 2 ft Ib LT 572 5 ...

Страница 191: ... Cap 1 4 O ring 1 Not reusable 5 Nut 1 6 Washer 1 7 Spacer 1 8 O ring 1 Not reusable 9 Oil seal 1 Not reusable 10 Oil seal 1 Not reusable 11 Ball bearing 1 Not reusable 12 Spacer 1 13 Ball bearing 1 Not reusable 14 Drive shaft 1 15 Impeller duct 1 1 8 9 10 15 7 330 Nm 33 0 kgf m 243 4 ft lb 13 12 11 6 5 14 4 3 2 2 74 Nm 7 4 kgf m 54 6 ft Ib ...

Страница 192: ...eads direct ly 4 Remove the ball bearing 1 5 Remove the oil seals 1 and 2 Drive shaft holder 6 2 90890 06520 Driveshaft holder 2 YB 06201 Drive shaft holder 6 4 90890 06520 Driveshaft holder 4 YB 06201 1 2 1 2 3 4 3 A Worldwide B U S A and Canada Stopper guide plate 2 90890 06501 Bearing puller assembly 3 90890 06535 Stopper guide stand 4 90890 06538 Slide hammer 5 YB 06096 1 2 1 3 3 4 A 1 5 5 B ...

Страница 193: ...ew oil seal 1 halfway into the impeller duct and then install a new oil seal 2 A Worldwide B U S A and Canada Stopper guide plate 3 90890 06501 Bearing puller assembly 4 90890 06535 Stopper guide stand 5 90890 06538 Slide hammer 6 YB 06096 3 A 5 5 4 4 1 2 6 B 6 1 2 1 2 3 4 3 4 Driver rod L3 3 90890 06652 Driver handle large 3 YB 06071 Needle bearing attachment 4 90890 06609 Driveshaft needle beari...

Страница 194: ...all bearing 1 A Worldwide B U S A and Canada Oil seal installer attachment 3 90890 06733 Oil seal installer attachment 4 YW 06628 Distance a 7 0 0 2 mm 0 28 0 008 in Bearing attachment 3 90890 06728 Bearing attachment 3 YW 06728 Distance a 23 0 0 1 mm 0 91 0 004 in A 3 a 1 2 A B 4 a 1 2 A 3 1 a 2 Bearing attachment 4 90890 06728 Bearing attachment 4 YW 06728 Grease quantity 20 g 0 7 oz Bearing att...

Страница 195: ...eller housing and nozzle 2 Apply sealant to the mating surfaces of the impeller duct 1 and impeller housing 2 3 Install the dowel pins 3 and then install the impeller housing 2 4 Apply sealant to the mating surfaces of the nozzle 1 and impeller duct 2 5 Install the dowel pins 3 and nozzle 1 6 Install the bracket 4 and then tighten the impeller duct bolts 5 to the specified torque Drive shaft holde...

Страница 196: ...6 15 Impeller drive shaft and impeller duct Impeller duct bolt 5 40 Nm 4 0 kgf m 29 5 ft lb 1 3 2 5 5 5 5 4 3 ...

Страница 197: ...lushing hose 1 8 Hose joint 1 1 9 Cooling water hose 1 a White paint mark 10 Rivet 1 11 Plastic tie 1 12 Bilge strainer ASSY 1 13 Clamp 2 14 Bilge hose 1 15 Hose joint 1 16 Clamp 1 3 17 13 14 15 1 11 12 19 20 18 14 20 19 2 10 21 16 17 22 21 26 23 25 24 1 2 8 1 9 1 6 4 5 9 a 7 7 3 26 Nm 2 6 kgf m 19 2 ft Ib 26 Nm 2 6 kgf m 19 2 ft Ib 6 Nm 0 6 kgf m 4 4 ft Ib ...

Страница 198: ...se 1 21 Nut 4 22 Washer 2 23 Washer 2 24 Plastic tie 1 25 Bilge hose 1 26 Transom plate 1 No Part name Q ty Remarks 3 17 13 14 15 1 11 12 19 20 18 14 20 19 2 10 21 16 17 22 21 26 23 25 24 1 2 8 1 9 1 6 4 5 9 a 7 7 3 26 Nm 2 6 kgf m 19 2 ft Ib 26 Nm 2 6 kgf m 19 2 ft Ib 6 Nm 0 6 kgf m 4 4 ft Ib ...

Страница 199: ... check 3 10 Transom plate installation 1 Clean the mating surfaces of the transom plate 1 2 Apply silicone sealant to the mating sur face of the transom plate 1 3 Install the transom plate 1 washers 2 and 3 and then tighten the nuts 4 to the specified torque Transom plate nut 4 26 Nm 2 6 kgf m 19 2 ft lb 1 2 4 3 4 ...

Страница 200: ...Intermediate drive shaft 1 8 O ring 2 Not reusable 9 Oil seal 2 Not reusable 10 Circlip 2 Not reusable 11 Ball bearing 1 Not reusable 12 Thrust washer 1 Not reusable 13 Oil seal 1 Not reusable 14 Intermediate housing 1 15 Grease nipple 1 16 Cap 1 11 14 12 13 10 9 5 6 9 8 8 15 7 10 3 Nm 0 3 kgf m 2 2 ft lb 205 Nm 20 5 kgf m 151 2 ft lb 17 Nm 1 7 kgf m 12 5 ft lb 2 2 3 1 4 4 16 ...

Страница 201: ...move the driven coupling 1 2 Remove the intermediate drive shaft 1 and thrust washer 2 using a press Do not press the intermediate drive shaft directly 3 Remove the oil seals 1 2 and 3 Shaft holder 2 90890 06730 Shaft holder 2 YW 06730 Coupler wrench 3 90890 06729 Coupler wrench 3 YW 06729 1 2 1 2 3 A Worldwide B U S A and Canada Stopper guide plate 4 90890 06501 Bearing puller assembly 5 90890 06...

Страница 202: ... intermediate drive shaft 1 us ing a press Do not press the intermediate drive shaft directly 5 Install a new circlip front 1 and then in stall a new oil seal 2 Needle bearing attachment 3 90890 06654 Needle bearing installer 3 YB 06434 Needle bearing attachment 3 90890 06654 Needle bearing installer 3 YB 06434 2 3 1 1 1 2 3 Needle bearing attachment 2 90890 06654 Needle bearing installer 2 YB 064...

Страница 203: ... TIP If shims 3 were removed install the shims in their original positions Bearing attachment 3 90890 06728 Bearing attachment 3 YW 06728 Bearing attachment 2 90890 06727 Bearing attachment 2 YW 06727 Distance a 1 6 0 2 mm 0 06 0 01 in Bearing attachment 2 90890 06727 Bearing attachment 2 YW 06727 1 2 3 1 2 a 1 1 2 a Distance a 3 7 0 3 mm 0 17 0 01 in Shaft holder 3 90890 06730 Shaft holder 3 YW 0...

Страница 204: ...6 23 Intermediate housing Intermediate housing bolt 2 17 Nm 1 7 kgf m 12 5 ft lb 1 2 3 ...

Страница 205: ...Intermediate housing 6 24 MEMO ...

Страница 206: ... 13 Stator coil check 7 13 Rectifier regulator check 7 13 Control system 7 15 Oil pressure switch check 7 15 Thermo switch check 7 15 Thermo sensor check 7 16 Engine temperature sensor check 7 16 Intake air temperature sensor check 7 17 Intake air pressure sensor check 7 18 TPS check 7 18 ETV circuit continuity 7 20 APS check 7 20 APS circuit continuity 7 21 ETV relay check 7 22 RPS check 7 23 RPS...

Страница 207: ...e check 7 35 Brush holder check 7 36 Remote control system 7 37 Remote control transmitter check 7 37 Remote control receiver check 7 38 Transmitter registration 7 38 Indication system 7 40 Multifunction meter check 7 40 Speed sensor check 7 40 Fuel level meter display and fuel level warning indicator check 7 41 Check engine warning indicator check 7 41 Diagnostic display check 7 42 Oil pressure w...

Страница 208: ...ignition coil 2 Cam position sensor 3 Electrical box 4 Thermo sensor 5 Rectifier regulator 6 Starter motor 7 Oil pressure switch 8 ETV TPS 9 Intake air pressure sensor 10 Fuel injector 11 Thermo switch 12 Intake air temperature sensor 13 Engine temperature sensor 14 Stator coil and pickup coil 15 Earth plate ...

Страница 209: ... 8 9 10 6 1 7 5 1 Remote control receiver 2 Steering sensor 3 APS electric throttle without wire cable 4 RPS electric shift without wire cable 5 Speed sensor 6 Buzzer 7 Fuel pump module and fuel sender 8 Multifunction meter 9 Battery 10 RiDE motor ...

Страница 210: ...nt detection switch 3 ECM 4 Starter relay 5 Fuse 10 A ETV relay 6 Fuse 10 A fuel pump relay 7 Main relay 8 Fuse 10 A main relay 9 Fuse 20 A main relay 10 Fuse 3 A Not used 11 Fuse 3 A remote control receiver 12 SCU relay 13 Fuse 30 A battery 14 Fuse 50 A SCU 15 Spare fuse 16 Fuel pump relay 17 ETV relay ...

Страница 211: ...ine temperature sensor 18 Thermo sensor Steering sensor Slant detection switch Fuel injector 1 Fuel injector 2 Fuel injector 3 Fuel injector 4 Ignition coil 1 Ignition coil 2 Ignition coil 3 Ignition coil 4 Fuel pump module YDIS 32 Multifunction meter ETV relay Fuse 10 A 35 ECM Rectifier regulator 1 2 3 5 11 Battery 13 14 19 20 21 22 23 24 25 26 27 28 29 30 Fuel pump relay 31 33 34 Fuse 3 A 9 Remo...

Страница 212: ...Ground 5 V Ground 5 V Ground 39 APS 43 RPS APS full close switch 5 V Ground 44 RPS 1 45 RPS 2 5 V Ground APS 1 APS 2 Ground 5 V TPS 1 TPS 2 ETV 46 ETV motor 35 ECM 36 37 Thermo switch 38 40 41 42 a a a a a a 49 48 47 50 SCU ß l v d b c a f x ç i Z X j Y T L S R W U k A V 2 9 ...

Страница 213: ...emperature sensor 18 Thermo sensor 19 Steering sensor 20 Slant detection switch 21 Fuel injector 1 22 Fuel injector 2 23 Fuel injector 3 24 Fuel injector 4 25 Ignition coil 1 26 Ignition coil 2 27 Ignition coil 3 28 Ignition coil 4 29 Fuel pump module 30 Fuel pump relay 31 YDIS 32 Multifunction meter 33 ETV relay 34 Fuse 10 A 35 ECM 36 Oil pressure switch 37 Thermo switch 38 Engine shut off switch...

Страница 214: ...k 6 7 Battery power source Red Yellow 8 Pickup coil White Black 9 SCU Blue 10 11 RPS 2 Pink White 12 13 Thermo sensor Black Blue 14 Main relay drive sig nal Yellow White 15 Intake air tempera ture sensor Black Red 16 Intake air pressure sensor Pink Green 17 Steering sensor White Blue 18 19 20 Main relay Yellow Green 21 Engine start switch Yellow 22 APS full close switch White Green 23 Engine tempe...

Страница 215: ... 2 power source Orange White 52 ETV motor negative Blue 53 54 55 56 57 58 Fuel injector 1 Purple Red 59 Fuel injector 2 Purple Black 60 Ignition coil 4 Black Green 61 Ignition coil 3 Black Yellow 62 ETV ground Black 63 64 Thermo switch Pink 65 66 67 Ground Black 68 69 70 ETV ground Black No Connecting part Color 71 72 Engine shut off switch White 73 74 75 76 77 78 ETV motor positive Green 79 Oil p...

Страница 216: ...er 2 20 Instruc tion Manual The software is available through YMAN Ya maha Marine Associate Network Power supply to the ECM Push the unlock button a on the remote con trol transmitter so that power is supplied to the ECM TIP To check that the remote control transmitter is working properly see Remote control trans mitter check 7 37 Peak voltage measurement When measuring the peak voltage do not tou...

Страница 217: ...the selector on the digital circuit tester to the DC voltage mode Test lead preparation If the special service tool test harness is not available make test leads suitable for the mea surement A Worldwide B U S A and Canada Digital circuit tester 1 90890 03243 Peak voltage adapter B 2 90890 03172 Digital multimeter 3 YU 34899 A Peak volt adapter 4 YU 39991 DC V 1 A 2 V 3 B 4 Test lead Terminal male...

Страница 218: ...Check the wire harness if out of specifica tion Check the ECM output peak voltage if within specification 3 Connect the test harness See Test lead preparation 7 10 4 Measure the ECM output peak voltage When checking the electrical components do not touch any of the connections of the digital tester leads TIP When measuring the ECM output peak volt age under the Cranking condition discon nect the f...

Страница 219: ...nder the Cranking and Unloaded conditions disconnect the pickup coil coupler wire harness end b 3 Disconnect the special service tool 4 Measure the pickup coil resistance Re place the pickup coil if out of specification 5 Connect the pickup coil coupler Output peak voltage 1 Black Red B R Black B 2 Black White B W Black B 3 Black Yellow B Y Black B 4 Black Green B G Black B r min Loaded Cranking 2...

Страница 220: ...nnect the stator coil coupler Rectifier regulator check 1 Disconnect the rectifier regulator coupler a and then connect the special service tool 1 2 Measure the rectifier regulator output peak voltage TIP Do not use the peak voltage adapter to mea sure the output voltage Test harness 3 pins 1 90890 06870 Test harness 3 pins 1 YB 06870 Output peak voltage Green G Green G r min Unloaded Cranking 200...

Страница 221: ...i ty OL Indicates an overload 6 Install the rectifier regulator See Exhaust manifold 5 3 7 Connect the rectifier regulator coupler Output voltage Red R Black B r min Loaded 2000 3500 V 13 G c G d Bf R b e G R b G c G d G e B f a a A A Worldwide B U S A and Canada Rectifier regulator continuity testing diode mode Tester lead Display value V reference data b c OL d e f c b 0 43 0 51 d OL e f d b 0 4...

Страница 222: ...il pressure switch See Oil separator tank and oil pan 5 69 8 Connect the oil pressure switch coupler Thermo switch check 1 Disconnect the thermo switch coupler a 2 Supply power to the ECM and then mea sure the input voltage at the thermo switch coupler terminals wire harness end Check the wire harness if out of specifica tion 3 Remove the thermo switch See Cylinder block and electrical part 5 67 4...

Страница 223: ...end the thermo sensor in a container filled with water and then slowly heat the water 5 Measure the thermo sensor resistance when the specified temperatures are reached Replace if out of specification 6 Install the thermo sensor See Muffler 5 16 7 Connect the thermo sensor coupler Engine temperature sensor check 1 Disconnect the engine temperature sensor coupler a a No continuity b Continuity c Co...

Страница 224: ...erature 2 Connect the YDIS to display Intake tem perature 3 If the ambient temperature and the dis played intake air temperature differ by more than 5 C 9 F measure the in take air temperature sensor resistance TIP Check the intake air temperature sensor when the engine is cold 4 Disconnect the intake air temperature sen sor coupler a 5 Supply power to the ECM and then mea sure the input voltage a...

Страница 225: ... the in take air pressure sensor 5 Connect the special service tool 1 to the intake air pressure sensor 6 Connect the YDIS to display Intake air pressure 7 Apply negative pressure to the intake air pressure sensor slowly and check that the displayed intake air pressure increases Replace if it does not increase 8 Disconnect the special service tool and then connect the vacuum hose TPS check Do not ...

Страница 226: ...is 4 5 V or less and then check the voltage difference between TPS 1 and TPS 2 Measure the TPS input volt age if out of specification Example If the TPS 1 output voltage is 2 5 V and the TPS 2 output voltage is 4 5 V then 4 5 2 5 2 0 V 6 Disconnect the ETV coupler a 7 Supply power to the ECM and then mea sure the input voltage at the ETV coupler terminals wire harness end Check the TPS circuit con...

Страница 227: ...ts of the throttle lever which cannot be disassembled 1 Connect the YDIS to display APS 1 APS 2 and APS full close switch TIP When checking the APS using the YDIS do not start the engine 2 Operate the throttle lever 1 and then check the output voltages of APS 1 and APS 2 at the fully closed position A and fully open position B Input voltage 4 75 5 25 V Orange O Black Orange B O a O B O a c b ETV c...

Страница 228: ... out of specifica tion 7 Connect the APS coupler APS circuit continuity 1 Disconnect the APS coupler a and ECM couplers b and c APS 1 output voltage with the throttle le ver fully closed 0 68 0 74 V APS 2 output voltage with the throttle le ver fully closed 0 68 0 74 V APS 1 output voltage with the throttle le ver fully open 3 95 4 15 V APS 2 output voltage with the throttle le ver fully open 3 95...

Страница 229: ...the ter minal a and ground 4 Supply power to the ECM and then mea sure the input voltage between the termi nals a and b 5 Install the ETV relay and fuse box cover APS circuit continuity Terminal No Color code Coupler a Coupler b c 1 36 P R 2 34 B R 3 49 O R 4 37 P W 5 35 B W 6 50 O W 7 22 W G 8 29 B G 9 30 O G c b 34 35 36 37 49 50 30 29 22 3 2 1 6 5 4 7 8 9 b c a Input voltage 12 V battery voltag...

Страница 230: ...nce between RPS 1 and RPS 2 Measure the RPS input voltage if out of specifica tion 4 Disconnect the RPS coupler a 5 Supply power to the ECM and then mea sure the input voltage at the RPS coupler terminals wire harness end Check the RPS circuit for continuity if out of specifica tion 6 Connect the RPS coupler RPS circuit continuity 1 Disconnect the RPS coupler a and ECM couplers b and c RPS 1 outpu...

Страница 231: ... voltage between the ter minal a and ground 4 Turn the engine start switch to ON and then measure the input voltage between the terminals a and b 5 Install the SCU relay and fuse box cover RPS circuit continuity Terminal No Color code Coupler a Coupler b c 1 33 P R 2 31 B R 3 28 O R 4 11 P W 5 32 B W 6 51 O W c b 28 11 31 32 51 33 b c a 3 2 1 6 5 4 Input voltage 12 V battery voltage Terminal a Gro...

Страница 232: ... position sensor coupler terminals wire harness end Check the wire harness if out of specification Measure the cam position sensor output voltage if within specifica tion 3 Remove the cam position sensor See Cylinder head cover 5 31 4 Connect the special service tool 1 to the cam position sensor and wire harness Electric trim switch operation Switch YDIS display Up 1 Down 2 Free OFF Pushed ON 1 2 ...

Страница 233: ...ness if out of specification 3 Remove the slant detection switch See Electrical box 5 19 4 Check the slant detection switch for conti nuity Replace if out of specification TIP Make sure to turn the switch over to both the left and right 5 Install the slant detection switch See Electrical box 5 19 Test harness 3 pins 1 90890 06877 Test harness 3 pins 1 YB 06877 Output voltage position a c More than...

Страница 234: ...ECM and then mea sure the output voltage when the handle bar is in each position 7 Disconnect the special service tool and then connect the steering sensor coupler ECM check 1 Disconnect the ECM coupler a 2 Supply power to the ECM and then mea sure the input voltage between the ECM coupler terminal wire harness end and ground Check the ECM circuit for continu ity if out of specification TIP Do not...

Страница 235: ...rth plate check 1 Remove the earth plate 2 Check the continuity between each termi nal a and the housing b Replace the earth plate if there is no continuity 3 Install the earth plate See Cylinder block and electrical part 5 67 Input voltage 12 V battery voltage Terminal 27 Ground b a c 27 a 62 46 67 70 b a a b ECM circuit continuity Terminal 46 Ground Continuity Terminal 62 Ground Terminal 67 Grou...

Страница 236: ...6 Measure the fuel injector resistance 7 Replace the fuel injector if out of specifica tion 8 Install the fuel injectors See ETV and fuel injector 4 6 Fuel pump relay check 1 Remove the fuse box cover and fuel pump relay 1 2 Check the fuel pump relay See Main re lay check 7 31 3 Measure the input voltage between the ter minal a and ground 4 Supply power to the ECM and then mea sure the input volta...

Страница 237: ...dule if within specification Check the wire har ness if out of specification TIP After the power is supplied to the ECM voltage will only be applied to the fuel pump module for 3 seconds 5 Remove the fuel pump module See Fuel tank and fuel pump module 4 9 6 Measure the fuel sender resistance Re place the fuel sender if out of specifica tions 7 Install the fuel pump module See Fuel tank and fuel pu...

Страница 238: ...bar switch left cou pler black coupler Main relay check 1 Remove the fuse box cover and main relay 1 2 Connect the positive battery lead to the terminal a and the negative battery lead to the terminal b and then check for con tinuity between the terminals c and d Replace the relay if there is no continuity Do not reverse the battery leads Other wise the relay may be seriously damaged Engine start ...

Страница 239: ...a 2 Remove the starter relay 3 Connect the tester leads between the starter relay terminals a and b 4 Connect the positive battery lead to the terminal c and the negative battery lead to the terminal d 5 Check the continuity between the starter relay terminals a and b Replace the starter relay if out of specification Relay terminals continuity Terminal c Terminal d Input voltage 12 V battery volta...

Страница 240: ...7 33 Starting system 6 Install the starter relay Connected Continuity Starter relay continuity Battery lead c d Terminal a b ...

Страница 241: ...1 3 Packing seal 1 Not reusable 4 Front cover 1 5 Packing seal 1 Not reusable 6 Plate 1 7 Starter motor yoke 1 8 Armature 1 9 Brush holder 1 10 O ring 1 Not reusable 11 Circlip 1 12 Drive gear 1 13 O ring 1 Not reusable 9 1 5 7 8 4 6 2 3 10 M M 13 12 11 9 Nm 0 9 kgf m 6 6 ft lb 7 Nm 0 7 kgf m 5 2 ft lb M M ...

Страница 242: ...disassembled make sure to check the operation again after as sembling it 5 Disconnect the negative battery lead and then the positive battery lead from the bat tery terminals 6 Install the starter motor See Wire har ness 5 18 Armature check 1 Check the commutator Clean using 600 grit sandpaper and compressed air if dirty 2 Measure the commutator diameter a Replace the armature if below specifica t...

Страница 243: ...mature continuity Commutator seg ment a Continuity Segment a Arma ture core b No continuity Segment a Arma ture shaft c No continuity Brush length 12 5 mm 0 49 in Wear limit 5 0 mm 0 20 in a b c a Brush holder continuity Brush a Brush b Brush c Brush d Brush c Terminal e Brush d Terminal e Continuity For all brush and terminal combinations not listed above No continuity e a c d e c a d b b ...

Страница 244: ...ransmitter is not received 4 Loosen the screws 1 in the order 1 2 and so on and then remove the transmit ter cover 2 Do not touch the internal parts except the battery 5 Remove the battery CR2016 1 Do not touch the battery directly using your hands Use a pair of non conductive twee zers to replace the battery 6 Measure the battery voltage Replace the remote control transmitter battery if below spe...

Страница 245: ... to the ECM and then mea sure the remote control receiver output voltage at the multifunction meter coupler terminal wire harness end and ground Replace the remote control receiver if out of specification 5 Connect the multifunction meter coupler Transmitter registration TIP Each remote control transmitter 1 has a unique ID code To add or re register the ID code of a remote control transmitter to ...

Страница 246: ...ed If the registration could not be com pleted the UNLOCK indicator light comes on Re transmit the ID code 3 After checking that the registration of the ID code has been completed using the UNLOCK indicator light c transmit the next ID code TIP Up to 5 remote control transmitters can be registered in any sequence regardless of whether they are original equipment or addi tional transmitters The sam...

Страница 247: ...r if there is in termittent or missing segment a 4 Disconnect the multifunction meter cou pler a 5 Supply power to the ECM and then mea sure the input voltage at the multifunction meter coupler terminals wire harness end Replace the wire harness if out of specification Replace the multifunction meter if within specification and there is no display on the multifunction meter 6 Connect the multifunc...

Страница 248: ... to the ECM and then check that all fuel level segments come on Re place if it does not come on 5 Lower the float to the lowest position B and then check that the fuel level warning indicator b the lowest 2 fuel level seg ments c and the WARNING indicator light d blink If the indicator segments and the light do not blink replace the mul tifunction meter 6 Install the fuel pump module See Fuel tank...

Страница 249: ...ase the en gine speed to 6000 r min or more 3 Check that the oil pressure warning indica tor a the check engine warning indicator b and the WARNING indicator light c blink and the buzzer sounds intermittently for 30 seconds 4 If the light and indicator do not blink check the Diagnosis record of the YDIS If a di agnosis record is available and the light and indicator do not blink replace the mul ti...

Страница 250: ... 1 Disconnect the buzzer coupler a 2 Supply power to the ECM and then mea sure the input voltage at the buzzer cou pler terminals wire harness end Check the wire harness if out of specification 3 Remove the buzzer See Steering mas ter 8 12 4 Connect the positive battery lead to the terminal a and the negative battery lead to the terminal b 5 Check that the buzzer sounds Replace the buzzer if does ...

Страница 251: ...Indication system 7 44 MEMO ...

Страница 252: ...g arm ASSY installation 8 14 Steering cable and speed sensor lead 8 15 Steering cable installation steering master end 8 16 Steering cable installation jet pump end 8 16 Seat and handgrip 8 17 Ventilation hose and water separator 8 19 Cooling water pilot outlet installation 8 21 Exhaust system 8 22 Exhaust system installation 8 24 RiDE motor 8 26 RiDE motor removal 8 27 RiDE motor installation 8 2...

Страница 253: ...8 Hull and hood Rear section 8 31 Spout installation 8 33 Reboarding step installation VXR 8 33 Deck and hull 8 34 ...

Страница 254: ...teering pad and handlebar cover No Part name Q ty Remarks 1 Screw 6 M5 16 mm 2 Upper handlebar cover 1 3 Steering pad 1 4 Screw 4 M6 14 mm 5 Lower handlebar cover 1 0 5 Nm 0 05 kgf m 0 37 ft lb 5 5 Nm 0 55 kgf m 4 06 ft lb 4 1 5 3 2 LT 242 ...

Страница 255: ...Washer 2 7 Handlebar grip 2 8 Bolt 2 M5 23 mm 9 Bolt 4 M8 45 mm 10 Upper handlebar holder 2 a Punch mark 11 Handlebar 1 LT 242 LT 242 LT 242 LT 242 2 Nm 0 2 kgf m 1 5 ft Ib 2 Nm 0 2 kgf m 1 5 ft Ib 7 Nm 0 7 kgf m 5 2 ft Ib 7 Nm 0 7 kgf m 5 2 ft Ib 21 Nm 2 1 kgf m 15 5 ft Ib 21 Nm 2 1 kgf m 15 5 ft Ib 3 5 Nm 0 35 kgf m 2 58 ft lb 3 5 Nm 0 35 kgf m 2 58 ft lb 5 6 7 a 3 1 8 4 11 8 4 9 9 10 10 2 6 1 5...

Страница 256: ...per edge of the packing 1 with the upper edge of the grommet 4 6 Fasten the grommet 4 using the plastic tie 5 Handlebar installation After installing the handlebar make sure that the handlebar switch leads are not pulled when the handlebar is turned to the right and left 1 Install the handlebar 1 and upper handle bar holders 2 and then tighten the bolts 3 to the specified torque TIP The upper hand...

Страница 257: ...IP Align the hole a in the handlebar switch right 1 with the stopper bolt 3 5 Install the stopper bolts 1 and then tight en them to the specified torque 6 Install the handlebar grips 2 Clearance reference data b 0 4 mm 0 02 in c 1 1 mm 0 09 in Handlebar holder bolt 3 21 Nm 2 1 kgf m 15 5 ft lb Handlebar switch stopper bolt 1 2 Nm 0 2 kgf m 1 5 ft lb 1 3 3 2 2 LT 242 2 b 2 c a 1 c b 1 1 Handlebar s...

Страница 258: ...ll the washers 3 and bolts 4 and then tighten the bolts 4 to the specified torque TIP Align the slit a in the handlebar grip 2 with the stopper bolt 5 Handlebar grip end bolt 4 7 Nm 0 7 kgf m 5 2 ft lb 1 1 2 2 3 4 3 4 LT 242 LT 242 2 2 a a 5 5 ...

Страница 259: ...er 2 8 Bolt 2 M6 95 mm 9 Screw 17 M5 16 mm 10 Latch 1 11 Upper front hood 1 12 Ornament 1 13 Lower front hood 1 14 Ornament 1 15 Front hood inner 1 16 Damper 2 26 27 19 20 7 8 5 4 2 3 13 14 12 11 1 10 18 17 15 16 9 6 25 22 25 22 23 21 22 24 7 Nm 0 7 kgf m 5 2 ft Ib 7 Nm 0 7 kgf m 5 2 ft Ib 2 5 Nm 0 25 kgf m 1 84 ft lb 3 5 Nm 0 35 kgf m 2 58 ft lb ...

Страница 260: ...Rivet 4 23 Hook 2 24 Fire extinguisher box 1 25 Mat 2 Not reusable 26 Rivet 5 27 Service lid 1 No Part name Q ty Remarks 26 27 19 20 7 8 5 4 2 3 13 14 12 11 1 10 18 17 15 16 9 6 25 22 25 22 23 21 22 24 7 Nm 0 7 kgf m 5 2 ft Ib 7 Nm 0 7 kgf m 5 2 ft Ib 2 5 Nm 0 25 kgf m 1 84 ft lb 3 5 Nm 0 35 kgf m 2 58 ft lb ...

Страница 261: ...7 Inner ornament left 1 8 Inner ornament right 1 9 Bolt 4 M6 29 mm 10 Nut 2 11 Screw 2 M6 18 mm 12 Side cover left 1 13 Side cover right 1 14 Nut 2 10 10 13 4 2 6 11 9 14 9 8 12 1 7 3 2 5 9 11 9 14 LT 572 LT 572 5 5 Nm 0 55 kgf m 4 06 ft lb 5 5 Nm 0 55 kgf m 4 06 ft lb 5 5 Nm 0 55 kgf m 4 06 ft lb 5 5 Nm 0 55 kgf m 4 06 ft lb 5 5 Nm 0 55 kgf m 4 06 ft lb ...

Страница 262: ...m 7 Center cover 1 8 Screw 2 M5 16 mm 9 Meter cover 1 10 Bolt 4 M5 12 mm 11 Multifunction meter 1 12 Grommet 4 13 Grommet 2 14 Glove box 1 15 Glove box lid 1 16 Lock 1 11 7 3 5 4 4 13 6 6 16 15 14 12 13 10 2 1 17 8 9 LT 572 4 Nm 0 4 kgf m 3 0 ft Ib 5 5 Nm 0 55 kgf m 4 06 ft lb 5 5 Nm 0 55 kgf m 4 06 ft lb 2 5 Nm 0 25 kgf m 1 84 ft lb ...

Страница 263: ...r 8 10 17 Grommet 1 No Part name Q ty Remarks 11 7 3 5 4 4 13 6 6 16 15 14 12 13 10 2 1 17 8 9 LT 572 4 Nm 0 4 kgf m 3 0 ft Ib 5 5 Nm 0 55 kgf m 4 06 ft lb 5 5 Nm 0 55 kgf m 4 06 ft lb 2 5 Nm 0 25 kgf m 1 84 ft lb ...

Страница 264: ...Part name Q ty Remarks 1 Bolt 1 M6 18 mm 2 Cable stopper 1 3 Steering cable 1 4 Plastic tie 2 5 Bolt 4 M8 30 mm 6 Steering master 1 7 Rivet 2 8 Bracket 1 9 Grommet 2 7 Nm 0 7 kgf m 5 2 ft Ib 17 Nm 1 7 kgf m 12 5 ft Ib LT 242 A LT 242 1 7 4 9 6 8 3 5 2 ...

Страница 265: ...7 Steering sensor 1 8 Nut 1 9 Bolt 1 M8 50 mm 10 Lock washer 1 Not reusable 11 Steering arm ASSY 1 12 Nut 1 13 Ball joint 1 14 Steering arm 1 15 Steering shaft 1 16 Bushing 1 4 Nm 0 4 kgf m 3 0 ft Ib 4 Nm 0 4 kgf m 3 0 ft Ib 4 Nm 0 4 kgf m 3 0 ft Ib 16 Nm 1 6 kgf m 11 8 ft Ib 7 Nm 0 7 kgf m 5 2 ft Ib A 1 12 4 3 13 10 9 8 11 14 19 20 7 16 15 18 17 6 5 6 2 ...

Страница 266: ...ring shaft housing 1 20 Rubber seal 1 Not reusable No Part name Q ty Remarks 4 Nm 0 4 kgf m 3 0 ft Ib 4 Nm 0 4 kgf m 3 0 ft Ib 4 Nm 0 4 kgf m 3 0 ft Ib 16 Nm 1 6 kgf m 11 8 ft Ib 7 Nm 0 7 kgf m 5 2 ft Ib A 1 12 4 3 13 10 9 8 11 14 19 20 7 16 15 18 17 6 5 6 2 ...

Страница 267: ...teering shaft 2 Install the nut 2 to the steering arm 1 3 Align the tab a on the plate 3 with the projection b on the arm 4 Tighten the steering arm bolt 4 to the specified torque 5 Bend the tabs c along the flat sides of the bolt Steering arm bolt 4 16 Nm 1 6 kgf m 11 8 ft lb a c b b c 4 3 2 1 ...

Страница 268: ... Cable stopper 1 4 Plastic tie 1 5 Nut 1 6 Steering cable 1 7 Packing 1 Not reusable 8 Plastic tie 6 9 Nut 1 10 Screw 4 M5 12 mm 11 Speed sensor 1 12 Rivet 6 13 Holder 6 10 1 9 11 8 13 12 2 3 13 4 12 5 7 6 LT 242 LT 242 LT 572 4 Nm 0 4 kgf m 3 0 ft Ib 7 Nm 0 7 kgf m 5 2 ft Ib 7 Nm 0 7 kgf m 5 2 ft Ib 7 Nm 0 7 kgf m 5 2 ft Ib 7 Nm 0 7 kgf m 5 2 ft Ib ...

Страница 269: ...5 Steering cable installation jet pump end 1 Adjust the steering cable set length a and then tighten the locknut 1 to the specified torque jet pump end 2 Install the washer 1 and steering cable joint 2 and then tighten the steering ca ble joint 2 to the specified torque 3 Install the washer 3 and locknut 4 and then tighten the locknut 4 to the specified torque Cable stopper bolt 3 7 Nm 0 7 kgf m 5...

Страница 270: ...9 Packing 1 Not reusable 10 Watertight storage compartment 1 11 Packing 1 Not reusable 12 Nut 11 13 Washer 11 14 Bolt 9 M8 30 mm 15 Deck beam 1 16 Nut 1 A BOW 7 Nm 0 7 kgf m 5 2 ft Ib 7 Nm 0 7 kgf m 5 2 ft Ib 16 Nm 1 6 kgf m 11 8 ft Ib 16 Nm 1 6 kgf m 11 8 ft Ib 26 Nm 2 6 kgf m 19 2 ft Ib 16 Nm 1 6 kgf m 11 8 ft Ib 5 5 1 3 2 4 6 6 2 7 2 7 8 9 10 11 14 19 23 15 14 18 17 21 22 17 16 13 12 21 20 13 1...

Страница 271: ...ion 1 23 Seat holder 1 No Part name Q ty Remarks A BOW 7 Nm 0 7 kgf m 5 2 ft Ib 7 Nm 0 7 kgf m 5 2 ft Ib 16 Nm 1 6 kgf m 11 8 ft Ib 16 Nm 1 6 kgf m 11 8 ft Ib 26 Nm 2 6 kgf m 19 2 ft Ib 16 Nm 1 6 kgf m 11 8 ft Ib 5 5 1 3 2 4 6 6 2 7 2 7 8 9 10 11 14 19 23 15 14 18 17 21 22 17 16 13 12 21 20 13 13 12 12 B A A ...

Страница 272: ...se 2 5 Plastic tie 3 6 Plastic tie 3 7 Fuel tank breather hose 1 8 Fuel tank breather hose 1 9 Rivet 2 10 Plate 1 11 Water separator 1 12 Drain bolt 1 13 O ring 1 Not reusable 14 Rivet 7 15 Ventilation socket 1 16 Ventilation pipe 1 18 23 14 19 22 20 21 17 6 14 23 6 14 23 7 3 4 3 4 6 14 23 23 5 14 15 16 2 1 1 2 14 9 5 5 11 10 13 12 8 SS 4 Nm 0 4 kgf m 3 0 ft Ib ...

Страница 273: ...Nut 1 19 Seal 1 Not reusable 20 Clamp 1 21 Cooling water hose 1 22 Cooling water pilot outlet 1 23 Holder 5 No Part name Q ty Remarks 18 23 14 19 22 20 21 17 6 14 23 6 14 23 7 3 4 3 4 6 14 23 23 5 14 15 16 2 1 1 2 14 9 5 5 11 10 13 12 8 SS 4 Nm 0 4 kgf m 3 0 ft Ib ...

Страница 274: ...tlet installation 1 Install a new seal 1 and the cooling water pilot outlet 2 and then tighten the cooling water pilot outlet nut 3 to the specified torque TIP Align the protrusion a with the slit b Cooling water pilot outlet nut 3 4 Nm 0 4 kgf m 3 0 ft lb 3 1 2 a b ...

Страница 275: ...ery case 1 10 Pad 1 Not reusable 11 Pad 1 Not reusable 12 Pad 3 Not reusable 13 Clamp 1 14 Resonator 1 15 Clamp 2 16 Clamp 1 17 13 14 15 20 18 26 19 22 23 24 16 15 21 a c c d d b a b 26 27 25 25 25 27 6 3 4 9 8 7 5 2 12 10 11 12 1 26 26 28 29 LT 240 24 23 22 3 5 Nm 0 35 kgf m 2 58 ft lb 3 5 Nm 0 35 kgf m 2 58 ft lb 5 5 Nm 0 55 kgf m 4 06 ft lb 5 5 Nm 0 55 kgf m 4 06 ft lb 3 5 Nm 0 35 kgf m 2 58 ft...

Страница 276: ...ent mark 24 Plate 1 25 Pad 3 Not reusable 26 Rivet 8 27 Hook 2 28 Bracket 1 29 Bracket 1 No Part name Q ty Remarks 17 13 14 15 20 18 26 19 22 23 24 16 15 21 a c c d d b a b 26 27 25 25 25 27 6 3 4 9 8 7 5 2 12 10 11 12 1 26 26 28 29 LT 240 24 23 22 3 5 Nm 0 35 kgf m 2 58 ft lb 3 5 Nm 0 35 kgf m 2 58 ft lb 5 5 Nm 0 55 kgf m 4 06 ft lb 5 5 Nm 0 55 kgf m 4 06 ft lb 3 5 Nm 0 35 kgf m 2 58 ft lb ...

Страница 277: ...P Align the alignment mark a on the rubber hose 3 with the alignment mark b on the wa ter tank 1 4 Install the water lock and rubber hose 1 and then tighten the clamp 2 to the spec ified torque TIP Align the projection a on the rubber hose 1 with the alignment mark b on the water tank 5 Install the resonator 1 and then tighten the clamp 2 to the specified torque TIP Fit the protrusion a on the res...

Страница 278: ...8 25 Exhaust system 6 Install the band Rubber hose clamp 2 3 5 Nm 0 35 kgf m 2 58 ft lb ...

Страница 279: ...mm 6 Trim arm 1 7 Shift arm 1 8 Bolt 2 M8 20 mm 9 Nut 3 10 Plate 1 11 RiDE motor 1 12 Packing 1 Not reusable 13 Rivet 2 14 Hook 2 15 Rivet 1 16 Holder 1 A A 2 1 15 11 12 14 13 14 13 16 4 10 9 8 7 5 17 Nm 1 7 kgf m 12 5 ft Ib LT 242 LT 242 LT 242 A 7 Nm 0 7 kgf m 5 2 ft Ib 11 Nm 1 1 kgf m 8 1 ft Ib 6 3 5 4 Nm 0 4 kgf m 3 0 ft Ib ...

Страница 280: ...he RiDE motor harness 1 from the holders 2 and the plastic tie 3 5 Remove the speed sensor 1 and ride plate 2 6 Disconnect the shift rod joint 1 7 Lower the reverse gate and then remove the trim rod 1 and shift rod 2 8 Remove the trim arm 1 and shift arm 2 9 While holding the RiDE motor 1 against the inner wall of the hull remove the RiDE motor bolts 2 nuts 3 and plate 4 1 b a 1 2 1 3 2 1 3 2 1 1 ...

Страница 281: ... specified torque 4 Adjust the length a of the trim rod 1 The trim rod joint must be screwed in more than 8 mm 0 31 in The shift rod joint must be screwed in more than 9 mm 0 35 in 5 Turn the trim rod joint 180 so that the 2 holes b face in the opposite directions and then tighten the locknut 2 to the specified torque 6 Adjust the length c of the shift rod 3 1 3 4 2 1 3 2 1 RiDE motor nuts 2 17 Nm...

Страница 282: ...en the speed sensor screws 4 to the specified torque 12 Fasten the RiDE motor harness 1 using the holders 2 and plastic tie 3 13 Install the water tank 1 and then tighten the rubber hose clamp 2 to the specified torque Trim rod length a 141 0 0 5 mm 5 55 0 02 in Shift rod length c 233 0 7 mm 9 17 0 03 in Distance e Trim rod More than 8 0 mm 0 31 in Shift rod More than 9 0 mm 0 35 in Locknut 2 4 Nm...

Страница 283: ... tween the protrusions d on the rubber hose 1 16 Connect the RiDE motor couplers a and b and then fasten the RiDE motor lead using a plastic tie 1 17 Install the deck beam 1 and then tighten the deck beam nut 2 to the specified torque 18 Initialize the RiDE system using the YDIS See YDIS Instruction Manual RiDE system initialization Connect the YDIS and initialize the RiDE sys tem See YDIS Instruc...

Страница 284: ... 4 11 Screw 4 M5 25 mm 12 Drain plug 2 13 Packing 2 Not reusable 14 Bolt 4 VXR M8 47 mm 15 Reboarding step 1 VXR 16 Bracket 2 VXR 15 14 14 14 14 6 5 4 17 16 1 2 12 13 11 1 2 2 3 2 7 8 10 9 BOW LT 271 LT 271 2 Nm 0 2 kgf m 1 5 ft Ib 16 Nm 1 6 kgf m 11 8 ft Ib 16 Nm 1 6 kgf m 11 8 ft Ib 16 Nm 1 6 kgf m 11 8 ft Ib 5 5 Nm 0 55 kgf m 4 06 ft lb 2 5 Nm 0 25 kgf m 1 84 ft lb ...

Страница 285: ...name Q ty Remarks 15 14 14 14 14 6 5 4 17 16 1 2 12 13 11 1 2 2 3 2 7 8 10 9 BOW LT 271 LT 271 2 Nm 0 2 kgf m 1 5 ft Ib 16 Nm 1 6 kgf m 11 8 ft Ib 16 Nm 1 6 kgf m 11 8 ft Ib 16 Nm 1 6 kgf m 11 8 ft Ib 5 5 Nm 0 55 kgf m 4 06 ft lb 2 5 Nm 0 25 kgf m 1 84 ft lb ...

Страница 286: ...s on both sides of the reboarding step in the down position using the plastic ties 1 so that they will not re turn to the up position 2 Install the reboarding step 1 and then tighten the reboarding step bolts 2 to the specified torque 3 Remove the plastic ties Check that the re boarding step returns properly Spout nut 2 5 5 Nm 0 55 kgf m 4 06 ft lb Spout hose clamp 4 2 5 Nm 0 25 kgf m 1 84 ft lb B...

Страница 287: ...Rivet 7 13 Rear protector 1 14 Rear protector 1 15 Bolt 10 M8 40 mm 16 Collar 10 7 Nm 0 7 kgf m 5 2 ft Ib 7 Nm 0 7 kgf m 5 2 ft Ib 7 Nm 0 7 kgf m 5 2 ft Ib 13 Nm 1 3 kgf m 9 6 ft Ib 16 Nm 1 6 kgf m 11 8 ft Ib 16 Nm 1 6 kgf m 11 8 ft Ib 18 Nm 1 8 kgf m 13 3 ft Ib 1 5 Nm 0 15 kgf m 1 11 ft lb 28 1 11 2 5 6 10 9 7 4 3 8 22 32 31 21 23 20 17 16 15 11 13 12 14 29 30 24 27 26 25 34 33 15 16 18 7 19 19 3...

Страница 288: ...Mat 1 Not reusable 30 Mat 1 Not reusable 31 Ornament 1 32 Ornament 1 33 Ornament 1 No Part name Q ty Remarks 7 Nm 0 7 kgf m 5 2 ft Ib 7 Nm 0 7 kgf m 5 2 ft Ib 7 Nm 0 7 kgf m 5 2 ft Ib 13 Nm 1 3 kgf m 9 6 ft Ib 16 Nm 1 6 kgf m 11 8 ft Ib 16 Nm 1 6 kgf m 11 8 ft Ib 18 Nm 1 8 kgf m 13 3 ft Ib 1 5 Nm 0 15 kgf m 1 11 ft lb 28 1 11 2 5 6 10 9 7 4 3 8 22 32 31 21 23 20 17 16 15 11 13 12 14 29 30 24 27 26...

Страница 289: ... kgf m 5 2 ft Ib 7 Nm 0 7 kgf m 5 2 ft Ib 7 Nm 0 7 kgf m 5 2 ft Ib 13 Nm 1 3 kgf m 9 6 ft Ib 16 Nm 1 6 kgf m 11 8 ft Ib 16 Nm 1 6 kgf m 11 8 ft Ib 18 Nm 1 8 kgf m 13 3 ft Ib 1 5 Nm 0 15 kgf m 1 11 ft lb 28 1 11 2 5 6 10 9 7 4 3 8 22 32 31 21 23 20 17 16 15 11 13 12 14 29 30 24 27 26 25 34 33 15 16 18 7 19 19 36 37 35 ...

Страница 290: ...Deck and hull 8 37 MEMO ...

Страница 291: ...onnecting the communication cable to the watercraft 9 4 Engine unit troubleshooting 9 5 Using the YDIS for engine unit troubleshooting 9 5 Diagnostic code table 9 7 Diagnostic code and checking step 9 8 Engine unit troubleshooting diagnostic code not detected 9 15 ...

Страница 292: ...dels and technologies maintaining compatibility with regulations This manual con tains the model specific information See YDIS Ver 2 20 instruction manual for detailed information Basic components TIP The software is available through YMAN Yamaha Marine Associate Network YDIS2 Hardware Kit 90890 06884 YDIS2 Hardware Kit LIT YDIS2 01 KT No Part name Q ty Remarks 1 Adapter interface 1 2 Adapter cap ...

Страница 293: ...ne speed is checked for changes to determine if the cylinder is malfunctioning These tests can be performed quickly 6 Logger graph Data stored in the ECM for the last 78 seconds in 6 second intervals is displayed on a graph 7 ECM record graph When a malfunction occurs in the ETV system or APS system 4 seconds 2 seconds before and after the malfunction of recorded data is saved in the ECM This data...

Страница 294: ... mode Main relay TPS 1 Engine start mode ETV relay TPS 2 SW activated engine stop mode 5 Thermoswitch Intake air pressure OTS mode Oil pressure switch Battery voltage Cruise assist mode WARNING Target TPS voltage 1 Reverse mode ETV limit 1 Target TPS voltage This item shows the target output voltage of the TPS This value is the control voltage that the ECM requires to set the target opening angle ...

Страница 295: ...anual Connecting the communication cable to the watercraft TIP Be careful not to pinch the communication cable between the front hood and the deck or to damage it W B R Y B a b 1 2 3 4 a Wire harness coupler b Meter coupler 1 K Line harness 2 Adapter interface 3 USB cable 4 Adapter cap ...

Страница 296: ...ermines that the part is disconnected and a diagnostic code is detected Therefore make sure to delete the diagnosis record after checking the input voltage Using the YDIS for engine unit troubleshooting TIP Use the diagnostic codes displayed by the YDIS to check each part according to the Diagnostic code and checking step table Delete the diagnostic codes after checking repairing or replacing a pa...

Страница 297: ...e warning indicator b blink and the buzzer sounds intermittently for 30 seconds When the engine is started for the first time after the problem is solved the WARNING indicator light and the check engine warning indicator blink and the buzzer sounds intermittently for 30 seconds to indicate that malfunction history exists TIP Because the multifunction meter cannot display more than 1 diagnostic cod...

Страница 298: ...9 Battery voltage 23 Air temperature sensor Intake air temperature sensor 24 Cam position sensor 29 Air pressure sensor Intake air pressure sensor 47 Slant detection switch 51 APS full close switch 55 Steering sensor 112 113 114 115 116 117 119 123 138 141 142 143 144 145 ETV system 118 121 122 129 136 137 139 ETV system 124 125 126 127 128 TPS 131 132 133 134 135 APS 150 151 152 153 154 RPS 157 1...

Страница 299: ...ack yellow B Y and black orange B O en gine temperature sensor leads for continuity A 2 Measure the engine tempera ture sensor resistance 7 16 19 Battery voltage Trolling speed is unstable 1 Check the battery voltage us ing the YDIS 9 2 Check the fuse for continuity 7 3 7 31 Measure the stator coil output peak voltage 7 13 Measure the rectifier regula tor output peak voltage 7 13 Check the battery...

Страница 300: ... black orange B O intake air pressure sensor leads for con tinuity A 2 47 Slant detection switch Normal operation Check the slant detection switch operation using the YDIS 7 26 Measure the slant detection switch input voltage 7 26 Check the blue black L B and black orange B O slant detection switch leads for con tinuity A 2 Check the slant detection switch for continuity 7 26 51 APS full close swi...

Страница 301: ...Check the charging system Stator coil output peak volt age Stator coil resistance Rectifier regulator output peak voltage Rectifier regulator continuity 7 13 7 13 7 13 7 13 Check the fuse for continuity 7 31 Check the battery voltage and specific gravity 3 6 Check the red R and black B power supply circuit cables and leads for continuity A 2 115 116 ETV system Engine speed is limited Check the pin...

Страница 302: ... 7 27 124 125 127 128 TPS Engine speed is limited Check the pink P orange O pink black P B and black orange B O ETV leads for continuity A 2 Check the ECM circuit for con tinuity 7 27 126 TPS Engine speed is limited Check the TPS output voltage using the YDIS 7 18 Check the ECM circuit for con tinuity 7 27 129 ETV Engine speed is limited Check the TPS output voltage using the YDIS 7 18 Check the E...

Страница 303: ... for continuity 7 3 7 31 Check the battery voltage and specific gravity 3 6 Check the red R and black B power supply circuit cables and leads for continuity A 2 141 ETV system Engine speed is limited Check the ECM circuit for con tinuity 7 27 Check the ETV relay and fuse ETV relay for continuity 7 3 7 22 7 31 142 ETV system Engine speed is limited Check the TPS output voltage and throttle valve op...

Страница 304: ...for continuity 7 3 7 22 7 31 Check the throttle shaft and throttle inner surface for wear or damage 4 7 150 151 152 153 RPS Engine speed is limited Shifting is impossible Check the orange red O R orange white O W pink red P R pink white P W black red B R and black white B W RPS leads for continuity A 2 Check the ECM circuit for con tinuity 7 27 154 RPS Engine speed is limited Shifting is impossibl...

Страница 305: ... im possible Replace the RiDE motor 8 26 163 SCU Engine speed is limited Shifting is impossible Check the SCU relay and fuse SCU for continuity 7 3 7 24 7 31 Check the battery voltage and specific gravity 3 6 Check the charging system Stator coil output peak volt age Stator coil resistance Rectifier regulator output peak voltage Rectifier regulator continuity 7 13 7 13 7 13 7 13 164 SCU Engine spe...

Страница 306: ...heck the fuse for continuity 7 3 7 31 Starter relay malfunction Check the starter relay 7 32 Engine start switch mal function Check the engine start switch han dlebar switch left 7 31 Short open or loose con nection in starter motor cir cuit Measure the starter relay input volt age 7 32 Check the wire harness A 2 Starter motor malfunction Disassemble and check the starter motor 7 34 Stuck piston o...

Страница 307: ...ed Check that the engine shut off cord clip is installed properly 7 31 Engine stop switch mal function Check the engine stop switch conti nuity handlebar switch left 7 31 Pickup coil malfunction Measure the pickup coil output peak voltage 7 12 Measure the pickup coil resistance 7 12 Short open or loose con nection in pickup coil circuit Check the white black W B and black orange B O pickup coil le...

Страница 308: ...mp module leads for continuity A 2 Measure the fuel pressure 4 3 Fuel pump relay malfunc tion Check the fuel pump relay 7 29 Compression pres sure is low Compression leakage Measure the compression pressure 5 1 Measure the valve clearance 3 11 Check the camshaft for damage 5 35 Check the cylinder head gasket and cylinder head warpage 5 47 Check the valve and valve seat for wear 5 48 Check the pist...

Страница 309: ...asure the fuel injector resistance 7 29 Short open or loose con nection in fuel injector cir cuit Measure the fuel injector input volt age 7 29 Check the red yellow R Y pur ple red Pu R purple black Pu B purple yellow Pu Y and pur ple green Pu G fuel injector leads for continuity A 2 Clogged fuel injector filter Clean the fuel injector 4 7 ECM malfunction Replace the ECM Compression pres sure is l...

Страница 310: ...the black yellow B Y and black orange B O engine tempera ture sensor leads A 2 Thermo switch malfunction Check the thermo switch for continu ity 7 15 Check that there is no short circuit between the pink P and black B thermo switch leads A 2 Thermo sensor malfunction Check the thermo sensor 7 16 Check that there is no short circuit between the black blue B L and black orange B O thermo sensor lead...

Страница 311: ...ging circuit for wiring connection and damage A 2 Stator coil malfunction Check the stator coil 7 13 Rectifier regulator malfunc tion Measure the rectifier regulator out put peak voltage 7 13 Symptom 2 Cause Checking step See page Watercraft cannot reach high speeds Jet pump unit malfunction Check the impeller impeller duct and intake grate 3 10 6 1 6 10 Water entered hull Check the drain plugs an...

Страница 312: ...Engine unit troubleshooting 9 21 MEMO ...

Страница 313: ...A Appendix Wiring diagram A 1 How to use the wiring diagram A 1 VXS VXR A 2 ...

Страница 314: ...B Y Black Yellow G Green Gy Gray G O Green Orange L Blue L B Blue Black L R Blue Red L W Blue White L Y Blue Yellow Lg Light green O Orange O G Orange Green O R Orange Red O W Orange White P Pink P B Pink Black P G Pink Green P R Pink Red P W Pink White Pu B Purple Black Pu G Purple Green Pu R Purple Red Pu Y Purple Yellow R Red R W Red White R Y Red Yellow Sb Sky blue W White W B White Black W G ...

Страница 315: ...r Br W B B B B B B B B B R Y R Y R Y R Y R Y R Y R Y R Y R Y L W R Y B O B O B O B O B O B O B O B O B O B O B R R R R Y R R R L L B O B O B O P G B O B O B B L B O B O O R B B B B B R Y R Y R Y R Y Y W R W W W Gy Gy Y Y L Y G Y W L R L R L B L Y B L B L B Y R W O O O O B B B B B B B B B W B B G P W B B R Y R Y R Y W L B O W O R P W B R B W P R R Y Y Y Br Y W R W R B W Gy P L R L R L B L B L Y B G...

Страница 316: ... Fuse 10 A fuel pump relay b Fuse 3 A not used c Fuse 20 A main relay d Fuse 10 A main relay e Fuse 10 A ETV relay f Fuse 3 A remote control receiver g Fuse 30 A battery h Fuse 50 A SCU relay i Fuel pump relay j Main relay k ETV relay l SCU relay ...

Страница 317: ......

Страница 318: ...Mar 2015 CR E ...

Отзывы: