Administrator Tools
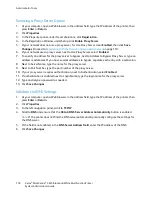
When you enter the third digit of a three-digit number, the cursor automatically advances to
the next cell.
−
After entering the number in the last cell, touch
OK
.
12.
At the Restart System prompt, touch
Close
.
13.
Touch
Gateway Address
.
14.
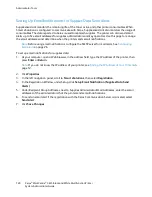
Using the keypad, enter the address as X.X.X.X, where X is a number from 0–255:
−
To clear an existing number from a cell, press
Clear
.
−
To enter a one or two-digit number, to advance to the next cell, touch the
Right
arrow.
When you enter the third digit of a three-digit number, the cursor automatically advances to
the next cell.
−
After entering the number in the last cell, touch
OK
.
15.
At the Restart System prompt, touch
Close
.
16.
Turn off the printer, then turn it on again.
See also:
Online Support Assistant at:
www.xerox.com/office/WC3615support
Assigning the Printer IP Address for the Xerox
®
Phaser
®
3610 Black and
White Printer
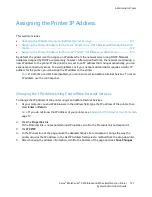
Assigning the IP Address Automatically
1.
At the printer control panel, press the
Menu
button.
Note:
To navigate through the menu, use the up or down arrow buttons.
2.
Navigate to
Admin Settings
, then press
OK
.
3.
Navigate to
Network Setup
, then press
OK
.
4.
Navigate to
TCP/IP
, then press
OK
.
5.
Navigate to
IPv4
, then press
OK
.
6.
Navigate to
Get IP Address
, then press
OK
.
7.
Navigate to
DHCP/AutoIP
, then press
OK
.
8.
Turn off the printer, then turn it on again.
9.
To view the new IP address and ensure that the connection is successful, print a Configuration
Report.
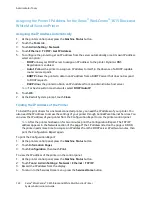
Finding the IP Address of the Printer Using the Control Panel
To install the print drivers for a network-connected printer, you need the IP address of your printer. You
also need the IP address to access the settings of your printer through CentreWare Internet Services. You
can view the IP address of your printer on the Configuration Page or on the control panel.
124
Xerox
®
WorkCentre
®
3615 Black and White Multifunction Printer
System Administrator Guide

