Page
111
11.7 Commissioning
Note: It is the responsibility of the installer to ensure that the boiler is properly
commissioned by an OFTEC trained and registered technician. Failure to do so WILL
invalidate ALL warranties.
Before firing ensure that all the baffles are in place, as they may have been displaced during
transit; Refer to the General Information section. Switch the boiler on, ensuring all controls are
calling for heat.
The oil pump pressure must be checked by fitting a pressure gauge to the pump pressure port.
If necessary the pressure should be adjusted until it corresponds with the value in the Technical
Data section for the required output. Using a smoke pump, check the smoke number. It should
be zero.
Using a flue gas analyser, check the CO
2
content and the flue gas temperature once the boiler
is hot. With the CO
2
correctly set, check the flue gas composition in line with OFTEC guidance.
Testing while the boiler is still relatively cold gives inaccurate results and leads to incorrect
adjustments being made.
Where a balanced flue has been fitted ensure the air duct connecting the flue and burner has
been properly connected before commissioning.
Note: All product warranties will be invalidated if the appliance is not commissioned by a
Warmflow or OFTEC trained and registered technician and the commissioning certificate
of the OFTEC Boiler Passport completed and returned to Warmflow within 30 days from
the date of installation and 90 days from the date code stamped on the appliance.
Additionally, to comply with the building regulations, the boiler passport or OFTEC form CD11
should be completed and a copy left with the householder.
Содержание Agentis Series
Страница 2: ......
Страница 30: ...Page 29 4 5 Components 4 5 1 B Series Boilerhouse Casing Key Components...
Страница 31: ...Page 30 4 5 2 I Series Internal Casing 21 26 33 Models 44 Models...
Страница 32: ...Page 31 4 5 3 I Series Internal Key Components 21 26 33 Models 44 Models...
Страница 33: ...Page 32 4 5 4 I Series Internal Pump Group 21 26 33 Models 44 Models...
Страница 34: ...Page 33 4 5 5 I Series Internal System Components SK3 4 5 6 I Series Internal Combination Boiler Key Components...
Страница 35: ...Page 34 4 5 7 E Series External Casing 21 26 33 Models 44 Models...
Страница 36: ...Page 35 4 5 8 E Series External Key Components 21 26 33 Models 44 Models...
Страница 37: ...Page 36 4 5 9 E Series External Pump Group 21 26 33 Models 44 Models...
Страница 39: ...Page 38 4 5 12 Combination Boiler Pipe Layout...
Страница 41: ...Page 40 5 1 2 I Series Internal I21 I26 I33 5 1 3 I Series Internal I44...
Страница 42: ...Page 41 5 1 4 I Series Internal Combination Boilers I21C I26C I33C 5 1 5 E Series External E21 E26 E33...
Страница 43: ...Page 42 5 1 6 E Series External Base Tray E21 E26 E33 5 1 7 E Series External E44...
Страница 44: ...Page 43 5 1 8 E Series External E44 Base Tray 5 1 9 E Series External Combination Boilers E21C E26C E33C...
Страница 45: ...Page 44 5 1 10 E Series External Combination Boiler Base Tray E21C E26C E33C...
Страница 60: ...Page 59 6 3 2 Wiring Diagram Fuses The appliance must have a permanent live supply connected to operate...
Страница 61: ...Page 60 6 3 3 External 230V Two Channel Programmer Room Thermostat Optional Outdoor sensor...
Страница 62: ...Page 61 6 3 4 Internal Two Channel Programmer and Room Thermostat Optional Outdoor Sensor...
Страница 73: ...Page 72 6 6 9 Honeywell Y Plan Independent CH DHW Fully Pumped Only 2 CHANNEL TIMECLOCK...
Страница 74: ...Page 73 6 6 10 Honeywell S Plan Independent CH DHW Fully Pumped Only 2 CHANNEL TIMECLOCK...
Страница 93: ...Page 92 Kabin Pak External Plume Management Kit KPMK The kit comprises...
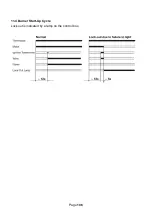
Страница 107: ...Page 106 11 4 Burner Start Up Cycle Lock out is indicated by a lamp on the control box...
Страница 122: ...Page 121 14 SPARES 14 1 RDB 2 2 BX Spares...
Страница 124: ...Page 123 14 2 RDB 3 2 BX Spares...
Страница 134: ...Page 133 Intentionally left blank...
Страница 135: ......


