Page
15
1.9 Setting the date and time
In order for the appliance to operate with maximum DHW efficiency, and if the built in timeclock
is to be used, it is necessary to correctly set the date and time upon first start-up of the
appliance. If the date is correctly set, daylight saving changes will be applied automatically.
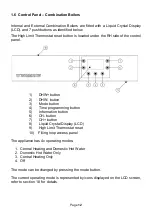
From the Home Screen, the date and time can be set by simultaneously pressing the Time
Programming button (4) and DHW- button (2) for 3 seconds.
Step 1 – Set the current hour (24 hr format) using the DHW+ button (1) and DHW- button (2),
then press the Time Programming button to confirm.
Step 2 – Set the current minute using the DHW+ button (1) and DHW- button (2), then press the
Time Programming button (4) to confirm.
Step 3 – Set the current week day (1-7) using the DHW+ button (1) and DHW- button (2), then
press the Time Programming button (4) to confirm.
Step 4 – Set the current year using the DHW+ button (1) and DHW- button (2), then press the
Time Programming button (4) to confirm.
Step 5 – Set the current month (1-12) using the DHW+ button (1) and DHW- button (2), then
press the Time Programming button (4) to confirm.
Step 6 – Set the current date using the DHW+ button (1) and DHW- button (2), then press the
Time Programming button (4) to confirm.
The LCD will show the time, and display the text ‘done’ when the programming is completed.
After the appliance has been in operation for a number of days, it will be able to maintain a
memory of the date and time settings during short power interruptions. If power is interrupted for
an extended period it may be necessary to re-set the time and date again using the above
routine.
Содержание Agentis Series
Страница 2: ......
Страница 30: ...Page 29 4 5 Components 4 5 1 B Series Boilerhouse Casing Key Components...
Страница 31: ...Page 30 4 5 2 I Series Internal Casing 21 26 33 Models 44 Models...
Страница 32: ...Page 31 4 5 3 I Series Internal Key Components 21 26 33 Models 44 Models...
Страница 33: ...Page 32 4 5 4 I Series Internal Pump Group 21 26 33 Models 44 Models...
Страница 34: ...Page 33 4 5 5 I Series Internal System Components SK3 4 5 6 I Series Internal Combination Boiler Key Components...
Страница 35: ...Page 34 4 5 7 E Series External Casing 21 26 33 Models 44 Models...
Страница 36: ...Page 35 4 5 8 E Series External Key Components 21 26 33 Models 44 Models...
Страница 37: ...Page 36 4 5 9 E Series External Pump Group 21 26 33 Models 44 Models...
Страница 39: ...Page 38 4 5 12 Combination Boiler Pipe Layout...
Страница 41: ...Page 40 5 1 2 I Series Internal I21 I26 I33 5 1 3 I Series Internal I44...
Страница 42: ...Page 41 5 1 4 I Series Internal Combination Boilers I21C I26C I33C 5 1 5 E Series External E21 E26 E33...
Страница 43: ...Page 42 5 1 6 E Series External Base Tray E21 E26 E33 5 1 7 E Series External E44...
Страница 44: ...Page 43 5 1 8 E Series External E44 Base Tray 5 1 9 E Series External Combination Boilers E21C E26C E33C...
Страница 45: ...Page 44 5 1 10 E Series External Combination Boiler Base Tray E21C E26C E33C...
Страница 60: ...Page 59 6 3 2 Wiring Diagram Fuses The appliance must have a permanent live supply connected to operate...
Страница 61: ...Page 60 6 3 3 External 230V Two Channel Programmer Room Thermostat Optional Outdoor sensor...
Страница 62: ...Page 61 6 3 4 Internal Two Channel Programmer and Room Thermostat Optional Outdoor Sensor...
Страница 73: ...Page 72 6 6 9 Honeywell Y Plan Independent CH DHW Fully Pumped Only 2 CHANNEL TIMECLOCK...
Страница 74: ...Page 73 6 6 10 Honeywell S Plan Independent CH DHW Fully Pumped Only 2 CHANNEL TIMECLOCK...
Страница 93: ...Page 92 Kabin Pak External Plume Management Kit KPMK The kit comprises...
Страница 107: ...Page 106 11 4 Burner Start Up Cycle Lock out is indicated by a lamp on the control box...
Страница 122: ...Page 121 14 SPARES 14 1 RDB 2 2 BX Spares...
Страница 124: ...Page 123 14 2 RDB 3 2 BX Spares...
Страница 134: ...Page 133 Intentionally left blank...
Страница 135: ......


