background image

E5

H High Performance Universal Inverter      User Manual 


Chapter 6    Parameter Description 

65 


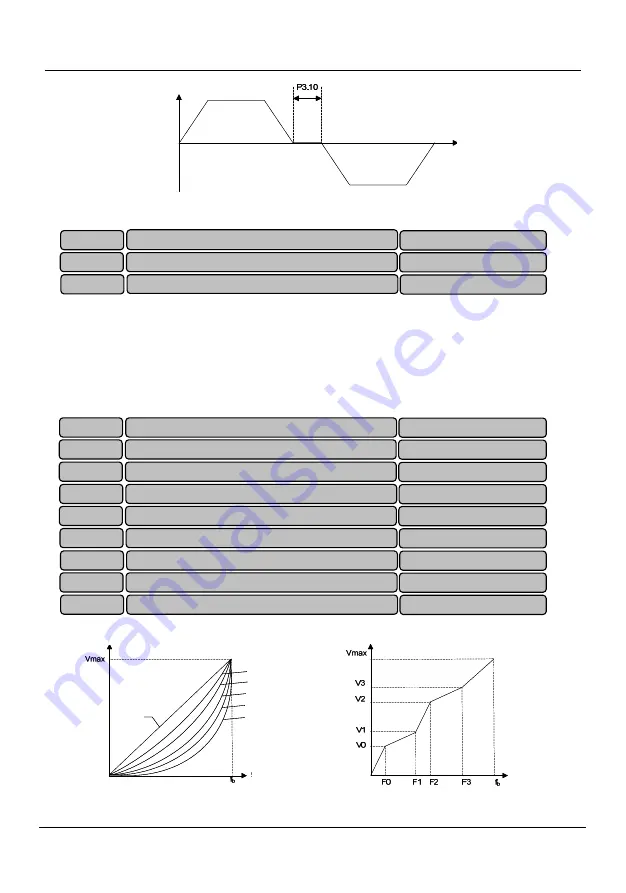
Figure 6

10 Forward/reverse dead zone time 


P3.11 is the frequency set for jog operation.   
Jog acceleration time P3.12: The time from zero to maximum frequency.   
Jog deceleration time P3.13: The time from maximum frequency to zero.   
When the inverter is in standby status, it can adopt jog operation. The jog operation command may come 
from the operation panel, multi

functional terminal or host computer.   

6.5 Multi

section Parameter (Group P4) 


It is to determine the different V/F curves . 


Figure 6

11 V/F curve                                                  Figure 6

12 Multi

section V/F curve 

P3.11 

Jog frequency 

0.10~300.00 Hz (5.00Hz) 

P3.12 

Jog acceleration time 

0.1~60.0 s(6.0s) 

P3.13 

Jog deceleration time 

0.1~60.0 s(6.0s) 

P4.00 

V/F curve reference   

0~6(0) 

P4.01 

V/F frequency value F0 

0.00~300.00 Hz(0.00Hz) 

P4.02 

V/F voltage value V0 

0.0~100.0 %(0.0%) 

P4.03 

V/F frequency value F1 

0.00~300.00 Hz(0.00Hz) 

P4.04 

  V/F voltage value V1

0.0~100.0 %(0.0%) 

P4.05 

  V/F frequency value F2 

0.00~300.00 Hz(0.00Hz) 

P4.06 

  V/F voltage value V2

0.0~100.0 %(0.0%) 

P4.07 

V/F frequency value F3 

0.00~300.00 Hz(0.00Hz) 

P4.08 

  V/F voltage value V3 

0.0~100.0 %(0.0%) 

Output frequency 

Time 

Output frequency 

Time 

Output voltage 

Output voltage 

1.2-power 

1.4-power 

1.6-power 

1.8-power 

2-power 

Output frequency 

Output frequency 

Straight line 

Output voltage 

Output voltage 

1.2-power 

1.4-power 

1.6-power 

1.8-power 

2-power 

Output frequency 

Output frequency 

Straight line 

Содержание E5-H Series

Страница 1: ...E5 H High Performance Universal Inverter User Manual E5 H Series USER S MANUAL V T ...

Страница 2: ...se severe accident or loss safety measures such as redundancy or bypass shall be taken Goods Arrival Inspection Note Note z If the inverter is found damaged or have missing parts the inverter cannot be installed Otherwise accident may be caused Installation Note Note z When handling and installing the inverter please hold the inverter bottom Do not hold the enclosure only Otherwise your feet may b...

Страница 3: ...1 V T2 and W T3 otherwise the inverter will be damaged z It is forbidden to connect the inverter output terminals to the capacitor or LC RC noise filter with phase lead otherwise the internal components of the inverter may be damaged z Please confirm that the power supply phases rated voltage are consistent with those indicated by the nameplate otherwise the inverter may be damaged z Do not perfor...

Страница 4: ...eatsink and the braking resistor have high temperature Please do not touch such device otherwise you may be burnt z When the inverter is used by crane or lifting equipment mechanical contracting brake shall also be equipped z Please do not change the inverter parameter randomly Most of the factory settings of the inverter can meet the operating requirement and the user only needs to set some neces...

Страница 5: ... Precautions Note Note z The circuit boards have large scale CMOS IC Please do not touch the board to avoid the circuit board damage caused by ESD Others Danger Danger z It is forbidden to modify the inverter unauthorizedly otherwise human injury may be caused ...

Страница 6: ...4 3 2 Description of Peripheral Devices for Main Circuit 15 3 3 Lectotype of Main Circuit Peripheral Devices 15 3 4 Product Terminal Configuration 16 3 5 Functions of Main Circuit Terminal 16 3 6 Attention for Main Circuit Wiring 17 3 7 Terminal Wiring 20 3 8 Functions of Control Circuit Terminals 21 3 9 Schematic Diagram of Control Board 24 3 10 Lectotype of Control Circuit Peripheral Devices 24 ...

Страница 7: ... Parameter Group Pb 95 6 13 Communication Parameters Group PC 101 6 14 Reserved 101 6 15 Failure Record Parameters Group d0 101 6 16 Product Identity Parameters Group d1 102 6 17 Use of Display Parameters Group d2 102 6 18 Special Parameters for Constant Pressure Control Group H0 103 Chapter 7 Fault Diagnosis 107 7 1 List of Fault and Alarm Information 107 7 2 Troubleshooting Procedures 111 Chapte...

Страница 8: ...Model Description The digits and letters in the inverter model field on the nameplate indicate such information as the inverter series power supply class power class and software versions E5 H 4 T 11G V F control technology platform with vector control 4 400V T Three prase 11G 11kW Constant torque heavy duty H Universal series 1 2 Product Nameplate Description ...

Страница 9: ... option Protection class IP20 Cooling mode Natural cooling Forced air convection cooling Power kW 90 110 132 160 185 200 220 250 280 315 355 400 450 500 Motor power kW 90 110 132 160 185 200 220 250 280 315 355 400 450 500 Voltage V Three phase 0 to rated input voltage Rated current A 176 210 253 304 350 380 426 470 520 600 650 690 775 860 Output Overload capacity 150 1 minute 180 10 seconds 200 0...

Страница 10: ...netic flux braking function Ongoing action and no action upon deceleration as option no action upon deceleration at default Multifunctional M key The unique multifunctional key is used to set the frequently used operations JOG emergent stop Running command issuing mode switch menu switching Multiple menu modes Basic menu mode fast menu mode Menu mode of non factory setting function codes Menu mode...

Страница 11: ...on abnormal version compatibility abnormal copying terminal mutual exclusion detection failure hardware overload protection Efficiency At rated power 7 5kW and below power class 93 45kW and below power class 95 55kW and above power class 98 Operating site The inverter shall be mounted vertically in the electric control cabinet with good ventilation Horizontal or other installation modes are not al...

Страница 12: ...Product component name 1 6 Product Outline Mounting Dimension and Weight Figure 1 2 Product outline and mounting dimension E5 H 4T7 5G and below power class E5 H 4T11G and above power class Cover Mounting hole Cooling fan Nameplate Operation panel Cover Mounting hole Cooling fan Enclosure Nameplate Dust guard Nameplate Leading board Dust guard Upper cover Operation panel Lower cover Heatsink Mount...

Страница 13: ...55 249 185 136 232 69 8 5 5 4 5 E5 H 4T11G E5 H 4T15G 210 337 200 150 324 88 2 7 8 5 E5 H 4T18 5G E5 H 4T22G E5 H 4T30G 289 440 220 200 425 88 2 5 7 17 E5 H 4T37G E5 H 4T45G 319 575 218 220 553 90 5 2 5 10 25 E5 H 4T55G E5 H 4T75G 404 615 255 270 590 86 5 3 0 10 35 E5 H 4T90G E5 H 4T110G 465 745 325 343 715 151 5 3 0 12 55 E5 H 4T132G E5 H 4T160G E5 H 4T185G E5 H 4T200G 540 890 385 370 855 205 5 4...

Страница 14: ...nting dimension Note E5 H 4T7 5G and below power class are equipped with shuttle type operation panel V6 DP01 as standard E5 H 4T11G and above power class are equipped with button type operation panel V6 DP02 as standard 1 8 Pallet Outline and Mounting Dimension V6 DP05 is the mounting pallet when the operation panel is to install on the electric control cabinet The outline and dimension are as fo...

Страница 15: ...er model Braking unit Power Resistor Minimum limit resistor Qty Braking torque E5 H 4T0 75G 110W 750Ω 125Ω 1 130 E5 H 4T1 5G 260W 400Ω 100Ω 1 125 E5 H 4T2 2G 320W 250Ω 100Ω 1 135 E5 H 4T3 7G 550W 150Ω 66 7Ω 1 135 E5 H 4T5 5G 800W 100Ω 66 7Ω 1 135 E5 H 4T7 5G 1070W 75Ω 66 7Ω 1 130 E5 H 4T11G 1600W 50Ω 25Ω 1 135 E5 H 4T15G Built in as standard 2000W 40Ω 25Ω 1 125 ...

Страница 16: ...into the inverter during the installation Mount the inverter vertically in the electric control cabinet mount the cooling fan or air conditioner to prevent the ambient temperature from rising to above 45 ºC For the sites with adverse environment it is recommended to mount the inverter heatsink outside the cabinet 2 2 Mounting Direction and Space In order not to reduce the inverter cooling effect t...

Страница 17: ...n panel As shown in Figure 2 3 the grab the operation panel forcefully in direction 1 and then lift the panel body in direction 2 Mounting of operation panel As shown in Figure 2 4 align with the lower clamping position of the operation panel in direction 1 and then press down the operation panel in direction 2 until the crack sound is heard Do not mount the operation panel in any other direction ...

Страница 18: ...ess the left and right sides of the cover forcefully in direction 1 and at the same time lift the cover in direction 2 as shown in Figure 2 5 Removal of upper cover As shown in Figure 2 6 press the left and right sides of the cover forcefully in direction 1 and at the same time lift the cover in direction 2 Figure 2 5 Removal of lower cover Figure 2 6 Removal of upper cover Mounting of upper cover...

Страница 19: ...re 2 8 Mounting of lower cover Mounting of operation panel Please refer to 2 3 1 Removal and mounting of operation panel 2 3 3 Removal and Mounting of Covers of E5 H 4T11G E5 H 4T75G and Above Power Class Inverter with Sheet metal Enclosure Removal of operation panel Please refer to 2 3 1 Removal and mounting of operation panel Removal of cover Remove the mounting screws on the lower part of the c...

Страница 20: ...sure Opening of the door Press the latch following direction 1 in Figure 2 11 and open the door following direction 2 Removal of operation panel The operation panel is connected to the control board through the standard network cable and will not interfere with the open close of the door To remove the operation panel refer to section 2 3 1 Removal and Mounting of Operation Panel Mounting of cover ...

Страница 21: ... the inverter and Peripheral Devices RCCB residual current circuit breaker Figure 3 1 Connection diagram of the inverter and peripheral devices Power supply Contactor Input AC reactor DC reactor Inverter Grounding Motor Grounding Circuit breaker or RCCB RCCB Input noise filter Output noise filter Braking resistor Output AC reactor ...

Страница 22: ...n the above situations occur install the AC reactor at the inverter input side or DC reactor to the DC reactor terminal Input noise filter The noise input from the power end to the inverter and output from the inverter to the power end can be reduced Thermal protection relay Although the inverter has motor overload protection function when one inverter drives two or more motors or multi pole motor...

Страница 23: ...185G 630 500 M12 48 6 59 4 240 M12 31 4 39 2 60 2 E5 H 4T200G 630 500 M12 48 6 59 4 240 M12 31 4 39 2 60 2 E5 H 4T220G 800 630 M12 48 6 59 4 150 2 M12 31 4 39 2 75 2 E5 H 4T250G 1000 630 M12 48 6 59 4 185 2 M12 31 4 39 2 100 2 E5 H 4T280G 1000 630 M12 48 6 59 4 185 2 M12 31 4 39 2 100 2 E5 H 4T315G 1000 800 M14 48 6 59 4 250 2 M14 31 4 39 2 125 2 E5 H 4T355G 1200 800 M14 48 6 59 4 325 2 M14 31 4 3...

Страница 24: ...ower cable to the inverter output terminal otherwise the internal components of the inverter will be damaged The inverter shall connect to the power supply through a circuit breaker or RCCB and contactor to Terminal symbol Terminal name and function description R L1 S L2 T L3 Three phase AC input terminal 1 2 B1 DC reactor connecting terminal short circuited with copper bus upon delivery 2 B1 B2 C...

Страница 25: ...rter and motor If the cable between the inverter and the motor is too long the high order harmonic leakage current of the output end will cause adverse impact on the inverter and the peripheral devices Output AC reactor should be installed if the motor cable is longer than 100m Refer to the following table for the carrier frequency setting Length of cable between the inverter and motor Less than 5...

Страница 26: ...yer shall be grounded with 360 degree grounding method and sleeved into the metal tube The signal cable shall be kept far away from the inverter input wire and output motor wire If the signal cable must cross the input wire and output motor wire they shall be kept orthogonal When analog voltage and current signals are adopted for remote frequency setting shielded twisted pair cable shall be used T...

Страница 27: ...E5 H High Performance Universal Inverter User Manual 20 Chapter 3 Wiring of Inverter 3 7 Terminal Wiring Figure 3 6 Terminal wiring diagram Take E5 H 4T5 5G as an example ...

Страница 28: ...nalog input reference voltage 10V 3 internal isolated with COM Maximum output current 10mA with short circuit and overload protection AI1 Analog input channel 1 0 20mA Input impedance 500Ω maximum input current 30mA 0 10V Input impedance 20kΩ maximum input voltage 15V Resolution 12 bits 0 025 0 20mA or 0 10V analog input can be selected through jumper AI2 Analog input channel 2 Same as AI1 Analog ...

Страница 29: ...t output terminals When using the internal 24V power supply of the inverter the external controller adopts NPN sink current wiring mode When using the internal 24V power supply of the inverter the external controller adopts PNP draw off current wiring mode Note The short circuit bar between terminal 24V and terminal PLC must be removed and short circuit bar shall be connected between PLC and COM t...

Страница 30: ...hen using the external power supply the external controller adopts PNP draw off current wiring mode Note The short circuit bar between terminal 24V and terminal PLC must be removed The wiring modes of the multi functional output terminals when the internal 24V power supply of the inverter and external power supply are used Note When this wiring mode is adopted if Y1 terminal is damaged the polarit...

Страница 31: ...V PLC X1 X2 X3 X4 COM Y1 COM RA RB RC M3 0 5 0 6 0 75 Shielded cable 3 11 Description of Jumper Function Jumper selecting switch in Figure 3 7 Name Function Factory setting AI1 I is the current input 0 20mA V is the voltage input 0 10V 0 10V AI2 I is the current input 0 20mA V is the voltage input 0 10V 0 20mA AO1 I is the current output 0 20mA V is the voltage output 0 10V 0 10V AO2 I is the curr...

Страница 32: ...finable indicator On Flash Current displayed parameter is self defined see description of P2 group Green Time indicator On Current displayed parameter is time Green Unit indicator Hz A V No unit indicator Off Current displayed parameter is no unit MULTI Multi function key indicator Refer to table 4 1 for using method of multi function keys and the meanings of MULTI indicator Red MON Running comman...

Страница 33: ...a 3 In stop run status increase the input frequency or close loop input Knob Knob Decrease Key 1 In first level menu decrease function code according to edit bit 2 In second level menu decrease the function code data 3 In stop run status decrease the input frequency or close loop input Shift Key 1 In first level menu use key to move edit bit of PX YZ menu 2 In second level menu use key to move the...

Страница 34: ...stop On Press M Off Release M 4 Switch the reference method of running command Press M key to switch the reference method of giving running command Via operation panel Via terminal Via host computer Via operation panel During switching time there is a 5 second response time limit and the change is cancelled automatically after 5 second time is exceeded Press PRG key to confirm the change within 5s...

Страница 35: ...0 P8 10 P9 group P9 00 P9 18 PA group PA 00 PA 22 Pb group Pb 00 Pb 23 PC group PC 00 PC 06 Pd group Pd 00 Pd 35 User operation area P area PE group Reserved d0 group d0 00 d0 11 d1 group d1 00 d1 11 Protection area of user password P0 00 Equipment status area d area d2 group d2 00 d2 24 A0 00 protection area Function code display hidden area defined by user A area A0 group A0 00 A0 02 C0 00 reser...

Страница 36: ...is 12345 operation panel displays 1234 When data is 1234 5 operation panel displays 1234 When data is 123 45 operation panel displays 123 4 When data is 12 345 operation panel displays 12 34 Display set hex code From data bit 1 to 4 the characters of 0 1 9 A B C D E and F can be displayed or set Meanings of 0 0 0 0 displayed in second level menu After entering second level menu besides the display...

Страница 37: ...odes so as to realize the fast application See 5 2 for the table of fast menu function code parameter Non factory setting function code menu ndFt This menu mode is used to search for the function codes different from the factory settings for the convenience of understanding the parameter setting Menu of last changed 10 function codes LASt If this menu mode is set it enters password protection stat...

Страница 38: ...menu P0 02 0 ndFt Non factory setting of function code P0 02 2 CoPy Inverter parameters are being downloaded and this symbol will be displayed when parameters are downloaded to inverter For example set Pb 23 2 or 3 P CLr Password is cleared see 4 5 for password operation dEFt Restore to factory settings P0 01 2 to 5 P SEt Password is set successfully see 4 5 for password operation E XXX E means fa...

Страница 39: ...the password setting is successful See 4 8 3 for password setting Password Verification Enter password function code enter password correctly and you can see the parameters protected by password See 4 8 4 descriptions of password verification Clear Password After passing password verification enter password function code set 0000 continuously for two times P CLr is displayed this means the passwor...

Страница 40: ... all the keys cannot be used Key Locking Function is Enabled One of following three methods can be used to enable the key locking function 1 Press ESC PRG at the same time for shuttle type turning clock wise is equivalent to the key to display Loc1 P2 00 1 or Loc2 P2 00 2 or Loc3 P2 00 3 the operation panel is locked according to the setting method of P2 00 When P2 00 0 Prot is displayed and the o...

Страница 41: ... level menu press PRG to enter 6 Password verification status If password protection is enabled press PRG to enter in the display status of first level menu 7 Password modification status In the display status of stopping and running parameters press and to enter 8 Information prompt status See 4 4 5 for identifying the LED display characters 4 7 2 Display Status and Operation Process key In the d...

Страница 42: ... Operation Example In following example the displayed parameters at stopping status is reference frequency the factory setting is 50 00Hz The underscored line in the figure means the bit that is being edited 4 8 1 Restore Factory Setting For example setting P0 01 3 Restore all the parameters in P area to factory settings except the motor parameters F9 group ...

Страница 43: ...0 00 to 0003 4 8 4 Password Verification Assume that the function codes after P0 00 are protected by password and the password is 3 If the password protection is not enabled you can press ESC PRG to enable the password in last example of P0 00 You can verify the password according to the following process Note If you use RS 485 communication mode to perform password verification please refer to Ap...

Страница 44: ...E5 H High Performance Universal Inverter User Manual Chapter 4 Using Instructions of Operation Panel 37 4 9 Running for the First Time Please follow the procedures to run the inverter for the first time ...

Страница 45: ...aving requirement For details refer to the descriptions of function code of Pb 21 and Pb 22 E5 series inverter built in constant pressure close loop control and sleeping function For details refer to the descriptions of function code of group H0 5 1 List of Basic Menu Function Codes Function code number Function code name Factory setting Setting range Unit Property Function code selection User set...

Страница 46: ...st 0 1 30 0 Group P1 Main and Auxiliary Reference Parameter P1 00 Open loop auxiliary reference mode 0 0 2 0 None 1 AI1 2 AI2 P1 01 Open loop reference main and auxiliary relation calculation 0 0 5 0 Main Auxiliary 1 Main Auxiliary 2 Auxiliary 50 3 Main Auxiliary 50 4 Take the maximum value 5 Take the minimum value P1 02 Analog feedback close loop control main reference mode 0 0 2 0 Digital voltag...

Страница 47: ... place 0 Reference frequency Hz 1 Bus voltage V 2 AI1 V 3 AI2 V 4 Reserved 5 Reserved 6 External counting 7 Motor rotation speed rpm 8 Close loop reference 9 Close loop feedback A Reserved B Running frequency Hz C Output current A D Output torque E Output power kW F Output voltage V LED tens hundreds thousands place Same with above P2 03 Display parameter selection at stopping 3210 0 FFFF LED ones...

Страница 48: ...1 Jog frequency 5 00 0 10 300 00 Hz 0 10 300 00Hz P3 12 Jog acceleration time 6 0 0 1 60 0 s 0 1 60 0s P3 13 Jog deceleration time 6 0 0 1 60 0 s 0 1 60 0s Group P4 Multi section Parameter P4 00 V F curve reference 0 0 6 0 Direct line 1 Multi section P4 01 P4 08 2 Power of 1 2 3 Power of 1 4 4 Power of 1 6 5 Power of 1 8 6 Power of 2 P4 01 V F frequency value F0 0 00 0 00 300 00 Hz F0 F1 P4 02 V F...

Страница 49: ...Hz High low frequency limit P0 13 P0 14 P4 30 Multi section frequency 9 30 00 0 00 300 00 Hz High low frequency limit P0 13 P0 14 P4 31 Multi section frequency 10 35 00 0 00 300 00 Hz High low frequency limit P0 13 P0 14 P4 32 Multi section frequency 11 38 00 0 00 300 00 Hz High low frequency limit P0 13 P0 14 P4 33 Multi section frequency 12 40 00 0 00 300 00 Hz High low frequency limit P0 13 P0 ...

Страница 50: ...0 Hz 0 00 300 00Hz P6 05 Curve2 input point A0 0 0 0 0 110 0 0 0 110 0 P6 06 Reference frequency f0 corresponding to curve2 input point A0 0 00 0 00 300 00 Hz 0 00 300 00Hz P6 07 Curve2 input point A1 100 0 0 0 110 0 0 0 110 0 P6 08 Reference frequency f1 corresponding to curve2 input point A1 50 00 0 00 300 00 Hz 0 00 300 00Hz P6 09 Curve3 input point A0 0 0 0 0 110 0 0 0 110 0 P6 10 Per unit val...

Страница 51: ...0 0 0 200 0 0 0 200 0 P7 08 AO2 bias 0 0 0 0 200 0 0 0 200 0 P7 09 Selection of positive and negative gain and bias 0000 0 1111 Ones place AO1 gain 0 Positive 1 Negative Tens place AO1 bias 0 Positive 1 Negative Hundreds place AO2 gain 0 Positive 1 Negative Thousands place AO2 bias 0 Positive 1 Negative P7 11 Output signal type 000 000 101 Ones place Y1 terminal 0 Level signal 1 Pulse signal Tens ...

Страница 52: ...ential gain Kd 0 000 0 000 10 000 0 000 10 000 P8 06 Sampling cycle 0 002 0 001 30 000 s 0 001 30 000s P8 07 Deviation limit 5 0 0 0 20 0 0 0 20 0 P8 08 PID regulation selection 10 0 11 Ones place Integral mode 0 Frequency reaches upper low limit stop integral regulation 1 Frequency reaches upper low limit continue integral regulation Tens place output frequency 0 Be consistent with preset directi...

Страница 53: ...r voltage regulation 0 Disabled 1 Enabled Hundreds place Over modulation 0 Disabled 1 Enabled PA 07 Energy saving coefficient 0 0 50 0 50 PA 08 Magnetic flux braking selection 1 0 1 0 Disabled 1 Enabled PA 09 Energy sonsumption braking selection 0 0 1 0 Disabled 1 Enabled PA 10 Braking unit operating time 100 0 100 0 s 100 0s Total cycle working time and interval is 100s PA 11 Braking unit action ...

Страница 54: ... upon fault 1 Fault is not shielded non stop upon fault 2 Fault is shielded no alarm and no stop PA 20 Fault locking function selection 0 0 1 0 Fault is not locked 1 Fault is locked PA 21 Automatic reset times 0 0 20 0 20 PA 22 Automatic reset interval 2 0 2 0 20 0 s 2 0 20 0s Group Pb Enhanced Function Parameter Pb 00 Skip frequency 1 low limit 0 00 0 00 300 00 Hz High low frequency limit P0 13 P...

Страница 55: ...nction 1 Without integral function Pb 11 Terminal UP DN integral rate 2 0 0 1 50 0 s 0 1 50 0s Pb 12 Action setting after refererence running time is out 00 00 11 Ones place Arrive continuous running time 0 Continue running 1 Stop and alarm Tens place Arrive summation running time 0 Continue running 1 Stop and alarm Pb 13 Continuous running time reference 0 0 0 0 6553 5 min 0 6553 5min Pb 14 Summa...

Страница 56: ...larm information list d0 03 Bus voltage upon latest fault 0 0 999 V 0 999V d0 04 Actual current upon latest fault 0 0 0 0 999 9 A 0 0 999 9V d0 05 Operation frequency upon the latest fault 0 00 0 00 300 00 Hz 0 00 300 00Hz d0 06 Total power up time on time 0 000 0 000 65 535 kh 0 000 65 535kh d0 07 Total operation time of the inverter 0 000 0 000 65 535 kh 0 000 65 535kh d0 08 Record of maximum te...

Страница 57: ...I2 exceeding limit 3 5 Reserved d2 13 Current detection failure source display Factory 0 6 2 Phase W abnormal 4 Phase V abnormal 6 Phase U abnorma d2 14 Frequency corresping to motor current speed 0 00Hz 0 655 35 Hz 0 655 35Hz Group H0 Special Parameters for Constant Pressure Control H0 00 Closed loop function selection for constant pressure control 0 0 1 0 Disabled 1 Enabled H0 01 The pressure va...

Страница 58: ... according H0 00 setting 1 Sleeping and wake up mode according function code of H0 31 to H0 34 setting H0 31 Wake up pressure reference 0 00 0 0 10 00 V 0 00 10 00V H0 32 Sleeping pressure reference 0 00 0 0 10 00 V 0 00 10 00V H0 33 Wake up delay time 0 0 0 0 3600 0 s 0 0 0 0 3600 0s H0 34 Sleeping delay time 0 0 0 0 3600 0 s 0 0 0 0 3600 0s Group A0 User defined Function Code Displayed hidden Zo...

Страница 59: ...E5 H High Performance Universal Inverter User Manual 52 Chapter 5 List of Parameters 5 3 User s Connection Diagram ...

Страница 60: ...ain and then P Clr is displayed and the password is cancelled Note For the method for activating the password refer to 4 5 password operation This function is used to set the modification authority and initialization level of the parameters 0 All the parameters are allowed for modification 1 All the parameters are disallowed for modification 2 Restore all the parameters in zone P to factory settin...

Страница 61: ...ation of one inverter driving one motor and the application of one inverter driving multiple motors the motors are in the same work conditions 1 Analog value feedback process close loop control It is applicable to applications with general requirement of speed control precision The feedback analog can represent such parameters as temperature pressure and humidity For the reference and feedback set...

Страница 62: ...and is given through operation panel P0 06 0 0 Forward 1 Reverse Note This function code is disabled when the running command is issued via terminal and the running direction is controlled by terminal command This function can set the speed and stability in the duration from acceleration to constant speed after the startup of the inverter or from constant deceleration to stop Acceleration time 0 T...

Страница 63: ... acceleration deceleration in linear mode curve 2 is the curve representing the acceleration deceleration in S curve mode Curves 1 and 2 corresponding to the same setting frequency The actual acceleration deceleration time of curve 2 is longer than that of curve 1 by the time set by P0 10 Note The S curve acceleration deceleration setting is also available for acceleration times 1 2 and 3 P4 09 P4...

Страница 64: ...oltage and offset the stator voltage drop to product enough torque so as to ensure the normal operation of the motor Note The torque boost amplitude should be set according to the load situation Excessive boost will cause large current impact during the startup process When P0 16 is set to 0 0 and P4 00 is set to 0 linear V F curve the automatic torque boost is enabled when P4 00 is set to a non z...

Страница 65: ...liary frequency reference value is superimposed on the main reference the function is add Figure 6 4 Process open loop main and auxiliary reference calculation 0 Open loop combination reference fcom main reference fm auxiliary reference fa 1 Main reference auxiliary reference The auxiliary frequency reference value is superimposed on the main reference the function is subtract Figure 6 5 Process o...

Страница 66: ...e and then superimposes on the main reference Figure 6 7 Process open loop main and auxiliary reference calculation 3 Open loop combination reference fcom main reference fm auxiliary reference fa 50 bias 4 Max Get the maximum value of the main reference fm and the auxiliary reference fa Figure 6 8 Process open loop main and auxiliary reference calculation 4 Open loop combination reference fcom Max...

Страница 67: ...reference mode P1 03 can be selected as follows 0 None 1 AI1 2 AI2 The analog feedback close loop control main reference and auxiliary reference calculation P1 03 can be selected as follows 0 Main auxiliary 1 Main auxiliary 2 Auxiliary 50 3 Main auxiliary 50 4 Max 5 Min The main reference and auxiliary reference calculation function for close loop reference is the same as the main reference and au...

Страница 68: ...nabled 1 The keys on the operation panel are locked and all the keys are disabled 2 All the keys except for the multi functional key are disabled 3 All the keys except for the RUN AND STOP RST keys are disabled Note For the effective methods of key locking refer to 4 6 description on key locking and unlocking To facilitate the operation the frequent operation can be set on the multi functional key...

Страница 69: ... E Output power kW F Output voltage V Tens place Same as above Hundreds place Same as above Thousands place Same as above If the parameter to be displayed has proportion relation with a physical value in the operation display parameter defined by P2 02 P2 04 can be used to designate the physical value as the display benchmark and P2 05 can be used to set the coefficient of the display benchmark Wh...

Страница 70: ...ter are LED A and LED V both of which shall be on 6 4 Startup stop Parameter Group P3 Different startup modes can be adopted for different applications 0 The inverter begins to run from the startup frequency P3 03 and accelerates to the setting frequency after the startup frequency retention time P3 04 If the motor is still rotating upon the startup of the inverter the motor will be automatically ...

Страница 71: ...ts the DC braking current value This value is presented as the percentage of the rated current of the inverter It ranges from 0 0 90 0 upon variable torque load P3 08 sets the action time of the DC braking current For some production equipment reverse running may cause equipment damage This function can be used to prevent reverse running P3 09 is set to forbid reverse running by default upon deliv...

Страница 72: ... 11 Jog frequency 0 10 300 00 Hz 5 00Hz P3 12 Jog acceleration time 0 1 60 0 s 6 0s P3 13 Jog deceleration time 0 1 60 0 s 6 0s P4 00 V F curve reference 0 6 0 P4 01 V F frequency value F0 0 00 300 00 Hz 0 00Hz P4 02 V F voltage value V0 0 0 100 0 0 0 P4 03 V F frequency value F1 0 00 300 00 Hz 0 00Hz P4 04 V F voltage value V1 0 0 100 0 0 0 P4 05 V F frequency value F2 0 00 300 00 Hz 0 00Hz P4 06...

Страница 73: ...me can be selected in different terminal status by defining the multi functional terminal X acceleration deceleration time selection function 13 14 The meaning of the three groups of acceleration deceleration time is the same as P0 08 and P0 09 It can be used as the process open loop frequency reference or analog feedback close loop digital reference Different digital voltage reference is selected...

Страница 74: ...ge and multi section frequency simultaneously the multi section frequency will have priority During analog feedback operation process the multi section digital voltage reference is in priority to other reference modes It can be used as process open loop frequency reference Different multi section frequency reference can be selected in different terminal status by defining the multi functional term...

Страница 75: ...uency 2 OFF OFF ON ON Multi section frequency 3 OFF ON OFF OFF Multi section frequency 4 OFF ON OFF ON Multi section frequency 5 OFF ON ON OFF Multi section frequency 6 OFF ON ON ON Multi section frequency 7 ON OFF OFF OFF Multi section frequency 8 ON OFF OFF ON Multi section frequency 9 ON OFF ON OFF Multi section frequency 10 ON OFF ON ON Multi section frequency 11 ON ON OFF OFF Multi section fr...

Страница 76: ...frequency source switching to disabled 18 Acceleration and deceleration disable instruction 59 Reserved 19 External failure input 60 Auxiliary frequency source switching to AI1 20 Terminal failure reset input 61 Auxiliary frequency source switching to AI2 21 External interrupt contact input 62 66 Reserved 22 Inverter running disabled 67 Closed loop output forced to be 0 23 Shutdown via terminal 68...

Страница 77: ...eleration deceleration terminal 2 Acceleration deceleration terminal 1 Acceleration deceleration time selection OFF OFF Acceleration deceleration time 0 P0 08 and P0 09 OFF ON Acceleration deceleration time 1 P4 09 and P4 10 ON OFF Acceleration deceleration time 2 P4 11 and P4 12 ON ON Acceleration deceleration time 3 P4 13and P4 14 15 Digital regulating frequency reset It is used to reset the cha...

Страница 78: ...and the DC braking time P3 08 26 Emergent stop 1 fastest stop When this terminal is enabled the inverter will stop in the fastest way The inverter will automatically determine the deceleration time according to the load torque and stop as fast as possible 27 DC injection braking stop 2 via terminal Once the stop command is executed on the inverter when the running frequency is lower than the DC br...

Страница 79: ...I2 62 66 Reserved 67 Closed loop output forced to be 0 Under process closed loop control when the terminal is enabled the inverter output frequency process closed loop adjustment is forced to set to 0 68 PID positive or negative function PID is positeve function at default It should enable negative function when feedback value is greater than reference value and the frequency needed increase This ...

Страница 80: ...the mode of controlling the startup and stop of the inverter with FWD and REV terminals when the running command is issued via terminal 0 Two line 1 COM FWD REV K1 K2 变 频 器 Inverter COM FWD REV K1 K2 变 频 器 Inverter Figure 6 14 Two line running mode 1 1 Two line 2 Inverter Inverter Figure 6 15 Two line running mode 2 FWD REV Start up and stop command 0 0 Stop 0 1 Run reverse 1 0 Run forward 1 1 Sto...

Страница 81: ...re disabled and the inverter stops The rising edge of FWD terminal means rotation command the disconnection of REV terminal means run forward command while the connection of REV terminal means run reverse command When the pulse signal counting of the terminal input complies with the preset condition the terminal Yi will output corresponding instructions The setting procedures are as follows 1 Set ...

Страница 82: ...Determine the reference frequency P6 01 P6 04 by Curve 1 1 Determine the reference frequency P6 05 P6 08 by Curve 2 2 Per unit value determined by curve 3 P6 09 to P6 12 3 Per unit value determined by curve 4 P6 13 to P6 20 4 Calibration by curve is not necessary Tens place AI1 Same as above Curve 1 and curve 2 can be used to directly realize the corresponding relationship between analog value and...

Страница 83: ...Figure 6 20 Corresponding percentage of input analog value current Figure 6 21 Setup frequency characteristics curve positive effect Figure 6 22 Setup frequency characteristics curve negative effect P6 01 Curve 1 input point A0 0 0 110 0 0 0 P6 02 Reference frequency f0 corresponding to curve 1 input point A0 0 00 300 00 Hz 0 00Hz P6 03 Curve 1 input point A1 0 0 110 0 100 0 P6 04 Reference freque...

Страница 84: ...close loop frequency reference 1 4 Reserved 5 Motor temperature feedback overload protection sensor mode 6 Reserved Tens place AI1 function selection the same as above P6 09 Curve 3 input point A0 0 0 110 0 0 0 P6 13 Curve 4 input point A0 0 0 110 0 0 0 P6 14 Per unit value B0 corresponding to curve 4 input point A0 0 0 110 0 0 0 P6 15 Curve 4 input point A1 0 0 110 0 25 0 P6 16 Per unit value B1 ...

Страница 85: ...nals can be defined as multifunctional digital signal output AO1 and AO2 terminals can be defined as multifunctional analog value output and the analog value type 0 10V 0 20mA can be selected via the jumper The definition table of multifunctional digital signal output is as follows Function setup Meaning Function setup Meaning 0 Signal indicating that the inverter is running RUN 1 Frequency arriva...

Страница 86: ... output current is higher than the overload pre warning detection level and the retention time is higher than the overload pre warning detection time the signal is enabled When the current is lower than the detection level the signal is disabled Refer to PA13 PA 15 for details 5 Stop and lock due to under voltage LU When the inverter bus voltage is lower than the under voltage action value the sig...

Страница 87: ... the stop or standby status the signal is enabled 32 Sleeping state indication When the inverter is in sleeping status the signal is enabled 12 16 21 24 31 and 33 47 Reserved The definition table of multifunctional analog outpu is as follows Function setup Output signal selection Definition of analog output range 48 Output frequency Maximum frequency P0 11 corresponds to 10V 20mA 49 Setup frequenc...

Страница 88: ...rom other function codes adjustment will affect the AO output timely that is by debugging the parameters P7 05 P7 09 you will get the analog output of A01 and A02 Both AO1 and AO2 have the same calibration way Take AO1 as an example Set P7 05 to 100 0 and P7 06 to 20 0 namely K 1 and b 2V and the AO1 characteristics curve is as shown in Figure 6 24 and Figure 6 25 Figure 6 24 AO1 Characteristics C...

Страница 89: ... 0 Level signal 1 Pulse signal Tens place Reserved Hundreds place Relay terminal 0 Level signal 1 Pulse signal Terminal delay time on the level or the pulse output signals are enabled terminal pulse width defines the effective holdup time of pulse signal Figure 6 28 in the Yi on behalf of Y1 relay terminal in order to keep the waveform consistent before delay and after delay need to ensure that th...

Страница 90: ...detecting the deviation between output frequency and setup frequency Once the output terminal function is set to 1 Frequency Arrival Signal the deviation between the output frequency and the setup frequency of the inverter is in the setup range of this function code and indication signal is output as shown in Figure 6 28 Frequency Arrival Signal FAR Yi represents Y1 terminal Y2 terminal or relay t...

Страница 91: ...als 0 The real terminal is enabled 1 The virtual terminal is enabled When Xi terminal signal source is input as virtual terminal whether the corresponding function of this terminal is effective depends on the control of the host computer and has nothing to do with the real status of the current Xi terminal When Yi and relay terminals are output as virtual terminals the real outputs of these termin...

Страница 92: ...t it may judge whether the output status is enabled by whether there is current flowing in the terminal It may judge whether the output status is enabled by whether the relay terminal is in the magnetizing status 6 9 Process PID Close Loop Parameters Group P8 Figure 6 31 Schematic diagram for PID The current control operation mode P0 03 shall be determined before determining the process close loop...

Страница 93: ...ll the output be updated Setting the deviation limit needs to take the system control precision and stability into consideration This function determines the specific running mode during the process close loop adjustment Display of operation panel Unit place Integration mode 0 Frequency reaches its high limit and low limit the integration adjustment is stopped 1 Frequency reaches its high limit an...

Страница 94: ...d Negative P8 09 0 Terminal function is enabled Negative 6 10 Motor Parameter Group P9 This function is used to determine the motor load type driven by the inverter 0 G type constant torque heavy duty application 1 L type variable torque light duty application P9 01 P9 04 are used to set the motor parameters driven by the setup inverter and shall be set properly in accordance with the motor namepl...

Страница 95: ...lace Protection mode 0 Motor current mode 1 Sensor mode 2 No action Tens place Low speed derating 0 Action applicable to common motor 1 No action applicable to variable frequency motor The unit s place of P9 16 determines whether the motor overload protection is to be executed and whether the motor overload protection employs current mode or sensor mode 0 Motor current mode Overload is calculated ...

Страница 96: ...hout inverse time lag characteristics Note When this protection mode is employed it needs to select the input channel for the analog feedback value of the thermal sensor and confirm that the input function of this analog channel is selected as 5 Motor Temperature Feedback 2 No motor protection action indicating that the inverter will not protect the overload status of the motor It must be used wit...

Страница 97: ...ly reliable operation by keeping operating with low noise at low loads and controlling the temperature of inverter at heavy load The function will be enabled when operating under V F control when P0 03 0 or 1 The function will help the inverter to keep the motor rotational speed constant if loads vary or under heavy loads Figure 6 33 V F control slip compensation gain PA 04 current limit motion se...

Страница 98: ...ng output frequency and auto prolonging deceleration time Note If energy consumption braking is applied and braking unit PA 09 1 has been set and applied the function becomes disabled Tens place Under voltage adjustment When power supply voltage decreases or has instantaneous power failure DC bus voltage will also decrease The function of under voltage adjustment is to decrease the motor rotating ...

Страница 99: ...raking unit Braking unit action cycle is fixed to be 100s If PA 09 is set to 1 the use rate of the braking unit is fixed to 100 That is the use time of the braking unit is fixed to 100 0s Action voltage of braking unit can be selected by adjusting PA 11 The motor can be stopped rapidly by energy braking with the appropriate action voltage Note Set PA 09 to 1 when using braking unit For model selec...

Страница 100: ...re and stop Hundreds place Detection conditions selection 0 Detection all the time 1 Detection only at constant speed Unit place Determine whether overload detection is motor overload prealarm or inverter overload prealarm Tens place Determine whether inverter continues to run or alarms then stops when the output current exceeds continuously overload prealarm detection level PA 14 and the lasting ...

Страница 101: ...ut not stop during failure 2 Failure shielded neither alarm nor stop Note To change factory setting please contact with distributor or manufacturer PA 16 failure shield and alarm attribute setting 1 Display of operation panel Unit place Output short circuit to ground abnormality Tens place Power failure abnormality during running Hundreds place Input power abnormality Thousands place Output phase ...

Страница 102: ...s overcurrent or overvoltage occurred occasionally from beginning or during running the function can be used if you want the equipment keep running without manual interfere Note For fault E PCU E rEF E AUt E FAL E oUt E ot1 E ot2 E Cur E GdF E LV1 E CPy E IoF and E oL3 there has no auto reset function The inverter will not check fault 6 12 Enhanced Function Parameter Group Pb Set Skip frequency ra...

Страница 103: ...g with operational panel regulating frequency can be realized by the function When the operational panel is in the parameter display state of operation or stop through operational panel to regulate frequency is the most direct and covenient way Frequency value will save in the inverter and superimposed on other frequency as final frequency Operational panel digital regulating frequency control Pb ...

Страница 104: ...ll be cleared after carrying out stop command 2 After the inverter stops adjustment volume of on operational panel is cleared under the stop status Frequency cannot set by under the stop status Hundreds place Setting of on operational panel 0 Only enabled when the main reference is P0 05 open loop digital frequency setting P0 04 0 1 Enabled under all frequency reference modes P0 04 not specified 2...

Страница 105: ...respond the running command continuous running time reaches continuous running time reference Pb 13 can output this signal through Y1 terminal or relay terminal and the Y1 terminal function number P7 00 or relay terminal function number P7 02 set to 18 arrive continuous running time From the inverter power on running time reaches summation running time reference Pb 14 can output this signal throug...

Страница 106: ... shutdown When the inverter operates the function can response the setting of reference channel for other frequencies after using the pre set frequency as the setting frequency and keeping the time as pre set frequency operating time Pb 18 Figure 6 36 High and low limit of zero frequency operation This function supports sleeping function and energy saving operation After running the inverter will ...

Страница 107: ...ed the parameter restores automatically to 0 1 Upload parameters Press PRG button to upload parameters to the operation panel after setting and will display percentage of copy process when indicating CoPy 2 Download parameters without motor s parameters Press PRG button to download parameters to the inverter after setting and will display percentage of copy process when indicating CoPy Parameters ...

Страница 108: ...available address 1 247 248 255 for reservation 6 14 Reserved 6 15 Failure Record Parameters Group d0 The inverter can record the latest three fault code serial numbers see 7 1 list of failure and alarm information and bus voltage output current and operation frequency during failures recently occurred for the ease of Trouble Shooting and repair Note Upon the under voltage display LU the parameter...

Страница 109: ...ber 0 0 FFF F Factory d1 01 Software version number of control panel 0 00 99 99 Factory d1 03 Software version number of operating panel 0 000 F FFF Factory d1 05 Manufacturer s bar code 1 0 9999 Factory d1 06 Manufacturer s bar code 2 0 9999 Factory d1 07 Manufacturer s bar code 3 0 9999 Factory d1 08 Manufacturer s bar code 4 0 9999 Factory d1 10 Control board software identification code 0 6553...

Страница 110: ...to 1 to realized close loop constant pressure control If setting H0 00 to 1 close loop reference and close loop feedback percentage display of the operation is pressure reference value and pressure feedback value The function code H0 04 dertermines the pressure target reference channel When H0 04 0 the pressure target value determinate by function code H0 05 When H0 04 1 the pressure target value ...

Страница 111: ...ID regulator the motor start running Note In the sleeping status the operation panel of inverter display SL The function realized auto switch acceleration time and deceleration time during acceleration and deceleration When the frequency reference lower than H0 11 the inverter will automatically switch to acceleration and deceleration time define by H0 12 For example if setting frequency is 0 to 1...

Страница 112: ...or start running Figure 6 37 Pressure control sleeping start and stop maintain time When PID is set to negetive function setting P8 09 to 1 when inverter detects the actual pressure feedback lower than sleeping pressure reference value H0 32 and lasting time is longer than sleeping delay time H0 34 the inverter will decelerate to 0 frequency this time motor stops when inverter detects the actual p...

Страница 113: ...p A0 Protect the customized menu with password A0 00 Only function code groups with corresponding Bit set to 1 by A0 01 or A0 02 can be shown Note Factory default for password of displayed hidden zone of user defined function code is 1 LSB the least significant bit to MSB the most significant bit of A0 01 correspond to P0 P1 P2 P3 P4 P5 P6 P7 P8 P9 PA Pb PC Pd PE and d0 in turn LSB to MSB of A0 02...

Страница 114: ...setting of motor parameters Set motor parameters properly Deceleration time is too short Prolong deceleration time 2 E oc2 Over current protection when deceleration operation Power level of inverter is small Replace to inverter with proper model Sudden change of load during operation Decrease load s abrupt frequency change and amplitude Improper setting of motor parameters Set motor parameters pro...

Страница 115: ... Clean the dusts wools and other foreign objects in the air duct Fan failure Check whether fan wirings are well connected Replace a new fan of the same model Inverter module failure Seek for technical support 11 E oH1 Heatsink 1 over temperature protection Temperature detection circuit failure Seek for technical support Ambient over temperature Lower the ambient temperature and strengthen ventilat...

Страница 116: ... fault Current detection circuit failure Seek for technical support Wrong connection Correct the connection error as per the user s manual Motor failure Replace the motor after performing ground insulation test Invert module failure Seek for technical support 20 E GdF Output to ground short circuit Too big ground leakage current at the inverter output side Seek for technical support 21 E LV1 Abnor...

Страница 117: ...istor resistance failure Check the thermistor 30 E Ptc Motor over temperature PTC The sensor protection threshold of the motor is set improperly Adjust the sensor protection threshold of the motor The communication of operation panel RS485 is disconnected Check the connection of the equipment communications Communication failure of operation panel RS485 Check whether the data receiving and transmi...

Страница 118: ...he inverter Check input power supply 63 LU Power under voltage Abnormal internal switching power supply Seek for technical support 7 2 Troubleshooting Procedures START Seek for technical help Fault reset NO YES NO Please shut down the power supply immediately to avoid further expansion of the fault NO YES Seek for technical help Seek for technical help END Identify the fault code per 4 4 4 Common ...

Страница 119: ...e below Item Inspection Contents Inspection Means Criteria Temperature Thermometer 10 40ºC Derated at 40 to 50ºC and the rated output current shall be decreased by 1 for every temperature rise of 1ºC Humidity Humidiometer 5 95 no condensing Dust oil water and drop Visual check There are no dust oil water and drop Vibration Special test instrument 3 5m s2 2 9Hz 10m s2 9 200Hz 15m s2 200 500Hz Opera...

Страница 120: ...t 500VDC megameter Normal 8 3 Component Replacement Different types of components have different service lives The service lives of the components are subject to the environment and application conditions Better working environment may prolong the service lives of the components The cooling fan and electrolytic capacitor are vulnerable components and shall be conducted routine inspection as per th...

Страница 121: ...rcuits to prevent the control circuits from connecting with the test voltage For the inverter with power level of E5 H 4T11G and E5 H 4T15G it must disconnect the terminal J1 on the drive board and the PE For the inverter with power level of E5 H 4T18 5G or above it must disconnect three pieces of cables entry to the surge suppressing circuit Pack the disconnected cable heads with insulating tapes...

Страница 122: ...e 1 RJ45 interface Lead of communication port A 1 2 3 4 5 6 7 8 Signal of communication port A 5V GND 485 485 485 485 GND 5V EIA TIA T568A White green Green White orange Blue White blue Orange White brown Brown EIA TIA T568B White orange Orange White green Blue White blue Green White brown Brown 3 Protocol Format Attached Figure 2 Protocol Format ADU Application Data Unit check is the CRC16 check ...

Страница 123: ...o EEPROM 4 Function Interpretation Function 0x03 reads parameters and status words of multiple function code parameters of the inverter PDU Part Contents Data Length Byte Range Request Function code 1 0x03 Initial address of register 2 0x0000 0xFFFF Number of registers 2 0x0001 0x0010 Response Function code 1 0x03 Read bytes 1 2 Number of registers Read contents 2 Number of registers Function 0x06...

Страница 124: ...e frequently such as change setting frequency repeat suggest use 0x42 command is better than 0x10 prevent from damage inner EEPROM 3 The life of EEPROM is about 100000 times if change setting frequency frequently several days or several weeks may damage EEPROM adopt write RAM it can avoid damaging EEPROM Function0x17 reads and writes multiple function codes or control parameters of the inverter PD...

Страница 125: ...ion code Pb 23 The attribute words are defined in the following order Bit0 Bit2 for unit Bit3 Bit4 for modifying attribute Bit5 Bit6 for precision and Bit7 Bit15 for reserved purpose 0x8000 0x800D The register for control word of the inverter Refer to Attached Table 2 for details 0x810B 0x8193 The register for status word of the inverter Refer to Attached Table 3 for details 0xF000 0xF002 Special ...

Страница 126: ...xternal counts 1 0x812E Rotate speed of motor 1 0x818E Rotate speed of motor 1 0x8130 Close loop reference 0 1 0x8190 Close loop reference 0 1 0x8132 Close loop feedback 0 1 0x8192 Close loop feedback 0 1 0x8134 Reserved 0 1 0x8194 Reserved 0 1 0x8136 Operating frequency Hz 0 01Hz 0x8196 Reserved 0x8138 Output current A 0 1A or 0 01A 0x8198 Reserved 0x813A Output torque 0 1 0x819A Reserved 0x813C ...

Страница 127: ...g 1 Jog running 5 0 Non open loop multi section voltage operation 1 Open loop multi section voltage operation 1 0 Non close loop operation 1 Close loop operation 6 0 Normal voltage 1 Under voltage 2 0 Non open loop multi section frequency operation 1 open loop multi section frequency operation 7 Reserved Reserved 3 0 Non close loop multi section frequency operation 1 Close loop multi section frequ...

Страница 128: ...mit 0 65535 R 0xF084 Factory default value of the function code 0 65535 R It can write the function code No into 0xF080 by reading and writing multiple register commands 0x17 firstly and then read several attributes of this function code 6 CRC16 Function unsigned int crc16 unsigned char data unsigned char length int i crc_result 0xffff while length crc_result data for i 0 i 8 i if crc_result 0x01 ...

Страница 129: ...0 0x0004 None None 0xE80A Read the operating frequency of No 1 inverter and the response operating frequency of the inverter is 50 00Hz Address Function code Register Address Number Bytes Register Contents Request 0x01 0x03 0x8136 0x0001 None 0x4C38 Response 0x01 0x03 None 0x02 0x1388 0xB512 No 1 inverter stops in the default mode Address Function code Register Address Register Contents Check Sum ...

Страница 130: ...ch of terminal resistor of the inverter at the most distant place id turn to ON start the internal 100Ω terminal compatible resistance Site No 2 Site No n Computer converter RS232 485 RS232 cable Maximum 15 meters Site No 1 GND 485 485 With shielded twisted pair GND GND 485 485 GND 485 485 Attached Figure 4 Connecting Multiple Inverters to the Computer ...

Страница 131: ...12 Setting rated frequency of motor P0 15 Setting upper frequency limit of motor P0 13 Setting max frequency of motor P0 11 Setting motor parameter P9 00 P9 04 Setting P9 15 1 Press RUN key to perform parameter tuning END Motor with multi V F Setting P4 00 1 auto torque boost invalid please setting about P0 16 3 manual torque boost Motor with multi power V F Please select correct P4 00to 2 6 accor...

Страница 132: ...E5 H High Performance Universal Inverter User Manual Appendix B Control Mode Setting Process 125 2 Setting Process for Open Loop ...

Страница 133: ...E5 H High Performance Universal Inverter User Manual 126 Appendix B Control Mode Setting Process Open loop setting process continued ...

Страница 134: ...E5 H High Performance Universal Inverter User Manual Appendix B Control Mode Setting Process 127 3 Setting Process for Closed Loop ...

Страница 135: ...E5 H High Performance Universal Inverter User Manual 128 Appendix B Control Mode Setting Process Closed loop setting process continued ...

Страница 136: ... to the V end of the jumper for the analog current input toggle the corresponding channel to the I end of the jumper A 2 Calibrate the analog input curve according to function codes P6 00 to P6 2 For details refer to the description of P6 group in Chapter 6 Parameter Description V Why was there large deviation on the correspondence relation between the analog output and the output frequency output...

Страница 137: ... connectors are properly connected when the operation panel is directly connected to the inverter control board A 2 Check if the connection wire signals are in one to one correspondence when the keyboard is connected to the operation panel and inverter control board through customized extension wires A 3 Check if the network cable connectors of the operation panel and inverter control board are pr...

Страница 138: ...ward reverse terminal is in one to one correspondence with that of the control equipment e g PLC XIII Why did the fans of inverters of certain power classes will rotate upon power up while others could not A The fans of the 15kW inverters and inverters of lower power class are under no control and they will run when powered up The operation of the fans of 18 5kW inverters and inverters of higher p...

Страница 139: ...ent Tel 400 0518 000 Company Tel 86 0755 26580810 Market Department Tel 86 0755 26580820 Fax 86 0755 26580821 Website http www v t net cn E mail lhht v t net cn English version E5 20130302 H 5 0 BOM 37110041 printed for the first time This document is subject to change without notice All rights reserved Any unauthorized reproduction or copy is forbidden ...

Отзывы: