background image

Version 1 


24 


MONITORING BEARING WEAR 

Ultrasonic inspection and monitoring of bearings is by far the most reliable method for detecting 
incipient bearing failure. The ultrasonic warning appears prior to a rise in temperature or an 
increase in low frequency vibration levels. Ultrasonic inspection of bearings is useful in recognizing 
all stages of bearing failure, including: 
 

a.  The beginning of fatigue failure.  
b.  Brinelling of bearing surfaces.  
c.  Flooding of or lack of lubricant. 

 
In ball bearings, as the metal in the raceway, roller or ball bearing begins to fatigue, a subtle 
deformation begins to occur. This deforming of the metal will produce irregular surfaces, which will 
cause an increase in the emission of ultrasonic sound waves. A change in amplitude from the 
original reading is an indication of incipient bearing failure. When a reading exceeds any previous 
reading by 12 dB, it can be assumed that the bearing has entered the beginning of the failure 
mode. 
 
This information was originally discovered through experimentation performed by 

NASA on ball 

bearings. 

In tests performed while monitoring bearings at frequencies ranging from 24 through 50 

kHz, they found that the changes in amplitude indicate incipient (the onset of) bearing failure before 
any other indicators including heat and vibration changes. An ultrasonic system based on detection 
and analysis of modulations of bearing resonance frequencies can provide subtle detection 
capability; whereas conventional methods are incapable of detecting very slight faults. As a ball 
passes over a pit or fault in the race surface, it produces an impact. A structural resonance of one 
of the bearing components vibrates or "rings" by this repetitive impact. The sound produced is 
observed as an increase in amplitude in the monitored ultrasonic frequencies of the bearing. 


Brinelling of bearing surfaces will produce a similar increase in amplitude due to the flattening 
process as the balls get out of round. These flat spots also produce a repetitive ringing that is 
detected as an increase in amplitude of monitored frequencies.


The ultrasonic frequencies detected by the Ultraprobe are reproduced as audible sounds. This 
"heterodyned" signal can greatly assist a user in determining bearing problems. When listening, it 
is recommended that a user become familiar with the sounds of a good bearing. A good bearing is 
heard as a rushing or hissing noise. Crackling or rough sounds indicate a bearing in the failure 
stage. In certain cases a damaged ball can be heard as a clicking sound whereas a high intensity, 
uniform rough sound may indicate a damaged race or uniform ball damage.


Loud rushing sounds similar to the rushing sound of a good bearing only slightly rougher, can 
indicate lack of lubrication. Short duration increases in the sound level with "rough" or "scratchy" 
components indicate a rolling element hitting a "flat" spot and sliding on the bearing surfaces rather 
than rotating. If this condition is detected, more frequent examinations should be scheduled.


Detecting Bearing Failure 

There are two basic procedures of testing for bearing problems: 
COMPARATIVE AND HISTORICAL. The comparative method involves testing two or more similar 
bearings and "comparing" potential differences. Historical testing requires monitoring a specific 
bearing over a period of time to establish its history. By analyzing bearing history, wear patterns at 
particular ultrasonic frequencies become obvious which allows for early detection and correction of 
bearing problems. 


Содержание Ultraprobe 3000

Страница 1: ...Version 1 1 Ultraprobe 3000 Instruction Manual ...

Страница 2: ...HC 2HH 9 WTG 1 warble tone generator 9 Rubber focusing probe 9 Stethoscope extension kit 9 Optional accessories 9 long range module LRM 9 RAS MT 9 DHC 1991 ear piece 9 SA 2000 speaker amplifier 9 UFMTG 1991 9 WTG 2SP warble pipe threaded tone generator 10 LLA 10 Operation mode 10 Display panel 10 Bargraph display 10 Sensitivity control storage entry dial To adjust the sensitivity 10 Frequency 11 T...

Страница 3: ...ethoscope extension kit 16 Long range module 16 RAS MT 16 TO CHARGE THE UP3000 17 WARBLE TONE GENERATOR UE WTG 1 17 TO CHARGE THE WARBLE TONE GENERATOR 17 Ultraprobe applications 18 1 Leak detection 18 How to locate leaks 19 B To confirm a leak 19 C Overcoming difficulties 19 Shielding techniques 20 D Low level leaks 20 D Tone test Ultratone 21 Electric arc corona tracking detection 23 MONITORING ...

Страница 4: ...UCKET TRAPS 28 A FLOAT AND THERMOSTATIC 28 THERMODYNAMIC DISC 28 THERMOSTATIC TRAPS 28 Locating faulty valves 29 Procedure for valve check 29 ABCD METHOD 30 CONFIRMING VALVE LEAKAGE IN NOISY PIPE SYSTEMS 30 MISCELLANEOUS PROBLEM AREAS 30 UNDERGROUND LEAKS 30 LEAKAGE BEHIND WALLS 31 PARTIAL BLOCKAGE 31 FLOW DIRECTION 31 Ultrasound Technology 32 Instructions for setting combination on carrying case ...

Страница 5: ...many applications ranging from leak detection to mechanical inspection and may be used to trend analyze or just find a problem How it is used is up to you As you gain knowledge and learn how many modes of inspection you can cover you might want to extend your knowledge by enrolling in one of the many training courses offered by UE Training Systems Inc A Scholarship certificate is available to you ...

Страница 6: ...Version 1 6 Ultraprobe 3000 ...

Страница 7: ... internally such as within a pipe bearing housing or steam trap Once stimulated by ultrasound it transfers the signal to a piezoelectric transducer located in the module housing directly behind the wave guide For placement align the plug with the corresponding receptacle in the front end of the pistol housing and plug in Pistol grip housing display panel In the Operation Mode the Display Panel wil...

Страница 8: ...NLY USE UE SYSTEMS BATTERY RECHARGER BCH 3L DO NOT USE UNAUTHORIZED BATTERIES OR BATTERY RECHARGERS Doing so may be hazardous and may damage the instrument and will void the warranty Recharging the battery takes about 1 hour continuous Scanning Module Stethoscope Module Headphone Jack Sensitivity Control Storage Entry Dial Display Panel run time is about 2 hours With normal operation on off betwee...

Страница 9: ...gs and provides for a consistency of testing in practically any material Rubber focusing probe The Rubber Focusing Probe is a cone shaped rubber shield It is used to block out stray ultrasound and to assist in focusing on the field of reception of the Scanning Module Stethoscope extension kit This consists of three metal rods that will enable a user to reach up to 31 additional inches 78 7 cm with...

Страница 10: ...d right side of the display Bargraph display The bar graph has 16 segments Each segment represents 3 decibels At the end of the bar graph is a vertical line which indicates the maximum intensity This is a maximum level hold function When in operation the bar graph will move up and down the scale as an indication of the amplitude of a sensed ultrasound The maximum level indicator will remain at the...

Страница 11: ... you wish to use a storage location other than the one shown spin the Sensitivity dial up clockwise or down counter clockwise to the desired location If the Storage Location is the one you chose to use click the Sensitivity Dial again and you will see a prompt on the bottom of the display panel STORE YES If you want to store the data click the Sensitivity Dial once more and the record is stored at...

Страница 12: ...be sure the Ultraprobe is connected to the computer via the USB cable To send data from the Ultraprobe to your computer 1 Make sure the Ultraprobe is off 2 Click Press the Sensitivity dial and hold it in while you pull squeeze the trigger Hold both the Sensitivity Dial and Trigger in until the screen displays Menu 01 Send Records NOTE Hold the Trigger in during any of the Set Up Mode operations or...

Страница 13: ...ick to exit Menu 03 Menu 03 Adjust Shutdown Time Adjust Shutdown Time 1 sec Click Spin Menu 03 Adjust Shutdown Time Click 04 User Sense Sensitivity Defaults With experience a user will know which sensitivity level to use as the highest level This mode allows the user to adjust the default starting sensitivity level for inspection routes To set the Sensitivity Default 1 Enter Setup Mode be sure to ...

Страница 14: ...xits the Store Mode to the Main Screen The Quick mode requires one click to store the data Every time you store data the instrument will move up one record to the next storage location To select Store Mode 1 Enter Setup Mode be sure to continue to hold the Trigger in 2 Spin to Menu 05 Store Mode 3 Click the Sensitivity Dial to Enter 4 A prompt will blink NORMAL or QUICK 5 To change spin the Sensit...

Страница 15: ... Location will stop blinking You will see a prompt STORE YES 5 To store click the Sensitivity Dial and the data will be stored 6 If you do not wish to store the data spin the Sensitivity Dial to NO and click to exit Scanning module Plug in to front end Align the plug located at the rear of the module with the receptacle in the front end of the Pistol Housing and plug in Start to scan the test area...

Страница 16: ... Stethoscope Module 3 Look at the thread of the rod you just unscrewed and locate a rod in the kit that has the same size thread this is the base piece 4 Screw the Base Piece into the Stethoscope Module 5 If all 78cm are to be utilized locate the middle piece This is the rod with a female fitting at one end and screw this piece into the base piece 6 Screw third end piece into middle piece 7 If a s...

Страница 17: ...s of unobstructed space When the Tone Generator is on a red light located below the recharge jack in the front flickers Place the Warble Tone Generator within the test item container and seal or close it Then scan the suspect areas with the Scanning Module in the Ultraprobe and listen for where the warble ultrasound penetrates As an example if the item to be tested is the seal around a window plac...

Страница 18: ...the same flow rate The reason for this is that the turbulence produced by a vacuum leak is occurring within the vacuum chamber while the turbulence of a pressure leak is generated in the atmosphere Fig 2 What type of gas leak will be detected ultrasonically Generally any gas including air will produce a turbulence when it escapes through a restricted orifice Unlike gas specific sensors the Ultrapr...

Страница 19: ...lose to the suspect leak site and move it slightly back and forth in all directions If the leak is at this location the sound will increase and decrease in intensity as you sweep over it In some instances it is useful to position the rubber focusing probe directly over the suspect leak site and push down to seal it from surrounding sounds If it is the leak the rushing sound will continue If it is ...

Страница 20: ...es it is hung over railings D Low level leaks In ultrasonic inspection of leakage the amplitude of the sound often depends upon the amount of turbulence generated at the leak site The greater the turbulence the louder the signal the less the turbulence the lower the intensity of the signal When a leak rate is so low that it produces little if any turbulence that is detectable it is considered belo...

Страница 21: ...d 2 Place the Tone Generator within the container if it is a room door or window to be tested place the Tone Generator on one side pointing in the direction of the area to be tested and close or seal so that the Tone Generator is enclosed within NOTE The size of the test area will determine the amplitude selection of the Tone Generator If the item to be tested is small select the LOW position For ...

Страница 22: ...ron beam microscope The test chamber has been fitted with a specially designed transducer to emit the desired tone and a partial vacuum is created A user then scans all seams for sonic penetration The Tone Test has also been effectively utilized to test tanks before they are put on line piping refrigerator gaskets caulking around doors and windows for air infiltration testing heat exchangers for l...

Страница 23: ... equipment follow all your plant or company safety procedures When in doubt ask your supervisor Never touch live electrical apparatus with the Ultraprobe The method for detecting electric arc and corona leakage is similar to the procedure outlined in leak detection Instead of listening for a rushing sound a user will listen for a crackling or buzzing sound In some in stances as in trying to locate...

Страница 24: ...g components vibrates or rings by this repetitive impact The sound produced is observed as an increase in amplitude in the monitored ultrasonic frequencies of the bearing Brinelling of bearing surfaces will produce a similar increase in amplitude due to the flattening process as the balls get out of round These flat spots also produce a repetitive ringing that is detected as an increase in amplitu...

Страница 25: ...f lubrication note the following 1 As the lubricant film reduces the sound level will increase A rise of about 8 dB over baseline accompanied by a uniform rushing sound will indicate lack of lubrication 2 When lubricating add just enough to return the reading to base line 3 Use caution Some lubricants will need time to run to uniformly cover the bearing surfaces Lubricate a little at a time DO NOT...

Страница 26: ... equipment begins to fail due to component wear breakage or misalignment sonic and more importantly ultrasonic shifts occur The accompanying sound pattern changes can save time and guess work in diagnosing problems if they are adequately monitored Therefore an ultrasonic history of key components can prevent unplanned down time And just as important if equipment should begin to fail in the field t...

Страница 27: ...e testing intermittent traps listen long enough to gauge the true cycle In some cases this may be longer than 30 seconds Bear in mind that the greater the load that comes to it the longer period of time it will stay open In checking a trap ultrasonically a continuous rushing sound will often be the key indicator of live steam passing through There are subtleties for each type of trap that can be n...

Страница 28: ...a overcomes the high inlet pressure of the steam As the steam starts to condense the pressure against the disc lessens and the trap cycles A good disc trap should cycle hold discharge hold 4 10 times per minute When it fails it usually fails in the open position allowing continuous blow through of steam THERMOSTATIC TRAPS bellows bimetallic operate on a difference in temperature between condensate...

Страница 29: ...shing through a partially open valve may sound very much like steam To discriminate reduce the sensitivity touch a steam line and listen to the sound quality then touch a water line Once you have become familiar with the sound differences continue your inspection A properly seated valve will generate no sound In some high pressure situations the ultrasound generated within the system will be so in...

Страница 30: ...ds upon the amount of ultrasound generated by the particular leak Some slow leaks will emit very little ultrasound Compounding the problem is the fact that earth will tend to insulate ultrasound In addition loose soil will absorb more ultrasound than firm soil If the leak is close to the surface and is gross in nature it will be quickly detected The more subtle leaks can also be detected but with ...

Страница 31: ...eadset 3 When necessary if there is too much sound reduce sensitivity 4 Listen for an increase in ultrasound created by the turbulence of partial blockage FLOW DIRECTION Flow in piping increases In intensity as it passes through a restriction or a bend in the piping As flow travels upstream there is an increase in turbulence and therefore the intensity of the ultrasonic element of that turbulence ...

Страница 32: ...tude nature of ultrasound amplification is a very important feature Although there are obvious audible sounds emitted by most operating equipment it is the ultrasonic elements of the acoustic emissions that are generally the most important For preventative maintenance many times an individual will listen to a bearing through some simple type of audio pick up to determine bearing wear Since that in...

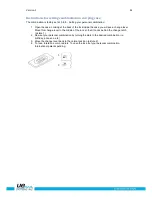
Страница 33: ...will see a change lever Move this change lever to the middle of the lock so that it hooks behind the change notch picture 1 2 Now set your personal combination by turning the dials to the desired combination i e birthday phone no etc 3 Move the change lever back to the normal position picture 2 4 To lock rotate one or more dials To open the lock set your personal combination International patents ...

Страница 34: ...librated heterodyned output decibel dB frequency USB data output Available Probes Scanning module and stethoscope contact module long range module RAS MT Headset Deluxe noise attenuating headphones Over 23 dB of noise attenuation Meets or exceeds specifications and OSHA standards Indicators dB battery status and 16 segment bar graph sensitivity setting record number Threshold 1 x 10 2 std cc sec t...

Страница 35: ...ed further support Want information regarding products or training Contact UE Systems Europe Windmolen 20 7609 NN Almelo NL e info uesystems eu w www uesystems eu t 31 0 546 725 125 f 31 0 546 725 126 www uesystems eu ...

Отзывы: