35
e. Not less than 3 ft (as measured to side of vent
termination) from an inside corner of an L-shaped
structure.
f. Not less than 1 ft from the nearest surface of the
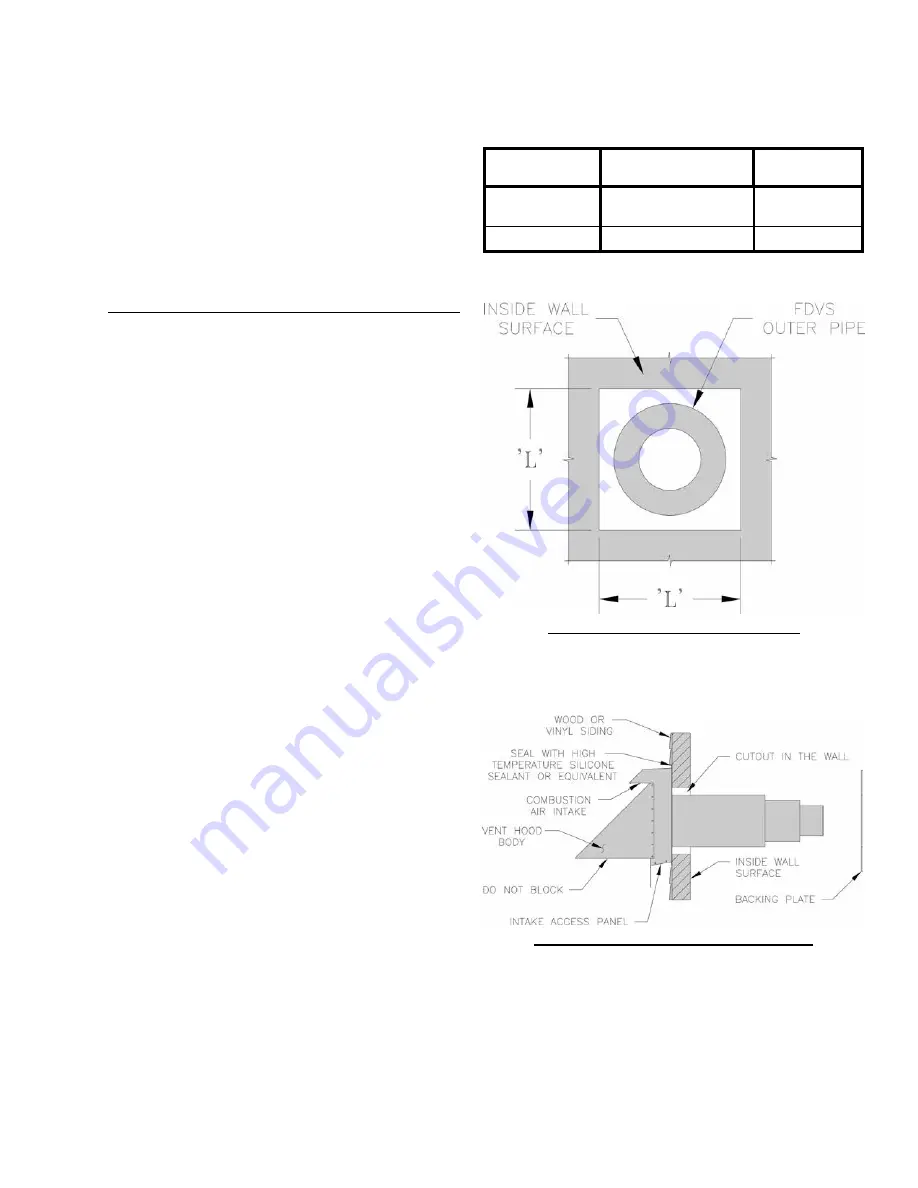
terminal to a roof soffit.
g. Not directly above, or, not less than 6 ft horizontally
from an oil tank vent or gas meter.
h. Not less than 2 ft from nearest surface of terminal to
an adjacent building.
B. INSTALLATION OF THE VENT HOOD TERMINAL
1. Inspect Direct Vent Conversion Kit Carton for damage.
DO NOT install if any damage is evident.
2. Direct Vent Conversion Kit Carton includes (see Figures
20, 21 and 22):
• Direct Vent Hood Assembly (consists of Vent Hood
Body and Vent Hood Tee) – 1 pc
• Backing Plate – 1 pc
• Vacuum Relief Valve VRV-4 – 1 pc
• Hardware Bag (includes high temperature sealant,
fasteners and inner pipe clamps) – 1 pc
• Appliance (Boiler Flue Outlet) Adapter – 1 pc
• Appliance Clamp Halves – 2 pcs
• Cover Sleeve Assemblies – 2 pcs
• Cover Ring Assemblies – 2 pcs
3. Remove vent system components from carton and set
aside.
4. Separate the vent hood tee from the vent hood body and
set aside for later use.
5. After determining the location of the venting system
termination, cut the square hole in the wall sized according
to “L” dimension in Table 5, see Figure 19.
6. Wood or vinyl siding should be cut, so that vent hood base
plate mounts directly on the wallboard to provide stable
support. If siding thickness exceeds ½”, use a spacer bar
or board behind the vent hood mounting (base) plate. See
Figure 20.
a. Seal the backside of the vent hood base plate around
the outer pipe of the vent hood with a bead of high-
temperature silicone sealant (provided in Bagged
Hardware).
b. Mount the vent hood body from outside, through the
wall, keeping the outer pipe centered in the hole.
c. Fasten the vent hood body to the outside wall with
appropriate fasteners (installer provided).
d. Seal the edges of the vent hood base plate to the wall
with a high-temperature silicone sealant (provided in
Bagged Hardware).
e. While inside, position the backing plate over the
outer pipe and fasten to inside wall with appropriate
fasteners (installer provided).
Figure 19: Wall Cutout Dimensions
Boiler Model No. Direct Vent Conversion
Kit Part No.
"L" Dimension
(Inch)
MPO-IQ147
MPO-IQ189
102130-02
8¼
MPO-IQ231
1021300-03
9¼
TABLE 5: WALL CUTOUT DIMENSIONS
Figure 20: Vent Hood Body Installation
VI. DIRECT VENTING / AIR INTAKE PIPING (continued)
Содержание MPO - IQ
Страница 6: ...6 Figure 1 MPO IQ84 Thru MPO IQ231 Water Boiler ...
Страница 22: ...22 Figure 11 Boiler Removal from Skid III UNIT PAK BOILER ASSEMBLY TRIM CONTROLS continued ...
Страница 27: ...27 Figure 13A Recommended Water Piping for Circulator Zoned Heating Systems IV WATER Boiler PIPING continued ...
Страница 28: ...28 Figure 13B Recommended Water Piping for Zone Valve Zoned Heating Systems IV WATER Boiler PIPING continued ...
Страница 42: ...42 Figure 28A Schematic Wiring Diagram VII ELECTRICAL continued ...
Страница 43: ...43 Figure 28B Schematic Wiring Diagram Burner Options VII ELECTRICAL continued ...
Страница 44: ...44 Figure 28C Ladder Diagram VII ELECTRICAL continued ...
Страница 70: ...70 Bare Boiler Assembly XIV Repair Parts continued ...
Страница 72: ...72 Jacket Assembly XIV Repair Parts continued ...
Страница 74: ...74 MPO IQ84 Thru MPO IQ231 Water Boilers Trim and Controls XIV Repair Parts continued ...
Страница 78: ...78 Beckett AFG Burner XIV Repair Parts continued ...
Страница 80: ...80 Beckett NX Burner XIV Repair Parts continued ...
Страница 92: ...92 U S Boiler Company Inc P O Box 3020 Lancaster PA 17604 1 888 432 8887 www usboiler net ...


