


CHAPTER 2 |
19
INSTALLATION AND CONFIGURATION
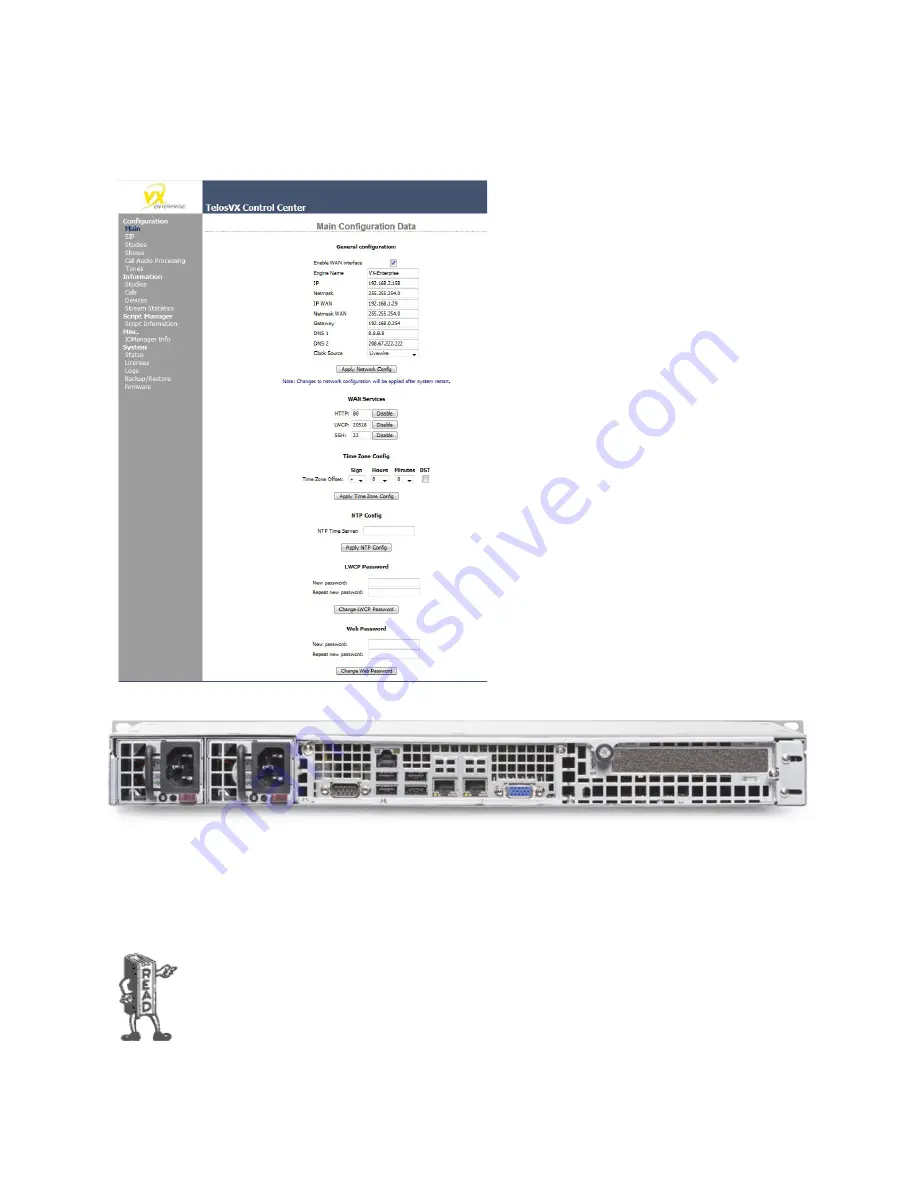
Once you get the VX Engine on a network, you’ll want
to finish configuring the system using the Web
interface. This is done using a browser on the same
network as the VX’s LAN port using the IP address
configured at the front panel. The
MAIN
CONFIGURATION
page is where we’ll finish the network
configuration. In the General Configuration section,
you can enable the WAN port and give it an IP address,
subnet mask, gateway, and DNS IPs, finalizing the WAN
network setup. This is also where you will also select
the type of AoIP clock you will be using on the LAN
network. The choices are “PTP” and “Livewire.” You
may also change the host name and the LAN (Livewire)
IP address from here too. Once you have made changes
to this page, the system will need a reboot. We will go
over the Web GUI in more detail a few pages later.
The VX Engine has two RJ-45 Ethernet jacks on the rear panel. Both are 100/1000 auto-speed and duplex setting. The WAN
port is to be connected to the business network or the network containing the SIP server. The LAN port is for AoIP audio and
everything else such as PCs used for web-based configuration, VSet controllers, producer PCs, and console controllers. This
can be connected to an existing Livewire network or to a new dedicated network that you create to serve only the VX system.
Remember the switch managing the AoIP network must be qualified for Livewire or AES67 and must be configured to handle
the multicast audio packets present on the network. A complete list of Telos approved switches is available on our website.
In order for AoIP audio to work, there must be one device capable of supplying clocking on the AoIP
network. In a L environment, this device is the xNode. While the Powerstatoin and QOR
engine can generate regular Livewire clocking, the xNode is L and is therefore AES67
compliant. Because of this, the xNode can also act as a PTP clock master on an AES67 network.


