background image

R

2800 LAURA LANE •  MIDDLETON, WI 53562 •  (800) 288-9383 •  FAX (608) 836-9044 •  www.tcsbasys.com

7

program

setup

program

setup

program

setup

program

setup

program

setup

program

setup

program

setup

MON

72F

12:00 AM

SET ACCESS

CODE:

000

43.

REQUIRE CODE FOR

YES

CLOCK/SCHED?

42.

REQUIRE CODE FOR

PROGRAMMING? YES

41.

ENABLE SMART

YES

RECOVERY?

ENABLE SMART

YES

RECOVERY?

40.

DELAY ON POWERUP

60 SECONDS

DELAY ON POWERUP

60 SECONDS

39.

DI3 USED FOR:

FILTER SERVICE

DI3 USED FOR:

FILTER SERVICE

38.

DI3 USED FOR:

FILTER SERVICE

SET DI2 SETPOINT

SHIFT:

37.

0F

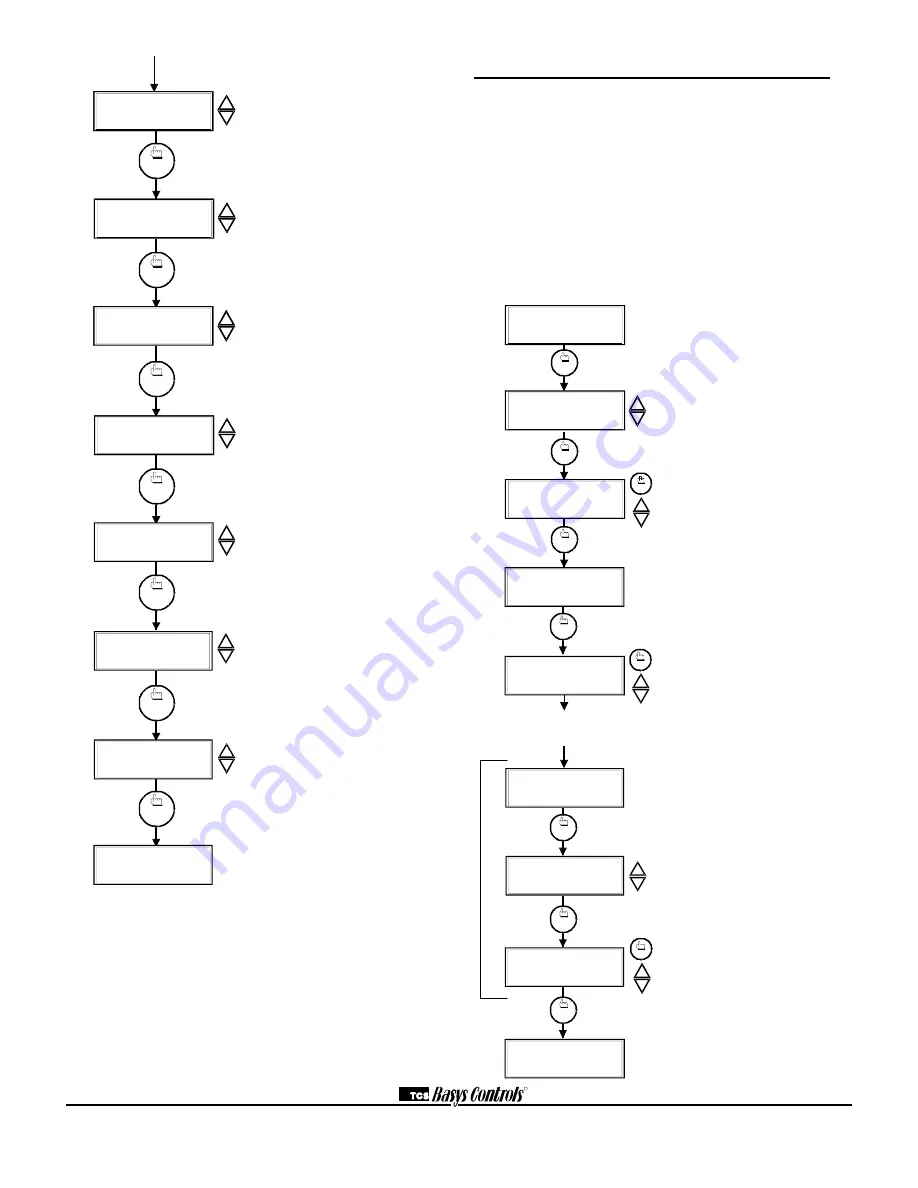
DI2 Shift Screen.

Enter the setpoint

shift value. This screen will only appear
if DI2 is set to MONITOR.

DI3 Choice Screen.

Choose FILTER

SERVICE, EXTernal OVERRIDE, or
EXTernal TIME CLOCK. Select EXTernal
OVERRIDE if unused.

Delay On Powerup  Screen.

Enter a

value in seconds, such that when the
unit is powered up, all outputs are
delayed for this time period before they
are allowed to close. 

Smart Recovery Screen.

Choose

whether or not smart recovery will be
used. 

Note: Smart Recovery is not

available when DI3 is used as EXTernal
TIME CLOCK.

Programming Access  Screen. 

Choose

whether or not a code will be required to
enter programming setup. A dipswitch
option to lock out access altogether is also
available. 

Clock and  Schedule Access  Screen.

Choose whether or not a code will be
required to enter clock and schedule
setup. A dipswitch option to lock out
access altogether is also available. 

Access Code  Screen.

Enter an access (0

to 255) code that will be used to enter the
programming and/or clock and schedule
setups if access code has been required in
the last two steps. The default is 248. 

Main Monitoring Screen.

Setting Clock and Schedule     

The SZ1022N  and SZ1024N clock and schedule may be set
through the display and keypad, or with a PC. For more
information on programming through the PC, consult the
software documentation.  

SETTING CLOCK & SCHEDULE 
THROUGH THE KEYPAD

To access the clock and schedule screens, press the clock
setup button. To make changes, use the warmer and cooler
keys. For screens that have more than one field to set, use the
override key to move to the next field. Access may be locked
out with dipswitches, or an access code may be required. 

MON

72F

12:00 AM

clock
setup

1.

ENTER ACCESS

000

CODE

SET TIME & DAY:

MON

12:00 AM

2.

override

clock
setup

clock
setup

3.

SET OCCUPIED

TIMES MONDAY:

5.

SET OCCUPIED

TIMES TUESDAY:

The following screens are repeated for

Wednesday, Thursday, Friday, Saturday

and Sunday

MON

72F

12:00 AM

clock
setup

A:08:00 TO 12:00

4.

B:13:00 TO 17:00

override

clock
setup

clock
setup

clock
setup

7.

A:08:00 TO 12:00

B:13:00 TO 17:00

override

6.

COPY MON FOR

TUE?

YES

Main Monitoring Screen.

Press the

clock setup button to access the
following screens. 

Access Code Entry  Screen.

May

appear if access code is required for
setting clock and schedules. Use 248
as the default. If the wrong code is
entered, it will revert to the previous
screen.

Time and Day Screen.

Set the hour,

minutes, AM or PM, and day of the
week.

Schedule Announcement Screen.

Announces the next screen. 

Occupied Times Screen.

Set hours

and minutes of start and end times
for up to two occupied periods.

Schedule Announcement Screen.

Announces the next screen. 

Copy Schedule Screen. 

Indicate

whether or not to use the same
schedule that was used for the
previous day. If the same schedule is
used, the following screen is not
displayed.

Occupied Times Screen.

Set hours

or minutes of start and end times for
up to two occupied periods.

Main Monitoring Screen.

Содержание SZ1022N

Страница 1: ...ut economizers z Fan interlock safety option z Filter service input and indication z Equipment monitoring inputs and indication z External time clock input z Energy management input for setpoint shift...

Страница 2: ...hielded wire is used and the installation environment is free of electrical noise Sensor wire should be kept at least five feet away from line voltage wiring The SZ1022N or SZ1024N accept two remote s...

Страница 3: ...in the cover shown above connected with ribbon cable must be set in order to lock the user out of the program and or to set the clock and schedule Use the guide below to set these dipswitches for you...

Страница 4: ...g Screen Press the program setup button to access the following screens Access Code Entry Screen Will appear if access code is required for programming Use 248 as the default If the wrong code is ente...

Страница 5: ...for heat stage 1 First stage is normally 0 offset Heat Stage 1 Differential Screen Enter a differential value for heat stage 1 Heat Stage 2 Offset Screen Enter an offset value for heat stage 2 This sc...

Страница 6: ...his screen only appears if compressor 2 is enabled Compressor Stage 2 Differential Screen Enter a differential value for compressor stage 2 This screen only appears if compressor stage 2 is enabled Au...

Страница 7: ...creen Setting Clock and Schedule The SZ1022N and SZ1024N clock and schedule may be set through the display and keypad or with a PC For more information on programming through the PC consult the softwa...

Страница 8: ...set DI3 to time clock and close the contact when you want the room occupied such as with a switch or wind up timer If each occupancy period is about the same theaters meetings another option is to se...

Страница 9: ...rential consideration and ramps the setpoint when going from the unoccupied mode to the occupied mode At the beginning of the occupied mode the occupied setpoint will be reached many times without the...

Страница 10: ...e fan is on whenever the fan LED is on If the fan should be on but the fan LED is off check the fan and system switch modes and the unoccupied fan mode in programming If the fan is off but the fan LED...

Страница 11: ...e following screens Service Screen This message may be followed by any or all of the following CHECK FILTER CHECK FAN DISCHARGE HIGH DISCHARGE LOW or CHECK DI2 Discharge Air Temperature Screen Shows d...

Страница 12: ...mode is allowed by factory default To lock out access to system switching see programming step 5 SETTING CLOCK SCHEDULE The ability to set the clock and schedule is allowed by factory default An acces...

Страница 13: ...e heating setpoint is shifted down ADI 19 Seconds Internal time clock second 0 59 ADI 20 Minutes Internal time clock minute 0 59 ADI 21 DegF C Occupied heating setpoint 40 90 4 32 Occupied heating set...

Страница 14: ...s 4 per hour setpoint ramp prior to oc cupancy for both heating and cooling BD 7 Require access code 0 No 1 Yes Programming access from keypad for programming BD 8 Require access code 0 No 1 Yes Clock...

Страница 15: ...eck DI2 NOTE 1 The Service status point represents general Check status If this is point is 1 the user can find out the actual failing condition by polling point 38 to 42 If this point is 0 points 38...

Страница 16: ...DegF C Occupied heating setpoint 40 90 4 32 Occupied heating setpoint must be less than occupied cooling setpoint ADI 19 DegF C Unoccupied heating setpoint 40 90 4 32 Unoccupied heating setpoint must...

Страница 17: ...e access code 0 No 1 Yes Clock Schedule access from keypad for clock schedule BD 9 Enable compressor 2 0 disable 1 enable Disable unused stages recommended BD 10 Enable auxiliary heat 1 0 disable 1 en...

Страница 18: ...is 1 then by polling point 38 to 42 the user can find out actual failing condition If this point is 0 then points 38 to 42 will be also 0 NOTE 2 All of the ADI and BD points support the override funct...

Страница 19: ...R 2800 LAURA LANE MIDDLETON WI 53562 800 288 9383 FAX 608 836 9044 www tcsbasys com 19...

Страница 20: ...R 2800 LAURA LANE MIDDLETON WI 53562 800 288 9383 FAX 608 836 9044 www tcsbasys com 20 Rev 0305...

Отзывы: