TASCAM 788 Operational Tutorial • 8/2000 Edition
Mixer Functions
11
Section II
Mixer Functions
(Continued)
the monitor section
switches the TRACK CUE
section on and off in the
MONITOR OUTPUT. As
mentioned in the TRACK
CUE section, the TRACK
CUE mix does not appear
in the stereo mix. This
only turns the TRACK CUE
mix on to the monitor section.
The CUE button
at the bottom of
As easy as the signal routing is on the 788 with the
controls on the surface of the recorder, it is sometimes
easier to just recall a set-up from a preestablished
library. This is especially true when you're switching
projects, or moving from recording tracks to bouncing
down, etc.
The three basic routing setups under the QUICK SETUP
key are:
- Routes inputs straight to mixer channels.
(Input A to track 1, input B to track 2, etc.)
- Routes recorder tracks to all channels on
the mixer for playback.
- Routes tracks 1-6 to channels 1-6, and
assigns the stereo mix to tracks 7/8 for bounce down.
There is also a ROUTING LIBRARY where you can store
your own routing set-ups, and a SCENE LIBRARY which
can store a complete snapshot of the mixer settings
(ie - fader levels, EQ curves, aux sends, etc.)
Both the scene library and
the routing library work
the same way. and
tabs are shown at
top. If the R tab is
selected, the chosen scene
or routing scheme will be
loaded into the mixer. If
is selected, the
current mixer settings or
routing scheme will be saved to that location. Use the
CURSOR keys to switch tabs and select the scene.
Pressing ENTER/YES will recall the selected scene.
A 12 character name can be assigned to each scene
and routing scheme. To assign a name, highlight the
ROUTING & SCENE LIBRARIES
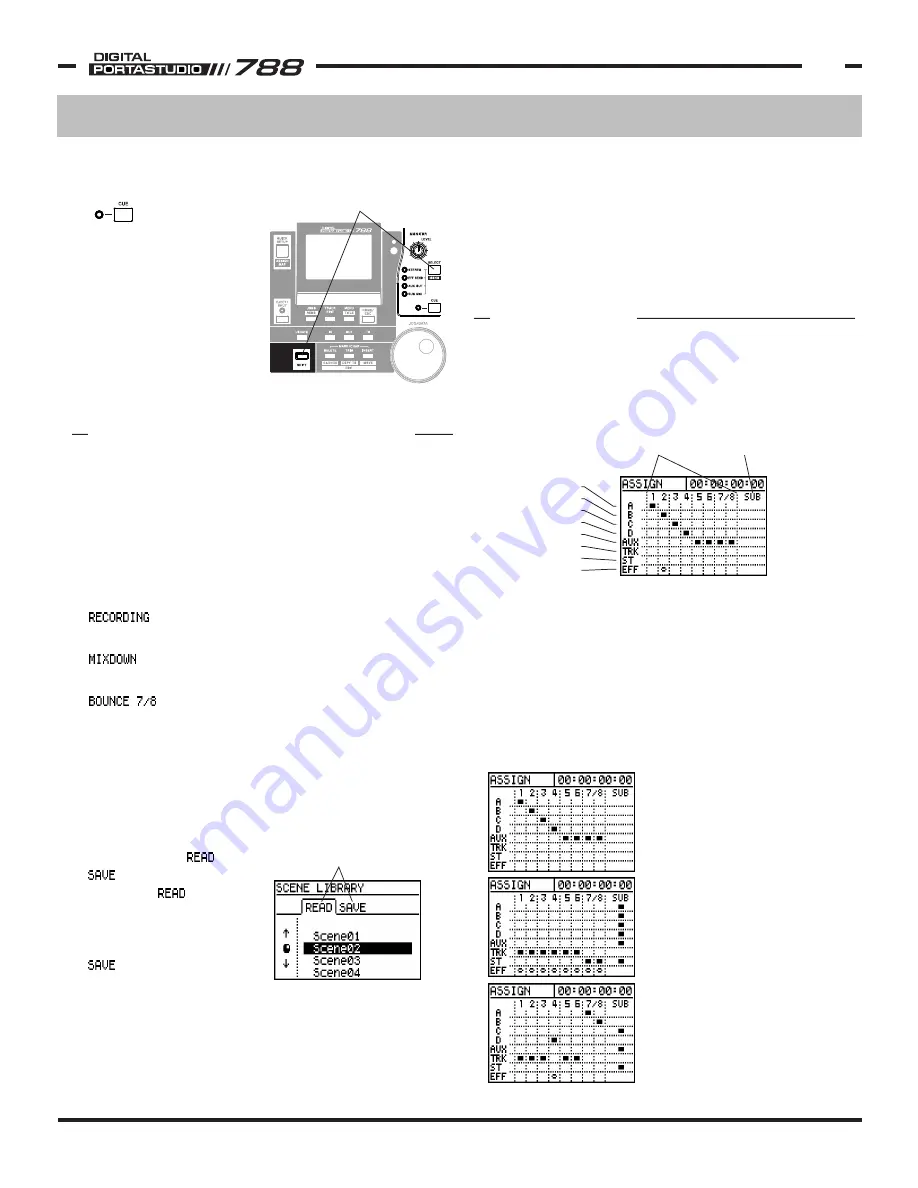
The ASSIGN MAP on the 788 is a chart that shows you
where the various signals are routed in the 788. You
can view this at any time by pressing SHIFT+QUICK
SETUP. Audio sources are listed down the left side of
the screen, with mixer channels listed across the top.
scene or routing library that you wish to wish to name
and press SHIFT+MENU/TITLE.
See Section V, "Assigning Names" on p23 for complete
naming capabilities and instructions.
When a scene is recalled, the display will immediately
flip to the ASSIGN MAP screen to show you the
routing scheme you've just recalled
In the above example, you may notice a little circle in
the Effect Insert row under Mixer Channel 2. This
indicates an effect is inserted into the channel. It
could represent the multieffect chain of EFFECT 1,
or a channel dynamic from EFFECT 2.
This screen is a great tool so you know where things
are routed in the heat of a session. Below, we have
a few examples of routing schemes to give you a
little practice understanding what it is showing you.
The READ and SAVE tabs indicate
whether the selected scene will
be loaded, or the target for saving
the current set-up.
ASSIGN MAP
Input A
Input B
Input C
Input D
Aux Input
Track Return
Stereo Mix
Effect Insert
Main Mixer Channels Input Submixer
This is the basic RECORDING Quick Setup.
Inputs are assigned in order to mixer
channels in order. (Input A to Channel 1,
Input D to channel 4, etc.) The Aux Input
is double assigned to Channels 5-6 and
Channels 7-8.
This set up is intended for bouncing tracks.
Tracks 1-6 from the recorder are fed to the
channels 1-6, and all of the analog inputs
are routed to the submixer. This offers 12
audio sources for mixdown. The stereo mix
is assigned to channels 7/8 for routing to
the recorder. The circles across the EFF
column indicate channel dynamics across
all channels.
This one is probably used for punching in
parts on channel 4. Channels 1-3 have
recorder tracks returning. Channel 4 is
coming from Input D and has an effect
inserted (probably a guitar plugged direct).
Channels 5-6 have recorder tracks
returning, while channels 7-8 are getting
input from Input A and B. Input C and the
Aux Input are assigned to the sub mixer
which feeds the stereo buss.
sure signals aren't out of
phase with each other.
Pressing SHIFT + SELECT will monitor
in mono. The LEDs in the monitor
section will flash to indicate MONO mode.
To go back to stereo, press SELECT.


