To decide a design to embroider and the color change order
53
1
2
3
4
5
6
7
8
9
10
11
Chapter 4
PT10
4-3.
To change color automatically / To start operation automatically
(Auto Color Change "AC" / Auto Start "AS")
4-3-1.
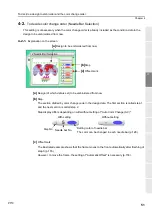
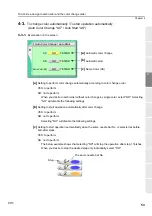
Explanation on the screen
[a]
Setting to perform color change automatically according to color change order
YES: to perform
NO: not to perform
When you desire to embroider without color change by single color, select "NO". Selecting
"NO" will disable the following settings.
[b]
Setting to start operation automatically after color change
YES: to perform
NO: not to perform
Selecting "NO" will disable the following settings.
[c]
Setting to start operation automatically when the same needle bar No. is selected at before-
and-after steps.
YES: to perform
NO: not to perform
The below example shows that selecting "NO" will stop the operation after step 1 finishes.
When you desire to stop the desired step only individually, select "NO".
1 Auto Color Change / Auto Start
B
AC
YES/NO
AS
YES/NO
YES/NO
Same Color (AS)
NO
NO
NO
[a]
[b]
[c]
Automatic color change
Automatic start
Same Color (AS)
1
5
Step
The same needle bar No.
2
5
3
2
Содержание TEMX-C Series
Страница 13: ...To search from the menu key ...
Страница 25: ...Inspection before starting work 12 Chapter 1 ...
Страница 39: ...How to use each part 26 Chapter 2 ...
Страница 40: ... E 1 2 3 4 5 6 7 8 9 10 11 27 PT10 Chapter 3 Screen 1 Screen display 28 2 Message display 31 ...
Страница 104: ...To stop the machine 91 1 2 3 4 5 6 7 8 9 10 11 Chapter 5 PT10 4 To make Frame Limit Setting effective YES ...
Страница 147: ...Other functions that must be remembered 134 Chapter 5 ...
Страница 171: ...To move the frame to the position registered 158 Chapter 6 ...
Страница 189: ...Design stored in USB memory 176 Chapter 7 ...
Страница 204: ...Functions concerning optional device 191 1 2 3 4 5 6 7 8 9 10 11 Chapter 8 4 To use air compressor YES RR07 ...

