Countermeasure when the machine stopped
195
1
2
3
4
5
6
7
8
9
10
11
Chapter 9
QS07
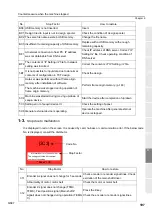
1-2.
Abnormal stop
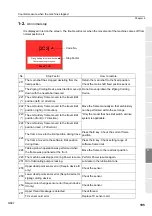
It is displayed in red on the screen. The trouble will occur when the movement of the machine comes off from
normal position etc.
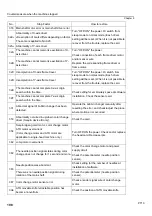
No.
Stop Factor
How to restore
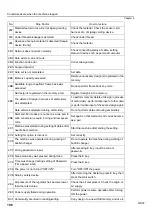
211
The main shaft has stopped deviating from the
fixed position.
Return the main shaft to the fixed position.
Check the main shaft fixed position sensor.
212
The Zigzag Cording Device was tried to move up/
down with the needle bar lowered.
Do not move up/down the Zigzag Cording
Device.
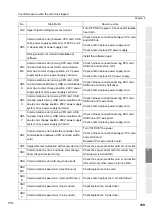
221
(*)
The embroidery frame moved to the travel limit
position (left) (-X direction).
Move the frame manually so that embroidery
can be performed within the set range.
*Only the model that has limit switch at drive
system is applicable.
222
(*)
The embroidery frame moved to the travel limit
position (right) (-X direction).
223
(*)
The embroidery frame moved to the travel limit
position (front) (+Y direction).
224
(*)
The embroidery frame moved to the travel limit
position (rear) (-Y direction).
225
The frame move to the limit position during trace.
Press the E key. Check the current frame
position.
The frame moved to the software limit position
during trace.
Press the E key. Check setting range of
software frame limit.
228
Table up/down operation was performed when
the frame was positioned at the front.
Move the frame to the rearmost position.
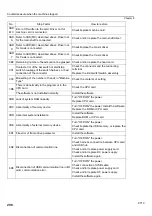
229 The machine was stopped during Power resume. Perform Power resume again.
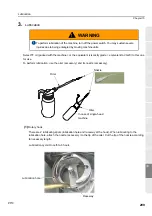
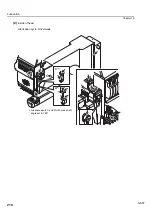
251 Oil of lubricating pump is lacking.
Lubricate to the lubrication tank.
258
Upper dead point sensor error (Sequin device III
only)
Check the sensor.
259
Lower dead point sensor error (Sequin device III,
zigzag cording device)
Check the sensor.
25A
Sequin color change sensor error (Sequin device
III only)
Check the sensor.
291
Upper thread breakage is detected.
Check thread.
TC sensor card error
Replace TC sensor card.
Wrong setting for optional device
Check the setting for option.
[2C2]
"Reset" >>E
Code No.
Stop Factor
Содержание TEMX-C Series
Страница 13: ...To search from the menu key ...
Страница 25: ...Inspection before starting work 12 Chapter 1 ...
Страница 39: ...How to use each part 26 Chapter 2 ...
Страница 40: ... E 1 2 3 4 5 6 7 8 9 10 11 27 PT10 Chapter 3 Screen 1 Screen display 28 2 Message display 31 ...
Страница 104: ...To stop the machine 91 1 2 3 4 5 6 7 8 9 10 11 Chapter 5 PT10 4 To make Frame Limit Setting effective YES ...
Страница 147: ...Other functions that must be remembered 134 Chapter 5 ...
Страница 171: ...To move the frame to the position registered 158 Chapter 6 ...
Страница 189: ...Design stored in USB memory 176 Chapter 7 ...
Страница 204: ...Functions concerning optional device 191 1 2 3 4 5 6 7 8 9 10 11 Chapter 8 4 To use air compressor YES RR07 ...

