background image

28

29

6. Wiring

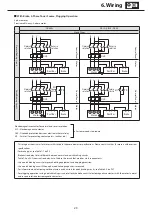
 With Brake, 3-Phase Power Source, Plugging Operation

3-phase motor
Premium-efficiency, 3-phase motor

FB-05A1

FB-1D, FB-1E - FB-5E

5 Lead Wires

Nor
mal Br

ak

ing C

ircuit

Q

uick Br

ak

ing C

ircuit

Electromagnetic contactor for normal and reverse rotation
MC  : Electromagnetic contactor
OLR : Overload protection device or electronic thermal relay
VR  : Varistor (for protecting contact points, rectifier, etc.)

  Customer needs to prepare.

-  This diagram shows cases for motors with standard Japanese domestic specifications. Please consult with us for motors with overseas 

specifications.

- For brake types, see Table 1-1 on P5.
-  Brake action delay time is different between normal and quick braking circuits.   


Table 7-2 on P39 shows action delay time. Choose the circuit that matches work requirements.

- Use a quick braking circuit to improve hoisting equipment and stopping precision.
- Use a quick braking circuit When a phase-advancing capacitor is mounted.
- For information on electromagnetic contactors and varistors for quick braking circuits, see Table 6-4 on P37.
-  For plugging operations using a quick braking circuit, interlock the brake circuit’s electromagnetic contactors with the motor’s normal 

and reverse rotation electromagnetic contactors.

U

V

W

1 2 4

M N

Rectifier

Brake

U

V

W

1 2 4

M N

Rectifier

Brake

U

V

W

M N

Brake

U

V

W

1 2 3 4

M N

Rectifier

Brake

Motor

VR

Motor

MC

MC

1 2 3 4

Rectifier

R S

T

Reverse

rotation

Normal

rotation

OLR

R S

T

Reverse

rotation

Normal

rotation

OLR

Motor

R S

T

Reverse

rotation

Normal

rotation

OLR

VR

Motor

R S

T

Reverse

rotation

Normal

rotation

OLR

Co

nt

ro

l P

an

el
M

ot

or

Co

nt

ro

l P

an

el
M

ot

or

Co

nt

ro

l P

an

el
M

ot

or

Co

nt

ro

l P

an

el
M

ot

or

Содержание RHYTAX

Страница 1: ...102E 2 The product should be handled by an experienced and skilled personnel The maintenance manual should be delivered to a customer who uses the product Make sure the maintenance manual stored secur...

Страница 2: ......

Страница 3: ...d by trained techni cians otherwise electric shock injury fire or damage to the equipment may result In the case of maintenance with disassembly of this device contact the nearest authorized maintenan...

Страница 4: ...ions in pages marked COMMON a mark is applied to the text concerned Specifications Common to All Specifications Gearmotor Speed Reducer Without Brake With Brake Symbol Common Contents Introduction Saf...

Страница 5: ...them by type When contacting the company please provide 1 Gearmotor or reducer nomenclature 2 Reduction ratio and 3 Serial number 1 Gearmotor 2 Speed reducer 1 2 Lubrication Method Oil lubrication pa...

Страница 6: ...Style Y Hollow Shaft Shaft Mount Hollow Shaft Flange F Solid Shaft Flange H Solid Shaft Foot Model Symbol K RHYTAX DRIVE Special Specification Blank Standard Specification S Special Specification Wit...

Страница 7: ...ntal type ESB 250 2 Vertical type 37 45 30 37 37 45 Note The brake type may differ from that in Table 1 1 depending on the specifications Check the nameplate X E H T C Support for Standards and Regula...

Страница 8: ...e tempera ture changes corrosive gases etc If the equipment is to be exported or stored for at least one year special rust prevention measures must be taken If the equipment is to be stored for at lea...

Страница 9: ...the falling unit or broken brackets Before hoisting check the weight with the nameplate crate outline drawing catalog etc Never hoist the gearmotor or speed reducer that exceeds load capacity of the...

Страница 10: ...y damage products Before installing moving or transporting the equipment be sure to drain off the lubricating oil If you move the equipment when it contains lubricating oil the lubricating oil may flo...

Страница 11: ...n the unit is directly coupled with another machine When a belt is used for coupling adjust the belt tension correctly Correctly fasten tightening bolts on the pulley and coupling be fore operation ot...

Страница 12: ...YM Y5 KHYM Y3 KVYM Y6 Top Bottom Top Bottom Top Bottom Top Bottom Top Bottom Top Bottom A A A A A A A A A A A A KHYM F1 KHYJM F4 KHYM F2 KVYM F5 KHYM F3 KVYM F6 A A A A A A Top Bottom Top Bottom Top B...

Страница 13: ...Flange Type Shaft Alignment T L Side Solid Shaft Flange Type Shaft Alignment L L Side KHFM L F1 KHFJM L F4 KHFM L F2 KWFM L F5 KHFM L F3 KVFM L F6 Top Bottom Top Bottom Top Bottom Top Bottom Top Bott...

Страница 14: ...KHFM R G1 KHFJM R G4 KHFM R G2 KVFM R G5 KHFM R G3 KWFM R G6 A A A A A A Top Bottom Top Bottom Top Bottom Top Bottom Top Bottom Top Bottom A A A A A A KHFM T G1 KHFJM T G4 KHFM T G2 KVFM T G5 KHFM T G...

Страница 15: ...KHHJM R K4 KHHM R K2 KVHM R K5 KHHM R K3 KWHM R K6 A A A A A A Top Bottom Top Bottom Top Bottom Top Bottom Top Bottom Top Bottom A A A A A A KHHM T K1 KHHJM T K4 KHHM T K2 KVHM T K5 KHHM T K3 KVHM T...

Страница 16: ...Installed Shaft Alignment L R T KHHM L V2 KHHM R V2 KHHM T V2 A A Top Bottom Top Bottom Top Bottom A A A A Figure 5 5 Confirming Rotation Direction and Location of Oil Filling Drain Ports Solid Shaft...

Страница 17: ...he alignment accuracy A B X in figure 5 6 should be no greater than that shown in Table 5 1 2 When Using Chains Sprockets or Gears When using a chain attach so that the chain tension angle is perpendi...

Страница 18: ...h a JIS H8 tolerance The following tolerances are recommended for driven shafts If an impact does not occur when a uniform load is applied JIS h6 or js6 If an impact is expected or the overhung load i...

Страница 19: ...10 9 JIS B 1051 6 When installing the torque arm be sure to lock the bolt Use spring washers U nuts or apply locking adhesive Part of is to be supplied by customer Locking part of torque arm Special b...

Страница 20: ...asonable force resulting in a damage of internal parts This product Bearing unit Good Example Bad Example The concentricity of the driven shaft and the mounted spigot is not appropriate The perpendicu...

Страница 21: ...er bolts in the clockwise direction not in diagonally opposite pairs In this case it is recommended that you tighten each bolt 30 in one turn 8 After the shrink disc has been tightened be sure to use...

Страница 22: ...otector to prevent burning electric shock injury and fire Do not touch the terminals when measuring insulation resistance otherwise electric shock may result When using a star delta starter select one...

Страница 23: ...Resistance Motor Voltage Megohmmeter Voltage Insulation Resistance R Low voltage electric motors of no more than 600V 500V 1 M or more Low insulation resistance is a sign that there is an insulation...

Страница 24: ...ction Rotation Plugging Rotation Inverter Drive 3 Phase Motor 0 4 FB 05A1 5 P25 P29 P33 0 55 FB 1D Premium Efficiency 3 Phase Motor 0 75 FB 1E 5 P25 P29 P33 1 1 FB 1HE 1 5 FB 2E 2 2 FB 3E 3 0 FB 4E 3...

Страница 25: ...MC OFF MC ON wiring when acceleration is completed MCM ON MC OFF MC OFF MC Electromagnetic contactor OLR Overload protection device or electronic thermal relay Customer needs to prepare This diagram...

Страница 26: ...lectric power to an axial fan as well In the case of 400V class indoor equipment the power source voltage for the axial fan is 200 V In the case of special specifications the actual product may someti...

Страница 27: ...brake types see Table 1 1 on P5 Brake action delay time is different between normal and quick braking circuits Table 7 2 on P39 shows action delay time Choose the circuit that matches work requiremen...

Страница 28: ...Table 1 1 on P5 Brake action delay time is different between normal and quick braking circuits Table 7 2 on P39 shows action delay time Choose the circuit that matches work requirements Use a quick br...

Страница 29: ...Please consult with us for motors with overseas specifications For brake types see Table 1 1 on P5 Use with a quick braking circuit For information on electromagnetic contactors for quick braking cir...

Страница 30: ...rs for quick braking circuits see Table 6 4 on P37 In the case of quick braking circuits interlock brake circuit s electromagnetic contractor with the motor s electromagnetic contractor Rectifiers are...

Страница 31: ...y time Choose the circuit that matches work requirements Use a quick braking circuit to improve hoisting equipment and stopping precision Use a quick braking circuit When a phase advancing capacitor i...

Страница 32: ...d quick braking circuits Table 7 2 on P39 shows action delay time Choose the circuit that matches work requirements Use a quick braking circuit to improve hoisting equipment and stopping precision Use...

Страница 33: ...specifications Please consult with us for motors with overseas specifications For brake types see Table 1 1 on P5 Use with a quick braking circuit For information on electromagnetic contactors for qui...

Страница 34: ...s see Table 1 1 on P5 Use with a quick braking circuit For information on electromagnetic contactors for quick braking circuits see Table 6 4 on P37 Rectifiers are external to the main unit Rectifiers...

Страница 35: ...ing circuits Table 7 2 on P39 shows action delay time Choose the circuit that matches work requirements Use a quick braking circuit to improve hoisting equipment and stopping precision Use a quick bra...

Страница 36: ...to improve hoisting equipment and stopping precision Use a quick braking circuit When a phase advancing capacitor is mounted For information on electromagnetic contactors and varistors for quick braki...

Страница 37: ...see Table 1 1 on P5 Use with a quick braking circuit For information on electromagnetic contactors for quick braking circuits see Table 6 4 on P37 Rectifiers are external to the main unit Rectifiers...

Страница 38: ...ontactor to the timing of the inverter control For AF motor for inverter with axial flow fan fully enclosed separate ventilate type note the following points Connect electric power to an axial fan as...

Страница 39: ...FB 05A1 SC 05 Serial contact points 2 0 4A S N11 or S N12 Serial contact points 2 0 5A DC 220V Minimum 0 3A TND10V 821KB00AAA0 AC510V 820V 738 902V 0 4W FB 1D SC 05 Serial contact points 3 2 0A S N11...

Страница 40: ...personal injury or fire may result Do not operate the unit in excess of the load rating otherwise personal injury or damage to the equipment may result 7 1 Items to Check Before Operation Oil is remov...

Страница 41: ...aking Circuit Simultaneous Turn Off Circuit Normal Braking Circuit for Inverter Circuit Normal Braking Circuit Separate Turnoff Circuit Quick Braking Circuit FB 05A1 0 4 0 2 4 0 0 1 0 15 0 03 0 07 0 0...

Страница 42: ...Do not operate damaged gearmotors or reducers otherwise injury fire or damage to the equipment may result We cannot assume any responsibility for damage or injury resulting from an unauthorized modif...

Страница 43: ...omes earlier Second time and after After 5 000 hours or a year whichever comes earlier 0 35 C indoors etc After 2 500 hours or 6 months whichever comes earlier Outdoors or other high temperature locat...

Страница 44: ...0 2 14 9 21 0 4 8 6 8 7 9 14 2 16 8 3 3 4 7 5 9 9 1 12 2 5 7 7 8 11 1 14 9 19 2 Solid Shaft Foot Type Frame Size Mounting Position K1 K2 V2 K3 K4 K5 K6 72 72DA 82 82DA 92 95 92DA 102 105 102DA 112 115...

Страница 45: ...5 years will extend product lifetime Contact the nearest authorized maintenance shop regarding maintenance with disassembly Oil seals have a lifetime During long use natural degradation and frictiona...

Страница 46: ...akemotor How ever please periodically inspect the brake gap G The brake lining wears after long hours of running time making it impossible for the brake to release When 2 million times is exceeded 1 m...

Страница 47: ...2 Loosen the fan set screw 8 and remove the fan 9 3 Slightly loosen the attachment bolts 4 and rotate the fixed plate 11 counter clockwise as far as it will go Then tighten the attach ment bolts 4 Aft...

Страница 48: ...m Reduce the number of shims according to the wear conditions then reassemble the spacers 5 gap adjustment shims 6 attachment bolts 7 and the fixed plate 15 as a set 6 Check the gap G and readjust the...

Страница 49: ...e the brake release bolt 5 and the manual release prevention spacer 4 2 Remove the cover 13 3 Remove the shaft retaining C ring 14 and remove the fan 15 4 Loosen the attachment bolts 8 and remove the...

Страница 50: ...emove the brake release bolt 5 and the manual release prevention spacer 4 2 Remove the cover 13 3 Remove the shaft retaining C ring 14 and remove the fan 15 4 Loosen the attachment bolts 8 and remove...

Страница 51: ...e the brake release bolt 4 and the manual release prevention spacer 3 2 Remove the cover 12 3 Remove the shaft retaining C ring 13 and the fan 14 4 Loosen the attachment bolts 7 and remove the spacers...

Страница 52: ...ons around the circumference 4 Adjustment is required if the gap value is near the limit Gap Adjustment 1 Remove the brake release bolt 5 and the manual release prevention spacer 4 2 Remove the cover...

Страница 53: ...locations around the circumference 4 Adjustment is required if the gap value is near the limit Gap Adjustment 1 Remove the brake release bolt 5 and the manual release prevention spacer 4 2 Remove the...

Страница 54: ...28 and cover 16 2 Insert a gap gauge between the stationary core 6 and the armature plate 20 and measure the gap Measure in 3 locations around the circumference 3 Adjustment is required if the gap val...

Страница 55: ...armature plate 20 and measure the gap Measure in 3 locations around the circumference 3 Adjustment is required if the gap value is near the limit Gap Adjustment 1 Remove the grommet 28 and cover 16 2...

Страница 56: ...e 13 Inner disc 14 Outer disc 15 Spacer bush 16 Stopper 17 Hub 18 Brake adapter plate 19 Opposite drive end cover 20 Opposite drive end bearing 21 Opposite drive end bearing cover Notes 1 The motor fo...

Страница 57: ...e outer disk 14 and the center ring 1 Rotating to the left as seen from the field 4 side will narrow the gap See Figure 8 16 4 Six attachment bolts 3 and lock bolts 11 alternately pass through the spa...

Страница 58: ...gap value is be tween the required value and the limit This operation will reduce the gap by 0 3 mm 7 Attach the waterproof cover 12 by using the attachment bolts 13 Attach the waterproof cover 12 so...

Страница 59: ...xed plate 6 as a set When removing the attachment bolts only make sure not to fall the gap adjustment shims 4 9 The gap adjustment shims 4 have a thickness of 0 2 0 25 mm Reduce the number of shims ac...

Страница 60: ...en removing the attachment bolts 8 only make sure not to fall the gap adjustment shims 7 and the shock absorber 26 8 The gap adjustment shims 7 have a thickness of 0 2 0 25 mm Reduce the number of shi...

Страница 61: ...s 8 only make sure not to fall the gap adjustment shims 7 and the shock absorber 26 8 The gap adjustment shims 7 have a thickness of 0 35 0 45mm Reduce the number of shims according to the wear condit...

Страница 62: ...s 7 and fixed plate 15 as a set When removing the attachment bolts 7 only make sure not to fall the gap adjustment shims 6 and the shock absorber 25 8 The gap adjustment shims 6 have a thickness of 0...

Страница 63: ...Insert a gap gauge between the stationary core 1 and the armature plate 18 and rotate to the right the gap adjusting nuts 9 that are attached to ends of the stud bolts 6 If large adjustments to the ga...

Страница 64: ...f cover 27 7 Insert a gap gauge between the stationary core 1 and the armature plate 18 and rotate to the right the gap adjusting nuts 9 that are attached to ends of the stud bolts 6 If large adjustme...

Страница 65: ...remove impurities 9 As shown in the construction diagram install the waterproof seal 32 between the stationary core 6 and the fixed plate 19 Be careful that the waterproof seal 32 does not meander Oth...

Страница 66: ...9 As shown in the construction diagram install the waterproof seal 32 between the stationary core 6 and the fixed plate 19 Be careful that the waterproof seal 32 does not meander Otherwise water coul...

Страница 67: ...ub 18 Brake adapter plate 19 Opposite drive end cover 20 Opposite drive end bearing 21 Opposite drive end bearing cover 22 Brake cover 23 V ring 24 Brake cover gasket 25 Outdoor cover Notes 1 The moto...

Страница 68: ...djustment screw 2 between the outer disk 14 and the center ring 1 Rotating the gap adjusting bar to the left as seen from the field 4 side will narrow the gap See Figure 8 30 4 Six attachment bolts 3...

Страница 69: ...1 3 Expand release lever 2 to the outside from each side of the lever in turn removing it from release pin 3 Do not expand the release lever overly 4 Remove release pin 3 5 Remove fan cover 6 Install...

Страница 70: ...0 2 1 million cycles or more or after 10 years or more have passed since shipment from the factory inspect to check whether continued operation is possible even if the lining is not at the us able thi...

Страница 71: ...eleased See Figure 8 35 2 After releasing the brake to return it to its original condition for safety return the manual release prevention spacer and the rubber gasket 3 that were removed in 1 to thei...

Страница 72: ...release hole Inner disc Outer disc Armature Field Hexagon socket head bolt Gap Adhesion Hexagonal wrench Figure 8 37 Figure 8 38 Figure 8 39 One Touch Release Lever Type Excluding FB 20 FB 30 FB 05A1...

Страница 73: ...with a specified switch Overload Decrease the load to the specified value The speed will not increase and the motor is overheating Voltage drop Contact the electric power company Overload Decrease th...

Страница 74: ...Consult with authorized maintenance shop A leaf spring in the brake boss unit has come off or is damaged Consult with authorized maintenance shop Brake is ineffective Does not activate Forgot to rest...

Страница 75: ...e 72R K1 Figure 10 2 KHYM Type Gearmotor E g Frame Size 72DA Y1 Figure 10 3 KHF Type Reducer E g Frame Size 72L F1 1 2 3 4 5 6 19 20 21 22 23 24 25 36 35 34 33 32 31 30 29 28 27 26 7 8 18 17 16 15 14...

Страница 76: ...cover 45 O ring 4 O ring 18 Fan cover 32 Bearing 46 Flange 5 Bearing 19 Snap ring for C type hole 33 Rotor conductor 47 Bearing 6 Gear third stage 20 Spacer 34 Stationary coil 48 Bearing 7 O ring 21 B...

Страница 77: ...indirect damages Exclusion from the warranty The following items will be excluded from the warranty 1 A breakdown resulting from defects in the mounting of the product and connection with other device...

Страница 78: ...MEMO 76...

Страница 79: ......

Страница 80: ...48011 Bilbao Vizcaya Spain TEL 34 9448 05389 FAX 34 9448 01550 United Kingdom SM Cyclo UK Ltd SMUK Unit 29 Bergen Way Sutton Fields Industrial Estate Kingston upon Hull HU7 0YQ East Yorkshire United...

Отзывы: